MobileAware Interaction Server Installation Guide
|
|
|
MobileAware Interaction Server Installation Guide
About This Manual
This document describes the process for installing and configuring the MobileAware Interaction Server, BEA WebLogic Edition.
Please read this document before commencing installation to ensure you comply with the installation pre-requisites and have access to relevant installation configuration information.
The document is split into two parts:
Installing the MobileAware Interaction Server on Microsoft Windows 2000
This section describes the installation and configuration of:
- The MobileAware Interaction Server, BEA WebLogic Edition, including the Mobility Extension for BEA WebLogic Workshop 8.1 on Microsoft Windows 2000.
- Configuration of device emulators in BEA WebLogic Workshop
- Creating the necessary Domains and Applications required for importing the sample projects using the BEA Configuration Wizard
- Importing the Sample Projects into BEA WebLogic Workshop
- Installing the MobileAware Device Database with BEA WebLogic Workshop
Installing the MobileAware Interaction Server on Sun Solaris, RedHat Linux, or HP-UX
This section describes the installation and configuration of:
Installing the MobileAware Interaction Server on Microsoft Windows 2000
This section explains the installation procedure for installing the MobileAware Interaction Server, BEA WebLogic Edition for BEA WebLogic Platform 8.1 on Microsoft Windows 2000.
Introduction
The BEAMAInteractionServer81-win.exe installation program is used to install the MobileAware Interaction Server, BEA WebLogic Edition on Microsoft Windows 2000.
It also installs the MobileAware Mobility Extension for BEA WebLogic Workshop 8.1 and places copies of the Sample Projects for BEA WebLogic Platform 8.1 on your hard drive so that they can later be imported into BEA WebLogic Workshop Applications.
License
You must update your BEA License with the MobileAware Interaction Server, BEA WebLogic Edition product component details. The required product component information is available for download from the BEA Web Site at the same location as the software installers.
Once you have updated your license, you will be able to develop and test mobile-device ready content. If you have a developer or evaluation BEA License, the software installers will install an evaluation version of the MobileAware Device Database enabling testing on a number of popular device emulators as well as a number of popular mobile and PDA devices. A production license must be present to install and utilise the full MobileAware Device Database. Note: An invalid license will result in HTML being delivered.
Please contact a BEA or MobileAware sales representative if you wish to extend your evaluation or developer license or upgrade to a production license.
Installation Pre-requisites
Software Pre-Requisites
The following software must be installed prior to installing the MobileAware Interaction Server, BEA WebLogic Edition:
Administration Rights
This installation program requires administration rights on the machine in order to complete the installation.
License
Ensure that you have updated your BEA License with the MobileAware Interaction Server, BEA WebLogic Edition product component details. The required license component information can be downloaded from the same download page as the software installer.
Installation Procedure for Windows
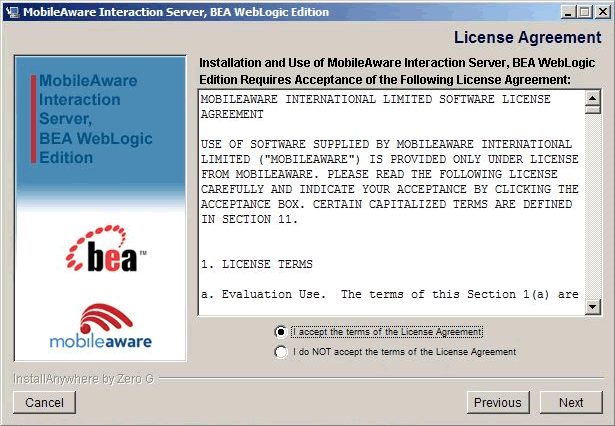
Note: The Next button is unavailable if the terms are not accepted.
Figure 2 License Agreement Screen
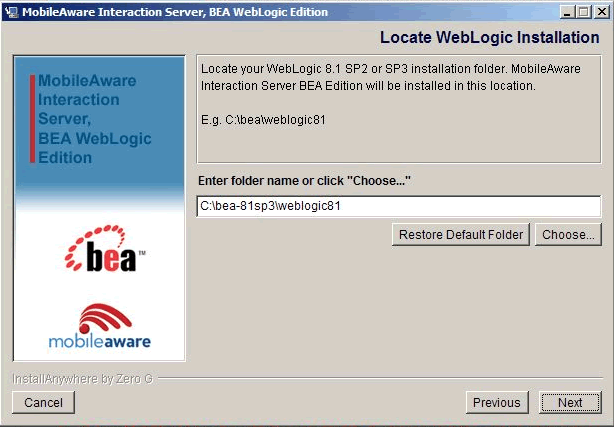
- On the "Locate WebLogic Installation" screen, enter the location of your WebLogic 8.1 Installation or click Choose to browse to the location.. This is where the MobileAware Interaction Server, BEA WebLogic Edition and the MobileAware Mobility Extension for BEA WebLogic Workshop 8.1 will be installed.
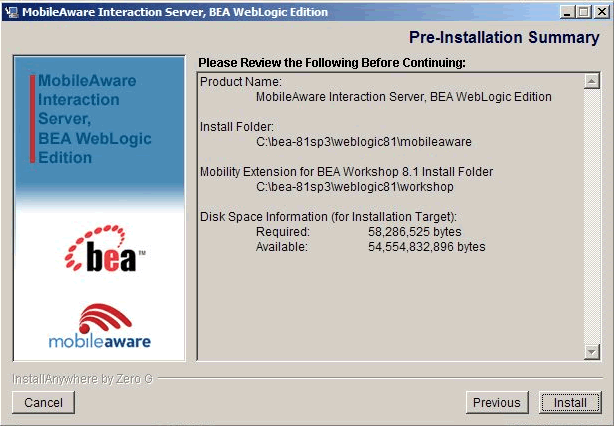
- On the "Pre-Installation Summary Screen", review the installation configuration information. If the information is correct, click Install. Otherwise, click Previous to go back through the screens and modify the provided information.
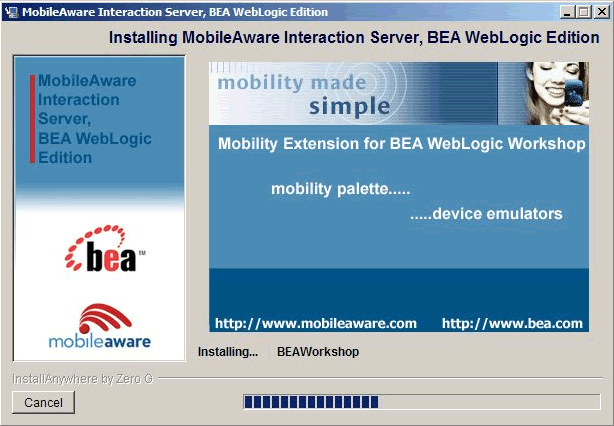
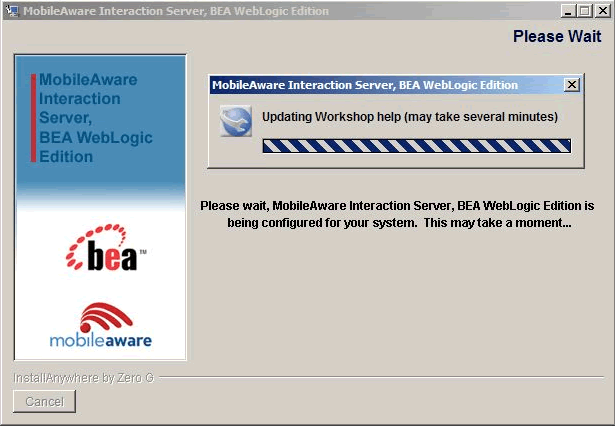
- You will now see a series of "Installing MobileAware Interaction Server" screens followed by an "Updating Workshop" screen while the installation and configuration of the MobileAware Interaction Server completes.
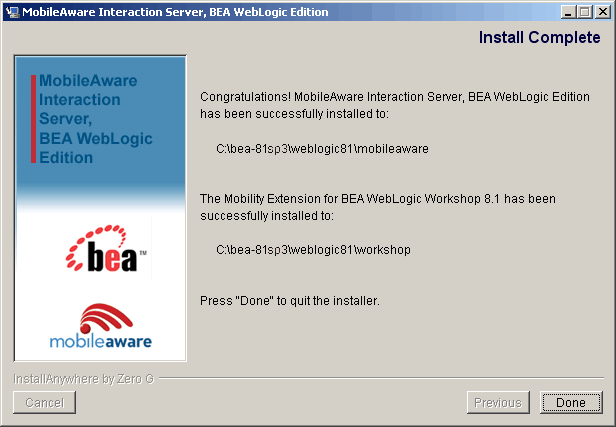
- The "Install Complete" screen will be displayed following a successful install. Click Done to exit the installer.
Figure 3 Location WebLogic Installation Screen
Figure 4 Pre-Installation Summary Screen
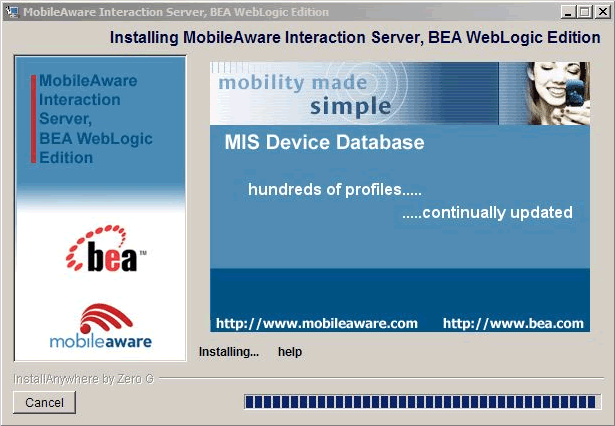
Figure 5 Installing MobileAware Interaction Server Screen 1
Figure 6 Installing MobileAware Interaction Server Screen 2
Figure 7 Please Wait, Updating Workshop Screen
Note: It really does take several minutes to update the Workshop help files!
Figure 8 Installation Complete Screen
Configuring the MobileAware Interaction Server
Introduction
The location of the MobileAware Interaction Server installation was pre-configured during the installation to <bea installation directory>\weblogic81\mobileaware.
For advanced users who may have multiple installations of the MobileAware Interaction Server, this section describes how to re-configure the MobileAware Interaction Server location for use with the MobileAware Sample Projects for BEA Workshop and BEA Portal.
Configuring the MobileAware Interaction Server Location
To configure the MobileAware Interaction Server location:
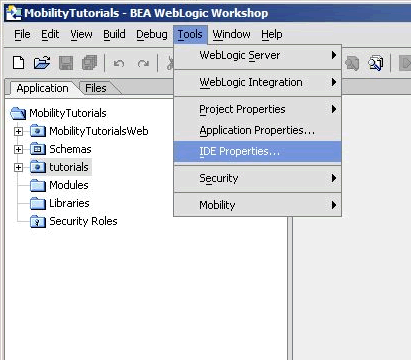
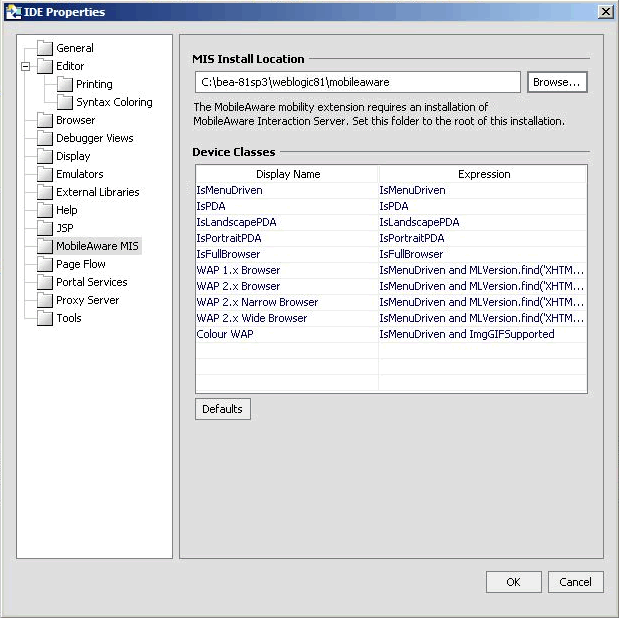
- Select the MobileAware MIS tab from the IDE Properties within your BEA Workshop Environment (Choose Tools > IDE Properties) and click OK.
- he location of the MobileAware Interaction Server installation was pre-configured during the installation to <bea installation directory>\weblogic81\mobileaware. To change the location to point at a different MobileAware Interaction Server installation, enter the location of the MobileAware Interaction Server installation in the MIS Install Location field or click Browse to browse to the location. This will enable access to device diagnostic and device management tools from within BEA WebLogic Workshop.
Figure 10 MobileAware Interaction Server Location
Creating the Workshop Domain and Installing the Sample Workshop Projects
Introduction
This section describes creating a BEA Workshop Domain, creating a new application, and then importing the provided Sample Workshop Projects into the newly created domain.
Create Mobility Domain
To create the Mobility Domain:
Choose Start > Programs > <BEA install directory> > Configuration Wizard
If you have BEA Workshop open, you can also launch it from the tools menu.
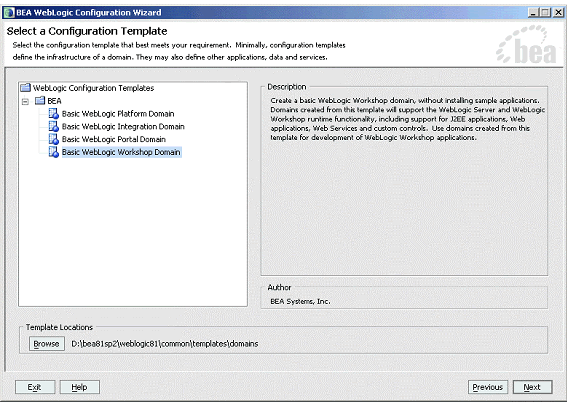
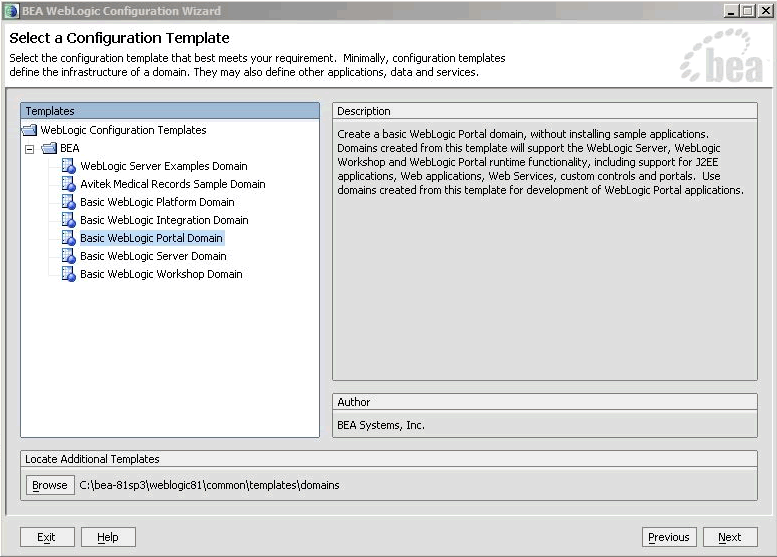
- In the "Select a Configuration Template screen", select "Basic WebLogic Workshop Domain" and click Next.
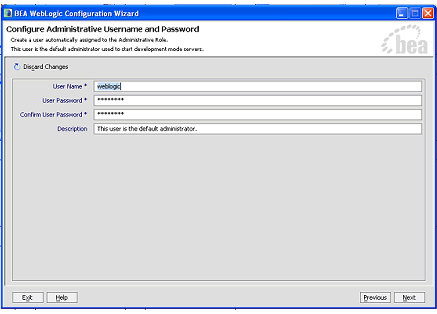
- On the "Configure Administrative Username and Password" screen enter "weblogic" for username and "weblogic" for password and click Next.
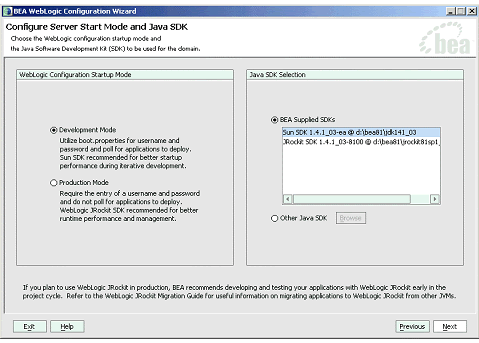
- On the "Configure Server Start Mode and Java SDK" screen, select Development Modeh within the WebLogic Configuration Startup Mode box.
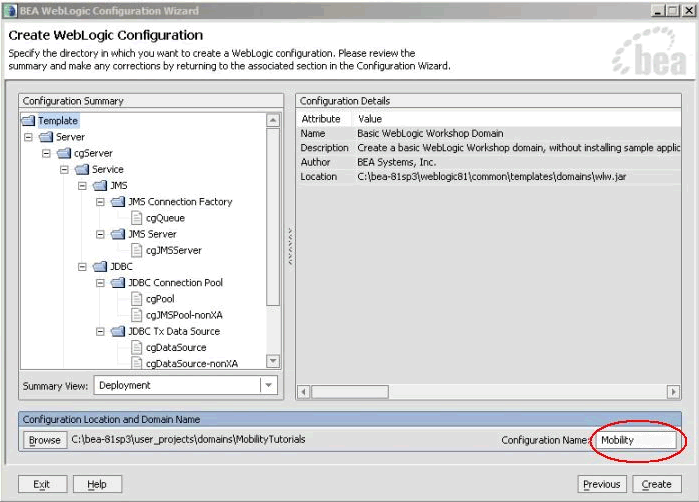
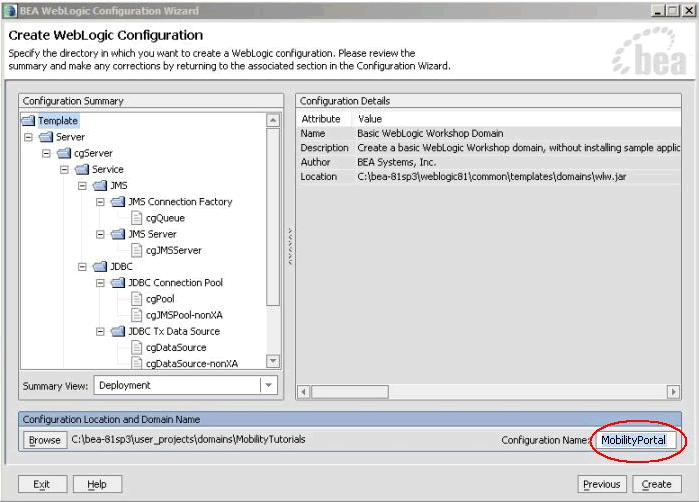
- On the Create WebLogic Configuration screen, enter Mobility in the Configuration Name field and click Create.
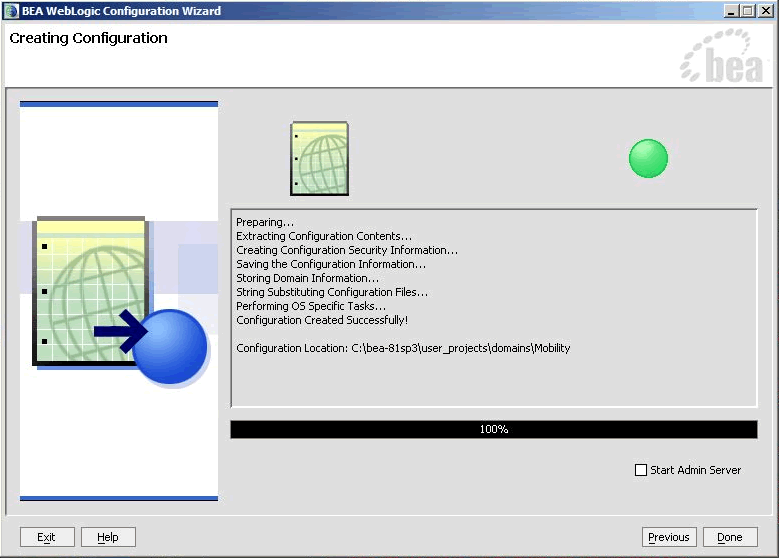
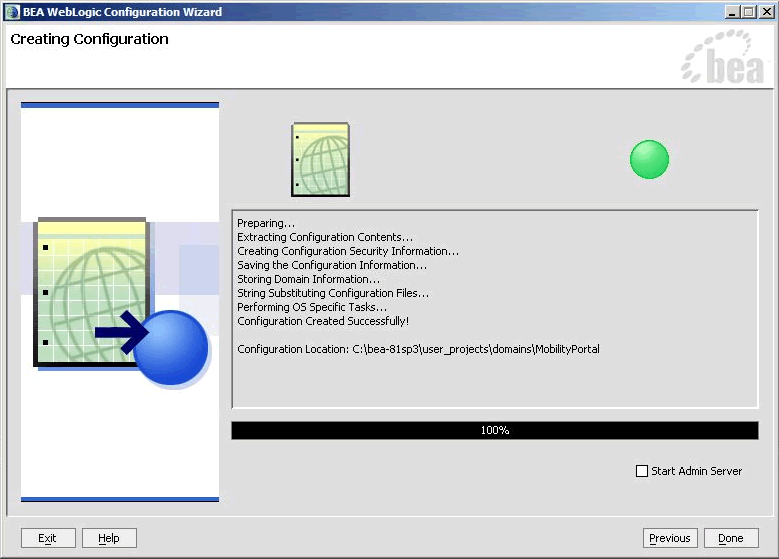
- The configuration wizard will now create the domain. When it completes, click Done on the Creating Configuration screen.
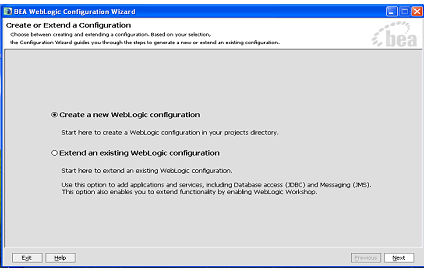
Figure 11 Configuration Wizard - Create a new WebLogic Configuration
Figure 12 Configuration Wizard - Basic WebLogic Workshop Domain
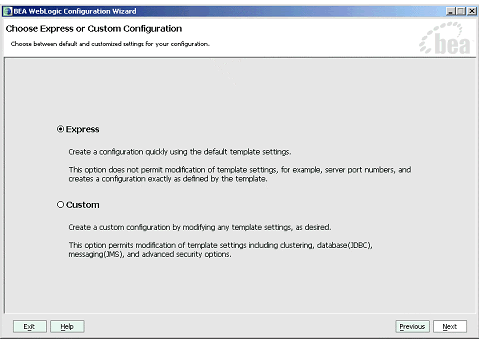
Figure 13 Configuration Wizard - Express Configuration
Figure 14 Configuration Wizard - User Name and Password
Figure 15 Configuration Wizard - Start Mode
Figure 16 Configuration Wizard - Mobility
Figure 17 Configuration Wizard - Creating Configuration
Note: When you create a domain using the BEA WebLogic Configuration Manager, a default PointBase database is installed. The MobileAware Device Database will be installed into this database as described in Installing the MobileAware Device Database.
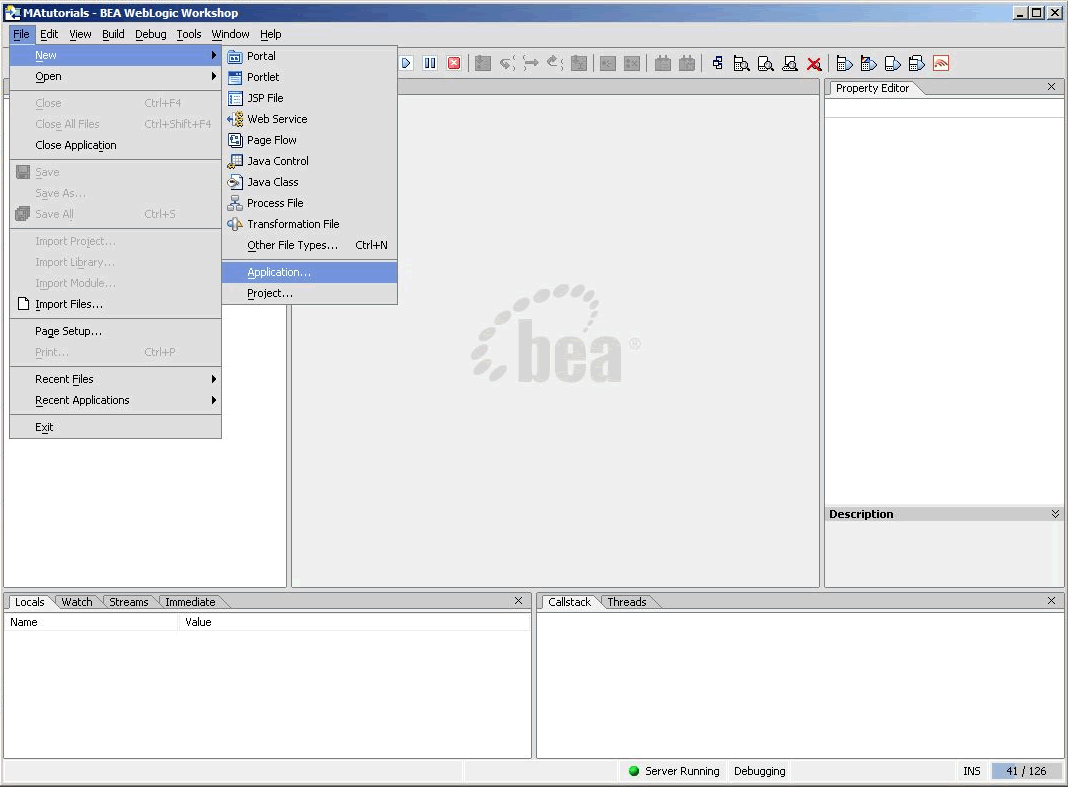
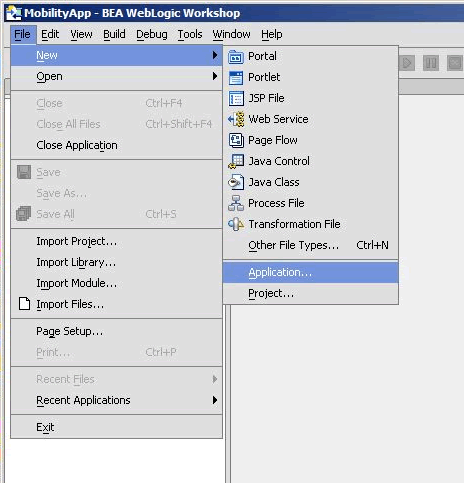
Create Mobility Application
To create the Mobility application:
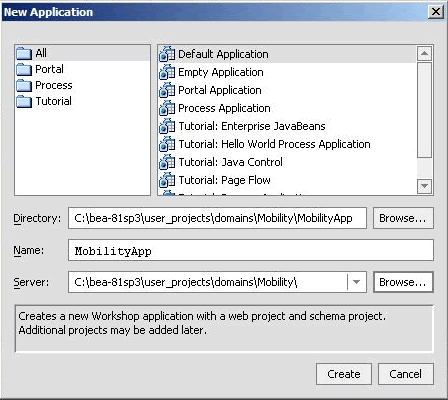
- Click Browse next to the Directory field and browse the Domains directory, selecting your newly created Mobility domain.
Figure 19 New Application Dialog
Now that you have created a new Domain and a new Application, you can import the sample Workshop mobility project.
Importing the Sample Workshop Mobility Project
The sample Workshop Mobility project is located in the <bea>\weblogic81\mobileaware\samples\BEAWorkshop directory.
Two versions of the project called restaurantWeb and restaurantWeb_After were installed during the Mobility Extension installation. The restaurantWeb project has not yet been mobilized, while the restaurantWeb_After project has already been fully mobilized.
You can install the restaurantWeb project as described below and then follow the steps described in the BEA Sample Workshop Mobility Project Guide to mobilize it.
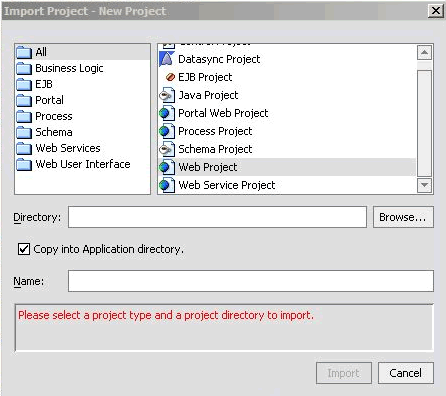
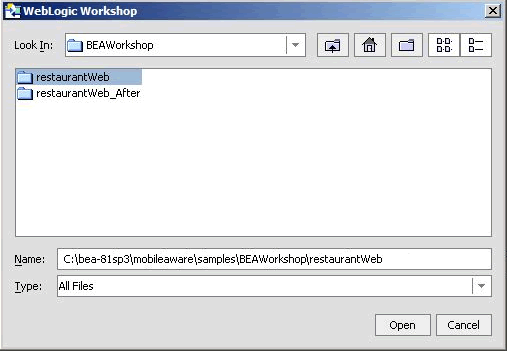
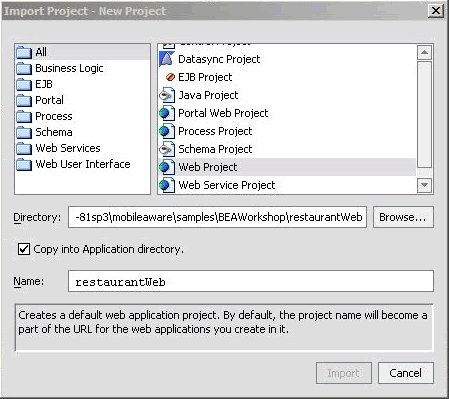
- On the Import Project - New Project screen, click Browse next to the Directory: field and browse to the <bea>\weblogic81\mobileaware\samples\BEAWorkshop\ directory.
- Back on the Import Project - New Project screen, the Directory will now be filled in, with a default Name for the application set to restaurantWeb . Select Web Project from the right hand pane.
Figure 21 Locate restaurantWeb
Figure 22 Import restaurantWeb project
You can also choose to import the restaurantWeb_After project to see the final version. The BEA Sample Workshop Mobility Project Guide document explains the steps to mobilize the restaurantWeb project to reach the same results as in the restaurantWeb_After project.
Creating the Portal Domain and Importing the Sample Mobility Portal Project
Introduction
This section describes creating a BEA Portal Domain, creating a new application, and then importing the provided Sample Mobility Portal Project into the newly created domain.
Create MobilityPortal Domain
To create the MobilityPortal Domain:
Choose Start > Programs > <BEA install directory> > Configuration Wizard
If you have BEA Workshop open, you can also launch it from the tools menu.
- On the Configure Administrative Username and Password screen enter weblogic for username and weblogic for password and click Next.
- In the Configure Server Start Mode and Java SDK screen, select ÅgDevelopment ModeÅh within the WebLogic Configuration Startup Mode box.
- On the Create WebLogic Configuration screen, set the Configuration Name to MobilityPortal and click Create.
- The configuration wizard will now create the domain. When it completes, click Done on the Creating Configuration screen.
Figure 23 Configuration Wizard - Create a new WebLogic Configuration
Figure 24 Configuration Wizard - Basic WebLogic Portal Domain
Figure 25 Configuration Wizard - Express Configuration
Figure 26 Configuration Wizard - User Name and Password
Figure 27 Configuration Wizard - Start Mode
Figure 28 Configuration Wizard - Mobility Portal
Figure 29 Configuration Wizard - Creating MobilityPortal Configuration
Note: When you create a domain using the BEA WebLogic Configuration Manager, a default PointBase database is installed. The MobileAware Device Database will be installed into this database as described in Installing the MobileAware Device Database.
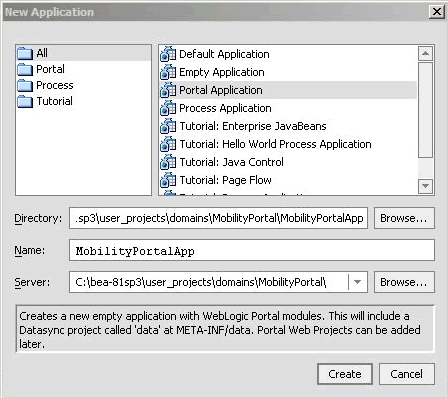
Create the MobilityPortalApp Application
To create the MobilityPortalApp application:
- Click Browse next to the Directory field and browse the Domains directory, selecting your newly created MobilityPortal domain.
Figure 31 Create Portal Application Dialog
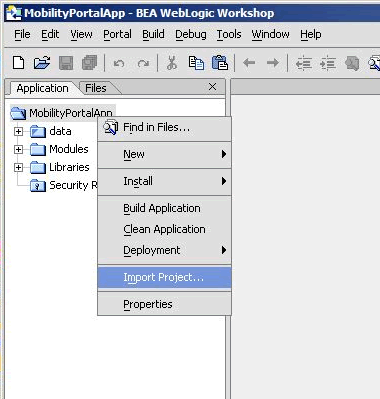
Now that you have created a new Domain and a new Portal Application, you can import the sample Workshop mobility portal project.
Importing the Sample Workshop Mobility Portal Project
The sample Workshop mobility portal project is located in the <bea>\weblogic81\mobileaware\samples\BEAPortal directory.
A sample mobility portal project called maportal was installed during the Mobility Extension installation.
Import the maportal project as described below and then refer to the BEA Sample Mobility Portal Guide for an explanation of the features of the sample portal.
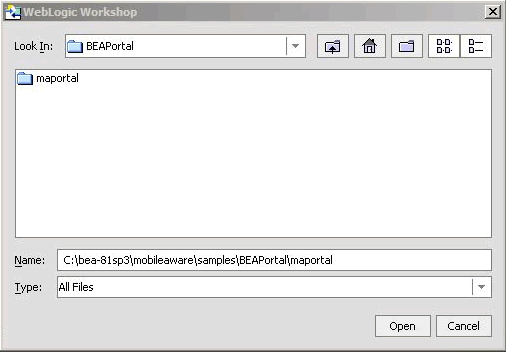
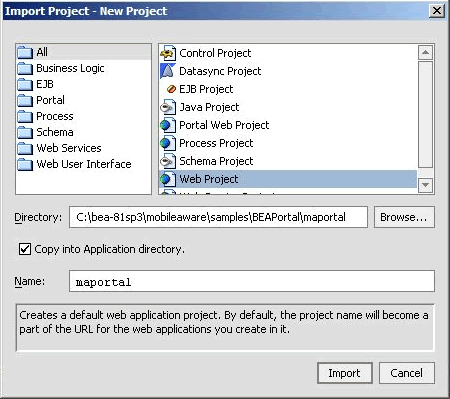
- On the Import Project - New Project screen, click Browse next to the Directory: field and browse to <bea>\weblogic81\mobileaware\samples\BEAPortal\ directory.
- Back on the Import Project - New Project screen, the Directory will now be filled in, with a default Name for the application set to maportal .
Figure 32 Import Portal Project
Figure 34 Locate maportal Project
Note: Do not select Portal Web Project.
Figure 35 Import maportal project
The BEA Sample Mobility Portal Guide document explains the features of the maportal sample project.
Installing the MobileAware Device Database
The MobileAware Interaction Server requires a database, the MobileAware Device Database, to store device profile information. The Mobility Extension for BEA WebLogic Workshop enables installation of the Device Database directly into a local PointBase database from the Tools menu in BEA WebLogic Workshop.
Installing the Device Database from BEA Workshop Tools Menu
When you created the Mobility and MobilityPortal domains using the BEA WebLogic Configuration Manager, a PointBase database was installed. The MobileAware Device Database can be installed in this database as follows:
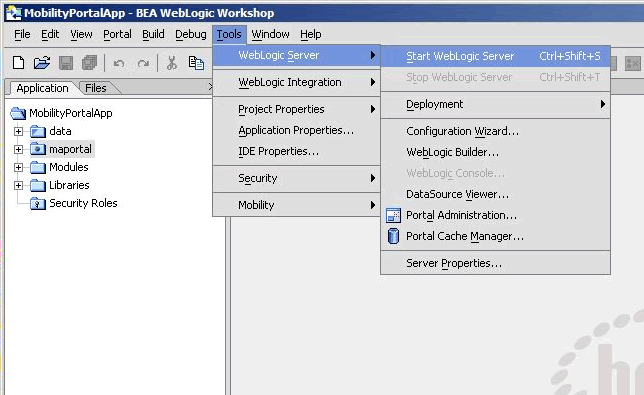
- Once the server has started, install the MobileAware Device Database:
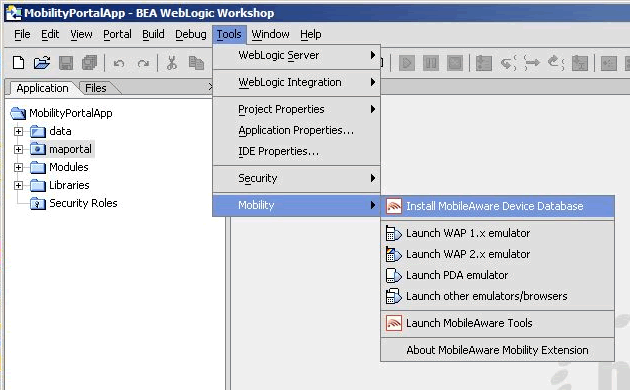
Choose Tools > Mobility > Install MobileAware Device Database
Figure 36 Start BEA WebLogic Server
Figure 37 Install MobileAware Device Database
Next, you will need to configure device emulators into your Workshop environment. This is described in the next section.
Configuring the Device Emulators
Introduction
This section describes how to configure the emulators for use within BEA Workshop. You can use the device emulators to see how the mobilized content will look on a particular device (for example phones, PDAs). Several emulators are available for download free of charge on the Internet. This section describes how to configure the emulators for use within BEA Workshop.
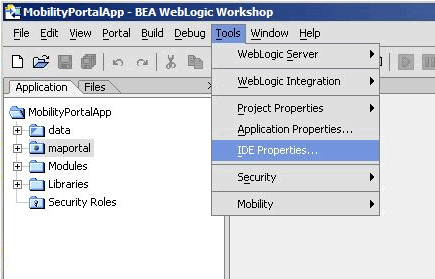
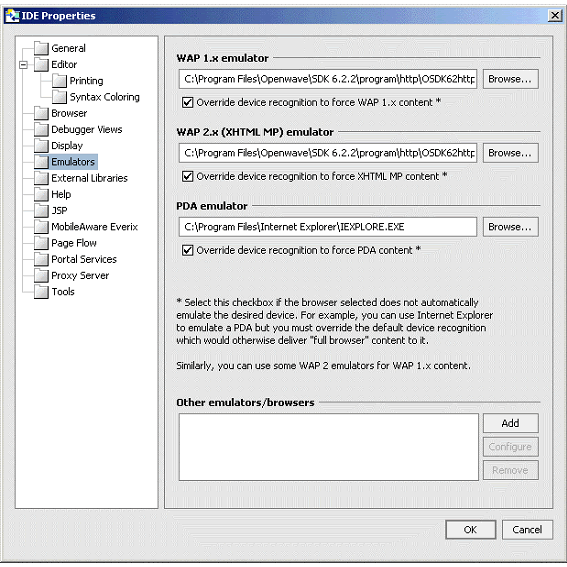
- To configure the tools and emulators for usage within the BEA Workshop environment, select IDE properties from the Tools Menu.
Choose Tools > IDE Properties Note: MobileAware recommends using the Openwave Emulator, which can emulate WAP 1.x and XHTML-MP devices. However, emulators from Nokia, Ericsson, or others can also be utilised. If using an Openwave Emulator, select the OSDK62http.exe (for version 6.2) or the OSDK61http.exe (for version 6.1) in the installation directory where you have installed the emulator, for example C:\Program Files\Openwave\SDK 6.1\program\http.
- You can find a MobileAware PDA emulator at
- Alternatively, to set up Microsoft Internet Explorer to function as a PDA emulator, browse to your iexplore.exe in the PDA emulator text box as can be seen in the diagram below and check the box next to Override device recognition to force PDA content .
Figure 38 Select IDE Properties
Figure 39 Setting up Internet Explorer as a PDA Emulator
Next Steps
Now that you have successfully installed the MobileAware Interaction Server, BEA WebLogic Edition, you are almost ready to begin mobilizing your own web applications and portal projects.
Before you do, it is recommended that you go through the BEA Sample Workshop Mobility Project Guide and the BEA Sample Mobility Portal Guide. The BEA Sample Workshop Mobility Project Guide provides a step-by-step exercise in mobilizing a sample workshop application, while the BEA Sample Mobility Portal Guide illustrates the features of a Mobilized BEA Portal Framework.
Installing the MobileAware Interaction Server on Sun Solaris, RedHat Linux, or HP-UX
This section explains the installation procedure for installing the MobileAware Interaction Server, BEA WebLogic Edition for BEA WebLogic Platform 8.1 on Sun Solaris, Redhat Linux 2.1, and HP-UX 11.
Introduction
The BEAMAInteractionServer81-<platform>.bin installation program is used to install the MobileAware Interaction Server, BEA WebLogic Edition on.
- For RedHat Linux, use the BEAMAInteractionServer81-linux.bin installer.
- For Sun Solaris, use the BEAMAInteractionServer81-solaris.bin installer.
- For HP-UX, use the BEAMAInteractionServer81-hpux.bin installer.
The installer installs the MobileAware Interaction Server, BEA WebLogic Edition into an existing BEA WebLogic installation at <bea_home>/weblogic81/mobileaware.
License
You must update your BEA License with the MobileAware Interaction Server, BEA WebLogic Edition product component details. The required product component information is available for download from the BEA Web Site at the same location as the software installers.
Once you have updated your license, you will be able to develop and test mobile-device ready content. If you have a developer or evaluation BEA License, the software installer will install an evaluation version of the MobileAware Device Database enabling testing on a number of popular device emulators as well as a number of popular mobile and PDA devices. A production license must be present to install and utilise the full MobileAware Device Database. Note: An invalid license will result in HTML being delivered.
Please contact a BEA or MobileAware sales representative if you wish to extend your evaluation or developer license or upgrade to a production license.
Installation Pre-requisites
Software Pre-Requisites
The following software must be installed prior to installing the MobileAware Interaction Server, BEA WebLogic Edition:
- supported Operating System, from the following list:
- BEA WebLogic Platform 8.1SP2 or SP3
- A Database, from the following list:
- Internet Browser:
License
Ensure that you have updated your BEA License with the MobileAware Interaction Server, BEA WebLogic Edition product component details. The required license component information can be downloaded from the same download page as the software installer.
Installation Procedure for Sun Solaris, RedHat Linux, and HP-UX
- For RedHat Linux, use the BEAMAInteractionServer81-linux.bin installer.
- For Sun Solaris, use the BEAMAInteractionServer81-solaris.bin installer.
- For HP-UX, use the BEAMAInteractionServer81-hpux.bin installer.
- Open an xterm, telnet, or console window and run the appropriate platform MobileAware Interaction Server installation program as identified above.
- The first stage of the installation is the Introduction. Please read the text and ensure that the installation environment meets the stated requirements. Press <Enter> to continue.
- Next is the License Agreement. Read the license agreement text and enter the value Y if you accept the terms of the license agreement, or the value N if you do not.
Note: this will cancel the installation after prompting you to confirm cancellation. - When Locate WebLogic Installation is shown, you must enter an absolute path to the location of the BEA WebLogic installation where the MobileAware Interaction Server should be installed. If BEA WebLogic is already installed, the installer will display the most recent <bea_home> by default. Press <Enter> to accept the default location as shown.
Alternatively, if you want to install the MobileAware Interaction Server into a different BEA WebLogic installation, enter the absolute path to the location of the appropriate BEA WebLogic installation and press <Enter>.
Note: You must have write and execute permissions for the chosen installation folder.
Installing the MobileAware Device Database
Please refer to the section Installing the Device Database with the Device Installer for instructions on installing the MobileAware Device Database.
Configuration of a MobileAware Interaction Server-Enabled Web Application
Please refer to Deploying an Application in the MobileAware Interaction Server, BEA WebLogic Edition Administration Guide for details on:
- Creating the deployment environment for a mobilized web application
- Configuring the MobileAware Interaction Server servlet filter
- Configuring the web application's Web Deployment Descriptor (web.xml file) for the MobileAware Interaction Server servlet filter
Post-Installation Configuration and Use of the Administration Tools
Please refer to Administration Console in the MobileAware Interaction Server, BEA WebLogic Edition Administration Guide for a description of how to use the Administration Console to manage device profiles in the MobileAware Device Database.
Please refer to Working With Diagnostics in the MobileAware Interaction Server, BEA WebLogic Edition User Guide for information on configuring and using the Diagnostics tools.
Installing the Device Database
Introduction
The MobileAware Interaction Server requires a database, the MobileAware Device Database, to store device profile information. Currently, the MobileAware Device Database supports Oracle, MySQL, Postgres, PointBase, and SQL Server databases.
The following installation procedures assume an Oracle, MySQL, Postgres, PointBase database has already been installed and the administrator performing the installation is familiar with database creation.
For installation on SQL Server, please refer to Installing the Device Database for SQL Server.
After completing the MobileAware Device Database installation below, configure the mis.properties settings as described in the next chapter.
About the Device Installer Tool
MobileAware has developed a GUI tool called the Device Installer that is used to perform both initial installations of the MobileAware Device Database, as well as installations of the MobileAware provided quarterly updates to the MobileAware Device Database.
Note: Individual additions and modifications to an installed MobileAware Device Database are made using the Administration Console, which is documented in the MobileAware Interaction Server, BEA WebLogic Edition Administration Guide.
The Device Installer tool itself allows customers to:
- Create a new MobileAware Device Database from a MobileAware provided flat DeviceRepository.xml file
- Backup a customer's existing MobileAware Device Database to an XML file
- Update a customer's existing MobileAware Device Database with the MobileAware provided quarterly updates (the quarterly updates are also provided as a flat DeviceRepository.xml file)
When using the Device Installer tool to install the MobileAware provided quarterly updates, the tool:
- Backs up the customer's existing device database to an XML file
- Detects and stores customer modifications to their existing device database
- Installs the new MobileAware provided device database
- Presents the customer with a list of modifications and allows the customer to re-apply each of them or accept the values provided in the device database update
Locating the Device Installer Tool
The Device Installer tool can be found under the installation directory that was selected during the installation:
The Install Complete screen at the end of the MobileAware Interaction Server installation contained the full path name for the install directory for reference.
Device Installer Scenario 1: Installing a New MobileAware Device Database
The steps used to install a new MobileAware Device Database are shown below, along with sample screenshots:
- Create a database for the MobileAware Device Database and note the connection details. To complete the device database installation, you will need the database type, the database URL, and a valid user name and password for accessing the database.
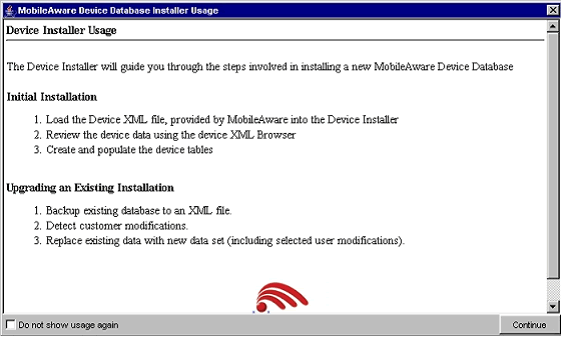
- Run MISDeviceInstaller.exe (Windows) or MISDeviceInstaller (Unix/Linux platforms) and the Device Installer Usage screen will appear. Click Continue.
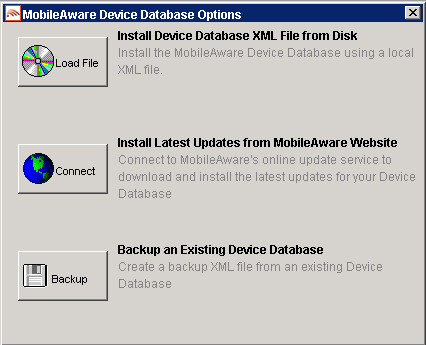
- The MobileAware Device Database Options screen will appear. Click Load File to install the MobileAware Device Database from the DeviceRepository.xml file included with the MobileAware Interaction Server installer.
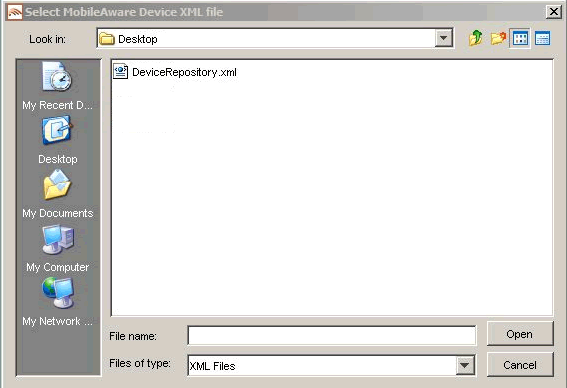
- When the Select MIS Device XML file screen appears, choose a DeviceRepository.xml file to install and click Open. The DeviceRepository.xml file included with the MobileAware Interaction Server installer will be shown as the default for a new installation.
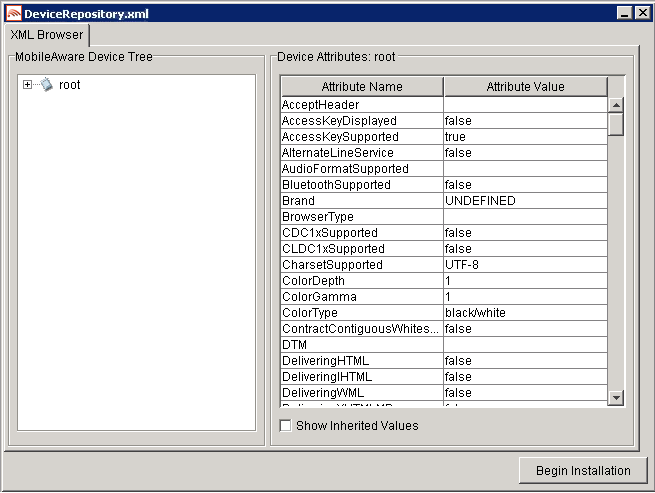
- The DeviceRepository.xml screen shows the DeviceRepository.xml to be installed. The file has been converted into a hierarchical structure and provided as a preview of the MobileAware Device Database to be installed. Inherited values for each device can also be displayed by checking the show inherited values box. Click Begin Installation to proceed.
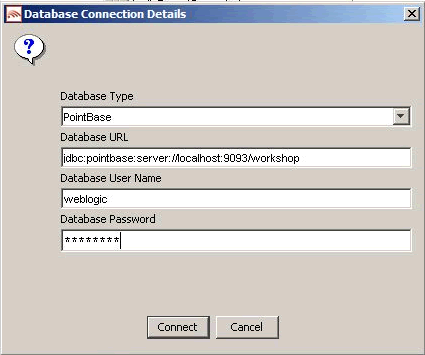
- In the Database Connection Details screen, select the type of database from the Database Type drop down menu and enter the database connection details in the format shown. The Database URL, User Name, and Password should be available from your Database Administrator (DBA). The format for these URL's is displayed in the dialog and is also described below:
- For Oracle, set to:
- For MySQL, set to:
- For Postgres, set to:
- For PointBase, set to:
- When using WebLogic database connection pool, set to:
- Example: deviceDB.url: jdbc:oracle:thin:@oracle_host:1521:mySID
- Click Connect. Once a successful connection is made the details are stored and will be remembered the next time the tool is run.
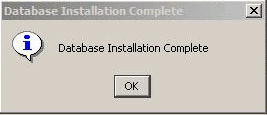
- Click OK on the Database Installation Complete screen and then click Exit on the Device Installer screen to close the tool.
Figure 40 Device Installer Usage Screen
Figure 41 MobileAware Device Database Options
Figure 42 Select MobileAware Device XML File Screen
Figure 43 DeviceRepository.xml Screen
Figure 44 Example of PointBase Connection Details screen
Figure 45 Creating Device Table Progress Bar
Figure 46 Database Installation Complete
Device Installer Scenario 2: Using MobileAware's Online Update Service to Update the MobileAware Device Database
The steps used to connect to MobileAware's Online Update Service to update an existing MobileAware Device Database are described below.
- Run MISDeviceInstaller.exe (Windows) or MISDeviceInstaller (Unix/Linux platforms) and the Device Installer Usage screen will appear. Click Continue.
- The MobileAware Device Database Options screen will appear. Click Connect to connect to MobileAware's online update service for the latest available DeviceRepository.xml file.
- On the Database Connection Details screen, select the type of database from the Database Type drop down menu and enter the database connection details in the format shown. The Database URL, User Name, and Password should be available from your Database Administrator (DBA). The format for these URL's is displayed in the dialog and is also described below:
Figure 47 Device Installer Usage Screen
Figure 48 MobileAware Device Database Options
- For Oracle, set to:
- For MySQL, set to:
- For Postgres, set to:
- For PointBase, set to:
- When using WebLogic database connection pool, set to:
- Example: deviceDB.url: jdbc:oracle:thin:@oracle_host:1521:mySID
- Click Connect. Once a successful connection is made the details are stored and will be remembered the next time the tool is run.
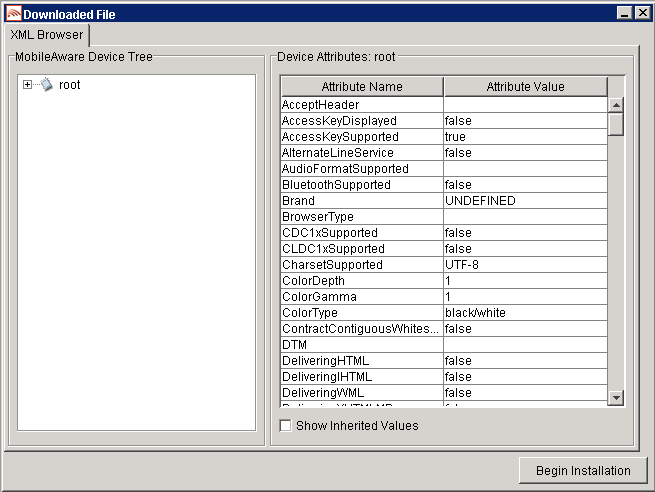
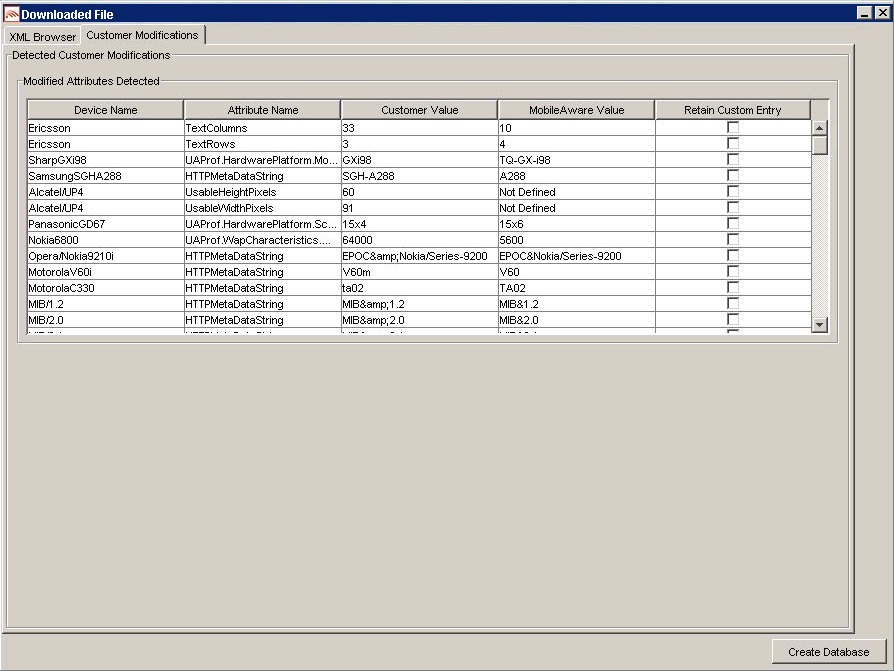
- If you successfully connect and are authorized to receive the latest DeviceRepository.xml file, it will be downloaded and the next screen you will see is the Downloaded File screen shows the DeviceRepository.xml to be installed. The file has been converted into a hierarchical structure and provided as a preview of the MobileAware Device Database to be installed. Inherited values for each device can also be displayed by checking the show inherited values box. Click Begin Installation to proceed.
On the Database Connection Details screen, select the type of database from the Database Type drop down menu and enter the database connection details in the format shown. The Database URL, User Name, and Password should be available from your Database Administrator (DBA). The format for these URL's is displayed in the dialog and is also described below:
Figure 49 Downloaded File Screen
- For Oracle, set to:
- For MySQL, set to:
- For Postgres, set to:
- For PointBase, set to:
- When using WebLogic database connection pool, set to:
- Example: deviceDB.url: jdbc:oracle:thin:@oracle_host:1521:mySID
- Click Connect. Once a successful connection is made the details are stored and will be remembered the next time the tool is run.
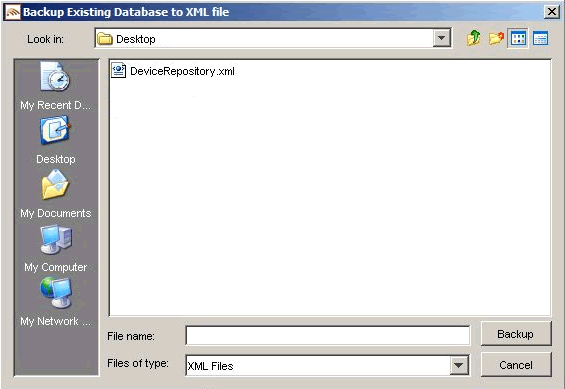
- If an existing MobileAware Device Database is detected, the Backup Existing Database to XML file screen is shown and you are required to backup the existing device database to an XML file before proceeding. The created backup XML file will have the same structure as the DeviceRepository.xml file. This backup XML file will be used for detecting modifications later in the upgrade process. Enter a name for the XML file and click Backup.
- A progress bar monitors the progress of the backup process. This may take up to 2 minutes depending on the connection.
The backupDeviceRepository.xml and DeviceRepository.xml files are compared to allow a list of modifications to be presented to the user.
If no modifications are identified, the existing database will be replaced with the selected Device XML file. When the Device Installation Compete window appears, click OK and then click Exit to close the DeviceInstaller tool.
- If odifications are detected, you will be asked to review the modifications before proceeding with the installation.
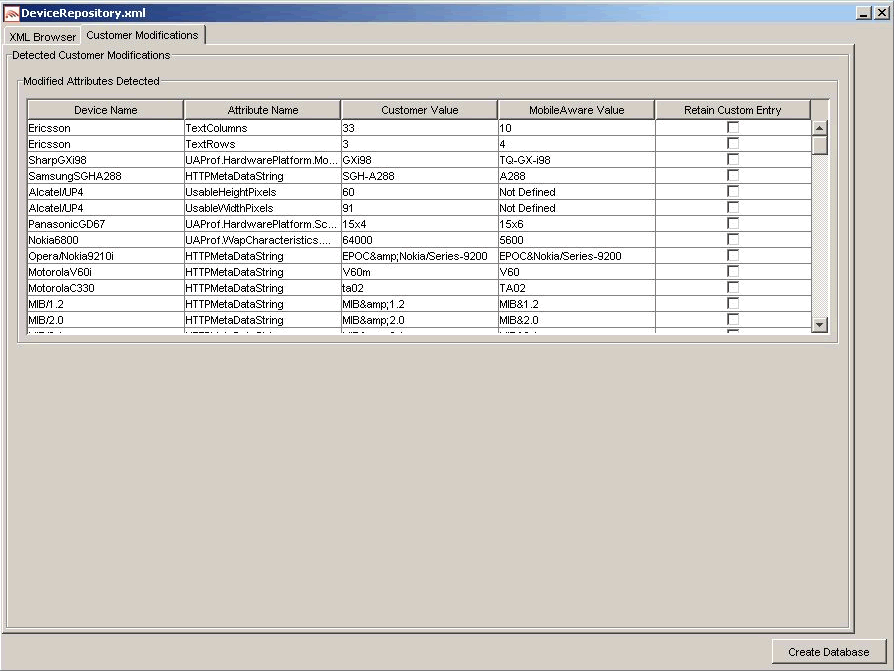
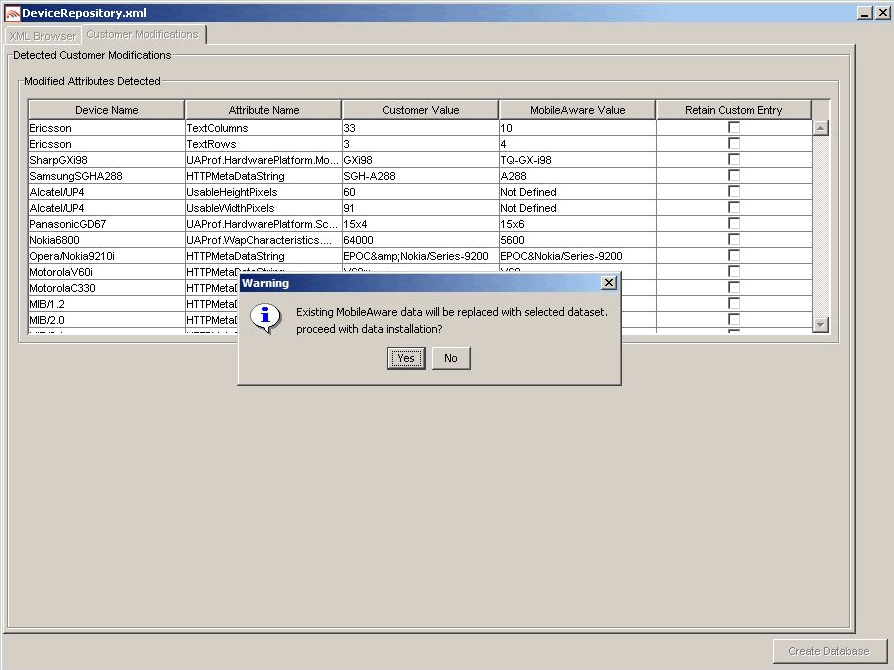
- Once the detection process completes, a dialog box similar to the one shown below will appear showing the delta between the DeviceRepository.xml file to be installed and the existing MobileAware Device Database. You can now choose to re-apply any modifications that have been detected in the existing MobileAware Device Database by selecting the appropriate Retain Custom Entry checkboxes.
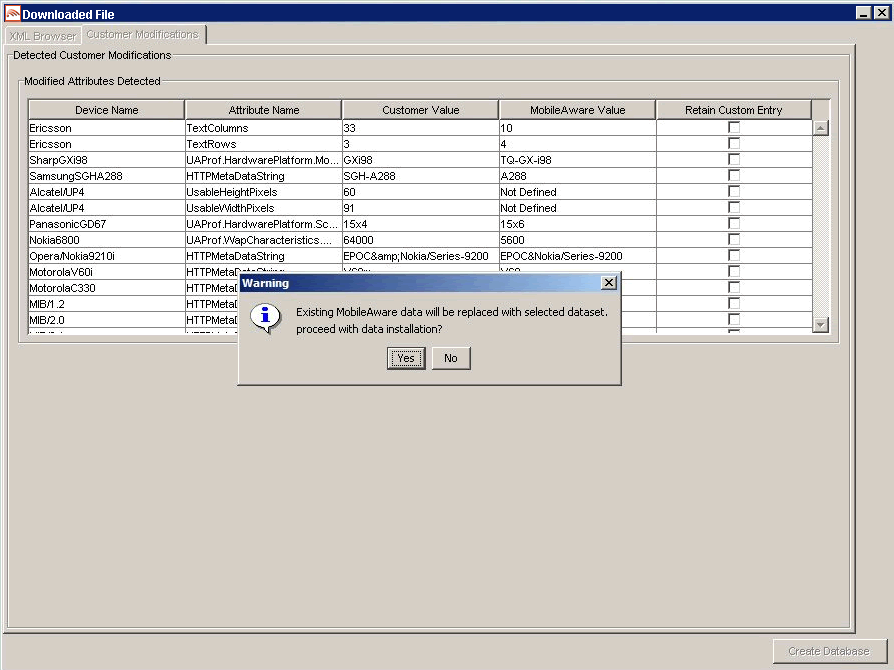
After selecting any data that you wish to retain, click Create Database. You will see a Warning dialog box indicating that the MobileAware Device Database data will be replaced with the selected data set. Click Yes button to proceed with the installation.
Figure 53 Overwrite Data Screen
- Click OK on the Database Installation Complete screen and then click Exit on the Device Installer screen to close the tool.
Figure 50 Backup Existing Device Database Screen
Figure 52 Comparison of Existing Download Data with New Data
Figure 54 Creating Device Table Progress Bar
Figure 55 Database Installation Complete
Device Installer Scenario 3: Updating an Existing MobileAware Device Database from an XML File
The steps used to update an existing MobileAware Device Database from an XML file are shown below, along with sample screenshots:
- Run MISDeviceInstaller.exe (Windows) or MISDeviceInstaller (Unix/Linux platforms) and the Device Installer Usage screen will appear. Click Continue.
- The MobileAware Device Database Options screen will appear. Click Load File to install the MobileAware Device Database from a local DeviceRepository.xml.
- Then the Select MIS Device XML file screen appears, choose a DeviceRepository.xml file to install and click Open. The DeviceRepository.xml file included with the MobileAware Interaction Server installer will be shown as the default for a new installation.
- The DeviceRepository.xml screen shows the DeviceRepository.xml to be installed. The file has been converted into a hierarchical structure and provided as a preview of the MobileAware Device Database to be installed. Inherited values for each device can also be displayed by checking the show inherited values box. Click Begin Installation to proceed.
- On the Database Connection Details screen, select the type of database from the Database Type drop down menu and enter the database connection details in the format shown. The Database URL, User Name, and Password should be available from your Database Administrator (DBA). The format for these URL's is displayed in the dialog and is also described below:
Figure 56 Device Installer Usage Screen
Figure 57 MobileAware Device Database Options
Figure 58 Select MobileAware Device XML File Screen
Figure 59 DeviceRepository.xml Screen
- For Oracle, set to:
- For MySQL, set to:
- For Postgres, set to:
- For PointBase, set to:
- When using WebLogic database connection pool, set to:
- Example: deviceDB.url: jdbc:oracle:thin:@oracle_host:1521:mySID
- Click Connect. Once a successful connection is made the details are stored and will be remembered the next time the tool is run.
- If an existing MobileAware Device Database is detected, the Backup Existing Database to XML file screen is shown and you are required to backup the existing device database to an XML file before proceeding. The created backup XML file will have the same structure as the DeviceRepository.xml file. This backup XML file will be used for detecting modifications later in the upgrade process. Enter a name for the XML file and click Backup.
- A progress bar monitors the progress of the backup process. This may take up to 2 minutes depending on the connection.
The backupDeviceRepository.xml and DeviceRepository.xml files are compared to allow a list of modifications to be presented to the user.
If no modifications are identified, the existing database will be replaced with the selected Device XML file. When the Device Installation Compete window appears, click OK and then click Exit to close the DeviceInstaller tool.
- If modifications are detected, you will be asked to review the modifications before proceeding with the installation.
- Once the detection process completes, a dialog box similar to the one shown below will appear showing the delta between the DeviceRepository.xml file to be installed and the existing MobileAware Device Database. You can now choose to re-apply any modifications that have been detected in the existing MobileAware Device Database by selecting the appropriate Retain Custom Entry checkboxes.
After selecting any data that you wish to retain, click Create Database. You will see a Warning dialog box indicating that the MobileAware Device Database data will be replaced with the selected data set. Click Yes button to proceed with the installation.
Figure 64 Overwrite Data Screen
- Click OK on the Database Installation Complete screen and then click Exit on the Device Installer screen to close the tool.
Figure 60 Example of PointBase Connection Details screen
Figure 61 Backup Existing Device Database Screen
Figure 63 Comparison of Existing Data with New Data
Figure 65 Creating Device Table Progress Bar
Figure 66 Database Installation Complete
Device Installer Scenario 4: Backup an Existing MobileAware Device Database to an XML File
The steps used to backup an existing MobileAware Device Database are shown below, along with sample screenshots:
- Run MISDeviceInstaller.exe (Windows) or MISDeviceInstaller (Unix/Linux platforms) and the Device Installer Usage screen will appear. Click Continue.
- The MobileAware Device Database Options screen will appear. Click Backup to backup the installed MobileAware Device Database to an XML file.
- On the Backup Existing Database to XML file screen, enter a name for the XML file and click Backup to backup the existing device database to an XML file.
- progress bar monitors the progress of the backup process. This may take up to 2 minutes depending on the connection.
Figure 67 Device Installer Usage Screen
Figure 68 MobileAware Device Database Options
Figure 69 Backup Existing Device Database Screen
Installing the MobileAware Device Database on SQL Server
Due to issues with the Microsoft JDBC Drivers for SQL Server, it is necessary to install the MobileAware Device Database on SQL Server using the MobileAware Device Database SQL Scripts.
To install the MobileAware Device Database on SQL Server, follow the steps below.
- Using a tool like SQL Enterprise Manager, create a SQL Server database for the MobileAware Device Database.
- deviceDB.driver: weblogic.jdbc.sqlserver.SQLServerDriver
- deviceDB.url: jdbc:bea:sqlserver://<sqlserver_host>:<sqlserver_port>;databaseName=<sqlserver_database_name>
- deviceDB.user:sqlserver_login
- deviceDB.password.sqlserver_login_password
Next Steps
Now that you have successfully installed the MobileAware Interaction Server, BEA WebLogic Edition, you are almost ready to begin mobilizing your own web applications and portal projects.
Before you do, it is recommended that you go through the BEA Sample Workshop Mobility Project Guide and the BEA Sample Mobility Portal Guide. The BEA Sample Workshop Mobility Project Guide provides a step-by-step exercise in mobilizing a sample workshop application, while the BEA Sample Mobility Portal Guide illustrates the features of a Mobilized BEA Portal Framework.

