WebLogic Portlets for Siebel User Guide
|
|
|
WebLogic Portlets for Siebel User Guide
This guide, which shows you how to use the WebLogic Portlets for Siebel, includes the following sections:
- Introduction
- Getting Started with WebLogic Portlets for Siebel
- Login Portlet
- Sales Order Portlet
- Service Request Portlet
- My Accounts Portlet
- My Team Accounts Portlet
- Agreements By Expiry Date Portlet
- All Assets By Account Portlet
- Contacts By Account Portlet
- Customer List with Address Info Portlet
- Repair Status Portlet
- RMA Order Status Portlet
This guide assumes that you have working knowledge of the following:
Introduction
Since the dawn of World Wide Web users have been accessing one Web page at a time. And that's been just fine. At first, excitement over the ability to provide platform-agnostic content to all users with network access or an Internet connection overshadowed any drawbacks or inadequacies with the new technology. Later, emerging technologies such as Java, JavaScript, and application servers provided application functionality, usability, stability, and performance improvements that have been the mainstay of Internet computing.
Now organizations need more. They want to not only surface their legacy applications, processes, and data in a Web interface, but they want to be able to do so more than one page at a time. They want portals.
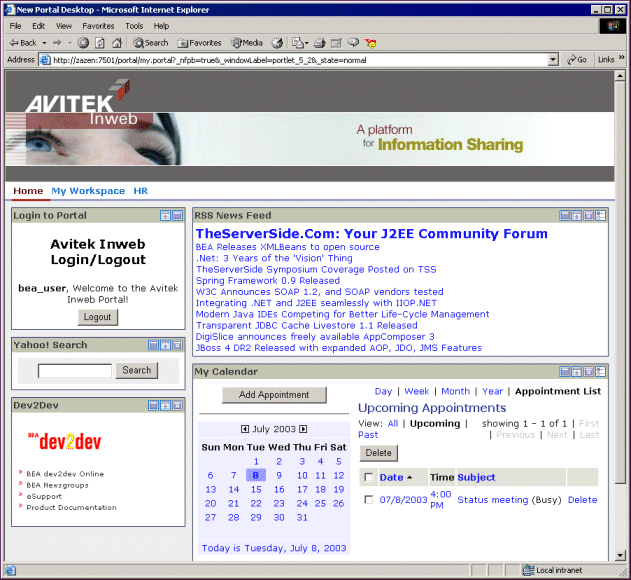
A portal is a powerful Web site that gives users a single point of access to applications and information in a unified interface. A portal lets users view each application or Web page in its own window, called a portlet, and a single browser window can contain multiple portlets. For example, a portal page can contain portlets for logging in, searching, displaying news feeds, and managing appointments with a calendar application, as shown in the following Figure.
Portlets are arranged or grouped on portal pages, and users can easily navigate among pages with page tabs, drop-down menus, or other mechanisms to access the portlets they want. The portal in Figure 1 contains three pages: Home, My Workspace, and HR, whose links appear just above the Login portlet.
Siebel 7.0.4- WebLogic Portlets for Siebel automates change and product content propagation related business processes that span across Siebel 7.0.4 and WebLogic Portlets for Siebel.
Business Goals of WebLogic Portlets for Siebel
Business Requirements addressed by WebLogic Portlets for Siebel at a high level are:
- Integrating Siebel 7.0.4 with WebLogic Portlets for Siebel.
- Facilitating real time collaborative practices between organization partners by transferring information from Siebel 7.0.4 to WebLogic Portlets for Siebel.
- Ensuring a smooth and fast Product Content propagation in high volume transactions scenario.
Key Features of WebLogic Portlets for Siebel
Key design goals of WebLogic Portlets for Siebel are:
- Easy to Deploy
- Easily Configurable to suit varying business needs
- Easy to Monitor
- Easy to Maintain with application upgrades
WebLogic Portlets for Siebel supports the following business processes:
Acronyms, Abbreviations, and Definitions
Supported Platforms
Product Life Cycle Management Applications
Windows NT, Windows 2000, Windows 2000 Server and Windows XP
Process Flow
Follow the steps given below to complete the flow from BEA WebLogic Suite 8.1 to Siebel Applications through WebLogic Portlets for Siebel.
Logon to WebLogic Portlets for Siebel (Optional).
Viewing, and Editing the Sales Orders etc., that are created from WebLogic Portlets for Siebel and, which are to be transferred to Siebel Applications instance.
Once the Sales Order is created successfully you can view the details in the Siebel Applications instance.
Getting Started with WebLogic Portlets for Siebel
To start WebLogic Portlets for Siebel, open Internet Explorer and type the following URL:
http://<WebLogic Portlets for SiebelServer>:<port>/<project name>/<Portal file>
http://siebelserver:7001/beaportal/BEAPortalNet.portal
Note: The parameters in the URL are to be replaced by actual values.
Login Portlet
The login screen is used to authenticate the user. Only those users who have a valid authentication are allowed to login.
Figure 2 WebLogic Portlets for Siebel Login Screen
Enter Username to log into the WebLogic Portlets for Siebel.
Enter the Password details. The user may note that the password details entered are not visible instead an asterisk (*) is displayed for each and every keystroke entered by the user. Since, this field is case sensitive the user should ensure that the Caps Lock key is set to off mode from the keyboard.
Click on Sign In after the Username and Password details are entered to successfully login to WebLogic Portlets for Siebel.
In order to log into WebLogic Portlets for Siebel system, the user should be of one of the following user type:
It is advised that the user refer to the BEA WebLogic Portlet Administration Guide. The guide details how to create a user, group and assign privileges, and so on.
The privileges, which are available for an Administrator, are not available to Employee and Customer. The details displayed on the Portlets vary depending on the user type selected.
In this user guide we will select the user type as Employee, which will contain all the privileges of a Customer and some more details as compared to a Customer.
After successfully logging into the WebLogic Portlets for Siebel a screen as illustrated in the following figure is displayed:
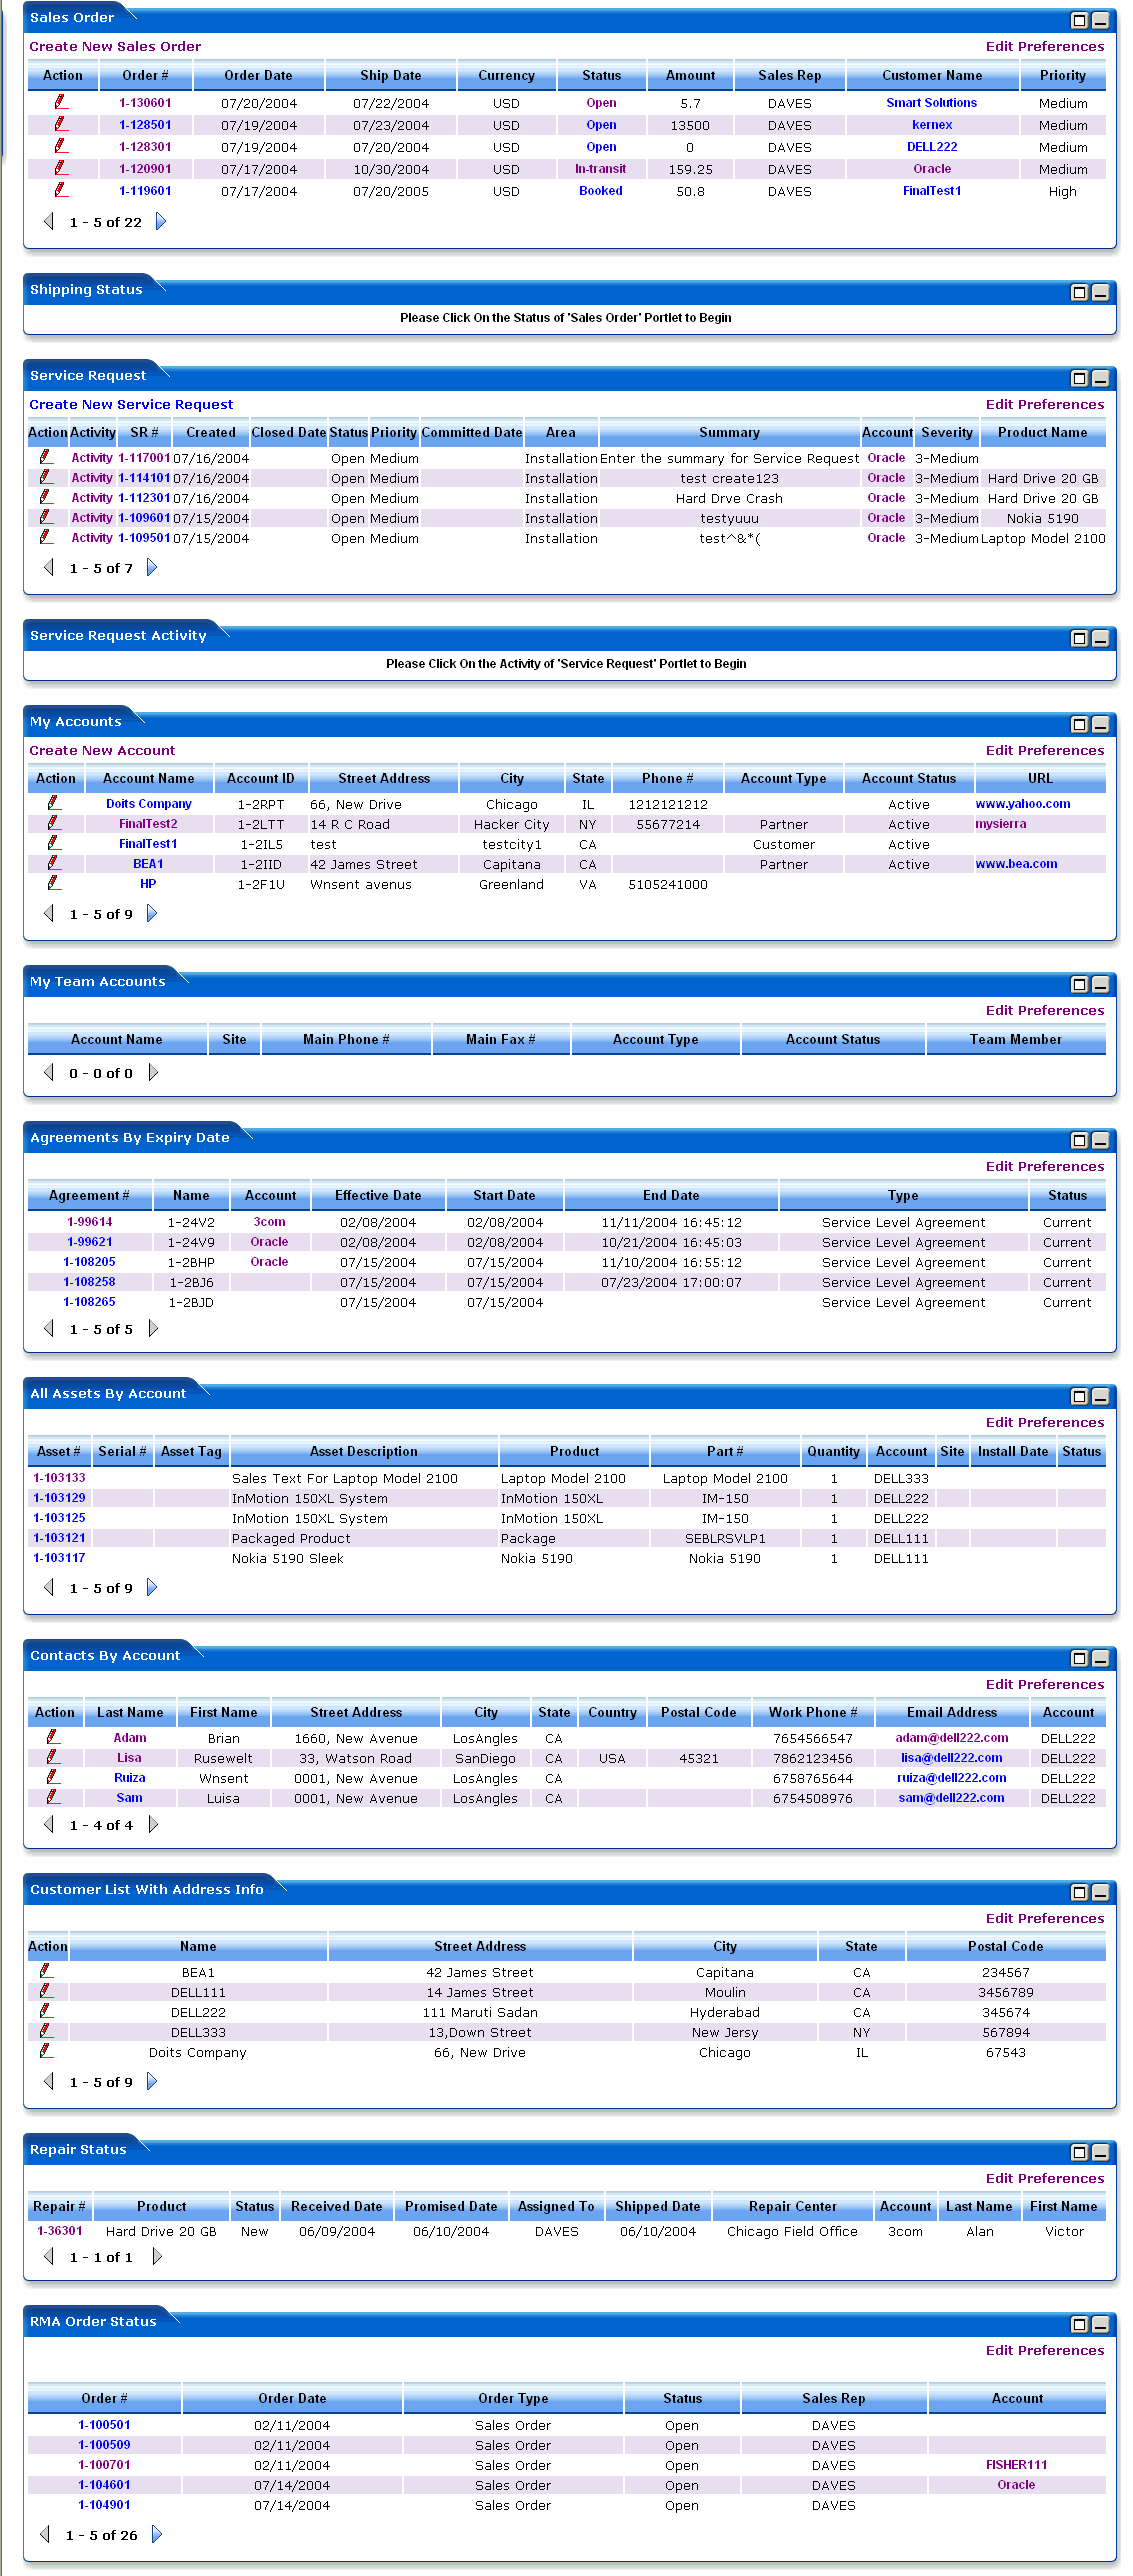
Figure 3 List of Portlets for the WebLogic Portlets for Siebel Screen
Note: The user may note that by default no records are displayed for most of the portlets. The user is required to click on Edit Preferences hyperlink and then need to configure from the respective portlets.
Use scroll bar to navigate through the Portlets. The following is the list of Portlets for the WebLogic Portlets for Siebel:
- Sales Order
- Shipping Status
- Service Request
- Service Request Activity
- My Accounts
- My Team Accounts
- Agreements By Expiry Date
- All Assets By Account
- Contacts By Account
- Customer List With Address Info
- Repair Status
- RMA Order Status
The Portlets are discussed in the following pages. We begin with Sales Order Portlet:
Sales Order Portlet
The following operations that can be performed from the Sales Order Portlet:
- To View an existing Sales Order
- To Edit / Update an existing Sales Order
- To Create a new Sales Order and
Note: The user may note that the Sales Order Portlet is the first Portlet displayed after valid authentication.
Viewing an existing Sales Order
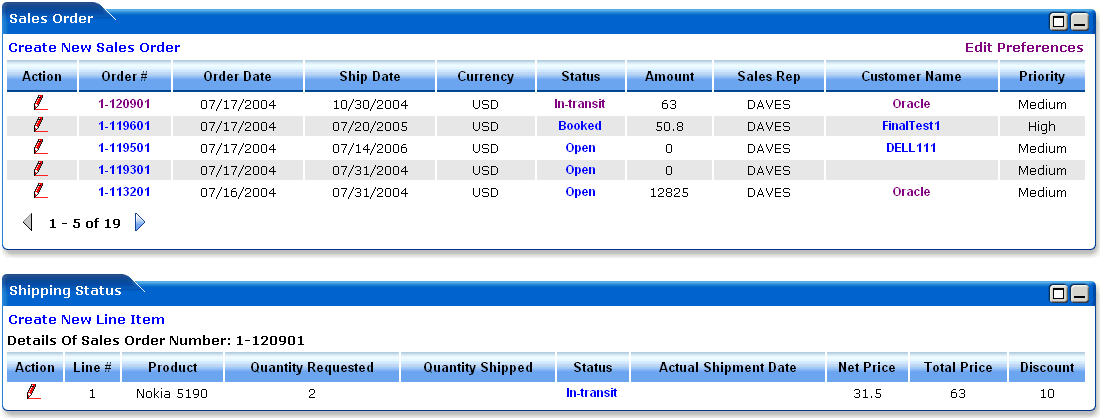
In order to view details for an existing Sales Order scroll to the Sales Order Portlet a screen as illustrated in the following figure is displayed:
Figure 4 WebLogic Portlets for Siebel Sales Order Portlet Screen
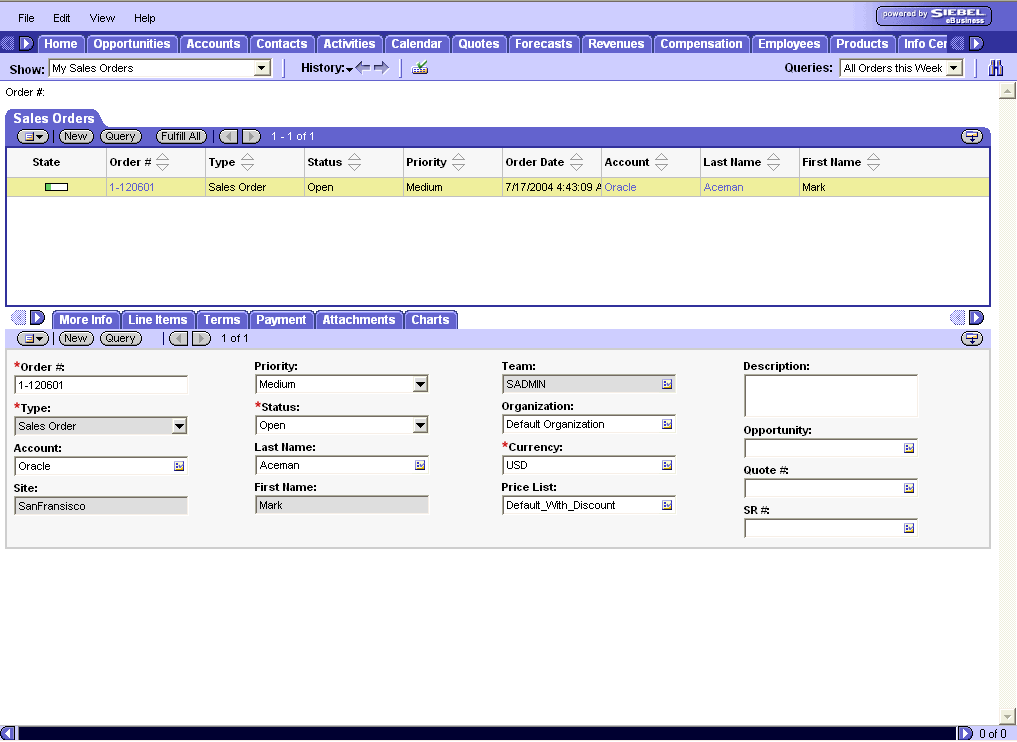
Click the Order # hyperlink to view details for the required Sales Order. And the Siebel screen for the selected Sales Order is displayed.
Figure 5 WebLogic Portlets for Siebel Sales Order Portlet - Siebel Sales Order details Screen
The fields displayed are self-explanatory. After viewing the details click close to quit from the Siebel screen.
Viewing an existing Customer
In order to view details for an existing Customer scroll to the Sales Order Portlet a screen as illustrated in the following figure is displayed:
Figure 6 WebLogic Portlets for Siebel Sales Order Portlet Screen
Click the Customer Name hyperlink to view details for the required Customer. And the Siebel screen for the selected Customer is displayed.
Figure 7 WebLogic Portlets for Siebel Sales Order Portlet - Siebel Customer details Screen
The fields displayed are self-explanatory. After viewing the details click Close to quit from the Siebel screen.
To Edit / Update an existing Sales Order Shipping Status
In order to update details for the Sales Order Shipping Status scroll to the Sales Order Portlet and then click Status hyperlink. A screen as illustrated in the following figure is displayed:
Figure 8 WebLogic Portlets for Siebel - Sales Order Shipping Status Portlet Screen
The above displayed screen displays Sales Order Shipping Status details pertaining to the selected Sales Order in the Sales Order Shipping Status portlet.
The above displayed screen can be divided into two parts:
The first part contains details like: Line #, Product, Quantity Requested, Quantity Skipped, Status, Actual Shipment Date, Net Price, Total Price, and Discount, which are self explanatory.
The second part can be categorized as the actions that can be performed from Sales Order Shipping Status Portlet. Action buttons available are: Edit, Maximize, and Minimize.
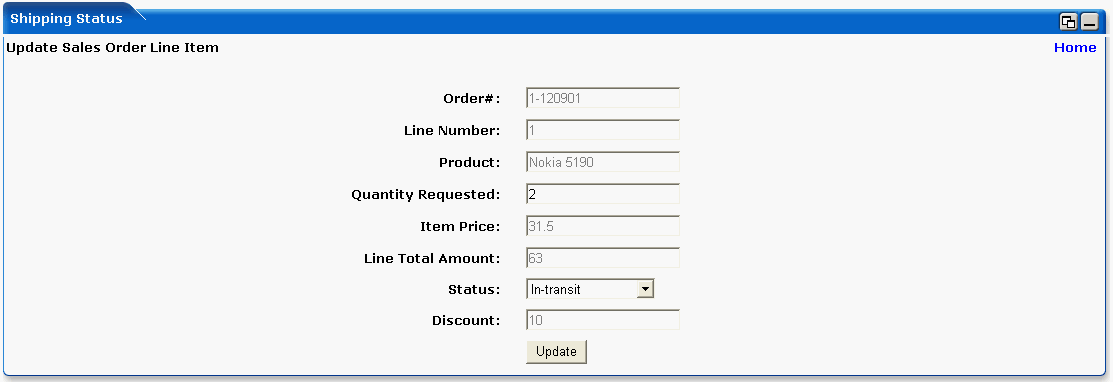
Click Edit icon (pencil icon) to update the Sales Order Shipping Status details.
Figure 9 WebLogic Portlets for Siebel Sales Order Shipping Status Portlet - SO details Screen
This field displays the Sales Order Number. This field is not updatable.
This field displays the Line Number attached to the Sales Order. This field is not updatable.
This field displays the product. This field is not updatable.
This field displays the Quantity Requested. This field is updatable.
This field displays the Item Price. This field is not updatable.
This field displays the total line amount. This field is not updatable.
This field displays the current status of the line item and allows the user to change the status. This field is updatable for employee.
This field displays the discount percentage. This field is not updatable.
Once the changes are updated, click Update.
Creating a new Line Item for the Sales Order Shipping Status
In order to create a new line item details for the Sales Order Shipping Status. Scroll to the Sales Order Portlet and then click Status hyperlink. A screen as illustrated in the following figure is displayed:
Figure 10 WebLogic Portlets for Siebel Sales Order Shipping Status Portlet Screen
Click Create New Line Item hyperlink from the Sales Order Shipping Status Portlet a screen as illustrated in the following figure is displayed:
Figure 11 WebLogic Portlets for Siebel - Sales Order Shipping Status Portlet - Create new Line Item Screen
Click Browse icon (magnify icon), which displays a screen as illustrated in the following figure.
Figure 12 WebLogic Portlets for Siebel - Sales Order Shipping Status Portlet - Create new Line Item Browse Screen
Click on Back hyperlink and the control is returned back to WebLogic Portlets for Siebel - Sales Order Shipping Status Portlet - Create new Line Item Screen.
Click on Home hyperlink to quit from the Sales Order Shipping Status Portlet - Create new Line Item Browse screen and return back to Sales Order portlet.
After entering the details, click Submit.
The following are the remaining fields of WebLogic Portlets for Siebel - Sales Order Shipping Status Portlet - Create new Line Item Screen:
Enter the required ordered quantity.
This field is to specify the discount for the line item.
After entering the details, click Create.
Creating a new Sales Order
In order to create a new Sales Order scroll to the Sales Order Portlet a screen as illustrated in the following figure is displayed:
Figure 13 WebLogic Portlets for Siebel - Sales Order Portlet Screen
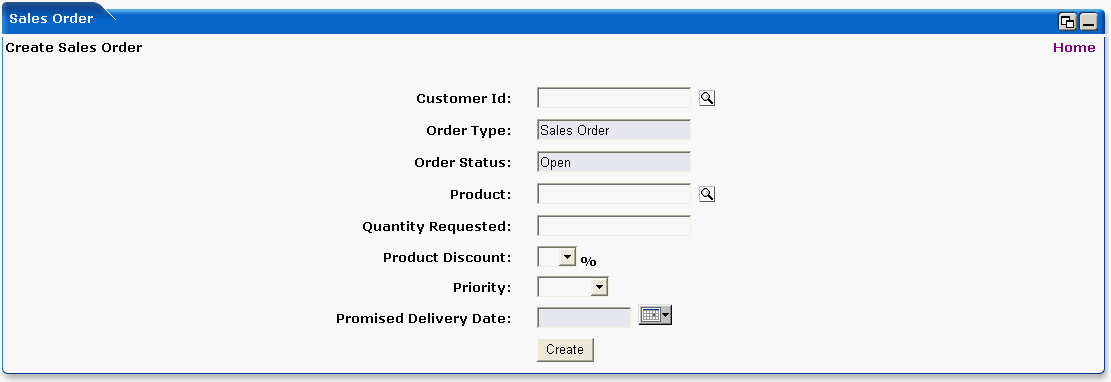
Click Create New Sales Order hyperlink from the Sales Order Portlet a screen as illustrated in the following figure is displayed:
Figure 14 WebLogic Portlets for Siebel - Sales Order Portlet - Creation of new Sales Order Screen
This field is to select the Customer ID (Account ID). Click Browse icon (magnify icon), which displays a screen as illustrated in the following figure. This field is shown only for Employee.
Figure 15 WebLogic Portlets for Siebel - Sales Order Portlet - Creation of new Sales Order Customer ID (Account ID) search screen
Click on Back hyperlink and the control is returned back to WebLogic Portlets for Siebel - Sales Order Portlet - Creation of new Sales Order Screen.
Click on Home hyperlink to quit from the S WebLogic Portlets for Siebel - Sales Order Portlet - Creation of new Sales Order screen and return back to Sales Order portlet.
After entering the details, click Submit.
The following are the remaining fields of WebLogic Portlets for Siebel - Sales Order Portlet - Creation of new Sales Order Screen:
This field specifies the Order Type. Default value is Sales Order.
This field specifies the status of the order. Default value is Open.
This field is to select the product. Click Browse icon (magnify icon), which displays a screen as illustrated in the following figure.
Figure 16 WebLogic Portlets for Siebel - Sales Order Portlet - Creation of new Sales Order Product search screen
Click on Back hyperlink and the control is returned back to WebLogic Portlets for Siebel - Sales Order Portlet - Creation of new Sales Order Screen.
Click on Home hyperlink to quit from the WebLogic Portlets for Siebel - Sales Order Portlet - Creation of new Sales Order screen and return back to Sales Order portlet.
After entering the details, click Submit.
The following are the remaining fields of WebLogic Portlets for Siebel - Sales Order Portlet - Creation of new Sales Order Screen:
This field allows the user to select the discount for a product. This is provided only for Employee users.
This field allows the user to select the priority.
In this field is enter the promised delivery date. Click on Calendar icon, which displays a pop screen to pick up the required date.
After entering the details, click Create.
Editing a Sales Order
In order to update an existing Sales Order scroll to the Sales Order Portlet a screen as illustrated in the following figure is displayed:
Figure 17 WebLogic Portlets for Siebel - Sales Order Portlet Screen
Click Edit icon (pencil icon) to update the Sales Order from the Sales Order Portlet a screen as illustrated in the following figure is displayed:
Figure 18 WebLogic Portlets for Siebel - Sales Order Portlet - Edit Sales Order Screen
Specifies the nature of the order.
This field displays the current status and allows the user to update the status as required. This field is updatable.
This field displays the priority set and allows the user to modify the priority as required. This field is updatable.
After entering the details, click Update.
Preferences for the Sales Order
Click on Edit preferences hyperlink from the Sales Order Portlet. A screen as illustrated in the following figure is displayed:
Figure 19 WebLogic Portlets for Siebel - Sales Order Portlet - Edit Preferences Screen
Depending on the value selected in the Maxrows field, the Sales Order portlet will only display the first few records (as specified for maxrows) and the user can then navigate for rest of the records using Previous and Next buttons, which are available at the bottom left of the Sales Order portlet.
Select customer. Click Browse icon (magnify icon), which allows the user to search and select the required customer for the selection list based on the selection criteria. This field is shown only for Employee.
Depending on the requirement, select the order status.
From Date and To Date entry is not mandatory; this will reduce the number of rows to be retrieved.
Action button available are: Maximize, Minimize, and Home.
Click on Home hyperlink to quit from the edit preferences screen.
After entering the details, click on SavePreferences.
Service Request Portlet
The following operations that can be performed from the Service Request:
- To View an existing Service Request
- To Create an new Service Request
- To Edit / Update an existing Service Request
Viewing an existing Service Request
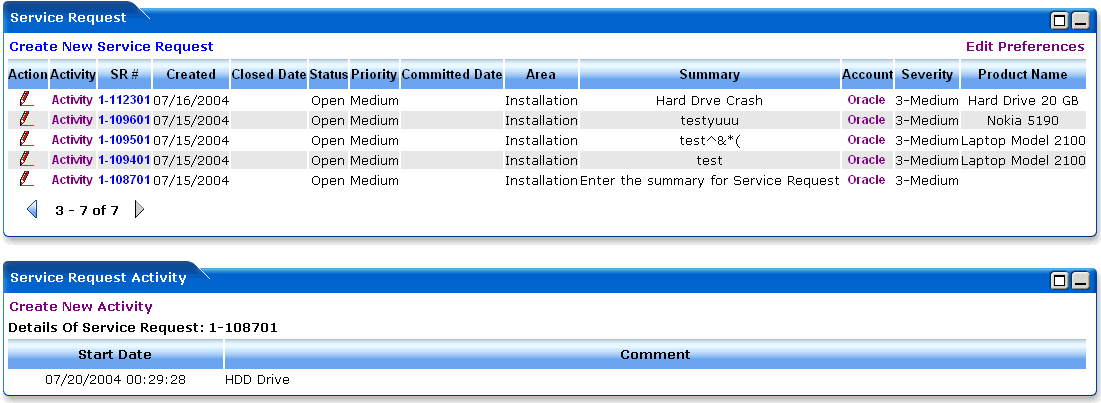
In order to view details for an existing Service Request scroll to the Service Request a screen as illustrated in the following figure is displayed:
Figure 20 WebLogic Portlets for Siebel - Service Request Portlet Screen
The above displayed screen can be divided into two parts:
The first part contains details like: Activity, SR#, Created, Closed Date, Status, Priority, Committed Date, Area, Summary, Account, Severity, and Product Name, which are self explanatory from the above displayed screen.
The second part can be categorized as the actions that can be performed for Service Request. Action buttons available are: Create New Service Request, Edit, Maximize, Minimize, and Edit Preferences for Service Request.
Click on Edit Preferences hyperlink. A screen as illustrated in the following figure is displayed:
Figure 21 WebLogic Portlets for Siebel - Service Request Edit Preferences Portlet Screen
Select the status from the list of options.
Select the severity (criticality) from the list of options.
Select the product. Click Browse icon (magnify icon), which is display a screen as illustrated in the following figure.
Figure 22 WebLogic Portlets for Siebel - Service Request Edit Preferences Product search Screen
Click on Back hyperlink and the control is returned back to Portlets for Siebel - Service Request Edit Preferences Portlet Screen.
Click on Home hyperlink to quit from the WebLogic Portlets for Siebel - Service Request Edit Preferences Product search Screen and return back to Sales Order portlet.
After entering the details, click Submit.
The following are the remaining fields of WebLogic Portlets for Siebel - Service Request Edit Preferences Portlet Screen:
Select the account number. Click Browse icon (magnify icon), which is display a screen as illustrated in the following figure. This field is shown only for Employee.
Figure 23 WebLogic Portlets for Siebel - Service Request Edit Preferences Account search Screen
Click on Back hyperlink and the control is returned back to Portlets for Siebel - Service Request Edit Preferences Portlet Screen.
Click on Home hyperlink to quit from the WebLogic Portlets for Siebel - Service Request Edit Preferences Product search Screen and return back to Sales Order portlet.
After entering the details, click Submit.
The following are the remaining fields of WebLogic Portlets for Siebel - Service Request Edit Preferences Portlet Screen:
Depending on the value selected in the Maxrows field, the Service Request will only display the first few records (as specified for maxrows) and the user can then navigate for rest of the records using Previous and Next buttons, which are available at the bottom left of the Service Request.
From Date and To Date entry is not mandatory; this will reduce the number of rows to be retrieved.
Action button available are: Maximize, Minimize, and Home.
Click on Home hyperlink to quit from the edit preferences screen.
After entering the details, click on SavePreferences.
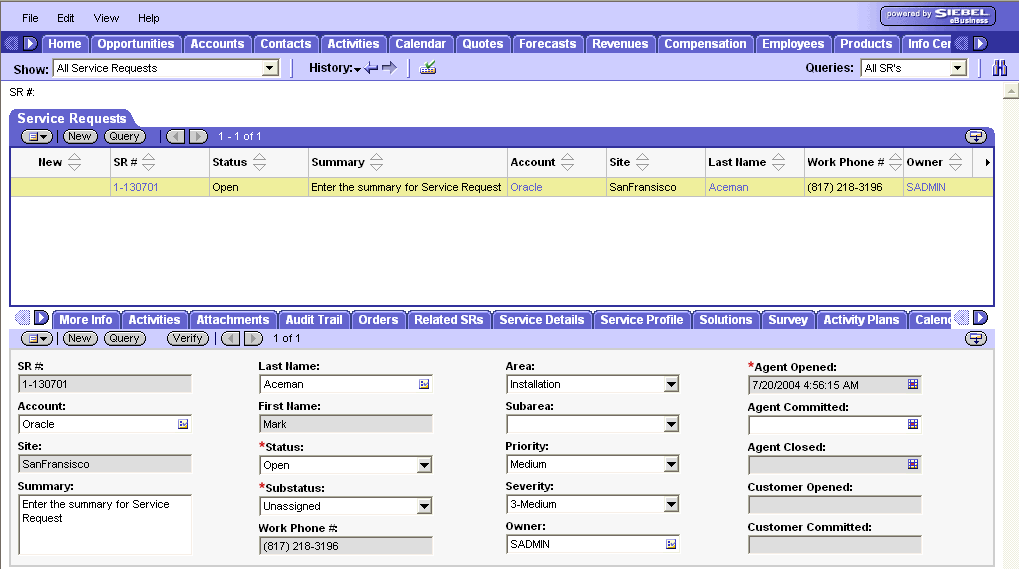
Click the SR# hyperlink from WebLogic Portlets for Siebel - Service Request Portlet Screen to view details for the required Service Request. And the Siebel screen for the selected Service Request is displayed.
Figure 24 WebLogic Portlets for Siebel - Service Request - Details Screen
The fields displayed are self-explanatory. After viewing the details click close to quit from the Siebel screen.
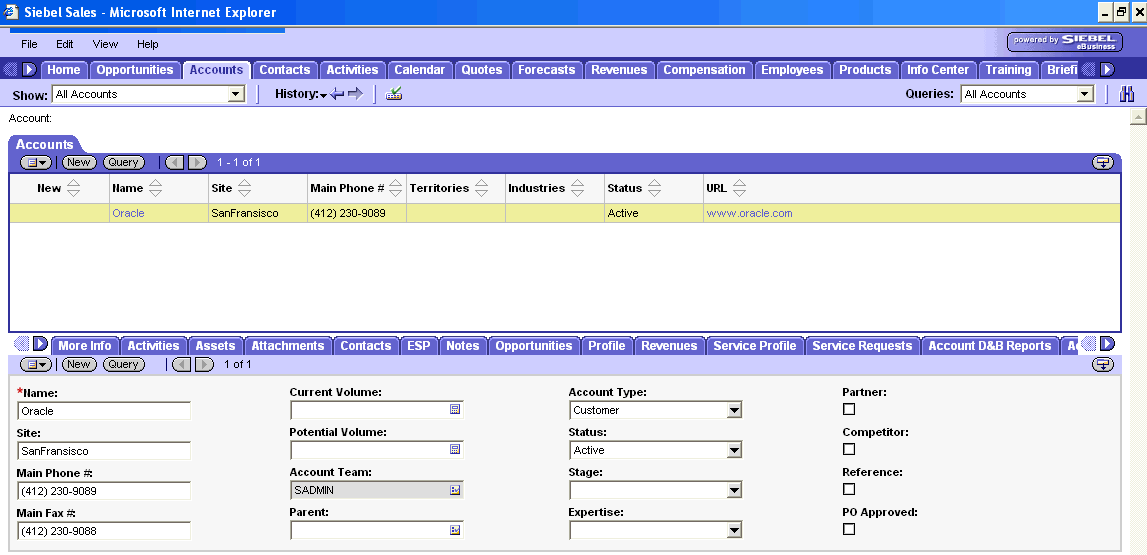
Click the Account hyperlink from WebLogic Portlets for Siebel - Service Request Portlet Screen to view details for the required Account. And the Siebel screen for the selected Account is displayed.
Figure 25 WebLogic Portlets for Siebel - Service Request - Account Details Screen
The fields displayed are self-explanatory. After viewing the details click close to quit from the Siebel screen.
Editing an existing Service Request
In order to edit/update details for an existing Service Request scroll to the Service Request a screen as illustrated in the following figure is displayed:
Figure 26 WebLogic Portlets for Siebel - Service Request Portlet Screen
The above displayed screen can be divided into two parts:
The first part contains details like: Activity, SR#, Created, Closed Date, Status, Priority, Committed Date, Area, Summary, Account, Severity, and Product Name, which are self explanatory from the above displayed screen.
The second part can be categorized as the actions that can be performed for Service Request. Action buttons available are: Create New Service Request, Edit, Maximize, Minimize, and Edit Preferences for Service Request.
Click Edit icon (pencil icon) to update Service Request details. A screen as illustrated below is displayed:
Figure 27 WebLogic Portlets for Siebel - Service Request -Edit Screen
This field displays the Service Request number. This field is not updatable.
This field displays the abstract (narration) for the Service Request. This field is not updatable.
This field displays the area or location. This field is not updatable.
This field displays the time, which was committed. This field is not updatable.
This field displays the current status and allows the user to select and update the status. This field is updatable.
This field displays the assigned severity and allows the user to select and update the severity. This field is updatable.
This field displays the priority assigned and allows the user to select and update the priority. This field is updatable.
Once the changes are updated, click Submit.
Creating a new Activity for the Service Request Activity
In order to create a new Service Request Activity scroll to the Service Request portlet.
Click on Activity hyperlink from the Service Request portlet. A screen as illustrated below is displayed:
Figure 28 WebLogic Portlets for Siebel - Service Request Activity portlet Screen
Click Create New Activity hyperlink from the Service Request Activity portlet a screen as illustrated in the following figure is displayed:
Figure 29 WebLogic Portlets for Siebel - Service Request Activity - Create Activity
Displays the auto generated Service Request number.
This field allows the user to enter the status. Default value is In Progress.
This field allows the user to select activity type from the drop down list. Click on the drop down list and a list of valid Activity Types are displayed. Select the appropriate Activity Type.
This field allows the user to enter any additional information or narration and so on.
Click on Home hyperlink to quit from the existing screen and return back to Sales Order portlet.
After entering the details, click Create.
My Accounts Portlet
The following operations that can be performed from My Accounts Portlet:
In order to view details for accounts scroll to the My Accounts portlet. And a screen as illustrated in the following figure is displayed:
Figure 30 WebLogic Portlets for Siebel - My Accounts Portlet Screen
The above displayed screen can be divided into two parts:
The first part contains details like: Account Name, Account ID, Street Address, City, State, Phone #, Account Type, Account Status, and URL, which are self explanatory from the above displayed screen.
The second part can be categorized as the actions that can be performed for My Accounts portlet. Action buttons available are: Maximize, Minimize, and Edit preferences for My Accounts portlet.
Click on Edit Preferences hyperlink. A screen as illustrated in the following figure is displayed:
Figure 31 WebLogic Portlets for Siebel - My Accounts Portlet Screen Edit preferences Screen
This field allows the user to select the status from the selection list.
Depending on the value selected in the Maxrows field, the My Accounts portlet will only display the first few records and the user can then navigate for rest of the records using Previous and Next buttons, which are available at the bottom left of the My Accounts portlet.
Action buttons available are: Maximize and Minimize, and Home.
Click on Home hyperlink to quit from the edit preferences screen and return back to My Accounts portlet.
After entering the details, click on SavePreferences.
Viewing an existing Account
In order to view details for an Account scroll to the My Accounts portlet. And a screen as illustrated in the following figure is displayed:
Figure 32 WebLogic Portlets for Siebel - My Accounts Portlet Screen
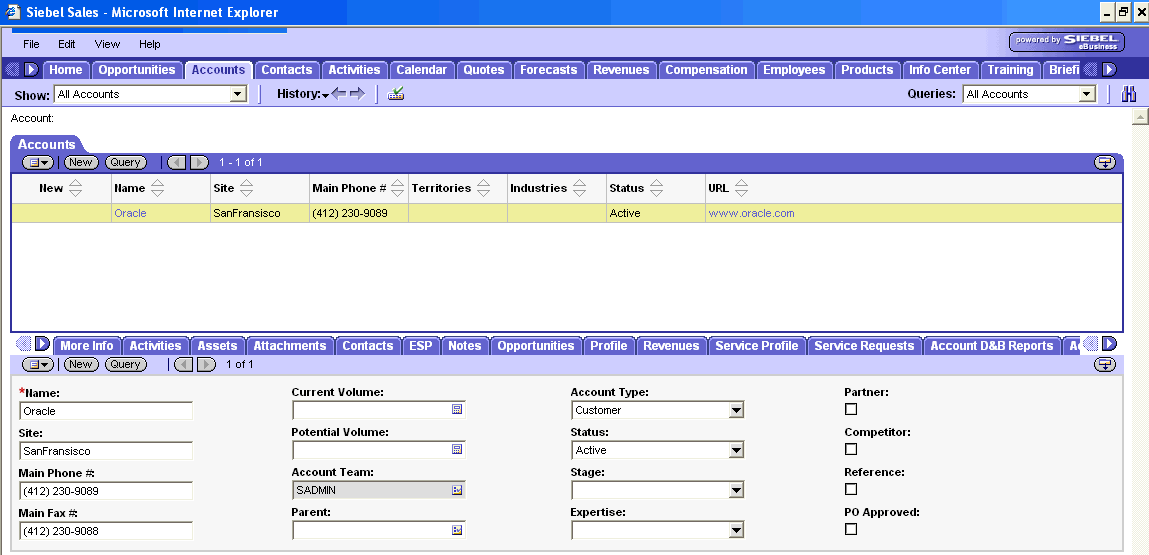
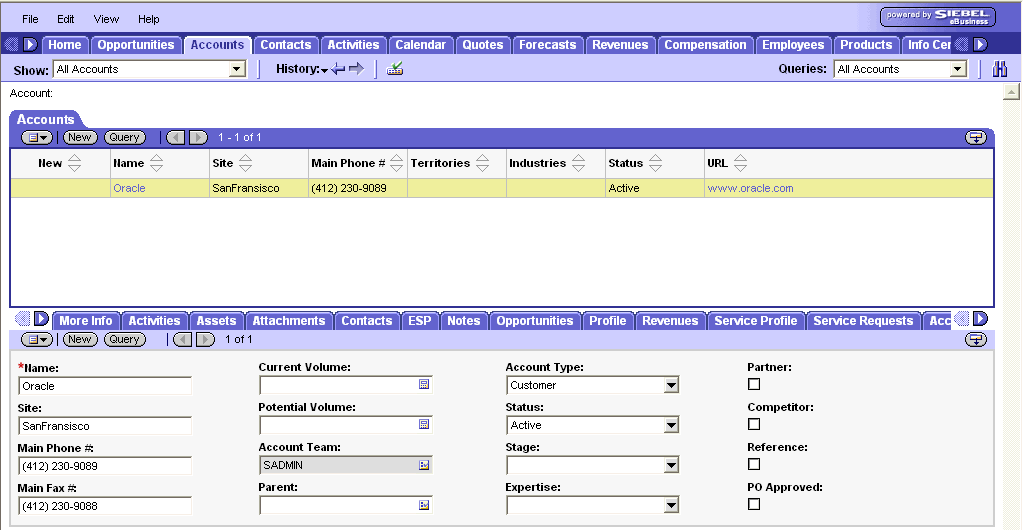
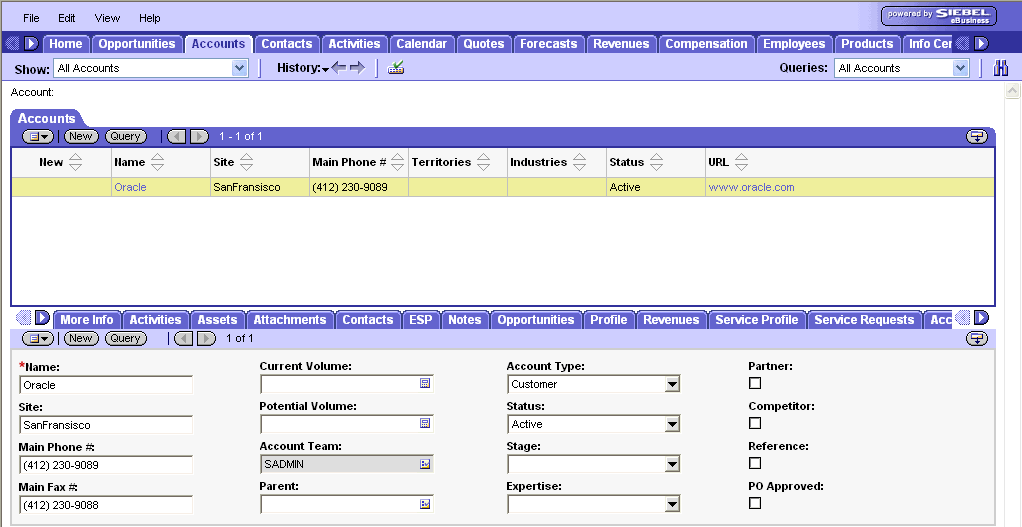
Click the Account Name hyperlink to view details for the required account. And the Siebel screen for the selected account is displayed.
Figure 33 WebLogic Portlets for Siebel - My Accounts - Account Siebel screen
The fields displayed are self-explanatory. After viewing the details click Close to quit from the Siebel screen.
Creating a new Account
In order to create a new account scroll to the My Accounts Portlet a screen as illustrated in the following figure is displayed:
Figure 34 WebLogic Portlets for Siebel - My Accounts Portlet Screen
Click Create New Account hyperlink from the My Accounts Portlet a screen as illustrated in the following figure is displayed:
Figure 35 WebLogic Portlets for Siebel - My Accounts - Creation of new Account
Select the Account Type from the selection list.
Select the status from the selection list.
Select the expertise from the selection list.
Select the price list from the selection list.
Action buttons available are: Maximize and Minimize, and Home.
Click on Home hyperlink to quit from the existing screen and return back to My Accounts portlet.
After entering the details, click Create.
Editing Account details
In order to update an existing account scroll to the My Accounts Portlet a screen as illustrated in the following figure is displayed:
Figure 36 WebLogic Portlets for Siebel - My Accounts Portlet Screen
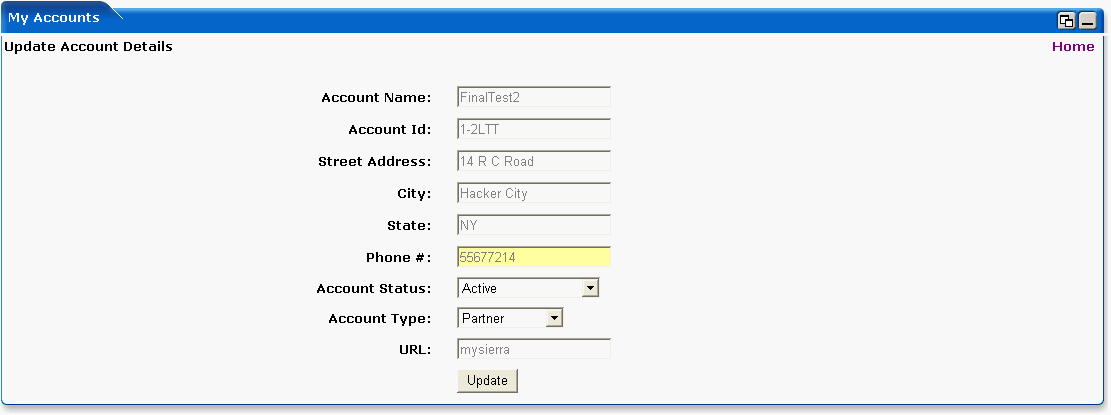
Click Edit icon (pencil icon) to update the account details from the My Accounts Portlet a screen as illustrated in the following figure is displayed:
Figure 37 WebLogic Portlets for Siebel - My Accounts Portlet - edit account Screen
This field displays the account name.
This field displays the account id attached to the account name.
This field displays the address details of the account holder.
This field displays the city that the account holder belongs to.
This field displays the state that the account holder belongs to.
This field displays the personal contact number of the account holder.
This field displays the current account status. The user can update by selecting a valid option from the selection list. This field is updatable.
This field displays the current account type. The user can update by selecting a valid option from the selection list. This field is updatable.
This field displays the personal Web site address or URL of the account holder.
Action buttons available are: Maximize and Minimize, and Home.
Click on Home hyperlink to quit from the existing screen and return back to My Accounts portlet.
After entering the details, click on Update.
My Team Accounts Portlet
The following operations that can be performed from the My Team Accounts Portlet:
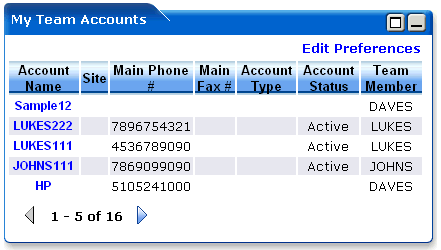
In order to view details for Team Accounts scroll to the My Team Accounts portlet. And a screen as illustrated in the following figure is displayed:
Figure 38 WebLogic Portlets for Siebel - My Team Accounts Portlet Screen
The above displayed screen can be divided into two parts:
The first part contains details like: Account Name, Site, Main Phone#, Main Fax#, Account Type, Account Status, and Team Member, which are self explanatory from the above displayed screen.
The second part can be categorized as the actions that can be performed for My Team Accounts portlet. Action buttons available are: Maximize, Minimize, and Edit preferences for My Team Accounts portlet.
Click on Edit Preferences hyperlink. A screen as illustrated in the following figure is displayed:
Figure 39 WebLogic Portlets for Siebel - My Team Accounts Portlet Screen Edit preferences Screen
Enter the account status. The user can select a valid status from the selection list.
Enter the sales representative responsible. The user can select to view all sales orders responsible by his team (all team members reporting to him and himself) or by each team member reporting to him.
Enter account type. The user can select a valid account type from the selection list.
Depending on the value selected in the Maxrows field, the My Team Accounts portlet will only display the first few records and the user can then navigate for rest of the records using Previous and Next buttons, which are available at the bottom left of the My Team Account portlet.
Action buttons available are: Maximize and Minimize, and Home.
Click on Home hyperlink to quit from the edit preferences screen.
After entering the details, click on SavePreferences.
Viewing an existing Account
In order to view details for an Account scroll to the My Team Accounts portlet. And a screen as illustrated in the following figure is displayed:
Figure 40 WebLogic Portlets for Siebel - My Team Accounts Portlet Screen
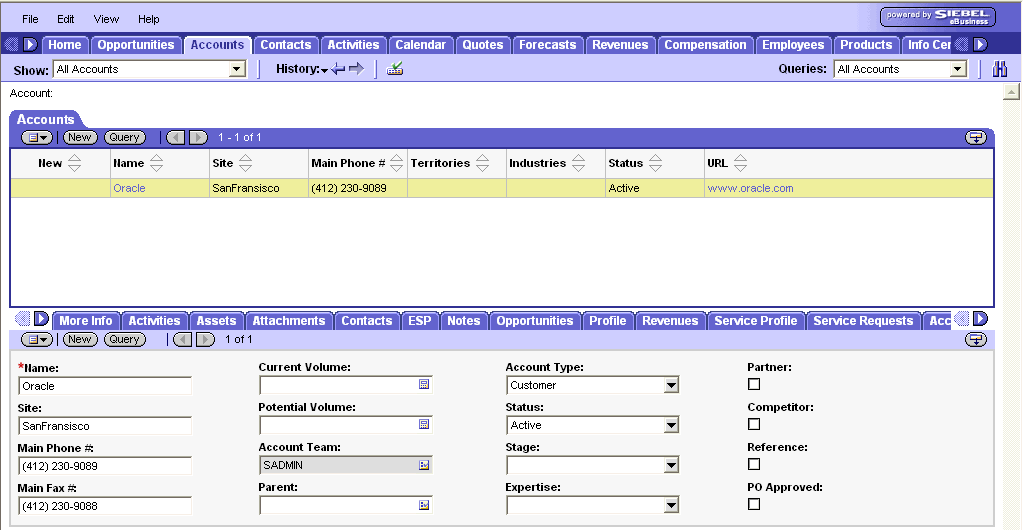
Click the Account Name hyperlink to view details for the required account. And the Siebel screen for the selected account is displayed.
Figure 41 WebLogic Portlets for Siebel - My Team Accounts - Account Siebel screen
The fields displayed are self-explanatory. After viewing the details click Close to quit from the Siebel screen.
Agreements By Expiry Date Portlet
The following operations that can be performed from the Agreements By Expiry Date Portlet:
In order to view details for agreements by expiry date scroll to the Agreements By Expiry Date portlet. And a screen as illustrated in the following figure is displayed:
Figure 42 WebLogic Portlets for Siebel - Agreements By Expiry Date Portlet Screen
The above displayed screen can be divided into two parts:
The first part contains details like: Agreement#, Name, Account, Effective Date, Start Date, End Date, Type, and Status, which are self explanatory from the above displayed screen.
The second part can be categorized as the actions that can be performed for Agreements By Expiry Date portlet. Action buttons available are: Maximize, Minimize, and Edit preferences for Agreements By Expiry Date portlet.
Click on Edit Preferences hyperlink. A screen as illustrated in the following figure is displayed:
Figure 43 WebLogic Portlets for Siebel - Agreement By Expiry Date Portlet Edit Preferences Screen
Depending on the value selected in the Maxrows field, the Agreements By Expiry Date portlet will only display the first few records and the user can then navigate for rest of the records using Previous and Next buttons, which are available at the bottom left of the Agreements By Expiry Date portlet.
Enter start date or view agreements by expiry from, which date.
Enter end date or view agreements by expiry until, which date.
Action buttons available are: Maximize, Minimize, and Home.
Click on Home hyperlink to quit from the edit preferences screen.
After entering the details, click on Submit.
Viewing an existing Agreement
In order to view details for an existing Agreement scroll to the Agreements By Expiry Date portlet. And a screen as illustrated in the following figure is displayed:
Figure 44 WebLogic Portlets for Siebel - Agreements By Expiry Date Portlet Screen
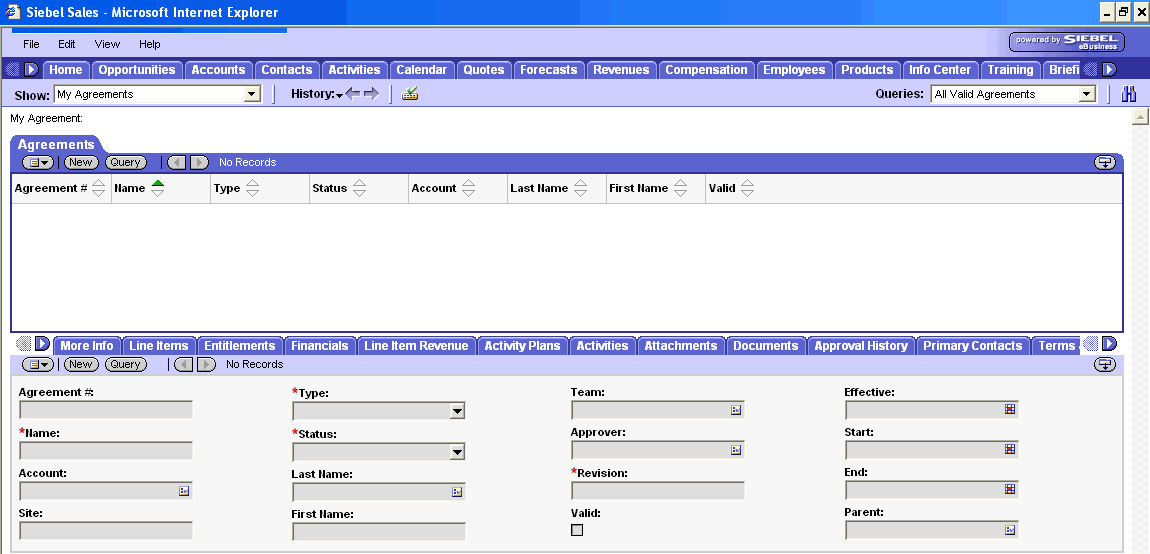
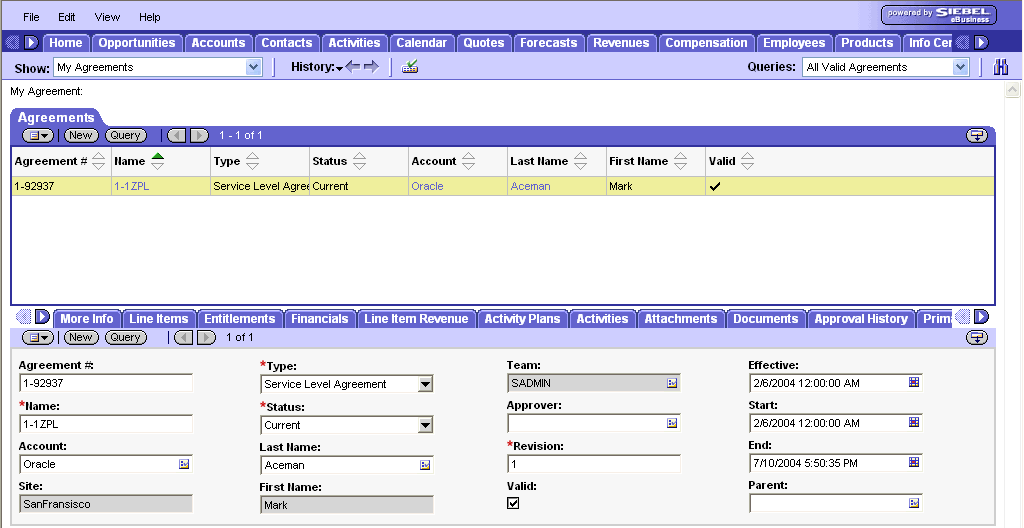
Click the Agreement# hyperlink to view Agreement details. And the Siebel screen as illustrated in the following screen is displayed.
Figure 45 WebLogic Portlets for Siebel - Agreements By Expiry Date Portlet Agreement Siebel Screen
The fields displayed are self-explanatory. After viewing the details click Close to quit from the Siebel screen.
Click the Account hyperlink from WebLogic Portlets for Siebel - Agreements By Expiry Date Portlet. And the Siebel screen as illustrated in the following screen is displayed.
Figure 46 WebLogic Portlets for Siebel - Agreements By Expiry Date Portlet Account details Siebel Screen
The fields displayed are self-explanatory. After viewing the details click Close to quit from the Siebel screen.
All Assets By Account Portlet
The following operations that can be performed from the All Assets By Account Portlet:
In order to view Asset details by account scroll to the All Assets By Account Portlet. And a screen as illustrated in the following figure is displayed:
Figure 47 WebLogic Portlets for Siebel - All Assets By Account Portlet Screen
The above displayed screen can be divided into two parts:
The first part contains details like: Asset#, Serial#, Asset Tag, Asset Description, Product, Part #, Quantity, Account, Site, Install Date, and Status, which are self explanatory from the above displayed screen.
The second part can be categorized as the actions that can be performed for All Assets By Account portlet. Action buttons available are: Maximize, Minimize, and Edit preferences for All Assets By Account portlet.
Click on Edit Preferences hyperlink. A screen as illustrated in the following figure is displayed.
Figure 48 WebLogic Portlets for Siebel - All Assets By Account Portlet Edit Preferences Screen
Depending on the value selected in the Maxrows field, the All Assets By Account portlet will only display the first few records and the user can then navigate for rest of the records using Previous and Next buttons, which are available at the bottom left of the All Assets By Account portlet.
Click Browse icon (magnify icon), which is display a screen as illustrated in the following figure.
Figure 49 WebLogic Portlets for Siebel - All Assets By Account Portlet Edit Preferences -Customer ID (Account ID) search screen
Click on Back hyperlink and the control is returned back to All Assets By Account Portlet Edit Preferences Screen.
Click on Home hyperlink to quit from the existing screen and return back to Sales Order portlet.
After entering the details, click Submit.
The following are the remaining fields of WebLogic Portlets for Siebel - All Assets By Account Portlet Edit Preferences Screen:
Action buttons available are: Maximize, Minimize, and Home.
Click on Home hyperlink to quit from the edit preferences screen.
After entering the details, click on SavePreferences.
Viewing an existing Asset By Account
In order to view details for an existing Asset by Account scroll to the All Assets By Account Portlet. And a screen as illustrated in the following figure is displayed:
Figure 50 WebLogic Portlets for Siebel - All Assets By Account Portlet Screen
Click the Asset # hyperlink to view Asset details. And the Siebel screen for the Asset is displayed.
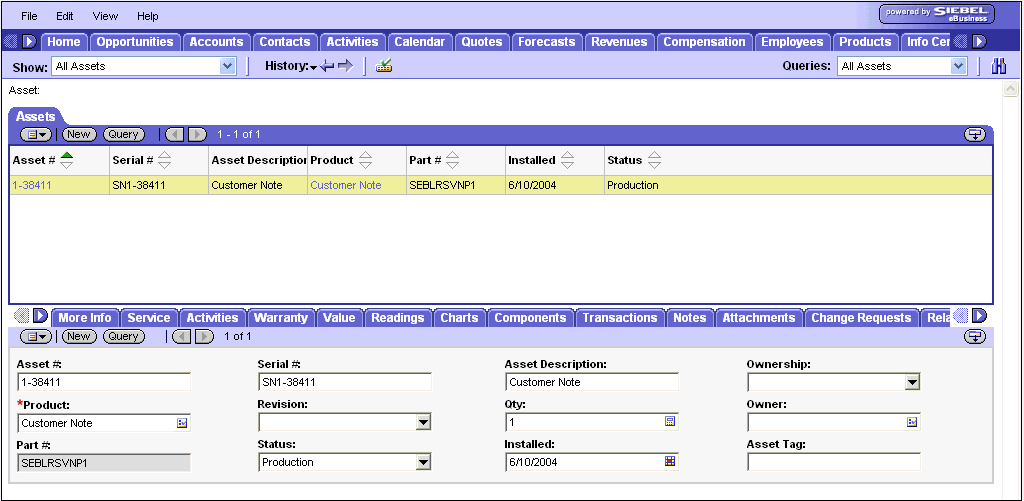
Figure 51 WebLogic Portlets for Siebel - All Assets By Account Portlet Asset Siebel screen
The fields displayed are self-explanatory. After viewing the details click Close to quit from the Siebel screen.
Contacts By Account Portlet
The following operations that can be performed from the Contacts By Account Portlet:
In order to view Contact details scroll to the Contacts By Account portlet. And a screen as illustrated in the following figure is displayed:
Figure 52 WebLogic Portlets for Siebel - Contacts By Account Portlet Screen
The above displayed screen can be divided into two parts:
The first part contains details like: Last Name, First Name, Street Address, City, State, County, Postal Code, Work Phone#, Email Address, and Account, which are self explanatory from the above displayed screen.
The second part can be categorized as the actions that can be performed for Contacts By Account portlet. Action buttons available are: Edit, Maximize, Minimize, and Edit Preferences for Contacts By Account portlet.
Click on Edit Preferences hyperlink. A screen as illustrated in the following figure is displayed:
Figure 53 WebLogic Portlets for Siebel - Contacts By Account Edit Preferences Screen
Depending on the value selected in the Maxrows field, the Contacts By Account portlet will only display the first few records and the user can then navigate for rest of the records using Previous and Next buttons, which are available at the bottom left of the Contacts By Account portlet.
Enter Last Name of an account holder.
Enter First Name of an account holder.
Select the account id from the selection list. Click Browse icon (magnify icon) to display a selection list.
Action buttons available are: Maximize, Minimize, and Home.
Click Home hyperlink to quit from the edit preferences screen.
After entering the details, click on SavePreferences.
Viewing an existing Contact By Account
In order to view details for an existing Contact by Account scroll to the Contacts By Account Portlet. And a screen as illustrated in the following figure is displayed:
Figure 54 WebLogic Portlets for Siebel - Contacts By Account Portlet Screen
Click the Last Name hyperlink to view Contact details. And the Siebel screen is displayed as illustrated in the following figure.
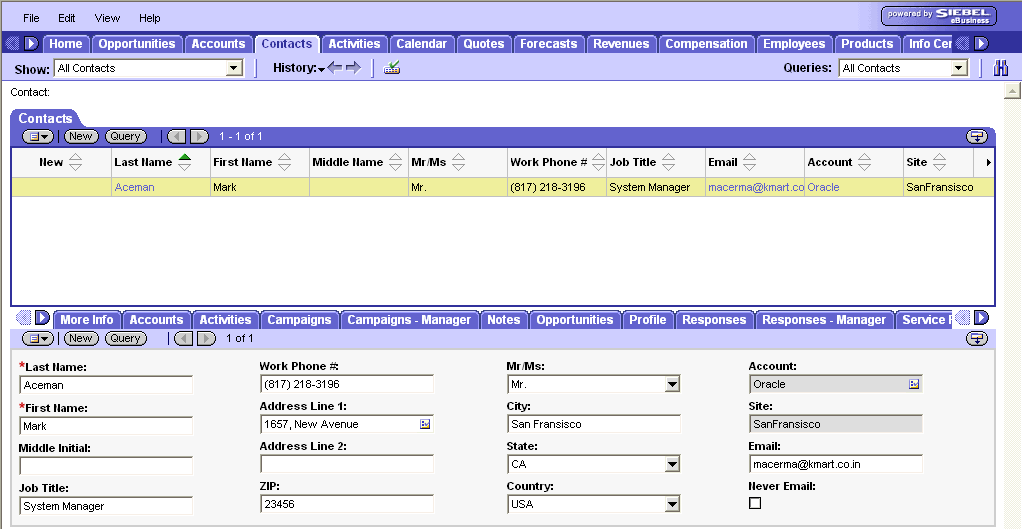
Figure 55 WebLogic Portlets for Siebel - Contacts By Account Portlet Asset Siebel screen
The fields displayed are self-explanatory. After viewing the details click Close to quit from the Siebel screen.
To Edit / Update an existing Contact By Account
In order to update details for the required Contact scroll to the Contacts By Account Portlet. A screen as illustrated in the following figure is displayed:
Figure 56 WebLogic Portlets for Siebel - Contacts By Account Portlet Screen
Click Edit icon (pencil icon) to update the Contact details.
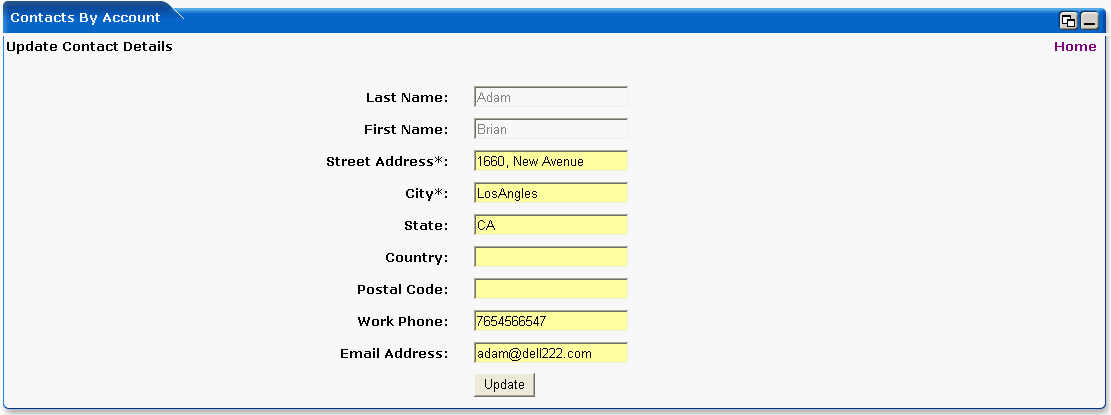
Figure 57 WebLogic Portlets for Siebel - Edit Contacts By Account Portlet Screen
This field displays the Last Name of an account holder. This field is not updatable.
This field displays the First Name of an account holder. This field is not updatable.
This field displays the address details of the account holder. This field is updatable.
This field displays the City that the account holder belongs to. This field is updatable.
This field displays the State that the account holder belongs to. This field is updatable.
This field displays the Country that the account holder belongs to. This field is updatable.
This field displays the Zip code or the postal code of the account holder. This field is updatable.
This field displays the personal contact number of the account holder. This field is updatable.
This field displays the personal electronic mail of the account holder. This field is updatable.
Once the changes are updated, click Update.
Customer List with Address Info Portlet
The following operations that can be performed from the Customer List with Address Info Portlet:
In order to view list of Customer with Address details scroll to the Customer List with Address Info portlet. And a screen as illustrated in the following figure is displayed:
Figure 58 WebLogic Portlets for Siebel - Customer List with Address Info Portlet Screen
The above displayed screen can be divided into two parts:
The first part contains details like: Name, Street Address, City, State, and Postal Code, which are self explanatory from the above displayed screen.
The second part can be categorized as the actions that can be performed for Customer List with Address Info portlet. Action buttons available are: Edit, Maximize, Minimize, and Edit preferences for Customer List with Address Info portlet.
Click on Edit Preferences hyperlink. A screen as illustrated in the following figure is displayed:
Figure 59 WebLogic Portlets for Siebel - Customer List with Address Info Portlet Edit Preferences Screen
Depending on the value selected in the Maxrows field, the Customer List With Address Info portlet will only display the first few records and the user can then navigate for rest of the records using Previous and Next buttons, which are available at the bottom left of the Customer List With Address Info portlet.
Action buttons available are: Maximize, Minimize, and Home.
Click Home hyperlink to quit from the edit preferences screen.
After entering the details, click on SavePreferences.
To Edit / Update an existing Customer Address Info
In order to update Customer Address details for the required Customer scroll to the Customer List With Address Portlet. A screen as illustrated in the following figure is displayed:
Figure 60 WebLogic Portlets for Siebel - Customer List With Address Info Portlet Screen
Click Edit icon (pencil icon) to update the Address information.
Figure 61 WebLogic Portlets for Siebel - Edit Customer List With Address Info Screen
This field displays the Last and First Name of a Customer. This field is not updatable.
This field displays the address details of the Customer. This field is updatable.
This field displays the City that the Customer belongs to. This field is updatable.
This field displays the State that the Customer belongs to. This field is updatable.
This field displays the Zip code or the postal code of the Customer. This field is updatable.
Once the changes are updated, click Update.
Repair Status Portlet
The following operations that can be performed from the Repair Status Portlet:
In order to view repair status scroll to the Repair Status portlet. And a screen as illustrated in the following figure is displayed:
Figure 62 WebLogic Portlets for Siebel - Repair Status Portlet Screen
The above displayed screen can be divided into two parts:
The first part contains details like: Repair #, Product, Status, Received Date, Promised Date, Assigned To, Shipped Date, Repair Center, Account, Last Name, and First Name, which are self explanatory from the above displayed screen.
The second part can be categorized as the actions that can be performed for Repair Status portlet. Action buttons available are: Maximize, Minimize and Edit preferences for Repair Status portlet.
Click on Edit Preferences hyperlink. A screen as illustrated in the following figure is displayed:
Figure 63 WebLogic Portlets for Siebel - Repair Status Portlet Edit Preferences Screen
Depending on the value selected in the Maxrows field, the Repair Status portlet will only display the first few records and the user can then navigate for rest of the records using Previous and Next buttons, which are available at the bottom left of the Repair Status portlet.
Enter the repair order number.
Action buttons available are: Maximize, Minimize, and Home.
Click on Home hyperlink to quit from the Edit Preferences screen.
After entering the details, click on SavePreferences.
RMA Order Status Portlet
The following operations that can be performed from the RMA Order Status Portlet:
In order to view list of RMA order statuses scroll to the RMA Order Status portlet. And a screen as illustrated in the following figure is displayed:
Figure 64 WebLogic Portlets for Siebel - RMA Order Status Portlet Screen
The above displayed screen can be divided into two parts:
The first part contains details like: Order#, Order Date, Order Type, Status, Sales Rep, and Account, which are self explanatory from the above displayed screen.
The second part can be categorized as the actions that can be performed for RMA Order Status portlet. Action buttons available are: Maximize, Minimize, and Edit preferences.
Click on Edit Preferences hyperlink. A screen as illustrated in the following figure is displayed:
Figure 65 WebLogic Portlets for Siebel - RMA Order Status Portlet Edit Preferences Screen
Depending on the value selected in the Maxrows field, the RMA Order Status portlet will only display the first few records and the user can then navigate for rest of the records using Previous and Next buttons, which are available at the bottom left of the RMA Order Status portlet.
Action buttons available are: Maximize, Minimize and Home.
Click on Home hyperlink to quit from the Edit Preferences screen.
After entering the details, click on SavePreferences.
Viewing an existing RMA Order Status
In order to view list of RMA order statuses scroll to the RMA Order Status portlet. And a screen as illustrated in the following figure is displayed:
Figure 66 WebLogic Portlets for Siebel - RMA Order Status Portlet Screen
The above displayed screen can be divided into two parts:
The first part contains details like: Order#, Order Date, Order Type, Status, Sales Rep, and Account, which are self explanatory from the above displayed screen.
The second part can be categorized as the actions that can be performed for RMA Order Status portlet. Action buttons available are: Maximize, Minimize, and Edit preferences.
Click on Order# hyperlink. A screen as illustrated in the following figure is displayed:
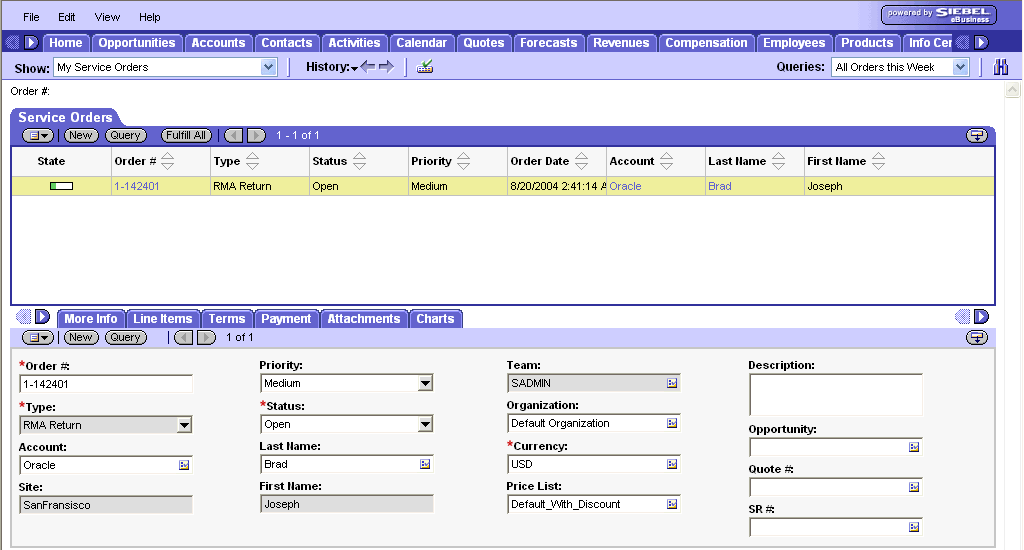
Figure 67 WebLogic Portlets for Siebel - RMA Order Status - Order Siebel Screen
The fields displayed are self explanatory. After viewing the details click on close to quit from the Siebel screen.
Click on Account hyperlink. A screen as illustrated in the following figure is displayed:
Figure 68 WebLogic Portlets for Siebel - RMA Order Status - Account Siebel Screen
The fields displayed are self explanatory. After viewing the details click on close to quit from the Siebel screen.
