Rebranding the Administration Portal
|
|
|
Rebranding the Administration Portal
You can update the appearance of the WebLogic Administration Portal (included with WebLogic Portal) by changing images (.gif and .jpg files) and cascading style sheets (the .css file). You can also update the text displayed on the login screen by updating the login.properties file. This feature allows you to make your implementation of the Administration Portal reflect your company identity or your specific personalization needs.
This document describes how to make these changes and then deploy the updated files. It is organized into these four steps:
- Step 1: Locate the Portal Branding Files
- Step 2: Modify the Files
- Step 3: Preview Changes
- Step 4: Install the Updated Files
Step 1: Locate the Portal Branding Files
Editable versions of the necessary files are located in:
<BEA_HOME>\weblogic81\portal\lib\adminPortalBranding
Below are instructions for installing your versions of these files in an adminPortal.war file (a web application archive of the WebLogic Administration Portal).
Step 2: Modify the Files
Once you've located the files, you can change them as necessary to fit your needs, so long as you stay within the following guidelines when modifying them. If you do not follow these guidelines, you risk breaking the functionality in the WebLogic Administration Portal.
- CSS File (
main.cssonly): You should only change color values (for example, #FFFFFF, #9FB8D4, and so on) and font-family values. - Image files (
*.gif,*.jpg): Generally, changing image files means that you will overwrite the default files with your own version. You shouldn't change the height and width of any image files, as size changes can have a serious affect on the appearance of the Adminstration Portal. The exception to this guideline are images whose name begins withbutton_. You can change these to fit the button label text, although you should ensure that these images remain as small as practical. - Properties file (
login.properties): Do not delete any keys from this file. A key is any text at the beginning of a line that is followed by an equals sign (=). If you want to remove certain text, remove only the portion after the equals sign.
Warning: Do not rename any of the files; renamed files will be ignored during browser rendering, resulting in missing information.
Step 3: Preview Changes
You can easily preview the changes to many images and CSS styles without updating or redeploying the adminPortal.war file by viewing the previewChanges.htm file. This file is located at:
<BEA_HOME>\weblogic81\portal\lib\adminPortalBranding
and uses the local images and CSS file. It will show any changes you made that affect those files. Simply open previewChanges.htm in a browser to preview many of your changes, depending upon which CSS styles you are using.
Not all of the CSS styles are used in the default previewChanges.htm. Far too many CSS styles are available to list exactly what you might and might not see when you preview the changes. The default page shows just the most common styles.
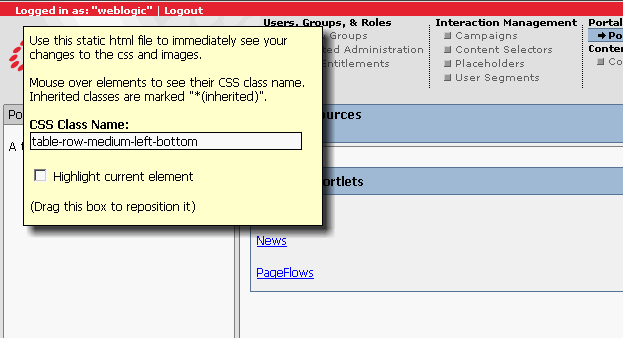
The floating palette that appears when you open previewChanges.htm, illustrated in Figure 1, displays the CSS class name used on the element directly under the mouse pointer. To highlight the element identified under CSS Class Name:, select Highlight current element.
Figure 1 Preview Changes Floating Palette
Step 4: Install the Updated Files
This section describes the steps required to install updated files into adminPortal.war. These procedures are described in:
Please read Before Installing Updated Files before proceeding with the installation.
Before Installing Updated Files
Before attempting to install the updated files, review the following prerequisites:
- Ensure that you have access to the
jarcommand, which is required to update theadminPortal.warfile. You can test to see if you have access to this command by typingjarat any command prompt. If your Java SDK or JDK was installed correctly, you should see a list of usage instructions for the command when you enterjar. If you need to install a Java SDK please talk to your system administrator or visit: http://java.sun.com/downloads/ - Identify the path to the targeted
adminPortal.warfile from the directory: - Due to file lock and resource caching issues, you might not be able to update a deployed
.warfile. If that occurs, modify a working copy and replace the original.warfile or undeploy the file you intend to update. Either way, you will need to deploy the modified.warfile before you can use it.
<bea_home>\weblogic81\portal\lib\adminPortalBranding
Installing the Updated CSS and Image Files
To install and update the CSS and image files, use this procedure:
- Enter the following command (where
pathToWarFileis the path to your targeted adminPortal.war file):
<bea_home>\weblogic81\portal\lib\adminPortalBranding
jar uvfpathToWarFileframework/*
