


|
|
The Export/Import Utility allows a full round-trip development life cycle, where you can easily move portals between a Workshop for WebLogic environment and a staging or production environment, as shown in Figure 10-1.
This chapter explains how to use the Export/Import Utility. The chapter includes background information on the utility and its purpose. In addition, detailed examples are provided that illustrate common use cases.
This chapter includes the following topics:
You only need to perform the following procedure if you intend to run the Export/Import Utility as a stand-alone application. If you only want to run the Workshop for WebLogic propagation tools, then the following procedure is unnecessary.
PATH environment variable. Ant is part of the normal WebLogic Server installation. It is located in:
where WEBLOGIC_HOME is BEA_HOME/weblogic92.
BEA_HOME/weblogic92/portal/bin/xip/build.xml, and edit the following properties in the Installer section to point to the appropriate locations:
BEA_HOME/weblogic92/portal/lib/modules/wlp-propagation-web-lib.war
p13n_prop.jar from the WAR and save it in BEA_HOME/weblogic92/portal/lib. | Note: | If you place the p13n_prop.jar file in this directory, you do not need to add it to the wlp.classpath in the build.xml file. If it is not in this directory, add it to the wlp.classpath in build.xml. |
BEA_HOME/weblogic92/portal/bin/xip directory: netuix.jar into ${wlp.lib.dir} from BEA_HOME/weblogic92/portal/lib/modules/wlp-framework-full-app-lib.ear | Note: | ${wlp.lib.dir}/netuix.jar is in the wlp.classpath in build.xml. |
xip.config.url in xip.properties uses port 7003, should make it 7001 to match the port number set in the Configuration Wizard.
xip.config.url=t3://localhost:7001
The xip.properties file is located in BEA_HOME/weblogic92/portal/bin/xip.
wls.classpath in build.xml uses bea.dir instead of wls.lib.dir. It should use wls.lib.dir as follows:
<property name="wls.classpath" value="${wls.lib.dir}/wlclient.jar" />
[javac] ?\xip\src\com\bea\wlp\xip\XipProperties.java:279: cannot find symbol
[javac] symbol : method setEnableWSRPPortletImport(boolean)
The full path name for XipProperties.java is:
BEA_HOME/weblogic92/portal/bin/xip/src/com/bea/wlp/xip/XipProperties.java
The Export/Import Utility allows a full round-trip development life cycle, where you can easily move portals between a Workshop for WebLogic environment and a staging or production environment, as shown in Figure 10-1.
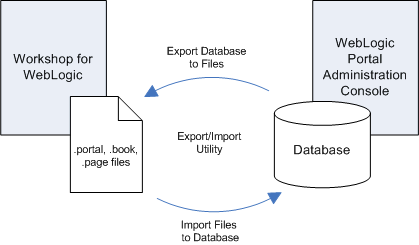
This utility lets you import .portal, .pinc, and other portal framework files into the database, and lets you export these files from the database. The exported files can be loaded back into Workshop for WebLogic, or imported into another WebLogic Portal database.
The utility performs its work in a single database transaction. If the utility fails for some reason, the database is not affected.
The Export/Import Utility moves desktops, portlet references, books, pages, and localization definitions. In other words, the utility exports .portal, .pinc, and other portal framework files from a database, and imports the contents of those files back into a database.
| Tip: | For detailed information on the portal framework, see the Portal Development Guide. |
| Note: | The actual definitions for portlets, look and feels, shells, menus, layouts, themes, JSPs, and other code are contained in the EAR file. These files are stored in directories in portal web applications, such as the framework/markup directory. If any of these file-based elements change, you must rebuild and redeploy the EAR. The .portal and other portal framework files simply refer to the definition files. |
The Export/Import Utility does not handle the following items: campaigns, behavior tracking events, content management assets, entitlements, WSRP producer registration, portlet categories, localization resources, user profiles, and commerce data.
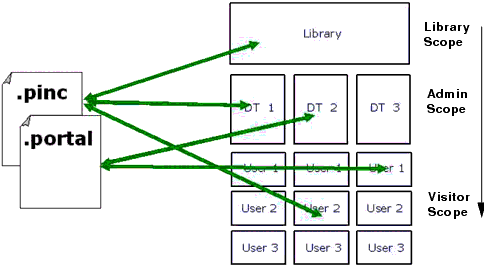
The Export/Import Utility allows you to select an object (desktop, book or page) at any level (library, admin, visitor) and import it or export it, according to specified rules.
To refine and customize the export and import of .portal, .pinc, and other portal framework files to and from the database, you can:
.portal file can be merged with changes in the database. As shown in Figure 10-2, the Export/Import Utility offers flexibility with respect to importing, exporting, and scoping. You can scope changes to the library, admin (desktop), or visitor (individual user) level. For instance, if you import a desktop at the admin scope, the imported changes will be applied only to the specified desktop. If a user has customized that particular desktop, then the changes will also be inherited by the user desktop. Note, however, that changes are never inherited up the hierarchy. Elements in the library will not inherit changes made to a desktop.
| Tip: | For a more in depth discussion of the relationship between the library, desktops, and user views, see Scope and Library Inheritance. |
Before you use the Export/Import Utility, it is important to understand some basic portal concepts and terms. If you review this section, the explanations and examples provided in the rest of this chapter will be more clear.
The concepts and terms described in this section include:
The .portal file that you create in Workshop for WebLogic is a fully functioning portal. However, it can also be used as a template to create a desktop. In this template you create books, pages and references to portlets. When you view the .portal file with your browser, the portal is rendered in “single file mode,” meaning that you are viewing the portal from your filesystem as opposed to a database; the .portal file’s XML is parsed and the rendered portal is returned to the browser. The creation and use of a .portal is intended for development purposes and for static portals (portals that are not customized by the end user or administrator). Because there is no database involved you cannot take advantage of functionality such as user customization or entitlements.
Once you have created a .portal file you can use it as a template to create desktops for a staging or production environment. A desktop is a particular view of a portal that visitors access. When you create a desktop based on the .portal file in the WebLogic Portal Administration Console, a desktop and its books and pages are placed into the database. The desktop, books, and pages reference shells, menus, look and feels, and portlets. The settings in the .portal file template, such as the look and feel, serve as defaults to the desktop. Once a new desktop is created from a .portal template, the desktop is decoupled from the template, and modifications to the .portal file do not affect the desktop, and vice versa. For example, when you change a desktop’s look and feel in the WebLogic Portal Administration Console, the change is made only to the desktop, not to the original .portal file. When you view a desktop with a browser it is rendered in “streaming mode” (from the database). Now that a database is involved, desktop customizations can be saved and delegated administration policies and entitlements can be set on portal resources.
Exports and imports can be scoped to the following levels:
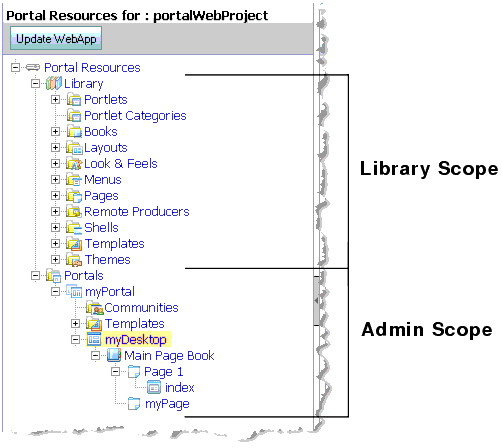
The first two levels correspond to the Library and Portals nodes in the Portal Resources tree of the WebLogic Portal Administration Console, as shown in Figure 10-3. The visitor level includes changes made by users to individual desktops using the Visitor Tools.
The relationship between library, admin, and visitor views is hierarchical, and properties from objects up the hierarchy can be inherited by objects down the hierarchy. For example, a change to a library element is inherited by desktops that use that element and by visitor views that use those desktops.
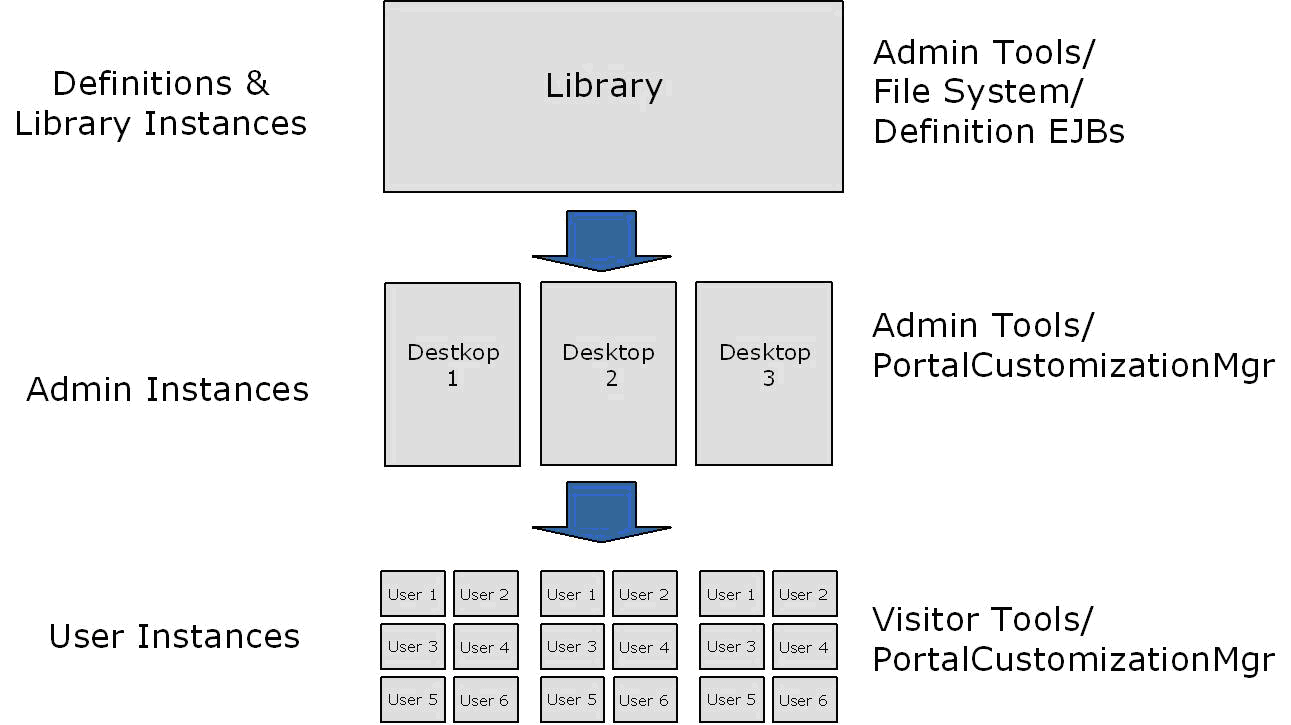
Figure 10-4 shows the hierarchy in which library, admin, and visitor instances are organized, the direction in which changes are inherited, and the tools that are typically used to make modifications at the different levels in the hierarchy.
An object (book, page, or portlet) can exist in the library and not be referenced by any desktop. A developer or administrator may create a page or book in the library only, outside the context of a desktop. This page or book can then be placed on a desktop at a later point in time. Changes made to objects in the library cascade down through all desktops that reference those objects. For more information on library inheritance, see Scope and Library Inheritance.
The admin scope represents the “default desktop.” This is where an administrator creates and modifies individual desktops. Changes made by an administrator to a desktop may use elements from the library, but desktop changes are never reflected back up into the library. Furthermore, changes made to individual desktops do not affect other desktops. However, changes made to desktops are cascaded down to the visitor views. See also Scope and Library Inheritance.
Visitors (users who access desktops) may be permitted to customize their desktop. Changes made to a visitor’s desktop are restricted to that visitor’s view. The changes do not show up in either the admin-level desktop, which the visitor view references, or in the library level. The changes also do not show up in other visitor’s views.
Customization refers to modifying a portal through an API. This API is typically called from the WebLogic Portal Administration Console and Visitor Tools, but it is also exposed to developers who wish to modify desktops. The API provides all the create, read, update, and delete (CRUD) operations needed to modify a desktop and all of its components (for example, portlets, books, pages, and menus).
| Note: | Customization and personalization are two distinctly different features. With customization, someone is making a conscious decision to change the makeup of a desktop. With personalization, desktops are modified based on rules and user behavior. |
The Export/Import Utility client consists of a simple command-driven Java program. This program reads a local properties file, which you must manually configure, as explained in Configuring the Export/Import Utility Properties File. After parameters are read from the properties file, the Java program calls an API that executes the appropriate actions on the server. For instance, if you wish to import a page and scope the change to the admin level, you must specify this in the properties file.
| Tip: | The Java program’s source code is freely available in the installation directory of the Export/Import Utility. You are free to use this source code to develop your own client interface. |
As previously mentioned, the Export/Import Utility is a Java program that reads a properties file. To use the utility, you must manually configure this properties file.
In the properties file you can specify such things as server configuration information, export import commands, objects, scoping rules, and propagation rules. The default properties file is fully commented to help guide you in editing it. In addition, the examples discussed later in this chapter, such as Exporting a Desktop, contain detailed information specific properties.
An excerpt from the default xip.properties file is shown in Figure 10-5. You can find this file in BEA_HOME/weblogic92/portal/bin/xip.
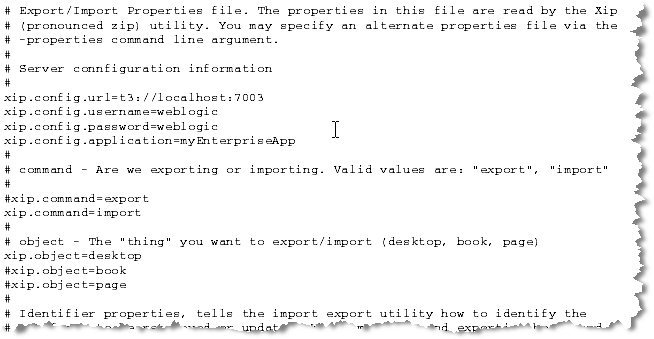
| Tip: | The complete default properties file is shown in Export/Import Utility Files. |
By default, the properties file that is used to configure the Export/Import Utility is called xip.properties. It is located in the installation directory of the Export/Import Utility (BEA_HOME/weblogic92/portal/bin/xip). You can specify an alternate properties file by editing the Ant build file build.xml, which is also included in the installation directory of the utility. Listing 10-1 shows the Ant target definition to edit:
  <target name="run" depends="jar" description="Run the Xip utility">
      <java classname="com.bea.wlp.xip.Xip" fork="true" failonerror="true">
          <arg value="-verbose"/>
          <arg value="-properties=my.properties"/>
          <classpath>
              <pathelement path="${wls.classpath}"/>
              <pathelement path="${wlp.classpath}"/>
              <pathelement path="${jarfile}"/>
          </classpath>
      </java>
  </target>
This section explains how to export a desktop using the Export/Import Utility. Exporting a desktop means retrieving the attributes of a desktop from the database and restoring them in a .portal file. The exported .portal file can then be loaded into Workshop for WebLogic for further development.
The basic steps for exporting a desktop include editing the xip.properties file and running an Ant build script.
These steps are explained in the following sections:
To export an existing desktop as a .portal file you need to specify attributes in the xip.properties file. This section highlights the required changes.
xip.config.application=portalProject
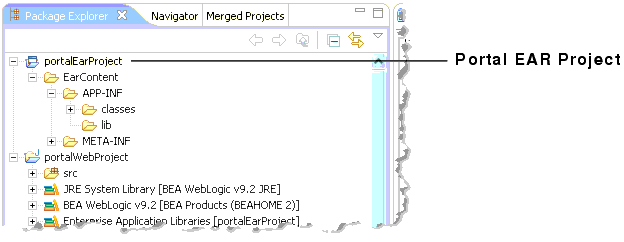
| Note: | You must specify the name of Enterprise application from which you are exporting. In Workshop for WebLogic, this value corresponds to the Portal EAR Project name, as shown in the following figure: |

xip.command=export| Note: | Specify that you wish to export, rather than import. |
xip.object=desktop| Note: | Specify the object you wish to export—in this example, a desktop. |
xip.identifier.webapp=PortalWebApp_1
xip.identifier.portal.path=yourPortalPath
xip.identifier.desktop.path=yourDesktopPath| Note: | These lines identify the objects you wish to export. For information on where to find the values for these properties, if you do not know what they are, see Locating and Specifying Identifier Properties for more information. |
| Note: | The web webapp property must always be specified. |
| Note: | If you scope the export to the admin or visitor level, then you must specify the portal.path and desktop.path properties. |
xip.output.file=myportal.portal| Note: | Specify where you wish to save the result (the exported .portal file). In this example, the resulting file is called myportal.portal, and it is placed in a location relative to where the utility was run. |
| Note: | You do not need to specify the encoding as this information is in the database. |
xip.export.context.scope=admin| Note: | Specify the scope of the export. In this example, the admin scope is specified. For more information on scope, see Export and Import Scope. |
xip.export.context.locale.language=en| Note: | Specify the locale of the exported desktop (in this example, English). Only one locale can be exported or imported at a time. |
Once the property attributes are defined, you can run the Ant build script, as shown in Listing 10-2. The build script’s task writes status information, also shown below, to the console window.
C:\dev\xip>ant run
Buildfile: build.xml
init:
compile:
jar:
run:
[java] Using: Properties from file [xip.properties]
[java]     Name [xip.config.url] Value [t3://localhost:7003]
[java]     Name [xip.config.username] Value [weblogic]
[java]     Name [xip.config.password] Value [********]
[java]     Name [xip.config.application] Value [portalProject]
[java]     Name [xip.command] Value [export]
[java]     Name [xip.object] Value [desktop]
[java]     Name [xip.identifier.webapp] Value [PortalWebApp_1]
[java]     Name [xip.identifier.portal.path] Value [yourPortalPath]
[java]     Name [xip.identifier.desktop.path] Value [yourPortalDesktop]
[java]     Name [xip.identifier.book.label] Value [mainBook]
[java]     Name [xip.identifier.page.label] Value []
[java]     Name [xip.input.file] Value [yourPortal.portal]
[java]     Name [xip.output.file] Value [myportal.portal]
[java]     Name [xip.import.context.deletes] Value [false]
[java]     Name [xip.import.context.moves] Value [false]
[java]     Name [xip.import.context.outermoves] Value [false]
[java]     Name [xip.import.context.updates] Value [true]
[java]     Name [xip.import.context.abort.on.collisions] Value [null]
[java]     Name [xip.import.context.abort.if.portlets.missing] Value [false]
[java]     Name [xip.import.context.scope] Value [admin]
[java]     Name [xip.import.context.modify.definitions] Value [false]
[java]     Name [xip.import.context.propagate.changes] Value [sync]
[java]     Name [xip.import.context.create.portal] Value [true]
[java]     Name [xip.import.context.portal.title] Value [My Portal]
[java]     Name [xip.import.context.locale.language] Value [en]
[java]     Name [xip.import.context.locale.country] Value []
[java]     Name [xip.import.context.locale.variant] Value []
[java]     Name [xip.export.context.scope] Value [admin]
[java]     Name [xip.export.context.locale.language] Value [en]
[java]     Name [xip.export.context.locale.country] Value []
[java]     Name [xip.export.context.locale.variant] Value []
[java] Executing command: export
[java] Exporting desktop [Webapp: [PortalWebApp_1] PortalPath: [yourPortalPath] DesktopPath: [yourDesktopPath]] to file [myportal.portal]
[java] Connection to host: t3://localhost:7003
[java] Saving changes to: myportal.portal
[java] Done. time taken 6 sec.
BUILD SUCCESSFUL
Total time: 8 seconds
C:\dev\xip>
The file myportal.portal can now be reloaded into Workshop for WebLogic or imported into another staging or production (database) environment.
This section explains how to import a .portal file into a desktop using the Export/Import Utility. When importing a .portal file into a desktop, there are two possible cases: the desktop already exists in the database or it does not. If the desktop does not already exist in the database, then the Export/Import Utility automatically creates it. If, however, the desktop does already exist in the database, you need to specify merging options.
The basic steps for importing a .portal file include editing the xip.properties file and running an Ant build script.
These steps are explained in the following sections:
To import an existing .portal file into a desktop, you need to specify attributes in the xip.properties file. This section highlights the required changes.
xip.config.application=portalProject
| Note: | You must specify the name of Enterprise application you are importing to. In Workshop for WebLogic, this value corresponds to the Portal EAR Project name, as shown in the following figure: |
xip.command=import| Note: | Specify that you wish to import, rather than export. |
xip.object=desktop| Note: | The object you are interested in importing – in this example a desktop. |
xip.identifier.webapp=PortalWebApp_1
xip.identifier.portal.path=yourPortalPath
xip.identifier.desktop.path=yourDesktopPath| Note: | These lines identify the objects you wish to export. For information on where to find the values for these properties, if you do not know what they are, see Locating and Specifying Identifier Properties. |
| Note: | The web webapp property must always be specified. |
| Note: | If you scope the export to the admin or visitor level, then you must specify the portal.path and desktop.path properties. |
xip.input.file=myportal.portal| Note: | Specify the .portal file that you wish to import from. The utility looks for the file in a location relative to where the utility is installed. |
| Note: | You do not need to specify an encoding as that is defined in the .portal file itself. |
xip.import.context.scope=admin| Note: | Specify the scope of the import. In this example, you wish to import a desktop at the admin level. For detailed information on scope, see Export and Import Scope. |
xip.import.context.deletes=false| Note: | You must specify how to handle deletes. See Controlling How Portal Assets are Merged When Imported for detailed information. |
xip.import.context.moves=false
xip.import.context.outermoves=true| Note: | You must specify how to handle moves. See Controlling How Portal Assets are Moved When Imported for detailed information. |
xip.import.context.updates=true| Note: | If xip.import.context.updates is true then new portlets, books, and pages that do not exist in the desktop but exist in the .portal will be added to the new desktop. Also instance level resources will be updated. |
xip.import.context.abort.if.portlets.missing=true| Note: | If xip.import.context.abort.if.portlets.missing is true then if a portlet is referenced in the .portal file but does not exist in the web application then the import is halted. If this flag is false a warning is logged and the import continues. |
xip.import.context.modify.definitions=true| Note: | If xip.import.context.modify.definitions is true, when updating books and pages the utility also updates the library definition. A library definition consists of markup, which includes backing files, activate, deactivate, and rollover images. Also titles and descriptions for books and pages, and the is_hidden flag are stored in these definitions. |
| Note: | Be aware that if you modify a library definition, desktop instances that share that library definition could be affected. Therefore, if you scope to a particular desktop, you may inadvertently affect other desktops if this property is set to true. For a detailed discussion about the relationship between library definitions and desktop instances, see Scope and Library Inheritance. |
xip.import.context.propagate.changes=sync| Note: | The xip.import.context.propagate.changes property lets you specify whether or not to propagate changes down the hierarchy of portal elements. Valid values for this property are sync or off. |
| Note: | When adding, removing, or moving portlets, pages or books, the changes typically are propagated down the hierarchy. In other words, changes made in the library are seen in all desktops, and changes made to the admin view (default desktop) are seen by all users. |
| Note: | A user’s desktop view initially points to (inherits its properties from) the default desktop (admin view). If the default desktop changes, the changes are propagated downward to the user view. |
| Note: | When users customize their views, each user’s view receives a copy of the customized portions of their view, and the rest of the portal continues to reference the default, or parent, desktop. |
| Note: | This property gives you the ability to control how changes are propagated down the hierarchy when users have customized their portals. If a user’s or admin’s portal is never customized, their views will always inherit changes from up the hierarchy, even if this property is set to off. |
| Note: | If, however, a user has customized a portion of a portal, and the same portion is modified up the hierarchy, this property allows you to control whether or not the change is propagated down the hierarchy. In this case, if you set this property to off, admin and user views will not inherit updates made to parent components. If set to synch, changes will be propagated downward, even if the user customized his or her view. |
| Tip: | You may want to turn this property off if you do not want to modify the pages or books that the user or administrator considers to be privately owned. |
| Tip: | It is considered good practice to allow your users to modify only a certain section of the portal and lock down the rest (for instance, one page that they have full control over), instead of allowing them free control over the entire portal. This promotes better scalability and makes portals more manageable when a large number of users make customizations. |
xip.import.context.create.portal=true| Note: | If xip.import.context.create.portal is set to true and a portal does not exist in the database, one will be created for you. In addition, you must specify a title for the new portal using the next property. |
xip.import.context.portal.title=My Portal| Note: | If xip.import.context.create.portal (described previously) is set to true, then you must specify a title using this property. |
xip.import.context.locale.language=en
xip.import.context.locale.country=
xip.import.context.locale.variant=| Note: | These properties define the locale for the .portal file’s titles and descriptions. |
Once the property attributes are defined, you can run the build script, as shown in Listing 10-3. The build script’s task writes status information, also shown below, to the console window.
C:\dev\xip>ant run
[java] Using: Properties from file [xip.properties]
[java]     Name [xip.config.url] Value [t3://localhost:7003]
[java]     Name [xip.config.username] Value [weblogic]
[java]     Name [xip.config.password] Value [weblogic]
[java]     Name [xip.config.application] Value [portalProject]
[java]     Name [xip.command] Value [import]
[java]     Name [xip.object] Value [desktop]
[java]     Name [xip.identifier.webapp] Value [PortalWebApp_1]
[java]     Name [xip.identifier.portal.path] Value [yourPortal]
[java]     Name [xip.identifier.desktop.path] Value [yourDesktop]
[java]     Name [xip.identifier.book.label] Value []
[java]     Name [xip.identifier.page.label] Value []
[java]     Name [xip.input.file] Value [myportal.portal]
[java]     Name [xip.output.file] Value []
[java]     Name [xip.import.context.deletes] Value [false]
[java]     Name [xip.import.context.moves] Value [false]
[java]     Name [xip.import.context.outermoves] Value [false]
[java]     Name [xip.import.context.updates] Value [true]
[java]     Name [xip.import.context.abort.on.collisions] Value [null]
[java]     Name [xip.import.context.abort.if.portlets.missing] Value [false]
[java]     Name [xip.import.context.scope] Value [admin]
[java]     Name [xip.import.context.modify.definitions] Value [false]
[java]     Name [xip.import.context.propagate.changes] Value [sync]
[java]     Name [xip.import.context.create.portal] Value [true]
[java]     Name [xip.import.context.portal.title] Value [My Portal]
[java]     Name [xip.import.context.locale.language] Value [en]
[java]     Name [xip.import.context.locale.country] Value []
[java]     Name [xip.import.context.locale.variant] Value []
[java]     Name [xip.export.context.scope] Value [admin]
[java]     Name [xip.export.context.locale.language] Value [en]
[java]     Name [xip.export.context.locale.country] Value []
[java]     Name [xip.export.context.locale.variant] Value []
[java] Executing command: import
[java] Importing desktop: Webapp: [PortalWebApp_1] PortalPath: [yourPortalPath] DesktopPath: [yourDesktopPath]
[java] Connection to host: t3://localhost:7003
[java] Uploading file: myportal.portal
[java] Done. time taken 40 sec.
BUILD SUCCESSFUL
Total time: 52 seconds
If you do not wish to export an entire desktop, you can configure the utility to export a single page.
| Tip: | While this section explicitly deals with exporting pages, the same basic procedure applies to exporting books. |
This section explains how to export a page from a desktop. Exporting a page is another common use case. When you export a page or a book, the result is a .pinc file.
| Note: | If you export a page or a book, all children of that page or book are exported as well. |
The basic steps for exporting a page include editing the xip.properties file and running an Ant build script.
These steps are explained in the following sections:
To export an existing page as a .pinc file you will need to specify attributes in the xip.properties file. This section highlights the required changes.
xip.config.application=portalProject
| Note: | You must specify the name of Enterprise application you are exporting from. In Workshop for WebLogic, this value corresponds to the Portal EAR Project name, as shown in the following figure: |

xip.command=export| Note: | Specify that you wish to export, rather than import. |
xip.object=page| Note: | The object you are interested in exporting – in this example a page. |
xip.identifier.webapp=PortalWebApp_1
xip.identifier.portal.path=yourPortalPath
xip.identifier.desktop.path=yourDesktopPath| Note: | These lines identify the objects you wish to export. For information on where to find the values for these properties (if you do not know what they are), see Locating and Specifying Identifier Properties. |
| Note: | The web webapp property must always be specified. |
| Note: | If you scope the export to the admin or visitor level, then you must specify the portal.path and desktop.path properties. If you are exporting a book or a page, then the book.label or page.label properties must be specified. |
| Note: | If you scope the export to the library then you do not need to supply a portal.path and desktop.path, but you still need to supply a webapp name. |
xip.identifier.book.label=
xip.identifier.page.label=P200134591113965077078
| Note: | You need to identify the page or book that you wish to export. To do this, specify the definition label of the page or book using the xip.identifier.page.label property. The definition label is typically supplied by the developer in Workshop for WebLogic, but it could also have been automatically generated by the WebLogic Portal Administration Console. See Locating and Specifying Identifier Properties for information on finding the definition label. |
xip.output.file=mypage.pinc| Note: | Use this property to specify a file in which to save the result. In this example, the file mypage.pinc is saved in the directory in which the utility is run. |
| Note: | You do not need to specify the encoding as this information is in the database. |
xip.export.context.scope=admin| Note: | Specify the scope of the export. In this example, the page is exported from within a desktop (admin scope). If you want to export a page from the library, set the scope to library. |
xip.export.context.locale.language=en| Note: | Specify the locale of the exported page. |
Once the property attributes are defined, you can run the Ant build script, as shown in Listing 10-4. The build script’s task writes status information, also shown below, to the console window.
C:\dev\xip>ant run
Buildfile: build.xml
init:
compile:
jar:
run:
[java] Using: Properties from file [xip.properties]
[java]     Name [xip.config.url] Value [t3://localhost:7003]
[java]     Name [xip.config.username] Value [weblogic]
[java]     Name [xip.config.password] Value [********]
[java]     Name [xip.config.application] Value [portalProject]
[java]     Name [xip.command] Value [export]
[java]     Name [xip.object] Value [page]
[java]     Name [xip.identifier.webapp] Value [yourPortal]
[java]     Name [xip.identifier.portal.path] Value [yourPortalPath]
[java]     Name [xip.identifier.desktop.path] Value [yourDesktopPath]
[java]     Name [xip.identifier.book.label] Value []
[java]     Name [xip.identifier.page.label] Value [P200134591113965077078]
[java]     Name [xip.input.file] Value []
[java]     Name [xip.output.file] Value [mypage.pinc]
[java]     Name [xip.import.context.deletes] Value [false]
[java]     Name [xip.import.context.moves] Value [false]
[java]     Name [xip.import.context.outermoves] Value [false]
[java]     Name [xip.import.context.updates] Value [true]
[java]     Name [xip.import.context.abort.on.collisions] Value [null]
[java]     Name [xip.import.context.abort.if.portlets.missing] Value [false]
[java]     Name [xip.import.context.scope] Value [admin]
[java]     Name [xip.import.context.modify.definitions] Value [false]
[java]     Name [xip.import.context.propagate.changes] Value [sync]
[java]     Name [xip.import.context.create.portal] Value [true]
[java]     Name [xip.import.context.portal.title] Value [My Portal]
[java]     Name [xip.import.context.locale.language] Value [en]
[java]     Name [xip.import.context.locale.country] Value []
[java]     Name [xip.import.context.locale.variant] Value []
[java]     Name [xip.export.context.scope] Value [admin]
[java]     Name [xip.export.context.locale.language] Value [en]
[java]     Name [xip.export.context.locale.country] Value []
[java]     Name [xip.export.context.locale.variant] Value []

[java] Executing command: export
[java] Exporting page [mypage] scoped to desktop: Webapp: [PortalWebApp_1] PortalPath: [yourPortalPath] DesktopPath: [yourDesktopPath]]
[java] Connection to host: t3://localhost:7003
[java] Saving changes to: mypage.pinc
[java] Done. time taken 6 sec.
BUILD SUCCESSFUL
Total time: 8 seconds
This section explains how to import a single page.
| Tip: | While this section explicitly deals with pages, the same procedure applies to importing a book. |
The imported page could have been created in Workshop for WebLogic or exported from another staging or production environment. Either way you are importing a .pinc file into the database.
| Note: | When you import or export a page or book, all the children are imported as well. |
The basic steps for importing a page include editing the xip.properties file and running an Ant build script.
These steps are explained in the following sections:
To import an existing .pinc file you must specify attributes in the xip.properties file. This section highlights the required changes you must make to the properties file to import a page.
xip.config.application=portalProject
| Note: | You must specify the name of Enterprise application you are importing to. In Workshop for WebLogic, this value corresponds to the Portal EAR Project folder, as shown in the following figure: |

xip.command=import| Note: | Specify that you wish to import, rather than export. |
xip.object=page| Note: | The object you are interested in importing – in this example a page. |
xip.identifier.webapp=PortalWebApp_1xip.identifier.book.label=
xip.identifier.portal.path=yourPortalPath
xip.identifier.desktop.path=yourDesktopPath
xip.identifier.page.label=
| Note: | These lines identify the objects you wish to export. For information on where to find the values for these properties (if you do not know what they are), see Locating and Specifying Identifier Properties. |
| Note: | If you scope the import to the admin or visitor level, then you must specify the portal.path and desktop.path properties. If you are importing a book or a page, then the book.label or page.label properties must be specified. |
| Note: | The web webapp property must always be specified. |
| Note: | The page.label property is not needed on imports. This is because the page label is defined in the .pinc file as an attribute of the <netuix:page ... /> element. |
xip.input.file=mypage.pinc| Note: | Specify the .pinc file to import from. By default, the utility locates the file in a directory relative to where you run the utility. |
xip.import.context.scope=admin| Note: | Identify the scope of the import. In this example you are importing a page at the admin level. |
xip.import.context.deletes=false| Note: | You need to specify how to handle deletes. See Controlling How Portal Assets are Merged When Imported for more information on this property. |
xip.import.context.moves=false| Note: | You need to specify how to handle moves. See Controlling How Portal Assets are Moved When Imported for more information on this property. |
xip.import.context.updates=true| Note: | If xip.import.context.updates is true then new portlets, book and pages that don’t exist in the desktop but exist in the .portal will be added to the new desktop. Also instance level resources will be updated. |
xip.import.context.abort.if.portlets.missing=true| Note: | If xip.import.context.abort.if.portlets.missing is true then if a portlet is referenced in the .portal file but does not exist in the web application then the utility will halt the import. If this flag is false then the utility logs a warning and continues. |
xip.import.context.modify.definitions=true| Note: | If xip.import.context.modify.definitions is true, when updating books and pages the utility also updates the library definition. A library definition consists of markup, which includes backing files, activate, deactivate, and rollover images. Also titles and descriptions for books and pages, and the is_hidden flag are stored in these definitions. |
| Note: | Be aware that if you modify a library definition, desktop instances that share that library definition could be affected. Therefore, if you scope to a particular desktop, you may inadvertently affect other desktops if this property is set to true. For a detailed discussion about the relationship between library definitions and desktop instances, see Scope and Library Inheritance. |
xip.import.context.propagate.changes=sync| Note: | The xip.import.context.propagate.changes property lets you specify whether or not to propagate changes down the hierarchy of portal elements. Valid values for this property are sync or off. |
| Note: | When adding, removing, or moving portlets, pages or books, the changes typically are propagated down the hierarchy. In other words changes made in the library are seen in all desktops. And changes made to the admin view (desktop) are seen by all users. |
| Note: | A user’s desktop view inherits its properties from the default desktop (admin view). If the default desktop changes, the changes are propagated downward to the user view. When a users customize their views, each user’s view receives a copy of the customized portions of their view, and the rest of the portal continues to reference the default, or parent, desktop. |
| Note: | This property gives you the ability to control how changes are propagated down the hierarchy when users have customized their portals. If a user’s or admin’s portal is never customized, their views will always inherit changes from up the hierarchy, even if this property is set to off. |
| Note: | If, however, they have customized a portion of a portal, and the same portion is modified up the hierarchy, this property allows you to control whether or not the change is propagated down the hierarchy. In this case, if you set this property to off, admin and user views will not inherit updates made to parent components. If set to sync, changes will be propagated downward, even if the user customized his or her view. |
| Tip: | You may wish to turn this property off if you do not want to modify the pages or books that the user or administrator considers to be privately owned. |
| Tip: | It is considered good practice to only allow your users to modify a certain section of the portal and lock down the rest (for instance, one page that they have full control over), instead of allowing them free control over the entire portal. This promotes better scalability and makes portals more manageable when a large number of users make customizations. |
xip.import.context.locale.language=en
xip.import.context.locale.country=
xip.import.context.locale.variant=
These properties define the locale for the .pinc file’s titles and descriptions.
Once the property attributes are defined, you can run the build script, as shown in Listing 10-5. The build script’s task writes status information, also shown below, to the console window.
C:\dev\xip>ant run
[java] Using: Properties from file [xip.properties]
[java]     Name [xip.config.url] Value [t3://localhost:7003]
[java]     Name [xip.config.username] Value [weblogic]
[java]     Name [xip.config.password] Value [weblogic]
[java]     Name [xip.config.application] Value [portalProject]
[java]     Name [xip.command] Value [import]
[java]     Name [xip.object] Value [page]
[java]     Name [xip.identifier.webapp] Value [PortalWebApp_1]
[java]     Name [xip.identifier.portal.path] Value [yourPortalPath]
[java]     Name [xip.identifier.desktop.path] Value [yourDesktopPath]
[java]     Name [xip.identifier.book.label] Value []
[java]     Name [xip.identifier.page.label] Value []
[java]     Name [xip.input.file] Value [mypage.pinc]
[java]     Name [xip.output.file] Value []
[java]     Name [xip.import.context.deletes] Value [false]
[java]     Name [xip.import.context.moves] Value [false]
[java]     Name [xip.import.context.outermoves] Value [false]
[java]     Name [xip.import.context.updates] Value [true]
[java]     Name [xip.import.context.abort.on.collisions] Value [null]
[java]     Name [xip.import.context.abort.if.portlets.missing] Value [false]
[java]     Name [xip.import.context.scope] Value [admin]
[java]     Name [xip.import.context.modify.definitions] Value [false]
[java]     Name [xip.import.context.propagate.changes] Value [sync]
[java]     Name [xip.import.context.create.portal] Value [true]
[java]     Name [xip.import.context.portal.title] Value [My Portal]
[java]     Name [xip.import.context.locale.language] Value [en]
[java]     Name [xip.import.context.locale.country] Value []
[java]     Name [xip.import.context.locale.variant] Value []
[java]     Name [xip.export.context.scope] Value [admin]
[java]     Name [xip.export.context.locale.language] Value [en]
[java]     Name [xip.export.context.locale.country] Value []
[java]     Name [xip.export.context.locale.variant] Value []
[java] Executing command: import
[java] Importing page scoped to desktop: Webapp: [PortalWebApp_1] PortalPath: [yourPortalPath] DesktopPath: [yourDesktopPath][java] Connection to host: t3://localhost:7003
[java] Uploading file: mypage.pinc
[java] Done. time taken 20 sec.
BUILD SUCCESSFUL
Total time: 25 seconds
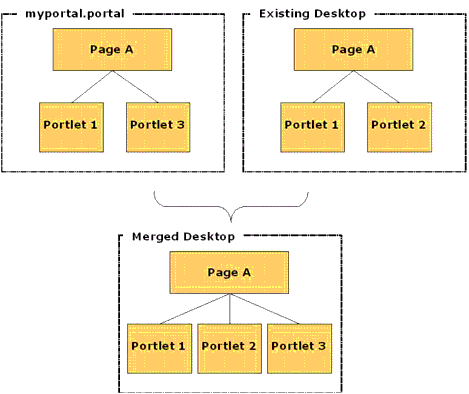
The xip.import.context.deletes property lets you control how portal assets are merged during an import. As shown in Figure 10-10, if you set this property to false, the contents of the imported pages are combined with the existing pages.
| Note: | This example refers to portlets; however, the same merge operations would apply as well for pages on a book. |
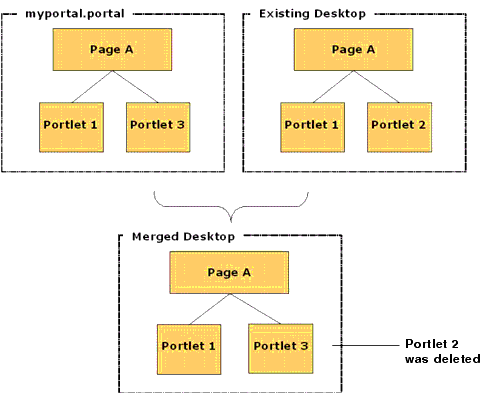
As shown in Figure 10-11, if you set this property to true, any portlets that do not exist in the .portal file but do exist in the desktop are deleted.
The xip.import.context.moves and xip.import.context.outermoves properties let you specify how moves are handled when portal assets are imported. To understand how moves operate, you need to understand the meaning of inner moves and outer moves. These terms are explained in the following sections.
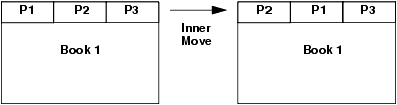
When an asset such as a portlet or a page is moved within the context of a single parent, the move is called an inner move. For example, if you move a portlet to a different placeholder within a page, it is an inner move because the parent (the page) remains the same. Likewise, if you move a page to a different position in a book, it is an inner move because the parent (the book) remains the same. The following figure illustrates this concept:
Set the xip.import.context.moves property to true to allow inner moves. If the property is set to false, the positions of assets will not change; however, the contents will be updated appropriately. If you want to move books, pages, or portlets across different parents, then use the xip.import.context.outermoves property, described in the next section.
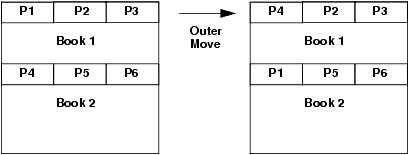
When an asset such as a portlet or a page is moved from one parent to another, the move is called an outer move. For example, if you move a page from one book to a different book, that is an outer move because the parent (the book) is different. The following figure illustrates this concept:
Set the xip.import.context.outermoves property to true to allow outer moves. If the property is set to false, then the operation handles the requested move as a deletion and addition operation.
| Note: | Move operations preserve customizations. When a deletion/addition operation is performed, some customizations are lost. |
If you want to move books, pages, or portlets across the same parent, then use the xip.import.context.moves property, described in the previous section.
This section explains how to find the values for the identifier properties in the xip.properties file. These properties help to identify the portal element to export or import. This section discusses the following properties:
The portal.path and desktop.path Properties
The page.label and book.label Properties
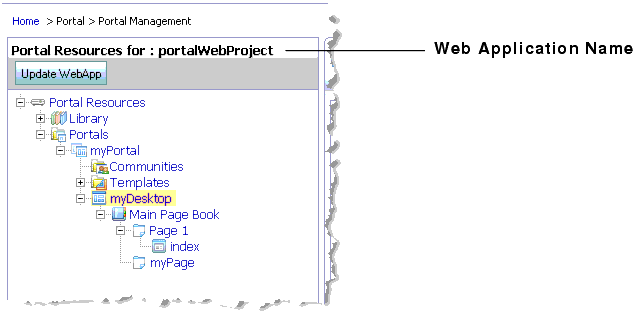
The web xip.identifier.webapp property must always be specified. The web application name is listed in the WebLogic Portal Administration Console, as shown in the following figure:
If you scope the export to the admin or visitor level, then you must specify the xip.identifier.portal.path and xip.identifier.desktop.path properties. You can find the correct value in the WebLogic Portal Administration Console. The portal path is shown in the Portal Details tab, and the desktop path is shown in the Desktop Details tab. For example, the portal path is shown in the following figure:

If you are exporting or importing a page or book, you need to specify the definition label of the page or book using the xip.identifier.page.label or xip.identifier.book.label property. Definition labels are typically supplied by the developer in Workshop for WebLogic; however, they can also be created in the WebLogic Portal Administration Console. If the page was created using the Administration Console, a definition label is assigned automatically.
| Note: | If you are exporting a book or a page, then the book.label or page.label properties must be specified. If you are importing a book or a page, the book.label or page.label properties are not needed, because these values are obtained directly from the .pinc files. |
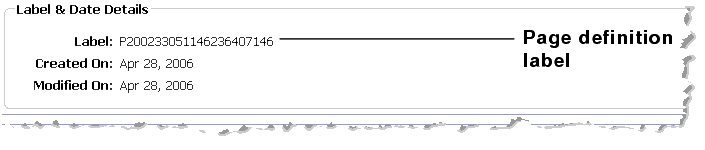
You can locate the definition label for a page in the Administration Console on the Details tab of the page window (click on the page in the Library tree to display the page window). Figure 10-16 shows the definition label for a page.
To find the definition label of a book, you need to look at the Manage Book Contents tab of the book’s parent book. You will find the labels of all of the child books listed there.
Proper cache management greatly improves portal performance. Whenever a cache is invalidated, the portal API must retrieve fresh data from the database. It is inefficient when the API retrieves data that has not changed. The Export/Import Utility invalidates only the caches (specifically, the portalControlTreeCache) for portal resources that have changed. The invalidation of the cache is governed by the following properties:
xip.config.application
xip.identifier.webapp
xip.identifier.portal.path
xip.identifier.desktop.path
xip.import.context.scope
xip.import.context.modify.definitions
Be sure to understand these properties and how they affect the invalidation of the cache. Understanding your changes, scoping them correctly, and tuning these properties correctly will greatly improve your production system’s performance.
These properties are described below.
xip.config.application | Note: | Specifies the name of the Enterprise application. Only portals under this Enterprise application will be affected. In Workshop for WebLogic, this value corresponds to the name of an Portal EAR Project folder, as shown in the following figure: |

| Note: | Specifies the name of the web application. Only portals under this web application will be affected. See also Locating and Specifying Identifier Properties. |
| Note: | Specifies the scope of the change. If the scope is set to library then all portalControlTree caches for the entire web application are invalidated. If the scope is set to admin then only the cache for the desktop defined by xip.identifier.portal.path and xip.identifier.desktop.path is affected, leaving the other desktop caches intact. If the scope is set to visitor then only the cache of an individual user’s view is invalidated. See also Locating and Specifying Identifier Properties. |
xip.import.context.modify.definitions
| Note: | If set to true, library definitions may be modified. Since definitions are shared across all instances of library resources, the entire web application cache must be invalidated, even if the scope is set to admin. If you are just adding pages or portlets to the books and pages there is no reason to update the definitions. |
| Note: | A library definition consists of markup, which includes backing files, activate, deactivate, and rollover images. Also titles and descriptions for books and pages, and the is_hidden flag are stored in these definitions. |
| WARNING: | Be aware that if you modify a library definition, desktop instances that share that library definition could be affected. Therefore, if you scope to a particular desktop, you may inadvertently affect other desktops if this property is set to true. For a detailed discussion about the relationship between library definitions and desktop instances, see Scope and Library Inheritance. |


|