

|
|
|
|
| |
Using the BEA WebLogic Server Internationalization Tools and Utilities
This section includes information about the following topics:
Note: Text in the catalog definitions may contain formatting characters for readability (for example, new lines), but these are not preserved by the parser. Text data is normalized into a one-line string. All leading and trailing white space is removed. All embedded newlines are replaced by spaces as required to preserve word separation. Tabs are left intact.
The Message Editor is a GUI for editing XML message catalogs. It creates, reads, and writes XML catalogs. Optionally, you can also edit the XML catalogs directly, in a text editor. Message Editor allows you to perform the following tasks:
The catalog current being created or used in the Message Editor is referred to as the context catalog.
The catalog parser recognizes special character references and converts them to the intended character, as shown in Table 4-1. The Message Editor will recognize the special characters and write them back using the character references. The parser recognizes no other character references.
|
Character |
Character Code |
|---|---|
|
@ |
& |
|
< |
< |
|
> |
> |
|
` |
' |
|
" |
" |
Starting the Message Editor
To start the Message Editor, type:
java weblogic.MsgEditor
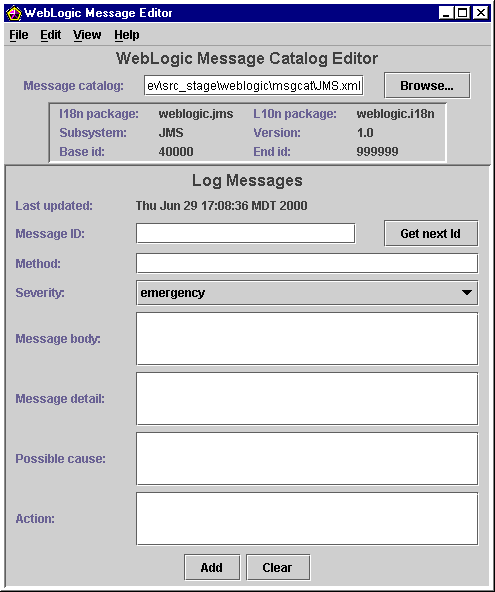
The main Message Editor for a log message is displayed as follows:
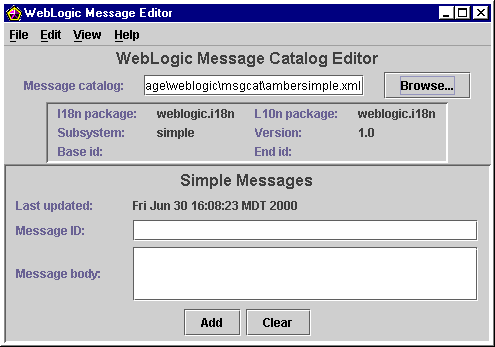
When displaying a simple message catalog in the Message Editor, it will appear as follows:
The catalogs can be found in the directory $SRC/weblogic/msgcat. Once the catalog has been located, the packages, subsystem, version and base id and end id (if any) for that catalog are displayed, and that catalog is the catalog context in which all other actions are performed. You are now ready to enter new messages into that catalog, to edit existing messages, to search for a message, or to view all messages in the catalog.
To create a new catalog, complete the following procedure:
A "Create new catalog" dialog box is displayed, as shown here.
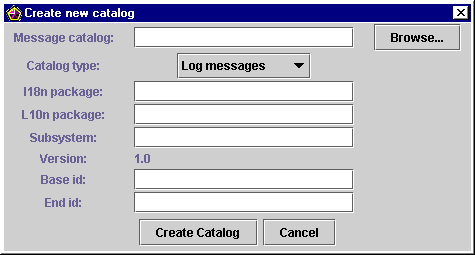
If this is to be a log message catalog, the Base ID and End ID fields are displayed; if it is to be a simple text message catalog, those fields disappear.
The dialog box disappears, and the catalog you just created is displayed as the context catalog in the main Message Editor window.
The entire catalog is written to disk immediately upon adding the message.
To enter a new message into a log catalog, complete the following procedure:
logNoAuthorization(String arg0, java.util.Date arg1,
   int arg2) logNote()
User {0} tried to access this on {1} but has no authority to do so. {2} lashes with a keyboard with coke spilled on it.
The entire catalog is written to disk immediately after the message is added.
Entering a New Simple Text Message
The entire catalog is written to disk immediatly upon adding the message.
This number must be unique within the catalog.
The entire catalog is written to disk immediately after the message is added.
Finding a Log Message

The fields are strung together to find the message. The message ID and the method name must be complete, but the search for text does a partial match in any of the text fields.
If a matching message is found, it is displayed in the main Message Editor window, ready for editing.
Finding a Simple Text Message
Make sure that the context catalog is a simple text message catalog.
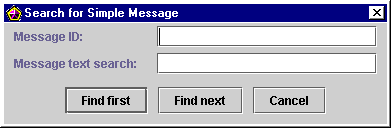
The fields are strung together to find the message. The message ID must be complete, but the search for text does a partial match.
If a matching message is found, it is displayed in the main Message Editor window, ready for editing.
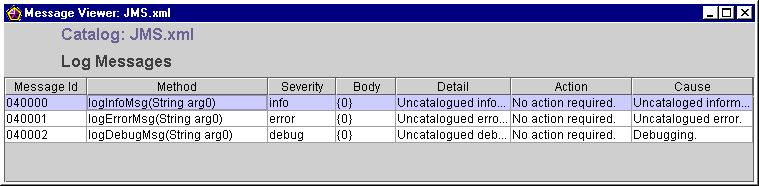
Viewing All Messages in a Catalog
To view all the message in a catalog, choose View from the main menu bar.
All the messages for the current catalog context are displayed in a table in the Message Viewer window, as shown.
Choosing a Message to Edit from the Catalog List
If you click on any row of displayed messaged in the Message Viewer, the designated row is selected, and the corresponding message appears in the main Message Editor window, ready for editing.
Viewing All Messages in Several Catalogs
If you view the messages from the current catalog context, and then change the context by browsing to a new catalog, the old view of the old catalog remains on the screen while you view the new catalog. Repeating this step allows you to view, at the same time, as many catalogs as you require (or can reasonably fit on your screen).
Choosing a Message to Edit from Any Catalog Shown
When you click on any row in any view the catalog context switches to the viewed catalog, and the message in that catalog is displayed in the Message Editor main window.
Editing an Existing Message
The entire catalog is written to disk immediately upon adding the message.
The entire catalog is written to disk immediately after the message is added.
Using the Internationalization Utilities
WebLogic Server provides three internationalization utilities:
The i18ngen utility parses message catalogs (XML files) to produce classes used for localizing the text in log messages. Used to compile the top-level message catalogs into Java classes and properties files.
Syntax
i18ngen [options] files
Options
|
Option |
Definition |
|
-d targetdirectory |
Send generated Java files to this target. User catalog properties are placed in i18n_user.properties, relative to the target directory named in the -d designation. |
|
-n |
Parse and validate, but do not generate classes |
|
-keepgenerated |
Keep generated Java source |
|
-ignore |
Ignore errors |
|
-i18n |
Generate internationalizers (for example, Loggers) |
|
-l10n |
Generate Localizers (for example, LogLocalizers) |
|
-compile |
Compile generated source |
|
-nobuild |
Parse and validate only |
|
files |
Process the files and directories in this list of files. |
The i18ngen utility creates or updates the i18n_user.properties file.
The option i18ngen -i18n creates the internationalizer source (for example, *Logger.java) that supports the logging of internationalized messages.
The option i18ngen -l10n creates the localizer source (property resource bundles) that provides access to each message defined in each message catalog. These properties are used by localization utilities to localize messages.
Errors detected during compilation generally result in no class files or properties file being created. i18ngen exits with a bad exit status.
The target directory (-d option) specifies the root directory in which generated source files are generated. Files are placed in appropriate directories based on the i18n_package and l10n_package values in the corresponding message catalog. The default target dir is the current directory.
The -compile option compiles generated Java files using the current CLASSPATH. The resulting classes are placed in the directory identified by the -d option.
The i18ngen utility processes all files listed on the command line. If directories are listed, the command processes all XML files in the listed directories. The names of all files must include an XML suffix. All files must conform to the msgcat.dtd syntax. i18ngen prints the fully-qualified list of names (Java source) to the stdout log for those files actually generated. Any errors, warnings, or informational messages are sent to stderr.
The l10ngen utility processes the locale-specific catalogs in directories that are subordinate to the top-level catalogs.
Syntax
java weblogic.i18n.tools.l10ngen [options] filelist
Options
|
Option |
Definition |
|
-d targetdirectory |
Directory in which to place properties. Default is the current directory. |
|
-language code |
Language code. Default is all. |
|
-country code |
Country code. Default is all. |
|
-variant code |
Variant code. Default is all. |
|
-filelist |
Message catalog directories and files to process, relative to the current directory. Identifies top-level, not local-specific, directory. |
This utility generates a listing of installed log messages. By default, CatInfo lists in order the ID and message body for all currently installed log messages.
Syntax
java weblogic.i18n.tools.CatInfo [options]
Options
Note: All options may be abbreviated to a single character.
|
Option |
Definition |
|---|---|
|
-id nnnnnn |
where nnnnnn represents the message ID. The -id option is used to specify a particular message. |
|
-subsystem identifier |
The subsystem identifier. The -subsystem option prints only those messages that match the specified subsystem. |
|
-detail |
Requests a detailed listing. The -detail option also requests version, severity, subsystem, message detail, cause, and action information. |
|
-help |
Provides usage information. |
|
|
|
Copyright © 2000 BEA Systems, Inc. All rights reserved.
|