Securing WebLogic Resources
|
|
Security Roles
The following sections describe the features and functions of security roles:
- Overview of Security Roles
- Dynamic Role Mapping
- Types of Security Roles: Global Roles and Scoped Roles
- Using the Administration Console to Create Security Roles
- Default Global Roles
- Default Group Associations
- Components of a Security Role: Role Conditions, Expressions, and Role Statements
- Working with Global Roles
- Working with Scoped Roles
Overview of Security Roles
A security role is a privilege granted to users or groups based on specific conditions. Like groups, security roles allow you to restrict access to WebLogic resources for several users at once. Security roles differ from groups as follows:
- Security roles are computed and granted to users or groups dynamically, based on conditions such as user name, group membership, or the time of day. Groups are static.
- Security roles can be scoped to specific WebLogic resources within a single application in a WebLogic Server domain (unlike groups, which are always scoped to an entire WebLogic Server domain).
Granting a security role to a user or a group confers the defined access privileges to that user or group, as long as the user or group is "in" the security role. For example, an administrator may define a security role called AppAdmin, which has write access to a particular Web Application's resources. Any user or group granted the AppAdmin security role would then have write access to that URL (Web) resource. Multiple users or groups can be granted a single security role. (For more information about users and groups, see Users and Groups.)
Note: In WebLogic Server 6.x, security roles applied to Web Applications and EJBs (Enterprise JavaBeans) only. This version of WebLogic Server expands the use of security roles to all of the defined WebLogic resources. For more information, see Types of WebLogic Resources.
Dynamic Role Mapping
At runtime, the WebLogic Security Service compares users or groups against a role condition to determine whether they should be dynamically granted a security role. This process is referred to as role mapping, and occurs just prior to when the WebLogic Security Service renders an access decision for a protected WebLogic resource. An access decision is the component of an Authorization provider that determines whether a subject has permission to perform a given operation on a WebLogic resource.
Note: For more information about role conditions and access decisions, see Components of a Security Role: Role Conditions, Expressions, and Role Statements and Access Decisions in Developing Security Providers for WebLogic Server, respectively.
This dynamic mapping of security roles to users or groups provides a very important benefit: users or groups can be granted a security role based on business rules, or the context of the request. For example, a user may be allowed to be in a Manager security role only while the actual manager is away. Dynamically granting this security role means that you do not need to change or redeploy your application to allow for such a temporarily arrangement. You simply specify the hours between which the temporary manager should have special privileges. Further, you do not need to remember to revoke these special privileges when the actual manager returns, as you would if you temporarily added the user to a management group.
Types of Security Roles: Global Roles and Scoped Roles
There are two types of security roles in WebLogic Server: global roles and scoped roles. A security role that applies to all WebLogic resources deployed within a security realm (and thus the entire WebLogic Server domain) is called a global role. A security role that applies to a specific instance of a WebLogic resource deployed in a security realm (such as a method on an EJB or a branch of a JNDI tree) is called a scoped role. Multiple roles (either global or scoped) can be used to create a security policy for a WebLogic resource. (For more information, see Security Policies.)
While BEA recommends creating security roles and using them (rather than users or groups) to secure WebLogic resources, you do not need to use a particular type of security role. BEA provides several default global roles that you can use out of the box to secure your WebLogic resources; these are described in Default Global Roles. You may never need to use scoped roles. (Scoped roles are provided for their flexibility and are an extra feature for advanced customers.)
Using the Administration Console to Create Security Roles
The way you use the WebLogic Server Administration Console to create security roles differs, depending on whether you want to create a global role or a scoped role.
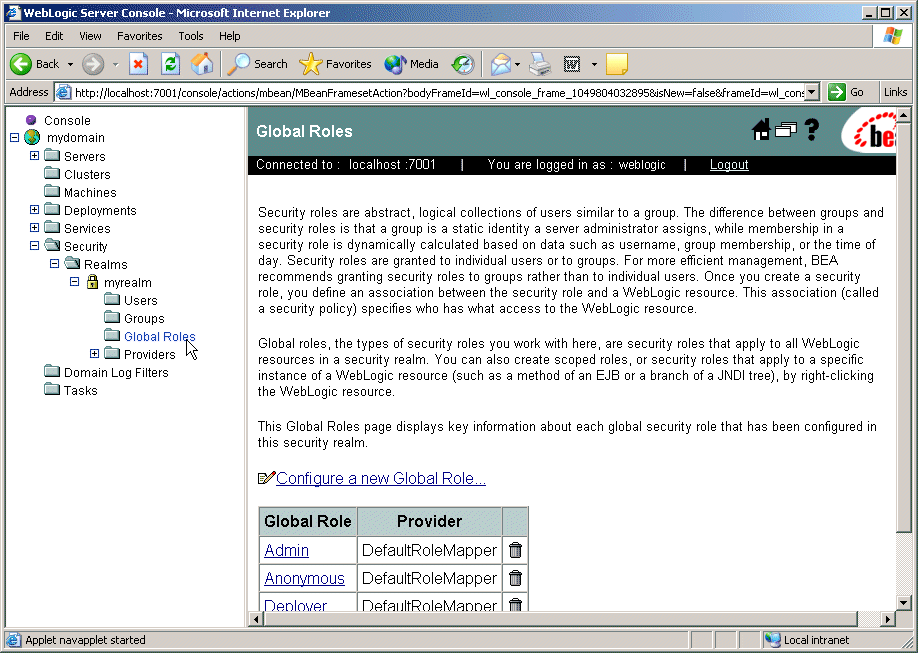
Because global roles apply to all WebLogic resources in a security realm, you create global roles at the security realm level. In the left pane of the Administration Console, expand Security myrealm (or the name of a security realm you created). Then click Global Roles to display the page that allows you to create a global role. This navigation path is shown on the left side of Figure 4-1, and the resulting page is shown on the right.
Figure 4-1 Creating a Global Role
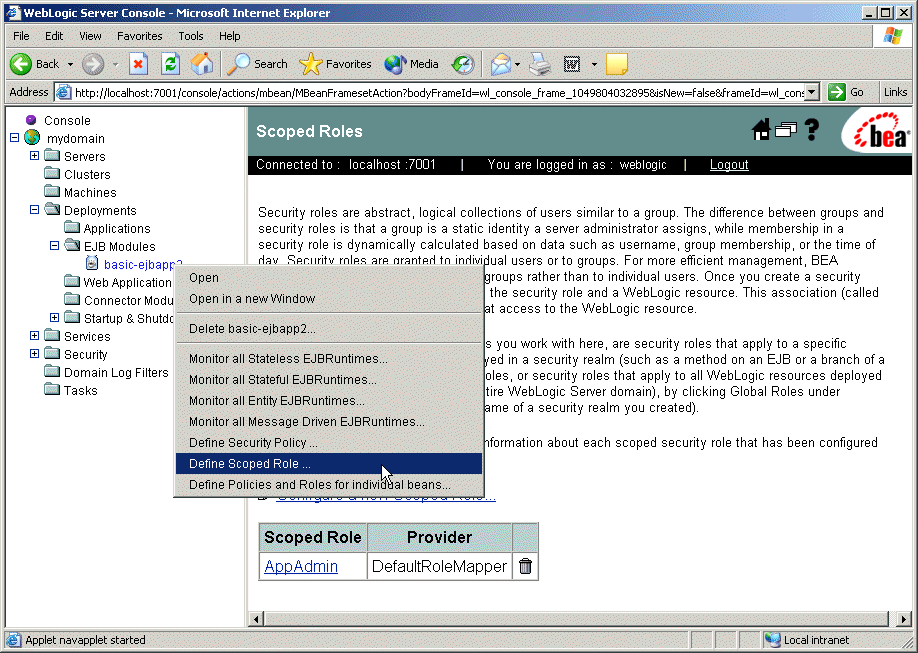
Because they apply only to a particular WebLogic resource in a security realm, you create scoped roles at the WebLogic resource level. Deployed modules (that is, Web Applications, EJBs, and so on) for which you can create scoped roles show a Define Scoped Role... option when you right-click on them in the Administration Console's navigation tree. Select the Define Scoped Role... option to display the page that allows you to create a scoped role. This navigation path—using the basic-ejbapp JAR as the WebLogic resource—is shown on the left side of Figure 4-2, and the resulting page is shown on the right.
Figure 4-2 Creating a Scoped Role
Default Global Roles
By default, WebLogic Server defines the global roles shown in Table 4-1. The table also lists the privileges that users or groups in these security roles are granted.
The default global roles are used in the default security policies that protect most types of WebLogic resources. In addition, the default global roles are used to provide additional security for Server resources that are exposed as MBeans. For more information, see Security Policies, and MBean Protections.
Note: If you are working directly with WebLogic Server MBeans and want more detailed information about the global roles and their privileges than is shown in Table 4-1, see Protected MBean Attributes and Operations.
You can add to the default global roles by creating your own security roles (global or scoped) as described in Creating Global Roles.
Protected MBean Attributes and Operations
Table 4-2 lists the immutable privileges given to users or groups who are granted the Admin default global role, for various WebLogic Server MBeans. In other words, users or groups who are granted the Admin default global role have permission to access the MBean attributes listed in Table 4-2.
Note: Users or groups who are granted the Admin default global role are also given the privileges described in Table 4-3 through Table 4-5.
The MBeans shown in Table 4-2 are all in the weblogic.management.configuration package. For more information on MBeans used to configure WebLogic Server, see System Administration Infrastructure in the WebLogic Server Administration Guide.
Table 4-3 lists the immutable privileges given to users or groups who are granted the Admin or Deployer default global roles, for various WebLogic Server MBeans. In other words, users or groups who are granted the Admin or Deployer default global roles have permission to access the MBean operations listed in Table 4-3.
Table 4-4 lists the immutable privileges given to users or groups who are granted the Admin or Monitor default global roles, for various WebLogic Server MBeans. In other words, users or groups who are granted the Admin or Monitor default global roles have permission to access the MBean operations listed in Table 4-4.
Table 4-5 lists the immutable privileges given to users or groups who are granted the Admin or Operator default global roles, for various WebLogic Server MBeans. In other words, users or groups who are granted the Admin or Operator default global roles have permission to access the MBean operations listed in Table 4-5.
Default Group Associations
By default, WebLogic Server grants four default global roles to four default groups. When you add a user to one of these groups, the user is automatically granted the global role. These default group associations are shown in Table 4-6.
Components of a Security Role: Role Conditions, Expressions, and Role Statements
A role condition is a condition under which a security role (global or scoped) will be granted to a user or group. The role conditions that are available in this release of WebLogic Server are:
User Name of the Caller—Creates a condition for a security role based on a user name. For example, you might create a condition indicating that only the userJohncan be granted theBankTellersecurity role.Caller is a Member of the Group—Creates a condition for a security role based on a group. For example, you might create a condition indicating that only users in the groupFullTimeBankEmployeescan be granted theBankTellersecurity role. BEA recommends this role condition for more efficient security management.Hours of Access are Between—Creates a condition for a security role based on a specified time period. For example, you might create a condition indicating that theBankTellersecurity role can only be granted to users when the bank is open.
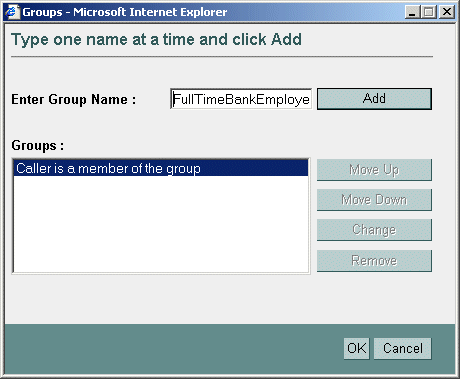
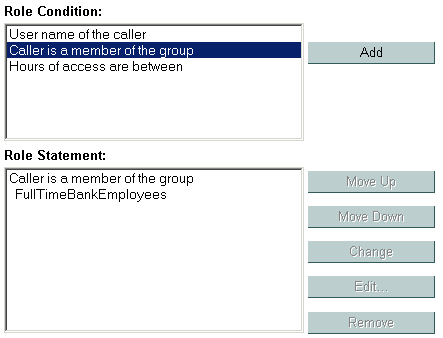
These role conditions, along with the specific information you supply for the condition (such as an actual user name, group, or start/stop times), are called expressions. An example of an expression that you may see in the WebLogic Server Administration Console is shown in Figure 4-3.
In this expression example, the first line is the role condition, the second line is the specific information you supply for the condition—in this case, a group called FullTimeBankEmployees.
A role statement is a collection of expressions that define how a security role is granted, and is therefore the main part of any security role you create. The ability to use multiple expressions means that you can create complex security roles that meet your organization's security requirements. The use of and and or between these expressions, as well as the ordering of the expressions, is also an important feature:
Andis used to specify that all the expressions must be true in order for the security role to be granted.Oris used to specify that at least one of the expressions must be true in order for the security role to be granted.
The entire role statement must be true in order for a user or group to be granted the security role. More restrictive expressions should come later in a role statement.
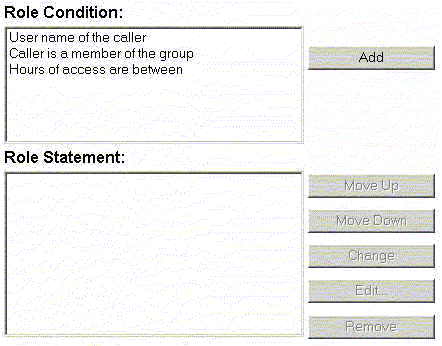
An example of a role statement that you may see in the Administration Console is shown in Figure 4-4.
Figure 4-4 Role Statement Example
In this role statement example, there are two expressions: the first and second lines contain an expression based on the Caller is a Member of the Group role condition, and the third and fourth lines contain another expression based on the Hours of Access are Between role condition.
Working with Global Roles
The following sections provide instructions for working with global roles:
Note: This section describes how to create, modify, and delete global roles. Because they are always scoped to a WebLogic resource, instructions for creating, modifying, and deleting scoped roles are provided under Working with Scoped Roles.
Creating Global Roles
Notes: The section Using the Administration Console to Create Security Roles may also be helpful to review before creating security roles. If you are creating global roles that will be used to secure Server resources, be sure to adhere to the advice given in Maintaining a Consistent Security Scheme.
Do not use blank spaces, commas, hyphens, or any characters in this comma-separated list: \t, < >, #, |, &, ~, ?, ( ), { }. Security role names are case sensitive. All security role names are singular and the first letter is capitalized, according to the BEA convention.
The proper syntax for a security role name is as defined for an
Nmtokenin the Extensible Markup Language (XML) Recommendation.- Select the Conditions tab to display the Role Editor page (see Figure 4-5).
- In the Role Condition list box, click one of the conditions. (For more information about the different role conditions, see Components of a Security Role: Role Conditions, Expressions, and Role Statements.)
BEA recommends that you create expressions using the
Caller is a Member of the Groupcondition where possible. When a group is used to create a security role, the security role can be granted to all members of the group (that is, multiple users).- Click Add to display a customized window. (See Figure 4-6.)
- If you selected the
Hours of Access are Betweencondition, use the Time Constraint window to select start and end times, then click OK. The window closes and an expression appears in the Role Statement list box. (See Figure 4-7 for an example.) - Use the Users or Groups window to enter the name of a user or group, then click Add. An expression appears in the list box.
Move Up and Move Down change the ordering of the highlighted user or group name, and therefore the order in which they are evaluated. Change switches the highlighted
andandorstatements between expressions. Remove deletes the highlighted user or group name.- Click OK to add the expression to the role statement. The window closes and the expression appears in the Role Statement list box. (See Figure 4-7.)
- If necessary, use the buttons located to the right of the Role Statement list box to modify the expressions:
- Move Up and Move Down change the ordering of the highlighted expression, and therefore the order in which they are evaluated.
- Change switches the highlighted
andandorstatements between expressions. - Edit... reopens the customized window for the highlighted expression and allows you to modify the expression.
- Remove deletes the highlighted expression.
Note: If multiple WebLogic Role Mapping providers are configured in the security realm, an intermediate page will list them in a table. From the table,select which WebLogic Role Mapping provider's database should store information for the new global role before performing step 5.
Figure 4-6 Customized Window for Caller is a Member of the Group Condition
Figure 4-7 Example Expression in Role Statement List Box
Modifying Global Roles
The procedure for modifying global roles is, for the most part, the same as the procedure for creating a new global role.
The Global Roles page displays all the global roles currently defined in the WebLogic Role Mapping provider's database.
- Make your changes, using steps 8- 12 in Creating Global Roles as a guide.
Deleting Global Roles
Working with Scoped Roles
The following sections provide instructions for working with scoped roles for the various types of WebLogic resources:
Creating Scoped Roles
To create a scoped role for a WebLogic resource:
- Step 1: Select the WebLogic Resource
- Step 2: Create the Scoped Role
- Step 3: Create the Role Conditions
Note: The instructions for working with scoped roles vary slightly from WebLogic resource to WebLogic resource. Be sure to follow any variations noted in this procedure that pertain to the type of WebLogic resource with which you are working. For more information, see Types of WebLogic Resources.
Step 1: Select the WebLogic Resource
Follow the instructions in the appropriate section to select the type of WebLogic resource for which you will be creating a scoped role:
- Administrative Resources
- Application Resources
- COM Resources
- EIS Resources
- EJB Resources
- JDBC Resources
- JNDI Resources
- Server Resources
- URL Resources
- Web Service Resources
Administrative Resources
In the left pane of the WebLogic Server Administration Console, right-click the name of the WebLogic Server domain (for example, examples), and choose Define Scoped Role... to display the Scoped Roles page.
If available, a table of currently defined scoped roles appears in the right pane.
Application Resources
COM Resources
If a package of EJB classes (such as ejb20.basic.beanManaged.*) will be accessed by a COM client:
- Right-click the name of an EJB JAR containing the EJB that will be used to access the package, and choose Define Policies and Roles for Individual Beans... to display a list of EJBs.
- Click the [Define JCOM Roles] link that is located in the same row as the EJB that will be used to access the package.
If a package of Java classes (such as java.util.*) or individual classes (such as java.util.Collection) will be accessed by a COM client:
- On the General tab, in the COM class field, enter the name of the Java class or package to which you want to scope the security role.
EIS Resources
- Right-click at the level of the EIS resource for which you want to create the scoped role, and choose Define Scoped Role... to display the Scoped Roles page.
If you will be creating a scoped role for all Connectors, right-click Connector Modules in the navigation tree. If you will be creating a scoped role for a particular Connector, expand Connector Modules, then right-click the name of a Connector. Figure 4-8 illustrates where you might click, using the
basic-connectoras an example.Figure 4-8 Deployments Portion of the Administration Console Navigation Tree
If available, a table of currently defined scoped roles appears in the right pane.
EJB Resources
Note: These instructions also apply to Message-driven Beans (MDBs).
If you will be creating a scoped role for all EJB JARs, right-click EJB Modules in the navigation tree. If you will be creating a scoped role for a particular EJB JAR, or for an EJB within a JAR, expand EJB Modules, then right-click the name of an EJB JAR. Figure 4-9 illustrates where you might click, using the
basic-ejbappJAR as an example.Figure 4-9 Deployments Portion of the Administration Console Navigation Tree
- If you will be creating the scoped role for all EJB JARs or for a particular EJB JAR (that is, for all the EJBs in the JAR), choose Define Scoped Role... to display the Scoped Roles page.
JDBC Resources
The JDBC node expands to show nodes for various JDBC components (connection pools, MultiPools, and data sources).
- Right-click at the level of the JDBC resource for which you want to create the scoped role, and choose Define Scoped Role... to display the Scoped Roles page.
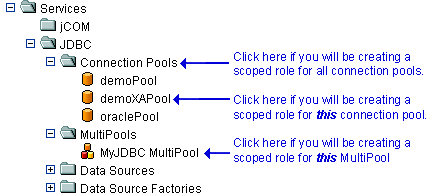
If you will be creating a scoped role for all connection pools, right-click Connection Pools in the navigation tree. If you will be creating a scoped role for a particular connection pool, expand Connection Pools, then right-click the name of a connection pool. To create a scoped role for an individual MultiPool, expand MultiPools, then right-click the name of the MultiPool.
Note: You cannot create a scoped role that encompasses all MultiPools.
Figure 4-10 illustrates where you might click, using various connection pools and a MultiPool as an example.
Figure 4-10 Services Portion of the Administration Console Navigation Tree
If available, a table of currently defined scoped roles appears in the right pane.
JMS Resources
The JMS node expands to show nodes for various JMS components (connection factories, templates, destination keys, and so on).
- Right-click at the level of the JMS resource for which you want to create the scoped role, and choose Define Scoped Role... to display the Scoped Roles page.
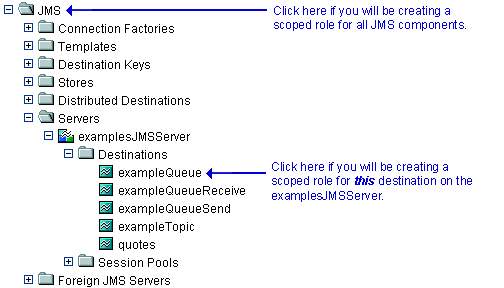
If you will be creating a scoped role for all JMS components, right-click JMS in the navigation tree. If you will be creating a scoped role for a particular destination on a JMS server, expand Servers, then the JMS server and the Destinations node, then right-click the name of a destination. Figure 4-11 illustrates where you might click, using various destinations on the
examplesJMSServeras an example.Figure 4-11 Services Portion of the Administration Console Navigation Tree
If available, a table of currently defined scoped roles appears in the right pane.
JNDI Resources
- Right-click the name of a server that contains the JNDI resource for which you want to create the scoped role. (For example,
myserver.) - In the new Administration Console window, right-click at the level of the JNDI tree at which you want to create the scoped role, and choose Define Scoped Role... to display the Scoped Roles page.
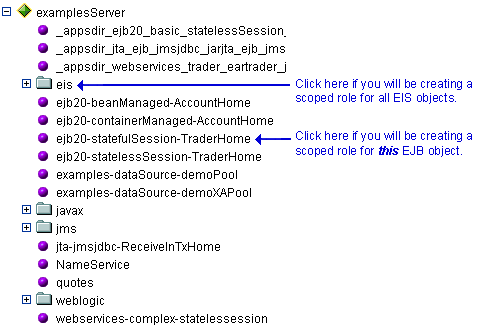
If you will be creating a scoped role for a group of objects, right-click the node in the navigation tree that represents that object type. If you will be creating a scoped role for a particular object, expand the node that represents that object, then right-click the name of an object.
Figure 4-12 illustrates where you might click, using the
examplesServerJNDI tree as an example.Figure 4-12 New Administration Console Window for examplesServer JNDI Tree
If available, a table of currently defined scoped roles appears in the right pane.
Server Resources
The Servers node expands to show the different Server resources for which a scoped role can be created.
- Right-click at the level of the Server resource at which you want to create the scoped role, and choose Defined Scoped Role... to display the Scoped Roles page.
If you will be creating a scoped role for all servers, right-click Servers in the navigation tree. If you will be creating a scoped role for a particular server, expand Servers, then right-click the name of a server. Figure 4-13 illustrates where you might click, using the
examplesServeras an example.Figure 4-13 Servers Portion of the Administration Console Navigation Tree
If available, a table of currently defined scoped roles appears in the right pane.
URL Resources
If you will be creating a scoped role for all Web Applications (WARs), right-click Web Application Modules in the navigation tree. If you will be creating a scoped role for a particular WAR or a component in a WAR (for example, a specific servlet or JSP), expand Web Application Modules, then right-click the name of a Web Application (WAR). Figure 4-14 illustrates where you might click, using the
basic-webappWAR as an example.Figure 4-14 Deployments Portion of the Administration Console Navigation Tree
- If you will be creating the scoped role for all Web Applications (WARs), choose Define Scoped Role... to display the Scoped Roles page.
If you will be creating the scoped role for a particular WAR, or a component within a WAR, follow these steps:
Web Service Resources
- If the Web Service is packaged as an EAR file, expand Applications, then expand the name of the application that contains the Web Service. The application expands to show the components that make up the application, including the Web Service Web Application.
Step 2: Create the Scoped Role
Do not use blank spaces, commas, hyphens, or any characters in this comma-separated list: \t, < >, #, |, &, ~, ?, ( ), { }. Security role names are case sensitive. All security role names are singular and the first letter is capitalized, according to BEA convention.
The proper syntax for a security role name is as defined for an
Nmtokenin the Extensible Markup Language (XML) Recommendation.
Note: If multiple WebLogic Role Mapping providers are configured in the security realm, an intermediate page will list them in a table. From the table,select which WebLogic Role Mapping provider's database should store information for the new scoped role before performing step 5.
Step 3: Create the Role Conditions
- Select the Conditions tab to display the Role Editor page (see Figure 4-15).
- In the Role Condition list box, select one of the conditions. (For more information about the different role conditions, see Components of a Security Role: Role Conditions, Expressions, and Role Statements.)
BEA recommends that you create expressions using the
Caller is a Member of the Groupcondition where possible. When a group is used to create a security role, the security role can be granted to all members of the group (that is, multiple users).Because the JMS subsystem performs its security check only once and the
Hours of Access are Betweencondition requires a subsequent security check, you should not use theHours of Access are Betweencondition if you are creating a scoped role for a JMS resource.- Click Add to display a customized window. (See Figure 4-16.)
- If you selected the
Hours of Access are Betweencondition, use the Time Constraint window to select start and end times, then click OK. The window closes and an expression appears in the Role Statement list box. (See Figure 4-17 for an example.) - Use the Users or Groups window to enter the name of a user or group, then click Add. An expression appears in the list box.
Move Up and Move Down change the ordering of the highlighted user or group name, and therefore the order in which they are evaluated. Change switches the highlighted
andandorstatements between expressions. Remove deletes the highlighted user or group name.- Click OK to add the expression to the role statement. The window closes and the expression appears in the Role Statement list box. (See Figure 4-17.)
- If necessary, use the buttons located to the right of the Role Statement list box to modify the expressions:
- Move Up and Move Down change the ordering of the highlighted expression, and therefore the order in which they are evaluated.
- Change switches the highlighted
andandorstatements between expressions. - Edit... reopens the customized window for the highlighted expression and allows you to modify the expression.
- Remove deletes the highlighted expression.
Figure 4-16 Customized Window for Caller is a Member of the Group Condition
Figure 4-17 Example Expression in Role Statement List Box
Modifying Scoped Roles
To modify a scoped role for a WebLogic resource:
- Navigate to the Scoped Roles page for the WebLogic resource, as described in Step 1: Select the WebLogic Resource.
- Make your changes, using the instructions in Step 3: Create the Role Conditions as a guide.
Deleting Scoped Roles
To delete a scoped role for a WebLogic resource:
- Navigate to the Scoped Roles page for the WebLogic resource, as described in Step 1: Select the WebLogic Resource.
