Using the WebLogic Diagnostic Framework Console Extension
|
|
Working with Views
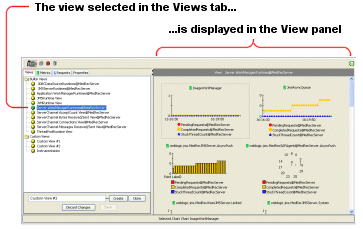
A view is a named collection of charts and graphs that present graphical information of similar diagnostic type data. The Views tab in the left panel provides the means to create, select, modify, and delete views. When you select (click) the name of a view in the Views tab on the left, the view is displayed in the View panel on the right, as shown in Figure 5-1. That view remains displayed in the View panel, even when you select different tabs in the left panel.
Figure 5-1 Views Tab and View Panel
The Views tab lists both built-in and custom views.
- Built-in views are a set of predefined views of available runtime metrics. These views surface some of the more critical runtime WebLogic Server performance metrics and serve as examples of the WLDF Console Extension's view and graphing capabilities.
Built-in views are available for every user logged into the Administration Console and using the WLDF Console Extension.
You can modify a built-in view, but the modification is only visible during your current session; it is lost when you switch back to the primary Administration Console view. Also, no other user can access the modified view. If you want to modify and save one of the built-in views, you can clone it and save it as a custom view.
- A custom view is any view created by a user. Custom views are available only to the user who created them. You can save a custom view and access it again when needed.
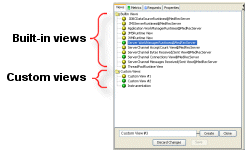
The views listed in the Views tab are displayed in separate trees, as shown in Figure 5-2.
Figure 5-2 Built-in and Custom Views Displayed in the View Tab
Table 5-1 describes the visual cues that help identify the views in the Views tab.
Displaying and Modifying an Existing View
To display and modify an existing view:
- Click the name of the view. The view appears in the View panel, replacing the view that is currently displayed. (Only one view can be displayed at a time.)
- Add and modify charts, as desired. See Creating and Modifying Charts and Graphs.
Creating a New View
To create and display a new view:
- Add and modify charts, as desired. See Creating and Modifying Charts and Graphs.
Creating a View Based on an Existing View (Cloning)
To create and display a view based on an existing view:
- Click Clone to copy the current view with a new name. The new, cloned view is displayed in the View panel. Until you make changes, the cloned view has the same properties as the view upon which it is based.
- Add and modify charts, as desired. See Creating and Modifying Charts and Graphs.
Changing the Name of a View
You can change the names of custom views only. To change the name of a view:
Saving A Custom View
While you can modify any view for the current session, you can save only custom views. To save a custom view:
Alternatively,. click the ![]() (Save All Modified Views) button on the toolbar to save all custom views.
(Save All Modified Views) button on the toolbar to save all custom views.
Deleting a View
You can only delete custom view. To delete a custom view:
Starting and Stopping a View
When you start a view, polling commences for the charts in the view. That is, the client starts polling for data from the server, so that the data can be represented in one or more graphs. When you stop a view, polling for the view ends.
To stop all views, click the ![]() (Stop All Active Views) button on the toolbar to stop all active views.
(Stop All Active Views) button on the toolbar to stop all active views.
Note: Current data for Metrics charts is polled from a data cache on the server. Historical data for Metrics charts and all data for Method Performance charts are retrieved from data archives. If you stop all views, data is no longer added to the data cache on the server. For more information, see Understanding How Data Is Collected and Presented.

