|
|
This chapter describes how to use WebLogic jCOM to call methods on a WebLogic Server object from a COM client.
Note that WebLogic Server must be installed on COM client machines in order for your COM-to-WLS application to run in native mode. However, this does not mean you need a distinct WebLogic Server license for each machine running a COM client.
For more information on native mode, see Running COM-to-WLS Applications in Native Mode
This section summarizes the main steps to call into WebLogic Server from a COM client. Most are described in detail in later sections.
For both of these steps, see Generate Java Wrappers and the IDL File—Early Binding Only.
The following sections discuss how to prepare WebLogic Server so that COM clients can call methods on WebLogic Server objects:
set CLASSPATH=%JAVA_HOME%\lib\tools.jar; %WL_HOME%\server\lib\weblogic.jar;%CLASSPATH% |
Where JAVA_HOME is the root folder where the JDK is installed (typically c:\bea\jdk131) and WL_HOME is the root directory where WebLogic Platform software is installed (typically c:\bea\weblogic700).
java com.bea.java2com.Main |
The java2com GUI is displayed:
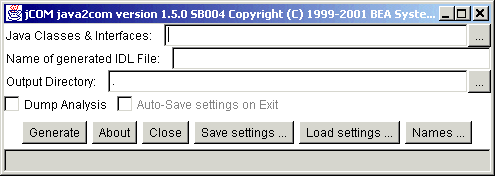
Java Classes & Interfaces: list of the wrapper classes to be converted
Name of generated IDL File: name of the IDL file
Output Directory: drive letter and root directory\TLB
where TLB signifies OLE Type Library.
The java2com tool looks at the class specified, and at all other classes that it uses in the method parameters. It does this recursively. You can specify more than one class or interface here, separated by spaces.
All Java classes that are public, not abstract, and have a no-parameter constructor are rendered accessible as COM Classes. Other public classes, and all public interfaces are rendered accessible as COM interfaces.
If you click the "Generate" button and produce wrappers and the IDL at this point, you will encounter errors when you attempted to compile the generated wrappers and IDL. This is because certain classes are omitted by default in the java2com tool. By looking at the errors generated during compilation, you would be able to determine which classes were causing problems.
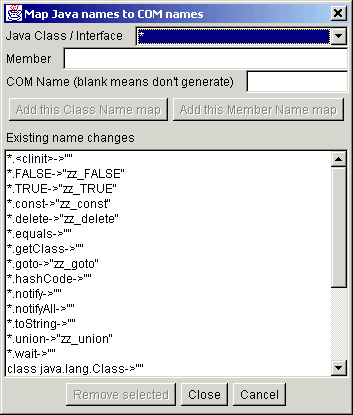
To fix the problem, click on the "Names" button in the java2com tool and remove any references to the class files you require. In this example we must remove the following references:
*.toString->'''' class java.lang.Class->'''' |
The java2com tool generates Java classes containing DCOM marshalling code used to access Java objects. These generated classes are used behind the scenes by the WebLogic jCOM runtime. You simply need to compile them, and make sure that they are in your CLASSPATH.
Grant the COM client user access to the classes that the COM client application needs to access. Your particular application will dictate which classes to expose.
For example, assume that the COM client needs access to the following three classes:
|
To grant access to ejb20.basic.beanManaged, repeat the steps in Granting Access to java.util.Collection and java.util.Iterator,replacing "java.util.*" with "ejb20.basic.beanManaged.*" in step 3.
Note that because of the final asterisk, you're actually granting access to the entire ejb20.basic.beanManaged package.
The following sections describe how to prepare a COM client to call methods on WebLogic Server objects:
There are a number of files that must be installed on your client machine in order to call methods on WebLogic Server objects. As noted below, some of these are only necessary if you are making method calls in native mode.
There are five files and three folders (including all subfolders and files) necessary for running the jCOM tools. You will find them in the WL_HOME\server\bin directory on the machine where you installed WebLogic Server. They are:
For more information on the jCOM tools, see A Closer Look at the jCOM Tools.
In order to run a COM-to-WLS application in native mode, a COM client machine must have access to certain WebLogic Server class files. To obtain these files, install WebLogic Server on each COM client machine. However, this does not mean you need a distinct WebLogic Server license for each client machine.
You can obtain an object reference moniker (ORM) from WebLogic Server. The moniker can be used from the COM client application, obviating the need to run regjvmcmd. The moniker will remain valid for new incarnations of the server as long as the host and port of the server remain the same.
There are two ways to obtain an ORM for your COM client code:
where wlshost is the WebLogic Server machine and wlsport is the server's port number.
java com.bea.jcom.GetJvmMoniker [wlshost] [wlsport]
A long message is displayed which shows the objref moniker and explains how to use it. The text displayed is also automatically copied to the clipboard, so it can be pasted directly into your source. The objref moniker returned can be used to access WebLogic Server on the machine and port you have specified.
Perform the client-side portion of the wrapper and Interface Definition Language (IDL) file generation:
If the java2com tool successfully executes on the WebLogic Server machine (see Preparing WebLogic Server), an IDL file is produced on the server machine. Copy this IDL file to the client machine, and place it in this COM application's \TLB subdirectory.
| Note: | If you are running the client and the server on the same machine this step is not necessary, since the java2com tool should already output to the sample's \TLB subdirectory. |
This command calls the Microsoft IDL compiler MIDL.EXE to carry out the compilation. The result of the compilation is a type library called containerManagedTLB.tlb.
regtlb /unregisterall
regtlb containerManagedTLB.tlb registered_jvm
The first line above calls the regtlb.exe in order to un-register any previously registered type library versions. The second line then registers the newly compiled type library.
The second parameter registered_jvm passed to regtlb is important. It specifies the name of the JVM that will be linked with the type library. The WebLogic jCOM runtime requires this information for linking type library defined object calls to the appropriate wrapper classes.
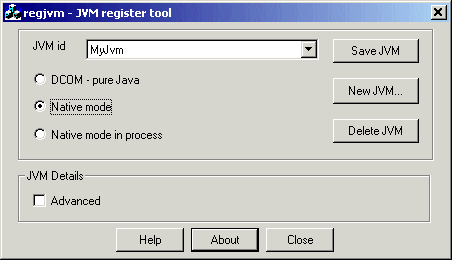
The WebLogic Server JVM is registered in the client machine registry via the regjvm tool. For details, see Register the WebLogic Server JVM in the Client Machine Registry.
Register with the local Java Virtual Machine by adding the server name to the Windows registry and associating it with the TCP/IP address and client-to-server communications port where WebLogic will listen for incoming COM requests. By default, this is localhost:7001.
The regjvm (or regjvmcmd) tool does not overwrite old entries when new entries with identical names are entered. This means that if you ever need to change the hostname or port of the machine with which you wish to communicate, you have to unregister the old entry, and then create a new one.
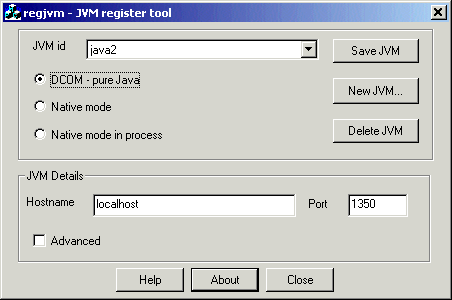
To unregister a JVM in the regjvm tool window, select the JVM you wish to unregister and click Delete.
Alternatively, unregister the JVM with the command line tool regjvmcmd:
regjvmcmd /unregister servername
If your COM client is running in native mode, check the "Native Mode" or "Native Mode Out-of-Process" radio button in the regjvm window or invoke regjvmcmd with the /native parameter. For details on this step, see Running COM-to-WLS Applications in Native Mode.
You can now invoke methods on the WebLogic Server objects. How you code this naturally depends on whether you chose late binding or early binding.
In the following sample Visual Basic Application, notice the declaration of the COM version of the Account EJB's home interface mobjHome. This COM object is linked to an instance of the AccountHome interface on the server side.
Dim mobjHome As Object
Private Sub Form_Load()
'Handle errors
On Error GoTo ErrOut '
Bind the EJB AccountHome object via JNDI
Set mobjHome = CreateObject("examplesServer:jndi:ejb20-containerManaged-AccountHome")WebLogic jCOM has problems handling methods that are overloaded but have the same number of parameters. There is no such problem if the number of parameters in the overloaded methods are different.
When they're the same, calls fail.
Unfortunately, the method InitialContext.lookup is overloaded:
public Object lookup(String)
public Object lookup(javax.naming.Name)
To perform a lookup, you must use the special JNDI moniker to create an object:
Set o = CreateObject("servername:jndi:objectname") The most obvious distinguishing feature of early bound code is that fewer variables are declared As Object. Objects can now be declared by using the type library you generated previously:
Declare objects using the type library generated in Generate Java Wrappers and the IDL File—Early Binding Only. In this Visual Basic code fragment, the IDL file is called containerManagedTLB and the EJB is called ExamplesEjb20BasicContainerManagedAccountHome:
Dim objNarrow As New containerManagedTLB.JCOMHelper
Now, you can call a method on the object:
Set mobjHome = objNarrow.narrow(objTemp, "examples.ejb20.basic.containerManaged.AccountHome")
Start up the COM client application.
For COM-to-WLS applications, there's a distinction in native mode between "in-process" and "out-of-process":
You determine which process your application uses by selecting the native-mode-in-process or native mode radio button in the regjvm GUI tool interface.
If you want your JVM to run out of process (but allow COM client access to the Java objects contained therein using native code), follow these steps:
| Note: | When you register the JVM you must provide the name of the server in the JVM id field. For example, if you enabled JCOM native mode on exampleServer then when you register with regjvm enter exampleServer in the JVM id box. |
For detailed information on the regjvm tool, see A Closer Look at the jCOM Tools.
com.bea.jcom.Jvm.register("MyJvm"):
|
|
|
|
|
|
|
Set acctEJB =
CreateObject("firstjvm.jndi.ejb20.beanManaged.AccountHome")
|
You can also control the instantiation of Java objects on behalf of COM clients by associating your own instantiator with a JVM (additional parameter to com.bea.jcom.Jvm.register(...))—a kind of object factory.
Use this technique to actually load the JVM into the COM client's address space.
Again, use the regjvm command, but this time specify additional parameters.
| Note: | When you register the JVM you must provide the name of the server in the JVM id field. For example, if you enabled JCOM native mode on exampleServer then when you register with regjvm enter exampleServer in the JV id box. |
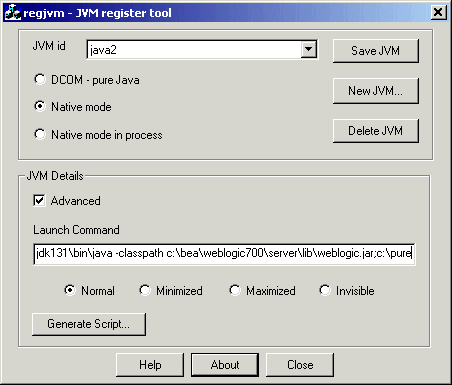
The simplest example would be to use Visual Basic to perform late bound access to Java objects. First register the JVM. If you are using Sun's JDK 1.3.1, which is installed under c:\bea\jdk131 and WebLogic Server is installed in c:\bea\weblogic700\server\lib\weblogic.jar and your Java classes are in c:\pure, you would complete the regjvm tools screen as follows:
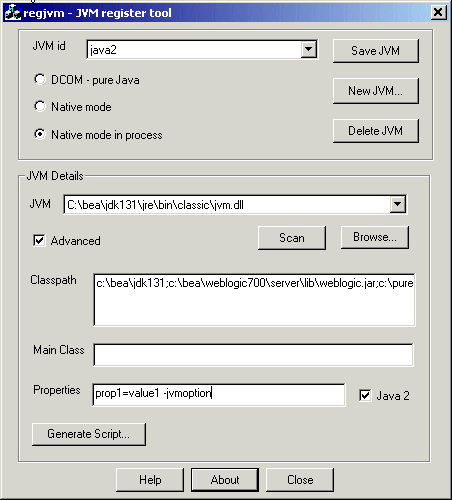
As you can see, you specify the JVM name, the CLASSPATH, and the JVM bin directory path.
From Visual Basic, you should now be able to call the GetObject method:
MessageBox GetObject("MyJVM.jndi.ejb20.beanManaged.AccountHome")For detailed information on the regjvm tool, see A Closer Look at the jCOM Tools.


|