In this step, you will run and deploy a simple web application.
The tasks in this step are:
- Open the Initial (Default) Page Flow in the Web Project
- Edit the Page Flow Components
- Run the Page Flow
Web applications that perform user interface functions (such as displaying "Hello, world!" in a browser page) are implemented as page flows. A page flow is a group of files (a Java controller class and JSP pages) that implement the flow of a portion of your user interface. When a user accesses a URL in the page flow, an instance of the controller class is created and remains in existence until the user exits the page flow. The page flow controller maintains state information for use by the controller's methods.
Web applications can contain several page flows that implement functional units. For example, one page flow could validate users, another page flow could browse data, and a third page flow might retrieve some specific information or perform navigation. Page flows in Workshop are based on the NetUI features of the open source framework called Beehive, a high-level project of Apache. Information on the organization and structure of NetUI and page flows is available in the NetUI Overview in the Apache Beehive documentation.
The page flow controller manages state variables and the actions of the page flow. When the initial (default) page flow controller is created, Workshop inserts a class definition that looks something like this:
@Jpf.Controller()
public class Controller extends PageFlowController { }
@Jpf.Controller is an annotation which provides metadata for the page flow controller class. Annotations look like this:
@annotation-name ( parameters )
similar to method calls except that they begin with @. Annotations always occur immediately before the definition for the class or method to which the annotation applies--they annotate the class or method with metadata. As you modify the page flow, the annotation on the page flow class will be updated by Workshop.
Every page flow controller class must define the begin action, the entry point for the page flow. In the default class, the initial action for begin is defined by a parameter to the @Jpf.Controller annotation:
@Jpf.Controller(simpleActions = { @Jpf.SimpleAction(name = "begin", path = "index.jsp") })
public class Controller extends PageFlowController { }
The @Jpf.SimpleAction annotation specifies the begin action that opens the index.jsp page.
A page flow is implemented within a dynamic web project in Workshop. A dynamic web project can contain multiple page flows.
To Open the Initial (Default) Page Flow in the Web Project
To work with the default page flow controller:
- Open the file Controller.java by double
clicking on its name in the Project Explorer view. The
file is located in
MyWebProject/Java Resources/src/(default package). An editor will open displaying the file contents. - Click Window > Open Perspective > Page Flow.
- The window changes to display the Page Flow perspective, a layout and set of views, menus, toolbars and editor pane most useful for creating page flows. There are several points to note:
- A Page Flow toggle button has appeared in the top right corner indicating that you are now in Page Flow perspective.
- The Page Flow Editor is now displayed at the top of the window. The Page Flow Editor allows you to visually manage the links between page flow artifacts. The initial view shows the begin action linked to the index.jsp page.
- The Page Flow Overview displays a visual map of the actions in the page flow (currently just the begin action and the index.jsp page).
- The Page Flow Explorer view has appeared at the left. The Page Flow Explorer does not display the page flow files as they are organized in folders. Instead, it shows files grouped by function so that artifacts can be accessed easily.
To Edit the Page Flow Components
You can display/edit other source files for your page flow artifacts by double clicking on their names in the Page Flow Explorer view at the left. When you open a file, Workshop creates an editor--a tab in the editor area where the file is open for editing.
Double clicking an action opens an editor for the page flow controller (if it is already open, its tab is brought to the top of the editor area) and positions the cursor at the method for that action.
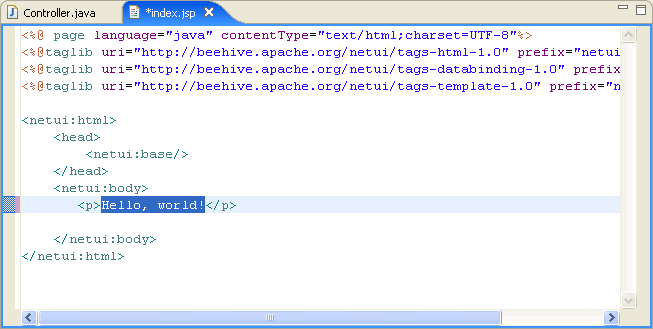
To edit the index.jsp file:
- Expand Pages in the Page Flow Explorer view at the left.

- Double click on index.jsp. Another editor appears in the editor area.
Change the default body text to Hello, world! and use the File > Save command to save the change.
To Run the Page Flow
The page flow is not very interesting at this point, since all that it does is invoke the initial JSP page index.jsp. However, to verify that the page flow works, let's run it now.
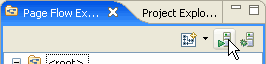
- To run the page flow, click on the Run on Server button on the Page Flow Explorer view
toolbar.
- In the Run on Server dialog, place a checkmark next to Always use this server when running this project and click Finish.
- While the deployment
is in process, you will see status messages displayed in the Servers view
at the bottom of the window.

The results appear in a new tab in the editor window. Note that the URL used to launch the application is .../Controller.jpf, where the JPF (Java Page Flow) was generated from the Controller.Java source file.