

|
|
|
|
|
|
Running the Purchase Order Sample
The BEA WebLogic XML/Non-XML Translator (hereafter referred to as XML Translator) software includes a Purchase Order sample designed to illustrate the basic techniques of creating message format definitions for binary data using Format Builder. The Purchase Order sample consists of DTD, MFL, and DATA files. These samples can be used to test your installation of the XML Translator.
The following topics are discussed in this section:
What is Included in the Purchase Order Sample
The following table provides a listing and description of the files included in the Purchase Order sample application.
Prerequisite Considerations
There are certain software applications that must be installed and tasks that must be performed prior to running the Purchase Order sample. Please refer to the BEA WebLogic XML/Non-XML Translator Release Notes for more information.
Understanding the Data Formats Used with XML Translator
To understand how the Format Builder is used, it helps to understand the data formats used by XML Translator: binary data, XML, and MFL.
About Binary Data (Non-XML Data)
Because computers are based on the binary numbering system, applications often use a binary format to represent data. A file stored in binary format is computer-readable but not necessarily human-readable. Binary formats are used for executable programs and numeric data, and text formats are used for textual data. many files contain a combination of binary and text formats. Such files are usually considered to be binary files even though they contain some data in text format.
Unlike XML data, binary data is not self-describing. In other words, binary data does not provide a description of how the data is grouped, divided into fields, or arranged in a layout. Binary data is a sequence of bytes that can be interpreted as an integer, a string, or a picture, depending on the intent of the application that generates the sequence of bytes. For example, the following binary data string can be interpreted many different ways:
2231987
This could be a date (2/23/1987) or a phone number (223-1987) or any number of other interpretations. Without a clear understanding of the purpose of this data string, the application has no idea how to interpret the string.
In order for binary data to be understood by an application, the format must be embedded within each application that accesses the binary data.
The Format Builder is used to create a Message Format Language (MFL) file that describes the layout of the binary data. MFL is an XML language that includes elements to describe each field of data, as well as groupings of fields (groups), repetition, and aggregation. The hierarchy of a binary record, the layout of the fields, and the groupings of fields and groups are expressed in an MFL document. The MFL document is used by XML Translator at run-time to translate binary data to and from an XML document.
About XML Documents
Extended Markup Language, or XML, is a text format for exchanging data between different systems. It allows data to be described in a simple, standard, text-only format. In contrast to binary data, XML data embeds a description of the data within the data stream. Applications can share data more easily, since they are not dependent on the layout of the data being embedded within each application. Since the data is presented in a standard form, applications on disparate systems can interpret data in proprietary binary formats.
Instances of XML documents contain character data and markup. The character data is referred to as content, while the markup provides hierarchy for that content. Markup is distinguished from content by angle brackets. Information in the space between the "<" and the ">" is referred to as the tags that markup the content. Tags provide an indication of what the content is for, and a mechanism to describe Parent-child relationships.
An XML document can conform to a content model. A content model allows Metadata (data that is used to describe other data) about XML documents to be communicated to an XML parser. XML documents are said to be "valid" if they conform to a content model. A content model describes the data that can exist in an instance of an XML document. A content model also describes a top-level entity, which is a sequence of subordinate entities. These subordinate entities are further described by their tag names and data content. The two standard formats for XML content models are XML Document Type Definition (DTD) and XML Schema. A Schema is an XML document that defines what can be in an XML document. A DTD also defines what content can exist in an XML document, but the Schema definition is more specific than the DTD, and provides much finer-grained control over the content that can exist in an XML document.
About MFL Documents
Message Format Language (MFL) is an XML language that describes the layout of binary data. This language includes elements to describe each field of data, as well as groupings of fields (groups), repetition, and aggregation. The hierarchy of a binary record, the layout of fields, and the grouping of fields and groups is expressed in an MFL document. MFL documents are created using Format Builder. The Format Builder application allows you to define the structure of binary data and save that information in an MFL document. These MFL documents are then used to perform run-time translation.
The MFL documents you create using Format Builder can contain the following elements:
Performing Binary to XML Translation
The following sections provide information on building sample purchase order format definitions using the Format Builder utility to test the translation of binary data into XML format.
The Format Builder included with XML Translator allows you to build format definitions for binary data that will be translated to or from XML. Format definitions are the metadata used to parse binary data.
Analyzing the Data to be Translated
The key to translating binary data to and from XML is to create an accurate description of the binary data. For binary data (data that is not self-describing), you must identify the following elements:
Listing 1-1 shows a sample of binary data. This file is included on the XML Translator CD-ROM and is called \sample\po\po_01.data. In this sample, the example data is taken from a ficticious purchase order on a proprietary system that the XYZ Corporation uses. They would like to interchange this information with another system that accepts XML data.
Listing 1-1 Sample Binary Purchase Order Data
1234;88844321;SUP:21Sprockley's Sprockets01/15/2000123 Main St.; Austin;TX;75222;555 State St.; Austin;TX;75222; PO12345678;666123;150;Red Sprocket;
Perform the following steps to analyze the purchase order data:
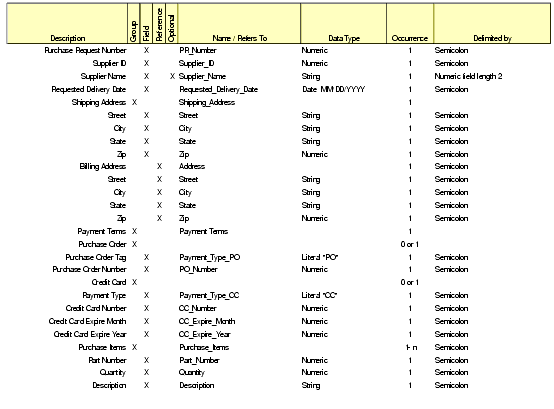
Table 1-2 Purchase Order Master Record
Groups are collections of fields, comments, and other groups or references that are related in some way. In the sample data presented in Table 1-2, notice that two distinct groups can be defined: Payment Terms and Purchase Items. In addition to these groups, notice that there are several fields related to shipping and billing addresses. You can define a group for Shipping Address and a group for Billing Address. You need to define the attributes of the hierarchical groups. Group attributes include the name of the group, whether the group is optional, repeating, delimited, or can be defined as a reference to another group. For example, look at the Address group within the Shipping Address and Billing Address groups. These two groups contain the same fields with the same attributes. Therefore, you can define the Address group within the Shipping Address group and set up the Address group within the Billing Address group as a reference. For more information on references, refer to the BEA WebLogic XML/Non-XML Translator User Guide. Fields are a sequence of bytes that have some meaning to an application. In the sample data shown in Table 1-2, some of the fields are Purchase Request Number, Supplier ID, Supplier Name, etc. You need to define the attributes of the data fields. Field attributes include the name of the field, the type of data contained in the field, the length of the field, or the delimiter that denotes the end of the field. For example, the Supplier ID field is delimited by a semicolon (;) indicating the end of the field data, but the Requested Delivery Date has an implied length of 10 characters.
Once you have completed the steps above, it might be helpful to put the data into a spreadsheet form as shown in Table 1-3. This will assist you in entering the data in Format Builder to create your message definitions.
Table 1-3 Analysis of Purchase Order Data
Using the Format Builder To Test the Translation This section walks you through the steps required in Format Builder to create the message definition file for translating the binary Purchase Order data to XML. Notes: For details on entering data in the detail windows of Format Builder, refer to the BEA WebLogic XML/Non-XML User Guide. The file \sample\po\po.mfl included on the CD-ROM contains the message definition created by the steps below. You can use this file for reference to make sure you create the definition correctly. Step 1. Starting Format Builder and Creating the Message Format
Step 2. Creating Fields
|
Field |
Value |
|---|---|
|
Name |
PR_Number |
|
Type |
Numeric |
|
Field Occurrence |
Once |
|
Delimiter |
; (semi-colon) |
These values were determined by our analysis of the raw purchase order data, as you can see in Table 1-3. Note: Since the only difference between the PR_Number field and the Supplier_ID field is the name, we will use the Duplicate feature of Format Builder to create the Supplier_ID field.
Note: The dashed box around the field icon in the tree pane indicates this is an optional field. Note: The Field detail pane changes based on the Type selected. Because this field is a Date type, it has an implied length and does not require you to specify the termination.
|
Field |
Value |
|---|---|
|
Name |
Requested_Delivery_Date |
|
Type |
Date: MM/DD/YYYY |
|
Field Occurrence |
Once |
|
Data Base Type |
String |
Step 3. Creating Groups
|
Field |
Value |
|---|---|
|
Name |
Shipping_Address |
|
Field Occurrence |
Once |
These values were determined by our analysis of the raw purchase order data, as you can see in Table 1-3. We know from our initial data analysis that the Shipping Address and Billing Address groups contain the same fields with the same attributes. Therefore, we can define the Address group within the Shipping Address group and set up the Address group within the Billing Address group as a reference. For more information on references, refer to the BEA WebLogic XML/Non-XML Translator User Guide. Note: You can use the Duplicate button to create the City and State fields, once the Street field is created.
Step 4. Creating a Group Reference
Now we are going to create the Billing Address group and fields. Since this is a duplicate of the Shipping Address group, we can create a group reference. A reference group has the same format as the original group, but you can change the optional setting and the occurrence setting for the reference group.
|
Field |
Value |
|---|---|
|
Name |
Billing_Address |
|
Field Occurrence |
Once |
These values were determined by our analysis of the raw purchase order data, as you can see in Table 1-3. Note: You can identify this Address group as a reference by the icon located to the left of it in the tree pane. 
Step 5. Creating the Remaining Items
Follow Steps 1 through 4 above to create the remaining items necessary to complete the message definition for the Purchase Order sample. Use the analysis of the raw purchase order data in Table 1-3 to determine the values you need to enter for each item. You can use the file \sample\po\po.mfl for reference if you need assistance.
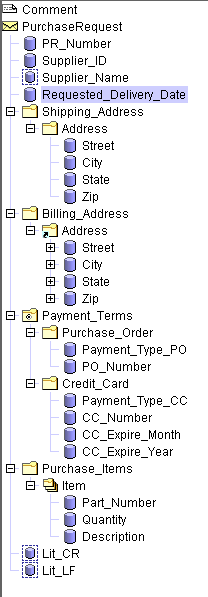
When you finish entering the items, your tree pane should looks similar to Figure 1-1.
Figure 1-1 Completed Tree Pane for Purchase Order Sample
Step 6. Saving the Message Format To save a message format file:
Note: Format Builder automatically assigns the .MFL extension to message format files by default if no extension is given.
Once you have generated the Message Format definition, you can create a DTD or XML Schema document that describes the XML to be converted. You can set up Format Builder to automatically generate a DTD and/or Schema for your message definitions as follows:
Now, whenever you save message format documents, Format Builder will generate a DTD and/or a Schema for your message format. Refer to the BEA WebLogic XML/Non-XML User Guide for more information on DTDs and Schemas.
Step 7. Testing the Message Format
Now, we need to test the message format to identify any errors that exist before using it to translate actual data.
Note: You can see the messages output during the translation by selecting Debug.
Performing XML to Binary Translation
You can also use Format Builder to create message definitions and test the translation of XML data to binary. The steps required to do this are essentially the same as translating binary data to XML. To translate XML data to binary, first create an MFL description of the binary format. The Purchase Order Record sample provides an MFL document that can be loaded by performing the following steps:
Note: You can see the messages output during the translation by selecting Debug.

|

|

|
|
|
|
Copyright © 2001 BEA Systems, Inc. All rights reserved.
|