 Understanding the Payment Process in Financial Gateway
This chapter provides an overview of the payment process in Financial Gateway and discusses how to:
Import Payment Files from Third-Party Applications into Financial Gateway.
Review the payment load process.
Review payments in Financial Gateway.
Dispatch payments in Financial Gateway.
Review payment files.
Import bank acknowledgments.
Understanding the Payment Process in Financial Gateway
This diagram illustrates the steps involved in payment and payment acknowledgment processing using Financial Gateway.
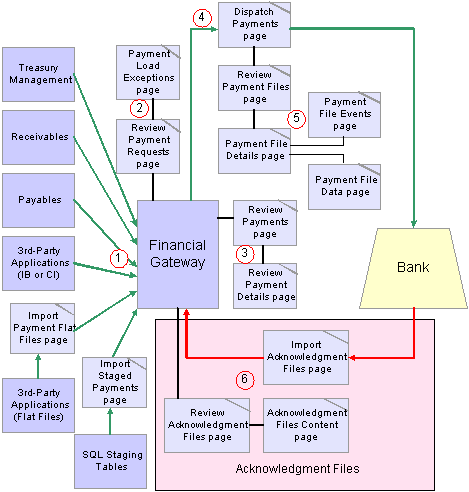
Financial Gateway payment process
In the diagram above, the payment path is represented by the green arrows. The payment-acknowledgment-file path is represented by the red arrows.
Payments are loaded into Financial Gateway from:
PeopleSoft source applications using the delivered integration, which involves the application class component. This method can be modified to include the use of a BPEL process server .
See Understanding the Financial Gateway Integration Process.
Third-party applications using a component interface.
Third-party applications using Integration Broker.
Third-party applications sending payments in flat-file format using the Import Payment Flat Files page.
SQL staging tables using the Import Staged Payments page. Users can use a variety of technologies to insert the data into the SQL staging tables.
Regardless of the method used to import payments, the Payment Load Application Engine (PMT_LOAD) process loads payments from source applications into Financial Gateway. If the payments originated from a source application for which financial sanctions validation is required, the system compares the Name and Address fields from the To Account on the payment against the Financial Sanctions list. If a potential match is found, the payment status changes to “Flagged for Hold.”
Note. The financial sanctions validation service is enabled at the source application level by selecting Require Payee Validation on the Source Registration page
You can view results of the payment load process on the Review Payment Request page. Details of errors that are encountered during the payment load process can be viewed on the Payment Load Exceptions page.
When the payments are in the Financial Gateway tables, you can review them using the Review Payment pages. Here payments can be approved for, or held from, further processing. Payments flagged by the financial-sanctions, data search are designated as a “Potential Sanction Violation” on the Payment Notes page. Administrators can perform a manual search of the financial sanctions data to verify the accuracy of the held payment, after which they can either cancel the payment or clear the flag on the payment thereby changing the status to “Awaiting Dispatch.”
After the optional review process, payments are sent to the bank as payment files using the Dispatch Payment Application Engine. This process can be run manually from the Dispatch Payments page or set up to run automatically using the Schedule Payment Dispatch page.
You can obtain a variety of information using the Payment Files page.
Depending on the bank and whether your system is set up appropriately, you can download files acknowledging that the payment was received, processed, and completed, or that the payment file contained errors that must be corrected. Importing payment acknowledgment files can also be set up to run automatically using the Integration Broker. After the acknowledgment files have been downloaded, they can be reviewed for pertinent information.
See Understanding Electronic Banking.
See Understanding the Financial Gateway Integration Process.
This table lists the three integration points that are used in the payment process.
|
Integration Point |
Purpose |
Method of Integration |
|
PAYMENT_REQUEST |
Used to send payments to Financial Gateway. |
Used by all source applications that can integrate with Financial Gateway. |
|
PAYMENT_STATUS_REQUEST |
Used to request the status of payments. |
Used by all source applications that can integrate with Financial Gateway. Message uses the payment ID as defined by the source application or Financial Gateway depending on how it is defined on the Source Registration page. |
|
PAYMENT_RESPONSE |
Used to send the status of payments from Financial Gateway to the source application. |
Can be used by Cash Management, Receivables, Payables, and third-party source applications that use Integration Broker to integrate with Financial Gateway. |
|
PAYMENT_CANCEL |
Used by Financial Gateway to cancel payments in the source application. |
Can be used by Cash Management, Receivables, Payables, and third-party source applications that use Integration Broker to integrate with Financial Gateway. |
ACH Prenotifications and Returns
An ACH payment prenotification or “prenote” is a zero-dollar, payment file sent to a debtor’s bank to test if payments may be made to a creditor through that bank account. If no response is sent back to the debtor, it is assumed, after a reasonable amount of time, that payments may be made. If an ACH Return file is sent back to the debtor, it will contain issues or setup that must be made before payments can be made to the creditor from the sender's bank account. Payments may not be made through that bank account until another successful prenotification is sent.
Financial Gateway processes prenotes similar to other ACH payments, however, tracking the status of prenotes between a debtor's bank account and a particular creditor is the responsibility of the source system.
This diagram illustrates the steps involved in the ACH prenote process.
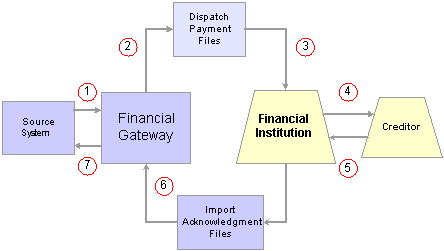
Payment prenotification process
These steps correspond to the prenotification process illustrated in the above diagram:
The source system sends a prenote request to Financial Gateway.
Financial Gateway imports the prenote and creates a payment file.
The payment file is dispatched to the bank using the Dispatch Payment Application Engine.
The prenote is sent to the creditor by the bank using the payee's account. If the prenote is accepted the process ends here.
If the prenote is rejected, an acknowledgment containing an ACH Return file is dispatched by the creditor.
Financial Gateway imports the acknowledgment files.
Financial Gateway transmits the acknowledgment file back to the source system. The source system changes the status of the prenote to “Error.” If the payment issues are correctable, the source system can make the changes and resend another prenote.
Note. For prenotes, Financial Gateway only tracks the status of the actual transaction. Financial Gateway does not track the status of a prenote for a customer or vendor. That is the responsibility of the source system.
This table lists the various statuses that a payment can have as it moves through the Financial Gateway payment process:
|
Payments Status |
Details |
|
Canceled |
Payment was canceled in Financial Gateway. Can be resent from source application. |
|
Error |
An error was encountered when Financial Gateway attempted to process the payment. Details of the error can be viewed on the Payment Load Exceptions page. |
|
Flagged for Hold |
Payment is being held for review and cannot be dispatched. |
|
Awaiting Dispatch |
Payment is loaded into Financial Gateway. If selected, the payment will be dispatched to the bank the next time the Dispatch Payment Application Engine is run. |
|
In Process |
The Dispatch Payment Application Engine is processing the payment. |
|
Dispatched to Bank |
The payment has been sent to the bank by the Dispatch Payment Application Engine. |
|
Acknowledged by Bank |
The bank has received the payment and has sent an acknowledgment. |
|
Paid |
The bank has received the payment, processed it, and sent a payment acknowledgment file back to Financial Gateway. |
See Also
Understanding the Financial Gateway Integration Process
Importing Payments as Flat Files from Third-Party Applications
This section discusses how to import payment flat files from third-party applications.
Note. This section provides information that is necessary for importing payments into Financial Gateway from third-party applications only in flat file format.
See Also
Understanding the Payment Process in Financial Gateway
 Pages Used to Import Payment Flat Files
|
Page Name |
Object Name |
Navigation |
Usage |
|
Import Payment Flat Files |
BSP_IMPORT |
Financial Gateway, Import Payments, Import Payment Flat Files |
Download payments as flat files from third-party applications into Financial Gateway. |
Importing Payment Flat Files from Third-Party ApplicationsAccess the Import Payment Flat Files page.
Parameters
|
Import Type |
Select from the following options:
|
|
Bank Node |
Enter the bank node that was used to transfer the data. This field appears only if FTP or HTTP is selected as the import type. |
|
View Bank Node Details |
Click to access the Bank Node Details page and review property details of the selected node. This link appears only if FTP or HTTP is selected as the import type. |
|
File Path |
Enter the complete file path location. To select files by using the Select File button, you must include a trailing backslash (\) in the file path. You can you can also load all files in a given directory by using the *.* notation or search for files of a specific type by entering an asterisk and the extension suffix. For example, to search all files with a .txt suffix, enter:
|
|
File Selection Help |
Click to view help information about specifying file paths and file names. |
|
File Name |
Select the specific file to import. If you want to import multiple files based on extension, leave this field blank. |
Advanced Options
|
Encryption Profile |
Select an encryption profile to decrypt bank statements. Encryption profiles contain both encryption and decryption information. |
|
Use Integration Broker |
Select to format the files and publish the formatted document to PeopleSoft Integration Broker. Integration Broker then processes the formatted file accordingly. You select this option if you want to use the bank statement information as a trigger to Integration Broker, as an indication to perform other processes, or to integrate with other systems. |
|
Post Process File Action |
Select what action, if any, to perform on bank statement files after the data has been processed. The options are:
|
|
Post Process File Directory |
Enter a file path to the directory to which the file will be moved or copied if either option is selected as the post process file action. |
Layout Properties
|
Value |
Specify the type of flat file to be imported. Enter:
|
Reviewing the Results of the Payment Load Process
The Payment Load Application Engine (PAYMENT_LOAD) process loads payments from source applications into Financial Gateway, regardless of the method that is used to import payments. This section discusses how to review payment requests.
Pages Used to Review the Results of the Payment Load Process
|
Page Name |
Object Name |
Navigation |
Usage |
|
Review Payment Requests |
PMT_REQUEST_LOG |
Financial Gateway, Import Payments, Review Payment Requests |
Review payment requests that were downloaded from source applications. This page is used primarily as an administration page to view payment requests residing in the staging tables. |
|
Payment Load Exceptions |
PMT_EXCEPTION_LOG |
Click the View Payment Load Exceptions icon on the Review Payment Requests page. |
View details of problems that occurred during attempts to load payment requests from source applications. |
Reviewing Payment RequestsAccess the Review Payment Requests page.
Use this page to view a listing and the status of payment requests that were made from source applications. The fields that appear in the Payments group section are source-specific key fields that were specified on the Source Registration page to appear here.
See Also
Page Used to Register Source Applications with Financial Gateway
Reviewing Payments in Financial Gateway
This section discusses how to review payments that have been sent to Financial Gateway.
Pages Used to Review Payments in Financial Gateway
|
Page Name |
Object Name |
Navigation |
Usage |
|
Payments |
PMT_INQUIRY |
Financial Gateway, Review Payments, Payments |
Inquire on payments that were received by Financial Gateway from source applications. |
|
Payment Preferences |
PMT_PREFERENCE |
Click the Edit User Preferences link on the Payments page. |
Define the search criteria and information to be displayed on the Payments page. |
|
Save Search As |
PMT_SEARCH |
Click the Save Search link on the Payments page. |
Define and save a transaction query using predefined search criteria for future use. |
|
Delete Saved Search |
PMT_SRCH_DEL |
Click Delete Search on the Payments page. |
Delete a defined set of transaction search criteria. |
|
Payment Notes |
PMT_NOTES |
|
View events and add comments regarding a particular transaction. This is useful for such things as describing reason transactions that are in hold status. Notes that you add here appear in the Events for Current Payment grid at the bottom of the page and are also replicated in the Events grid of the Review Payment Details page. |
|
Review Payment Details |
PMT_LIFE_CYCLE_INQ |
Click the Review Payment Details icon on the Payments page, the Dispatch Payments page, or the Payment File Data page. |
View a payment's details and progress through the payment life cycle, and drill down to application pages that are related to payment events. |
|
Override Payment Status |
PMT_STAT_OVR |
Financial Gateway, Administration, Override Payment Status |
Change the status of payments. |
Reviewing PaymentsAccess the Payments page.
|
Edit User Preferences |
Click to access the Payment Preferences page, which you use to define the search criteria and information that is displayed on the Payments page. |
Search Fields
Use these field to narrow your search for specific payments, or leave them blank to view all payments that were sent to Financial Gateway.
Note. If Financial Gateway security is enabled, user will see only the payments that meet their access criteria based on the specified security rules.
See Setting Up Payment Security.
|
Saved Searches |
Displays a list of previously saved search criteria (if any). |
|
Save Search |
Click to access the Save Search As page to save the search parameters for future inquiries. |
This group box provides a graphic representation of the criteria that is listed in the Select a Chart field. Use the Payment Preferences page to enable this functionality as well as to define the default chart to be displayed. The chart can display:
Total Payments by Method: A graph of the total number of payments by payment method for the current date.
Payments on Hold by Source: A graph of the total number of payments that were put on hold, grouped by source applications.
Payment Aging: A graph of the total number of payments within Financial Gateway that were sent within the last five days.
Payments by Bank: A graph of all payments by bank for the current day.
Payments in Error: A graph of all payments within Financial Gateway that contain erroneous data.
Payments Awaiting Response: A graph of all payments within Financial Gateway that have been sent to the bank, but have not yet been acknowledged.
Note. The chart may not display data properly if a large amount of data is selected. Because of size constraints within the page the labels will be truncated.
Payment Totals
This group box displays the number of payments that were sent to Financial Gateway grouped by currency type. If more than one type of currency is displayed, the total for each currency appears as a link. Clicking a link regenerates the rows in the Review Payments grid to display only transactions belonging to that specific currency type.
Payments – Payment Information
|
Select |
Use this box to select transactions:
|
|
|
Indicates that the transaction is on hold status pending further approval. |
|
Source ID |
The unique identifier that is assigned to the transaction by the source application. |
|
Transaction ID |
The unique identifier that is assigned to the transaction by Financial Gateway. Settlement ID nomenclature is defined on the Source Registration page. |
|
|
Click to access the Payment Notes page, which you use to add and view comments about the specified transaction. |
|
|
Click to access the source application to view detailed information about the specified transaction. |
|
|
Click to access the Dispatch Payment run control page to manually send the payment to the bank. |
|
|
Click to access the Review Payment Details page to view the payment progress, events, and detailed information on the transaction. |
|
|
Click to access the Payment Files page to view payment-file, transmittal information. |
Bank Details
|
Cutoff Time and Cutoff Date |
Payments arriving by this time and date are processed by the bank that day. Payments arriving afterwards are processed on the next business day. |
Configuring the Payments PageAccess the Payment Preferences page.
Use this page to define search criteria for the Payments page.
|
Default Saved Search |
Select a previously defined set of search criteria to be designated as the default search settings on the Payments page. |
|
Execute Search on Load |
Select to automatically query the database for the data matching the default search criteria for the current day. |
|
Display Totals |
Select to display the number of payments that were sent to Financial Gateway categorized by currency types on the Payments page. |
Reviewing Payment DetailsAccess the Review Payment Details page.
This page provides a graphical representation of the current payment's progress through the payment life cycle. The icons at the top of the page—Awaiting Dispatch, Dispatched to Bank, Acknowledged by Bank, Payment Processed, and Payment Completed—change from black and white to color as each specific event occurs, and they become enabled buttons that act as links to application pages that are related to the payment and the event. Click a button to access the associated page and view the indicated life-cycle information.
|
Awaiting Dispatch |
The transaction is ready to be dispatched to bank. Click to access the Dispatch Payments page. |
|
Dispatched to Bank |
The transaction has been dispatched to the bank. Click to access the Dispatch page to view more details about when and how this transaction was dispatched, and the payment file that was created and dispatched. |
|
Acknowledged by Bank |
The acknowledgement of payment has been received from the bank and downloaded to your system. Click to view the downloaded acknowledgement file. |
|
Payment Completed |
The bank has paid the transaction. Click to view the paid file and acknowledgement. |
Changing Payment StatusAccess the Override Payment Status page.
Note. Access to this page and the ability to change the payment status is limited to users assigned to the administrator role.
The options for changing the status of a payment are limited and depend on the current status of the payment. This table lists the options that are available for each payment status.
|
Current Status |
Available Status Options |
|
Canceled |
Awaiting Dispatch |
|
Error |
Canceled Paid Awaiting Dispatch |
|
Flagged for Hold |
Canceled |
|
Awaiting Dispatch |
Canceled |
|
In Process |
Can be changed to Awaiting Dispatch if the payment is still in the queue, and the Dispatch Payment Application Engine process has not been run. This may occur if Process Scheduler was set to run at a later time. |
|
Dispatched to Bank |
Error Paid |
|
Acknowledged by Bank |
Error Paid |
|
Paid |
Error Awaiting Dispatch |
Note. For prenotes, Financial Gateway only tracks the status of the actual transaction. Financial Gateway does not track the status of a prenote for a customer or vendor. That is the responsibility of the source system.
Dispatching Payments in Financial GatewayThis section discusses how to dispatch payments.
You dispatch payments in Financial Gateway by running the Payment Dispatch Application Engine process (PMT_DISPATCH). You can run this process manually or schedule it to run at a specified time using PeopleSoft Process Scheduler.
See Enterprise PeopleTools 8.48 PeopleBook: PeopleSoft Process Scheduler
Pages Used to Dispatch Payments
|
Page Name |
Object Name |
Navigation |
Usage |
|
Schedule Payment Dispatch |
PMT_BATCH_DISPATCH |
Financial Gateway, Process Payments, Schedule Payment Dispatch |
Use PeopleSoft Process Scheduler to automate the payment dispatch process by scheduling the Dispatch Payment process to run in batch mode as the payments arrive in Financial Gateway. Use the Parameter fields to define the payment batches. |
|
Payment Dispatch |
PMT_INQUIRY |
Financial Gateway, Process Payments, Payment Dispatch |
Manually send selected payments to a bank from Financial Gateway. |
|
Payment Preferences |
PMT_PREFERENCE |
Click the Edit User Preferences link on the Dispatch Payments page. |
Modify functionality and define how data is displayed on the Dispatch Payments page. |
|
Addenda |
PMT_ADDENDA_SP |
Click the Addenda Information icon on the Payment Dispatch page. |
Add instructional information that will appear in the actual payment file for a specified payment. |
|
Payment Dispatch Results |
PMT_DISP_RESULT |
Financial Gateway, Process Payments, Payment Dispatch Click the Results button in the Dispatch Results grid. |
View details of a particular payment dispatch. |
Dispatching PaymentsAccess the Payment Dispatch page.
|
Edit User Preferences |
Click to access the Payment Preferences page, which you use to define how certain elements of the Dispatch Payments page are displayed and function. |
Search Fields
Use these fields to query the tables in Financial Gateway for specific payment transactions.
Payment Totals
Displays the number of payments and the monetary total for each currency type.
Payments
|
Select |
Select the payments to be dispatched or flagged for hold. This field is unavailable for entry for payments that have already been dispatched |
|
Dispatch |
Click to send selected payments to the banks. |
|
Flagged for Hold |
Click to hold selected payments for further review and approval. |
|
Payments Selected |
Displays the number of payment rows that have been selected for dispatching or placing on hold. |
|
|
Click to access the Payment Notes page, which you use to add and view comments about the specified transaction. Comments added here appear only online within the Financial Gateway system— including the event log—for the particular payment. |
|
|
Click to access the Addenda page, which you use to add additional instructions for the specified payment. Instructions here will appear within the actual payment file. |
|
|
Click to access the source application to view detailed information about the specified transaction. |
|
|
Click to access the Review Payment Details page to view the payment progress, events, and detailed information on the transaction. |
|
Review Payment File |
Click to access the Review Payment Files page to review payment file transmittal information. |
Bank Details Tab
|
Cutoff Time and Cutoff Date |
Payments arriving by this time and date are processed by the bank that day. Payments arriving afterwards are processed on the next business day. |
Dispatching a Payment
To dispatch a payment:
Select a payment.
Click the Dispatch button.
If prompted, confirm that you are an authorized user by typing your system sign-in password on the Verify Identity page.
The system displays a message stating that the Payment Dispatch Application Engine is scheduled to process the payment. If the process is successful, a payment file is created.
Dispatch Results
This grid provides a view of payment dispatch processes.
|
Refresh |
Click to update the grid and view the results of more recent dispatch processes. |
|
Results |
Click to access the Payment Dispatch Results page and view details of a particular payment dispatch. |
Reviewing Payment FilesThe Review Bank Payment Files pages enable you to review the status of the transmitted payment files. You can see whether the system successfully transmitted a file. And if a file was not successfully transferred, use the Payment File Events page to determine exactly where the system encountered a file transmittal error.
Important! Any user with access to these pages can view the file details. Restrict user access to these pages by using PeopleTools Security functionality.
Note. The Process Monitor's message log will not provide the cause of an error that occurred as the result of a payment dispatch process involving XML-Publisher-template layouts. In such cases, you must inspect the content of the payment file for the cause of the error by accessing the Payment File Data page.
See Understanding the Layout Catalog.
See Enterprise PeopleTools 8.48 PeopleBook: Security Administration
This section discusses how to:
Review payment files.
Change payment file status
Pages Used to Review Payment Files
|
Page Name |
Object Name |
Navigation |
Usage |
|
Payment Files |
PMT_FILE_DEFN |
|
Review payment file transmittal information. |
|
Payment File Details |
PMT_FILE_DETAILS |
Click the Payment File ID link for a specific payment file. |
View summary information about the payments that are included in the specified payment file. |
|
Payment File Events |
PMT_FILE_EVENT |
|
View summary information of system events that occurred to the payment file during transmittal. Colored icons indicate the transmittal status of the file. A green circle indicates that the file was successfully transmitted; a red square indicates that the file was not successfully transmitted. |
|
Payment File Data |
PMT_FILEDATA_SP |
|
. View detailed payment file data that was transmitted to the bank. This page cannot be edited. |
|
Override Payment File Status |
PMT_FILE_DEFN |
Financial Gateway, Administration, Override Payment File Status |
Change the status of a payment file. |
Reviewing Payment FilesAccess the Payment Files page.
Enter the search parameters and click Search.
|
File Status |
Options are:
|
|
Payment File Contents |
Click this link (located in the Payment File ID column) to access the Payment File Data page, and review all payments that are included in this payment file. |
|
|
This conditional field appears only if the payment has an error status. Use the functionality that is described in “Setting Up Electronic Banking in Financial Gateway” to correct the error. After making the corrections, click the Recreate File icon to re-create the selected payment file. |
|
|
Click to cancel a selected payment file and reset its payments. This conditional field appears only if the payment has an error status. |
|
|
Click to access the Payment File Events page and view summary event log information. |
|
|
Click to access the Payment File Data page, and view payment file data that is transmitted to the bank. The system encrypts stored payment file data. |
|
Dispatch Payments |
Click to access the Dispatch Payments page, and select payments for electronic transmittal to a financial institution. See Dispatching Payments. |
|
Process Monitor |
Click to access the Process List page, and review processing results for the Payment Dispatch Application Engine process (PMT_DISPATCH). |
Changing Payment File StatusAccess the Override Payment File Status page.
Note. Access to this page and the ability to change the payment file status is limited to users who are assigned to the administrator role.
The options for changing the status of a payment file are limited and depend on the current status of the payment file. This table lists the options that are available for each payment file status.
|
Current Status |
Available Options |
|
Canceled |
No change allowed. |
|
Complete |
Error |
|
Complete with Errors |
Complete Error |
|
Error |
Complete |
|
Dispatched to Bank |
Complete Error |
|
In Process |
No change allowed. |
|
Received by Bank |
Complete Error |
Importing Bank AcknowledgmentsThis section discusses how to:
Import payment acknowledgement files.
View payment acknowledgement files.
Understanding Acknowledgments
Acknowledgment files are imported from financial institutions into Financial Gateway. They contain data that is used to:
Verify the receipt of a payment.
Acknowledge that a payment was processed successfully.
Notify the sender of problems with a payment.
PeopleSoft provides a variety of layouts designed specifically importing this type of payment data.
Pages Used to Import Bank Acknowledgments
|
Page Name |
Object Name |
Navigation |
Usage |
|
Import Acknowledgment Files |
BSP_IMPORT |
Financial Gateway, Process Payments, Import Acknowledgment Files |
Import bank payment acknowledgments (or payment error messages) into the application tables. |
|
Acknowledgment Files |
PMT_FILE_ACK_DEFN |
Financial Gateway, Review Payments, Acknowledgment Files |
View a listing of imported payment acknowledgement files. |
|
Acknowledgment File Contents |
PMT_FILE_ACK_DTL |
Click the Ack File ID link for a specific file. |
View the details of a specific payment acknowledgment file. |
Importing Payment Acknowledgment FilesAccess the Import Acknowledgment Files page.
Parameters
|
Import Type |
Select a method for importing the acknowledgment files. The options are:
|
|
Bank Node |
Enter the node that will be used to relay the payment-acknowledgment files from the bank to your system. This field appears only if FTP or HTTP is selected as the import type. |
|
View Bank Node Details |
Click to access the Bank Node Details page and review property details of the selected node. This field appears only if FTP or HTTP is selected as the import type. |
|
File Path |
Enter the complete file path location. To select files using the Select File button, the file path must have a trailing backslash (\). You can also search for files of a specific type by entering an asterisk and the extension suffix. For example, to search all files with an .XXX suffix, enter:
Note. Be sure that the application server and the Process Scheduler have access to the directory where the file(s) are stored. |
|
File Selection Help |
Click to view help information about specifying file paths and file names. |
|
File Name |
Select the specific file to import. If you want to import multiple files based on extension, leave this field blank. |
|
Layout ID |
Select an acknowledgment file layout. |
|
View Layout Details |
Click to access the Layout Catalog page to view details of the acknowledgment file layout. |
Advanced Options
|
Encryption Profile |
Select an encryption profile to decrypt payment acknowledgments. Encryption profiles contain both encryption and decryption information. |
|
Use Integration Broker |
Select to format the files and publish the formatted document to PeopleSoft Integration Broker. Integration Broker then processes the formatted file accordingly. You select this option if you want to use the payment acknowledgment information to trigger Integration Broker to perform other processes or integrate with other systems. |
|
Post Process File Action |
Select what action, if any, is to be performed on the payment acknowledgment files after the data has been processed. The options are:
|
|
Post Process File Directory |
Enter a file path to the directory to which the file will be moved or copied if either option is selected as the post process file action. |
Layout Properties
|
Value |
Property codes and values appear by default from values that are defined on the selected layout ID. If you configure unique code mappings for a layout (on the Code Mappings page) you need to modify the displayed CODE_MAP_GROUP value with the appropriate unique map value. See Defining Code Mappings for Bank Statements, Payments, and Payment Acknowledgments. |
Note. If you are importing multiple files for a single run control ID, you must add requests (by using the Add button) for each file that is being requested. Do not enter a file name; run the import process, and then edit the file name and run the import process again. Doing this can result in duplicate acknowledgment loading errors.
Viewing Payment Acknowledgment FilesAccess the Acknowledgment Files page.
Enter the search parameters and click Search.
|
File ID |
Click to view the contents of the payment acknowledgment file. |
|
File Status |
Options are:
|
|
|
Click to access the Payment File Events page, and view summary event log information. |
|
|
Click to access the Payment File Data page, and view payment file data that is transmitted from the bank. The system encrypts stored payment-acknowledgment files. |
|
Dispatch Payments |
Click to access the Payment Dispatch page to search for, and dispatch, payments. |