 Understanding Payment Processing
This chapter provides an overview of payment processing, lists prerequisites, and discusses how to:
Set up pay cycles.
Approve payments.
Schedule, review, and modify payment installments.
Make immediate payments.
Create prepayments.
Inquire about payments.
Cancel payments.
Manage payments outside PeopleSoft eSettlements.
Understanding Payment ProcessingDuring buyer registration you can specify to approve payments in PeopleSoft eSettlements. If you choose this option, in either the Business Service Provider or the Buyer Direct Model, you must run the payment selection process from the Pay Cycle Manager, and approving payments automatically initiates the payment creation process.
In the Business Service Provider model, payments are processed according to the subscriptions established during buyer registration. The Business Service Provider model supports only electronic funds transfer (EFT) payments.
The Buyer Direct model supports all PeopleSoft Payables payment methods—except draft.
Note. If you have enabled financial sanctions at either the installation or bank level, the system does not create payments for a supplier with a financial sanctions status of Blocked or Review. However, if financial sanctions validation is enabled at the bank level and you no longer validate for a particular supplier's bank, the system may select a supplier with a financial sanctions status of Review for payment.
See Understanding Pay Cycle Alerts.
Users who have authority to create urgent payments or to approve payments must have the primary permission list and process profile EPMP8000 attached to their user ID. To attach this profile, select PeopleTools, Security, User Profiles, User Profiles.
Note. None of the following processing options are available in the Buyer Direct model. In the Buyer Direct model, you set up pay cycles in PeopleSoft Payables. You can enable PeopleSoft eSettlements payment approval which you can use in conjunction with the PeopleSoft Payables pay cycle approval.
Buyers can choose from the following payment processing options:
|
Processing Method |
Details |
Setup |
|
Fully Automated |
Requires no payment approval. Scheduled by the host administrator, with the buyer administering payments. |
To specify this method, on the Registration page select the Automated Paycycle radio button but do not select the Paycycle Approval Required check box. |
|
Semi-controlled |
Selected payments are presented to the buyer for approval and confirmation before the payment file is created. The host administrator enters the pay cycle criteria and runs the payment selection process on a predetermined schedule. Buyers review payments based on voucher selection. |
To specify this method, on the Registration page select the Self Service Paycycle radio button and select the Paycycle Approval Required check box. |
|
Full Control |
The host administrator grants the buyer access to the Pay Cycle Processing and Pay Cycle Approvals components. These PeopleSoft Payables pages must be secured to ensure the users have only limited access to the data. |
To specify this method, on the Registration page select the Self Service Paycycle radio button. You can optionally select the Paycycle Approval Required check box for this level of control. |
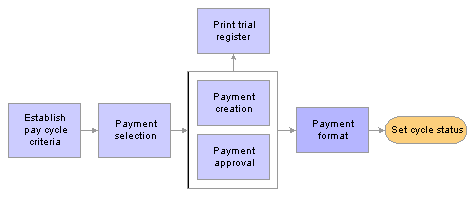
The following diagram illustrates fully automated payment processing:

Fully automated payment processing
Subscription during buyer registration indicates payments are preapproved. No further approvals are required as part of the pay cycle. Pay cycles are created and run by the host administrator. Buyers receive email notification when the payment file is generated. The host administrator uses the Create Pay Cycle component (PYCYCL_DEFN) and the Pay Cycle Manager page in PeopleSoft eSettlements to process the pay cycle.
The following diagram illustrates semi-controlled payment processing:
Semi-controlled payment processing
The payments can be approved and created using either the PeopleSoft eSettlements Approve Payments component (EM_PYCYCL_APPROVE) or the PeopleSoft Payables Pay Cycle Approval page—both are on the portal navigation for PeopleSoft eSettlements. The buyer should use the PeopleSoft eSettlements pages to approve the payments.
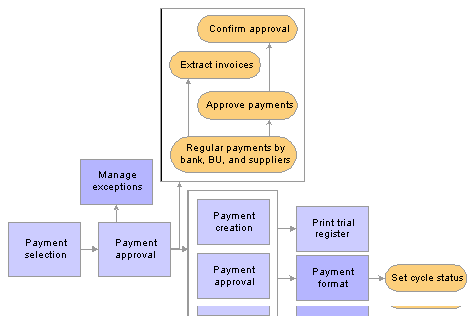
The following diagram illustrates full control payment processing:
Full control payment processing
The system administrator or buyer user creates a pay cycle using the Create Pay Cycle component. The buyer runs the payment selection process on demand—from Pay Cycle Manager—on one or many business units at once. Because this requires greater knowledge of underlying PeopleSoft Payables system functionality, additional training is required for buyers exercising this option.
The buyer approves the payments using either the PeopleSoft eSettlements Approve Payments component or the PeopleSoft Payables Pay Cycle Approval page. Normally, the buyer should use the PeopleSoft eSettlements pages to approve the payments.
PeopleSoft eSettlements Payments and PeopleSoft Financial Gateway
PeopleSoft eSettlements leverages the integration between PeopleSoft Banks, Payables and Financial Gateway to process electronic payments. PeopleSoft eSettlements can process automated clearing house (ACH), EFT, and wire payment methods. To process payments through the PeopleSoft Financial Gateway processing, you must first define the appropriate EFT layout and settle through method in the Banks External Account component (BANK_EXTERNAL).
PeopleSoft eSettlements settles payments through PeopleSoft Financial Gateway at two events:
Saving urgent payment requests.
Approving and creating payments in the Pay Cycle Selection process.
Performing either of these actions triggers the PS Job program, eSettlement Payment Job (EM_PAY). This job works in tandem with multiple PeopleSoft Payables programs to create payment messages, which are submitted to the PeopleSoft Financial Gateway for processing. PeopleSoft eSettlements sends payment messages of New or Cancel. During payment processing with PeopleSoft Financial Gateway, PeopleSoft eSettlements receives messages indicating the payment's processing status, such as Loaded, Hold, Error, and Paid. The system displays this payment status information in Pay Cycle Manager and the following PeopleSoft eSettlements inquiry pages:
Review Payment – Buyer (EM_BUY_PYMT_INQ).
Review Payment – Seller (EM_SEL_PYMT_INQ).
Review Payment – Payment Reference (EM_PYMNT_INQ).
If the payment cannot be successfully processed through PeopleSoft Financial Gateway, it generates an error message. You must correct the errors by cancelling the payment to reprocess the payments.
You can cancel a payment processed through PeopleSoft eSettlements and PeopleSoft Financial Gateway. The cancellation logic for PeopleSoft eSettlements and Payables payments processed through the PeopleSoft Financial Gateway is very similar. If you cancel a payment that the system has not yet sent to the bank, the system marks the payment as cancelled in PeopleSoft Financial Gateway and prevents it from being transmitted to the bank. If you cancel a payment that has already been sent to the bank, the PeopleSoft Financial Gateway functionality marks the payment as cancelled but does not send a cancelled payment message to the bank. Instead, you must cancel the PeopleSoft Payables payment cancellation functionality, and then resubmit it.
See Also
Setting Up Payment Formats and Payment Forms
Understanding Invoice Extracts
Pay Cycle Processing Using the PeopleSoft Financial Gateway
Prerequisites
Before processing payments, the system administrator must do the following:
Create a buyer template.
Create a bank account.
Create a buying entity (buyer).
Establish buyer payment processing preferences.
See Also
Understanding Buyer Registration
Setting Up Pay CyclesAfter completing the prerequisites, the system administrator must set up the pay cycles.
Important! In the Buyer Direct model, you must assign the appropriate pay cycles to each user that is responsible for reviewing approving pay cycles from PeopleSoft eSettlements. In the Business Service Provider model, each buyer administrator must notify the exchange host which users from the buying entity will be responsible for reviewing and approving pay cycles.
To set up pay cycles, use the Secure Pay Cycles component (EM_SEC_PYCYCL_OPR).
This section describes how to:
Assign pay cycle access.
Process pay cycles.
 Page Used to Set Up Pay Cycles
|
Page Name |
Object Name |
Navigation |
Usage |
|
SEC_PYCYCL_OPR |
eSettlements, Administration, Secure Pay Cycles, Pay Cycle by User ID |
Assign access for one or many pay cycles to the user responsible for reviewing and approving pay cycles. |
Assigning Pay Cycle AccessAccess the Pay Cycle by User ID page.
|
Pay Cycle |
Assign the accessible pay cycles to the user ID that you selected to access the page. |
Processing Pay CyclesAfter you complete all relevant configuration, you run the pay cycle. The system administrator or buyer user accesses the Create Pay Cycle component and Pay Cycle Manager to create a pay cycle and select the payments.
Note. If you have enabled financial sanctions at either the installation or bank level, the system does not select payments for a supplier with a financial sanctions status of Blocked or Review. However, if financial sanctions validation is enabled at the bank level and you no longer validate for a particular supplier's bank, the system may select a supplier with a financial sanctions status of Review for payment.
See Understanding Pay Cycle Alerts.
The system administrator can specify that pay cycle approval is required either on the buyer Registration page in PeopleSoft eSettlements, or in the Payment Selection Criteria component (PYCYCL_DEFN) in PeopleSoft Payables.
A pay cycle containing any buying organizations that specified their payment approvals be performed in PeopleSoft eSettlements, will be eligible for the payment selection process only, and will not be eligible to have both the payment selection and payment creation processes run together.
System administrators or buyers can select any payment method other than draft payment methods when they create a pay cycle.
See Also
Creating, Updating, and Reusing Pay Cycles
Approving PaymentsAfter the payments are selected for each pay cycle, the pay cycles await approval by the buyer user having pay cycle access before that user can generate the related payments.
That buyer then:
Approves or rejects payments.
Reviews and optionally excludes invoice schedules included in payments.
Includes discount-eligible invoices that would be lost if not included in the current pay cycle.
Resolves disputes on invoices included in any pay cycle before processing payments.
This section describes how to:
Review pay cycles awaiting approval.
Review and create payments.
Include payments eligible for discount.
Select invoices for payment.
Confirm payment creation.
Reject payments.
Exclude and resolve disputed invoices.
Define payment processing workflow notifications.
Note. If payment approval is required in PeopleSoft eSettlements, you must run the payment selection process from the Pay Cycle Manager. Once the payment is approved in PeopleSoft eSettlements, the payment creation process is automatically initiated.
See Also
Understanding Buyer Invoice Management
Pages Used to Approve Payments
|
Page Name |
Object Name |
Navigation |
Usage |
|
EM_PYCYCL_STAT |
eSettlements, Payments, Approve Payments, Approve Payments - Pay Cycle Summary |
Review the pay cycles waiting for approval. |
|
|
EM_PYCYCL_SUM |
Click a Details link on the Approve Payments - Pay Cycle Summary page. |
Review payments included in the pay cycle summarized by different criteria, and view the sum debited on each bank account. |
|
|
EM_PYCY_DSCNT_ALRT |
Click the Invoices Eligible for Discount link on the Approve Payments - Approve Pay Cycle page. |
Include payments eligible for a discount in the pay cycle. |
|
|
EM_PYCY_CONF_CREAT |
Click the Create Payment button on the Approve Payments - Approve Pay Cycle page. |
Confirm payment creation. Bank account and amount debited information appears. |
|
|
EM_PYCY_CONF_REJEC |
Click the Reject Payment button on the Approve Payments - Approve Pay Cycle page. |
Reject the pay cycle. Payment is not created and all invoices included in the pay cycle remain outstanding and are selected in the next pay cycle. Rejection confirmation resets the pay cycle. |
|
|
EM_PAY_PAGE |
Click a Details link on the Approve Payments - Approve Pay Cycle page. |
Review invoices selected and different suppliers to be credited in the pay cycle, and exclude any invoices from the pay cycle. Excluded invoices are not paid and are selected in the next pay cycle Any schedules which have been disputed can also be resolved. |
Reviewing Pay Cycles Awaiting ApprovalAccess the Approve Payments - Pay Cycle Summary page.
|
Details |
Click a link in this column to the Approve Payments - Approve Pay Cycle page to create or reject payments. |
Note. The combination of the Pay Cycle ID and the Seq (sequence number) identifies the remittance.
Reviewing and Creating PaymentsAccess the Approve Payments - Approve Pay Cycle page.
|
Summarize By |
Select a parameter to summarize your search: Bank: The bank account debited. Bank and Supplier: The bank account debited and the remit to supplier credited. Buyer: The business unit originating the payment. Supplier: The remit to supplier credited. Note. Depending on the Summarize By selection, the information that appears on the page varies. |
|
Invoices Eligible for Discount |
Click this link to access the Approve Payments - Lost Discount Alert page where you can include potential discount-bearing invoices in the current pay cycle. Note. This link is available only when invoices with discount potential have been identified in the pay cycle. The buyer uses this page to view and potentially include scheduled payments that are currently not included in this pay cycle, but which will forfeit an earned discount if not paid before the next payment date. This enables quick analysis of upcoming payments to determine whether an advance payment would capture a discount that might otherwise be lost. |
Payment Details
The information that displays can include:
|
Bank and Description |
Displays the bank originating the payment and the bank name. |
|
Nbr of Payments (number of payments) |
Displays the number of payment schedules making up the payment. |
|
|
If an invoice is on hold, this button displays in the Dispute column. Click its adjacent Details link to view associated payment details. |
|
Details |
Click this link to view and act on the invoices included in the payment. |
|
Create Payment |
Click this button to access the Approve Payments - Payment Confirmation page where you can create the payment. Note. If there are invoices in dispute this button will be inactive. You must resolve the disputed invoices or exclude them from the pay cycle before creating the payment. |
|
Reject Payment |
Click this button to access the Approve Payments - Payment Selection Rejection page where you can reject all listed invoices for this pay cycle. |
Including Payments Eligible for DiscountAccess the Approve Payments - Lost Discount Alert page.
|
Include |
Click this button to include the invoice in the pay cycle, then click Save. Note. To view all potential invoices, be sure to select View All in the Voucher Information group box header. |
See Also
Handling Potential Lost Discounts
Selecting Invoices for PaymentAccess the Approve Payments - Invoices to be Paid page.
Advanced Search
|
Show More Information and And |
Select additional invoice detail categories to appear in the last two columns of the Invoices to be Paid grid, then click the Search button. |
|
Display |
Specify which invoices appear. Values include: All Invoices, Excluded Invoices, and Included Invoices. |
|
Exclude All |
Click this link to remove all invoices from the pay cycle, effectively canceling the pay run. |
|
Included Invoices |
Displays the number of invoices included in the pay cycle. |
|
Sum of Included Amount |
Displays the total amount of included invoices. |
|
Refresh |
Click this button to recalculate the Sum of Included Amount after you include and exclude payments. |
Invoices to be Paid
The column headings that appear vary depending on your Show More Information and And drop-down list box selections.
|
Include |
Select the respective check box to include the invoice in the pay cycle. |
|
|
Click to view dispute information and resolve disputes. |
|
Scheduled |
Displays the invoice due date. |
|
|
Click to view the HTML invoice. |
|
Gross Amt (gross amount) |
Displays the gross amount of the invoice. |
|
Rate |
Click a link to view the current exchange rate detail, depending on the currency selected. |
|
Discount Due and Bank Code |
Displays additional invoice detail categories. The last two column headings vary depending on your Show More Information and And drop-down list box selections. Possible heading names are Discount Due and Bank Code. |
Confirming Payment CreationAccess the Approve Payments - Payment Confirmation page.
|
Confirm Payment Creation |
Click to create the payment and generate the EFT or check file. |
Rejecting PaymentsAccess the Approve Payments - Payment Selection Rejection page.
|
Reject Payment Selection |
Click this button to reject the payment and reset the pay cycle, clearing all the included invoices. |
Excluding and Resolving Disputed InvoicesAccess the Approve Payments - Invoices to be Paid page.
Note. Buyers can generate payments only when disputed invoices are either resolved or excluded from the pay cycle.
|
|
Click the Dispute Information button to resolve the invoice dispute, or clear the Include check box for any invoice to exclude it from the pay cycle. |
Note. The buyer can put invoices on hold even after the invoices have been selected for a pay cycle, by using the Review Invoices or Invoice Life Cycle pages.
See Also
Understanding Buyer Invoice Management
Defining Payment Processing Workflow NotificationsThree types of workflow notifications are available depending on the subscription options chosen by the buyer and supplier. The following table lists the email notification types and describes the conditions that trigger each:
|
Notification Type |
Trigger |
|
Payment Approval |
Payment approval notifications are sent to buyers when payments are awaiting approval and if payment approval notifications have been set up at the buyer setID or the agreement level. |
|
Buyer Payment Creation |
At the end of the pay cycle, when the payment is created, the buyer receives notification that payments debiting the appropriate bank account have been created. This only occurs if notification has been set up at the buyer setID or agreement level. |
|
Supplier Payment Creation |
At the end of the pay cycle, when the payment is created, and if notification has been set up at the supplier setID level (or if the organization so subscribed during supplier registration or during agreement creation), the supplier receives notification that payments have been created crediting the supplier's bank account. |
See Also
Scheduling, Reviewing, and Modifying Payment InstallmentsBuyers can schedule partial payments against an invoice, thereby creating more than one payment installment. When you schedule payments, the system automatically populates the remaining gross amount as the next payment amount.
Buyers can also create manual or urgent payments for an installment, as well as place an installment or partial payment in dispute. They can also create late payment and reminder notifications for each payment schedule.
You must select the Manually Schedule Payments check box for each user responsible for scheduling payments and placing payments on hold, on the User Preferences - Procurement: Payables page.
This section discusses how to schedule, review, and modify payment installments.
Note. The system generates payment schedules automatically according to the payment terms, and you can also schedule them manually.
Pages Used to Schedule, Review, and Modify Payment Installments
|
Page Name |
Object Name |
Navigation |
Usage |
|
EM_BUY_PYMNT_INSTL |
eSettlements, Payments, Review Payment Installments, Review Payment Installments - Inquiry |
Review a list of invoices that need to be paid. |
|
|
EM_VCHR_PAYMENT |
Click a Schedule link on the Review Payment Installments - Inquiry page. |
Schedule, review, and modify payment installments. |
Scheduling, Reviewing, and Modifying Payment InstallmentsAccess the Schedule Payment - Schedule a Payment page.
Payment Information
If more than one payment exists for this invoice, a reminder message displays just beneath this group box header.
When you access the page, the full amount displays on a single line. You can change the amount to be the first payment installment amount. Once you click the Add button, the system calculates the remaining amount as the next payment installment. You can continue this process up to the number of installments you want, editing each line for due date.
|
|
Click the add button before saving the page to add an installment after you enter your first amount. Add a row for each desired installment, entering an amount on each line. Each time you add an installment the system recalculates the remaining gross amount on the newly added line. |
|
Bank |
Select a bank ID. The only bank IDs available are those associated with the buyer during buyer bank security setup. Note. Buyer bank security is only used in the Business Service Provider model. In the Buyer Direct model, users have access to all banks that are available through TableSet sharing. |
|
Account |
Select the account from which the funds originate. |
|
Method |
Select a different payment method if needed. Note. No Draft methods are available. |
|
Layout |
Displays the defined layout for the specified bank account and payment method. |
|
Settle by |
Displays if the payment has been processed through Financial Gateway or Pay Cycle. |
|
Action |
Select Schedule. |
|
Scheduled Due Date |
Enter the date the installment will be selected for payment. |
Payee
|
Remit to, Location, and Address |
Displays the supplier to which the payment is made, supplier location, and address for the location. You define locations for the supplier on the Review Supplier Details - Locations page. |
See Also
Making Immediate PaymentsThis section provides an overview of immediate payment processing and discusses how to:
Record manual payments.
Create urgent payments.
Note. Users who have authority to create urgent payments or to approve payments must have permission list EPMP8000 attached to their user ID. This list is automatically assigned to buyer users created from the Review User Profiles - Buyer User Details page in PeopleSoft eSettlements. To manually attach this profile select PeopleTools, Security, User Profiles, User Profiles.
See Also
Enterprise PeopleTools PeopleBook: Security Administration
Understanding Immediate Payment ProcessingBuyers have three options to satisfy suppliers when immediate payment becomes necessary:
Pay the invoices through the system and create the payment file remitted to the bank.
Issue a check for an invoice manually—outside the system—and assign a payment reference number to record the payment in the system.
In the Buyer Direct model, the buyer creates manual payments using the PeopleSoft Payables pages, accessed directly from PeopleSoft eSettlements. Buyers first add the payment, then select the invoices to be paid. The payment method can be Direct Debit, Giro - Manual, Manual Check, or Wire Report in PeopleSoft Payables.
Only those users who have been set up to record payments at the user preference level can record manual payments.
If financial sanctions validation is enabled at the installation level or the bank level, you cannot create a manual payment worksheet from the Manual Pay Selection page if the supplier has a financial sanctions status of Review or Blocked. The system validates the supplier against the financial sanctions lists (for example, the Specially Designated Nationals (SDN) list) when you attempt to build a manual payment. If financial sanctions validation is enabled at the bank level, the system only validates the supplier if the remit supplier's bank requires financial sanctions validation.
See Manual Payments.
In the Business Services Provider model, the buyer creates manual payments using the Create Manual Payment - Schedule payment page in PeopleSoft eSettlements. Buyers first select the invoices, then create the manual payment.
To create a manual payment:
The invoice must be approved in the system.
The bank account setup must support manual payments.
The installment must not be in dispute.
Create an urgent payment to pay a supplier instantly.
Invoices must be entered into the system and be approved for payment before you can use this method.
All payment methods are available for urgent payment creation—except for any of the Draft payment methods. This is true for both models.
If financial sanctions validation is enabled at the installation level or the bank level, you cannot create an urgent payment if the supplier has a financial sanctions status of Review or Blocked. However, if financial sanctions validation is enabled at the bank level and you no longer validate for a particular supplier's bank, the system may allow you to create an urgent payment for a supplier with a financial sanctions status of Review. The system validates the supplier against financial sanctions lists (for example, the SDN list) when you attempt to create an urgent payment.
See Also
Understanding PeopleSoft Payables Payment Formats
Pages Used to Make Immediate Payments
|
Page Name |
Object Name |
Navigation |
Usage |
|
EM_VCHR_PAYMENT |
eSettlements, Payments, Create Manual Payment, Record Manual Payments - Schedule a Payment |
In the Business Service Provider model, record payments made outside the system. The buyer can record a reference number for each payment, and close invoices that were paid outside PeopleSoft eSettlements. |
|
|
AP_MAN_SEL |
eSettlements, Payments, Create Manual Payment, Manual Pay Selection |
In the Buyer Direct model, enter criteria to build the manual payment worksheet in PeopleSoft Payables. This page is only available to those users who have been set up to record payments at the user preference level. |
|
|
AP_MAN_ENTRY |
Click the Build Worksheet button on the Manual Pay Selection page. |
Enter manual payment information. |
|
|
EM_PYMNT_EXPRESS |
|
Create an instant payment for invoices for a specific supplier. |
|
|
EM_EXPRESS_CONFIRM |
Click the Create Payment button on the Create Urgent Payment - Create Payment page. |
View details and confirm urgent payment creation. |
Recording Manual PaymentsAccess the Record Manual Payments - Schedule a Payment page.
Payment Information
If more than one payment exists for this invoice, a reminder message displays just beneath this group box header. You cannot add payment installments when creating a manual payment; you must pay the entire amount.
Note. If multiple installments exist for a given invoice, the system populates this page with all of them when you access it. All installments have a default Action of None. You change this value to Record only on installments for which you are recording a manual payment. To ensure that you pay the correct installment, be sure to note the number of payments in the Payment Information group box header and set the Action to Record Manual Payment for the appropriate payment installment.
Payment Details
|
Bank, Account, and Method |
Displays the default values from the information specified on the agreement. Override the method if needed. |
|
Layout |
Displays the defined layout for the specified bank account and payment method. |
|
Settle by |
Displays if the payment has been processed through Financial Gateway or Pay Cycle. |
|
Action |
Select the appropriate payment action: Record Manual Payment: Select to make a manual payment and record it in PeopleSoft eSettlements. None: Select for invoices to be picked up by the pay cycle and to ensure that the installment is not manually recorded. |
|
Pay |
Select what type of amount to pay. Effective only if you select Record Manual Payment in the Action field. Options are: Full Amount: Select to pay the entire installment amount. Discounted Amount: Select to pay the discounted amount if the installment has a discount. |
Payment in Dispute
|
In Dispute |
Displays if the payment is on hold by the check box being selected. Note. You cannot clear this check box from this page. |
|
Reason |
Displays the reason for the payment installment hold. |
Record Payment Information
|
Reference |
Enter a payment reference number for this manually paid installment. |
|
Payment Date |
Enter the date the payment was made. Note. Setting the Action to Record Manual Payment, and entering a Reference and Payment Date creates a manual record. |
Payee
|
Remit To, Location, and Address |
The supplier to which the payment is made and, optionally, a supplier location and address for the location. You define locations for the supplier on the Review Supplier Details - Locations page. |
|
|
Click the Alternate Names button to use an alternate name for the supplier on the payment. |
See Also
Scheduling and Creating Voucher Payments for Online Vouchers
Creating Urgent PaymentsAccess the Create Urgent Payment - Create Payment page.
Note. If you've accessed this page by clicking a Pay link on an inquiry page, the system populates voucher and installment details.
Payment Information
|
Buyer Name |
Enter the buyer (business unit) ID against which the payment is to be drawn. |
|
Bank and Bank Account |
Enter the ID and account number for the bank account from which the payment is made. |
|
Remit Supplier |
Enter the supplier to which you are making the payment. |
|
Remit to Location |
Enter the supplier location that will receive the payment. |
Select Voucher
|
Voucher |
Enter the voucher number that you are paying. |
|
Payments |
Select or add the payment schedule numbers associated with the payment schedule you want to pay. |
|
Invoice Dt (invoice date) |
Displays the invoice date associated with the voucher you select. |
|
Apply Discount |
Select this check box to apply any available discount to the payment. |
|
Gross Amount |
Displays the gross amount for the selected payment schedule. |
|
Discount |
Enter the amount of discount that you are taking on the payment. |
|
Paid Amount |
Displays the payment amount for the selected payment schedule. This amount differs from the gross when a Discount is available. |
Payment
|
Payor Bank Account Detail |
Displays the name of the payee and associated bank based on the vouchers selected. |
|
Add All Vouchers |
Click this button to include all outstanding payments for the supplier in the payment. |
|
Create Payment |
Click this button to create the payment file and confirm the payment. Note. If financial sanctions validation is enabled, the system validates the supplier against financial sanctions lists (for example, the SDN list) upon clicking the Create Payment button. The system does not allow you to create a payment for a supplier with a financial sanctions status of Review or Blocked. However, if financial sanctions validation is enabled at the bank level and you no longer validate for a particular supplier's bank, the system may allow you to create an urgent payment for a supplier with a financial sanctions status of Review. |
Note. If a prepayment is available for a voucher paid by an urgent payment, the prepayment amount is not applied. We discuss prepayments in the next section.
Creating Prepayments
This section provides an overview of prepayment processing and discusses how to:
View and add prepayment invoices.
Enter details for new prepayment invoices.
Understanding Prepayment ProcessingDown payments and prepayments are common practice worldwide. Most organizations, at one time or another, need to pay for goods or services before an invoice is received. For example, when a company sets up a new customer account with a supplier, the supplier may require prepayment on the first one or two orders before extending credit to the buyer.
In the Buyer Direct model, use the PeopleSoft Payables pages to create and process prepayments.
In the Business Services Provider model, use the PeopleSoft eSettlements pages to create prepayment invoices. The prepayment feature does the following:
Allows a payment to be made to a supplier without an invoice.
Applies VAT to the prepayment.
Facilitates the application of the prepayment to the final voucher.
In the Business Services Provider model, these are the steps for prepayment processing:
Buyer creates the prepayment invoice.
Buyer or system administrator processes the payment as they would any other payment.
The system administrator runs the Voucher Post Application Engine process (AP_PSTVCHR) in PeopleSoft Payables to associate the prepayment voucher with the regular voucher after the invoice is received from the supplier.
See Also
Pages Used to Create Prepayments
|
Page Name |
Object Name |
Navigation |
Usage |
|
EM_PPY_INQUIRY |
eSettlements, Payments, Create Prepayment Invoice, Create Prepayment Invoice - Inquiry |
View existing prepayment vouchers and add new prepayment invoices. |
|
|
EM_VCHR_PPY |
|
Enter or view details for a prepayment invoice. |
Viewing and Adding Prepayment InvoicesAccess the Create Prepayment Invoice - Inquiry page.
Enter search criteria to view a list of existing prepayment vouchers.
Note. If a given buyer has not yet established any agreements with suppliers, the system will not return any search values.
|
Add a New Prepayment |
Click this button, then add invoice details and create the invoice. |
|
Invoice ID |
Click a link in this column to view the details of the existing prepayment. |
Entering Details for New Prepayment InvoicesAccess the Create Prepayment Invoice - Invoice Details page.
|
Supplier and Supplier Location |
Select the supplier and location to which you are making the prepayment. |
|
Invoice and Invoice Date |
Enter the date and number of the invoice which the supplier created, but you have not received. |
|
Gross Amount |
Enter the amount that you must pay the supplier. |
|
VAT |
Enter the actual VAT amount for the invoice, if applicable. |
|
Merchandise Amount |
Displays the amount of the invoice less any VAT amount. |
Inquiring About PaymentsThis section discusses how to:
View payment details summary and status.
View payment details and invoices.
Pages Used to Inquire About Payments
|
Page Name |
Object Name |
Navigation |
Usage |
|
EM_BUY_PYMT_INQ |
eSettlements, Payments, Review Payments, Review Payments - Payment History |
View payment details summary and status. |
|
|
EM_PYMNT_INQ |
Click a Reference link on the Review Payments - Payment History page. |
View payment details and the invoices included in each payment. |
|
|
EM_VCHR_PYMNT_INQ |
eSettlements, Invoices, Review Invoices, Review Invoices - Invoice Inquiry Click the Invoice link of a paid invoice on the Review Invoices - Invoice Inquiry page. Click the Payment Details link on the Review Invoices - Invoice Cycle page. |
View processed, scheduled, canceled, and outstanding payment details. |
Viewing Payment Details Summary and StatusAccess the Review Payments - Payment History page.
Payment Details
|
Seq (sequence) |
Displays the payment advice sequence. |
|
Reference |
Click a link in this column to view details about the invoices included in the payment. |
Financial Gateway
|
Reference |
Click a reference ID link to access the Review Payments – Payment Reference page, and view payment detail and advice information. |
|
Settle by |
Displays if the payment has been processed through Financial Gateway or Pay Cycle. |
Viewing Payment Details and InvoicesAccess the Review Payments - Payment Reference page.
Payment Detail
|
Created |
Displays the date the payment was created. |
|
Days Outstanding |
Displays the number of days the payment is outstanding. |
|
Cleared On |
Displays the date the payment was cleared. If this field is blank, the payment has not yet cleared. |
|
Cancel Action |
Displays the cancellation status of the payment. Values include: No Cancel Action: Displays if the payment hasn't been canceled. Re-Open Voucher(s)/Re-Issue: Enables you to reselect the scheduled payments and reissue them in the next pay cycle. Re-Open Voucher(s)/Put On Hold: Enables you to reopen the scheduled payments, but places them on hold for your review. You can perform additional investigation or revise voucher information before proceeding with a payment. The pay cycle process does not select the scheduled payments until the hold is removed. Note. Search for payments with a Payment Status of Void to view the last two cancel actions statuses. |
Canceling PaymentsThis section provides and overview of payment cancellation and discusses how to:
Review payments to be cancelled.
Confirm payment cancellations.
Understanding Payment CancellationBuyers can cancel (void or stop) payments either through PeopleSoft eSettlements or through PeopleSoft Payables. They can then reissue the payment, reissue the payment with a hold, or close the liability. In PeopleSoft eSettlements, a cancelled payment triggers an email notification to the supplier user if this notification type has been set up and if payment was made electronically. PeopleSoft Payables provides no email notification. Whether you use PeopleSoft eSettlements or PeopleSoft Payables depends on your business requirements.
Note. If a buyer cancels a payment in PeopleSoft eSettlements and then further modifies the payment in PeopleSoft Payables (such as uncanceling or changing a void to a stop), the supplier will not receive email notification of the modification.
For payments submitted through the PeopleSoft Financial Gateway, the payment cancellation processing logic in PeopleSoft eSettlements is similar to the PeopleSoft Payables cancellation logic. Payments loaded but not yet processed through the bank can be canceled. However, for payments that are undergoing processing, you must wait for the system to finish processing and display a Complete status. You can then cancel the payment and resubmit the payment.
See Also
Pay Cycle Processing Using the PeopleSoft Financial Gateway
Pages Used to Cancel Payments
|
Page Name |
Object Name |
Navigation |
Usage |
|
EM_PYMNT_CANCEL |
eSettlements, Payments, Cancel Payment, Cancel Payments - Inquiry |
Search for and identify payments to be cancelled. |
|
|
EM_PYMT_CNCL_CNFRM |
Click a link in the Payment Amount column on the Cancel Payments - Inquiry page. |
Specify whether you are voiding or stopping a payment and the action to take for the cancelled payment. |
|
|
DOC_SEQ_CANCEL_SEC |
Click the Document Sequencing link on the Cancel Payments - Confirm Payment Cancellation page. |
Override the default document type and enter a document sequence number, if applicable. |
Reviewing Payments to be Cancelled
Access the Cancel Payments - Inquiry page.
Expand the Advanced Search group box to enter additional search criteria.
|
Payment Amount |
Click a link in the Payment Amount column for a payment, and then specify whether you are voiding or stopping a payment and whether to reissue the payment. |
|
|
Click the Payment Information button to view details about the invoices included in this payment. |
See Also
Confirming Payment CancellationsAccess the Cancel Payments - Confirm Payment Cancellation page.
|
Document Sequencing |
Click this link to access the Document Sequence page, where you override the default document type and enter a document sequence number, if applicable. |
|
Payment Status |
Select an option for cancelling the payment: Void or Stop. |
|
Cancel Action |
Select the action to take on the cancelled payment: Re-Open Vouchers(s)/Re-Issue: Select to reissue the related invoices in the next pay cycle. Re-Open Vouchers(s)/Put on Hold: Select to reissue the related invoices, but to place them on hold. Do Not Reissue/Close Liability: Select to eliminate the payment and to create accounting entries to remove the liability from the books. |
|
Explanation |
Enter a reason why you cancelled or stopped the payment. |
|
Confirm Cancellation |
Click this button to cancel the payment. Once you confirm the payment cancellation, email notification is sent to the supplier. |
Note. You must run the PeopleSoft Payables Payment Posting Application Engine process (AP_PSTPYMNT) to reissue the invoices. Once you do so, the system cancels the original payment schedule and creates another one. Running this process creates another payment installment against the voucher and, depending on the option you select, places the installment on hold.
See Also
Running and Managing Pay Cycles
Basic Voucher and Payment Processing
Managing Payments Outside PeopleSoft eSettlementsIn the Business Service Provider model, depending on the needs of a given organization, a buyer may use only the approval and matching features of PeopleSoft eSettlements without subscribing to the PeopleSoft eSettlements payment feature. Sometimes payments are created using the buyer's own ERP system and bank. In such cases, at the point the invoice is approved, the host administrator runs a process that marks the invoice as externally paid and closes it.
When this option is preferred, the system administrator indicates it during buyer registration by not selecting the Payments By eSettlements check box. If the supplier has subscribed to receive payment notifications, when the process is run for the externally paid invoices the supplier receives email notification advising which invoices have been externally paid.
The External Payments Application Engine process (EM_PAY_XTRNL) sets the Payment Selection Status (PYMNT_SELCT_STATUS) on the PS_PYMNT_VCHR_XREF table for the voucher to E (externally paid). The system administrator may schedule this job to run on a daily basis. It is important to ensure that buyers set up for external payments have not been included in any pay cycle selection criteria.
After you run the External Payments process, you can review those invoices the process marked as externally paid from the Review Invoices - Invoice Inquiry page by specifying Externally Paid as the Payment Status filter option.
Important! The host administrator must run the PeopleSoft Payables Voucher Posting Application Engine process (AP_PSTVCHR) before running the External Pay process.
This section lists the page used to run the external pay process.
See Also
Running Voucher and Payment Posting
Page Used to Manage Payments Outside PeopleSoft eSettlements
|
Page Name |
Object Name |
Navigation |
Usage |
|
EM_PAY_XTRN_RUN |
eSettlements, Batch Processes, Process External Payments, Process External Payments - Run Control Parameters |
Run the External Payments Application Engine process (EM_PAY_XTRNL) to generate email notification. |