 Understanding Returned Material Management
This chapter provides an overview of returned material management and discusses how to:
Establish return type codes and restocking fees.
Manage returned material for sales orders.
Override returned material address (RMA) information.
Associate notes and attachments with returned material headers and lines.
Manage returned material for material stock requests.
Manage returned material from third-party systems.
Understanding Returned Material ManagementThis section discusses:
Returns in PeopleSoft Order Management.
RMA process flow.
Business unit setup for RMA processing.
Business unit defaults for returned material.
RMA defaults.
Order groups with RMAs.
RMA line pricing.
 Returns in PeopleSoft Order Management
Using the RMA Form (returned material authorization) component, you can manage returns for sales orders and material stock requests. To process returns for sales orders, use the RMA Form component in the Customer Returns menu. For material stock requests, use the RMA Form component in the Inventory menu. Before you begin setting up return processing options for sales orders, revisit the business unit structure. This section provides examples of business unit setup for RMA (returned material authorization) processing and an RMA process flow diagram to help you decide on a business unit structure to process returns for the company.
You can create replacement sales orders or issue credit requests automatically, either immediately or when you receive the returned goods. Replacement sales orders are created in a Pending status. You can set up charges for which the customer must pay as either a flat amount for restocking fees or as a percentage of the value of the goods returned; do so on the Restock Fees page. On the Return Type Codes page, set up the processing options for the different types of returns. For example, for an RMA replacement order, you can have the replacement order sent out before the customer returns the item. You can also use Order Groups to supply default order information for replacement sales orders. You can view information for the replacement sales orders on the Replace Sales Orders page.
After you set up RMA processing options, enter returned material information on the RMA Form (returned material authorization form) pages. There are three primary pages: RMA Form (PeopleSoft Order Management component), RMA Line, and Revenue Distribution Accounts.
Note. Use the RMA pages in the Inventory menu to process returns for material stock requests in PeopleSoft Inventory.
To populate the RMA Form page, select shipped lines on the Customer Shipment History page. If the product is ship serial, serial numbered or lot controlled, you can select the specific serial number or lot returned from the Serial/Lot Selection page (Serial ID) or the Serial/Lot Selection page (Lot ID). From Review RMA Information, you can view shipment history by header, line, and schedule.
Set up attachments and notes with RMAs to further help you communicate information about the returns. This chapter reviews associating attachments and standard or custom notes on the RMA Header Notes/Attachments (returned material authorization header notes and attachments) page. You can also use attachments and notes with RMA line information.
PeopleSoft delivers three standard reports to help manage RMA activity. Use the Print RMA page to generate RMA acknowledgments to send to customers. You can view RMAs and overdue RMAs after setting up the RMA Register page and Overdue RMAs page, respectively.
RMA Process FlowThis diagram illustrates the process flow for returned materials:

RMA process flow
Note. You run Journal Generator from either PeopleSoft Billing or Receivables, not both.
You must have PeopleSoft Order Management installed to request credit upon returned material receipt in PeopleSoft Inventory.
Business Unit Setup for RMA ProcessingIf you have a separate facility for processing returns, it may make sense to set up the facility as a separate PeopleSoft Order Management Business Unit for the entry of RMAs that is distinct from the business unit for entering sales orders.
Because you can bill by PeopleSoft Inventory Business Unit instead of PeopleSoft Order Management Business Unit, you must make the correct PeopleSoft Billing Business Unit links to record sales order activity and returns in the same PeopleSoft Billing Business Unit. Link the PeopleSoft Inventory Business Unit and the PeopleSoft Order Management RMA Business Unit to the same PeopleSoft Billing Business Unit.

Billing RMA activity by Order Management Business Unit
You create sales orders in PeopleSoft Order Management Business Unit XX but have chosen to bill sales activity by Inventory business unit YY. To do this, you associated Inventory business unit YY with Billing business unit AA on the Inventory Definition - Business Unit Definition page. It is not necessary to link Order Management business unit XX to Billing business unit AA. If you do link XX to AA, the system still uses the Inventory business unit billing defaults that you record on the Inventory Definition - Business Unit Options: Revenue and Billing Defaults page.
You have a separate location (Order Management business unit ZZ) where you enter RMAs, sell spare parts, and perform other service-related activities. You must link business unit ZZ with Billing business unit AA.
Keep in mind that the RMA adjustments process in PeopleSoft Billing uses the restock product ID, bill type ID, and bill source ID that you record on the Accounting and Billing page. Therefore, you must link the Order Management business unit where you are entering RMAs to a Billing business unit on the Order Management Definition - Order Management Setup page. If you are billing by Inventory business unit and select the Inventory business unit in the RMA Adjustments Billing Source field on the Accounting and Billing page, you’ll use the restock ID for the Inventory business unit. Similarly, if you are billing by Order Management business unit and you select the Order Management business unit in the RMA Adjustments Billing Source field on the Accounting and Billing page, you’ll use the restock ID for the Order Management business unit.
Note. If the RMA Adjustments Billing Source field is set to “No RMAs,” you can not enter RMAs in the Order Management Business Unit.
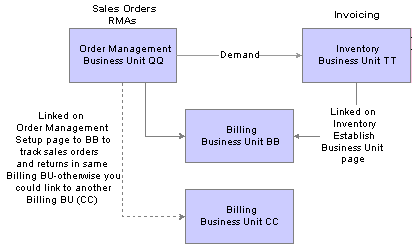
This diagram illustrates how Order Management business units are linked to RMAs:
You enter sales orders and RMAs in the same Order Management business unit QQ, but you bill sales activity by Inventory business unit TT. You linked Inventory business unit TT to Billing business unit BB. You must also link Order Management business unit QQ to a Billing business unit; use BB to track sales orders and return transactions in the same Billing business unit.
This diagram illustrates the linkage between RMAs and Billing business units:
Billing RMA activity by Inventory Business Unit
See Also
Setting Up PeopleSoft Order Management Business Units
Business Unit Defaults for Returned MaterialThis section discusses defining business unit defaults for returned material.
You can establish processing criteria for returned material at the business unit level. This information is used by default defaults on all the RMAs that are issued for the selected business unit. Define this information on the Shipping and Returns page in the Order Management Definition component.
Select a return type code and order group that apply to the majority of returned material for the Order Management business unit.
Identify a Return To IBU (Return to Inventory business unit) if you use a central area for receiving and inspecting returned material.
The Ship History for RMAs (Months) field value determines the default date range for the customer shipment history that is available for populating RMA lines.
See Also
Staging Interunit Transfer and RMA Receipts
RMA DefaultsThis table lists the default logic for RMA distribution codes:
|
What |
Defaults From |
|
Manual RMA Line |
RMA line distribution set Return to Inventory business unit RMA business unit |
|
RMA Line from Shipping History |
RMA line distribution set Sales order schedule |
|
Credit Memo Restocking Fee |
RMA line distribution set (using restock product ID) Business unit that corresponds to the RMA business unit Billing Adjustment Source |
This table lists the default logic for return to Inventory business units:
|
What |
Defaults From |
|
Header |
Order Management RMA business unit Sold to customer distribution network code |
|
Manual RMA Line |
RMA header Order Management RMA business unit Sold to customer distribution network code |
|
RMA Line from Shipping History |
RMA header Order Management RMA business unit Schedule Ship from Inventory business unit |
Order Groups With RMAsThis section discusses how to use order groups with RMAs.
Order groups link order terms that appear on sales orders and quotes by default when you select an order group code. You can define order groups that apply exclusively to the replacement sales orders that are created for returned material. One possible RMA-specific order group would define no charge terms for replacement orders. Use the Order Groups page to define an order group for RMAs.
To define a no-charge order group for RMAs, select the code that you set up as a no-charge terms code for the payment terms. For example, you may set up NOCHG payment terms in PeopleSoft Receivables on the Defining Payment Terms PeopleSoft Receivables page. In addition, you may enter a standard discount of 100 percent, which is applied to all lines on the replacement sales order. This will render all lines on the sales order chargeable at zero.
Use the Order Group Terms page to include shipping criteria that applies to replacement orders.
The ship via, carrier ID, and freight terms code appear by default on the replacement sales order.
You can choose a carrier in the Carrier ID field that has a shorter transit lead time than normal shipments. You can also waive freight charges that customers pay for regular orders for replacement orders by selecting a different freight terms code for this order group or place a higher priority on replacement orders by selecting an appropriate priority code.
See Also
RMA Line Pricing
When you create an RMA line manually, enter the product ID and the quantity to be returned. When the page is refreshed, the unit of measure defaults from the product definition, and the return-to Inventory Business Unit defaults to the return-to Inventory Business Unit defined on the Order Management Business Unit. The system defaults the list price for a non-kit product or for the component of a product kit from the list price defined for the return-to Inventory Business Unit. For a product kit, the list price defaults from the list price defined for the top-level product list price defined for the return-to Inventory Business Unit.
When you create an RMA line automatically from shipping history, the system defaults the product and the unit of measure from the shipment history line you choose. If the shipment was invoiced, the price for the RMA line defaults from the invoice. Otherwise, the price defaults from the original order schedule. When selecting from shipping history for lines that were originally shipped as product kits, you must choose the individual product kit components. The price for each component defaults to zero. You can manually override any price that is defaulted.
Establishing Return Type Codes and Restocking FeesTo define return type codes and restocking fees, use the Return Type Codes and Restock Fees components.
This section discusses how to:
Define return type codes.
Define restocking fees.
Pages Used to Define Return Type Codes and Restocking Fees|
Page Name |
Object Name |
Navigation |
Usage |
|
RMA_RETURN_TYPE |
Set Up Financials/Supply Chain, Product Related, Order Management Foundation, Return Type Codes |
Define the actions that returned goods initiate. |
|
|
RMA_RSTK_SET |
Set Up Financials/Supply Chain, Product Related, Order Management Foundation, Restock Fees by Reason, Restock Fees |
Define restocking fees. |
Defining Return Type CodesAccess the Return Type Codes page.
Material returns necessitate a variety of follow-up actions depending on the reason for the return and the condition of the returned goods. You may want to immediately replace the order if the product is damaged in shipment or credit the customer for goods that were sent in error.
See Also
Establishing Product Attributes by Unit of Measure
Defining Restocking FeesAccess the Restock Fees page.
In addition to issuing a credit memo or replacing returned goods, you may want to charge customers for return restocking fees. The restocking fees are either a flat amount per return or a percentage of the returned material selling price. These fees are associated with a reason code in a one-to-one relationship. You can determine which customers are normally charged restocking fees on the General Information - Sold To Options page.
|
You must already define reason codes with a Returned Material Authorization type on the Reason Code page. |
|
|
Enter the date on which the restock fees first become effective. You can apply multiple fees per reason code for a given period. |
|
|
You can charge a flat amount for a returned quantity or base restocking fees on a percent of the returned material's value. Enter the appropriate value in the field to the right of the Percent option. |
|
|
If you select Amount, you can select a currency code. |
|
|
Select to have the flat amount or percentage of the restocking fee applied against the total order, not the fee applied to each RMA line individually. You can apply only one total order restocking fee per RMA. Restocking fees are passed to PeopleSoft Billing, where the system adjusts the credit memo by the amount of the restocking charges. |
Note. You must associate an Order Management business unit with a PeopleSoft Billing Business Unit (on the Order Management Definition - Order Management Setup page) and define a restocking product ID (on the Accounting and Billing page) for PeopleSoft Billing to process restocking fees. If you are returning to an Inventory business unit and have the business unit definition set up, the system uses the defaults from the Inventory business unit.
See Also
Managing Returned Material for Sales OrdersPeopleSoft Order Management provides a quick entry format to process RMAs for sales orders.
Note. Use the RMA pages in the Inventory menu to process returns for material stock requests in PeopleSoft Inventory.
This section discusses how to:
Enter RMAs for sales orders.
Populate RMA lines from shipment history.
Select serial numbers to return.
Select lot IDs to return.
Enter or change RMA line details.
Modify serial numbers and lot IDs for a line.
Select revenue accounts for the RMA.
Review promotion details for the RMA
Pages Used to Process RMAs for Sales OrdersEntering RMAs for Sales OrdersAccess the RMA Form page.
Note. You can assign an RMA number in Add mode. For example, you can assign an RMA Number that uses the same number as the original sales order. Alternatively, you can have the system automatically assign a number.
|
View the current date, but you can change this value. |
|
|
Select a value: Pending: RMA is not complete. The system cannot receive goods that are referenced on RMAs with a status of Pending or create replacement sales orders and credit memos until the status is changed to Open. This is the default value. Open: RMA is complete and ready for processing. This means that the system can receive returned goods, create replacement sales orders, and request credits. Status remains Open until the last line of the RMA is received. Canceled: RMA is no longer valid. No receipts are expected for it, no credit memo is issued, and no replacement orders are generated. You cannot change the RMA status in the header to Canceled if there are receipts against any of the RMA lines, and you can't change an RMA line status to Canceled if there are any receipts against the line. Closed: All RMA lines are received. Note. You can change the status to Closed: for non-inventory items. |
|
|
Enter values that are the defaults for all the RMA lines. You can change them as needed. Note. Reason codes with a reason type of RMA Cancel must exist in the system. |
|
|
Enter a customer ID. |
|
|
Enter the primary contact who is associated with the sold to customer defaults. |
|
|
Click to view the customer sold to, bill to, or return from address. |
|
|
Click to override the address for the sold to or return from customer. Note. If you click Override, the next time you click Display you will access the new address for the override. |
|
|
You can define any number of location addresses for customers. The location that you identified as primary for each customer role appears by default, but you can select another location from the available options. The currency code that is associated with the sold to customer is the default currency value. |
|
|
Select if the items that are returned are eligible for intrastat reporting. The system passes this flag to PeopleSoft Billing for products that are returned for credit only as well as for credit and replacement. |
|
|
The Bill To ID, Contact, and Return From ID (the Priority 1 Ship To customer ID) fields appear by default from the sold to customer, but you can change them as needed. If you specified a distribution network code on the General Information - Ship To Options page for the Return From customer, the priority 1 ship from business unit defaults to the Return To field. Select the payment method. If you haven't set up a distribution network code for the customer, the PeopleSoft Inventory Business Unit (if one exists) that you define on the Shipping and Returns page defaults to the Return To field on the RMA Form page. You can select a different PeopleSoft Inventory Business Unit. |
|
|
(Optional) Enter a date and time. If the Return To business unit requires closure calendar validation and processing for receiving activities as defined on the Closure Calendar page, the Estimated Return Date is validated against the calendar. If the system encounters an exception date, you will receive a warning message. You can either click No to accept the exception date or click Yes to reschedule. If you click Yes, the system returns the first future valid date for receiving operations. |
|
|
Selected by default if you indicated on the General Information - Sold To Options page that the sold to customer is normally charged restocking fees. You can clear this check box. |
|
|
You can create a workflow that uses this option in conjunction with the Virtual Approver in PeopleSoft Workflow to route the RMA to the appropriate person for approval. Select this check box to keep the status of the RMA at Pending. |
|
|
Click the Header Notes/Attachments link to access the RMA Header Notes/Attachments page. |
|
|
Click the RMA Header Project link to access the RMA Header Projects page. |
|
|
Click to toggle between the base currency and the transaction currency. |
|
|
Click the Customer Shipment History link to transfer to the Customer Shipment History page. |
|
|
Click the Customer Conversations link to transfer to the Conversations page. |
RMA Lines
See Also
Setting Up and Running Intrastat Reports
Populating RMA Lines From the Shipment HistoryAccess the Customer Shipment History page.
An easy way to populate RMA lines is to review customer shipment history and select the order lines that reflect the returned merchandise.
Note. You can view the Customer Shipment History page from Review RMA Information; however, you must access the page from the RMA Form page to automatically populate RMA lines.
Note. Use the inquiries in the Control Inventory menu to view internal and external issues.
Selecting Serial Numbers to ReturnAccess the Serial/Lot Selection page.
|
View the original amount that was shipped. |
|
|
Click to select or clear all of the serial IDs. You can also select them individually. |
Selecting Lot IDs to ReturnAccess the Serial/Lot Selection page (Lot ID).
|
View the original amount that was shipped. If the item was a configured item, the configuration code also appears. |
|
|
Click to select or clear all of the serial IDs. You can also select them individually in the Serial/Lot group box. |
Entering or Changing RMA Line DetailsAccess the RMA Line page.
The system populates many field values on this page from the RMA Form page. All of the fields are available for editing except Unit, RMA Number, and Currency.
Modify Serial Numbers and Lot IDs for a LineAccess the RMA Serial/Lot IDs page.
Note. You can add multiple serial IDs manually by inserting new rows in the Serial/Lot group box. The serial ID, lot ID, and quantity shipped will appear for the ship serial-, serial-, or lot-controlled items that are returned.
Selecting Revenue Accounts for the RMAAccess the Revenue Distribution Accounts page.
|
Select a code. You can have multiple revenue codes. |
|
|
Must total 100 percent. |
Reviewing Promotion Details for the RMAAccess the Promotion Details page.
If the RMA was populated from Customer Shipment History, the promotion details will default from the original order. Otherwise you can update the options for the promotion.
|
Promotions Management Detail |
Click the link to access the Promotions Management Detail page. |
|
Refresh Promotions Detail |
Click the link after making any changes to the promotion. |
See Also
Overriding RMA Address InformationThis section lists common elements and lists the pages used to override RMA address information.
Common Elements Used in This Section|
If needed, you can subsequently reset the address, replacing the new address with the original from address by clicking the link to restore the original address. |
Pages Used to Override RMA Address InformationAssociating Notes and Attachments With Returned Material Headers and LinesThis section discusses how to associate note and attachments with RMA headers.
Pages Used to Associate Notes and Attachments With RMAsAssociate Notes and Attachments With RMA HeadersAccess the RMA Header Notes/Attachments page.
Header Attachments
|
Add |
Click the Add button to browse for and add an attachment. |
|
View |
After you upload an attachment, click the View button to view it. |
|
Attached File |
After you upload an attachment, its name appears here. |
|
Enter the file type, and add a Description of the item that you’re attaching. Note. Attachment type is not a file extension, but a categorization of the attachment defined through system configuration. |
Header Notes
|
Enable this option to attach a note already set up in the system on the Standard Notes page. Select a Standard Note Code from the available options and the rest of the fields established for the standard note code appear. If this option is not checked, the note that is created is a unique note. Select a Note Type and enter the note in the Text field. |
|
|
For a custom note, you can select the Return Material Authorization. |
Managing Returned Material for Material Stock RequestsThis section discusses how to:
Enter RMA transactions for material stock requests.
Enter additional details for an RMA line that is entered on the RMA Form page.
View internal material stock requests.
Specify which serial IDs are returned.
Specify which serial IDs or lot IDs are returned (internal requests).
View external material stock requests.
Specify which serial and lot IDs are returned (external requests).
Specify which serial IDs or lot IDs are returned (external requests).
Use the PeopleSoft Inventory RMA Form component to enter RMA transactions for material stock requests, that is, demand from sources other than PeopleSoft Order Management.
In PeopleSoft Inventory, you can access internal and external shipment information from both the RMA Form page and the navigation. When you access the Internal Shipment History and External Shipment History pages from the RMA Form page, you can select Inventory shipment history lines to populate the RMA form.
Pages Used for Managing Returned Material for Material Stock RequestsEntering RMA Transactions for Material Stock RequestsAccess the RMA Form page.
|
View the current date by default. |
|
|
Select a value: Pending: RMA form is not complete. The system cannot receive items referenced on the RMA that have a status of Pending until the status is changed to Open. Open: RMA form is complete, ready for processing, and can receive returned items. The RMA status remains Open until the last line item of the RMA is received. This is the default value. Canceled: RMA is no longer valid and no receipts are expected for it. You cannot change RMA status in the header to Canceled if there are receipts against any of the RMA lines, and you can't change RMA line status to Canceled if there are any receipts against the line. Change the RMA status to Canceled to access the RMA Cancel page and enter the date and the reason for the cancellations. Closed: All RMA lines are received. RMA lines are automatically set to Closed when the received quantity on the line is greater than or equal to the returned quantity. |
|
|
Reason codes with an RMA Cancel type must exist on the Reason Codes page. |
|
Option |
Available Fields |
|
Internal Location |
Select a return from location for internal issues from PeopleSoft Inventory. Values include all locations. |
|
Click the RMA Location Address link to access the RMA Return-From Location page, where you can view the internal location address from which the stock is returned. |
|
|
External Customer |
Select the return from customer and modify the return from location as necessary for external issues from PeopleSoft Inventory. If the installation does not include PeopleSoft Order Management, Billing, or Accounts Receivable, the system doesn’t validate the entry. |
|
For external customers, you can view or change the return from address. Click the Display link to access the RMA Customer Address page and can view the current return from address. Click the Override link to access the RMA Header Return-From Address page and modify the address information. |
|
The PeopleSoft Inventory Business Unit to which the material is returned. |
|
|
View the current date and time. These are estimates only, and the planning system might use them as a potential source of supply. If the Return To business unit requires closure calendar validation for receiving activities (defined on the Closure Calendar page), the system validates the order’s estimated return date and time against the calendar. If the estimated return date and time are not valid for receiving activities at the destination business unit, a warning message appears when you save the change. You can ignore the warning or reschedule the return date. If you reschedule, the system calculates and returns the next valid date for receiving operations at the destination business unit. |
|
|
View the business unit's distribution options. Distribution types define different departments or cost centers. While the transaction determines the debit and credit accounts for most transactions, distribution types are used when the account distribution depends on which department or cost center issued the product. |
|
|
If selected (the default), you can save the RMA only as Pending. |
You can use the links on this page to associate additional information with the RMA. You must save the RMA Form page before transferring to ChartFields overrides and internal or external shipment history.
RMA Lines
Enter basic information for the RMA line. This information appears as default information on the RMA Line page, where you can modify it.
|
The default is 1 for the first return line. This value increments by one for each additional line. |
|
|
Enter the ID for the item that you are returning. Only items with a status of Active, Hold, Discontinue, or Inactive are values, and only these items appear in the prompt table. |
|
|
Enter the quantity and UOM for the returned item. The UOM must be a valid stocking UOM for the item. |
|
|
The quantity returned, in the item’s base UOM. |
|
|
The Return To business unit that you defined at the header level becomes the default for all lines. You can change this value on a line-by-line basis. |
|
|
The distribution type that you selected at the header level becomes the default distribution type on all lines. You can change this value on a line-by-line basis. |
See Also
Managing Inventory by Item Status
Defining and Using ChartFields
Entering Additional Details for an RMA Line That Is Entered on the RMA Form PageAccess the RMA Line page.
All of the fields on this page derive their default values from the RMA Form page and are available for editing except Unit and RMA Number.
|
The default is the PO number that is associated with the shipment that is referenced on the line. |
|
|
The system retrieves the default value from the Return Type Codes page. |
See Defining Return Type Codes.
Viewing Internal Material Stock RequestsAccess the Internal Shipment History page.
Specifying Which Serial IDs Are Returned (Internal Requests)Access the Serial/Lot Selection page.
In the scroll area, the serial IDs that are associated with the demand line appear together with the quantity shipped. Select the serial ID that is returned. Click the Select/Deselect All IDs link to select or clear (not select) all of the serial or lot rows.
Specifying Which Serial IDs or Lot IDs Are Returned (Internal Requests)Access the Serial/Lot Selection page.
In the scroll area, the serial or lot IDs that are associated with the demand line appear together with the quantity shipped.
|
Select the serial or lot ID that is returned. |
|
|
Click to select or clear (not select) all of the serial or lot rows. |
|
|
View, for lot-controlled items, the lot expiration date that was calculated at the source business unit upon shipment of the lot, if applicable. |
Viewing External Material Stock RequestsAccess the External Shipment History page.
Specifying Which Serial IDs Are Returned (External Requests)Access the Serial/Lot Selection page (external serials) page.
In the scroll area, the serial IDs that are associated with the demand line appear together with the quantity shipped.
|
Select the serial ID that is returned. |
|
|
Click to select or clear (not select) all of the serial or lot rows that appear on this page. |
Specifying Which Serial IDs or Lot IDs Are Returned (External Requests)Access the Serial/Lot Selection page (External Material Stock Requests - Lot ID).
In the scroll area, the serial or lot IDs that are associated with the demand line appear together with the quantity shipped.
|
Select the serial or lot ID that is returned. |
|
|
Click to select or clear (not select) all of the serial or lot rows. |
|
|
View, for lot-controlled items, the lot expiration date that was calculated at the source business unit upon shipment of the lot, if applicable. |
Managing Returned Material From Third-Party SystemsThe RMA Load EIP is an inbound asynchronous service operation that receives RMA receipts from a third-party system to create RMAs in PeopleSoft Inventory. Once the PeopleSoft system receives the transaction, the RMA Load process validates the data and inserts it into either the RMA table or, if errors are found, into the transaction error table. You can correct errors and resubmit the transaction using the RMA Load EIP Maintenance pages in the Maintain Data Definitions component.
See Also
Staging RMA Receipts Using an Electronic Data Collection System