|
Developing and Deploying Siebel Business Applications > Installing Software, Adding Users, and Creating the Company Structure > Process of Creating the Company Structure >
Creating Positions and Position Skills
This task is a step in Process of Creating the Company Structure. A position represent an actual job position in your organization. It determines the records that Siebel CRM displays to each user. A position can be a formal job title, such as the actual job title that the developer uses. It can also be any descriptive text. For example, Developer 1, Developer 2, and so forth. To log in to a Siebel application, an employee must be assigned a position. When you create positions and position skills, it is recommended that you do the following:
- To determine reporting relationships between positions and parent positions, refer to the organization chart for your company.
- Because you choose parent positions as you create new positions, start at the top of the organization chart and work your way down.
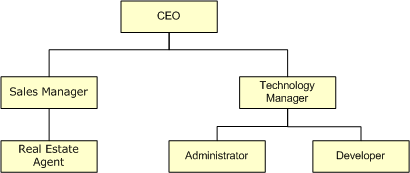
Note that there is typically one position that does not include a parent position. For example, the CEO position typically does not report to a higher level. Siebel CRM includes predefined positions that ship with the Siebel product. However, none of the predefined positions meet the requirements of the developer role in the NREC example, so you must create a new position for the developer. For more information about positions, see Siebel Applications Administration Guide. Figure 9 illustrates the NREC position hierarchy.
Figure 9. NREC Position Hierarchy
|
To create positions and position skills
- Create positions:
- In the Siebel client, navigate to the Administration - Group screen, and then the Positions view.
- In the Positions list, add a new record using values from the following table. For all positions that you add in this step, enter
NREC Organization in the Division field.
|
|
Position |
NREC CEO |
Parent Position |
Leave empty |
Last Name |
Bosch |
First Name |
Patricia |
- In the Positions list, add a new record using values from the following table.
|
|
Position |
NREC Technology Manager |
Parent Position |
NREC CEO |
Last Name |
Brown |
First Name |
Christine |
- In the Positions list, add a new record using values from the following table.
|
|
Position |
NREC Developer |
Parent Position |
NREC Technology Manager |
Last Name |
Cheng |
First Name |
Li |
- In the Positions list, add a new record using values from the following table.
|
|
Position |
NREC Administrator |
Parent Position |
NREC Technology Manager |
Last Name |
Bolivar |
First Name |
Sandy |
- In the Positions list, add a new record using values from the following table.
|
|
Position |
NREC Sales Manager |
Parent Position |
NREC CEO |
Last Name |
Smith |
First Name |
Lee |
- In the Positions list, add a new record using values from the following table.
|
|
Position |
NREC Sales Agent |
Parent Position |
NREC Sales Manager |
Last Name |
Castro |
First Name |
Dana |
- In the employee record, adjust the position for the CEO:
- Navigate to the Administration - Users screen, and then the Employees view.
- In the Employees list, click Query, enter
Bosch in the Last Name field, and then click Go.
- In the Position field, click the selection icon.
- In the Selected window, click the NREC CEO position, and then make sure the Primary field for the NREC CEO position contains a check mark.
- In the Selected window, click the Siebel Administrator position.
- Click Remove, and then click OK.
- Repeat Step 2 for each of the following employees:
- Christine Brown
- Li Cheng
- Sandy Bolivar
- Lee Smith
- Dana Castro
- Log out of the Siebel client.
- Verify your work:
- Log in to the Siebel client. In the login screen, enter values using information from the following table.
|
|
User ID |
LCHENG |
Password |
LCHENG |
To make sure you possess system administrative access, navigate to an administrative view, such as Administration - User, and then the Employees view.
- Log out of the Siebel client, and then log back in using values from the following table.
|
|
User ID |
PBOSCH |
Password |
PBOSCH |
- To make sure you do not possess system administrative access, attempt to navigate to an administrative view, such as Administration - User, and then the Employees view.
You must not be able to view an administrative view.
- Create position skills:
- Navigate to the Administration - Group screen, and then the Positions view.
- In the Positions list, click the position to which to add skills.
- Click the Assignment Skills tab.
- In the Assignment Skills list, add a new record.
- Choose a skill in the Item field.
You must use Siebel Tools to add skills before you can add them to a position.
- Add comments, if required.
- Save the record.
|