|
Configuring Siebel Open UI > Customizing Styles, Applets, and Fields > Customizing Applets >
Allowing Users to Change the Applet Visualization
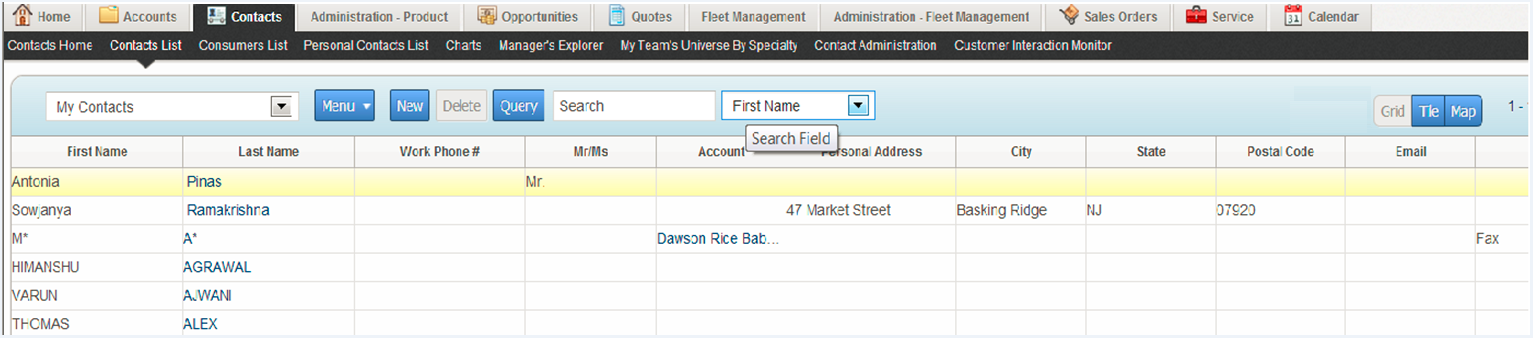
This topic describes how to modify an applet so that the user can change the applet visualization. The applet visualization is a type of configuration that specifies the layout that Siebel Open UI uses to display the applet. List, form, tile, map, grid, and carousel are each an example of an applet visualization. Siebel Open UI allows the user to set some user preferences that determine how it displays an applet. The user can navigate to the User Preferences screen, and then use the Behavior view to set these preferences. For example, if the user chooses a value in the Visualization field of the Behavior view, such as Tile, and then navigates to a list applet that includes a tile configuration, such as the Opportunity List Applet, then Siebel Open UI displays this applet as a set of tiles. If the user clicks Grid in this applet, then Siebel Open UI displays the applet as a grid and sets Grid as the default layout only for the Opportunity List Applet. This local setting takes precedence over the global setting that the user sets in the Visualization field in the Behavior view. Siebel Open UI continues to use a tile layout for all other applets that include a tile configuration. In this situation, it displays the Opportunity List Applet as a grid even if the user logs out and then logs back in to the client. Figure 31 includes the Contacts List that you modify in this topic so that it allows the user to change the applet visualization. It illustrates how Siebel Open UI displays this list after you successfully finish the configuration. The user can click one of the applet visualization buttons, such as Tile, to change the applet visualization.
Figure 31. Contacts List That Allows Users to Change the Applet Visualization
|
This topic describes how to configure the manifest for a custom applet visualization. For information about configuring the manifest for a predefined configuration, see Configuring Manifests for Predefined Visualizations. To allow users to change the applet visualization
- Modify the applet in Siebel Tools:
- Open Siebel Tools.
For more information, see Using Siebel Tools.
- In the Object Explorer, click Applet.
- In the Applets list, query the Name property for the applet that you must modify.
For example, query the Name property for Contact List Applet.
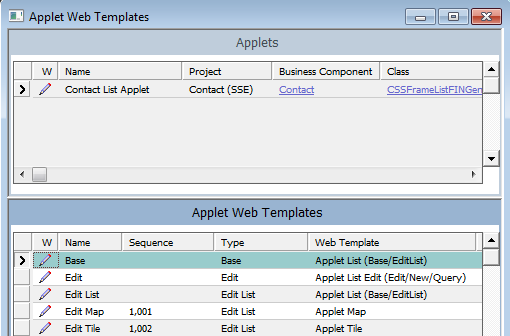
- In the Object Explorer, expand the Applet tree, and then click Applet Web Template.
The Applet Web Templates list displays the applet modes that are defined for the applet. For example, Base, Edit, and Edit List. For more information about these modes, see Displaying Applets Differently According to the Applet Mode.
- In the Applet Web Templates list, add the following applet web template.
|
|
Name |
Enter text that describes the visualization behavior. For example, enter Edit Tile to describe a tile visualization that allows the user to modify field values. |
Sequence |
Enter a value of 1000 or greater. To help you quickly recognize how Siebel Open UI uses a web template, it is recommended that you use a value of:
- 1000 or greater for a web template that Siebel Open UI uses to determine the applet visualization, such as a Tile.
- 1, 2, or 3 for a web template that Siebel Open UI uses to determine the applet mode, such as Edit List.
|
Type |
Specify the applet mode, such as Edit or Edit List. |
Web Template
|
Choose a web template that defines the desired visualization. For example, choose Applet Tile. |
- Make sure Siebel Tools defines a SWT file for the web template that you defined in Step e.
For example, make sure the Web Template Files list in Siebel Tools includes a record for the Applet Tile web template file, and that the FileName property for this record is CCAppletList_Tile.swt. If your deployment requires a new web template, then you must define it before you can define the applet web template. For more information about configuring web templates, see Configuring Siebel Business Applications.
- Repeat Step d and Step e for each web template that your deployment requires.
Your completed work in Siebel Tools must resemble the following configuration.
- Compile your modifications.
- Configure the manifest for the applet that you modified in Step 1:
- Log in to the Siebel client with administrative privileges.
For more information about the screens that you use in this step, see Configuring Manifests.
- Navigate to the Administration - Application screen, and then the Manifest Files view.
- In the Files list, add the following predefined files.
|
|
Name |
siebel/mappmodel.js |
siebel/Tilescrollcontainer.js |
- Navigate to the Administration - Application screen, and then the Manifest Administration view.
- In the UI Objects list, specify the following applet.
|
|
Type |
Applet |
Usage Type |
Web Template |
Name
|
Contact List Applet |
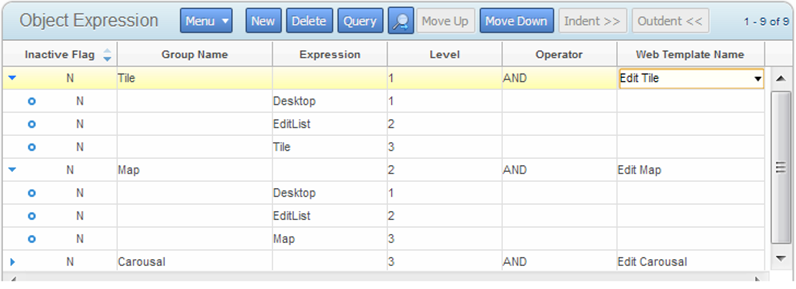
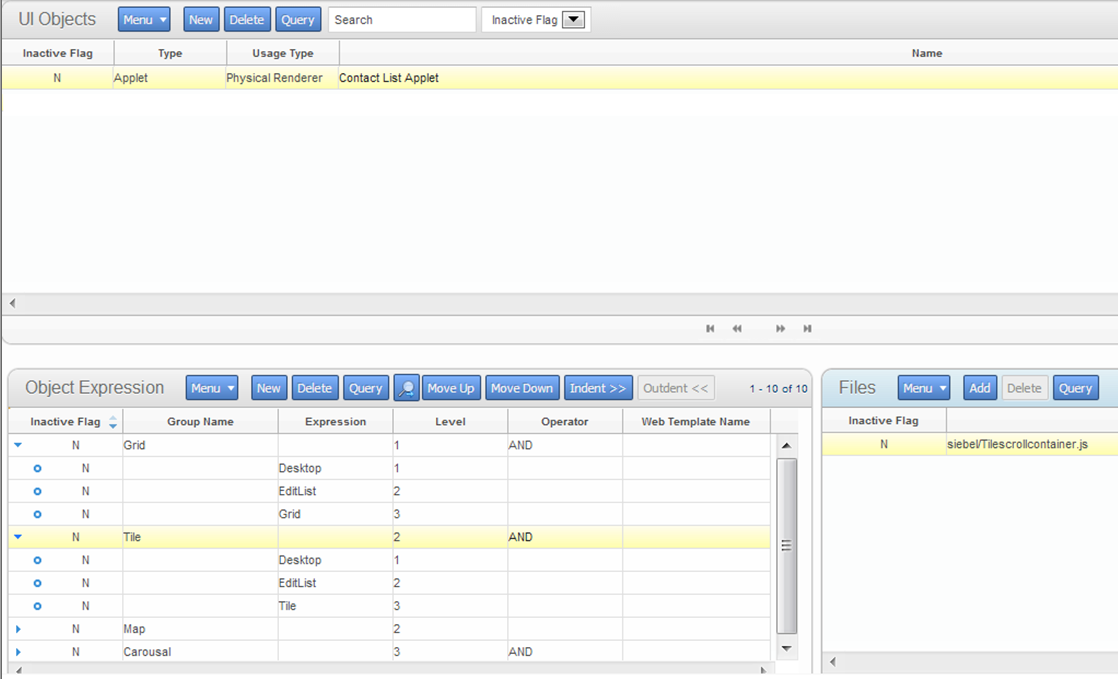
- In the Object Expression list, add the expressions that Siebel Open UI uses to render the applet for this web template in the various visualizations and applet modes that you defined in Step 1.
Your completed work must resemble the following configuration. Use the Move Up, Move Down, Indent, and Outdent buttons to create the hierarchy. Note that you do not add files in the Files list for a web template. You only add files for a presentation model or physical renderer. For more information about how to create these object expressions, see Configuring Manifests.
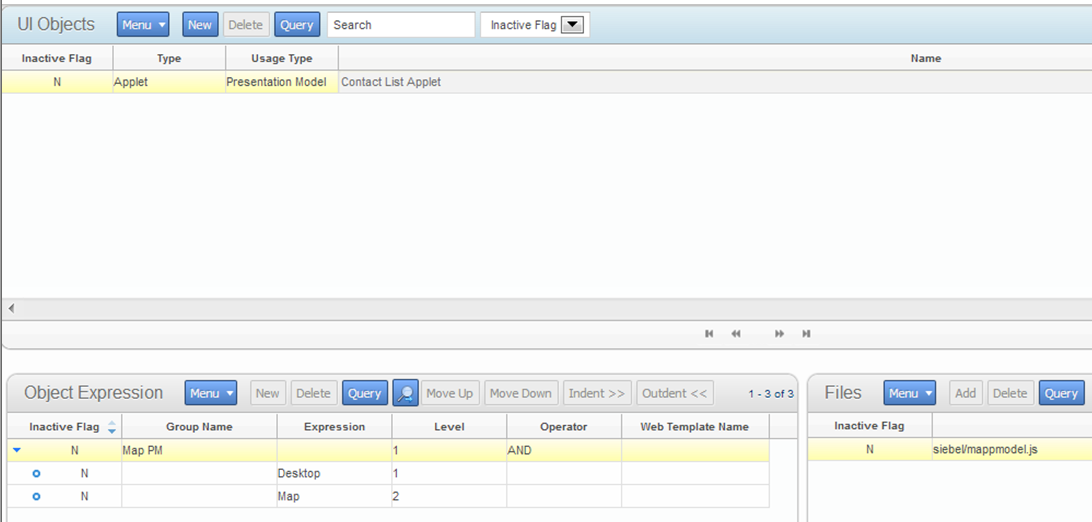
- Configure the manifest for the presentation model for each applet visualization that you defined in Step 1.
You add the UI object, object expressions, and files until the Manifest Administration screen resembles the following configuration.
- Repeat Step g for each applet visualization that you configured in Siebel Tools.
- Configure the physical renderer for each applet visualization that you defined in Step 1.
You add the UI object, object expressions, and files until the Manifest Administration screen resembles the following configuration:
If you do not do this administration, then Siebel Open UI uses the jqgridrenderer.js file for the physical renderer for a list applet, by default.
- (Optional) Modify the strings that Siebel Open UI uses for the labels of the applet visualization buttons.
Do the following:
- In Siebel Tools, choose the Screens application-level menu, click System Administration, and then click List of Values.
- In the List of Values list, query the Type property for OUI_MODE_VISUALIZATION.
- Make sure the Language-Independent Code property for each record that Siebel Tools displays in the List of Values list includes the same string that you modified in Step g.
For example, make sure the Language-Independent Code property includes the following values:
|
|
Language-Independent Code |
OUI_MODE_VISUALIZATION |
Tile |
Tile |
Map |
Map |
Grid |
Grid |
Siebel Open UI uses the value that the Display Value property contains as the label for each applet visualization button. To view these buttons, see Figure 31.
- Compile your modifications.
- Log in to the client.
- Navigate to the Administration - Application screen, and then the Manifest Expressions view.
- In the Manifest Expressions view, modify the following strings, as necessary.
|
|
Tile |
GetObjectAttr("VisualMode") = 'Tile' |
Map |
GetObjectAttr("VisualMode") = 'Map' |
Grid |
GetObjectAttr("VisualMode") = 'Grid' |
For example, Siebel Open UI uses the Tile string in the Expression field for the Tile expression. You can modify these strings to meet your deployment requirements.
- Test your modifications:
- Log out of the client, and then log back in.
- Navigate to the Contacts screen, and then the Contacts List view.
- Verify that Siebel Open UI displays the Grid, Tile, and Map visualization buttons.
The visualization buttons must resemble the buttons that Figure 31 displays.
- Click each visualization button, and then verify that Siebel Open UI displays the visualization that is associated with the button that you click.
Configuring Manifests for Predefined Visualizations
Table 14 summarizes different manifest configurations for visualizations that come predefined with Siebel Open UI. It includes all the configuration required. For example, you do not configure any expressions or files for web templates.
Table 14. Configuring Manifests for Predefined Visualizations
|
|
|
|
Tile |
Set Usage Type to Presentation Model. Set Name to List Applet Name. Add the following to the Files list: siebel/listpmodel.js
|
Set Usage Type to Physical Renderer. Set Name to List Applet Name. Add the following to the Files list: siebel/Tilescrollcontainer.js
|
Set Usage Type to Web Template. Set the Name to Edit Tile. |
Grid |
Same as Tile. |
Set Usage Type to Physical Renderer. Set Name to List Applet Name. Add the following to the Files list: siebel/jqgridrenderer.js
|
No manifest administration is necessary. You use Siebel Tools to configure Edit List web templates. |
Map |
Same as Tile except add the following file: siebel/mappmodel.js
|
Same as Grid except add the following file: siebel/custom/siebelmaprenderer.js
|
Set Usage Type to Web Template. Set the Name to Edit Tile. |
The following physical renderer modifies the List presentation model so that it can use the Google Map plugin for jQuery: siebel/custom/siebelmaprenderer.js
Oracle provides this file only as an example that does a map visualization for a list applet. Oracle does not support usage of siebelmaprenderer.js with Google Maps.
|