|
Configuring Siebel Open UI > Customizing Siebel Open UI for Siebel Mobile > Customizing Layout, Views, Menus, Lists, and Controls >
Customizing Tiles
This topic describes how to customize tiles. It includes the following topics:
Overview of Customizing Tile Applets
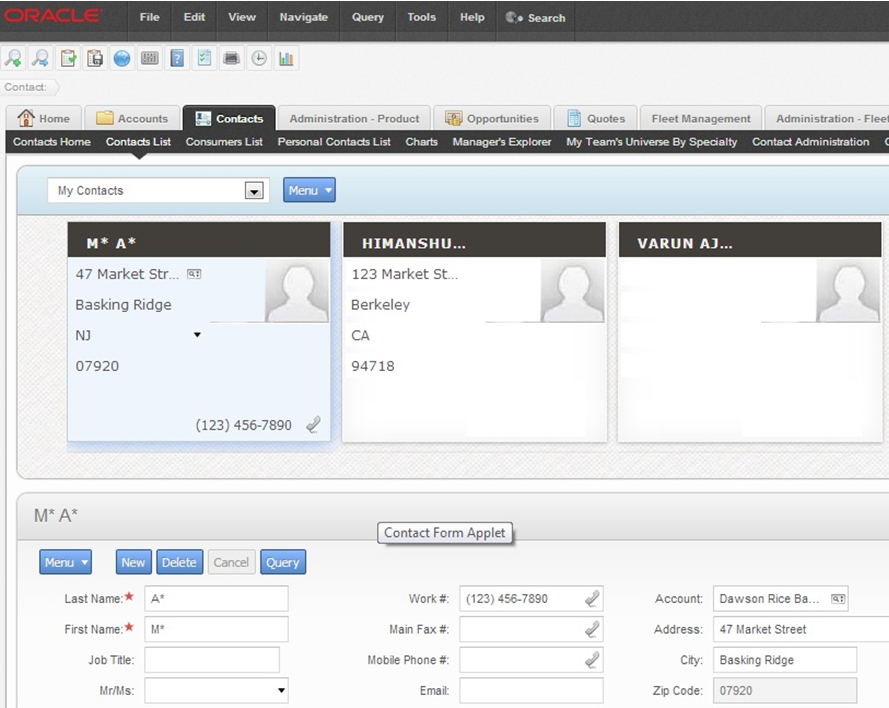
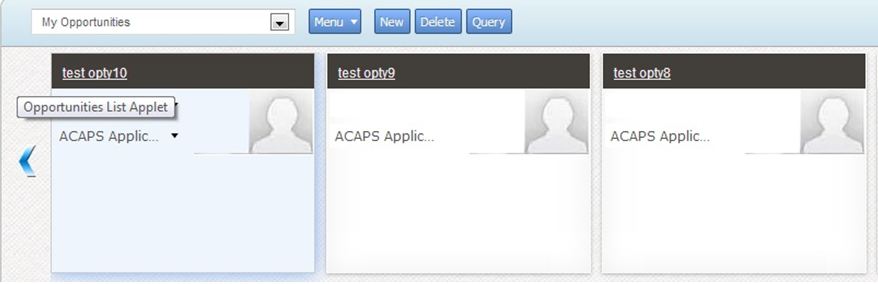
Figure 34 includes an example of an applet that Siebel Open UI displays as a set of tiles. A tile is a type of user interface object that Siebel Open UI uses to display a Siebel CRM record as a square or rectangle.
Figure 34. Example Tile Applet
|
This example includes the following items:
- The Contact List applet and the Contact List View.
- Usage of the cascading style sheet to indicate the chosen tile in blue. You can modify this cascading style sheet to customize color usage.
- Usage of applet controls to display images. These controls determine the pick applet icon, MVG icon, email icon, and other icons that Siebel Open UI displays in the chosen tile. If the user clicks a different tile, then Siebel Open UI hides the icons in the current tile and displays them in the tile that the user clicks. You can modify the applet controls in Siebel Tools to customize how Siebel Open UI displays them. For more information, see Adding Controls to Tile Applets.
Applet Mode Configurations for Tiles
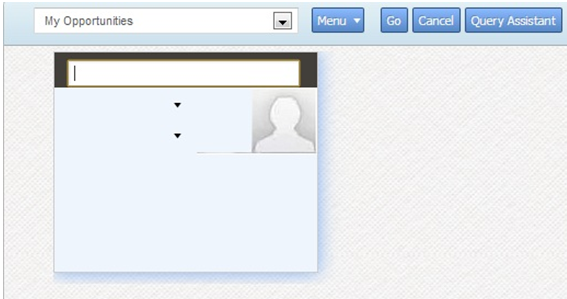
This topic describes two applet modes that Siebel Open UI can use to display a tile applet. You can modify the applet modes in Customizing Tiles for List Applets. Figure 35 includes an example of an applet that Siebel Open UI displays in the Query applet mode. The user can query records in the applet, but cannot modify and field values.
Figure 35. Example Tile Applet in the Query Applet Mode
|
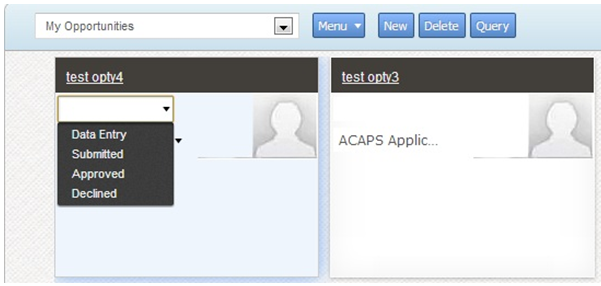
Figure 36 includes an example of an applet that Siebel Open UI displays in the Edit applet mode. The user can query records in this applet and can also modify field values. Siebel Open UI displays the control field values in each tile as a label, by default. The user clicks the field value to edit it.
Figure 36. Example Tile Applet in Edit Mode
|
Customizing Tiles for List Applets
This topic describes how to customize tiles so that Siebel Open UI can display them in different applet modes. To view a tile applet that is similar to the applet that you configure in this topic, see Overview of Customizing Tile Applets. For information about custom tiles in a mobile environment, Customizing Tiles for Mobile Lists. To customize tiles for list applets
- Configure the SWT file so that Siebel Open UI can use it to render tiles:
- Open Siebel Tools.
For more information, see Using Siebel Tools.
- In the Object Explorer, click Applet.
- In the Applets list, query the Name property for the applet that you must modify.
For example, query for Opportunity List Applet.
- In the Object Explorer, expand the Applet tree, and then click Applet Web Template.
- In the Applet Web Templates list, choose the record that Siebel Open UI uses to display the applet in the applet mode that your deployment requires.
For example, if you must display the applet in Base mode, then choose the record that includes Base in the Name property.
- Make a note of the value that the Web Template property contains.
For example, the Web Template property contains the following value for Base mode:
Applet List (Base/EditList)
- In the Object Explorer, click Web Template.
- Query the Name property for the value that you noted in Step f.
For example, query the Name property for the following value. If the value includes special characters, such as parentheses or a slash, then enclose the value in quotation marks:
"Applet List (Base/EditList)"
- In the Object Explorer, expand the Web Template tree, and then click Web Template File.
- In the Web Template Files list, make a note of the value that the Filename property contains.
For example, the Filename property contains the following value for the Applet List (Base/EditList) web template:
CCAppletList_B_EL.swt
- In Windows Explorer, navigate to the following folder:
siebsrvr\webtempl\ouiwebtempl
- Make a copy of the file that you noted in Step j, and then rename this copy.
For example:
CCAppletList_B_EL_custom_tiles.swt
- Add each of the following tags to the copy that you created in Step l.
For example code that includes these tags, see Code That You Can Use to Customize Tiles for List Applets.
- Modify the swe:list tag so that it includes the HTML layout for each tile.
The swe:list tag includes the swe:list-record tag that specifies the layout for each tile. For example code that includes this HTML layout, see the contents of the swe:list tag in Code That You Can Use to Customize Tiles for List Applets.
- Create a new web template:
- In the Object Explorer, click Web Template.
- In the Web Templates list, add the following web template.
|
|
Name |
Applet Tile |
Type |
Applet Template - List |
- In the Object Explorer, expand the Web Template tree.
- In the Object Explorer, click Web Template File.
- In the Web Template Files list, add the following web template file.
|
|
Name |
Applet Tile |
Filename |
Specify the file that you modified in Step 1. For this example, you specify the following file: CCAppletList_B_EL_custom_tiles.swt
|
Bitmap |
Applet_List |
- Configure the applet so that Siebel Open UI can display it as a tile layout:
- In the Object Explorer, click Applet.
- In the Applets list, query the Name property for the applet that you must modify.
For example, query for Opportunity List Applet.
- In the Object Explorer, expand the Applet tree, and then click Applet Web Template.
- In the Applet Web Templates list, add the following applet web template.
|
|
Name |
Enter a name that describes the applet mode. For this example, Siebel Open UI must allow the user to edit values, so enter the following value: Edit List
|
Type |
Choose the applet modes that Siebel Open UI must use to display the applet. For this example, choose the following value: Edit List
For more information, see Applet Mode Configurations for Tiles. |
Web Template |
Choose the following web template that you added in Step 2: Applet Tile
|
- Configure the manifest:
- Log in to the Siebel client with administrative privileges.
- Navigate to the Administration - Application screen, and then the Manifest Administration view.
For more information about the screens you use in this step, see Configuring Manifests.
- In the UI Objects list, specify the following applet.
|
|
Type |
Applet |
Usage Type |
Physical Renderer |
Name
|
Opportunity List Applet |
- In the Object Expression list, add the following expression. Siebel Open UI uses this expression to render the applet on the desktop.
|
|
Expression |
Desktop |
Level
|
1 |
- In the Files list, add the following file:
siebel/Tilescrollcontainer.js
- Test your modifications.
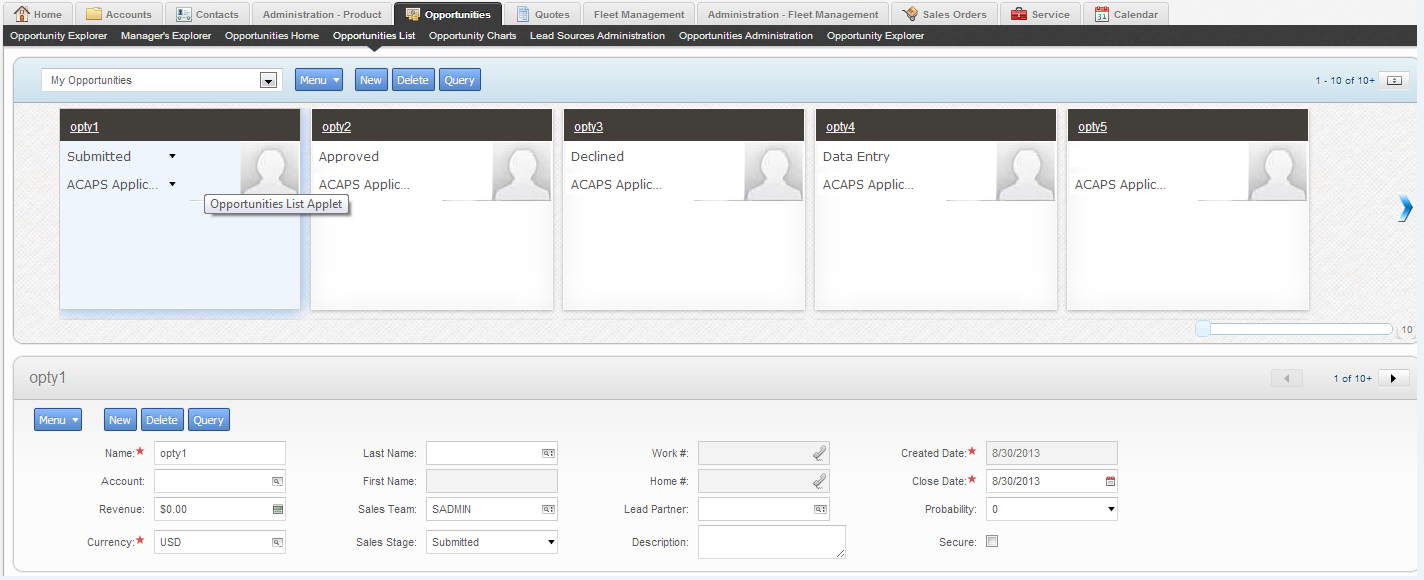
- Log in to the client, and then navigate to the Opportunities List.
- Verify that the client displays a list that resembles the following layout.
Code That You Can Use to Customize Tiles for List Applets
Siebel Open UI comes predefined with the CCAppletList_Tile.swt file that resides in the following folder, starting with Siebel CRM versions 8.1.1.11 and 8.2.2.4: siebsrvr\webtempl\ouiwebtempl
It includes an example tile format that you can customize to meet your deployment requirements. It includes the following code. Bold font indicates modifications that customize tiles: <!-- Template Start: CCAppletList_Tile.swt -->
<swe:include file="CCApplet_NamedSpacer.swt"/>
<swe:control id="1100">
<div class="CmdTxt">
<swe:this property="FormattedHtml" hintText="Outside Applet Help Text" hintMapType="Control"/>
</div>
</swe:control>
<swe:form>
<swe:include file="CCTitle_Named.swt"/>
<div class="swe:this.SelectStyle">
<swe:switch>
<swe:case condition="Web Engine State Properties, IsMobileApplicationMode">
<swe:include file="CCListButtonsTop_Mobile.swt"/>
</swe:case>
<swe:default>
<swe:include file="CCListButtonsTop.swt"/>
</swe:default>
</swe:switch>
<swe:error type="Popup">
<div class="swe:class AppletBack">
<div class="error">
<swe:this property="FormattedHtml"/>
</div>
</div>
</swe:error>
<div class="AppletHIListBorder siebui-tile-container">
<swe:this property="NoGrid"/>
<swe:this property="Horizontal"/>
<swe:list>
<swe:list-record>
<div class="siebui-tile-name">
<swe:for-each count="3" startValue="500" iteratorName="currentId">
<swe:control id="swe:currentId" hintMapType="FormItem">
<div class="siebui-form-data" align="swe:this.TextAlignment">
<swe:this property="FormattedHtml" hintText="Field"/>
</div>
</swe:control>
</swe:for-each>
</div>
<div class="siebui-tile-details-row1">
<ul>
<swe:for-each count="4" startValue="510" iteratorName="currentId">
<li>
<swe:control id="swe:currentId" hintMapType="FormItem">
<div class="siebui-form-data" align="swe:this.TextAlignment">
<swe:this property="FormattedHtml" hintText="Field"/>
</div>
</swe:control>
</li>
</swe:for-each>
</ul>
</div>
<div class="siebui-tile-image">
<swe:for-each count="2" startValue="520" iteratorName="currentId">
<swe:control id="swe:currentId" hintMapType="FormItem">
<div class="siebui-form-data" align="swe:this.TextAlignment">
<swe:this property="FormattedHtml" hintText="Field"/>
</div>
</swe:control>
</swe:for-each>
</div>
<div class="siebui-tile-clear"/>
<div class="siebui-tile-details-row2">
<ul>
<swe:for-each count="4" startValue="530" iteratorName="currentId">
<li>
<swe:control id="swe:currentId" hintMapType="FormItem">
<div class="siebui-form-data" align="swe:this.TextAlignment">
<swe:this property="FormattedHtml" hintText="Field"/>
</div>
</swe:control>
</li>
</swe:for-each>
</ul>
</div>
</div>
</swe:list-record>
</swe:list>
</div>
</div>
</swe:form>
<!-- Template End: CCAppletList_Tile.swt -->
Customizing Tiles for Mobile Lists
This topic describes how to customize tiles that the mobile tile renderer displays. A mobile tile is a type of user interface object that Siebel Open UI uses to display a Siebel CRM record as a small square or rectangle. To customize tiles for mobile lists
- Verify that your deployment includes the Applet Tile Mobile web template:
- Open Siebel Tools.
For more information, see Using Siebel Tools.
- In the Object Explorer, click Web Template.
- In the Web Templates list, query the Name property for Applet Tile Mobile, and then verify that Siebel Tools includes an object definition for this web template.
- In the Object Explorer, expand the Web Template tree, and then click Web Template File.
- Verify that the Filename property references the CCAppletList_MobileTile.swt file.
If your deployment does not include this web template, then add it now. Note that Siebel Open UI includes the predefined CCAppletList_MobileTile.swt file in the siebel\webtempl\ouiwebtempl folder, starting with Siebel CRM versions 8.1.1.11 and 8.2.2.4.
- Modify the web template that the applet references:
- In the Object Explorer, click Applet.
- In the Applets list, query the Name property for the applet that you must modify.
For this example, query for the following predefined applet:
CG Contact List Applet Mobile
- In the Object Explorer, expand the Applet tree, and then click Applet Web Template.
- In the Applet Web Templates list, modify the following property of the Edit List applet web template.
|
|
Web Template |
Applet Tile Mode |
- Right-click in the Applet Web Templates list, choose Edit Web Layout, and then use the Web Layout Editor to arrange columns, add columns, remove columns, and make other layout modifications, as necessary.
- Compile your modifications.
- Configure the manifest:
- Log in to the Siebel application with administrator privileges.
- Navigate to the Administration - Application screen, and then the Manifest Files list.
For more information about the screens you use in this step, see Configuring Manifests.
- In the Files list, add the following file.
|
|
Name |
siebel/TileLayoutMobilePR.js |
- Navigate to the Administration - Application screen, and then the Manifest Administration list.
- In the UI Objects list, add the following UI applet.
|
|
Type |
Applet |
Usage Type |
Physical Renderer |
Name |
CG Contact List Applet Mobile |
- In the Object Expression list, add the following expression.
|
|
Expression |
Mobile |
Level |
1 |
- In the Files list, add the following file.
|
|
Name |
siebel/TileLayoutMobilePR.js Siebel Open UI uses the TileLayoutMobilePR.js file to render applet tiles, starting with Siebel CRM versions 8.1.1.11 and 8.2.2.4. It resides in the following folder: Siebel\eapps\public\enubuild_number\scripts\siebel\
|
- Test your modifications:
- Clear the cache, and then navigate to the applet that you specified in Step e.
- Make sure Siebel Open UI displays an applet that is similar to the following, with the tiles organized on the left side of the applet and the form on the right.
Configuring Horizontal and Vertical Scrolling in Tile Applets
You can configure tiles so that the user can scroll them horizontally or vertically. The configuration you do to configure scrolling in tile applets is the same configuration that you do to configure infinite scrolling. For more information, see Configuring Infinite Scrolling. To configure horizontal and vertical scrolling in tile applets
- Add the following tags to the web template file that Siebel Open UI uses to display the tile applet. You can configure these tags when you edit the web template file in Step 1.
|
|
swe:this property="NoGrid" |
Specifies that the current list layout is not a Grid layout. |
swe:this property="Horizontal" |
Specifies the scroll direction. You use the following format: <swe:this property="direction"/>
where:
- direction is Horizontal or Vertical.
For example, the following code configures Siebel Open UI to display vertical scrolling: <swe:this property="Vertical"/>
If the web template file does not include this tag, or if this tag does not include a value then, then Siebel Open UI uses horizontal scrolling, by default. To view the layout that Siebel Open UI uses for these directions, see Horizontal Scroll and Vertical Scroll Layouts. |
swe:this property="ScrollVisibleTiles" |
Enables Scrolling By Visible Tiles. For more information, see Scrolling By Visible Tiles. If the web template file does not include this tag, or if this tag does not include a value, then Siebel Open UI uses Smooth Scrolling. For more information, see Smooth Scrolling. |
Horizontal Scroll and Vertical Scroll Layouts
Figure 37 includes an example of a horizontal scroll configured in a tile applet. The user can click the left or right arrow to scroll through the records.
Figure 37. Example Horizontal Scroll in Tile Applet
|
Figure 38 includes an example of a vertical scroll configured in a tile applet. The user can click the up or down arrow to scroll through the records.
Figure 38. Example Vertical Scroll in Tile Applet
|
Smooth Scrolling
Smooth Scrolling is a feature that allows the user to hold down the mouse button on the scroll arrow to scroll the container according to the number of pixels that the scroll speed specifies. Siebel Open UI continues scrolling as long as the user holds down the mouse button. It stops scrolling when the user releases the mouse button. Siebel Open UI uses Smooth Scrolling, by default. To set the scroll speed for all tile applets, the user can navigate to the Application screen, Tools, User Preferences, and then set the Default Scroll Speed field in the Behavior form. To set the scroll speed for a single tile applet, the user can use the slide control that each tile applet displays in the lower-right corner of the applet. For more information about how the user sets the scroll speed, see Siebel Fundamentals. Scrolling By Visible Tiles
Scrolling By Visible Tiles is a feature that allows the user to click the mouse on the scroll arrow to start scrolling rather than holding down the mouse button on the scroll arrow. For each mouse click, Siebel Open UI scrolls the number of records according to the number of tiles that it displays in the tiles container rather than according to pixels. For example, assume the record set includes 10 tiles and tile one through tile five of this record set are visible in the tile container. The width of the container determines the number of records that are visible. If the user clicks the right pointing scroll arrow, then Siebel Open UI scrolls the tiles container to display tiles six through ten. Adding Controls to Tile Applets
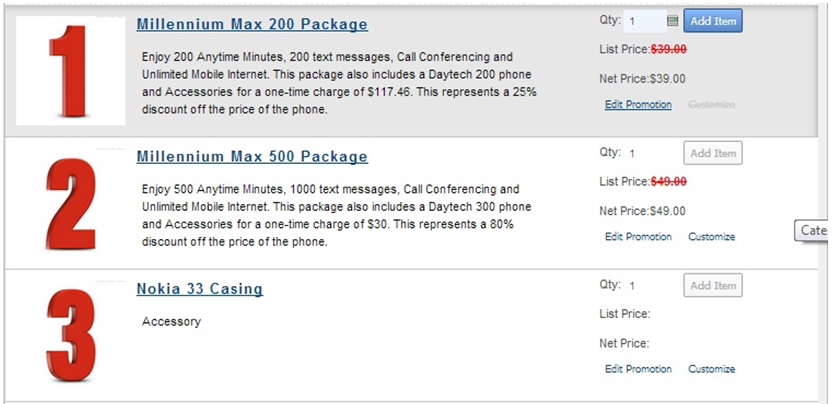
Figure 37 illustrates how you can use a method to control the behavior of a button that Siebel Open UI displays in a tile applet. This example includes an Add Item button in a Product catalog that allows the user to add an item to the shopping cart. Each tile represents one product. Siebel Open UI uses the cascading style sheet to display the state of the Add Item button as enabled in the active tile and to display it as not chosen in other tiles. The CSS controls how Siebel Open UI represents these states. To add a control, you use Siebel Tools to add it to the applet, and then create a placeholder for it in the SWT file. For more information about adding controls to applets, see Configuring Siebel Business Applications.
Figure 39. Example of Adding Controls to Tile Applets
|
|