Release 11g (11.1.1)
Part Number E13881-01
Contents
Previous
Next
| Oracle Fusion Middleware Report Designer's Guide for Oracle Business Intelligence Publisher Release 11g (11.1.1) Part Number E13881-01 | Contents | Previous | Next |
This chapter covers the following topics:
A style template is an RTF template that contains style information that can be applied to RTF layouts. The style information in the style template is applied to RTF layouts at runtime to achieve a consistent look and feel across your enterprise reports. You associate a style template to a report layout in the report definition. Using a style template has the following benefits:
Enables the same look and feel across your enterprise reports
Enables same header and footer content, such as company logos, headings, and page numbering
Simplifies changing the elements and styles across all reports
The styles of the following elements can be defined in the style template:
You can create a paragraph style in your style template. When this same named style is used in your report layout, the report layout will inherit the following from the style template definition: font family, font size, font weight (normal, bold), font style (normal, italic), font color, and text decoration (underline, overline, or strikethrough).
Following are some of the style elements inherited from the table style definition: font style, border style, gridline definition, shading, and text alignment.
The header and footer regions of the style template will be applied to the report layout. This includes images, dates, page numbers, and any other text-based content. If the report layout also includes header and footer content, it will be overwritten.
Design Time
For the Style Template:
Open Microsoft Word.
Define named styles for paragraphs, tables, headings, and static header and footer content. This is your style template
Save this document as a .RTF file.
To ensure that you do not lose your custom styles in Microsoft Word, also save the document as a Word Template file (.dot) or save your styles to the Normal.dot file. This file can be shared with other report designers.
Upload the RTF style template file to the catalog.
For the layout template using the style template:
In your RTF template, use the same named styles for paragraph and table elements that you want to be inherited from the style template.
Open the report in BI Publisher's Report Editor and select the style template to associate to the report. Then enable the style template for the specific report layout.
Runtime
When you run the report with the selected layout, BI Publisher will apply the styles, header, and footer from the style template.
The following sections describe how to define the style types in your Microsoft Word document. For more complete information see the Microsoft Word documentation.
Use a paragraph style to define formatting such as font type, size, color, text positioning and spacing. A paragraph style can be applied to one or more paragraphs. Use a paragraph style to format headings and titles in your report as well.
To define a paragraph style type
In your Microsoft Word document, from the Format menu, select Styles and Formatting.
From the Styles and Formatting task pane, select New Style.
In the New Style dialog, enter a name for your style. Choose style type: Paragraph. Format your style using the options presented in the dialog. To see additional paragraph options (such as font color and text effects), click Format.
When finished, click OK and your new style will appear in the list of available formats in the Styles and Formatting task pane.
Choose your new style and make an entry in your style template to display the style.
To apply the paragraph style type in your document
Position your cursor within the paragraph (or text) to which you wish to apply the style.
Select the style from list of available formats in the Styles and Formatting task pane. The style will be applied to the paragraph.
To modify an existing style type
In your Microsoft Word document, from the Format menu, select Styles and Formatting.
From the Styles and Formatting task pane, select and right-click the style to modify.
From the menu, select Modify.
To define a table style type
In your Microsoft Word document, from the Format menu, select Styles and Formatting.
From the Styles and Formatting task pane, select New Style.
In the New Style dialog, enter a name for your style. Choose style type: Table. Format your style using the options presented in the dialog. To see additional table options (such as Table Properties and Borders and Shading), click Format.
When finished, click OK and your new style will appear in the list of available formats in the Styles and Formatting task pane.
Choose your new style and make an entry in your style template to display the style.
To apply the table style type in your document
Position your cursor within the table to which you wish to apply the style.
Select the table style from list of available formats in the Styles and Formatting task pane. The style will be applied to the table.
You can define a header and footer in your style template. The contents and sizing of the header and footer in the style template will be applied to the report layouts.
Important: If a header and footer have been defined in the report layout, they will be overwritten. The header and footer from the style template will be applied.
To define a header and footer
In your Microsoft Word document, from the View menu, select Header and Footer.
Enter header and footer content. This can include a logo or image file, static text, current date and time stamps, page numbers, or other content supported by Microsoft Word.
You can place a style template in any folder in the catalog to which you have access. Your organization may have a designated folder for style templates.
To upload a style template file:
On the global header click New and then click Style Template. This launches an untitled Style Template properties page.
From the Templates region, click the Upload toolbar button.
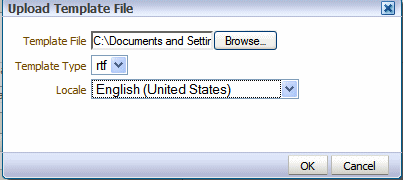
In the Upload Template File dialog, use the Browse button to select your Template File. Select rtf as the Type, and select the appropriate Locale. Then click OK.
Your style template file will display in the Templates region as the locale name you selected (for example: en_US).
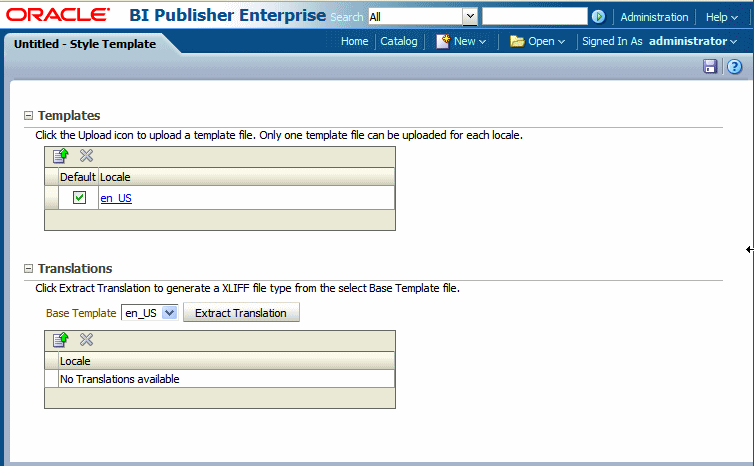
Click Save.
In the Save As dialog choose the catalog folder in which to save the style template. Enter the Name and click Save.
Note: You may only upload one RTF file per locale to a Style Template definition. If you upload additional template files to this Style Template, each file will be automatically named as the locale regardless of the name you give the file before upload.
If you are uploading multiple localized files, select the file that is to be used as the default. For more information on localization of template files see Adding Translations to Your Style Template.
Navigate to the report in the catalog and click Edit to open the report editor.
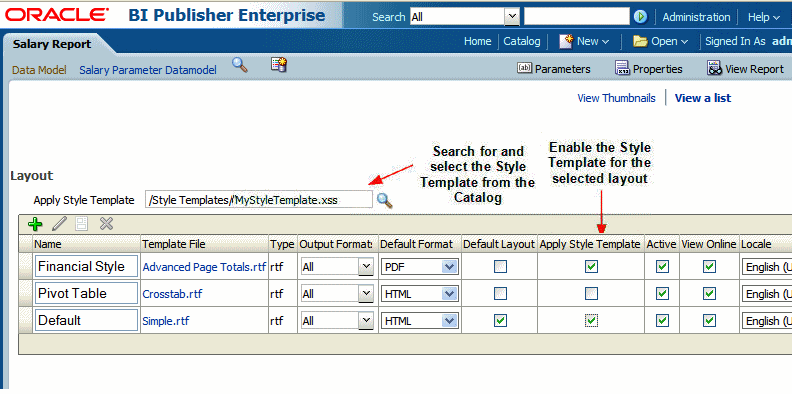
From the default thumbnail view, select View a List. In the Layout Region, click the Choose icon to search for and select your style template from the BI Publisher catalog. .
For the layout templates that you wish to use the style template, select the Apply Style Template box for the template. Note that the box is only enabled for RTF templates.
The following figure shows the actions required to enable a style template in the Report Editor.
To update or edit a saved style template:
Navigate to the file in the catalog.
Click Edit to open the Style Template properties page.
Delete the existing file.
Upload the edited file, choosing the same locale.
Style templates offer the same support for translations as RTF template files.
You can upload multiple translated RTF files under a single Style Template definition and assign the appropriate locale. These will display in the Templates region, as shown in the following figure:
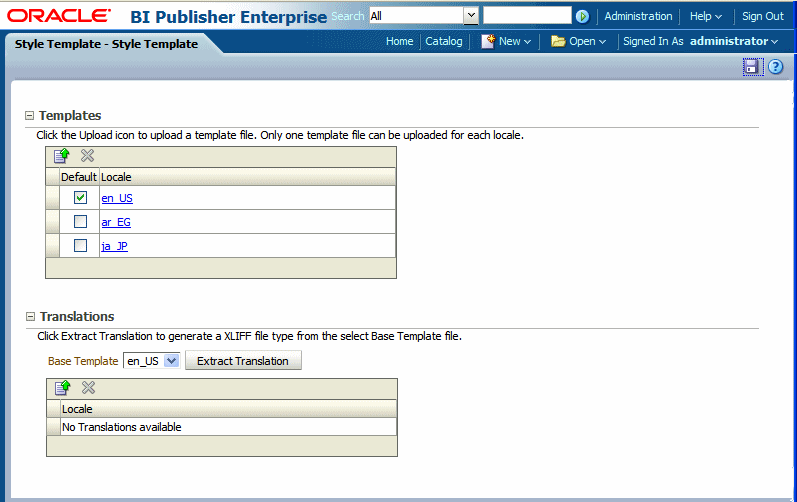
Or you can generate an XLIFF (.xlf) file of the translatable strings, translate the strings, and upload the translated file. These will display in the Translations region, as shown in the following figure:
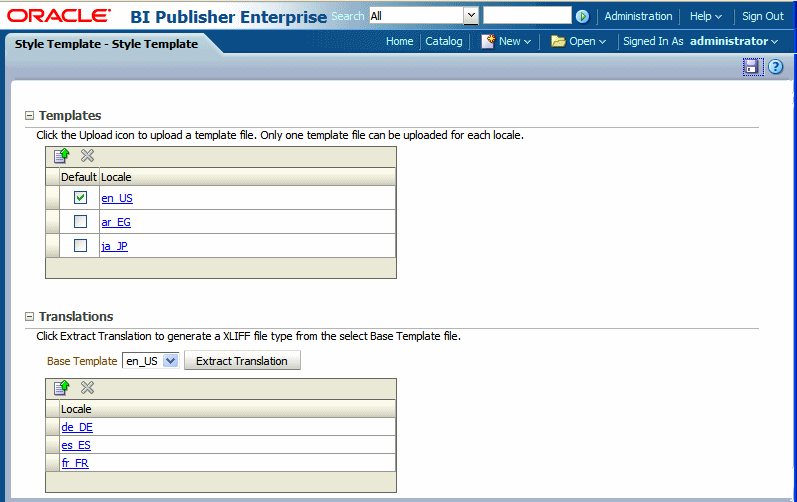
At runtime, the appropriate style template is applied based on the user's account Preference setting for Report Locale for reports viewed online; or, for scheduled reports, based on the user's selection for Report Locale for the scheduled report.
The XLIFF files for style templates can be generated individually, then translated, and uploaded individually. Or, if you perform a catalog translation that includes the style template folders, the strings from the style template files will be extracted and included in the larger catalog translation file. When the catalog translation file is uploaded to BI Publisher, the appropriate translations from the catalog file will display in the Translations region of the Style Template definition.
For more information on translations, see the section Translating Reports and Catalog Objects.
![]()
Copyright © 2004, 2010, Oracle and/or its affiliates. All rights reserved.