Release 11g (11.1.1)
Part Number E13881-01
Contents
Previous
Next
| Oracle Fusion Middleware Report Designer's Guide for Oracle Business Intelligence Publisher Release 11g (11.1.1) Part Number E13881-01 | Contents | Previous | Next |
This chapter covers the following topics:
The Data Model diagram helps you to quickly and easily define data sets, break groups, and totals for a report based on multiple data sets.
If you do not link the data sets (or queries) you will produce a multipart unrelated query data set.
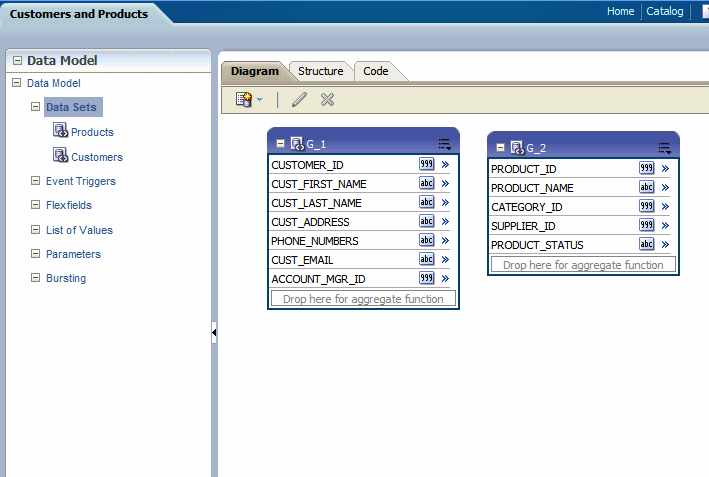
For example, in the data model below, one query selects products and another selects customers. Notice that there is no relationship between the products and customers.
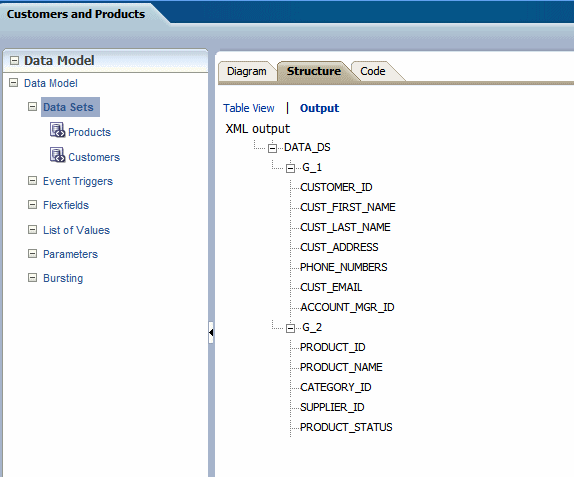
This will produce the following data structure:
In many cases, the data fetched for one part of the data set (or query) is determined by the data fetched for another part. This is often called a "master/detail," or "parent/child," relationship, and is defined with a data link between two data sets (or queries). When you run a master/detail data model, each row of the master (or parent) query will cause the detail (or child) query to be executed, retrieving only matching rows.
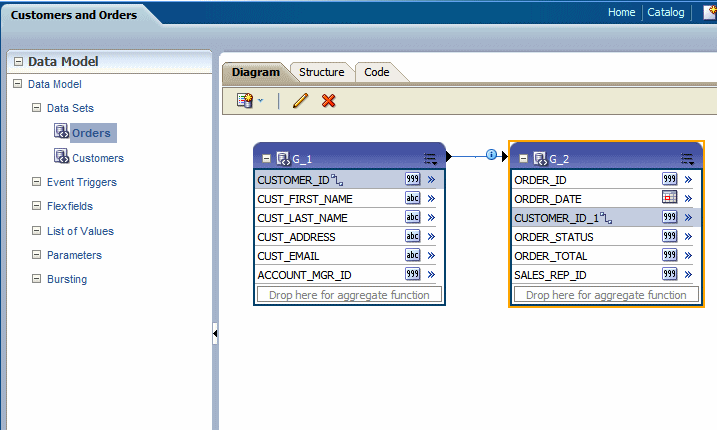
In the following example two data sets are linked by the element Customer ID. The Orders data set a child of the Customers data set.
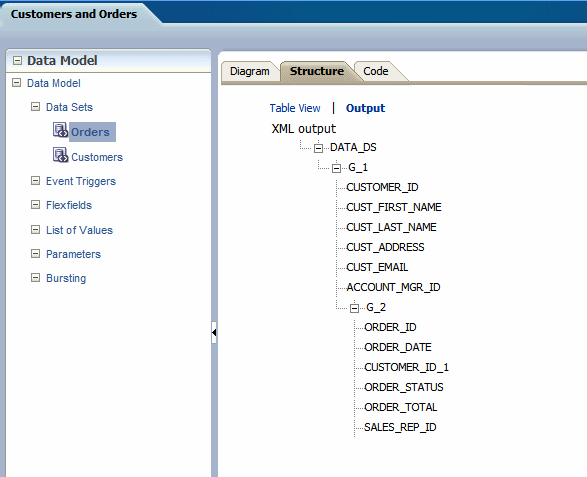
This produces the following data structure:
Following are recommended guidelines for building data models:
Reduce the number of data sets or queries in your data model as much as possible. In general, the fewer data sets/queries you have, the faster your data model will run. While multiquery data models are often easier to understand, single-query data models tend to execute more quickly. It is important to understand that in parent-child queries, for every parent, the child query is executed.
You should only use multiquery data models in the following scenarios:
To perform functions that the query type, such as a SQL query, does not support directly.
To support complex views (for example, distributed queries or GROUP BY queries).
To simulate a view when you do not have or want to use a view.
The data model editor enables you to combine data from multiple data sets into a single XML data structure. Data sets from multiple data sources can be merged either as sequential XML or at line-level to create a single combined hierarchical XML. Using the data model editor you can easily combine data from the following data set types: SQL query, OLAP (MDX query), LDAP, and Microsoft Excel.
The data model editor supports the following
Group data
Groups are created to organize the columns in your report. Groups can do two things: separate a query's data into sets, and filter a query's data. When you create a query , the data engine creates a group that contains the columns selected by the query; you can create groups to modify the hierarchy of the data appearing in a data model. Groups are used primarily when you want to treat some columns differently than others. For example, you create groups to produce subtotals or create breaks.
Link data - define master-detail links between data sets to group data at multiple levels.
Aggregate data - create group level totals and subtotals.
Transform data - modify source data to conform to business terms and reporting requirements.
Create calculations - compute data values that are required for your report that are not available in the underlying data sources.
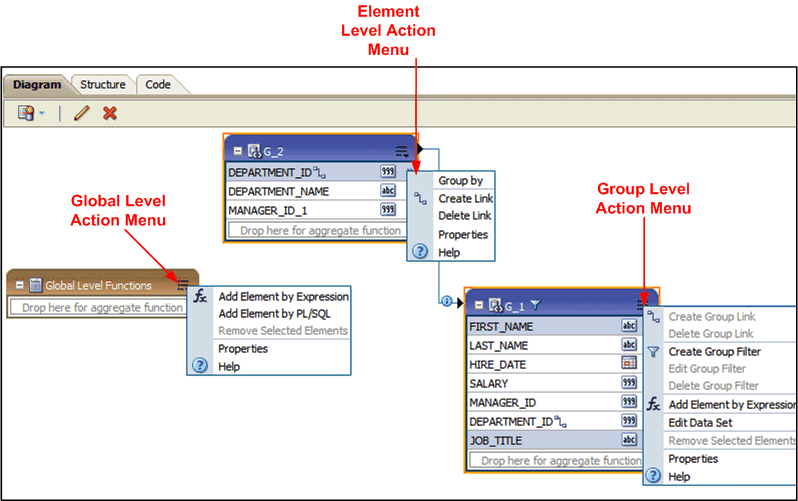
The data model editor provides functions at the element level, the group level, and the global level. Note that not all data set types support all functions. See the Important Notes section that accompanies your data set type for limitations.
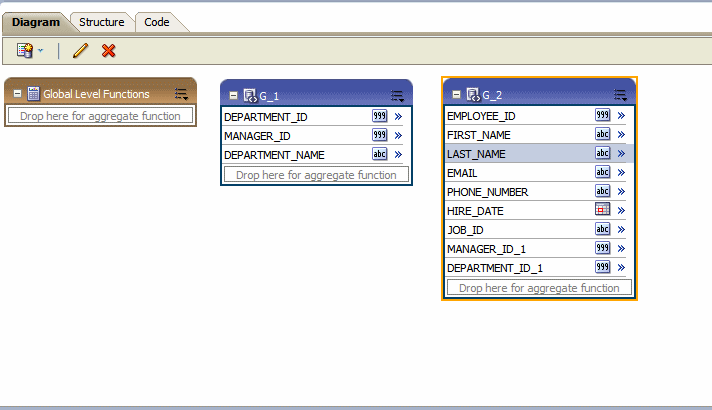
By default, the data sets that you created are shown in the Diagram View as separate objects.
The data set structure builder has three views:
Diagram View - (shown above) this view displays your data sets and enables you to graphically create links and filters, add elements based on expressions, add aggregate functions and global-level functions, edit element properties, and delete elements. The Diagram View is typically the view you will use to build your data structure.
Structure View - this view has two modes:
Table View and Output
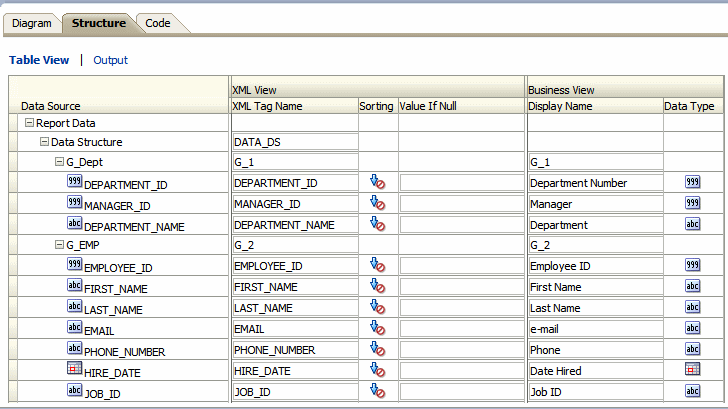
The table view displays element properties in a table and enables you to update XML element alias names, presentation names of the elements, sorting, null values, and reset options. The following figure shows the structure Table View:
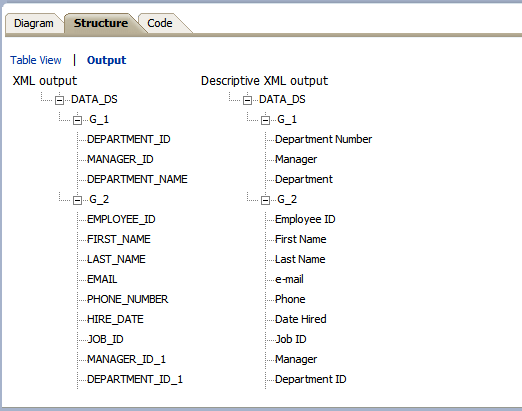
The Output view provides a clear view of the XML structure that will be generated. The Output view is not updateable. The following figure shows the Output view:
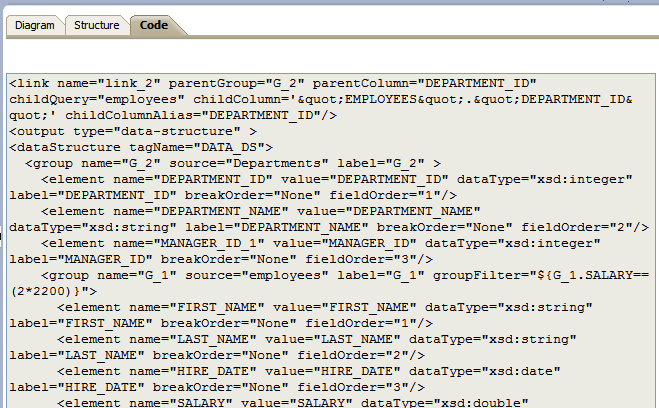
Code View - this view displays the data structure code created by the data structure builder that will be read by the data engine. The code view is not updateable. The following figure shows the code view:
Joining and structuring data at the source into one combined data set is sometimes not possible. For example, you cannot join data at the source when data resides in disparate sources such as Microsoft SQL Server and an Oracle database. You can use the BI Publisher data engine to combine and structure data after you extract it from the data source. Even if your data is coming from the same source, if you are creating large reports or documents with potentially hundreds of thousands of rows or pages, structuring your data so that it matches the intended layout will optimize document generation.
Create a link to define a master-detail (or parent-child) relationship between two data sets. You can create links as element-level links or group-level links. The resulting, hierarchical XML data will be the same. Creating links as element-level links is the preferred method. Group-level links are provided for backward compatibility with data templates from earlier versions of BI Publisher.
A data link (or parent-child relationship) relates the results of multiple queries. A data link can establish these relationships:
Between one query's column and another query's column
Between one query's group and another query's group (this is useful when you want the child query to know about its parent's data)
Element-level links create a bind (join) between two data sets and define a master-detail (parent-child) relationship between them. This is the preferred method of defining master detail relationships between data sets. The simplest way to link data sets is by creating element-level links because they do not require you to code a join between the two data sets through a bind variable.
Group level links also determine the way data sets are structured as hierarchical XML, but lack the join information that the data engine needs to execute the master and detail queries. When you define a group-level link, you must also update your query with a link between the two data sets through a unique bind variable.
Link data sets to define a master-detail (or parent-child) relationship between two data sets. Defining an element-level link enables you to establish the binding between the elements of the master and detail data sets.
To define an element-level link:
Open the element action menu and click Create Link.
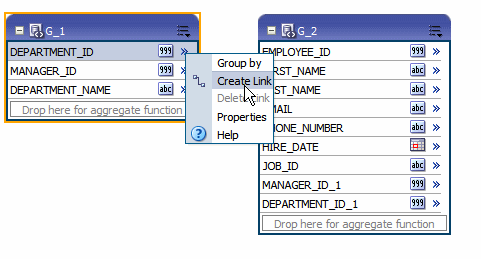
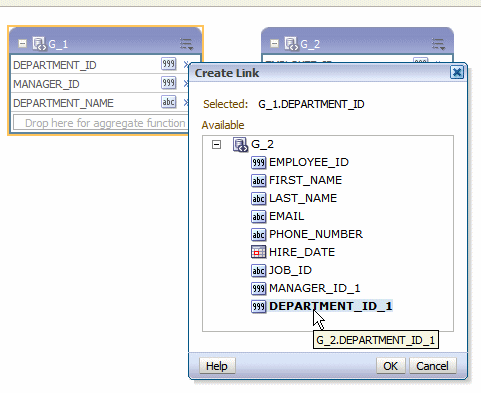
The Create Link dialog will launch and display the elements from the other data sets. Choose the element and click OK to create the link.
Alternatively, from the parent group, click and drag the element you wish to bind to the matching element in the child group.
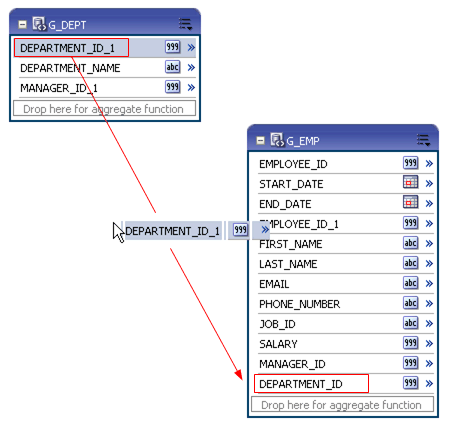
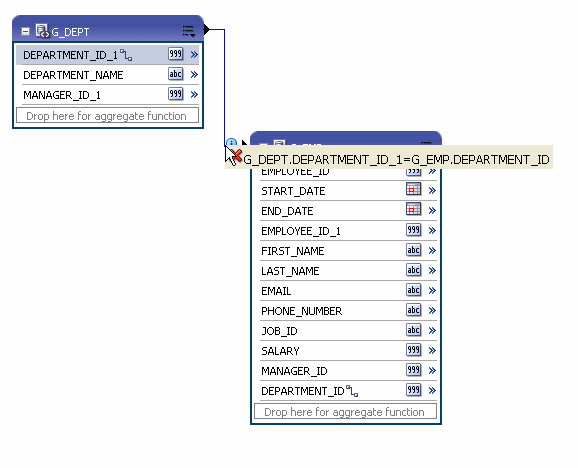
After dropping the element from the parent data set to the matching element on the child data set, a connector will display between the data sets. Pause your cursor over the connector to display the link (as shown in the following figure).
To delete an element link:
Pause your cursor over the element connector to display the linked element names and the delete button.
Click the delete button.
Or, alternatively:
Open the element action menu for either element and click Delete Link.
A group-level link defines a master-detail relationship between two data sets. The following figure shows two data sets with a group-level link defined. Next to the data sets the resulting XML data structure is shown.

To define a group-level link:
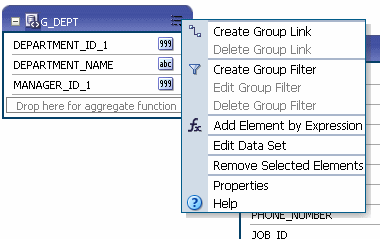
In the parent group, click the View Actions menu (in the upper right corner of the object).
Click Create Group Link.
Actions Menu
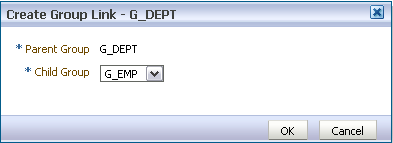
In the Create Group Link dialog, select the Child Group from the list and click OK.
Click the View Actions menu and then click Edit Data Set to add the bind variables to your query.
Example:
| Data Set: DEPT | Data Set: EMP |
|---|---|
|
|
Important: A unique bind variable must be defined in the child query.
To delete a group link:
In the parent group, click the View Actions menu (in the upper right corner of the object).
Click Delete Group Link.
In the Delete Group Link dialog, select the Child Group from the list and click OK.
In addition to creating parent-child structures by linking two data sets, you can also group elements in the same data set by other elements. This might be helpful if your query returns data that has header data repeated for each detail row. By creating a subgroup you can shape the XML data for better more efficient document generation.
Select the element by which you want to group the other elements in the data set.
Click the element action menu icon to open the menu and select Group by.
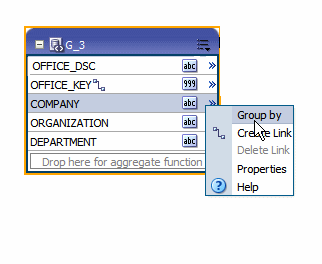
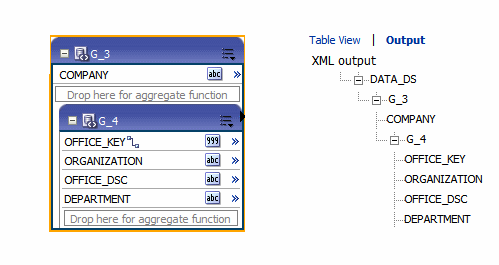
This creates a new group within the displayed data set. The following figure shows the G_3 data set grouped by the element COMPANY. This creates a new group called G_4, that contains the other four elements in the data set. The figure shows how the grouped data set is displayed in the Diagram View along with the structure.
Note that the you can perform any of the group actions on the new group you have created.
On the group's title bar, click View Actions and then click Ungroup.
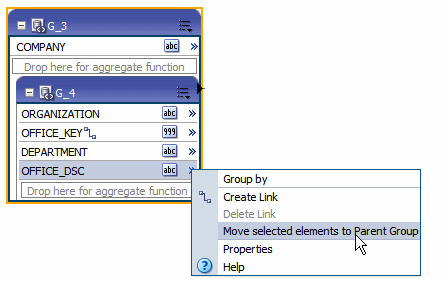
Once you have created a group within your data set, two new options display on the element action menu that enable you to move elements between the parent and child groups.
For the element you wish to move, click the element action icon to open the menu. If the element is in the parent group and you wish to move it to the child group select Move this element to Child Group.
If the element is in the child group and you wish to move it to the parent group select Move this element to Parent Group. In the following figure, the element action menu for OFFICE_DSC displays the option to move the element to the parent group.
Important: Be careful with moving an element as it can have dependency on other elements.
You can use the data model editor to aggregate data at the group or report level. For example, if you group sales data by Customer Name, you can aggregate sales to get a subtotal for each customer’s sales. Note that you can only aggregate data for at the parent level for a child element.
The aggregate functions are:
Average - calculates the average of all the occurrences of an element.
Count - counts the number of occurrences of an element.
First - displays the value of the first occurrence of an element in the group.
Last - displays the value of the last occurrence of an element in the group.
Maximum - displays the highest value of all occurrences of an element in the group.
Minimum - displays the lowest value of all occurrences of an element in a group.
Summary - sums the value of all occurrences of an element in the group.
Drag the element to the Drop here for aggregate function field in the parent group.
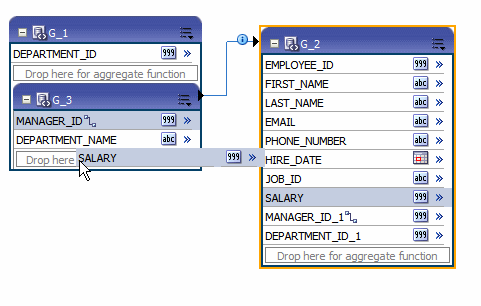
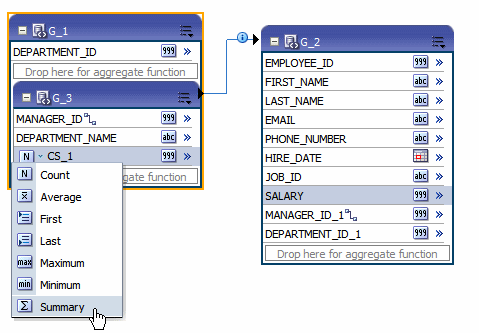
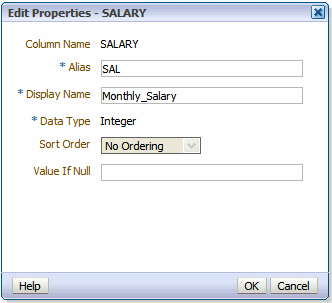
The following figure shows the element SALARY being dragged to the aggregate function bar of the G_DEPT group.
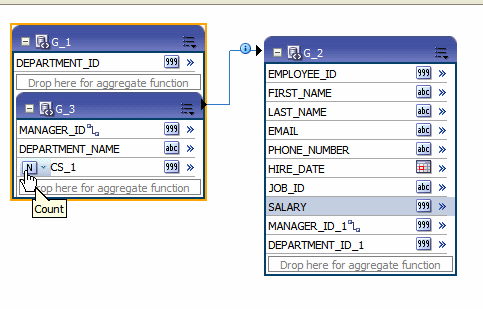
Once you drop the element, a new element is created in the parent group. By default, the Count function is applied. The icon next to the name of the new aggregate element indicates the function. Pause your cursor over the icon to display the function.
The following figure shows the new aggregate element, CS_1. with the default Count function defined.
To change the function: Click the function icon to view a list of available functions and choose from the list.
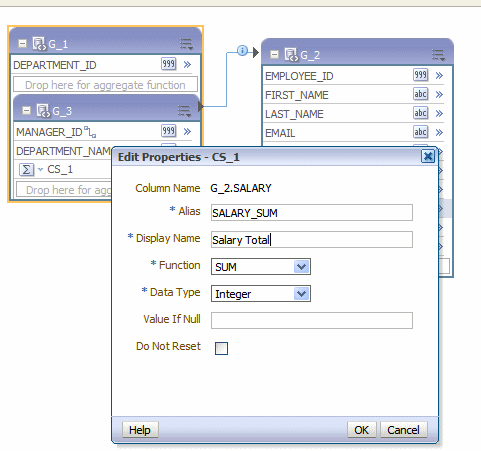
If you wish to rename the element or update other properties, click the element's Action menu icon. On the menu, click Properties. The Properties dialog is shown in the following figure:
Important: Be careful when renaming an element as it can have dependency on other elements.
Set the following properties as needed:
| Property | Description |
|---|---|
| Column Name | The internal name assigned to the element by the BI Publisher data model editor. This name cannot be updated. |
| Alias (XML Tag Name) | BI Publisher assigns a default tag name that the element will have in the XML data file. You can update this tag name if you want a more meaningful name within the data file. |
| Display Name | The Display Name appears in the report design tools. Update this name to be meaningful to your business users. |
| Function | If you have not already chosen the desired function, you can select it from the list here. |
| Data Type | BI Publisher assigns a default data type of Integer or Double depending on the function. Some functions also provide the option of Float. |
| Value if Null | If the value returned from the function is null, you can supply a default value here to prevent having a null in your data. |
| Do Not Reset | By default, the function resets at the group level. For example, if your data set is grouped by DEPARTMENT_ID, and you have defined a sum function for SALARY, then the sum will be reset for each group of DEPARTMENT_ID data, giving you the sum of SALARY for that department only. If instead you want the function to reset only at the global level, and not at the group level, select Do Not Reset. This will create a running total of SALARY for all departments. Note that this property is for group level functions only. |
Filters enable you to conditionally remove records selected by your queries. Groups can have two types of filters:
Expression - create an expression using predefined functions and operators
PL/SQL Function - create a custom filter
To Create a Group Filter
Click the View Actions menu and select Create Group Filter.
This displays the Edit Group Filter dialog:
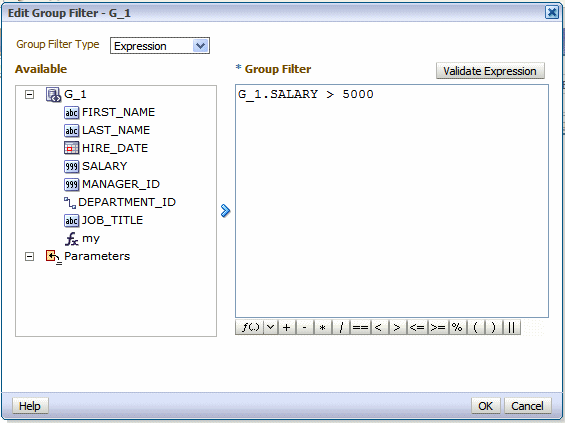
Choose the Group Filter Type: Expression or PL/SQL.
Note: For PL/SQL filters, you must first specify the PL/SQL Package as the Oracle DB Default Package in the data model properties. See Setting Data Model Properties.
Enter the Filter:
To enter an expression, select the elements and click the shuttle button to move the element to the Group Filter definition box. Click the predefined functions and operators to insert them in the Group Filter box.
Refer to Function Reference for a description of the available functions.
Click Validate Expression to ensure your entry is valid.
To enter a PL/SQL function, select the PL/SQL package from the Available box and click the shuttle button to move the function to the Group Filter box.
Your PL/SQL function in the default package must return a Boolean type.
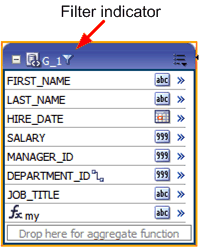
After you have added the group filter, the data set object displays the filter indicator, as shown in the following figure:
To Edit or Delete a Group Filter
Click the data set View Actions menu.
Choose the appropriate action:
To edit the group filter, choose Edit Group Filter to launch the Group Filter dialog for editing.
To delete the group filter, choose Delete Group Filter.
You can perform the following functions at the element level:
You can set properties for individual elements. Note that these properties are also updateable from the Structure View. If you need to update multiple element properties, it may be more efficient to use the Structure View. See Using the Structure View to Edit Data Structures.
To set element-level properties using the element dialog:
Click the element's action menu icon. From the menu, select Properties. The Properties dialog is shown in the following figure:
Set the following properties as needed:
| Property | Description |
|---|---|
| Alias | BI Publisher assigns a default tag name that the element will have in the XML data file. You can update this tag name if you want a more meaningful name within the data file. |
| Display Name | The Display Name appears in the report design tools. Update this name to be meaningful to your business users. |
| Data Type | BI Publisher assigns a default data type of Integer or Double depending on the function. Some functions also provide the option of Float. |
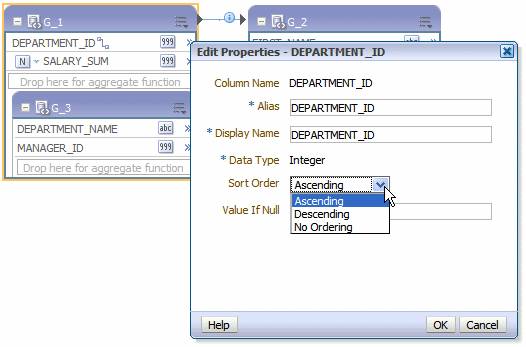
| Sort Order | You can sort XML data in a group by one or more elements. For example, if in a data set employees are grouped by department and manager, you can sort the XML data by department. Within each department you can group and sort data by manager, and within each manager subgroup, employees can be sorted by salary. If the element is not in a parent group, the Sort Order property will not be available. |
| Value if Null | If the value returned from the function is null, you can supply a default value here to prevent having a null in your data. |
Sorting is supported for parent group break columns only. For example, if a data set of employees is grouped by department and manager, you can sort the XML data by department. Within each department you can group and sort data by manager. If you know how the data should be sorted in the final report, you specify sorting at data generation time to optimize document generation.
To apply a sort order to a group:
Click the action menu icon of the element you want to sort by. From the menu, select Properties.
Select the Sort Order.
The following figure shows the Properties dialog for the DEPARTMENT_ID element with the Sort Order list displayed.
The View Actions menu available at the group level enables you to perform the following:
To edit the underlying data set, click Edit Data Set to launch the data set editor. See the appropriate section for the data set type in the chapter Creating Data Sets for more information.
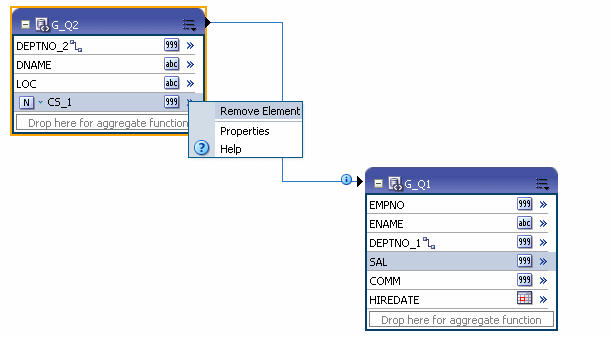
On the element, click the menu and then click Remove Element.
Note that you can only remove elements added as a group function (sum, count, and so on) or added as an expression.
Click the View Actions menu and select Properties.
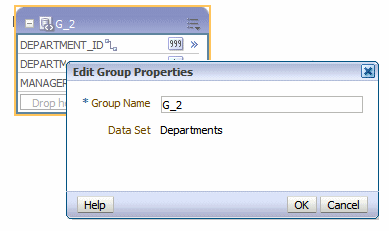
Edit the Group Name and click OK.
The Global Level Functions object enables you to add elements to your report data set at the top report level. You can add the following types of elements as top-level data:
Elements based on aggregate functions
Elements based on expressions
Elements based on PL/SQL statements (for Oracle Database data sources)
Important: If you select a data type of Integer for any calculated element and the expression returns a fraction, the data will not be truncated.
The Global Level Functions object is shown in the following figure. To add elements based on aggregate functions, drag the element to the "Drop here for aggregate function" space of the object. To add an element based on an expression or PL/SQL, choose the appropriate action from the View Actions menu.
To add a global aggregate function:
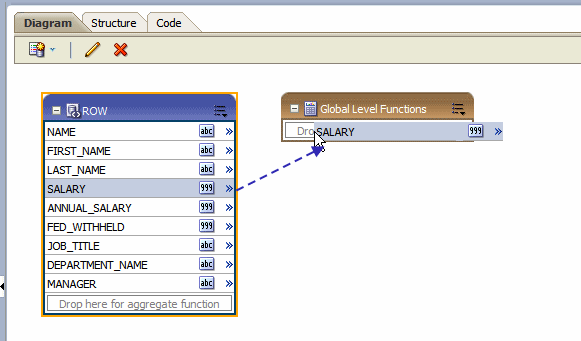
Drag and drop the data element from the data set to the "Drop here for aggregate function" area of the Global Level Functions object.
For example, the following figure shows the Salary element dragged to the Global Level Functions object.
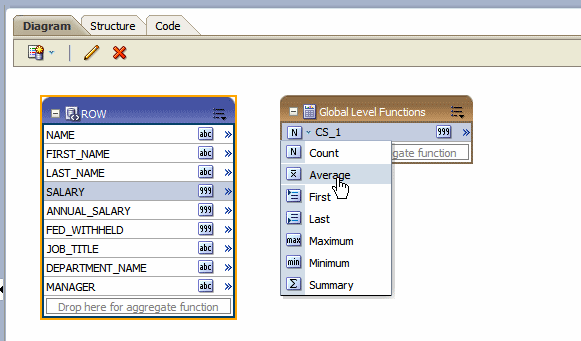
When you release the mouse, the data model editor assigns a default name to the aggregate element and assigns Count as the default function. Available functions are:
Count
Average
First
Last
Maximum
Minimum
Summary
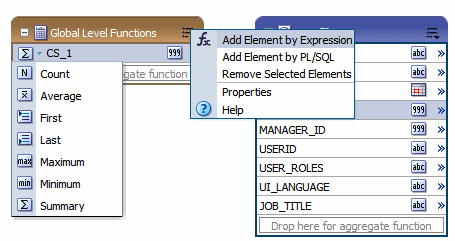
To change the function, click the function icon to the left of the new element name and choose the function from the list.
The following figure shows the function for the new global level element CS_1 being modified from Count to Average.
To change the default name, click the actions icon to the right of the element name and click Properties to launch the Edit Properties dialog, See Setting Element Properties for more about the properties available on this dialog.
Perform the following:
To add a group-level element: On the Group object, click the View Actions menu and select Add Element by Expression.
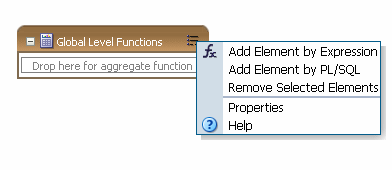
To add a global level element: On the Global Level Functions object, click the View Actions menu and select Add Element by Expression.
In the Add Element by Expression dialog, enter the fields.

| Field | Description |
|---|---|
| Name | Enter a name for this element. |
| Alias | Enter the tag name that the element will have in the XML data file. |
| Display Name | The Display Name appears in the report design tools. Enter a name that will be meaningful to your business users. |
| Data Type | Select from the list of data types: String, Integer, Double, Float, or Date. |
Enter the expression.
Use the shuttle arrow to move the data elements required for the expression from the Available box to the Expression box.
Click an operator to insert it in the Expression box, or choose from the function list.
Refer to Function Reference for a description of the available functions.
Click Validate Expression to validate.
The PL/SQL function must return a VARCHAR data type.
On the Global Level Functions object, click the View Actions menu and then click Add Element by PL/SQL.
In the Add Element by PL/SQL dialog, enter the fields.
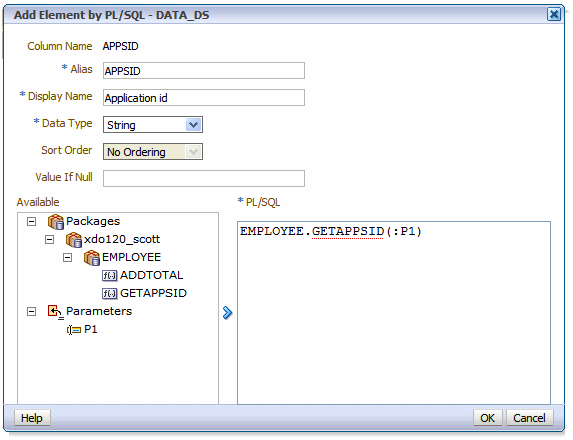
| Field | Description |
|---|---|
| Name | Enter a name for this element. |
| Alias | Enter the tag name that the element will have in the XML data file. |
| Display Name | The Display Name appears in the report design tools. Enter a name that will be meaningful to your business users. |
| Data Type | Must select String. |
| Sort Order | Select a sort order. |
| Value if Null | Enter a value to return if the value returned from the PL/SQL function is null. |
Select the PL/SQL package from the Available box and click the shuttle button to move the function to the Group Filter box.
The Structure view enables you to preview the structure of your data model. The Data Source column displays the date elements in a hierarchical tree that you can collapse and expand. Use this view to verify the accuracy of the data model structure.
Use the Structure page to define user-friendly names for elements in the data model. You can rename both the XML element tag name (XML View) and the name that will display in the report layout tools (Business Name).
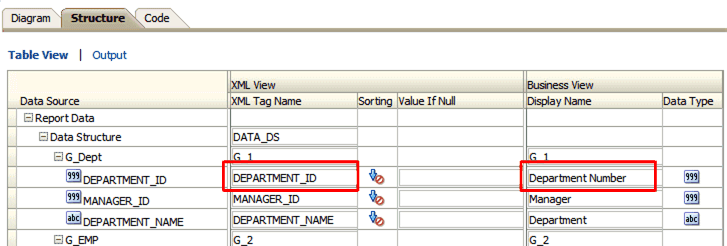
The Structure also enables you to enter a value to use for an element if the data model returns a null value for the element.
Enter the value to use in the Value if Null field for the element.
The following table describes the usage of supported functions available from the Add Element by Expression dialog and the Edit Group Filter dialog:
| Function | Description |
|---|---|
| IF | operator |
| NOT | operator |
| AND | operator |
| OR | operator |
| MAX | Returns the maximum value of the element in the set. |
| MIN | Returns the minimum value of the element in the set. |
| ROUND | ROUND ( number [, integer ] ) returns number rounded to integer places right of the decimal point. If integer is omitted, then number is rounded to 0 places. integer can be negative to round off digits left of the decimal point. integer must be an integer. Example: round (2.777) returns 3 Example: round (2.777, 2) returns 2.78 |
| FLOOR | FLOOR(n) returns largest integer equal to or less than n. |
| CEILING | CEILING(n) returns smallest integer greater than or equal to n. |
| ABS | ABS(n) returns the absolute value of n. |
| AVG | AVG(expr) returns average value of expr. |
| LENGTH | The LENGTH(char) functions return the length of char. LENGTH calculates length using characters as defined by the input character set. If char is null, then this function returns null. |
| SUM | SUM(expr) returns the sum of value of expr. |
| NVL | NVL(expr1, expr2) lets you replace null (returned as a blank) with a string in the results of a query. If expr1 is null, then NVL returns expr2. If expr1 is not null, then NVL returns expr1. |
| CONCAT | CONCAT(char1, char2) returns char1 concatenated with char2. |
| STRING | STRING(char1) returns char as a string data type. |
| SUBSTRING | The substring function allows you to extract a substring from a string. The syntax for the substring function is: substring(string, start_position, length) string is the source string. start_position is the position for extraction. The first position in the string is always 1. length is the number of characters to extract. |
| INSTR | The instr function returns the location of a substring in a string. The syntax for the instr function is: instr(string1,string2,[start_position],[nth_appearance]) string1 is the string to search. string2 is the substring to search for in string1. start_position is the position in string1 where the search will start. The first position in the string is 1. If the start_position is negative, the function counts back start_position number of characters from the end of string1 and then searches towards the beginning of string1. nth appearance is the nth appearance of string2. |
| DATE | DATE(char) Converts char to date data type. |
| FORMAT_DATE | The FORMAT_DATE function takes a date argument in Java date format and converts it to a to formatted string. For example, FORMAT_DATE(HIRE_DATE, 'MM-DD-YYYY') where the value of HIRE_DATE is 1987-09-17T00:00:00.000+00:00 would return 17-Sep-1987. |
| FORMAT_NUMBER | The FORMAT_NUMBER function takes a number argument and converts it to a string in the format specified. For example, FORMAT_NUMBER (SALES_UNITS,'9G990D000') |
| NUMBER | NUMBER(char) converts char to a number data type. |
![]()
Copyright © 2004, 2010, Oracle and/or its affiliates. All rights reserved.