A User Interface
This section contains information about the interface used with Inbound Refinery and enabled conversion options.
The following screens are shown in this section:
A.1 Providers Page
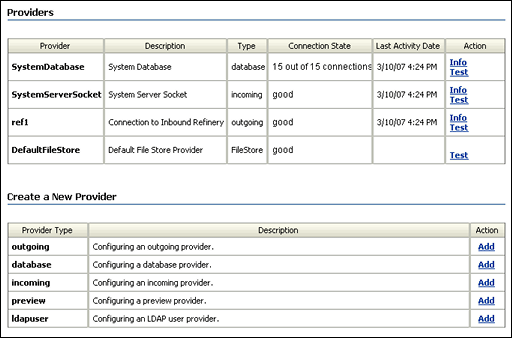
Access this Content Server page by selecting Providers in the content server Administration menu. The Providers page enables you to view, add, and edit providers for the content server. For more information about Providers, see the Oracle Fusion Middleware System Administrator's Guide for Universal Content Management.
| Providers Table | Description |
|---|---|
| Provider column | The name of the provider that establishes connection to outside entities. |
| Description column | A description of the provider. |
| Type column | The type of provider. |
| Connection State column | Possible states are:
|
| Last Activity Date column | The last date and time that the provider was active. |
| Actions column | The Info link displays the Provider Information Page for the provider.
The Test link refreshes the Connection State and Last Activity Date columns for the provider. |
| Create a New Provider Table | Description |
|---|---|
| Provider Type column | The type of provider. |
| Description column | A description of the provider type. |
| Action column | Clicking the Add link for the outgoing provider type displays the Add/Edit Outgoing Socket Provider Page. |
A.2 Add/Edit Outgoing Socket Provider Page
Access this Content Server page using one of the following methods:
-
By clicking Add in the Action column for the outgoing provider type on the Providers page.
-
By clicking Info in the Actions column for a refinery provider on the Providers page, and then clicking Edit on the Provider Information page.
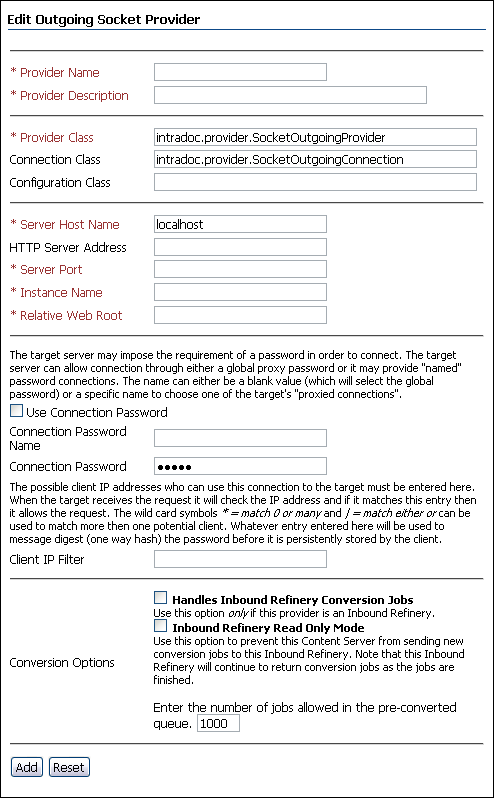
The Add/Edit Outgoing Provider page enables you to add a refinery as a provider to a content server or edit information for an existing refinery provider.
| Element | Description |
|---|---|
| Provider Name field (required) | A name for the provider, which will become a subdirectory in the IntradocDir/data/providers directory. |
| Provider Description field (required) | A user-friendly description for the provider. |
| Provider Class field (required) | The name of the Java class for the provider. The default is the intradoc.provider.SocketOutgoingProvider class. |
| Connection Class field | Not required. |
| Configuration Class field | Not required. |
| Server Host Name field (required) | The host name of the server on which the refinery is installed. |
| HTTP Server Address field | The HTTP server address for the refinery. Not required when the refinery is on the same computer as the content server. |
| Server Port field (required) | The port on which the refinery provider will communicate. The default refinery port is 5555. |
| Instance Name field (required) | The instance name of the refinery. For example, ref2. |
| Relative Web Root field (required) | The relative web root of the refinery. When installed under WebLogic Server, the relative web root is /ibr/. |
| Use Connection Password check box (optional) | The target server may impose the requirement of a password in order to connect. The target server can allow connection through either a global proxy password or it may provide named password connections. The name can either be a blank value to select the global password or a specific name to choose one of the target's proxied connections. |
| Connection Password Name | The password required to connect to the target server. Leave blank to use the global password or specify the named connection. |
| Connection Password | The password necessary to connect to the target server or named proxy connection. |
| Client IP Filter | Enter the possible client IP addresses that can use the connection to the target server. When the target receives the request it will check the IP address. If it matches the IP address entered here then it allows the request. The wild card symbols * = match 0 or many and | = match either or can be used to match more then one potential client. The IP address entered here is used to message digest (one way hash) the password before it is persistently stored by the client. |
| Handles Inbound Refinery Conversion Jobs check box | Select this check box when creating a refinery provider for a content server. |
| Inbound Refinery Read Only Mode check box | Select this check box only when you do not want the content server to send new conversion jobs to the refinery. By default, this check box should be cleared. |
| Number of jobs allowed in the pre-converted queue field | If necessary, change the maximum number of jobs allowed in the content server's pre-converted queue. The default is 1000 jobs. |
| Add button | Adds a new refinery provider. |
| Update button | Saves your changes when updating a refinery provider. |
| Reset button | Resets the Add/Edit Outgoing Provider page to the last saved settings. |
A.3 Provider Information Page
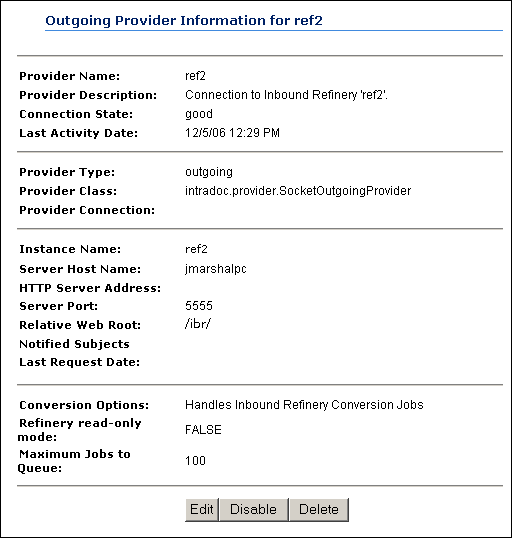
Access this Content Server page by clicking Info in the Actions column for a refinery provider on the Providers Page page of the Content Server, or by clicking Info in the Actions column of the IBR Provider Status Page.
| Element | Description |
|---|---|
| Information fields | Display information about the provider. See "Add/Edit Outgoing Socket Provider Page" on page 3 for a description of each field. |
| Edit button | Displays the Add/Edit Outgoing Socket Provider Page. |
| Disable/Enable button | Disables or enables the provider. The content server must be restarted after a provider is disabled or enabled. |
| Delete button | Deletes the provider. |
A.4 File Formats Wizard Page
Access this Content Server page by selecting Administration, then Refinery Administration, then File Formats Wizard on the Content Server. The File Formats Wizard page enables you to select types of files that should be sent to a refinery for conversion. The corresponding default file extensions, file formats, and conversions are mapped automatically.
Important:
The InboundRefinerySupport component must be installed and enabled on the content server to enable the File Formats Wizard page and at least one Inbound Refinery provider must be enabled. Also, conversion option components might add file types to the File Formats Wizard page.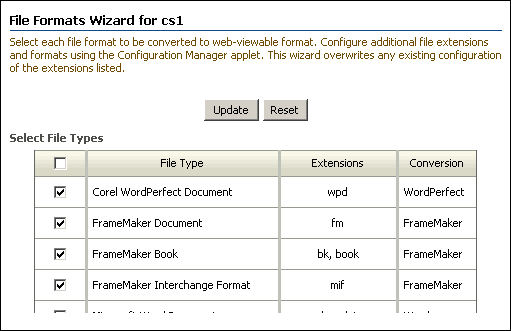
You can also make file format configuration changes manually using the Configuration Manager applet. For details, see "File Formats Screen". The File Formats Wizard page can be used to configure conversions for most common file types, however it does not replicate all of the Configuration Manager applet features.
Important:
The Ichitaro conversion is not supported for this version of Inbound Refinery.| Element | Description |
|---|---|
| Select File Types check boxes | Select each file type to be sent to a refinery for conversion. To select or clear all check boxes, select or clear the check box in the heading row. |
| Update button | Saves your changes. |
| Reset button | Resets the File Formats Wizard page to the last saved settings. |
A.5 File Formats Screen
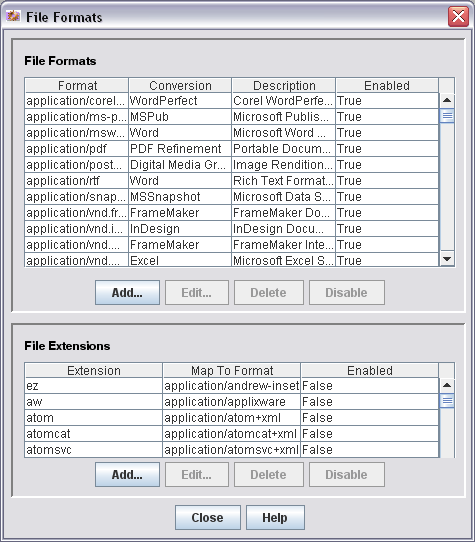
Access this Content Server screen by clicking Admin Applets under the Administration tray on the Content Server, clicking Configuration Manager to open the applet, then selecting Options and File Formats from the Configuration Manager applet. Use it to set up the file extensions, file formats, and conversions for the content server. The File Formats Wizard can be used to configure default conversions for most common file types. For details, see "File Formats Wizard Page". You should only need to use the File Formats screen to change default conversions and set up conversions for uncommon file types.
| Field | Description |
|---|---|
| Format | The name of the file format. Any name can be used, but Oracle recommends that you use the MIME type associated with the corresponding file extension(s). |
| Conversion | The conversion that is linked to the file format. |
| Description | The description for the file format. |
| Enabled | Specifies if the format or extension is enabled. |
| Extension | The file extension that is mapped to a file format. |
| Map to Format | The file format to which you want to map the file extension. |
A.5.1 Add New/Edit File Formats Screen
Access the Add New File Formats screen from Content Server by selecting Options, then File Formats from the Configuration Manager applet and then clicking the Add button in the File Formats section.
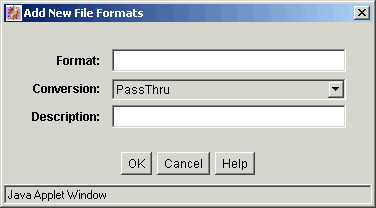
Access the Edit File Format screen by selecting Options, then File Formats from the Configuration Manager applet, selecting an existing file format in the File Formats section, and then clicking the Edit button in the File Formats section.
| Field | Description |
|---|---|
| Format | This is generally the MIME type associated with the corresponding file extension(s). |
| Conversion | The conversion that will be used for all file extensions that are mapped to the file format. |
| Description | The description for the file format. |
A.5.2 Add/Edit File Extensions Screen
Access the Add File Extensions screen from Content Server by selecting Options, then File Formats from the Configuration Manager applet and then clicking the Add button in the File Extensions section.
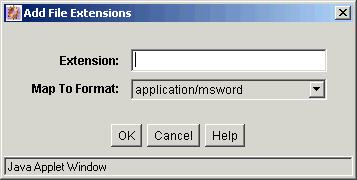
Access the Edit File Extension screen by selecting Options, File Formats from the Configuration Manager applet, selecting an existing file extension in the File Extensions section, and then clicking the Edit button in the File Extensions section.
| Field | Description |
|---|---|
| Extension | The file extension (for example, doc for Microsoft Word, xls for Microsoft Excel, vsd for Microsoft Visio, and so forth). |
| Map to Format | The file format to which you want to map the file extension. |
A.6 Refinery Conversion Options Page
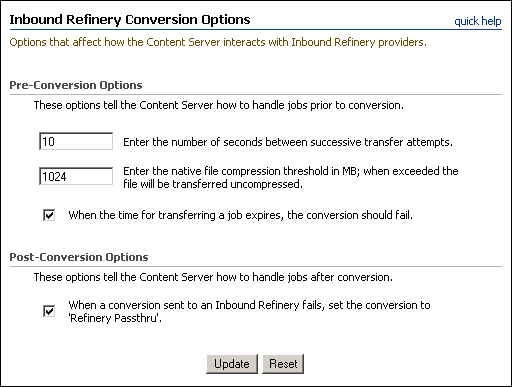
Access this Content Server page by selecting Administration, then Refinery Administration, then Conversion Options in the content server. The Inbound Refinery Conversion Options page enables you to configure several options that affect how the content server interacts with its refinery providers, including how the content server should handle pre and post-converted jobs.
Important:
The InboundRefinerySupport component must be installed and enabled on the content server and at least one Inbound Refinery provider must be configured to enable the Inbound Refinery Conversion Options page.| Element | Description |
|---|---|
| Number of seconds between successive transfer attempts field | Enter the number of seconds that the content server should wait between transfer attempts for pre-converted jobs. The default is 10 (seconds). |
| Native file compression threshold field | Enter the native file compression threshold size in MB. The default threshold size is 1024 MB (1 GB). Unless the native file exceeds the threshold size, it will be compressed before the content server transfers it to a refinery. This setting enables you to avoid the overhead of compressing very large files (for example, large video files). If you do not want any native files to be compressed before transfer, set the native file compression threshold size to 0. |
| When job transfer time expires, conversion should fail check box | Select this check box to fail the conversion if the total job transfer time expires. |
| When conversion sent to a refinery fails, set the conversion to 'Refinery Passthru' check box | Specifies whether a copy of the native document should be used as the primary web-viewable rendition when a conversion fails. If this option is selected, when a conversion fails (a web-viewable rendition cannot be produced) a copy of the native file is placed in the weblayout directory. When this option is cleared, the native file is not copied to the weblayout directory. |
| Update button | Saves your changes. |
| Reset button | Resets the Inbound Refinery Conversion Options page to the last saved settings. |
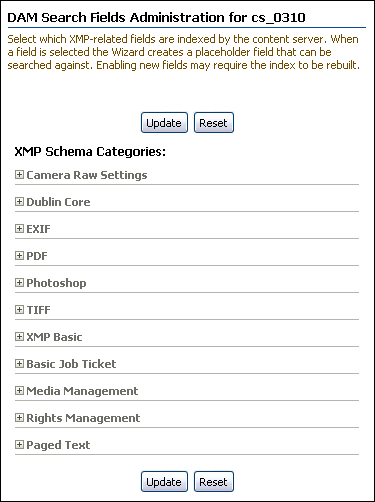
A.7 DAM Search Fields Administration Page
By default, XMP schema are extracted from digital images by Inbound Refinery and passed to Content Server. Content Server then displays the data on the Image Data tab of a digital asset. If OracleTextSearch is installed and enabled, the data is indexed and available for searching through a full-text search.
Note:
XMP data is only searchable as text. Any date or number values extracted from XMP data are indexed and made available for searching only as text.To allow searching on specific criteria in the XMP metadata, a placeholder field must be enabled on the Content Server user interface using the DAM Search Fields Administration page and the index rebuilt. Once done, users can search for content using the specific criteria in the XMP data.
The DAM Search Fields Administration page lists the primary XMP schema from the XMP specification as categories, and lists the available Content Server placeholder field names, labels and XMP-related descriptions within each category. Expand the category to find the specific XMP-related description to be indexed and enable the placeholder field. Once enabled, Click Update on the page and rebuild your search index.
To access this Content Server page, expand the Content Server Administration tray and click DAM Administration.
A.8 Conversion Listing Page
The Conversion Listing page in the Inbound Refinery enables you to set accepted conversions and queue maximums. Access this Inbound Refinery page by selecting Conversion Settings, then Conversion Listing from the Refinery.
Important:
The Ichitaro and LegacyCustom conversions are not supported for this version of Inbound Refinery.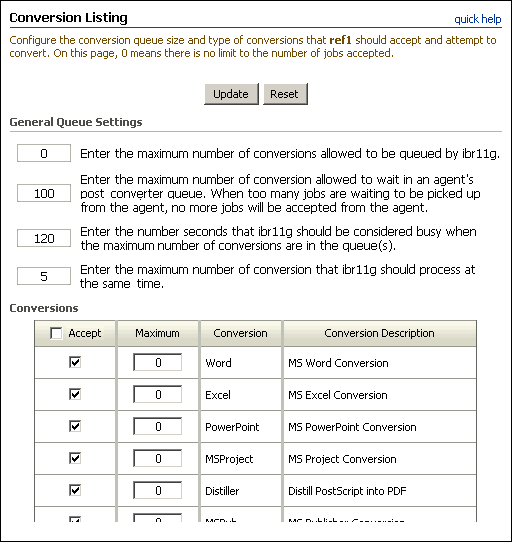
| Element | Description |
|---|---|
| Maximum number of conversions allowed to be queued field | Set the total number of conversion jobs that are allowed to be queued by the refinery. The default is 0 (unlimited). |
| Maximum number of conversions allowed in post converter queue field | Enter the number of conversions allowed to wait in a post converter queue before an agent no longer accepts jobs. The default is 1000. Enter zero (0) to allow unlimited jobs. However, allowing unlimited jobs can slow the system and cause problems by consuming available storage space. |
| Number of seconds the refinery should be considered busy field | Enter the number of seconds that the refinery should be considered busy when the maximum number of conversions has been reached. The default is 30 (seconds). When the maximum number of conversion jobs for the refinery has been reached, content servers will wait this amount of time before attempting to communicate with the refinery again. |
| Maximum number of concurrent conversions field | Enter the number of conversions the refinery is allowed to run at the same time. Concurrent conversions are possible provided multiple instances of the conversion application can run at the same time. For example, multiple instances of Outside In PDF Export can run at the same time and convert multiple documents concurrently, but only one instance of Adobe Photoshop can run on a computer, allowing for only one conversion of a Photoshop document. |
| Accept conversions check boxes | Select a check box to accept conversion jobs of that type sent by a content server. Clear a check box to prevent the refinery from accepting that type of conversion. To select or deselect all check boxes, check or clear the check box next to the column heading. By default, all conversions are accepted. |
| Maximum conversions column | Specify the maximum number of jobs (across all refinery queues) for each conversion type. The default is 0 (unlimited). |
| Conversion column | The name of each conversion enabled in the refinery. This should match the names of the conversions enabled in the content server. |
| Conversion Description column | A description of each conversion. |
| Update button | Saves changes to settings.
Important: Content Server must be made aware of the updated status of each refinery where conversion changes are made. This happens when the content server polls the refinery, but can be forced using the Force Status Update button on the IBR Provider Status Page to effect your changes in the content server's queuing immediately. Alternately, restart each content server that is an agent to the refinery. |
| Reset button | Reverts to the last saved settings. |
A.9 Primary Web-Viewable Rendition Page
The Primary Web-Viewable Rendition page enables you to select the conversion methods that Inbound Refinery can use to attempt to create a primary-webviewable rendition. Conversion methods are added to this page as the associated components are installed and enabled on Inbound Refinery. Access this Inbound Refinery page by selecting Conversion Settings, then Primary Web Rendition.
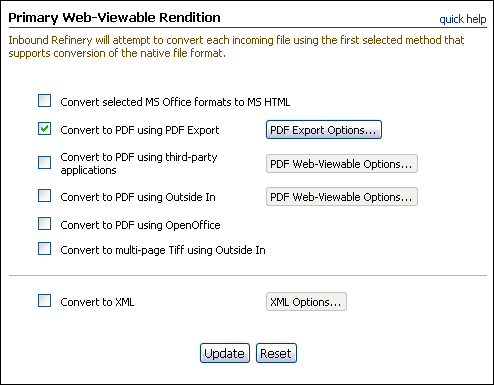
Inbound Refinery includes Outside In Image Export, which enables you to convert files to multi-page TIFF files as the primary web-viewable rendition. This enables users to view the files through standard web browsers with a TIFF viewer plugin. When no conversion options are installed, the only available conversion method is to use Outside In to convert the native file format to multi-page TIFF files as the primary web-viewable rendition. When conversion components are enabled, other conversion methods might be available on this page. For example, when the PDFExportConverter component is enabled, options are available to convert the native file to PDF using PDF Export.
Inbound Refinery will attempt to convert each incoming file based on the native file format. If the format is not supported for conversion by the first selected method, Inbound Refinery will check to see if the next selected method supports the format, and so on. Inbound Refinery will attempt to convert the file using the first selected method that supports the conversion of the format.
For example, consider that you have enabled the PDF conversion components and select both the Convert to PDF using third-party applications option and the Convert to PDF using Outside In option. You then send a Microsoft Word file to the refinery for conversion. Since the Microsoft Word file format is supported for conversion to PDF using a third-party application (Microsoft Word), Inbound Refinery will attempt to use the Convert to PDF using third-party applications method to convert the file to PDF as the primary web-viewable rendition. If this method fails, Inbound Refinery will not attempt the Convert to PDF using Outside In method. However, if you send a JustWrite file to the refinery for conversion, this file format is not supported for conversion to PDF using the Convert to PDF using third-party applications method, so Inbound Refinery will check to see if this format is supported by the Convert to PDF using Outside In method. Since this format is supported by Outside In, Inbound Refinery will attempt to convert the file to PDF using Outside In.
| Element | Description |
|---|---|
| Convert selected MS Office formats to MS HTML | Enable to convert native Microsoft Office files directly to HTML with the native Microsoft Office application. This method is available with HtmlConverter installed and enabled and is compatible with Windows only. |
| Convert to PDF using PDF Export | Enable to use Outside In PDF Export to convert supported files directly to PDF without any other third-party applications. This offers cross-platform compatibility and is available when PDFExportConverter is installed and enabled. |
| Convert to PDF using third-party applications | Enable to use native applications to convert files first to PostScript and then to PDF. This is available on Windows platforms only when WinNativeConverter is installed and enabled. |
| Convert to PDF using Outside In | Enable to use Outside In to convert supported files first to PostScript and then to PDF. When using this option, only a PostScript distiller engine is required. |
| Convert to PDF using OpenOffice | Enable to use OpenOffice to convert supported files to PostScript and then to PDF. This offers cross-platform compatibility and is available when OpenOfficeConversion is installed and enabled. |
| Convert to multi-page Tiff using Outside In | When no conversion options are installed, this is the only available conversion option. When this option is selected, the refinery will attempt to convert all native file formats supported for conversion by Outside In to multi-page TIFF files as the primary web-viewable rendition using Outside In Image Export.
This conversion method will be attempted only if it is the first selected method that supports the native file format. |
| Convert to XML | Enable to convert supported files to XML files using Outside In XML Export, Search Export, and either the FlexionDoc or SearchML schema. In addition, the XSLT feature can post-process the resulting XML document, transforming it to a different XML document based on your XSL file and validated against your DTD or schema. XML Converter is supported on both Windows and UNIX. This method is available when XMLConverter is installed and enabled. |
| Update button | Saves changes to settings. |
| Reset button | Reverts to the last saved settings. |
A.10 PDF Export Options Page
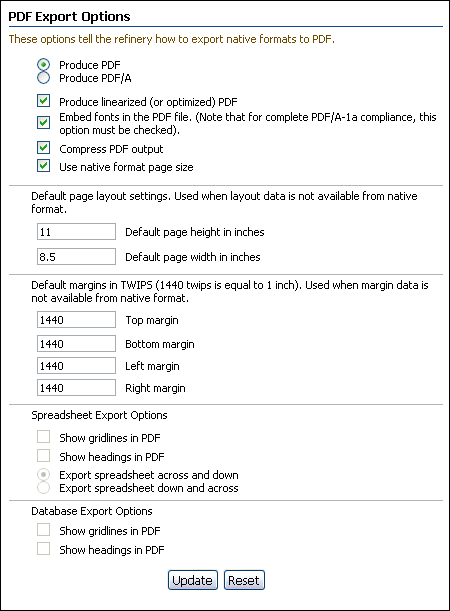
The PDF Export Options page of the Inbound Refinery allows you to configure the options used when using Outside In PDF Export to convert directly to PDF without any third-party applications. Access this Inbound Refinery page by selecting Conversion Settings, then Primary Web Rendition, enabling Convert to PDF using PDF Export, then clicking the PDF Export Options button.
Refinery Export Options Section
| Element | Description |
|---|---|
| Produce PDF | Select to output a PDF document. |
| Produce PDF/A | Select to output a PDF/A document. PDF/A is an ISO standard sub-set of PDF designed for long term archiving. It includes metadata information specific to PDF/A and cannot rely on content from external sources. A PDF/A document must be self-contained so that all information necessary for accurate and consistent display of the document must be embedded in the document. Such information includes fonts, color profiles, vector and raster images, text, and any other information necessary. |
| Produce linearized (or optimized) PDF | Enable to output a PDF document that is linearized, which optimizes PDF files for web delivery. Linearized PDF files structure the file in such a way as to deliver the PDF over a network and allow the PDF to display before the entire file is downloaded. This assists in rapid deployment for web browsing. |
| Embed fonts in the PDF file | Enable to embed font information into each individual PDF file. This ensures proper display of text in the PDF, but results in a larger PDF file. Note that for full PDF/A compliance, where the PDF file must be self-contained, this option must be enabled. |
| Compress PDF output | Enable to compress the PDF file using zlib compression to reduce output file size. Compressing the PDF strips the PDF of any duplicate font or layout information, unnecessary metadata, scripts, or other objects, and compresses any embedded image files. |
| Use native format page size | Enable to use the page margins, paper size, scaling, and orientation specified in the input file. Enabling also ensures that any page size and page breaks specified in a spreadsheet file are maintained. If this option is disabled, then the default page size, margin, and orientation is used as specified in the Default Page Layout Section and Default Margins SectionPDF · Mobi · ePub |
| Element | Description |
|---|---|
| Default page height in inches | Specifies the default page height of the PDF output file in inches. The default setting is used when the Use native format page size setting is disabled or if it is enabled and no page size setting is specified in the native file. |
| Default page width in inches | Specifies the default page width of the PDF output file in inches. The default setting is used when the Use native format page size setting is disabled or if it is enabled and no page size setting is specified in the native file. |
| Element | Description |
|---|---|
| Top margin | Specifies the default top page margin of the PDF output file in twentieth of an inch points (TWIPS). A twip is a typographical measurement. There are 1440 twips per inch.
The default top margin setting is used when the Use native format page size setting is disabled or if it is enabled and no top page margin setting is specified in the native file. |
| Bottom margin | Specifies the default bottom page margin of the PDF output file in twentieth of an inch points (TWIPS). A twip is a typographical measurement. There are 1440 twips per inch.
The default bottom margin setting is used when the Use native format page size setting is disabled or if it is enabled and no bottom page margin setting is specified in the native file. |
| Left margin | Specifies the default left page margin of the PDF output file in twentieth of an inch points (TWIPS). A twip is a typographical measurement. There are 1440 twips per inch.
The default left margin setting is used when the Use native format page size setting is disabled or if it is enabled and no left page margin setting is specified in the native file. |
| Right margin | Specifies the default right page margin of the PDF output file in twentieth of an inch points (TWIPS). A twip is a typographical measurement. There are 1440 twips per inch.
The default right margin setting is used when the Use native format page size setting is disabled or if it is enabled and no right page margin setting is specified in the native file. |
Spreadsheet Export Options Section
| Element | Description |
|---|---|
| Show gridlines in PDF | Enable to display gridlines between cells in the PDF output of spreadsheet files. |
| Show headings in PDF | Enable to display row heading in the PDF output of spreadsheet files. |
| Export spreadsheet across and down | When enabled, pagination happens horizontally across rows and then down the column. Long horizontal rows are split first, with the next cell in the row or rows beginning the next page until all cells in the row are used, then the page would move down to the next cell in the first column.
For example, if a page can fit 10 columns and 10 rows per page and a spreadsheet file has 30 rows and 20 columns, pagination would happen as follows:
|
| Export spreadsheet down and across | When enabled, pagination happens vertically down columns and then across the row. Long vertical columns are split first, with the next cell in the column or columns beginning the next page until all cells in the column are used, then the page would move across to the next cell in the first row.
For example, if a page can fit 10 columns and 10 rows per page and a spreadsheet file has 30 rows and 20 columns, pagination would happen as follows:
|
Database Export Options Section
| Element | Description |
|---|---|
| Show gridlines in PDF | Enable to display gridlines between cells in the PDF output of database files. |
| Show headings in PDF | Enable to display row heading in the PDF output of database files. |
A.11 PDF Options Page
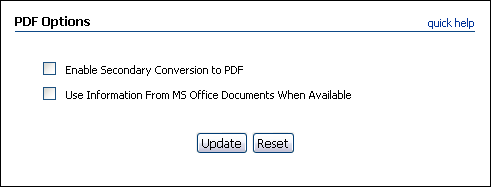
The PDF Options page enables you to set options for converting files to PDF when using a third-party application to convert PostScript files to PDF. Access this Inbound Refinery page by selecting Conversion Settings, then selecting Primary Web Rendition, enabling either the Convert to PDF using Third-Party Applications method or the Convert to PDF using Outside In method, and clicking the corresponding PDF Web-Viewable Options button.
| Element | Description |
|---|---|
| Enable Secondary Conversion to PDF check box | Specifies whether Inbound Refinery can use an alternate conversion if it is defined. This enables conversion of most documents even if the third-party application is misbehaving or missing. For example, if this is checked and the PDFExportConverter component is enabled, then Outside In PDF Export is used as the secondary conversion.
If PDFExportConverter component is not enabled, Convert to PDF using Outside In is used. If the PDFExportConverter component is enabled but you want Convert to PDF Using Outside In to be used as the secondary conversion, you can override the default behavior by setting SecondaryConversionStepName=OIXConverter as a configuration variable in the refinery. |
| Use Information From MS Office Documents When Available check box | For Microsoft Office files only, specifies whether the document content information should be obtained from the native Microsoft Office file, or from the content server information fields. |
| Update button | Saves changes to settings. |
| Reset button | Reverts to the last saved settings. |
A.12 XML Options Page
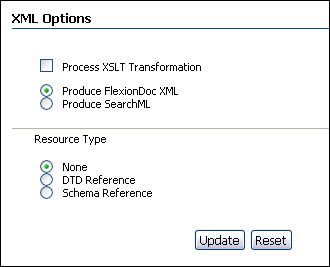
The XML Options page enables you to set options for converting files to XML. Access this Inbound Refinery page using one of the following methods:
-
From Conversion Settings, select Primary Web Rendition. Then select the Convert to XML option, and click the XML Options button.
-
From Conversion Settings, select Additional Renditions. Then select the Create XML renditions for all supported formats option, and click the XML Options button.
-
From Conversion Settings, select Third-Party Application Settings. Locate the XML Options section and click the XML Options button.
| Element | Description |
|---|---|
| Process XSLT Transformation | The XSLT (eXstensible Style Language Transformation) feature can post-process the resulting XML document, transforming it to a different XML document based on your XSL (eXstensible File Language) file and validated against your DTD (Document Type Definition) or schema. |
| Produce FlexionDoc XML | Specifies the use of FlexionDoc XML schema when converting documents to XML. |
| Produce SearchML | Specifies the use of SearchML schema when converting documents to XML. |
| None radio button | A DTD or schema will not be referenced when converting documents to XML. |
| DTD Reference radio button | The FlexionDoc or SearchML DTD will be referenced when converting documents to XML. |
| Schema Reference radio button | The FlexionDoc or SearchML schema will be referenced when converting documents to XML. |
| Update button | Saves changes to settings. |
| Reset button | Reverts to the last saved settings. |
Please note the following important considerations:
-
If you want to adjust the default settings for the Flexiondoc and SearchML options, you can specify option settings in the intradoc.cfg file located in the refinery DomainHome/ucm/ibr/bin directory. For a complete description of available Flexiondoc and SearchML options, refer to the xx.cfg file located in the refinery IntradocDir/components/XMLConverter/resources directory. You must restart your refinery after making changes to the intradoc.cfg file.
-
FlexionDoc and SearchML schema code and documentation files are installed with the XMLConverter component into the refinery IdcHomeDir/components/XMLConverter directory.
A.13 Additional Renditions Page
The Additional Renditions page enables you to select the additional renditions that Inbound Refinery should attempt to create. Access this Inbound Refinery page by selecting Conversion Settings, then Additional Renditions.
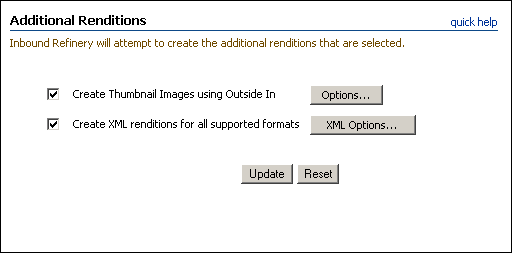
When no conversion options are installed, the only available conversion method is to use Outside In to create thumbnails of files as additional renditions. When conversion options are installed, other conversion methods might be available on this page. For example, when XML Converter is installed, an option is available to create XML files as additional renditions.
| Element | Description |
|---|---|
| Create Thumbnail Images using Outside In check box | When this option is selected, the refinery will use Outside In Image Export to create thumbnails for all files that the refinery processes. |
| Options button | Displays the Thumbnail Options Page, enabling you to set your thumbnail options. |
| Update button | Saves changes to settings. |
| Reset button | Reverts to the last saved settings. |
A.14 Thumbnail Options Page
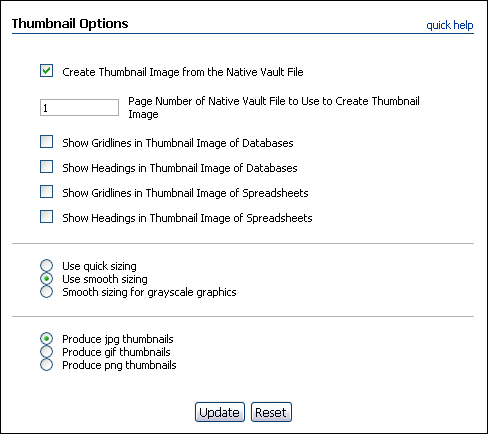
The Thumbnail Options page enables you to configure your thumbnail settings (for thumbnailing using Outside In Image Export, which is provided with Inbound Refinery). Access this Inbound Refinery page by selecting Conversion Settings, then Additional Renditions and then clicking Options for Create Thumbnail Images using Outside In.
| Element | Description |
|---|---|
| Create Thumbnail Image from the Native Vault File check box | Specifies whether the thumbnail image will be created from the native file or the primary web-viewable file. |
| Page Number of Native Vault File to Use to Create Thumbnail Image field | Specifies which page of the native file will be used to create the thumbnail image. The default setting is 1, meaning that the first page of the native file will be used to create the thumbnail image. |
| Thumbnail Quality (1-100) field | Specifies the image quality of the thumbnails. You can use any number on a scale from 1 to 100, where 1 is a lowest quality, and 100 the best quality. The higher the quality, the less the compression and the bigger the thumbnail file. The default setting is 100. |
| Show Gridlines in Thumbnail Image of Databases check box | Specifies whether gridlines should be included in thumbnail images of databases. When this option is selected, the gridlines are included. |
| Show Headings in Thumbnail Image of Databases check box | Specifies whether headings should be included in thumbnail images of databases. When this option is selected, the headings are included. |
| Show Gridlines in Thumbnail Image of Spreadsheets check box | Specifies whether gridlines should be included in thumbnail images of spreadsheets. When this option is selected, the gridlines are included. |
| Show Headings in Thumbnail Image of Spreadsheets check box | Specifies whether headings should be included in thumbnail images of spreadsheets. When this option is selected, the headings are included. |
| Use quick sizing radio button | Selecting this option results in the fastest conversion of color graphics; however, the quality of the converted graphic will be somewhat degraded. |
| Use smooth sizing radio button | Selecting this option results in a more accurate representation of the original graphic, but requires a more complex process which will slow down the conversion speed slightly. This is the default setting. |
| Smooth sizing for grayscale graphics radio button | Selecting this option uses the smooth sizing option for grayscale graphics and the quick sizing option for any color graphics. |
| Produce jpg thumbnails radio button | Specifies that all thumbnails will be created as JPG files. This is the default thumbnail file type setting. |
| Produce gif thumbnails radio button | Specifies that all thumbnails will be created as GIF files. |
| Produce png thumbnails radio button | Specifies that all thumbnails will be created as PNG files. |
| Update button | Saves changes to settings. |
| Reset button | Reverts to the last saved settings. |
A.15 Third-Party Application Settings Page
The Third-Party Application Settings page enables you to configure settings for third-party applications that are used during conversions. Access this Inbound Refinery page by selecting Conversion Settings, then Third-Party Application Settings.
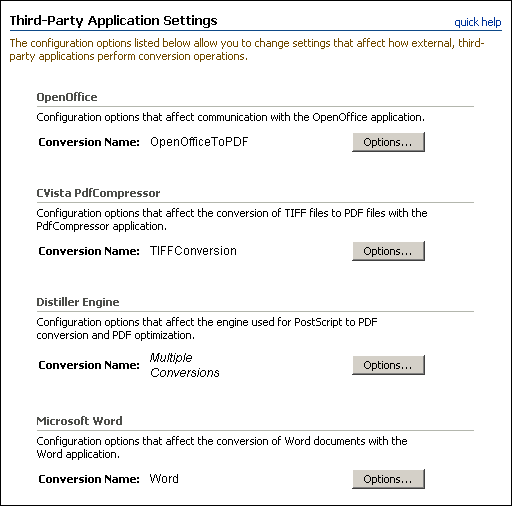
Two options are always available on this page both affecting Multiple Conversions:
-
General OutsideIn Filter Options
-
Distiller Engine
When additional conversion options that use third-party applications are installed, entries are added to this page. Each entry includes an Options button that displays a page with configuration options for the application. Most of the third-party application options are related to the WinNativeConverter and Tiff Converter add-ons. However, additional options can be added as necessary to control conversions using other third-party applications.
A.16 General OutsideIn Filter Options Page
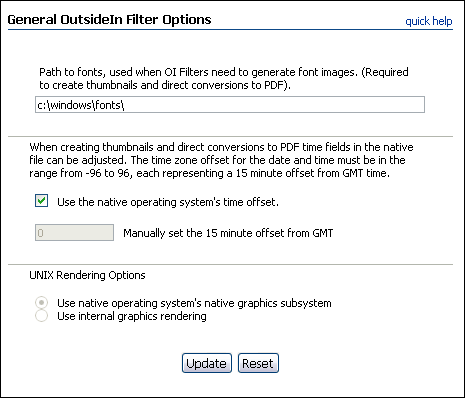
The General OutsideIn Filter Options page enables you to set options for converting files to PDF with Outside In Technology. These options are required for conversion and must be set before Inbound Refinery can function.
Access this Inbound Refinery page by selecting Conversion Settings, then selecting Third-Party Application Settings, and clicking Options under the General OutsideIn Filter Options section.
| Element | Description |
|---|---|
| Font Path | Specify the path to fonts used when Outside In filters need to generate font images. This is required to create thumbnails and direct conversions to PDF. |
| Use the native operating system's time offset | Time fields in native documents can be used when Inbound Refinery creates thumbnails and direct conversions to PDF. Enable this check box to automatically reflect the time offset of the refinery server making the conversion. Enabling this check box deactivates the Manually set the 15 minute offset from GMT field. |
| Manually set the 15 minute offset from GMT | Manually set the offset from Greenwich Mean Time (GMT) in 15 minute increments. Manual offsets can range from -96 to 96, with each single whole number representing a 15 minute segment. For example, -6 would represent an hour and 30 minutes earlier than Greenwich Mean Time. Use the native operating system's time offset must be disabled to activate this option. |
| Use native operating system's native graphics subsystem (available only when running on UNIX) | Selecting this UNIX rendering option specifies that Outside In Image Export will render fonts and graphics using the operating system's native graphics subsystem (X11 on UNIX platforms).
This option works only when at least one of the appropriate output solutions is present. For example, if the UNIX $DISPLAY variable does not point to a valid X Server, but the OSGD and/or WV_GD modules required for Image Export exist, Image Export will default to the Image Export rendering code. |
| Use internal graphics rendering (available only when running on UNIX) | Selecting this UNIX rendering option specifies that Outside In Image Export will attempt to use its internal graphics code to render fonts and graphics. This is the default option. |
A.17 Distiller Engine Options Page
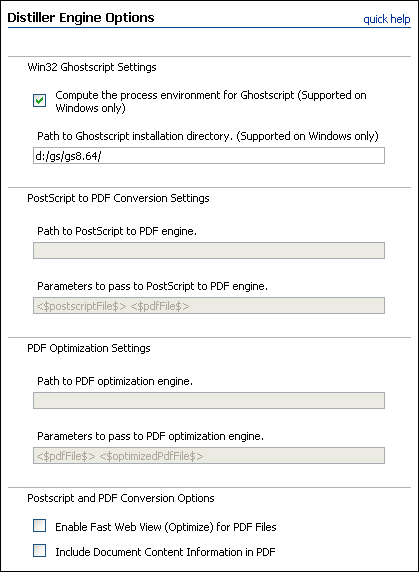
Access this Inbound Refinery page by selecting Conversion Settings, then selecting Third-Party Application Settings and clicking the Options button for the Distiller Engine.
| Element | Description |
|---|---|
| Compute the process environment for Ghostscript (win32 only) check box | For Ghostscript to work correctly on a win32 system, the process environment must be set properly. On a win32 platform, enable this check box to use Ghostscript as your distiller engine and to have Inbound Refinery correctly compute the process environment. Clear this check box if you want to use a different distiller engine. |
| Path to Ghostscript installation directory (win32 only) | This field is active only when the Use Ghostscript check box is selected. Specify the path to the main Ghostscript installation directory. For example: c:/3rdParty-Bin/gs/gpl/gs8.64 |
| Path to PostScript to PDF engine | This field is active only when the Compute the process environment for Ghostscript (win32 only) check box is cleared. Enter the path to the executable or script file of the PostScript to PDF distiller engine.
For example: c:/gs/gs8.54/lib/ps2pdf14.bat |
| Parameters to pass to PostScript to PDF engine | This field is active only when the Compute the process environment for Ghostscript (win32 only) check box is cleared. Enter the parameters to be passed to the PostScript to PDF distiller engine. This field is Idoc Script enabled.
For example, if the path to the distiller engine is c:\utils\PostScript\distll.exe and the distiller engine takes the parameters [options <psPath> [<pdfPath>], at a command prompt you would enter To achieve this result through PDF Converter, you would set the following: Path to generic PostScript to PDF engine: c:/utils/PostScript/distll.exe Parameters to pass to generic PostScript to PDF engine: <$postscriptFile$> –optimize -1.3 –crop <$pdfFile$> To achieve maximum flexibility, this entry uses the tokens <$postscriptFile$> for the PostScript file path and <$pdfFile$> for the output file. Consider these tokens as place holders and not actual path references. |
| Path to PDF optimization engine | This field is active only when the Compute the process environment for Ghostscript (win32 only) check box is cleared. Enter the path to the executable or script file capable of optimizing PDF files.
For example: c:/gs/gs8.54/lib/pdfopt.bat |
| Parameters to pass to PDF optimization engine | This field is active only when the Compute the process environment for Ghostscript (win32 only) check box is cleared. Enter the parameters to be passed to the distiller engine during PDF optimization. This field is Idoc Script enabled.
For example, if the path to the distiller engine is c:\utils\PostScript\opt.exe and the distiller engine takes the parameters [options <psPath> [<pdfPath>], at a command prompt you would enter To achieve this result through PDF Converter, you would set the following: Path to generic PDF optimization engine: c:/utils/PostScript/opt.exe Parameters to pass to generic PDF optimization engine: <$pdfFile$> <$optimizedPdfFile$> To achieve maximum flexibility, this entry uses the tokens <$pdfFile$> for the PostScript file path and <$optimizedPdfFile$> for the output file. Consider these tokens as place holders and not actual path references. |
| Enable Fast Web View (Optimize) for PDF Files check box | Specifies whether PDF files should be optimized for fast web viewing. Optimization removes graphics and text that appear multiple times in the content, and replaces them with pointers to the first instance. Optimization allows you to begin viewing the first pages of a PDF before the entire PDF is downloaded.
When this check box is selected, Inbound Refinery attempts to optimize all PDF files, including all generated and checked-in PDF files. To do so, you must integrate Inbound Refinery with a distiller engine capable of optimizing PDF files such as AFPL Ghostscript. |
| Include Document Content Information in PDF check box | Specifies whether document content information (information about the document) should be included in the PDF. The document content information can be obtained using two methods:
From the content information provided at check-in (from the content server information fields). This includes the Title (dDocTitle), Subject (dDocName; the Content ID), Author, (dDocAuthor), and Keywords. This is the default method for all file types except Microsoft Office files. For Microsoft Office Documents, from the native Microsoft Office file. This includes the Title, Subject, Author, and Keywords. This is the default for Microsoft Office files only. |
A.18 CVista PdfCompressor Options Page
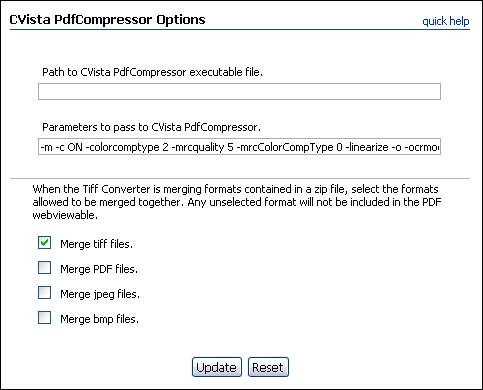
Access this Inbound Refinery page by selecting Conversion Settings, Third-Party Application Settings and clicking the Options button for CVista PdfCompressor.
| Element | Description |
|---|---|
| Path to CVista PdfCompressor executable file. | The full path name to the CVista PdfCompressor executable. |
| Parameters to pass to CVista PdfCompressor | Parameters to configure CVista PdfCompressor for Tiff-to-PDF conversion. See the documentation provided with the CVista PdfCompressor for information regarding parameter usage/values. |
| Merge options | When the Tiff Converter is merging formats contained in a zip file, select the formats allowed to be merged together. Any unselected format will not be included in the PDF webviewable. The following options are available:
|
| Update button | Saves changes to settings. |
| Reset button | Reverts to the last saved settings. |
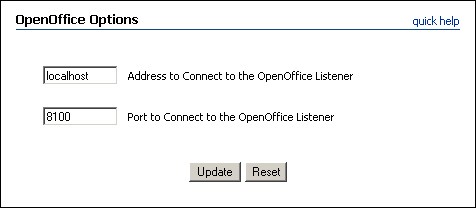
A.19 OpenOffice Options Page
Access this Inbound Refinery page by selecting Conversion Settings, then selecting Third-Party Application Settings and clicking the Options button for OpenOffice.
| Element | Description |
|---|---|
| Address to Connect to the OpenOffice Listener field | The server address to connect to the OpenOffice Quickstarter Listener.
If you want to override the default address to connect to the OpenOffice Quickstarter Listener, specify the address in this field. The default address is localhost. |
| Port to Connect to the OpenOffice Listener field | .The port to connect to the OpenOffice Quickstarter Listener.
If you want to override the default port to connect to the OpenOffice Quickstarter Listener, specify the port in this field. This port must match the port being used by OpenOffice Quickstarter Listener. The default port is 8100. |
| Update button | Saves changes to settings. |
| Reset button | Reverts to the last saved settings. |
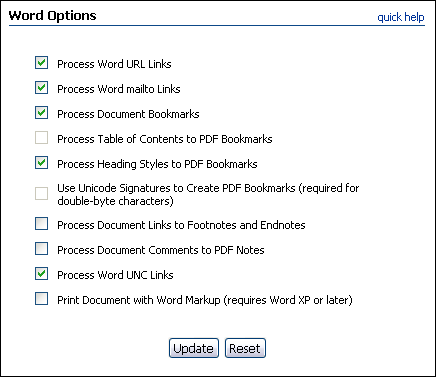
A.20 Word Options Page
Access this Inbound Refinery page by selecting Conversion Settings, then selecting Third-Party Application Settings and clicking the Options button for Microsoft Word.
| Element | Description |
|---|---|
| Process Word URL Links check box | Specifies whether links to absolute URLs (for example, http://www.company.com) in Microsoft Word documents should be converted to the corresponding links in the generated PDF files. |
| Process Word mailto Links check box | Specifies whether links to e-mail addresses (for example, mailto:support@company.com) in Microsoft Word documents should be converted to the corresponding links in the generated PDF files. |
| Process Document Bookmarks check box | Specifies whether bookmarks in Microsoft Word documents should be converted to the corresponding links in the generated PDF files. |
| Process Table of Contents to PDF Bookmarks check box | Specifies whether tables of contents in Microsoft Word documents should be converted to bookmarks (navigation tree) in the generated PDF files.
The Process Table of Contents to PDF bookmarks option is only available if the Process Heading Styles to PDF Bookmarks option is not selected. Otherwise it is grayed out. In Microsoft Word documents, either the table of contents or all headings can be processed and converted to PDF bookmarks, but not both. |
| Process Heading Styles to PDF Bookmarks check box | Specifies whether the standard heading styles in Microsoft Word documents (Heading 1, Heading 2, and so forth) should be converted to bookmarks (navigation tree) in the generated PDF files.
The Process heading styles to PDF bookmarks option is only available if the Process Table of Contents to PDF Bookmarks option is not selected. Otherwise it is grayed out. In Microsoft Word documents, either all headings or the table of contents can be processed and converted to PDF bookmarks, but not both. |
| Use Unicode Signatures to Create PDF Bookmarks (required for double-byte characters) check box | Specifies whether the Unicode character coding format should be used when creating PDF Bookmarks. Unicode uses 16 bits, which means that non-ACSII characters can be used in the PDF Bookmarks. This is required for Microsoft Word documents that use double-byte characters in Word Headings. If cleared, PDF Bookmarks are created with ACSII characters. |
| Process Document Links to Footnotes and Endnotes check box | Specifies whether links to footnotes and endnotes in Microsoft Word documents should be converted to links in the generated PDF files. |
| Process Document Comments to PDF Notes check box | Specifies whether comments added to Microsoft Word documents should be converted to notes in the generated PDF files. |
| Process Word UNC Links check box | Specifies whether links to both absolute URL links (for example, http://www.company.com) and relative URL links (for example, ../../../../portal.htm) in Microsoft Word documents should be converted to corresponding links in the generated PDF files. |
| Print Document with Word Markup check box | Specifies whether markups in Microsoft Word documents should be included in the generated PDF files (requires Word XP or later). |
| Update button | Saves changes to settings. |
| Reset button | Reverts to the last saved settings. |
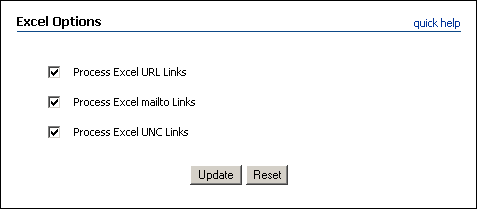
A.21 Excel Options Page
Access this Inbound Refinery page by selecting Conversion Settings, then selecting Third-Party Application Settings and clicking the Options button for Microsoft Excel.
| Element | Description |
|---|---|
| Process Excel URL Links check box | Specifies whether links to external URLs (for example, http://www.company.com) in Microsoft Excel spreadsheets should be converted to links in the generated PDF files. |
| Process Excel mailto Links check box | Specifies whether links to e-mail addresses (for example, mailto:support@company.com) in Microsoft Excel documents should be converted to the corresponding links in the generated PDF files. |
| Process Excel UNC Links check box | Specifies whether links to both absolute URL links (for example, http://www.company.com) and relative URL links (for example, ../../../../portal.htm) in Microsoft Excel documents should be converted to corresponding links in the generated PDF files. |
| Update button | Saves changes to settings. |
| Reset button | Reverts to the last saved settings. |
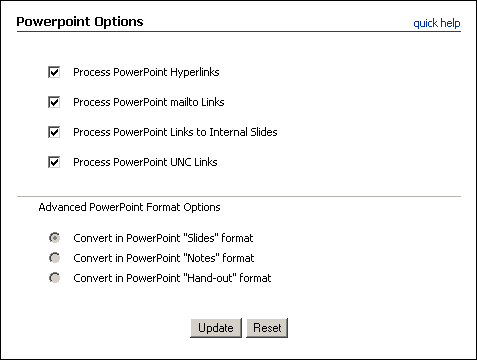
A.22 PowerPoint Options Page
Access this Inbound Refinery page by selecting Conversion Settings, then selecting Third-Party Application Settings and clicking the Options button for Microsoft PowerPoint.
| Element | Description |
|---|---|
| Process PowerPoint Hyperlinks check box | Specifies whether hyperlinks in PowerPoint presentations should be converted to hyperlinks in the generated PDF files. |
| Process PowerPoint mailto Links check box | Specifies whether links to e-mail addresses (for example, mailto:support@company.com) in PowerPoint documents should be converted to the corresponding links in the generated PDF files. |
| Process PowerPoint Links to Internal Slides check box | Specifies whether links to other slides within the same PowerPoint presentation should be converted to hyperlinks in the generated PDF files. |
| Process PowerPoint UNC Links check box | Specifies whether UNC links in PowerPoint documents should be converted to corresponding links in the generated PDF files.
Note: PowerPoint links can only be processed if PowerPoint presentations are converted in the Slides format. |
| Convert in PowerPoint "Slides" format radio button | Specifies that PowerPoint presentations should be converted to the Slides format, which means that each page contains one slide (without any associated notes). |
| Convert in PowerPoint "Notes" format radio button | Specifies that PowerPoint presentations should be converted to the Notes format, which means that each page contains one slide with any associated notes.
This option can only be selected if none of the options for converting PowerPoint links are selected. |
| Convert in PowerPoint "Hand-out" format radio button | Specifies that PowerPoint presentations should be converted to the Hand-out format, which means that each page contains multiple slides. (They only show the slides; they do not include any associated notes.)
This option can only be selected if none of the options for converting PowerPoint links are selected. |
| Update button | Saves changes to settings. |
| Reset button | Reverts to the last saved settings. |
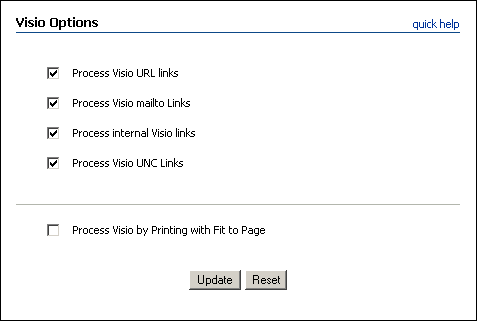
A.23 Visio Options Page
Access this Inbound Refinery page by selecting Conversion Settings, then selecting Third-Party Application Settings and clicking the Options button for Microsoft Visio.
| Element | Description |
|---|---|
| Process Visio URL links check box | Specifies whether links to both absolute URL links (for example, http://www.company.com) and relative URL links (for example, ../../../../portal.htm) in Microsoft Visio drawings should be converted to links in the generated PDF files. |
| Process Visio mailto Links check box | Specifies whether links to e-mail addresses (for example, mailto:support@company.com) in Microsoft Visio documents should be converted to the corresponding links in the generated PDF files. |
| Process internal Visio links check box | Specifies whether links within a Visio drawing should be converted to links in the generated PDF files. |
| Process Visio UNC Links check box | Specifies whether UNC links in Microsoft Visio documents should be converted to corresponding links in the generated PDF files. |
| Process Visio by Printing with Fit to Page check box | Specifies whether a Visio drawing should be scaled to fit on the printer's page size or allowed to print using the drawing's actual size (which can cause some of the drawing to be printed off the page and therefore not included in the PDF). |
| Update button | Saves changes to settings. |
| Reset button | Reverts to the last saved settings. |
Important:
Microsoft Visio does not store links in the same manner as other Microsoft Office documents. It is therefore important to make sure that all URL and mailto links are created in Visio with the full prefix: http:// for URL links and mailto: for mailto links. Failure to use the appropriate prefix may result in the link failing to convert properly.A.24 InDesign Options Page
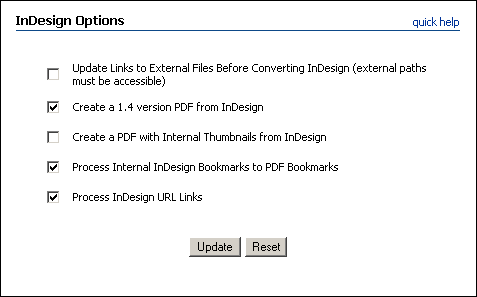
Access this Inbound Refinery page by selecting Conversion Settings, then selecting Third-Party Application Settings and clicking the Options button for Adobe InDesign.
| Element | Description |
|---|---|
| Update Links to External Files Before Converting InDesign check box | Specifies whether links to external files are updated before the InDesign document is converted to PDF (external paths must be accessible). |
| Create a 1.4 version PDF from InDesign check box | Specifies whether InDesign should set the PDF version to 1.4. |
| Create a PDF with Internal Thumbnails from InDesign check box | Specifies whether InDesign should create page thumbnails within the PDF for each document. |
| Process Internal InDesign Bookmarks to PDF Bookmarks check box | Specifies whether bookmarks in InDesign documents should be converted to bookmarks (navigation tree) in the generated PDF files. |
| Process InDesign URL Links check box | Specifies whether links to external URLs (for example, Internet websites) should be converted to links in the generated PDFs. |
| Update button | Saves changes to settings. |
| Reset button | Reverts to the last saved settings. |
A.25 Timeout Settings Page
The Timeout Settings page enables you to configure your timeout settings. Access this Inbound Refinery page by selecting Conversion Settings, then Timeout Settings.
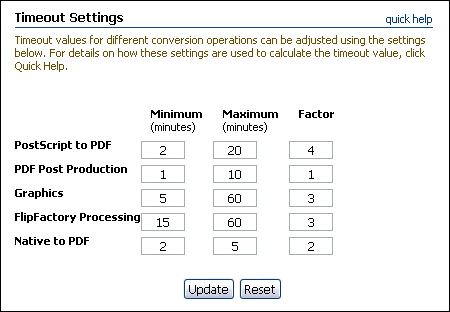
Only timeout settings for graphics conversions are applicable to Inbound Refinery. When conversion options that require additional timeout configurations are installed, settings are added to this page.
| Element | Description |
|---|---|
| Minimum, Maximum, and Factor timeout fields | Specify the time that Inbound Refinery waits for the conversion process to complete. The timeout value, in minutes, is calculated in the following manner:
timeout value [in minutes] = ([file size in bytes] x timeout factor) / 60,000 For example, if a 100,000-byte file is to be converted and the timeout factor is set to 1, the system will wait no more than 1:40 minutes (100,000 x 1 divided by 60,000 = 10/6) for the conversion process to complete. The content item to be processed is allotted at least the number of minutes indicated in the Minimum column, but no more minutes than indicated in the Maximum column. If the calculated timeout value is lower than the minimum value, the minimum value applies. If the calculated timeout value is larger than the maximum value, the maximum value applies. |
| Update button | Saves changes to settings. |
| Reset button | Reverts to the last saved settings. |
A.26 Refinery Status Page
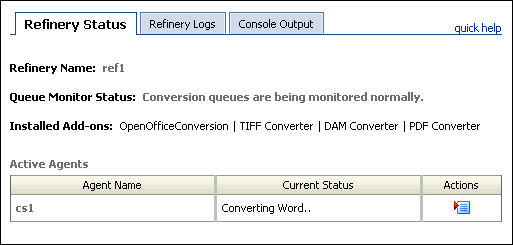
The Refinery Status page enables you to view the status of conversions for all refinery agents. Access this Inbound Refinery page by selecting Refinery Status from the Status tray in the refinery.
| Element | Description |
|---|---|
| Agent Name column | The name of an agent that has sent at least one conversion job to the refinery. |
| Current Status column | The current status of the agent. |
| Actions menu | Select one of the following actions:
|
Important:
The refinery creates each agent when it sends its first conversion job to the refinery. Until then, information for the agent is not available in the refinery.A.27 Refinery Logs Page
The Refinery Logs page enables you to view the refinery logs. Access this Inbound Refinery page using one of the following methods:
-
Select the Refinery Logs tab on the main refinery page.
-
Select Status, then Refinery Status from the navigation menu, and select the Refinery Logs tab.
-
Select Logs, then Refinery Logs from the navigation menu.
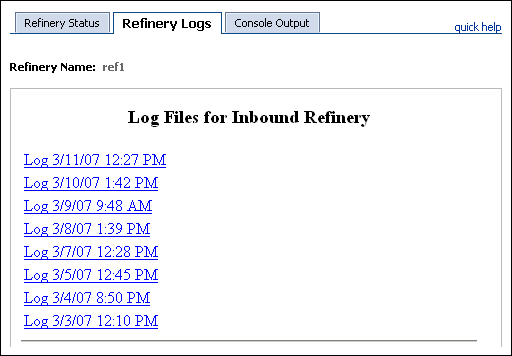
| Element | Description |
|---|---|
| Refinery log links | Click a link to display the refinery log. |
| Details links | When a refinery log is displayed, click the Details links to expand and collapse log details. Typically, the log details are either a stack dump or a trace back to the code that generated the error. |
A.28 Console Output Page
The Console Output page enables you to view the refinery console output. Access this Inbound Refinery page using one of the following methods:
-
Click Home in the main menu and select the Console Output tab.
-
Select Status, then Refinery Status from the navigation menu, and select the Console Output tab.
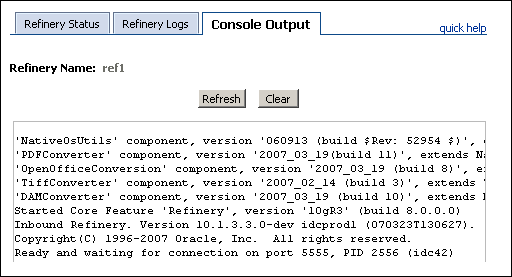
| Element | Description |
|---|---|
| Refresh button | Updates the console output. |
| Clear button | Clears the console output. |
A.29 Conversion Job Status Page
The Conversion Job Status page is added to the Content Server Administration tray when Inbound Refinery is configured to work with a Content Server. To access this Content Server page, open the Administration tray of the Content Server, click Refinery Administration, and then click Conversion Job Status.

| Element | Description |
|---|---|
| Action Menu | When jobs are listed, each job has an Actions menu with the following options:
|
| Refresh Page | Click to refresh the page content for current information. |
| Force Job Queue Check | Click to check job queues of all active refineries. |
A.30 IBR Provider Status Page
The IBR Provider Status page is added to the Content Server Administration tray when Inbound Refinery is configured to work with a Content Server. To access this Content Server page, open the Administration tray of the Content Server, click Refinery Administration, and then click IBR Provider Status.
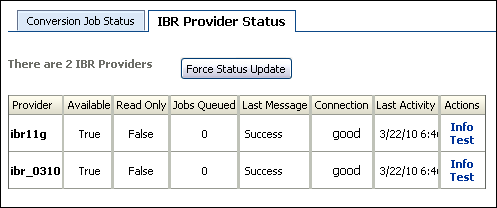
| Element | Description |
|---|---|
| Force Status Update | Click to receive current information. |
| Provider | The name of the Inbound Refinery provider. |
| Available | Tells if the refinery is available to the Content Server:
|
| Read Only | Tells if the refinery is no longer accepting jobs. |
| Jobs Queued | Lists the number of jobs currently in the refinery queue. |
| Last Message | Displays the last message received from the refinery. |
| Connection | Lists the connections status. |
| Last Activity | Details the date and time of the last communication with the refinery. |
| Actions | Lists the following options:
|
A.31 Agent Status Page
The Agent Status page enables you to view the status of current conversions for a specific agent. Access this Inbound Refinery page using one of the following methods:
-
Select Status, <agent_name> Agent Status from the navigation menu.
-
Click the agent name or select View Detailed Status from the Actions menu for the agent on the Refinery Status Page.
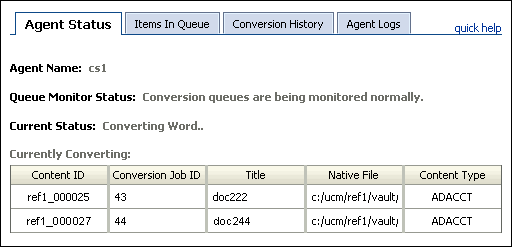
| Element | Description |
|---|---|
| Agent Name | The name of an agent (for example, a content server) that has sent at least one conversion job to the refinery. |
| Current Status | The current status of the agent. |
| Content ID column | The content ID of the content item that the refinery is converting for the agent currently. |
| Conversion Job ID column | The conversion job ID of the content item. |
| Title column | The title of the content item. |
| Native File column | The name of the native file. |
| Type column | The conversion type assigned to convert the content item. |
A.32 Items In Queue Page
The Items In Queue page enables you to view items in the pre and post-converted queues for the agent. Access this Inbound Refinery page using one of the following methods:
-
Select Status, then <agent_name> Items in Queue from the navigation menu.
-
Select View Items In Queue from the Actions menu for the agent on the Refinery Status Page.
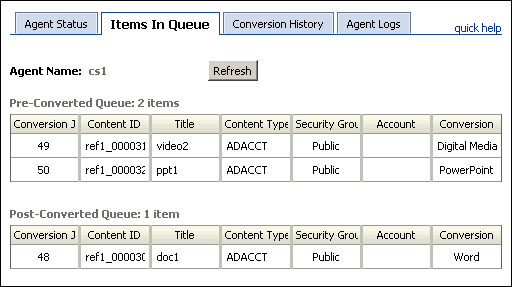
| Element | Description |
|---|---|
| Agent Name | The name of an agent (for example, a content server) that has sent at least one conversion job to the refinery. |
| Pre-Converted Queue | Lists the items that are in the agent's pre-converted queue and awaiting conversion by the refinery. |
| Post-Converted Queue | Lists the items that are in the agent's post-converted queue, which have been converted by the refinery and are waiting for transfer back to the agent. |
| Refresh button | Updates the queue status on the page. |
A.33 Conversion History Page
The Conversion History page enables you to view the last 50 conversions for a specific agent. Access this Inbound Refinery page using one of the following methods:
-
Select Status, then <agent_name> Conversion History from the navigation menu.
-
Select View Conversion History from the Actions menu for the agent on the Refinery Status Page.
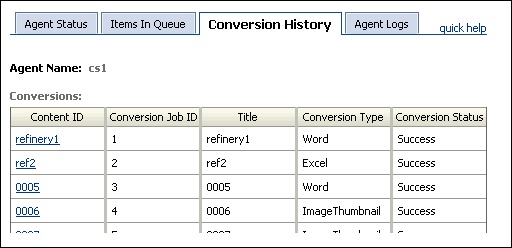
| Element | Description |
|---|---|
| Agent Name | The name of an agent (for example, a content server) that sent the conversion jobs to the refinery. |
| Content ID column | The content ID of the content item that was converted. Clicking a Content ID displays the Conversion Detail Page. |
| Conversion Job ID column | The conversion job ID of the content item that was converted. |
| Title column | The title of the content item that was converted. |
| Conversion Type column | The conversion type used to convert the content item. |
| Conversion Status column | The status of the conversion. |
A.33.1 Conversion Detail Page
The Conversion Detail page enables you to view the details of a specific conversion. Access this Inbound Refinery page using one of the following methods:
-
Select Status, then <agent_name> Conversion History from the navigation menu and click the Content ID.
-
Select View Conversion History from the Actions menu for the agent on the Refinery Status Page, and click the Content ID on the Conversion History Page.
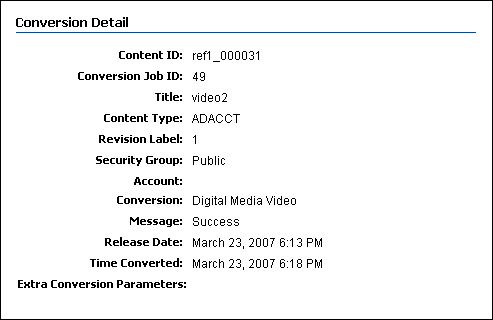
A.34 Agent Logs Page
The Agent Logs page enables you to view the logs for a specific refinery agent. Access this Inbound Refinery page using one of the following methods:
-
Select Status, then <agent_name> Agent Logs from the navigation menu.
-
Select View Agent Logs from the Actions menu for the agent on the Refinery Status Page.
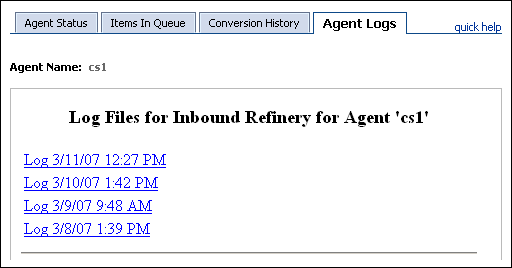
| Element | Description |
|---|---|
| Refinery agent log links | Click a link to display the refinery agent log. |
| Details links | When a refinery agent log is displayed, click the Details links to expand and collapse log details. Typically, the log details are either a stack dump or a trace back to the code that generated the error. |
A.35 User Profile Page
The User Profile page enables you to change settings for the administration user. Access this Inbound Refinery page by clicking the name of the user in the main navigation bar.
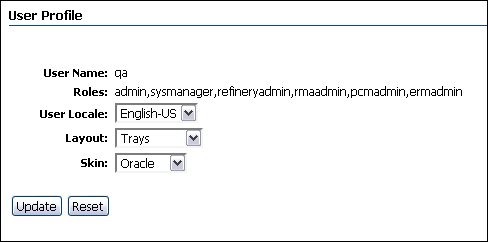
| Element | Description |
|---|---|
| Roles | Identifies the roles assigned to the user. |
| User Locale | Select to choose the language locale used for the Inbound Refinery user interface. |
| Layout drop-down menu | Select the layout view. The default view is Trays. |
| Skin drop-down menu | Select the layout skin. The default skin is Oracle. |
| Update button | Saves changes to settings. |
| Reset button | Reverts to the last saved settings. |
A.36 Agent Management Page
The Agent Management page enables you to view the status of each agent for the refinery (something that has sent at least one conversion job to the refinery), enable verbose logging for the agent, and delete agents). Access this Inbound Refinery page by selecting Administration, then Agent Management from the navigation menu.
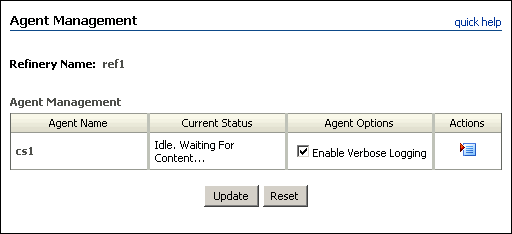
| Element | Description |
|---|---|
| Agent Name column | The name of an agent that has sent at least one conversion job to the refinery. |
| Current Status column | The current status of the agent. |
| Agent Options column | Select the Enable Verbose Logging check box to enable verbose logging in the corresponding agent logs. |
| Actions menu | Select one of the following actions:
|
| Update button | Saves changes to settings. |
| Reset button | Reverts to the last saved settings. |
A.37 Delete Agent Page
The Delete Agent page enables you to delete an agent for the refinery. Access this Inbound Refinery page by selecting Delete Agent from the Actions menu for the agent on the Agent Management Page.
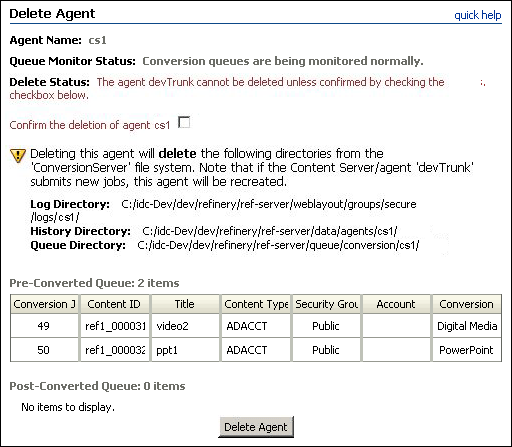
| Element | Description |
|---|---|
| Confirm the deletion of agent | Enable to confirm that you want the agent deleted. Note that history, logs, and any jobs in the agent queue are also deleted. |
| Agent information | Provides information about the current status of the agent. |
| Delete Agent button | Deletes the agent. |
A.38 Configuration Information Page
The Configuration Information page provides an overview of the main system settings, including server parameters and options, installation directories, Internet properties, classpath information, version information, Java properties, and content security options. In addition, it lists all installed server components or custom components that are currently enabled and disabled. Access this Inbound Refinery page by selecting Administration, then Configuration for <refinery_name> from the navigation menu.
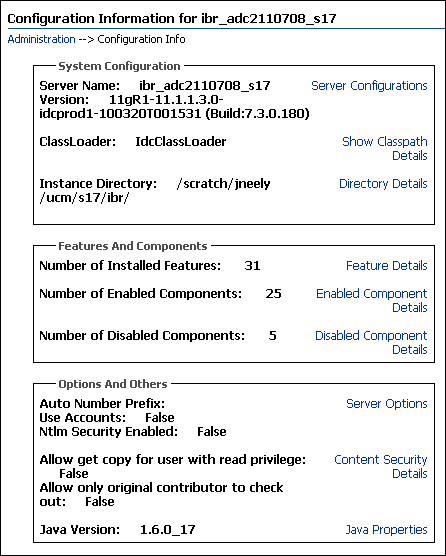
The Configuration Information page is for information purposes only.
A.39 System Audit Information Page
The System Audit Information page enables you to view the system audit information for the refinery. Access this Inbound Refinery page by selecting Administration, then System Audit Information from the navigation menu. This page displays system audit information for the refinery, which might be useful while troubleshooting a problem or tweaking a server's performance.
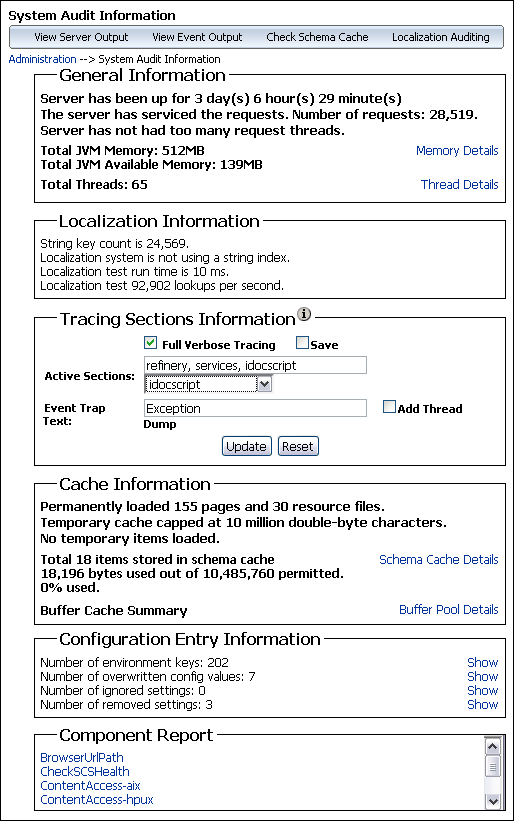
The General Information section of this page provides the following information:
-
Information regarding whether the system is receiving too many requests.
-
Information about the memory cache for the system, and is useful in troubleshooting any "out of memory" errors you may receive.
-
Information about which Java threads are currently running. This is useful in determining the cause of an error.
-
Listing of any audit messages.
Tracing in a refinery can be activated on a section-by-section basis. Tracing for active sections is displayed on the Console Output Page. Section tracing is useful for determining which section of the server is causing trouble, or when you want to view the details of specific sections. Sections can be added by appending extra sections to create a comma separated list. A listing of the sections available for tracing, with brief descriptions, is available by clicking the information icon next to the Tracing Sections Information heading. The wildcard character * is supported so that schema* will trace all sections that begin with the prefix schema.
Some tracing sections also support verbose output. Enable Full Verbose Tracing if you wish to see in-depth tracing for any active section that supports it.
Important:
Any options set on this page will be lost when the refinery is restarted unless you enable Save and click Update.A.40 Configure Web Server Filter Page
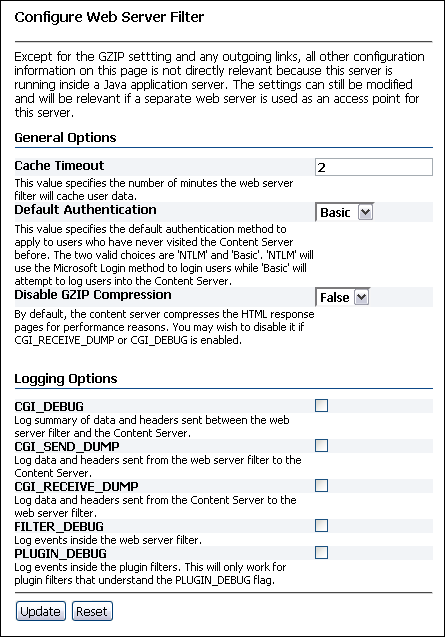
The Configure Web Server Filter page enables you to configure and troubleshoot the web server filter communication with the refinery. Access this page by selecting Administration, then Filter Administration from the navigation menu.
| Element | Description |
|---|---|
| Cache Timeout | Sets the number of minutes the web server filter will cache user data. |
| Default Authentication | Specifies how users new to the Inbound Refinery server are authenticated by default. The options are:
|
| Disable GZIP Compression | To aid performance the Inbound Refinery server uses GZIP compression to compress the HTML response pages by default. If enabling either CGI_DEBUG or CGI_RECEIVE_DUMP, set this to TRUE to disable GZIP compression and facilitate debugging or logging data. |
| CGI_DEBUG | Enable log a summary of data and headers sent between the web server filter and the Inbound Refinery server. If enabled, set Disable GZIP Compression to TRUE. |
| CGI_SEND_DUMP | Enable to log data and headers sent from the web server filter to the Inbound Refinery server. |
| CGI_RECEIVE_DUMP | Enable to log data and headers sent to the web server filter from the Inbound Refinery server. |
| FILTER_DEBUG | Enable to log events inside the web server filter. |
| PLUGIN_DEBUG | Enable to log events inside any plugin filters that understand the PLUGIN_DEBUG flag. |
A.41 Admin Server Page
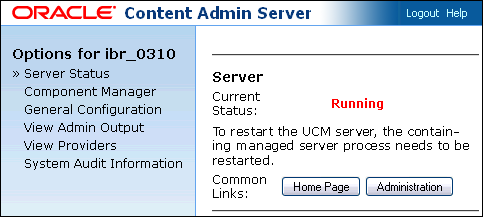
Admin Server is an administration tool used to start, stop, and restart a refinery or content server. In addition, it enables you to review or edit a number of system settings, as well as manage components. Access this page by selecting Administration, then Admin Server from the navigation menu.
A.42 Inbound Refinery Administration Page
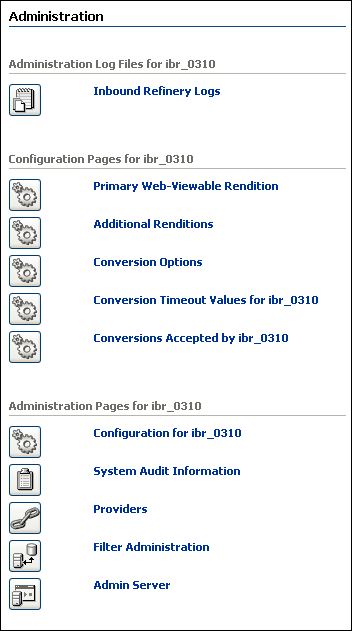
The Inbound Refinery Administration page offers an alternate way to access the links also found in the Administration tray of the navigation pane. The Administration page for a refinery is accessed by clicking Administration on the Admin Server Page.
| Element | Description |
|---|---|
| Inbound Refinery Logs | Displays the Refinery Logs Page. |
| Primary Web-Viewable Rendition | Displays the Primary Web-Viewable Rendition Page. |
| Additional Renditions | Displays the Additional Renditions Page. |
| Conversion Options | Displays the Third-Party Application Settings Page. |
| Conversion Timeout Values for <refinery_name> | Displays the Timeout Settings Page. |
| Conversions Accepted by <refinery_name> | Displays the Conversion Listing Page. |
| Configuration for <refinery_name> | Displays the Configuration Information Page. |
| System Audit Information | Displays the System Audit Information Page. |
| Providers | Displays the Providers Page. |
| Filter Administration | Displays the Configure Web Server Filter Page. |
| Admin Server | Displays the Admin Server Page. |