C Setting Global Options
This section covers the following topics:
C.1 About Global Options
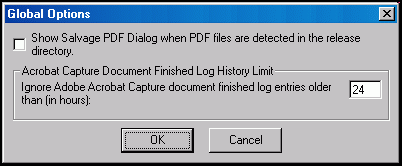
There is a Global Options dialog that you can use to:
-
Salvage PDF documents
-
Limit the error check of the Adobe Acrobat Capture log
To set either of these options, you must have write privileges to the registry. If you have any question regarding these settings, you may want to contact your system administrator or Information Technology department.
These settings only affect the workstation that is running the Release Script. If you use more than one release station, you may want to set these options on each one.
C.2 Salvaging PDF Documents
You can salvage PDF documents in the release directory for check in to prevent reconversion of the TIFF file in Adobe Acrobat Capture.
Note:
If you run batches unattended, you must disable this feature. It is disabled by default.It is recommended that you configure a separate release directory for each Kofax release station in order to prevent detection of PDF files generated by another batch running in a different release station. The dialog appears when a TIF would be sent to Adobe Acrobat Capture for PDF creation. If a format other than PDF is used, the dialog does not display.
To salvage a PDF:
-
Double click StellentRelOptions.exe, which is typically installed in
<Kofax Capture Install>\Bin\StellentRel, to open the Global Options dialog.
-
Select Show Salvage PDF Dialog when PDF files are detected in the release directory.
-
Click OK.
-
Run the release script for the batch as usual.
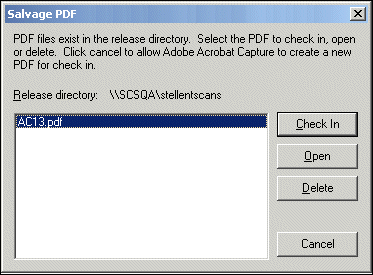
When the release script runs, it will inspect the release directory for PDF files. If PDF files exist, the following dialog displays, from which you can select a file to check in. Using this you can salvage the PDF if the check in fails but the file is still valid, rather than creating a new PDF from Capture.

-
From the list of PDF files that display, select what you would like to do:
-
Click Check In to select the PDF for check in as the primary or alternate file (without needing to go through the Adobe Acrobat Capture step).
-
Click Open to display the PDF in its associated application, which is typically Adobe Acrobat Reader.
-
Click Delete to delete the PDF file from the release directory.
-
Click Cancel (or use the escape key on your keyboard) to have Adobe Acrobat Capture create the PDF as usual.
Note:
The Check In, Open and Delete buttons are available once you select a PDF file from the dialog. -
C.3 Limiting the Error Check of the Adobe Acrobat Capture Log
You can limit the error check of the Adobe Acrobat Capture finished document log to documents that finished within a given number of hours from the present time. This setting can be changed by running the StellentRelOptions.exe that is typically installed in <Kofax Install Dir>\Bin\StellentRel.
To set the log history limit:
-
Double click StellentRelOptions.exe, which is typically installed in
<Kofax Install Dir>\Bin\StellentRel, to open the Global Options dialog.
-
Select Acrobat Capture Document Finished Log History Limit.
-
Enter the cut off point, in hours, for the log file. The Adobe Acrobat Capture log will be limited to entries within the period of time you specify. Any entries older than the time entered will not be inspected. Typically, you do not need to change this value.
-
Click OK.