Oracle® Fusion Middleware
User's Guide for Oracle Enterprise Content Management Solutions for Oracle PeopleSoft
11g Release 1 (11.1.1)
E17068-01
May 2010
This document describes how to use the Enterprise Content Management Solutions for PeopleSoft. It is intended for users whose PeopleSoft application has been extended with an Enterprise Content Management solution.
This document covers the following topics:
1 Imaging Solution Overview
The Imaging Solution provides imaging, capture, and workflow capabilities via Oracle Imaging and Process Management (Oracle I/PM). Depending on configuration, use the Imaging Solution for tasks such as the following:
-
Launch Oracle I/PM from PeopleSoft, and select and perform workflow tasks. When you select a task, you acquire it for your use and it is no longer available to other users.
-
View attached images and metadata values. Use Oracle I/PM's tools for viewing, annotating, and redacting images, as your permissions allow.
-
Key entries in PeopleSoft while viewing images and related values in the Oracle I/PM viewer. See "Keying Entries From Images".
-
Perform actions related to the workflow task, such as routing, canceling, updating, and completing tasks.
-
Scan or upload supporting documents for a selected PeopleSoft record.
-
View supporting images for a PeopleSoft record without leaving the PeopleSoft application.
1.1 Sample Scenario 1: Processing Invoices
An Imaging Solution configured for invoice processing might work as follows:
-
A workflow process automatically generates user tasks.
An invoice is uploaded, metadata values are assigned, and a task for processing the invoice is generated. Typically, tasks are pooled into profiles from which groups of users select. You may have access to tasks in multiple profiles.
-
From PeopleSoft, you launch the invoices imaging solution, by selecting a command called Process Invoices from a menu, or clicking a link or button.
-
You select a task from those listed for a selected profile. Once you select (acquire) a task, it is no longer available to other users.
-
In the Task Viewer, you view the task's invoice image, key entries in PeopleSoft based on the image, and perform related commands.
Additional action commands are typically provided in a side panel. You might route the task to another user or group for approval, add comments for others to view, skip the task, or re-scan or delete the task's document.
-
You complete the task and begin another, if desired.
Most often, changes you make in PeopleSoft are synchronized with Oracle I/PM, and vice versa.
1.1.1 Keying Entries From Images
When configured, the Imaging Solution enables you to easily key entries in PeopleSoft while viewing a related image on another monitor. For example, you might follow this sequence to process invoices:
-
From PeopleSoft's invoice entry screen, start the invoice imaging solution.
-
Select a task. In the Task Viewer screen, view the invoice image and its associated metadata values.
-
In the invoice entry screen, key in entries such as invoice amount and date.
-
Save the invoice entry in PeopleSoft.
-
Complete the task.
-
Values are synchronized between Oracle I/PM and PeopleSoft. For example, suppose the amount was incorrectly listed in the Oracle I/PM summary values. If you entered a different amount in the invoice entry screen (based on the invoice image), the Oracle I/PM metadata value is updated.
-
If configured, the invoice image is stored as an attachment to the corresponding PeopleSoft record.
-
-
You repeat steps 2 through 5 to create additional invoice records, keying from their displayed images.
1.2 Sample Scenario 2: Capturing Supporting Employee Documents
An Imaging Solution configured for capturing supporting documents might work as follows:
-
From PeopleSoft, you retrieve a record such as an employee record.
-
You launch the document imaging solution, by selecting a command called Scan Employee Document from a menu or by clicking a button or link.
-
Oracle Distributed Document Capture launches and automatically initiates a scan (if a scanner is attached to the desktop) or enables you to upload electronic images from your desktop.
-
You enter index values (metadata) in Oracle Distributed Document Capture to store with the images.
-
You click Send, which transmits the captured document images and their metadata from Oracle Distributed Document Capture to Oracle I/PM.
1.3 Sample Scenario 3: Viewing Supporting Employee Documents
An Imaging Solution configured for viewing supporting documents might work as follows:
-
From PeopleSoft, you retrieve a record such as an employee record.
-
You launch the document imaging solution, by selecting a command called View Employee Documents from a menu, or by clicking a button or link.
-
From the list of documents associated with the employee record and their metadata values, you select a document.
-
The document is displayed in the Oracle I/PM viewer, where you can view its images, and with appropriate permissions, apply annotations or redactions.
2 Using the Imaging Solution
This section describes how to perform the following tasks in the Imaging Solution.
2.1 Starting the Imaging Solution
Follow these steps to display the Imaging Solution from a PeopleSoft record.
-
Display a supported PeopleSoft page.
-
From the toolbar, click the solution's button or link, or select a solution command from a menu. (For example, if using an invoice processing imaging solution, you might click a Process Invoices link. For a document imaging solution, you might click a button titled Scan Employee Document or View Employee Documents.)
Note:
Depending on configuration, you may be prompted to enter a username and password to log in to the solution.Depending on the solution you selected, imaging-related options are displayed. For example:
-
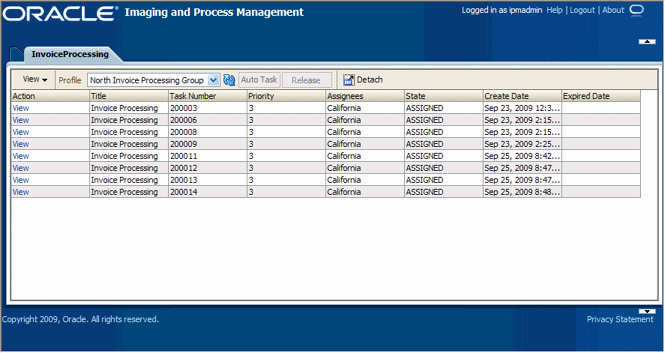
If you selected a Process Invoices command for a workflow imaging solution, the Task List Screen is displayed. If needed, select a profile in the Profile field. Tasks are associated with a profile, and users assigned a profile can access any of its tasks not currently selected by other users. After you select a profile, a list of tasks is displayed. See "Viewing and Selecting Tasks".
-
If you selected a Scan Employee Document command for a supporting document imaging solution, an application called Oracle Distributed Document Capture launches, enabling you to either scan from a desktop scanner or upload electronic images for the PeopleSoft employee record.
-
If you selected a View Employee Documents command for a supporting document imaging solution, a list of documents associated with the selected employee record displays, enabling you to view selected documents.
-
2.2 Viewing and Selecting Tasks
Follow these steps to view a list of available tasks and begin performing them.
When you select a task, it is acquired for your use and no longer available to other users also assigned the selected profile. It remains selected until you complete or release the task, even if you close the browser and the session times out. The next time you view the task list, it remains listed as one of your tasks. To release (unacquire) a task, see "Releasing Tasks".
-
Start the Imaging Solution as described in "Starting the Imaging Solution".
-
In the Profile field, select a profile, if needed.
Tasks are associated with a profile, where users assigned the profile can access its tasks. After you refresh the display, a list of the profile's tasks is displayed.
-
From the Task List Screen, select a task.
-
To perform tasks without selecting them manually, click Auto Task. In this mode, tasks are automatically assigned and displayed in the Task Viewer Screen.
-
To manually select a task, click its View Task link in the Action column. The task is displayed in the Task Viewer Screen.
-
A side panel may list additional task list actions you can perform.
-
2.3 Automatically Selecting Tasks
Follow these steps to use auto task mode, in which tasks are automatically displayed for you in the Task Viewer Screen, instead of you selecting them individually from the Task List Screen.
-
Display the Task List Screen.
-
Click Auto Task.
The Task Viewer Screen is displayed with your first task. After you complete a task, the next task is automatically displayed in the viewer.
-
To exit auto task mode, click the link for returning to the task list from the side panel.
2.4 Releasing Tasks
When you select a task, it becomes acquired by you, until you either complete or release it. (If you close your browser without completing a task, the task remains listed in your task list when you next view the list.)
Releasing a task makes it available to all users assigned its associated profile. Follow these steps.
-
Display the Task List Screen.
-
Select a task to release.
-
Click Release.
2.5 Customizing the Task List Display
You can adjust the task list in the following ways:
2.5.1 Hiding or Displaying Columns
Follow these steps to hide or display columns in the Task List Screen.
-
Display the Task List Screen. (If needed, choose a profile in the Profile field.)
-
Click the View menu, select Columns, and select a column to hide or display it.
Selecting a column hides it if displayed, and displays it if hidden. A checkmark is displayed next to columns selected for display.
Select Show All to display all columns.
-
Click the Refresh button shown below.

2.5.2 Reordering and Resizing Columns
For ease of use, you can change the order in which columns are displayed and their width. Follow these steps to reorder and resize columns.
-
Display the Task List Screen. (If needed, choose a profile in the Profile field.)
-
To resize a column, hover the cursor over its heading until a double arrow is displayed, then click and drag to increase or decrease its width.
-
Reorder columns using either of these methods:
-
Click a column's heading row, and drag and drop it to a new location. Columns are reordered.
-
Click View, then Reorder Columns. In the Reorder Columns popup displayed, select columns to display and click the up and down buttons to reorder them. The column you position topmost in this popup is displayed leftmost in the task list table. Click OK.
-
2.5.3 Detaching the Display
Follow these steps to display an expanded view of the task list in a detached, movable screen.
-
Display the Task List Screen. (If needed, choose a profile in the Profile field.)
-
Click Detach. The list of tasks is displayed in its own screen within the application screen. The Detached button appears pressed.
-
To return the list of tasks to its attached position, click Detach again.
2.6 Viewing Document Images
Follow these steps to view a document associated with a selected task in the Oracle I/PM viewer.
-
Display the Task Viewer Screen, either by selecting a task or choosing Auto Task in the Task List Screen.
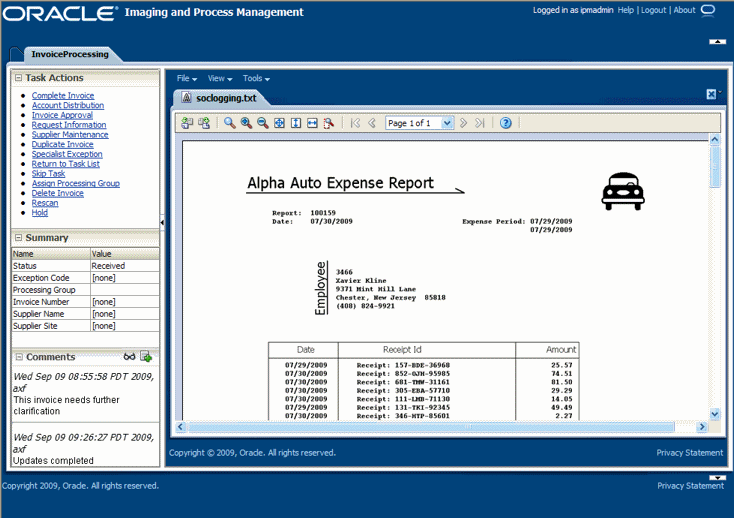
The task's document is displayed in the Oracle I/PM viewer in the large panel of the Task Viewer Screen. The document title is listed in the top tab.
Note:
The first time you access the viewer per session, you may be prompted to log in to Oracle I/PM. Enter a username and password and click Sign In. -
Use the Oracle I/PM viewer toolbar buttons to perform tasks such as rotating images, zooming in or out, or moving between pages of the document.
For more information, see the Oracle Fusion Middleware User's Guide for Oracle Imaging and Process Management.
-
If needed, switch between the basic and advanced viewer. (You must use the advanced viewer for annotations.)
2.7 Customizing the Task Viewer Display
In addition to the Oracle I/PM image viewer, the Task Viewer screen typically displays Task Actions, Summary, and Comments side panels that relate to the selected task.
-
The Oracle I/PM Viewer panel shows the document's image, along with related options. See "Viewing Document Images".
-
The Task Actions panel lists action commands related to the task, such as routing, updating, or completing actions.
-
The Summary panel lists key metadata values assigned to the document in Oracle I/PM for quick reference. For example, in an Invoice Processing scenario, invoice number and supplier name might be listed.
-
The Comments panel lists comments entered for the task by users. See "Viewing and Entering Comments".
You can customize the task viewer as follows:
-
To hide a panel, click its minus (-) sign box. The panel collapses and the sign changes to a plus (+). To show a panel, click its plus (+) sign.
-
To resize a panel, hover the cursor at the top of its title bar. When it becomes a two-headed arrow, click and drag it up or down to change its size.
-
You can use the basic or advanced viewer. You must use the advanced viewer to add annotations, as your permissions allow.
Tip:
Click the Preferences link at the top of the screen to set the basic or advanced viewer to display by default.
2.8 Selecting Users or Groups
When performing tasks, you may need to identify a user or group of users. For example, in an invoice processing solution, you might search for users to request an invoice's approval. Follow these steps to search for a user or group of users and select them. (Depending on configuration, you search for either users or groups.)
-
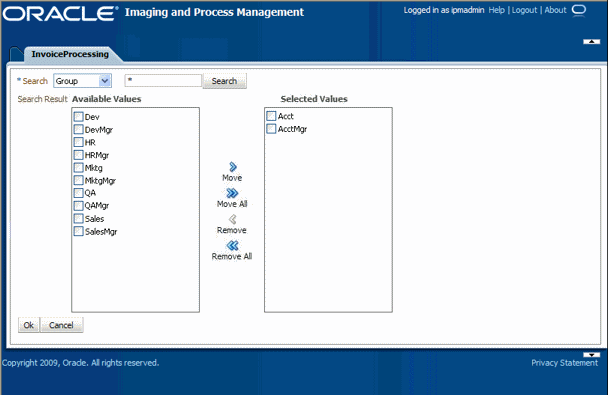
Display the Select User/Group Screen.
This screen is displayed whenever you choose an action command requiring a user or group selection.
-
In the Search field, specify the criteria by which you are searching, such as by user name or group name.
-
In the entry field, specify the value for which you are searching.
For example, if searching by username, enter a portion or all of the user's name. You can enter an asterisk (*) as a wildcard character to match one or more characters. For example, type Acc* to search for a group called Accounting.
-
Click Search to perform the search.
Note:
On a large system, the search could take a while. The more specific your search criteria, the faster results are displayed. -
From the search results displayed in the Available Values field, select one or more users or groups and click Move to move them to the Selected Values field. If needed, click Remove or Remove All to remove users or groups.
-
Click OK.
2.9 Selecting Items
When performing tasks, you may need to select an item from a list of choices. For example, in an invoice processing solution, you might select a processing group from several choices. Follow these steps to select an item.
-
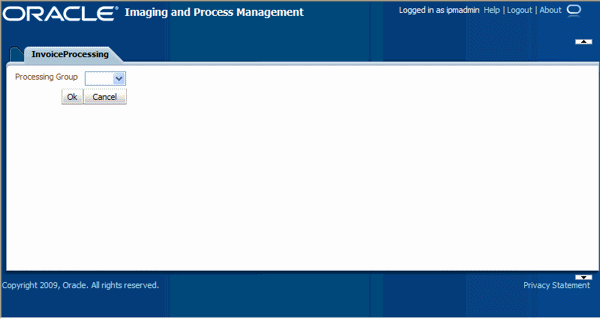
Display the Select Item Screen.
This screen is displayed whenever you select an action command requiring an item selection.
-
From the field listing choices, select an item and click OK. Click Cancel to exit the screen without a selection.
2.10 Viewing and Entering Comments
The Task Viewer Screen typically includes a Comments side panel that lists the first portion of comments entered by users about the selected task. Follow these steps to view complete comments or add them.
-
In the Comments panel in the Task Viewer Screen, click the glasses icon shown below to view all comments.

A View Comments popup is displayed, listing comments in the order in which they were added, along with the date and user who entered the comment. Click OK to close the popup.
-
To add a comment, click the Add Comment icon shown below. Enter a comment in the Comment Text field of the popup and click OK. The new comment is displayed at the bottom of the comments list.

3 Imaging Solution User Interface
The Imaging Solution contains the following user interface screens:
3.1 Task List Screen
Use this screen to view and select from a list of tasks available to you, based on a selected profile. You can also select related links (if present), and activate auto task mode for automatically selecting tasks.

To display this screen, start the Imaging Solution in PeopleSoft by clicking the solution's link or button or selecting the solution command from a specified menu. For example, if using an Invoice Processing solution, click a Process Invoices solution link.
| Element | Description |
|---|---|
| Task List Links | Depending on configuration, this side panel may list task list-related links. (This side panel may not be displayed.) For example, it might include links to external informational sites, shortcuts to commonly used instructions or internal organization links. |
| View | Use this menu to reorder columns, hide or display columns, and detach the task list to a floating screen. |
| Profile | If needed, select a profile (category to which tasks are assigned) to view its tasks. You may be assigned multiple profiles. |
| Click to update the task list display. | |
| Auto Task | Click to activate auto task mode, in which tasks are automatically selected and displayed in the Task Viewer Screen, instead of you selecting them manually from the Task List Screen. |
| Release | Click to make a previously selected task available to all users assigned its profile.
Note: When you select a task, it becomes acquired by you, until you either complete or release it. (If you close your browser without completing a task, the task remains listed in your task list when you next view it.) |
| Detach | Click to expand the task list to a floating window you can reposition on the screen. To attach, click Detach again. |
| Table | The task list table lists available tasks and their related information. The columns listed depend on configuration. Note that you can hide, display, or reorder columns using View menu options. |
| View Task | Click this link to view the selected task in the Task Viewer Screen. |
3.2 Task Viewer Screen
Use this screen to view information about the selected task and perform actions for it.

Display this screen from the Task List Screen in one of two ways: by clicking a specific task's View Task link or by clicking Auto Task.
| Element | Description |
|---|---|
| Action Commands | This side panel typically lists action commands for the selected task. Common tasks include: Complete Task, Skip Task, and Return to Task List, plus tasks specific to the business use. |
| Summary | Displays metadata values stored in Oracle I/PM for the document, for reference. |
| Comments | Displays the first line of comments users have entered for the selected task. Use this area to view or enter comments. |
| Oracle I/PM Image Viewer | Displays the task's associated images in the basic or advanced Oracle I/PM image viewer mode. For more information on Oracle I/PM viewer options, see the Oracle Fusion Middleware User's Guide for Oracle Imaging and Process Management. |
3.3 Select User/Group Screen
Use this screen to search for and select a user or group of users.

Display this screen by selecting a command requiring a user or group selection. For example, clicking an action command called Approval on the Task Viewer Screen might display the Select User/Group screen for selecting a group to request approval for a selected document.
3.4 Select Item Screen
Use this screen to select an item from a list of choices.

Display this screen by choosing a command requiring a selection. For example, clicking an action command called Assign Processing Group on the Task Viewer Screen might display the Select Item screen for assigning the task to a selected processing group.
| Element | Description |
|---|---|
| Item Selector | From the field listing choices, select an item and click OK. |
| OK | Exit the screen and use the selection made. |
| Cancel | Exit the screen, discarding any selection made. |
4 Documentation Accessibility
Our goal is to make Oracle products, services, and supporting documentation accessible to all users, including users that are disabled. To that end, our documentation includes features that make information available to users of assistive technology. This documentation is available in HTML format, and contains markup to facilitate access by the disabled community. Accessibility standards will continue to evolve over time, and Oracle is actively engaged with other market-leading technology vendors to address technical obstacles so that our documentation can be accessible to all of our customers. For more information, visit the Oracle Accessibility Program Web site at http://www.oracle.com/accessibility/.
Accessibility of Code Examples in Documentation
Screen readers may not always correctly read the code examples in this document. The conventions for writing code require that closing braces should appear on an otherwise empty line; however, some screen readers may not always read a line of text that consists solely of a bracket or brace.
Accessibility of Links to External Web Sites in Documentation
This documentation may contain links to Web sites of other companies or organizations that Oracle does not own or control. Oracle neither evaluates nor makes any representations regarding the accessibility of these Web sites.
Oracle customers have access to electronic support through My Oracle Support. For information, visit http://www.oracle.com/support/contact.html or visit http://www.oracle.com/accessibility/support.html if you are hearing impaired.
Oracle Fusion Middleware User's Guide for Oracle Enterprise Content Management Solutions for Oracle PeopleSoft, 11g Release 1 (11.1.1)
E17068-01
Copyright © 2008, 2010, Oracle and/or its affiliates. All rights reserved.
This software and related documentation are provided under a license agreement containing restrictions on use and disclosure and are protected by intellectual property laws. Except as expressly permitted in your license agreement or allowed by law, you may not use, copy, reproduce, translate, broadcast, modify, license, transmit, distribute, exhibit, perform, publish, or display any part, in any form, or by any means. Reverse engineering, disassembly, or decompilation of this software, unless required by law for interoperability, is prohibited.
The information contained herein is subject to change without notice and is not warranted to be error-free. If you find any errors, please report them to us in writing.
If this software or related documentation is delivered to the U.S. Government or anyone licensing it on behalf of the U.S. Government, the following notice is applicable:
U.S. GOVERNMENT RIGHTS Programs, software, databases, and related documentation and technical data delivered to U.S. Government customers are "commercial computer software" or "commercial technical data" pursuant to the applicable Federal Acquisition Regulation and agency-specific supplemental regulations. As such, the use, duplication, disclosure, modification, and adaptation shall be subject to the restrictions and license terms set forth in the applicable Government contract, and, to the extent applicable by the terms of the Government contract, the additional rights set forth in FAR 52.227-19, Commercial Computer Software License (December 2007). Oracle USA, Inc., 500 Oracle Parkway, Redwood City, CA 94065.
This software is developed for general use in a variety of information management applications. It is not developed or intended for use in any inherently dangerous applications, including applications which may create a risk of personal injury. If you use this software in dangerous applications, then you shall be responsible to take all appropriate fail-safe, backup, redundancy, and other measures to ensure the safe use of this software. Oracle Corporation and its affiliates disclaim any liability for any damages caused by use of this software in dangerous applications.
Oracle is a registered trademark of Oracle Corporation and/or its affiliates. Other names may be trademarks of their respective owners.
This software and documentation may provide access to or information on content, products, and services from third parties. Oracle Corporation and its affiliates are not responsible for and expressly disclaim all warranties of any kind with respect to third-party content, products, and services. Oracle Corporation and its affiliates will not be responsible for any loss, costs, or damages incurred due to your access to or use of third-party content, products, or services.