


|
|

A Timer Control notifies your application, when a specified period of time has elapsed or when a specific absolute time has been reached.
Some transactions and events require a certain amount of time to complete. Others can run indefinitely if not aborted, and eat up resources. Still others must occur at a specific time. The Timer control provides the developer with a way to respond from code when a specified interval of time has elapsed or when a specified absolute time has been reached.
This topic describes how to create a WLI Timer control.
To create a WLI Timer control:
 on the Data Palette and from the drop-down list choose Integration Controls to display the list of controls used for integrating applications.
| Note: | If the Data Palette view is not visible in Oracle Workshop for WebLogic, click Window > Show View > Data Palette from the menu bar. |
The WLI Timer control is created and appears in the Data Palette.
A Timer control notifies your application when a specified period of time has elapsed or when a specified absolute time has been reached. For example, you can use a Timer control to run a process at certain intervals throughout the day, or to cancel an operation that is taking too long.
The following sections describe how to configure the Timer control.
You can specify the behavior of a Timer control in Design view by setting the control's timeout and repeatsEvery properties in the Properties pane. A Timer control instance displays the following annotations as shown in Figure 20-1.
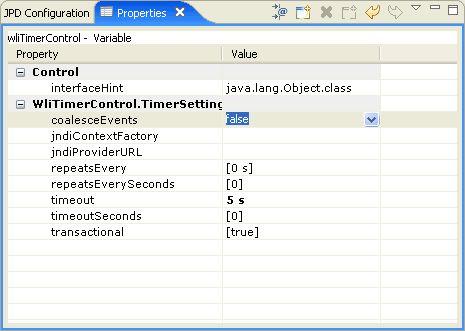
These annotations correspond to attributes of the com.bea.control.WliTimerControl.TimerSettings, which identifies the Timer control in your code. The com.bea.control.WliTimerControl.TimerSettings has the following attributes:
coalesceEvents- It specifies how the Timer control should behave if delivery of its events is delayed.jndiContextFactory- It specifies the JNDI context factory class.jndiProviderURL- It specifies the JNDI provider URL. repeatsEvery- It specifies how often the Timer control should fire after the first time repeatsEverySeconds- It specifies the time in seconds until the timer control fires the first time, once started (default: 0).timeout- It specifies the time until the Timer control fires the first time, once started and the default value is 0 seconds.timeoutSeconds- It specifies the time in seconds until the timer control fires the first time, once started. The default value is 0. transaction- It specifies the timer’s participation in a transaction, the default value is true.You can set these attributes to specify relative time. Relative time is an interval of time in relation to the present, such as three hours from now. You can also specify that the Timer control fire at an absolute time, such as 3:00 AM, by calling the Timer control's setTimeoutAt method. For more information see Interface WLiTimerControl.
This topic describes how to specify relative and absolute time values for a Timer control. A relative time value specifies an interval of time that is relative to the present, such as next Thursday or twenty minutes from now. An absolute time value specifies time according to the clock. For example, 5:00 PM is an absolute time.
You specify relative time when you want an event to fire at a time relative to the present. For example, you might want to wait only 5 minutes for another system to respond. So your application sets a timer with a relative timeout of 5 minutes and starts the timer. If the timer expires (that is, calls its callback) before the system responds, the web service stops waiting and continues with other operations.
To specify that the timer fires after an interval, set the timeout and, optionally, the repeats-every attribute of the Timer control. You can set these attributes in the Properties pane or in source code, or by calling the setTimeout or setRepeatsEvery methods of the TimerControl interface.
When relative time is expressed as a text string, it is formatted as integers followed by case-insensitive time units. These time units can be separated by spaces. For example, the following code sample is a valid duration specification that exercises all the time units, spelled out fully:
/** * org.apache.beehive.controls.api.bean.Control * com.bea.control.WliTimerControl.TimerSettings ="99 years 11 months 13 days 23 hours 43 minutes 51 seconds" */Timer almostCentury;This example creates a Timer control whose default initial firing will occur in almost 100 years.
Units may also be truncated. For example, valid truncations of "months" are "month", "mont", "mon", "mo", and "m". If both months and minutes are specified, use long enough abbreviations to be unambiguous.
The string "p" (case insensitive) is allowed at the beginning of a text string. If it is present, then single-letter abbreviations and no spaces must be used and parts must appear in the order y m d h m s.
The following Timer control declaration is equivalent to the previous example, but uses the fully truncated form:
/*
* @control
* @timer timeout="P99Y11Mo13D23H43M51S"
*/
Timer almostCentury;
Durations are computed according to Gregorian calendar rules, so if today is the 17th of the month, 3 months from now is also the 17th of the month. If the target month is shorter and doesn't have a corresponding day (for example, no February 31), then the closest day in the same month is used (for example, February 29 on a leap year).
Absolute time is useful when you know the exact moment you want operations to begin and end. For example, your application can have your web service send a reminder email to remind you that someone's birthday is coming up.
You can configure a Timer control to fire at an absolute time by calling the setTimeoutAt method of the TimerControl interface.
The setTimeoutAt method configures the timer to fire an event as soon as possible on or after the supplied absolute time. If you supply an absolute time in the past, the timer will fire as soon as possible.
If setTimeoutAt is called within a transaction, its effect (any work performed in the callback handler) is rolled back if the transaction is rolled back, and its effect is committed only when the transaction is committed.
If setTimeoutAt is called while the timer is already running, it will have no effect until the timer is stopped and restarted.
The setTimeoutAt method takes as its argument a java.util.Date object. Other Java classes that are useful when dealing with Date are java.util.GregorianCalendar and java.text.SimpleDateFormat.
The getTimeoutAt method returns the time at which the timer is next scheduled to fire, if the repeats-every attribute is set to a value greater than zero. If the repeats-every attribute is set to zero, then the getTimeoutAt method returns the value set by the setTimeoutAt method or the value set in the timeout attribute. If you call the getTimeoutAt method from within the onTimeout callback handler, the first timeout has already fired, so getTimeoutAt will return either the time of the next timeout or the time of the first timeout if the timer is not set to repeat.
The following example calls the setTimeoutAt method to specify that the first timeout fires at thirty seconds past the current minute, then calls the setRepeatsEvery method to specify that the timer subsequently fires every sixty seconds. The onTimeout event provides information about the Timer control’s firing.
/**
* @common:operation
* @jws:conversation phase="start"
*/
public void StartTimer()
{Calendar cd = new GregorianCalendar();
cd.set(cd.SECOND, 30);
tTimer.setTimeoutAt(cd.getTime());
tTimer.setRepeatsEvery(60);
tTimer.start();
}
public void tTimer_onTimeout(long time)
{ callback.FireTimeout("The timer was scheduled to fire at: " + new Date(time) + ". The current time is: " + new Date()
+ ". The timer will fire again at: " + tTimer.getTimeoutAt());
}


|