|
|

The OSB control allows your web service or business process to invoke an Oracle Service Bus proxy service, and provides support for security and transaction context propagation.
The OSB control allows a business process to invoke the Oracle Service Bus proxy services, which have Service Bus Transport configured through RMI, and send requests to and receive callbacks from a Web service, or a remote Web service or business process.
OSB control extends Service Broker control, and the functionality supported by the service control is also supported by the OSB control. For more information on Service Broker Control, see Service Broker Control.
OSB control does the following:
The first step is creating a OSB Control file. The Control can be automatically generated from a target service (WSDL file) using Oracle Workshop for WebLogic, or can be created using the Add function in the Controls section of the Oracle Workshop for WebLogic Data palette. The methods and callbacks on the Control file correspond to operations and callbacks of the target service. An instance of this Control file is used by a parent service to call the target service and can also be used to get callbacks from the target service. OSB control files can only have selector annotations on start methods for stateful target services, whereas they can have selector annotations on any method for stateless target services.
| Note: | The parent process and the target process must both be configured to use the same protocol. Protocol matching and enabling is not handled automatically. |
You can create an OSB control:
You can create a new OSB control and add it to your Web service or business process by using the Insert Control - OSB dialog.
| Note: | If you are not in Design view, click the Design tab. |
 on the Data Palette and from the drop-down list choose Integration Controls to display the list of controls used for integrating applications.
If the Data Palette view is not visible in Oracle Workshop for WebLogic, click Window > Show View > Data Palette from the menu bar.
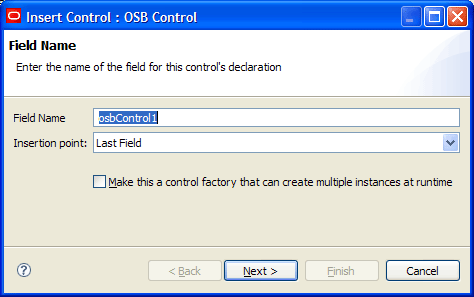
The Insert Control: OSB Control dialog appears (see Figure 15-1).
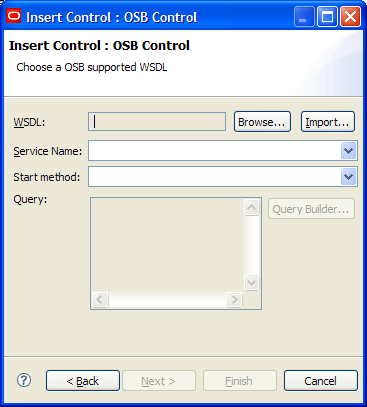
The Insert control: OSB Control dialog-box appears (see Figure 15-2).
| Note: | An OSB Control cannot be created from a WSDL file located outside the current Web project. |
If you invoked the Dynamic Selector query builder, perform the following steps to build and test a query:
TPM to bind lookup values to properties in the TPM repository. Choose LookupControl to bind lookup values to dynamic properties specified in a domain-wide DynamicProperties.xml file. You should only edit the DynamicProperties.xml file to bind lookup values to dynamic properties if the domain is inactive. If the domain is active, it is recommended that you use the Oracle WebLogic Integration Administration Console to bind lookup values. For more information on binding lookup values to dynamic properties using the Oracle WebLogic Integration Administration Console, see “Adding or Changing Dynamic Control Selectors” in Process Configuration.
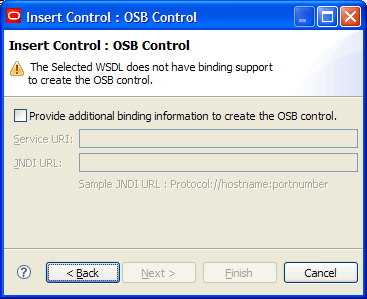
If the Oracle Service Bus bindings are not configured in your WSDL file, the Insert Control: OSB Control dialog box appears (see Figure 15-5), do the following:
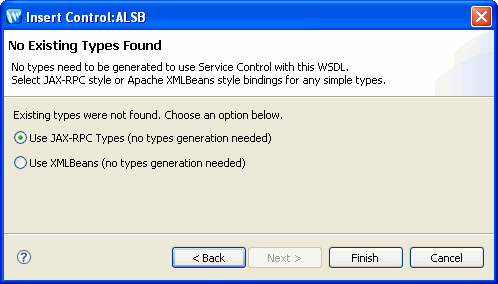
The No Existing Types Found dialog-box appears (see Figure 15-6).
The OSB control is created and displayed in the Package Explorer pane. An instance of the control is also created and is added to the Data Palette.
To create an OSB Control using the proxy service, you need to have an existing Oracle Service Bus project.
on the Data Palette and from the drop-down list choose Integration Controls to display the list of controls used for integrating applications.The Insert Control: OSB dialog appears
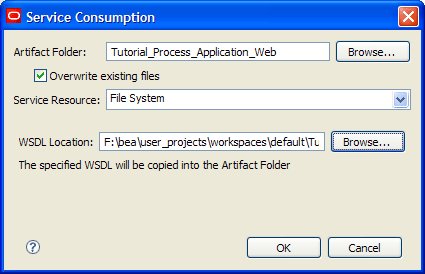
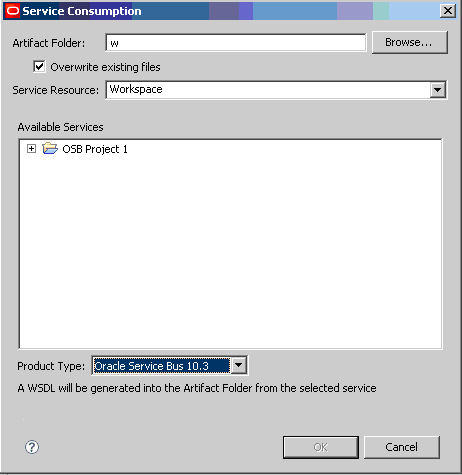
The Service Consumption dialog-box appears.
In the Service Consumption dialog-box do the following:
The No Existing Types Found dialog-box appears.
The OSB control is created using a proxy service and displayed in your business process, in the Package Explorer pane. An instance of the control is also created and is added to the Data Palette.
OSB control extends Service Broker control. In addition to the annotations of the Service Broker Control, other than those annotations it provides the following additional annotations depending on the requirement:
See Notes on Service Broker Control Annotations, for more information on Service Broker annotations.
This annotation is a marker annotation, specifies the OSB control supports SOAP 1.1 over RMI. This annotation can only be specified at the class level. This annotation is used for supporting SOAP over RMI. This annotation looks like the following:
@Retention(RetentionPolicy.RUNTIME)
@Target({ElementType.TYPE})public @interface RmiSoapProtocol
{}
| Note: | This annotation is auto generated based on the WSDL and, you should not modify this annotation. When this annotation is specified, you should not specify service control supported annotations like HttpSoapProtocol, HttpSoap12Protocol, JmsSoapProtocol, and JmsSoapProtocol. Location which is a service control annotation is optional. The service control annotation WSDL is required. |
This annotation is a marker annotation, specifies the OSB control supports SOAP 1.2 over RMI. This annotation can only be specified at the class level. This annotation is used for supporting SOAP over RMI. This annotation looks like the following:
@Retention(RetentionPolicy.RUNTIME)@Target({ElementType.TYPE})public @interface RmiSoap12Protocol{}| Note: | This annotation is auto generated based on the WSDL and, you should not modify this annotation. When this annotation is specified, you should not specify service control supported annotations like HttpSoapProtocol, HttpSoap12Protocol, JmsSoapProtocol, and JmsSoapProtocol. Location, which is a service control annotation is optional. The service control annotation WSDL is required. |
This annotation is used to specify the RMI related parameters required for the SB Thin Client API. This annotation can only be specified at the class level. This annotation is used for supporting SOAP, abstract SOAP, and abstract XML over RMI. This annotation looks like the following:
@Retention(RetentionPolicy.RUNTIME)
@Target({ElementType.TYPE, ElementType.FIELD})public @interface SBTransport
{String serviceURI();
boolean execute() default true;
String jndiURL() default “”;
Table 15-1 describes the fields within the SBTransport annotation.
| Note: | This annotation should only be specified along with the annotations RmiSoapProtocol or RmiSoap12Protocol.Location, which is a service control annotation is optional. The service control annotation WSDL is required. |
This annotation is used to specify the custom header to the SB Transport. This annotation can be specified at the class level. This annotation is used for supporting SOAP over RMI. This annotation looks like the following:
@Retention(RetentionPolicy.RUNTIME)@Target({ElementType.TYPE})public @interface CustomHeader{String name;String value;}Table 15-2 describes the fields within the CustomHeader annotation.
| Note: | This annotation should only be specified along with the annotations RmiSoapProtocol or RmiSoap12Protocol. |
This annotation is used to specify the custom headers to the SB Transport. This annotation can be specified at the class level. This annotation is used for supporting SOAP, abstract SOAP, and abstract XML over RMI. This annotation looks like the following:
@Retention(RetentionPolicy.RUNTIME)
@Target({ElementType.TYPE})public @interface CustomHeaders
{CustomHeader[] headers;
}
The fields with in the annotation are headers, which represents an array of name value pairs.
| Note: | This annotation should only be specified along with the annotations RmiSoapProtocol or RmiSoap12Protocol. |
This annotation is a marker annotation and used for specifying that the OSB control supports abstract XML message over RMI. This annotation can only be specified at the class level. This annotation is used for supporting abstract XML and abstract SOAP over RMI. This annotation looks like the following:
@Retention(RetentionPolicy.RUNTIME)@Target({ElementType.TYPE})public @interface RmiXmlProtocol{}| Note: | When you specify this annotation, do not specify RmiSoapProtocol, RmiSoap12Protocol, and any service control supported annotations. You need to specify the SBTransport annotation. In this case there should not be any callback interface (with @EventSet annotation) with in the OSB control. |
This annotation is a marker annotation and is used to specify that the operation is one way. This annotation can only be specified at the method level. This annotation is used for supporting abstract XML, and abstract SOAP over RMI. This annotation looks like the following:
@Retention(RetentionPolicy.RUNTIME)@Target({ElementType.METHOD})public @interface OneWay{}| Note: | This annotation should be specified only when RmiXmlProtocol is specified. |
When this annotation is specified the method signature for:
OSB control supports transaction context propagation at method level within a business process, where you can decide whether to propagate the transaction context for that method or not using the Transactional annotation. This annotation also specifies the RMI invocation timeout, if you are not propagating the transaction context.
If you specify the transaction annotation at the control level, it will be applicable for all the methods with in the control and if specified at the method level, it will be applicable to the method level.
This annotation looks like the following:
@Retention(RetentionPolicy.RUNTIME)
@Target({ElementType.TYPE, ElementType.METHOD})public @interface Transactional
{boolean value() default true;
int timeout() default 60;
}
Table 15-3 describes the fields within the Transactional annotation.
| Note: | This annotation should only be specified along with the OSB control defined annotations only. If this annotation is not specified, by default the transaction context would be propagated to Oracle Service Bus. |
If you specify the principal and credentials as part of SBTransport annotation, those credentials would be used to authenticate with remote JNDI provider. Depending on the value of the execute attribute in SBTransport annotation, security context propagation happens accordingly as explained below while transporting the message to Oracle Service Bus.
true for the execute attribute, then the JNDI lookup happens with the supplied principal/credential and the transporting the message/remote invocation happens with in the context of the current authenticated subject.false for the execute attribute, then the JNDI lookup & transporting the message/remote invocation happens with the supplied principal/credentials.
This section shows an example of OSB control:
import com.bea.control.SbTransportControl;
import org.apache.beehive.controls.api.events.EventSet;
import org.apache.beehive.controls.api.bean.ControlExtension;
@SbTransportControl.SBTransport(serviceURI = "/MyAddProxy", jndiURL = "t3://localhost:7001")
@SbTransportControl.RmiSoapProtocol
@SbTransportControl.SOAPBinding(style = SbTransportControl.SOAPBinding.Style.DOCUMENT, use = SbTransportControl.SOAPBinding.Use.LITERAL, parameterStyle = SbTransportControl.SOAPBinding.ParameterStyle.WRAPPED)
@SbTransportControl.WSDL(path = "../requestquote/AddPro_proxy.wsdl", service = "AddPro")
public interface ALSBControl extends SbTransportControl
static final long serialVersionUID = 1L;
public int addNumbers(int num1_arg,int num2_arg);
/** This event set interface provides support for the onAsyncFailure event.
public interface Callback extends SbTransportControl.Callback {};
public ALSBControl create(); }


|