|
|
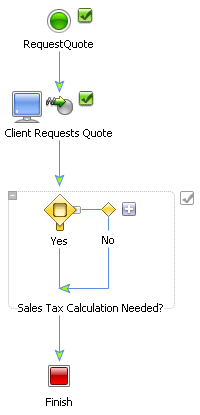
The business process is required to take a decision based on a value that the process extracts from the variable to which the XML message from the client is assigned. You design a condition, which must be evaluated at run time to determine whether the shipping address specified in the incoming RFQ XML file requires sales tax to be calculated for the quote.
You design the decision logic by creating a Decision node in your business process. This step includes the following tasks:
 ) from the Node Palette view, drag it to the Design view, and drop it just below the Client Requests Quote node.
| Note: | As you drag the node to the Design view, targets ( ) appear, indicating possible positions at which you can insert the node. As you drag the node close to a target location, the target is activated ( ) appear, indicating possible positions at which you can insert the node. As you drag the node close to a target location, the target is activated ( ) and the mouse pointer changes to an arrow ( ) and the mouse pointer changes to an arrow ( ). At this point, you can release the mouse button; the node snaps to the location indicated by the active target. ). At this point, you can release the mouse button; the node snaps to the location indicated by the active target. |
The Decision node includes a node for the condition (labeled Condition) and two paths of execution: one for actions to be executed if the condition evaluates to true and the other (Default path) for actions to be executed if the condition evaluates to false.
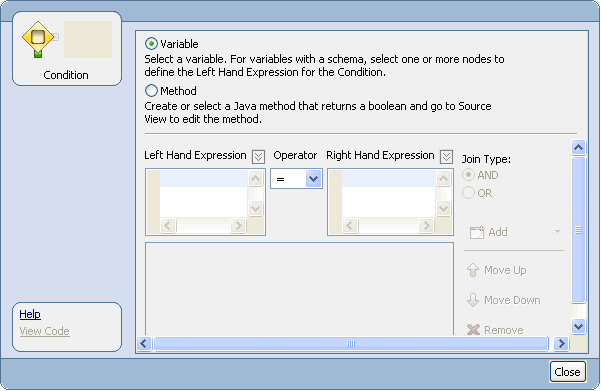
 ) to invoke the decision builder, which provides a task-driven user interface to help you design the decision logic.
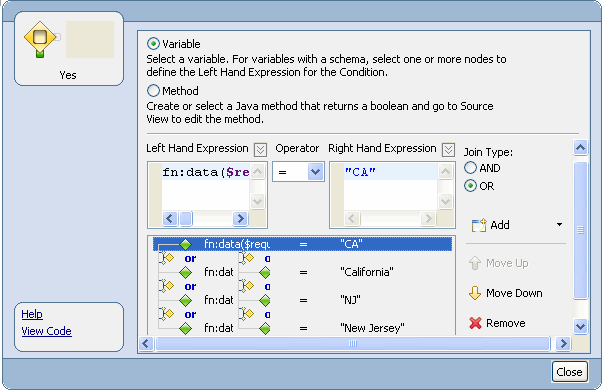
The Variable option button is selected by default. Do not change this selection because, in this case, you design the decision based on the value of an element in an XML document, which is valid with respect to an XML schema.
 icon adjacent to Left Hand Expression.
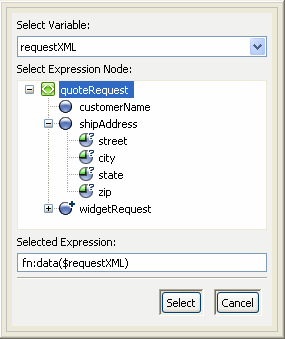
A drop-down list of the variables in your project is displayed. In this case, the requestXML variable, which you created for the Client Request node at the start of your business process, is displayed.
The quoteRequest XML schema is depicted in the Select Expression Node pane.
The schema in our example (QuoteRequest.xsd) specifies the following elements:
With this step, you have selected the node in the XML document that represents the element based on which you want to define the condition logic.
The following expression appears in the Selected Expression field:
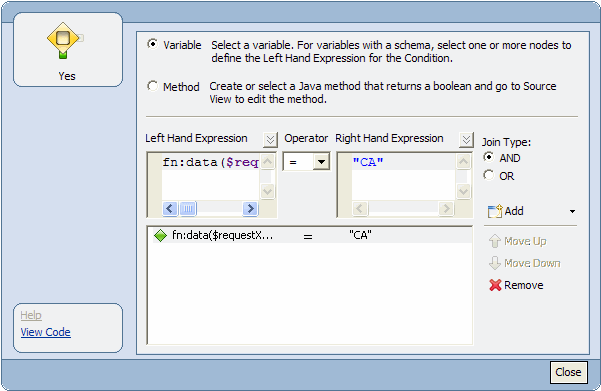
fn:data($requestXML/ns0:shipAddress/@state)
“CA” in the Right Hand Expression field. fn:data($requestXML/ns0:shipAddress/@state) = “CA”You have now finished designing the first condition for the decision node.
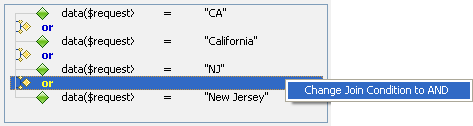
| Note: | You can change the join type for a condition even after you define the condition, by right-clicking on the join type as shown in the following figure. |
CA to California.The Add button changes to Update.
NJ and New Jersey.The conditions that you defined are listed in the condition list pane, as shown in the following figure.
The icon for the Condition node in the Design view changes from to  , indicating that the condition defined for this node is based on the evaluation of XML data.
This step completes the design of the condition that is evaluated when the flow transitions to the Decision node at run time.
The condition logic is represented in the source code as an XQuery expression. As you define the conditions in the decision builder, Oracle Workshop for WebLogic generates an XQuery expression.
To view the XQuery expression, go to the Source view. The condition that you defined is represented by the following XQuery expression in the source code:
@com.bea.wli.common.XQuery(prolog =
"declare namespace ns0 = \"http://www.example.org/request\";" +
"declare function exprFunction0($requestXML) as xs:boolean {" +
"(((fn:data($requestXML/ns0:shipAddress/@state) = \"CA\") or
(fn:data($requestXML/ns0:shipAddress/@state) = \"California\")) or
(fn:data($requestXML/ns0:shipAddress/@state) = \"NJ\")) or
(fn:data($requestXML/ns0:shipAddress/@state) = \"New Jersey\")" +
"};")
You are now ready to define the actions on the subsequent paths in the flow.
Defining Conditions for Branching


|