| Oracle® Fusion Middleware Configuration Guide for Oracle Business Intelligence Applications 11g Release (11.1.1) Part Number E16814-01 |
|
|
View PDF |
| Oracle® Fusion Middleware Configuration Guide for Oracle Business Intelligence Applications 11g Release (11.1.1) Part Number E16814-01 |
|
|
View PDF |
This section explains how to use Oracle BI Applications Configuration Manager and FSM to administer and maintain functional configuration data.
This section contains the following topics:
Section 7.1, "About Maintaining and Administering Functional Configuration Data"
Section 7.2, "Roadmap for Setup Data Maintenance and Administration"
Section 7.4, "About Working With Domains and Domain Mappings"
Section 7.8, "How to Change Configuration Values Using Oracle BI Applications Configuration Manager"
Section 7.9, "How to Locate Unmapped Domain Values in Oracle BI Applications Configuration Manager"
During an Oracle BI Applications deployment project, you use Oracle BI Applications Configuration Manager and FSM to manage and make changes to configuration values for Data Load Parameters, Domains and Mappings, and Reporting Parameters.
For Functional Configuration road map information, see Section 7.2, "Roadmap for Setup Data Maintenance and Administration".
The list below provides a high-level roadmap for Setup Data Maintenance and Administration.
Note: Before you configure Oracle BI Applications, you must install and set up Oracle BI Applications according to the instructions in Chapter 4, "Setting Up Oracle Business Intelligence Applications".
High-Level Setup Data Maintenance and Administration Roadmap
During the Functional Configuration stage, you use Oracle BI Applications Configuration Manager to monitor the setup data values.
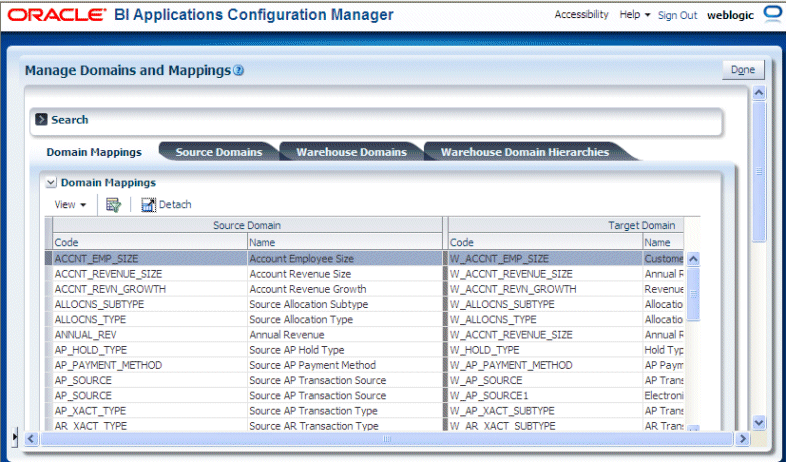
To monitor Domain Mappings, in Configuration Manager, select the Manage Domains and Domain Mappings link from the Tasks bar to display the select Manage Domains and Domain Mappings dialog.
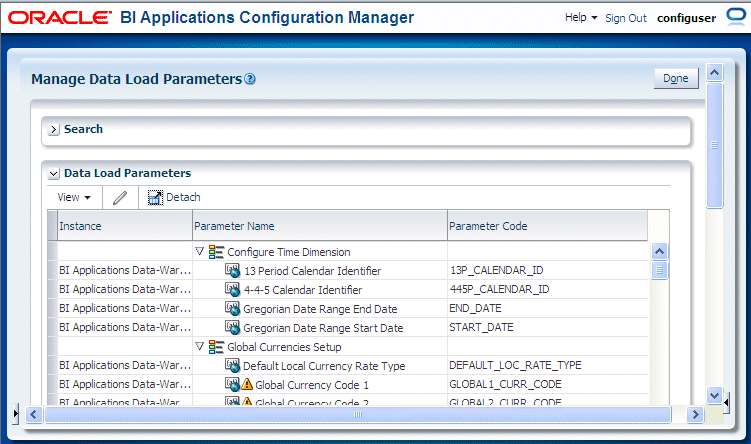
To monitor Data Load Parameters, select the Data Load Parameters link from the Tasks bar to display the select Manage Data Load Parameters dialog.
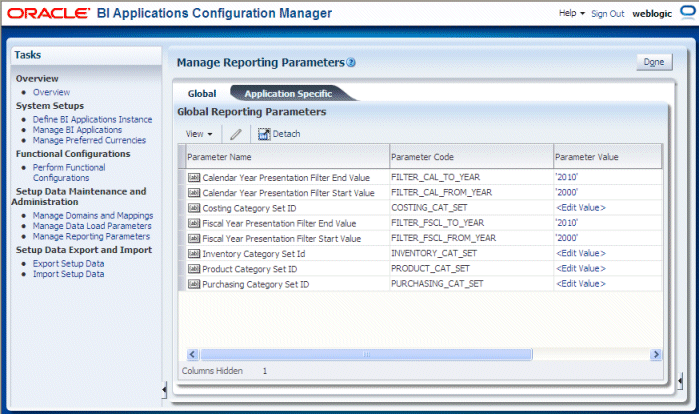
To monitor Reporting Parameters, select the Manage Reporting Parameters link from the Tasks bar to display the select Manage Reporting Parameters dialog.
For more information about monitoring setup data, see Section 7.7, "How to Monitor Setup Data".
For information about locating unmapped Domain values, see Section 7.9, "How to Locate Unmapped Domain Values in Oracle BI Applications Configuration Manager".
Tip:
Domain values can be used to define delivered business metrics; therefore, you must review the delivered domain member values and map them to the correct source values.During Functional Configuration of purchased Offerings, you use FSM to monitor the status of Tasks.
For example, you might use the Implementation Project page in FSM to assess the number of completed tasks.
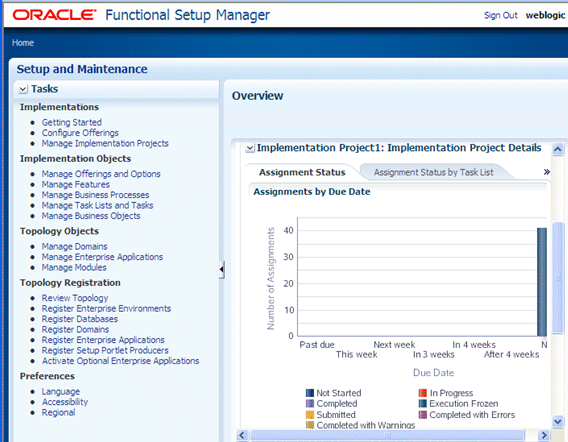
If required, you use Oracle BI Applications Configuration Manager to make changes to the configuration values. For more information, see Section 7.8, "How to Change Configuration Values Using Oracle BI Applications Configuration Manager".
If required, you use Oracle BI Applications Configuration Manager to add Domains or Domain Member values. For more information, see Section 7.10, "About Adding Target Domain Members".
Functional Configuration Data for Oracle BI Applications is information about the following:
Domains and Mappings (for more information, see Section 7.4, "About Working With Domains and Domain Mappings").
Data Load Parameters (for more information, see Section 7.5, "About Working With Data Load Parameters").
Reporting Parameters (for more information, see Section 7.6, "About Working With Reporting Parameters").
Functional Configuration Data for Oracle BI Applications is:
configured using Functional Tasks in FSM.
monitored and updated using Oracle BI Applications Configuration Manager.
Domains are pre-seeded dimensional values that help define business metrics. For example, in Financial Analytics, domains store information about the General Ledger accounts.
To manage Domains and Domain Mappings, use the Manage Domains and Mappings link on the Tasks bar to display the Manage Domains and Mappings dialog (see screenshot below).

The Manage Domains and Mappings dialog comprises the following tabs:
Domain Mappings - this tab shows how data fields in the Source System map to data fields in the Data Warehouse (for more information, see Section 7.4.1, "About Domain Mappings and Domain Member Mappings").
Source domains - this tab shows data fields and Domain Members in the Source System (for more information, see Section 7.4.2, "About Source Domains").
Warehouse Domains - this tab shows data fields and Warehouse Members in the Data Warehouse (for more information, see Section 7.4.3, "About Warehouse Domains").
Warehouse Domain Hierarchies - this tab shows Domains that have been organized into hierarchies to enable the data to be more effectively analyzed (for more information about this tab, see Section 7.4.4, "About Warehouse Domain Hierarchies").
Domain Mappings specify how data in a source system is extracted and loaded into the target data warehouse. For example, the data in domain Source Group Account (BI_GROUP_ACCOUNT) extracts and loads into the domain Group Account (W_GL_GROUP_ACCOUNT).
The screenshot below shows example domain mappings for Oracle Financial Analytics.

Domain Member Mappings specify how domain member data in a source system is extracted and loaded into domain member data in the target data warehouse. For example, in Oracle HR Analytics, domain Gender (W_SEX_MF_CODE) has a source value 'Male' that is mapped to a domain member value 'M' in the target data warehouse.
For a complete list of out-of-the-box Domains, see Oracle Business Analytics Warehouse Data Model Reference.
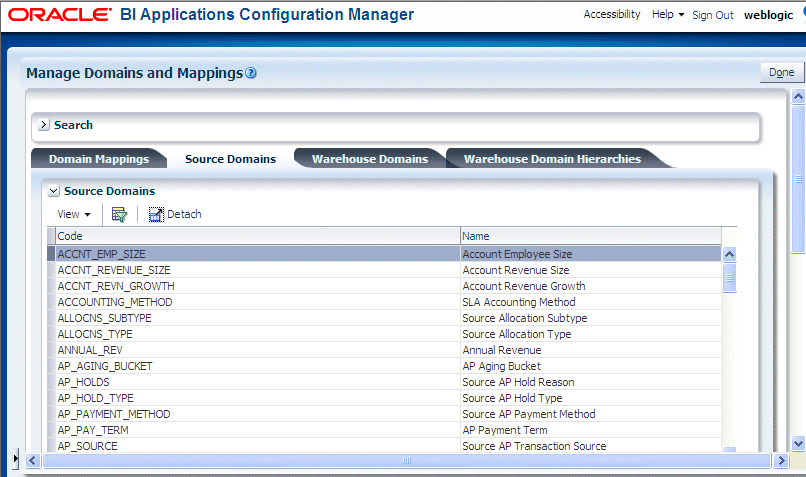
Data fields in a Source System application are referred to as Source Domains. Data fields in a Data Warehouse are referred to as Warehouse Domains.
The screenshot below shows example source domains for Oracle Financial Analytics.
Note: Source Domains displayed on the Source Domains tab are read-only.
Domain Members are the permitted values for a Source or Warehouse Domain. For example, the Domain Members for MARITAL_STATUS include D for Divorced, M for Married, S for Single, and so on.
Tip:
Domain values can be used to define delivered business metrics; therefore, you must review the delivered domain member values and map them to the correct source values.Domain Mappings specify how entities in a Source System application are loaded into a target Data Warehouse.
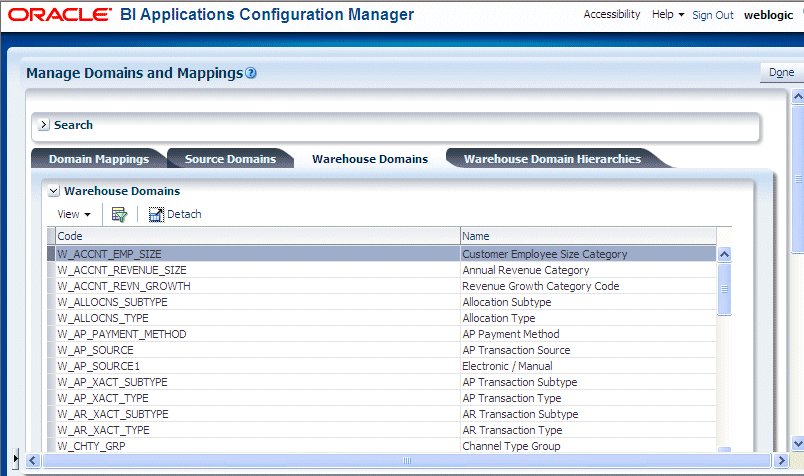
Data fields in the Data Warehouse are referred to as Warehouse Domains.
The screenshot below shows example warehouse domains for Oracle Financial Analytics.
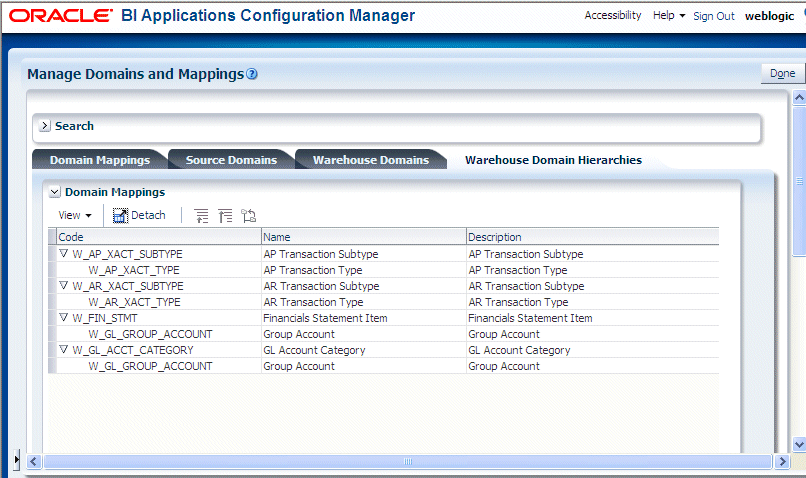
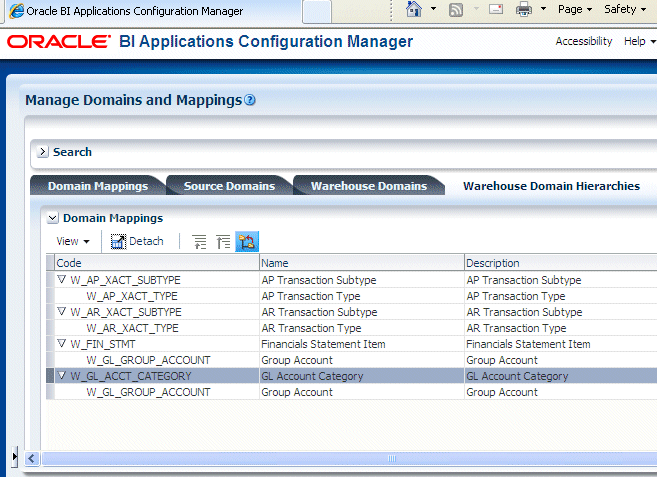
Warehouse Domain Hierarchies are Domains that have been organized into hierarchies to enable the data to be more effectively analyzed. For example, in Oracle HR Analytics, you might need to have a workforce event hierarchy: Event Group -> Event Sub-group -> Event Detail.
Note:
Domain Hierarchies are displayed in inverted format, that is in the following format:<Child 1>\
<Child n>\
<Parent>.
For more information, see Section 7.11, "Viewing Domain Hierarchies".
The screenshot below shows example warehouse domain hierarchies for Oracle Financial Analytics.
Oracle Business Intelligence Applications ships out-of-the-box domain value mappings that map the seeded BI Application domain values to the seeded configuration data in Oracle Enterprise Resource Planning applications.
When you configure your Offerings, you need to review the out-of-the-box mappings for domain values, and if necessary update them to suit the categories that you want to use to report on your data.
For example, in Oracle HR Analytics, the out-of-the-box domain values for Performance Range might be similar to the following:
0 - 50 - PERF_RANGE_1
50 - 60 - PERF_RANGE_2
60 - 70 - PERF_RANGE_3.
If you want to use these out-of-the-box categories, you do not need to make any changes to these mappings before you start your ETL processes.
If you want to make changes to out-of-the-box mappings, then you use the Domain Mappings tab to implement these changes.
For example, you might want to change the range for PERF_RANGE_1 from 0 - 50 to 0 - 100. Or you might want to add a new category named PERF_RANGE_4 and assign the range 100 - 500 to the new PERF_RANGE_4 category.
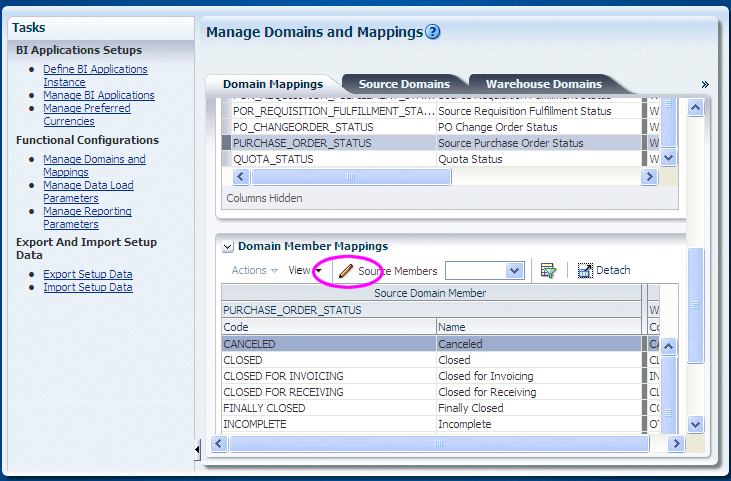
To edit a Domain Member Mapping, on the Domain Member Mappings tab, select a domain then click the Edit Domain Member Mappings icon (see screenshot below) to display the Edit Domain Member Mappings dialog, and edit the values. For example, for a range mapping, you specify values in the Range Start, Range End, and Target Domain Member fields.
To add a Range Member Mapping, click the Add Range Member Mapping (+) icon and specify values in the Range Start, Range End, and Target Domain Member - Code fields.
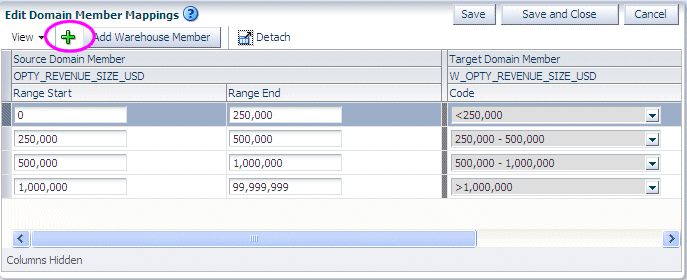
Tip: Before you create a new range, you might first want to use the Add Warehouse Member button to first create a target Warehouse Member, which is then available as an option in the Target Domain Member - Code list. For example, you might add a Warehouse Member called 'Greater than 250,000' to map to the range 250,000 to 1,000,000.
To add a target Warehouse Member, click Add Target Domain Member.
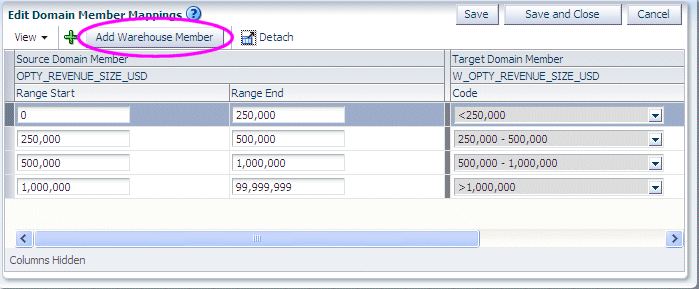
Note: If the Add Target Domain Member option is disabled or not displayed, then the domain is non-extensible (for more information, see Section 7.4.7, "Why are some domains non-extensible?").
When you click Add Target Domain Member you display the Create Warehouse Domain Member dialog, which enables you to specify a Name, Code, and Description (optional).
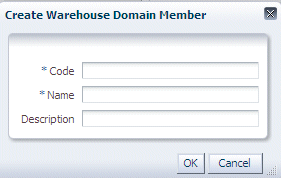
For example, you might add a Warehouse Member called 'Greater than 250,000' to map to the range 250,000 to 1,000,000.
Oracle BI Applications Warehouse Domains are organized into hierarchies out-of-the-box. You might want to modify an out-of-the-box hierarchy to enable data to be more effectively analyzed. For example, you might change the order of items in a hierarchy.
To create or edit a Warehouse Domain Hierarchy:
In the Domain mappings list, select the Domain Mapping that you want to edit.
Use the options at the top of the Domain Mapping list to change the hierarchy.
To maintain data integrity in Oracle Business Intelligence Applications, some domains have been designed as non-extensible, and are therefore read-only.
If a domain is non-extensible, then when the domain is selected, the following options are either disabled or not displayed: the Edit Domain Member Mappings icon, the Add Range Member Mapping (+) icon, the Add Warehouse Member button. For more information about icons, see Section 5.8.3, "About the Icons".
Data Load Parameters are configuration values that specify how Source System data is loaded into the Data Warehouse. For example, the cost time grain parameter COST_TIME_GRAIN specifies how costs are aggregated (for example, WEEKLY, MONTHLY, QUARTERLY) during the data loading process.
Data Load Parameters can be either Global or Application Specific.
Global or Application Specific parameters are displayed differently in the user interface, and have different editing capabilities.
Data Load Parameters are either specific to the Business Analytics Warehouse or to a Source Instance. If there is more than one Source Instance (not supported in the BI Applications 11.1.1.5.0 release), then a parameters which is Source Instance specific will occur as many times as there are Source Instances defined, and the parameter has values that are specific to its particular source. There is only one occurrence of a parameter which is specific to the Business Analytics Warehouse.
You edit Data Load Parameters using the "Manage Data Load Parameters dialog", which is displayed in FSM when you edit a Data Load Parameter (see screenshot below).
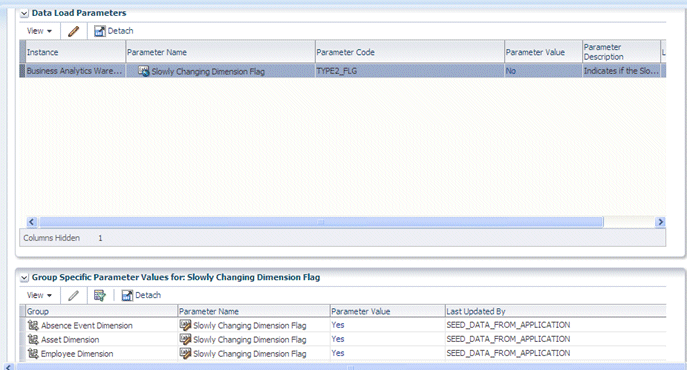
To display the "Manage Data Load Parameters dialog" in Oracle BI Applications Configuration Manager, select the Manage Data Load Parameters link on the Tasks bar.
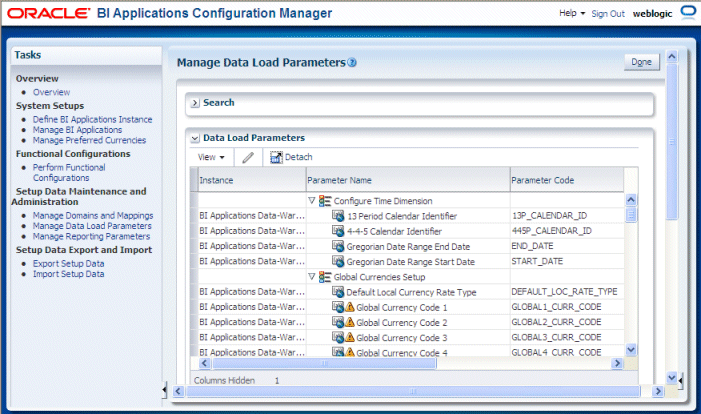
A Global Data Load Parameter applies to all ETL Tasks or a large number of tasks. Global Parameters are indicated on the UI by the Global parameter icon: ![]()
Global Parameters can be associated with Fact Groups or Dimension Groups. The parameters that are associated with Fact Groups or Dimension Groups are displayed in the detail table named Group Specific Parameter Values for: <Name of Parameter selected in the master table>. The detail table displays the name of the Fact Group or Dimension Group to which the group-specific parameter applies. Parameters at the group level have the same name as the parent Data Load Parameter.
For example, the parameter with name Slowly Changing Dimension Flag is a Global Parameter that is associated with Dimension Groups Absence Event Dimension, Asset Dimension, Employee Dimension, and so on.

A Global Parameter that is associated with Fact Groups or Dimension Groups can have a value at the Group level that is different from the value that is set for the Parameter in the master table named Data Load Parameters.
Note: Not all Global Parameters are associated with Fact Groups or Dimension Groups. Parameters that are not associated with Fact Groups or Dimension Groups have no records in the Group Specific Parameter Values for detail table.
To edit the value of a Global Parameter, select the record for the Global Parameter in the Data Load Parameters master table, and then click on either the Edit icon in the table toolbar or click on the link in the Parameter Value column.
If the Global Parameter is associated with Fact Groups or Dimension Groups, then a warning message is displayed to verify that you want to updates the value at a global level for all occurrences of the parameter at Group level. If you click Yes at the warning message, then the values of all occurrences of the parameter at the Group level will be updated to the new value.
For example, if you click the Edit icon or the link in the Parameter Value column for the parameter Slowly Changing Dimension Flag (TYPE2_FLG) in the Data Load Parameters master table, then the following Warning dialog is received:
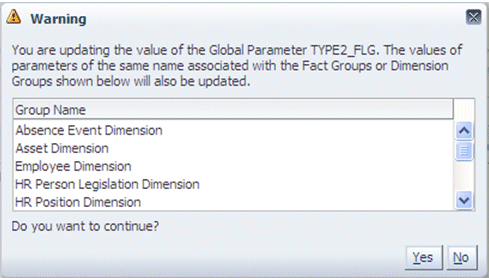
Clicking Yes allows you to continue with the edit of the parameter value. A change to the parameter value is applied to all parameter occurrences at the Group level.
A Global Parameter that is associated with Fact Groups or Dimension Groups can have a value at the Group level that is different from the value that is set for the Parameter in the master table titled Data Load Parameters. To change the value of parameter for a specific Fact Group or Dimension Group, select the Global Parameter in the Data Load Parameters master table, and then select the parameter in the Group Specific Parameter Values for: <Parameter Name> detail table for the desired Fact Group or Dimension Group. Click on the Edit icon in the table tool bar or the link in the Parameter Value column to open the Parameter Value Edit dialog.
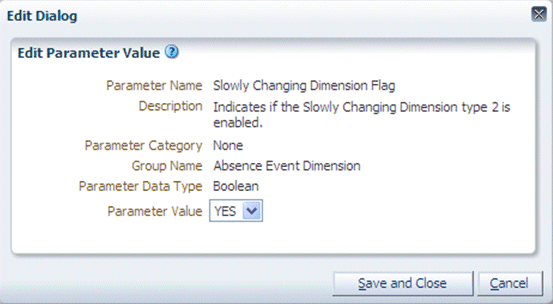
Changing the parameter value in the above Edit Dialog updates the parameter value for the Slowly Changing Dimension Flag parameter associated with the Absence Event Dimension Group.
An Application Specific Parameter applies to one or more BI Applications and to only a few ETL Tasks. Application Specific Parameters are indicated on the UI by the icon: ![]()
Examples: Cost Time Grain (Project Analytics), Workforce Snapshot Date (HR Analytics)
Application Specific Parameters are always associated with Fact Groups or Dimension Groups and are displayed in the detail table named Group Specific Parameter Values for: <Name of Parameter selected in the master table> in the user interface.
The detail table displays the name of the Fact Groups or Dimension Groups that the group-specific parameter applies to, and the value of the parameters.
Application Specific Parameters are of two types: Overridable Application Specific and Non-Overridable Application Specific Parameters, as follows:
Overridable Application Specific Parameters are those parameters whose values can differ for each parameter of the same name associated with a Fact Group or Dimension Group. Overridable Application Specific Parameters are indicated on the user interface in the detail table titled Group Specific Parameter Values for: <Name of Parameter selected in the master table> by the following icon:
An example of an Overridable Application Specific Parameter is Aggregate Table Grain.
Non-Overridable Application Specific Parameters are those parameters whose values cannot differ for each parameter of the same name associated with a Fact Group or Dimension Group. All occurrences of the parameter at the Group level must have the same parameter value. Non-Overridable Application Specific Parameters are indicated on the user interface in the detail table titled Group Specific Parameter Values for: <Name of Parameter selected in the master table> by the following icon: ![]()
An example of a Non-Overridable Application Specific Parameter is Enterprise List. This parameter is associated with multiple Fact Groups and Dimension Groups. The value of this parameter must be the same for all occurrences of the parameter at the Group level.
The values of Application Specific Parameters are only displayed in the Group Specific Parameter Values for: < Parameter> detail table, and are not displayed in the Data Load Parameter master table. Instead a link text <Edit Value> is displayed in the Parameter Value column of the master table. This allows you to edit the values of Application Specific Parameters for all occurrences of the parameter at the Group level from the master Data Load Parameter tables.
To edit Non-Overridable Application Specific Parameters, select the parameter record in the Data Load Parameters table, and click on the Edit icon in the table toolbar or the link <Edit Value> in the Parameter Value column.
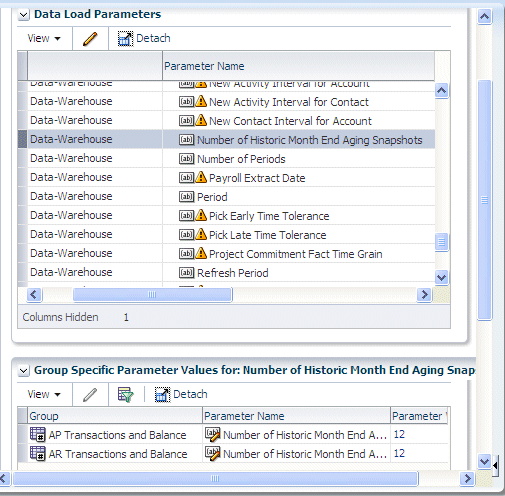
A warning message is displayed indicating that you are editing the value for all occurrences of the parameter at the Fact Group or Dimension Group level. Click Yes to continue to the Parameter Value Edit dialog.
The value of an Overridable Application Specific Parameter is also edited in a similar manner. Doing so edits the values for all occurrences of the parameter at Group level. A warning dialog is displayed to indicate that the values of all occurrences of the parameter at the Fact Group or Dimension Group level will be updated to the new value.
To change the value of an Overridable Application Specific Parameter for a specific Fact Group or Dimension Group, select the parameter in the Data Load Parameters master table and then select the parameter record in the Group Specific Parameter Values for: <Parameter Name> detail table for the desired Fact Group or Dimension Group. Click on the Edit icon in the table tool bar or the link in the Parameter Value column to open the Parameter Value Edit dialog.
Note: The Edit icon and the Parameter Value link are disabled in the Group Specific Parameter Values for: <Parameter Name> detail table for Non-Overridable Parameters.
To edit a Data Load Parameter:
Select the parameter in the Data Load Parameters list.
If the parameter is a Global parameter, then the Parameter Value field displays the actual value (for example, 'MONTHLY').
If the parameter is a non-Global parameter, then the Parameter Value field displays '<Edit Value>').
Do one of the following:
To update a Global parameter, in the Data Load Parameters list click the value displayed in the Parameter Value field to display the Edit Parameter Value dialog, and edit the value. Alternatively, select the row and click the Edit icon.
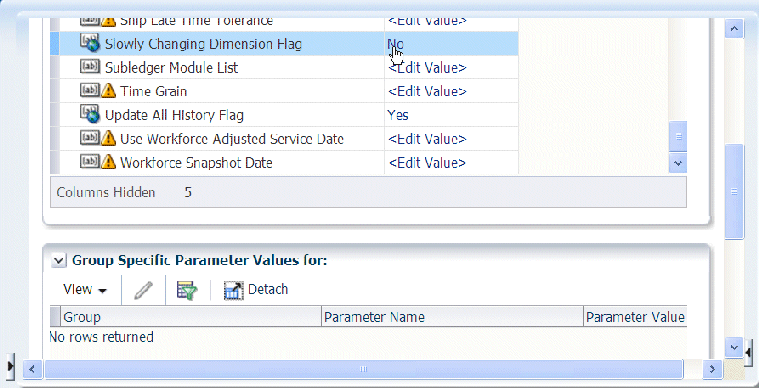
To update an Application-Specific parameter, in the Data Load Parameters list click <Edit Value> in the Parameter Value field to display the Edit Parameter Value dialog, and edit the value. Alternatively, select the row and click the Edit icon.
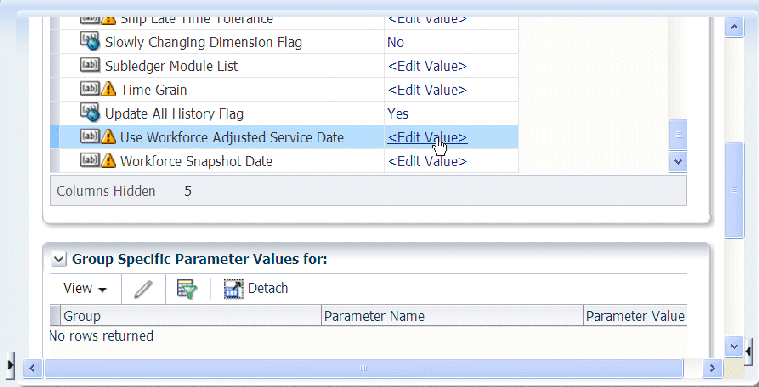
If a parameter is overridable at the Fact Group or Dimension Group level, edit the value displayed in the Group Specific Parameter Values for: list in the bottom pane. Alternatively, select the row and click the Edit icon. Note: If the Edit icon or parameter value is greyed out, then the value is non-overridable.
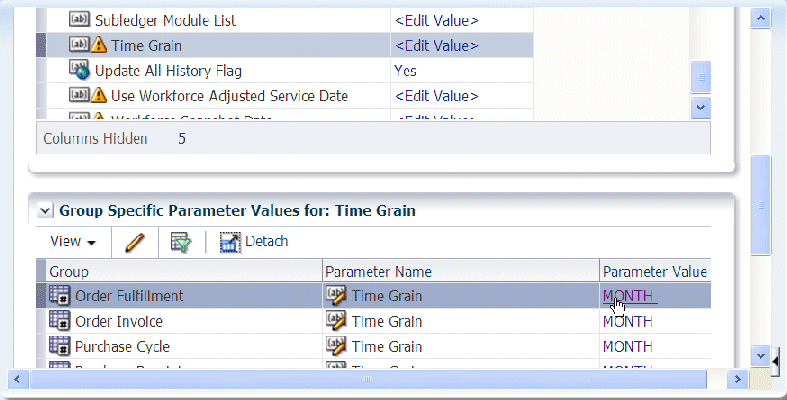
Reporting Parameters are configuration values that specify how data is presented in Business Intelligence dashboards.
There are two categories of Reporting Parameter:
Global, which apply to all Offerings. These are displayed on the Global tab.
Application Specific, which apply to one or more Offering. These are displayed on the Application Specific tab.
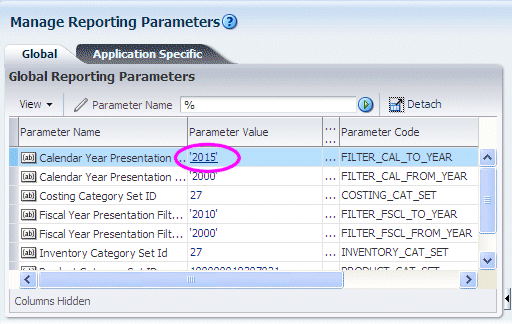
You manage and edit Reporting Parameters using the "Manage Reporting Parameters: Global/Application Specific tab" (see screenshot below).

To display the "Manage Reporting Parameters: Global/Application Specific tab" in Oracle BI Applications Configuration Manager, select the Manage Reporting Parameters link on the Tasks bar.
You monitor Setup Data to ensure that your Offerings are being correctly configured. For example, you might use the Alerts area on the Overview page to check for unmapped domain values.
You can monitor set up data in the following ways:
In Configuration Manager, you can monitor the status of the underlying set up data values, as follows:
Use the pages and tabs in the Setup Data Maintenance and Administration area on the Tasks bar.
From the Tasks bar, select one of the links in the Setup Data Maintenance and Administration area. For example, select the Data Load Parameters link to display the Data Load Parameters page.

Use the Alerts pane on the Overview page.
Display the Overview page, and view the Alerts pane.
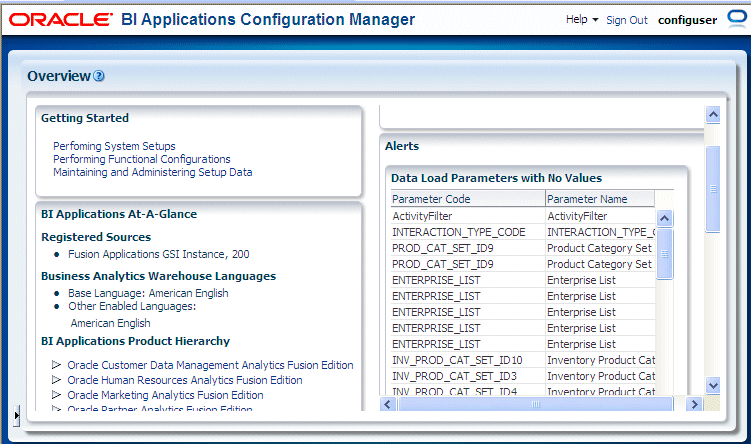
If you need to make configuration changes after an Implementation Project has been completed in FSM, you can use Oracle BI Applications Configuration Manager to update your parameter values. To change setup data values, you use the options in the Setup Data Maintenance and Administration area on the Tasks bar.
To change configuration values using Oracle BI Applications Configuration Manager:
In Oracle BI Applications Configuration Manager, use options in the Setup Data Maintenance and Administration area on the Tasks bar as follows:
To make changes to domain mappings, select Manage Domains and Mappings and display the tab for the domain type that you want to edit. To edit a Domain Mapping, select a domain in the Domain Mapping list and click the Edit icon in the Domain Member Mappings area.

To make changes to data load parameters, select Manage Data Load Parameters and use the Search area to locate the parameters that you want to edit. To edit the value of a Data Load Parameter, click the value in the Parameter Value column (or select the row then click the Edit icon) to display the "Edit Parameter Value dialog (for Data Load Parameters)".
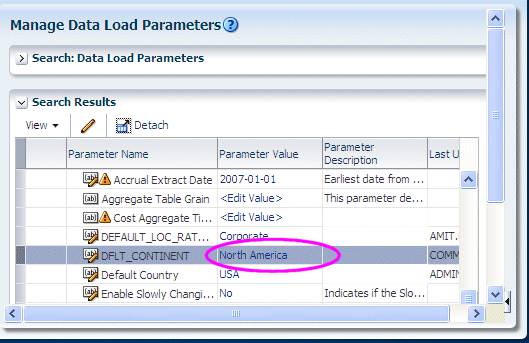
To make changes to reporting parameters, select Manage Reporting Parameters and display the tab for the area that you want to edit. To edit the value of a Reporting Parameter, click the value in the Parameter Value column (or select the row then click the Edit icon) to display the "Edit Parameter Value dialog (for Reporting Parameters)".
Tip:
For information about locating unmapped domain values, see Section 7.9, "How to Locate Unmapped Domain Values in Oracle BI Applications Configuration Manager".You locate unmapped Domain Values to enable you to make sure that you have mapped all of your source system domain values.
Tip: You can also use the Alerts area on the Overview page in Oracle BI Applications Configuration Manager to identify unmapped Domain values.
How to locate unmapped domain values:
Start Oracle BI Applications Configuration Manager.
Do one of the following:
From the Tasks bar, select Manage Domains and Mappings to display the Manage Domains and Mappings dialog.
Display the "Manage Domains and Mappings: Domain Mappings tab".
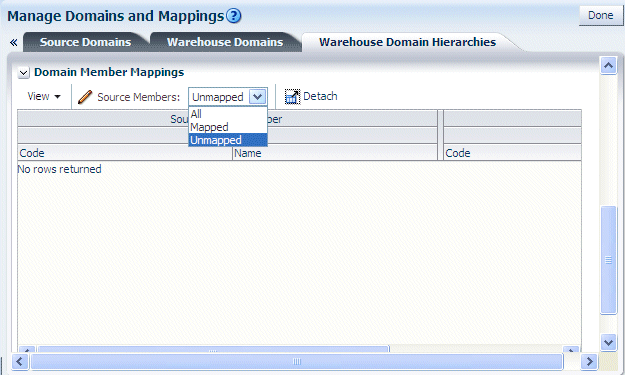
In the Domain Member Mappings area, select Unmapped from the Source Members list.
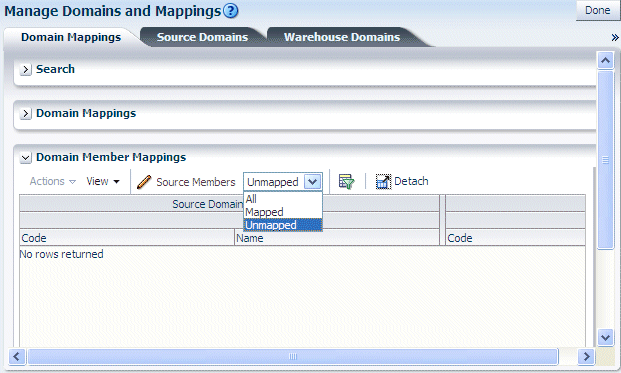
From the Tasks bar, select Manage Domains and Mappings to display the Manage Domains and Mappings dialog.
Display the "Manage Domains and Mappings: Warehouse Domain Hierarchies tab".
In the Domain Member Mappings area, select Unmapped from the Source Members list.
You add Target Domain Members to extend the target Data Warehouse. For example, you might want to create a new salary category called 'Range 5' so that you can map salary values to this new category.
You add a target domain member to extend your target Data Warehouse.
To add a Target Domain Member:
Display the Warehouse Domains tab.
In FSM, the Warehouse Domain tab is displayed when you perform a Task that edits a Warehouse Domain value.
In Oracle BI Applications Configuration Manager, from the Tasks bar, select Manage Domains and Mappings to display the Manage Domains and Mappings dialog.
In the Warehouse Members area, click Add Warehouse Domain Member, to display the "Add Warehouse Domain Member/Add Target Domain Member dialog".
Use the "Add Warehouse Domain Member/Add Target Domain Member dialog" to specify the details.
Click OK to save the details and close the dialog.
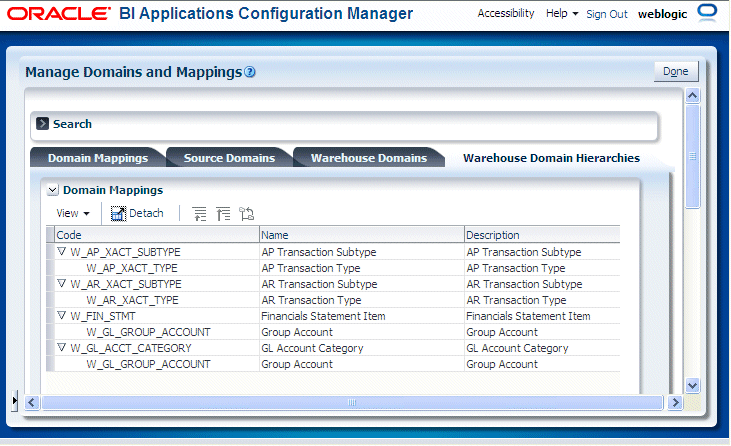
To view Domain Hierarchies, select the Manage Domains and Mappings link on the Tasks bar, then display the Warehouse Domain Hierarchies tab.
Notes
Domain Hierarchies are displayed in inverted format, that is in the following format:
<Child 1>\
<Child n>\
<Parent>.
For example, in the screenshot above, the child node AP Transaction Subtype is shown above and to the left of the parent node AP Transaction Type.
Domain Hierarchies are read-only. However, you can change the domain mappings.
For field level help for the Warehouse Domains Hierarchies dialog, see Section C.21, "Manage Domains and Mappings: Warehouse Domain Hierarchies tab".
You export and import Setup Data for Oracle BI Applications Configuration Manager to:
make a backup of your configuration settings for security purposes. For example, to keep a record of the configuration changes that you have made.
migrate the Setup Data for Oracle BI Applications Configuration Manager from one environment to another environment. For example, to move the configuration changes that you have made from Test to Production.
When you export Setup Data, you export the changes that you have made to the values of the following objects:
Data Load Parameters
Domains and Mappings
Reporting Parameters
Unchanged configuration values are not exported. In other words, if you only change the value of DEFAULT_CURRENCY from USD to Euro and then you export your data, then the export ZIP file that is produced will only contain columns for 'DEFAULT_CURRENCY=Euro'.
Note: Other Oracle BI Applications Configuration Manager data (for example, Source System configuration settings, Target Data Warehouse configuration settings) is not included in export files. In other words, before you import on the target system, you must first re-specify the Source System and Target Data Warehouse.
When you import Setup Data from a ZIP file, you import whatever configuration changes were exported to that ZIP file. For example, if you first export only Reporting Parameters to a ZIP file, you import only the changes that were made to Reporting Parameters.
To migrate Setup Data, you do the following:
In the source environment, export the Oracle BI Applications Configuration Manager Setup Data as a ZIP file. For more information about exporting Setup Data, see Section 7.12.5, "How to Export Setup Data".
Copy the ZIP file from the source environment to the target environment.
In the target environment, import the Oracle BI Applications Configuration Manager Setup Data from the ZIP file. For more information about importing Setup Data, see Section 7.12.6, "How to Import Setup Data".
Note: The data source number in the target system must be the same as the data source number in the source system.
To back-up Setup Data, you do the following:
In the source environment, export the Oracle BI Applications Configuration Manager Setup Data as a ZIP file. For more information about exporting Setup Data, see Section 7.12.5, "How to Export Setup Data".
Store the ZIP file in a secure location.
In the target environment, make sure that you have installed Oracle BI Applications Configuration Manager, which installs the out-of-the-box setup data. Note: The data source number in the target system must be the same as the data source number in the source system.
To restore the backed-up data, you import the Oracle BI Applications Configuration Manager Setup Data from the ZIP file. For more information about importing Setup Data, see Section 7.12.6, "How to Import Setup Data".
You export Setup Data to back-up or migrate a Oracle BI Applications Configuration Manager environment.
To export Setup Data:
In the source environment, start Oracle BI Applications Configuration Manager.
From the Tasks bar, select Export Setup Data to display the "Export Setup Data dialog".
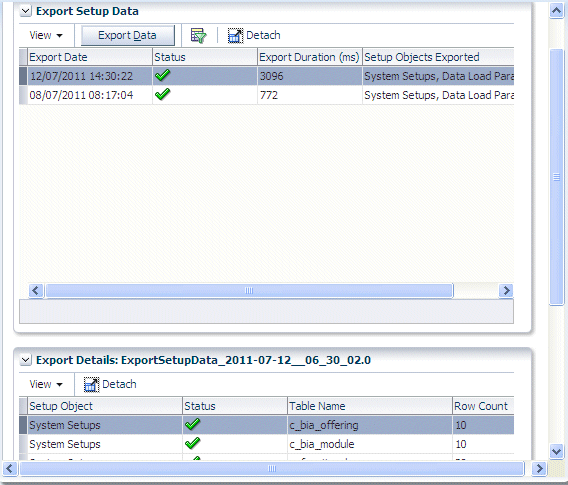
Click Export Data to display the "Export Data dialog".
Use the "Export Data dialog" to specify the setup objects that you want to export.
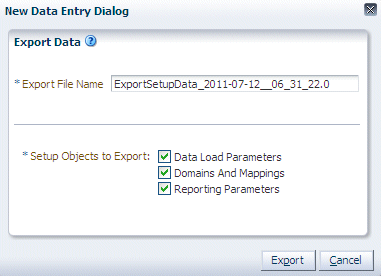
Click Export.
When the File Download dialog is displayed, click Save to save the ZIP file to a location that you specify.
If you first click Open at the File Download dialog to open the ZIP file, then make sure that you save the ZIP file in the ZIP program that you are using.
The Export Setup Data table is updated with the export details.
You import Setup Data to restore or migrate Setup Data. Before you import Setup Data, you must copy the previously exported ZIP file to a file location that is accessible from the machine that is running the Oracle BI Applications Configuration Manager client.
Note: When you import Setup Data, the data source number in the target system must be the same as the data source number in the source system.
To import Setup Data:
In the source environment, start Oracle BI Applications Configuration Manager.
From the Tasks bar, select Import Setup Data to display the "Import Setup Data dialog".
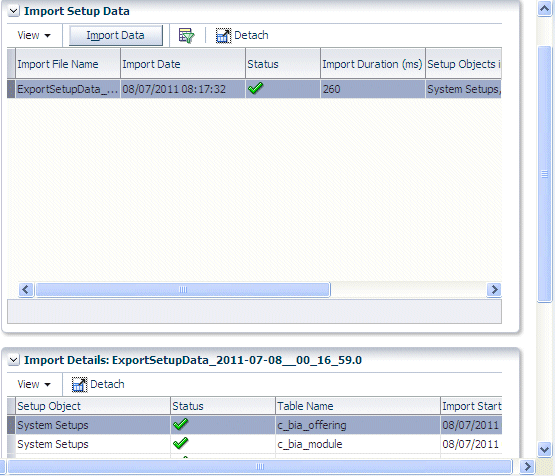
Click Import Data to display the "Import Data dialog".
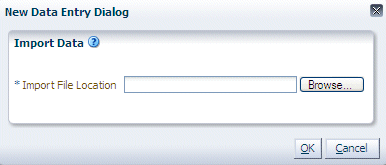
Use the "Import Data dialog" to specify the location and name of the ZIP file that contains the configuration changes that you want to import.
Click OK.
The Setup Data is imported from the ZIP file, and the Import table is updated with the details.