11g Release 1 (11.1.1.5.0)
Part Number E20386-01
Contents
Previous
Next
|
Oracle® Fusion
Applications Order Orchestration Implementation Guide 11g Release 1 (11.1.1.5.0) Part Number E20386-01 |
Contents |
Previous |
Next |
This chapter contains the following:
Define Catalogs: Create Catalogs
Define Catalogs: Manage Catalogs
Manage Customers: Define Source Systems
Define Common SCM Configuration: Manage SCM Common Customers
You can import items and item-related information using interface tables. This import data is loaded into the production tables using the Import Item task in Functional Setup Manager.
The Import Item task in Functional Setup Manager creates an Enterprise Storage Server (ESS) process that takes the data that is loaded in the interface tables and uses the import process to move the data to the production tables. The import processes will perform all of the validations necessary to ensure the data imported is correct prior to moving the data into the production tables.
Access the Enterprise Storage Server and provide a process name (job definition) such as Item Import Process.
In Functional Setup Manager, access the All Tasks tab on the Overview page, and search for the Import Item task with the name of your ESS process definition, then click the Go to Task icon in the search results for that Import Item task.
The parameters for the item import process are
Batch ID: Associate the interface table to an item batch definition.
Organization: Select an organization to be used for the import.
Process Only: Determines how the data is processed. The choices are:
Create
Sync
Update
Process All Organizations: Select Yes if the import contains items that will be imported to multiple organizations.
Delete Processed Rows: Select Yes to delete rows that are imported without errors
Click Submit and the Request Number will be displayed.
Access Monitor Item Imports in Functional Setup Manager to search for specific Enterprise Storage Server processes and monitor their status in the search results table.
A catalog is a collection of categories that you use to classify items. You can organize the categories into a hierarchy the represents a taxonomy. You create new categories only in the context of a catalog. You can add existing categories to one or more catalogs, either from another catalog or as shared categories from a source catalog.
You can set the Catalog Content value to Items at all levels which allows items to be assigned to any level within the category hierarchy, not only to the leaf levels.
The following diagram shows the relationships of the catalog components.
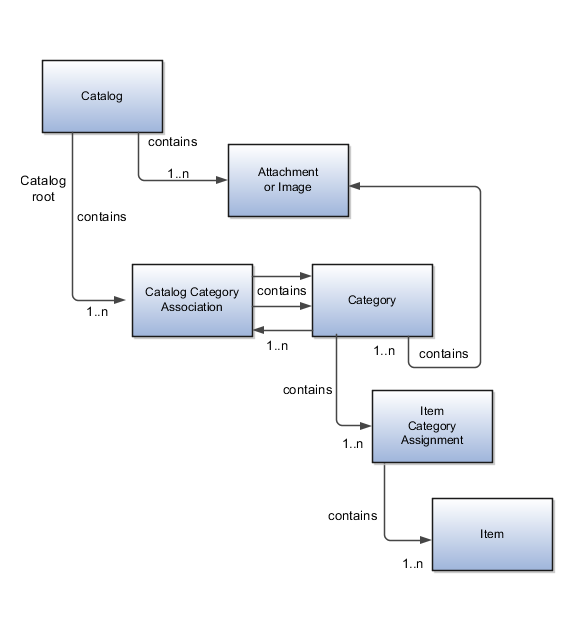
A catalog is a collection of categories that are organized to define a classification of items. The top most level of a catalog is the catalog root. All categories for the first level in the category hierarchy are associated with the catalog root through the catalog category association component.
A category is a component of a catalog that represents a portion of the classification defined by the categories and category hierarchy in the catalog. You can associate a category to a catalog through the catalog category association. Both the shared category and the native category are associated thorough the catalog category association.
Catalog category association represents the relationship between a catalog and a category, or a parent category and a child category. Each catalog category association represents one relationship between the catalog and a category or one relationship between a parent category and a child category.
Item category assignment represents the assignment of the item to a category in a catalog. Each item category assignment represents the relationship between a category and an item.
An item represents objects such as a product, service or template. An item is assigned through the item category assignment component.
Information is associated to the catalog and/or category, or both, through the attachment framework. Multiple attachments are supported but you can associate only a single attachment or attachment type image with a catalog or category.
The format of a catalog is defined at the time the catalog is created and controls the behavior of the catalog at runtime.
When you format a catalog the layout controls three main areas and includes the following tasks, some fields are required, and others are optional.
Catalog configuration
Date enablement
Category sharing
You can configure the catalog, and this affects how the content behaves. The catalog configuration contains a set of attributes that define the catalog configuration. These attributes interact to define the runtime behavior of the catalog.
The configuration functions are:
Catalog code: A unique identifier that is used.
Catalog structure: The key flexfield structure used to define the catalog.
Controlled at: Controls how items are assigned to categories and has two values. The first value is master level, which enables the automatic assignment of items to all child organizations associated with the master organization, if the current context is a master organization. The second value is organization level, which assigns the item only to the organization in the current context.
Default category: Applies any time a new item is created. The newly created item is assigned to this category within the catalog automatically. The automatic assigned is controlled by the functional area.
Catalog content: Controls what content can be added to the catalog and where the content can be added. This attribute has three values:
The Item at leaf levels allows items to be added only to the bottom level categories in the hierarchy.
The Items at all levels allows items to be assigned to any category in the hierarchy regardless of level.
Categories only allows categories to be added only to the catalog.
Allow multiple item category assignment: When this option is selected, you can assign an item to one or more categories in the catalog. The default is deselected, which means that each item can be assigned to only one category in the catalog.
Enable hierarchies for categories: When this option is selected, you can create a hierarchy for the catalog. The default is deselected, which means that the catalog cannot have a hierarchy and categories are associated with the catalog root.
Enable automatic assignment of categories: When this option is selected, the catalog is built by automatically associating all categories, based on matching the catalog structure value to the category structure value.
The date enablement function controls when the catalog is in an active state or inactive state by using the start date and end date attributes.
The category sharing function enables sharing by reference to categories from a designated source catalog.
The sharing function has these attributes:
Source catalog: A catalog that does not have sharing enabled from which categories, category hierarchies, and assigned items can be added to the catalog.
Sharing content: Controls what content can be added from the source catalog. This attribute has three values:
Categories only: Only categories without assigned items can be shared.
Items only: Only categories with assigned items can be shared.
Items and categories: All categories can be shared.
You can change a default category so that you can use it for item creation, or modify the inactive date so that the category is no longer used as you update a catalog. You can correct mistakes or reclassify the category due to shifting relationships within the category hierarchy.
You can view and edit a catalog on the Edit Catalog page when you have editing rights. For users that do not have rights to edit, the page is in read only mode.
The following aspects are important regarding managing and editing catalog details:
Catalog header region
Catalog detail tab
Category hierarchy tab
This region contains the catalog name and description, the selection of the default category and the start and end date for the catalog.
The Detail tab contains:
The configuration attributes for the catalog that controls the runtime behavior for the catalog.
The sharing attributes for the catalog which controls the source catalog that will be used for sharing from and what content can be shared.
The additional information which contains the descriptive flexfields defined for the catalog.
This contains the category hierarchy region in which the category hierarchy can be created and maintained. In addition, items can be assigned, and the usage of the category in other catalog can be viewed, and the attributes for the category and catalog category association can be edited.
The automatic assignment catalog feature enables you to reduce the cost of creating and maintaining a catalog. It is a simple way to create a nonhierarchical catalog because you do not have to add categories manually to the catalog.
All categories that have the same category structure value as the catalog are automatically assigned and associated to the catalog when you create a catalog category association for each category. Note that if you create a category in another catalog with the same structure value as the automatic assignment catalog, the category is added to your catalog. The categories displayed for auto assignment catalogs are refreshed only at startup and after you save.
The automatic assignment feature is enabled during catalog creation when you select the Enable automatic assignment of category check box. When you open a new catalog, any categories that have the same category structure value as the catalog structure value for the catalog are automatically assigned to the catalog.
For example, Purchasing may maintain a master catalog containing all categories that represent commodities. Each commodity team can create categories for their commodity in their own catalog.
The master catalog for Purchasing is named Purchasing and is configured during creation to support the automatic assignment of categories.
The Electronic commodity team creates a catalog named Electronics and proceeds to create categories that represent the classification of their commodity. The Electronic commodity team creates the categories televisions, computers, and home theaters.
The other commodity teams create and maintain separate catalogs.
Because you enabled automatic assignments for the Purchasing catalog, any categories created by the commodity teams are added to the catalog automatically. The Purchasing managers can view the collection of all commodities represented as categories in the Purchasing catalog.
The Edit Catalog dialog is a shared page that has two modes, view and update. The view mode displays the selected catalog in a read-only file. The update mode displays the selected catalog in an editable file. You must have edit catalog privileges to access the catalog in update mode. You can edit only an active or future-dated catalog.
The following fields are editable in the catalog:
Catalog Name
Description
Start Date
End Date
Default Category
Allow multiple item category assignment
Addition Information
Category Hierarchy
Category Details
Items assigned to category
You can edit this field to select another category as the default category for item creation. You cannot remove the default category if the catalog is assigned to a functional area that requires a default category to be specified.
This check box is editable only until you assign an item to a category in the catalog.
You can edit the values of the descriptive flexfields attributes.
After you make changes, clicking the Save button saves the changes to the database but will does not close the Edit Catalog page. Clicking the Save and Close button saves the changes to the database and closes the Edit Catalog page.
Catalogs are used to organize and classify collections of items by associating categories to the catalog. The categories are organized to form a taxonomy and items are assigned to the categories. When a category is associated with the catalog a catalog category association is created which specifies the relationship of the association. The catalog category association may also represent the relationship between two categories, for example a relationship between a parent category and a child category.
The following aspect is important regarding catalog category association:
Date enablement attribute value
The catalog category association is date enabled providing the control of when the catalog category association is active in the catalog and when the catalog category association is inactive. The catalog category association has two attributes to support date enablement; the start date and the end date. The start date is value is the first day that the catalog category association is available or active for use and the end date is the last day the catalog category association can be used, after this date the catalog category association is inactive. The date enablement attribute values are also used to control the visibility of content and the behavior of the category in the catalog. If a category association is inactive or end dated, having the value of the end date attribute past the current date, then the items cannot be assigned to the category.
A catalog category association will be set to inactive state when the category referenced by the catalog category association is set to an inactive state automatically, but the display will not be refreshed automatically.
The catalog, categories, and catalog category association use date enablement to determine if the object specified is active or inactive based on the start date and end date. The following are date enablement definitions:
Active An object is active when the current date is later than or equal to the value of the start date, but earlier than or equal to value of the end date.
Inactive An object is inactive when the current date is later than the value of the end date.
Future dated An object is future dated when the current date is earlier than the value of the start date.
You set the date enablement attributes are used to determine when a catalog, category, or catalog category association is used or visible.
On the Manage Catalog page, a table filter determines which catalogs appear. The default value for the choice list is Active, indicating that only active catalogs will be displayed. You can select the value All to view both active and inactive catalogs.
On the Edit Catalog page, on the category hierarchy tab, two table filters determine what categories and catalog category associations appear. The default values for the two choice lists are Active, indicating that only active categories and active catalog category associations will be displayed. You can select the value All to view both active and inactive categories and catalog categories associations.
Other applications also use the date enablement attributes to filter information retrieved through application programming interfaces or services for catalogs.
The following illustration provides the date enablement attributes for these objects. The catalog, category, or the catalog category association has an internal state that is active or inactive.
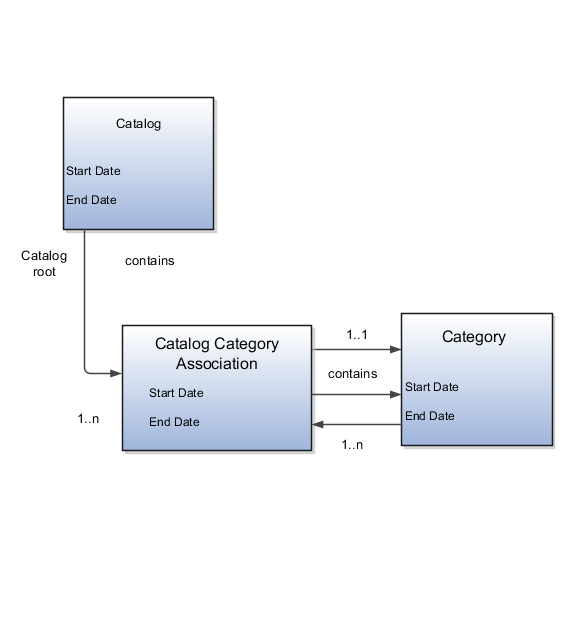
The following aspects are important regarding date enablement for catalogs and categories:
Start date
End date
Catalog and category objects
Catalog category association
Catalog and category rules
The start date is defined as the first date that the object can be active. The start date can be future dated by setting the value to a date later than the current date. The start date value defaults to the system date if no date is entered during catalog or category creation.
The end date is defined as the last date that the object can be active. The object is end dated one second after the date specified by the value of End Date, that is the next day at 12:00:01 a.m. You cannot set the end date in the past. Also, you can change the end date from a condition when the object is ended to a new end date greater than or equal to the system date, causing the object to go from inactive to active. The end date value is optional during catalog or category creation.
The start and end dates have been added for the catalog and catalog category association. The inactive date for categories has been renamed as the end date and the start date has been added.
The catalog category association is used to specify the parent and child relationships between catalogs and categories and for category to category relationships. The catalog category association date enablement is independent of the category data enablement, except for the case where the category is end dated; the association is ended automatically as well. The catalog category association dates represents the state of the category for the catalog in which the category is associated.
When a catalog is inactive the following rules apply:
All operations for the catalog are disabled; the catalog is not editable.
The catalog cannot be used in other processes.
The catalog can be viewed only if you set filters on the Manage Catalog page to a value of All, enabling you to view active and inactive catalogs.
When a category is inactive the following rules apply:
All operations for the category are disabled; the category is not editable.
The category cannot be added to other catalogs.
The category can be viewed only if you set the filters on the Edit Catalog page to a value of All, enabling you to view active and inactive catalogs.
The system sets the catalog category association for the inactive category to inactive.
When a catalog category association is inactive the following rules apply:
The category may be inactive or active; if the category is active it can be edited.
The catalog category associations and related category can be viewed only if you set the association filter on the Edit Catalog page to a value of All, enabling you to view active and inactive catalogs.
When a catalog is future dated the following rules apply:
All the operations of the catalog are enabled and the catalog is editable.
The catalog can be used in other processes, if allowed.
The catalog can be viewed only if the you set the filters on the Manage Catalog page to value of All.
You use catalogs to organize and classify collections of items by associating categories with the catalog. You organize the categories to form a taxonomy and assign items to the categories. When you associate a category with the catalog, a catalog category association is created which specifies the relationship of the association. The catalog category association may also represent the relationship between two categories, for example, a relationship between a parent category and a child category.
The following diagram shows the relationships of the category hierarchy components:
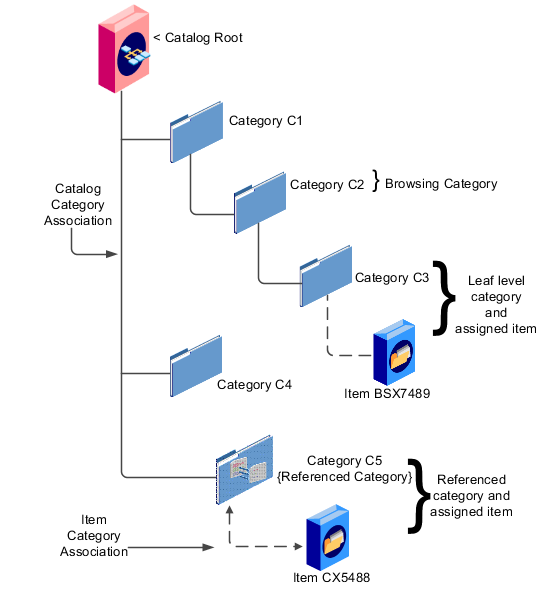
The components of a category hierarchy are:
Catalog root: The topmost node in category hierarchy that represents the object called catalog.
Category: The catalog component that is used to represent the classification structure.
Catalog category association: The line in the diagram represents the relationship between a catalog and category or between a parent category and child category.
Item category assignment: The dotted line in the dialog represents the relationship between a category and an item.
Reference category: The category C5 in this diagram is shared as a reference category from a source catalog.
Leaf level category: The lowest or bottom-level category in a category hierarchy. You can assign items to all levels in a category hierarchy if you configure the catalog to support this.
Browsing category: The category C2 in this diagram is a browsing category. Browsing categories are categories that you add to the category hierarchy for the purpose of classification and do not have items assigned to them.
The category hierarchy does not have a limit on how many levels can be represented. The category hierarchy can have multiple hierarchies within a single category hierarchy.
Categories can be edited only from within an Edit Catalog page, the category hierarchy tab. The category can be edited by selecting row for the category in the category hierarchy table and editing the category information in the category detail panel. The category can only be edited if the category is active and the catalog is active or future dated.
The category information can be edited in both the details and items tabs.
The following fields are editable in the category:
Category name
Description
Attachments
Category start date
Category end date
Items assigned to category
After changes are made the Save button will save the changes to the database but will not close the Edit Catalog page. The Save and Close button will save the changes to the database and close the Edit Catalog page.
The catalog category association can be edited only within the Edit Catalog page, in the category hierarchy tab. The catalog category association start date and end date attributes can be edited in the details region.
You select the category in the category hierarchy table for the catalog category association that is being edited, the category details are displayed in the right hand panel. The association start date and association end date are the only editable fields.
After completing the edits, click on the Save button to save your changes to the database, the Edit Catalog page will not close. The Save and Close button will save the changes to the database and close the Edit Catalog page.
You can update category details when you select the row with the category in the category hierarchy table, the category details are displayed in the right hand panel in the user interface in an edit mode for all native categories. The category detail region contains information about the category that is associated to the catalog. It also contains the association start and end dates.
You can view and edit a catalog on the category details tab when you have editing rights. For users that do not have rights to edit, the page is in read only mode.
The following aspects are important regarding managing and editing category details:
Category details tab
Items tab
Where used tab
The details tab contains information about the category that has been associated to the catalog. This information appears in all catalogs, since a category can be associated to one or more catalogs. The details tab contains the category configuration, category date enablement, association date enablement, and the additional attributes for the category.
The details tab contains attributes that define a category. Unstructured information is added through attachments. Images are added to a category and are displayed in the category details tab.
The item assignments are specific to the catalog where the category is associated.
The Where used tab contains a list of catalogs that the category is associated with.
You can create categories only in the context of a catalog, on the Edit Catalog page, Category hierarchy tab. When you select the Create icon in the category hierarchy table, it launches the Create Category dialog.
Consider the following important aspects when creating categories for catalogs:
Create category region
Configuration region
Date enablement region
Additional information region
Enter a name and a meaningful description of the category in the create category region. Optionally, you can add an image and an attachment to this category.
The key flexfield is determined during creation based on the catalog structure of the catalog. Enter the key flexfield segment values for the category. The number of key flexfield segment values depends on how you define the key flexfield at setup time. The category structure is the key flexfield structure instance that you create as part of the setup. When you define the key flexfield structure instance, you define the segments for the structure instance. For example, the family group and class group are segments. The segments appear in the Create Category dialog based on the key flexfield structure instance that you select.
The default value of the category content selection value is Items and Categories, but you can change the value. The values in the category content choice list vary based on the catalog content value.
The category content attribute value controls the content that you can add to this category.
Items Only: Select to add only items to the category
Categories Only: Select to add only categories to the category
Items and Categories: Select to add both items and categories to the category
Date enablement determines if an object is active or inactive based on the start date and end date. When categories are created, the default start date value is the current date. You can move the category start date beyond the current date to a future date within the category. The end date value is optional.
The additional information region contains all descriptive flexfield attributes that you set up for categories. You can edit the values of the descriptive flexfield attributes at the time of category creation.
After you complete the required fields for the catalog, clicking OK creates the category in the database, adds the category to the point of selection in the category hierarchy, and closes the dialog.
You use the move category function in the category tree table region of the Edit Catalog page. This is a table row action. The dialog is launched when you select an active or future dated category within the catalog and select this action. The move category function is disabled when the Enable hierarchies for categories check box is not checked or left unchecked.
Consider the following important aspects when moving categories within catalogs:
Indentifying the new parent
The dialog provides the current category parent and allows you to pick a new category parent. Only the legal category parents are displayed in the choice list.
The category list within the New Parent choice list is filtered by based on a set of rules:
The new parent category must be an active or future dated category; the end date value of the category must be later than the current system date.
The value of the category content for the new parent category must allow the selected category to be added; the legal values are items and categories and categories only.
A selected category associated with the catalog at a level below the categories at the root categories can be moved to the root of the catalog.
The new parent category catalog category association must be active; the end date value of the catalog category association must be later than the current system date.
Category hierarchy can be created and maintained through a spreadsheet interface reducing the amount of time to create and maintain catalogs. Existing catalog content can be exported and the content used in other catalogs for catalog category hierarchies.
The following aspects are important regarding category hierarchy import used in catalogs:
Spreadsheet interface
Export category hierarchy
You can manage the catalog category hierarchy to use the spreadsheet interface that is available in the Edit Catalog page by using the Export Hierarchy button to download existing catalog content, modify this content in a spreadsheet, and upload the content back into the Product Information Management application.
You use export category hierarchy for example, when you need to provide the category hierarchy to a partner. Your partner has the capability to import the catalog file using an Excel spreadsheet.
You can export the category hierarchy from our catalog and it can be used by partners. If your partner has the Oracle Product Information Management solution, they can directly import the category hierarchy into their catalog.
Catalogs and categories support attachments and use a common component for managing attachment content. You can add attachments on both the Create Catalog and Edit Catalog pages.
The attachment component displays a green plus sign icon indicating that no attachments are available for the object. The Attachment dialog appears when you click the green plus sign icon. You define the attachment by selecting the attachment type, file name or Uniform Resource Locator (URL), title, description, and by indicating whether the attachment can be shared with other objects. Once you define the attachments and click the OK button, that attachment title appears in the attachment component region of the page along with a red X icon that you can click to delete the attachment.
The attachment file types are:
File
Repository File/Folder
Text
URL
You must provide a title for the file and create a description for the attachment. You select a file to upload from your desktop.
You click the Browse button to attach a repository file/folder from the document repository to a catalog. The attachment repository contains existing attachments and is organized as a set of folders. The Browse button launches the Attachment Repository dialog to enable you to select an attachment. You must provide a title for the repository file/folder and create a description for the attachment.
Enter the text string in the field that you want to appear as an attachment. You must provide a title for the text and create a description for the text attachment.
Enter the URL address to a web page that you want to attach to the catalog. You must provide a title for the URL attachment and create a description for it.
The Share check box alerts users that you added an attachment and the date that you performed the task.
You can assign items to categories on the Edit Catalog page, category hierarchy tab, on the category detail item tab. You can assign items only to active categories and categories where the Category Content field value is Items and Categories or Items Only. In addition, you can configure catalogs to control item assignment to categories within the catalog by selecting the Allow multiple item category assignment check box, which allows items to be added to all levels of the category hierarchy.
You select items from a choice list and add them to the category. The choice list is filtered based on a set of rules:
Item data level security: Displays only the items that the user has permission to view and assign.
Organization context: Based on the organization context that is controlled by a choice list in the item table header, only the items assigned to organizations are displayed.
You also control item assignment by selecting the value of the Controlled at check box. If you select the Master Level value and the organization context is a master organization, the items are automatically assigned to all child organizations that are associated with the master organization.
Other applications can use catalog data if you export the catalog content. For example, you may want to export catalog content to use as a monthly report of all items assigned to a specific catalog. You can use the default publish template provided in hyper text markup language (HTML). You can specify the content and layout of the catalog information. When the catalog is published, you select the format and initiate the creation of the content in the file.
The following aspects are important regarding catalog data to be published:
Publish a catalog
Type of catalog content that can be published
You initiate a search for a catalog from the Manage Catalogs page, select the row corresponding to the catalog that you want to publish and select the Publish action. The application generates the report based on the default template in HTML format, and the locale prior to creation of the file. You can select a new template or format from the report window. The content displayed for items, categories, catalog categories, and catalog is based on the publish template.
The default catalog publish template allows the publication of the catalog header details, category hierarchy, category details, and category item assignments. The order of a published report begins with the catalog header and the catalog category details. If the category has a child relationship then the catalog category association details for the child category follows. If the child category has a hierarchy, then the complete hierarchy under the category is published with the catalog category association details and categories details.
Categories can be shared across multiple catalogs allowing catalog content to be reused and saving the work needed to maintain multiple copies of the categories. In the case of category sharing, the category structure in the source catalog can be different than the native catalog.
Categories can be shared using two methods; the first method is directly associating the category to the catalog. The category is added to the catalog and can be edited in the catalog or any catalog the category is associated to. The items assigned to the category are not shared, but are assigned to the category in context with the catalog the category is associated. For example if the category name or description is changed in one catalog, the change will be reflected in all catalogs where the category is associated, but if items are assigned to a category, the assignment will be for that single catalog.
The second method of sharing categories is adding a category by reference into the catalog. During the creation of the catalog, sharing can be enabled by specifying a single source catalog that will be used for sharing by reference and setting the value of the sharing content to control what content will be shared from the source catalog. The advantage of using sharing by reference is source catalog content can be shared to multiple catalogs and maintained in a single place, the source catalog. In addition, the referenced content can be more than one category, for example a complete category hierarchy and any assigned items to categories in shared content can also be reference within the catalog.
Categories can be organized to represent classification taxonomies. The hierarchy organizations for categories have parent and child relationships that form a tree structure. The category hierarchy is created and maintained within the Edit Catalog page, category hierarchy tab. The category hierarchy is shown in true relationship to the way it is defined.
The category hierarchy can be created using two methods: the first is manually creating the hierarchy by adding referenced categories, duplicating categories or creating category for the catalog.
The second method for creating the hierarchy is by importing the category hierarchy through the spreadsheet interface. The category hierarchy can be exported from other catalog or other sources, edited and imported into a new catalog, additionally it can be added manually to the spreadsheet.
The category hierarchy can be edited using Move Category. The catalog category association cannot be deleted, but can be end dated to make the catalog category association inactive. The category hierarchy table provides a choice list filter that controls what catalog category associations and categories area displayed based on the date enablement. The category hierarchy can also be edited by exporting the complete hierarchy, editing it and importing the category hierarchy back into the catalog.
You can select and duplicate a category as a quick way to create a similar category configuration. Selecting the Duplicate icon action launches a Create Category dialog that has attribute fields populated based on the selected category attribute values. The category name is prefixed with Copy_ followed by the name of the selected category. You fill in the required field information in the key flexfield segment values which are blank. Once the category attributes are updated and the key flexfield segments values are entered, the OK button adds the newly created category into the category hierarchy of the selected category you have configured.
Categories are catalog components that are associated to a catalog for purpose of classification of items. You can add existing categories to the point of selection which can be a category in the hierarchy or the root of the catalog. If no category is selected, the default is the root of the catalog.
You can add categories by selecting the Add Category field and selecting the value Add Category. You can then search for existing categories based on the value of the catalog structure for the catalog. You can narrow the search for existing categories by using the Advance Search region in the dialog. You can add each selected category by selecting the Apply button and the add category region remains open. The OK button adds a category if a category is selected and then closes the dialog.
Adding a shared category is similar to adding an existing category except the category is selected from the catalog that has been designated as a source catalog. The sharing content attribute value determines what content is shared from the source catalog. A category within a source catalog that has been added to a native catalog is also known as a referenced category. You use the drop list menu from the Add Categories menu, and the Shared Category option will be disabled if the catalog has not been configured for category sharing.
You can attach an image from your desktop or from a configured repository to a catalog or a category, or both. The image is displayed in the catalog detail and the category detail section of the catalog page. Only one image can be associated with a catalog or category. To attach an image, select the green plus icon to launch the Manage Attachment dialog. The image attachment type can have values of File or Repository File/Folder and is selected in this dialog. The title you provide for the image attachment will appear under the image that is displayed in the catalog. The description you provide is not displayed. Browse will allow you to select the file to be used as the image for the catalog or category. After the information is entered in to the dialog, you click the OK button to load the image and the image attachment title will be displayed under the image. The image will not initially be displayed until the catalog is saved. The image can be replaced with another image by selecting the red X to delete the existing image and entering a new image.
You use Catalog Category mapping to map categories of different catalogs to the reporting categories in other catalogs. This feature allows one or more categories within a catalog to be mapped to category in a second catalog. For example, suppose that you want to roll up the costs associated with allow items assigned to a set of categories in catalog. Catalog mapping allows you to select a category in a catalog, and map all the categories in the set to that category. When you use this feature you are required to write code to do the roll up as identified in the example.
You can map a catalog to be assigned to a functional area such as Purchasing. When a catalog is assigned to a functional area, the catalog will behave based on the rules you defined for that functional area. Only one catalog can be assigned to a functional area.
Define units of measure, unit of measure classes, and base units of measure for tracking, moving, storing, and counting items.
The Quantity unit of measure class contains the units of measure Box of 8, Box of 4, and Each. The unit of measure Each is assigned as the base unit of measure.
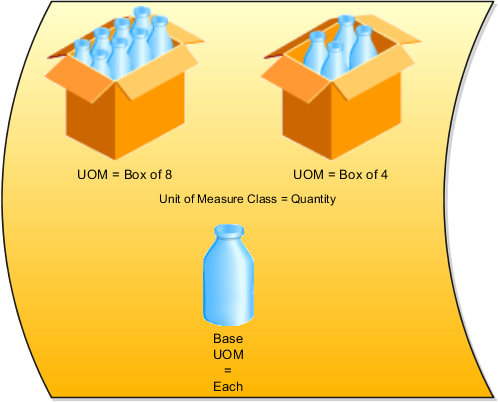
Unit of measure classes represent groups of units of measure with similar characteristics such as area, weight, or volume.
Units of measure are used by a variety of functions and transactions to express the quantity of items. Each unit of measure you define must belong to a unit of measure class.
Each unit of measure class has a base unit of measure. The base unit of measure is used to perform conversions between units of measure in the class. For this reason, the base unit of measure should be representative of the other units of measure in the class, and should generally be one of the smaller units. For example, you could use CU (cubic feet) as the base unit of measure for a unit of measure class called Volume.
Each unit of measure class must have a base unit of measure.
This table lists examples of unit of measure classes, the units of measure in each unit of measure class, and the unit of measure assigned as the base unit of measure for each unit of measure class. Note that each base unit of measure is the smallest unit of measure in its unit of measure class.
|
Unit of Measure Class |
Units of Measure |
Base Unit of Measure |
|---|---|---|
|
Quantity |
dozen box each |
each |
|
Weight |
pound kilogram gram |
gram |
|
Time |
hour minute second |
second |
|
Volume |
cubic feet cubic centimeters cubic inches |
cubic inches |
A unit of measure standard conversion specifies the conversion factor by which the unit of measure is equivalent to the base unit of measure.
This table lists examples of unit of measure classes, one unit of measure included in each class, the base unit of measure for the unit of measure class, and the conversion factor defined for the unit of measure.
|
Unit of Measure Class |
Unit of Measure |
Base Unit of Measure |
Conversion Factor |
|---|---|---|---|
|
Quantity |
dozen |
each |
12 (1 dozen = 12 each) |
|
Weight |
pound |
gram |
454 (1 pound = 454 grams) |
|
Time |
minute |
second |
60 (1 minute = 60 seconds) |
A unit of measure standard conversion defines the conversion factor by which the unit of measure is equivalent to the base unit of measure that you defined for the unit of measure class. Defining a unit of measure standard conversion allows you to perform transactions in units other than the primary unit of measure of the item being transacted. The standard unit of measure conversion is used for an item if an item-specific unit of measure conversion has not been defined.
A UOM interclass conversion defines the conversion between the source base unit of measure ("From Base UOM") in one unit of measure class ("From Class") and the destination base unit of measure ("To Base UOM") in a different unit of measure class ("To Class").
For example, the item is gasoline. The From Base UOM (of the From Class called "volume") is liters. The To Base UOM (of the To Class called "quantity") is Barrels. The conversion is 158.76 liters (volume) to 1 barrel of oil (quantity).
A UOM intraclass conversion specifies the conversion between a unit of measure (the "From UOM") and the base unit of measure of the same class.
For example, the item is soda pop. The unit of measure class is Quantity. The From UOM is Case (CS). The base unit of measure is Each (EA). The conversion is 24, to specify that 1 CS = 24 EA.
Source systems are used to import data into Oracle Fusion Applications, and are used within the application to identify source data information. You can specify whether the source system is a Spoke system, such as a legacy system, or a Purchased system, such as data from a third party provider. You can also specify what type of data will be imported using the source system, for example, you can specify that a source system will import trading community members.
You can configure the following for a source system:
Source system code, name, and description
Source system type
Enable for Items, Trading Community Members, and Order Orchestration and Planning
You can create a source system code to uniquely identify the source system. Source system codes are used by the application when creating references between source IDs and the Oracle Fusion Applications database IDs. You can create a source system name and description to provide information that is more descriptive than the source system code.
Note
You cannot update the source system code once you have created the source system.
You must set up a source system as either a Spoke system, such as a legacy system, or a Purchased system, such as data from Dun & Bradstreet.
You should select which types of entities will be imported from the source system into the Oracle Fusion Applications database from the following:
Items
Trading Community Members
Order Orchestration and Planning
You can select one or more of these entity types as required for the source system. It is important to enable the correct entity types because each import UI filters source systems based on their entity type. For example, if a source system is enabled for Trading Community Members and Items, then the source system can be selected as a data source in the Trading Community Members and Items import UIs, but the source system cannot be selected in the Orchestration and Planning import UI.
Source System Entities are the entities, such as addresses and parties, which can be imported using a specified source system.
When you import data from a source system, all the entities in the source system data will be imported. Within the Source System Entities UI you can then choose to allow multiple source references, which allows mappings between one Oracle Fusion Applications database ID and multiple source IDs from the same source system.
Allowing multiple source system references means that when you import data from a source system you can merge multiple, or duplicate, source system records and create one record in the Oracle Fusion Applications database.
If you do not allow multiple source system references then an Oracle Fusion Applications database record will be created for every source system record. This means that you could potentially create duplicate records in the Oracle Fusion Applications database.
Import objects are business entities that can be imported into the trading community model registry, for example, competitors, partners or resource teams. When you create a data import batch you should choose which business entity, or object, you are importing from the batch into the trading community model registry. For example, if you are responsible for resource management, you might want to import objects such as employee resource and resource team.
The import process flow will change according to which object you have selected. There are two import process flows for the following sets of objects:
Customer, reference, competitor, and custom party.
Employee resource, resource team, partner, and partner contact.
When you select these objects you will receive the option to check for duplicates within the import batch before the import, and the option to check for duplicates between the import batch and the trading community model registry before import. You will also be able to choose to preview data before it is imported, specify if addresses will be cleansed before import, and set the how many errors you will allow before the import is terminated.
If you choose to import these objects you will not be able to deduplicate the batch or registry data. However, you will be able to choose to preview data before it is imported, specify if addresses will be cleansed before import, and set the how many errors you will allow before the import is terminated.
You can use the import process to import a batch from the interface tables into the Trading Community Model registry. Before the data is imported into the registry you need to decide if you want to use the data quality services and if so, how you want to configure the data quality services. The data quality services are:
Batch deduplication
Registry deduplication
Import to registry options
Within the batch deduplication page you can decide if you want to identify and resolve duplicates within the batch that you are importing from the interface tables. If you want to check for duplicates you need to choose what match configuration rule you want to use to identify duplicates for each entity. Then you need to specify what action will be taken on the persons, organizations, and address duplicates found within the batch. Your specified actions will be performed on the batch before the data is imported into the registry.
Similar to batch deduplication, registry deduplication identifies duplicates between the data in the batch and the data in the registry before the data is imported into the registry. If you want to check for duplicates you need to choose what match configuration rule you want to use to identify duplicates for each entity. Then you need to specify what action will be taken on the persons, organizations, and address duplicates found in the registry deduplication check. Your specified actions will be performed when you import the batch into the registry.
When defining an import process you can decide whether to run the import process in preview mode, or you can choose to load the data directly into the registry without previewing the data. You can also choose to cleanse addresses prior to import, and you can define an error limit for the batch.
You can choose to run the import batch in preview mode, or you can skip the preview and load the data directly into the registry.
If you select to run the batch in preview mode you will be able to review information about the level of duplicates or incorrect addresses in the batch data before the data is actually imported. You will also be able to preview how many records will be created and how many records will be updated for each entity. You can then continue to import the batch, or you can amend the match configuration rules and actions to be taken on the identified duplicates and then rerun the batch to review the data again.
If you do not want to review the batch data before it is imported into the registry, then you can choose to skip the preview and allow the data to be loaded into the registry as soon as preprocessing is complete. You may prefer not to preview the batch data if the data source is frequently used.
Note
The Define Import: Import to Registry page is the only place that you can specify if you want to run the batch in preview mode. Once the option to skip the preview mode is selected, and you submit the batch for processing, you will not be able to review the batch data before it is imported.
You can choose to validate the addresses in the interface tables before importing them into the registry. The addresses are validated using an integrated third party service that verifies addresses and corrects them if they are incorrect.
You can define how many process errors can be generated by the import batch process before the process terminates automatically. Error reports are generated by the application for you to review.
This example demonstrates how to create an import batch, and how to define the import process data quality services you want to use on the data prior to completing the import.
Note
Once an import is completed, the data is loaded into the Trading Community Model registry.
Create an import batch containing customer and consumer objects, load the import data into the interface tables, and configure the data import process so that you can view the batch in preview mode to check that all duplicate data are removed.
|
Field |
Value |
|---|---|
|
Batch Name |
Customer Import Batch |
|
Source System |
Comma separated values |
|
Object |
Customer and Consumer |
|
Estimated Number of Records |
300 |
|
Batch Description |
Import of customer data |
You want to check the batch for address, organization, and person duplicates; you also want to remove all of these duplicates from the batch.
|
Field |
Value |
|---|---|
|
Addresses |
Batch Location Basic Duplicate Identification |
|
Organizations |
Batch Organization Basic Duplicate Identification |
|
Persons |
Batch Person Basic Duplicate Identification |
|
Field |
Value |
|---|---|
|
Select Action for Persons and Organizations |
Remove all duplicates |
|
Select Action for Addresses |
Remove all duplicates |
You want to check for address, organization, and person duplicates between the import batch and the Trading Community Model registry; you also do not want to import duplicate records.
|
Field |
Value |
|---|---|
|
Addresses |
Batch Location Basic Duplicate Identification |
|
Organizations |
Batch Organization Basic Duplicate Identification |
|
Persons |
Batch Person Basic Duplicate Identification |
|
Field |
Value |
|---|---|
|
Select Action for Persons and Organizations |
Do not import duplicate records |
|
Select Action for Addresses |
Do not import duplicate records |
You want to configure the data import process so that you can view the batch in preview mode, enabling you to review the data after preprocessing. You also want to cleanse addresses before they are imported, and specify an error limit for the batch.
This example demonstrates how to perform What-If analysis on a data import batch that has been processed and has completed with a status of pre-import completed. The match configuration is redefined and the import process is resubmitted. The batch deduplication actions are then amended, and the batch import is completed.
The following table summarizes key decisions for this scenario.
|
Decisions to Consider |
In This Example |
|---|---|
|
Do you want to redefine batch deduplication match configuration? |
Yes, a different match configuration is selected for the organizations entity. |
|
Do you want to redefine registry deduplication match configuration? |
Yes, a different match configuration is selected for the persons entity. |
|
What actions do you want to take on Persons, Organizations, and Addresses duplicates? |
|
The results of the batch and registry deduplication are not as expected and so the match configurations need to be redefined.
You want to view the What-If analysis for the new match configurations that you selected for the batch.
Yes. If the data is still available in the interface tables and the batch status is Preimport Completed, Completed with Errors, Error, or Terminated when Error Limit Reached, then you can redefine the data import process and reimport the batch. However, once a batch has been successfully imported then you will not able to reimport the batch, even if the data is present in the interface tables.
You can view any errors that occurred after submitting the batch for import by selecting the batch in the data import batches Overview page, and then click Report.
You permanently remove all records in the batch from the import interface tables. You should purge batches after the batch has been imported successfully and you are sure that the data in the interface tables is no longer required.
Purging the interface tables improves import performance. To archive imported data, you should copy the data to a set of custom tables.
Data import batches cannot be purged when they have a status of Processing. Purging a batch purges the batch data in the interface tables and so cannot be carried out while the batch is importing the data from the interface tables into the registry.
The Oracle Fusion Trading Community Data Quality service may be unavailable, or you may not have the necessary licenses for the Data Quality service.
Yes. You can reimport a batch to correct validation errors if the import process status is either Preimport Completed, Completed With Errors, Error, or Terminated When Error Limit Reached.
The import process details are only available when you have selected to run the batch in preview mode, and you have submitted the batch for import.
|
Copyright © 2011, Oracle and/or its affiliates. All rights reserved. Legal Notices |
|