Release 11g (11.1.1)
Part Number E20837-01
Contents
Previous
Next
| Oracle Fusion Middleware Administrator's Guide for Oracle Business Intelligence Publisher (Oracle Fusion Applications Edition) Release 11g (11.1.1) Part Number E20837-01 | Contents | Previous | Next |
| View PDF |
This chapter covers the following topics:
BI Publisher allows you to define an administration Superuser. Using the Superuser credentials you can directly access the BI Publisher administrative functions without logging in through the defined security model.
Set up this Superuser to ensure access to all administrative functions in case of failures with the configured security model. It is highly recommended that you set up a Superuser.
Click Administration.
Under Security Center click Security Configuration.
Under Local Superuser, select the box and enter the credentials for the Superuser.
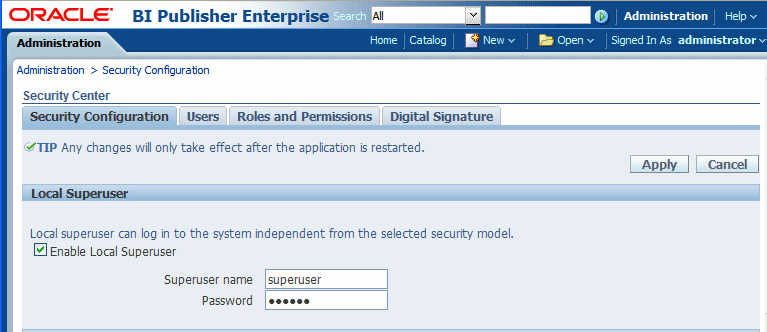
Restart the BI Publisher application.
BI Publisher allows you configure public access to specific reports by defining a "Guest" folder. Any user can access the reports in this folder without entering credentials. Note that Guest access is not supported if you are using a shared catalog with Oracle Business Intelligence Enterprise Edition.
Important: Guest access is not supported with Single Sign-On.
Note that all objects required to view a report must be present in the Guest folder because the Guest folder is the only folder the guest user will have any access rights to. Therefore the report and the data model must be present in the Guest folder as well as Sub Templates and Style Templates, if applicable. The guest user will have read access only.
The Guest user must also be granted access to the report data source.
To enable guest access:
Under Shared Folders, create the folder to which you want to grant public access.
Click Administration.
Under Security Center select Security Configuration.
Under Guest Access, select Allow Guest Access.
Enter the name of the folder that you created for public access.
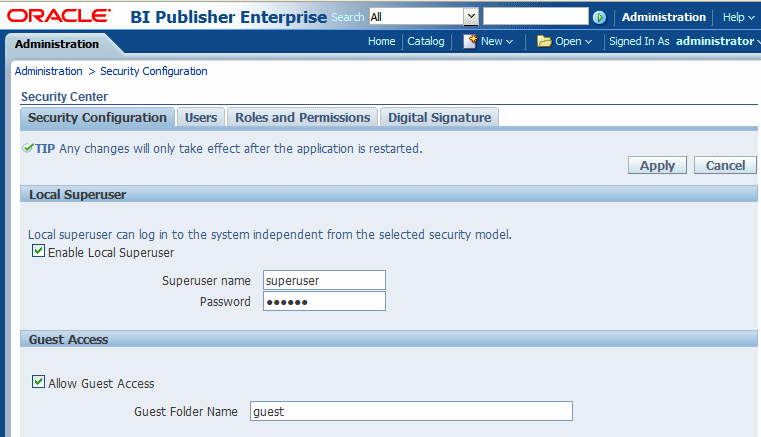
Restart the BI Publisher application.
Add the objects to the Guest folder that you want the guest users to access: folders, reports, data models, Sub Templates and Style Templates.
Note: The report must reference the data model that is stored in the guest folder. Therefore, if you copy a report with its data model from another location, ensure to open the report and reselect the data model so that the report references the data model inside the guest folder.
Similarly, any references to Sub Templates or Style Templates must also be updated.
Grant access to the data sources used by data models in your Guest folder. See Setting Up Data Sources for information on granting Guest access to a data source.
Users who access BI Publisher will see the Guest button on the log on page. Users can select this button and view the reports in your chosen guest folder without presenting credentials.
If BI Publisher is communicating with other applications over SSL you may need to perform additional configuration to ensure operability.
Important: It is strongly recommended that you enable Secure Socket Layer (HTTPS) on the middle tier hosting the Web services because the trusted username/password that is passed can be intercepted. This also pertains to Web services that are used for communication between BI Publisher and Oracle BI Presentation Services.
Point BI Publisher to the System-Wide Keystore
Import certificates to the Java keystore
Configure the Delivery Manager
By default, BI Publisher uses the Java keystore: {java.home}/lib/security/cacerts
If you are using a different location as your keystore, set the JAVA_OPTS environment variable for your Web server to tell the BI Publisher server where to find the keystore, as follows:
set JAVA_OPTS=-Djavax.net.ssl.trustStore=<keystore file>If you make calls to Web services that are protected via Secure Sockets Layer (SSL) you must export the certificate from the Web server hosting the Web service and import it into the Java keystore on the machine running BI Publisher.
Navigate to the HTTPS site where the WSDL resides.
Download the certificate following the prompts (the prompts you see will vary depending on the browser you are using).
Install the Certificate into your keystore using the Java keytool, as follows:
keytool -import -file <certfile> -alias <certalias> -keystore <keystore file>Restart the application server.
These steps should not be required if the server certificate is linked to some certificate authority (such as Verisign). But if the Web service server is using a self-generated certificate (for example, in a testing environment), then these steps will be required.
If you wish to use the default certificates built-in with BI Publisher, no further configuration is required. SSL will work with the default certificate if the server uses the certificate signed by a trusted certificate authority such as Verisign.
If the user uses the SSL with a self-signed certificate, the certificate information must be entered in the Delivery Configuration page. A self-signed certificate means the certificate is signed by a non-trusted certificate authority (usually the user).
To use external Web Services or HTTP data sources when your BI Publisher server is set up behind a firewall or requires a proxy to access the internet, you must configure Oracle WebLogic Server to be aware of the proxy.
Add the following to setDomainEnv.sh:
EXTRA_JAVA_PROPERTIES="-Dhttp.proxyHost=www-proxy.example.com
-Dhttp.proxyPort=80
-Djavax.xml.soap.MessageFactory=oracle.j2ee.ws.saaj.soap.MessageFactoryImpl
-Djavax.xml.soap.SOAPFactory=oracle.j2ee.ws.saaj.SOAPFactoryImpl
-Djavax.xml.soap.SOAPConnectionFactory=oracle.j2ee.ws.saaj.client.p2p.HttpSOAPConnectionFactory ${EXTRA_JAVA_PROPERTIES}"
export EXTRA_JAVA_PROPERTIES
where
-www-proxy.example.comis the proxy host.
Note that for communication between BI Publisher and the other components of Oracle BI Enterprise Edition, you must also set the http.nonProxyHosts JVM parameter. This property indicates the hosts that BI Publisher will connect to directly and not through the proxy server. Specify the list of hosts, each separated by a |, and in addition a wildcard character (*) can be used for matching. For example:
-Dhttp.proxySet=true -Dhttp.proxyHost=www-proxy.example.com
-Dhttp.proxyPort=80
-Dhttp.nonProxyHosts="localhost|*.example1.com|*.example2.com"![]()
Copyright © 2010, 2011, Oracle and/or its affiliates. All rights reserved.