Release 11g (11.1.1)
Part Number E20837-01
Contents
Previous
Next
| Oracle Fusion Middleware Administrator's Guide for Oracle Business Intelligence Publisher (Oracle Fusion Applications Edition) Release 11g (11.1.1) Part Number E20837-01 | Contents | Previous | Next |
| View PDF |
This chapter covers the following topics:
BI Publisher supports a variety of data sources. The data can come from a database, an HTTP XML feed, a Web service, an Oracle BI Analysis, an OLAP cube, an LDAP server, or a previously generated XML file or Microsoft Excel file.
This section describes how to set up connections to the following:
Connections to an HTTP XML feed or a Web service are configured when you define the data model for your report (see Creating Data Sets, Oracle Fusion Middleware Data Modeling Guide for Business Intelligence Publisher). Connection to Oracle BI Presentation Services is automatically configured by the Oracle BI Installer.
When you set up data sources, you can also define security for the data source by selecting which user roles can access the data source.
Access must be granted for the following:
a report consumer must have access to the data source to view reports that retrieve data from the data source
a report designer must have access to the data source to build or edit a data model against the data source
By default, a role with administrator privileges can access all data sources.
The configuration page for the data source includes a Security region that lists all the available roles. You can grant roles access from this page, or you can also assign the data sources to roles from the roles and permissions page. See Configuring Users and Roles for more information.
If this data source will be used in guest reports, you must also enable guest access here. For more information about guess access see Enabling a Guest User.
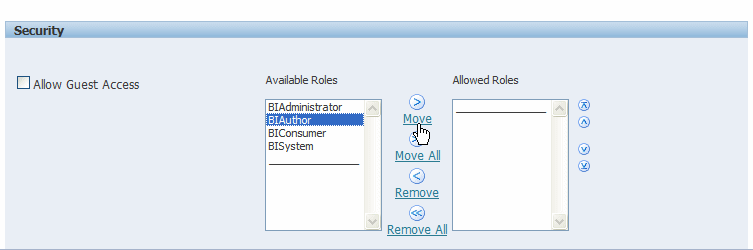
The following figure shows the Security region of the data source configuration page:
BI Publisher supports proxy authentication for connections to the following data sources:
Oracle 10g database
Oracle 11g database
Oracle BI Server
For direct data source connections via JDBC and connections via a JNDI connection pool, BI Publisher enables you to select "Use Proxy Authentication". When you select Use Proxy Authentication, BI Publisher passes the user name of the individual user (as logged into BI Publisher) to the data source and thus preserves the client identity and privileges when the BI Publisher server connects to the data source.
Note: Enabling this feature may require additional setup on your database. For example, your database must have Virtual Private Database (VPD) enabled for row-level security.
For more information on Proxy Authentication in Oracle databases, refer to Oracle Database Security Guide 10g or the Oracle Database Security Guide 11g.
Note that for connections to the Oracle BI Server, Proxy Authentication is required. In this case, proxy authentication is handled by the Oracle BI Server, therefore the underlying database can be any database that is supported by the Oracle BI Server.
In general, a JNDI connection pool is recommended because it provides the most efficient use of your resources. For example, if a report contains chained parameters, each time the report is executed, the parameters will initiate to open a database session every time.
When you configure a JDBC connection to a database, you can also configure a backup database. A backup database can be used in two ways:
As a true backup when the connection to the primary database is unavailable
As the reporting database for the primary. To improve performance you can configure your report data models to execute against the backup database only.
To use the backup database in either of these ways, you must also configure the report data model to use it.
See Setting Data Model Properties, Oracle Fusion Middleware Data Modeling Guide for Oracle Business Intelligence Publisher for information on configuring a report data model to use the backup data source.
You can define PL/SQL functions for BI Publisher to execute when a connection to a JDBC data source is created (preprocess function) or closed (postprocess function). The function must return a boolean value. This feature is supported for Oracle databases only.
These two fields enable the administrator to set a user's context attributes before a connection is made to a database and then to dismiss the attributes after the connection is broken by the extraction engine.
The system variable :xdo_user_name can be used as a bind variable to pass the login username to the PL/SQL function calls. Setting the login user context in this way enables you to secure data at the data source level (rather than at the SQL query level).
For example, assume you have defined the following sample function:
 FUNCTION set_per_process_username (username_in IN VARCHAR2)
   RETURN BOOLEAN IS
     BEGIN
     SETUSERCONTEXT(username_in);
     return TRUE;
   END set_per_process_username
To call this function every time a connection is made to the database, enter the following in the Pre Process Function field: set_per_process_username(:xdo_user_name)
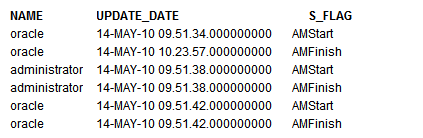
Another sample usage may be to insert a row to the LOGTAB table every time a user connects or disconnects:
CREATE OR REPLACE FUNCTION BIP_LOG (user_name_in IN VARCHAR2, smode IN VARCHAR2)
RETURN BOOLEAN AS
   BEGIN
   INSERT INTO LOGTAB VALUES(user_name_in, sysdate,smode);
   RETURN true;
   END BIP_LOG;
In the Pre Process Function field enter: BIP_LOG(:xdo_user_name)
As a new connection is made to the database, it is logged in the LOGTAB table. The SMODE value specifies the activity as an entry or an exit. Calling this function as a Post Process Function as well will return results like the following:
Prerequisites
If you plan to use a different version of any of the drivers installed with WebLogic Server, you can replace the driver file in WL_HOME\server\lib with an updated version of the file or add the new file to the front of your CLASSPATH.
If you plan to use a third-party JDBC driver that is not installed with WebLogic Server, you need to update the WebLogic Server classpath to include the location of the JDBC driver classes. Edit the commEnv.cmd/sh script in WL_HOME/common/bin and prefix your classes as described in "Modifying the Classpath" in the Command Reference for Oracle WebLogic Server.
For more information, see Oracle Fusion Middleware Configuring and Managing JDBC for Oracle WebLogic Server 11g.
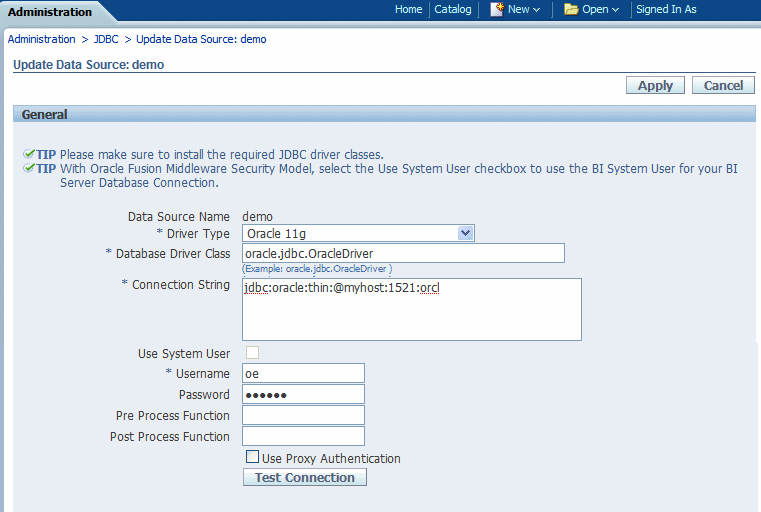
Setting Up a JDBC Connection to Your Data Source
From the Administration page click JDBC Connection. This will display the list of existing JDBC connections.
Click Add Data Source.
Enter the following fields for the new connection:
Data Source Name - enter a display name for the data source. This name will appear in the Data Source selection list in the Data Model Editor.
Driver Type - select your database type from the list. When you select a driver type, BI Publisher will automatically display the appropriate Database Driver Class as well as provide the appropriate Connection String format for your selected database.
Database Driver Class - this will be automatically entered based on your selection for Driver Type. You can update this field if desired.
For example: oracle.jdbc.OracleDriver or
hyperion.jdbc.sqlserver.SQLServerDriver
Connection String - enter the database connection string.
When you select the driver type, this field will automatically display the appropriate connection string format for your database type.
For an Oracle database the connect string will have the following format:
jdbc:oracle:thin:@[host]:[port]:[sid]
For example: jdbc:oracle:thin:@myhost.us.example.com:1521:prod
For a Microsoft SQL Server, the connect string will have the following format:
jdbc:hyperion:sqlserver://[hostname]:[port];DatabaseName=[Databasename]
For example:
jdbc:hyperion:sqlserver://myhost.us.example.com:7777;DatabaseName=mydatabase
Use System User - this is reserved for connections to the Oracle BI Server. See Setting Up a JDBC Connection to the Oracle BI Server.
User Name - enter the user name required to access the data source on the database.
Password - enter the password associated with the user name for access to the data source on the database.
Pre Process Function and Post Process Function - (optional) enter a PL/SQL function to execute when a connection is created (Pre Process) or closed (Post Process). For more information see About Pre Process and Post Process Functions.
Use Proxy Authentication - select this box to enable Proxy Authentication. See About Proxy Authentication for more information.
Click Test Connection. A confirmation will display.
The following figure shows the general settings of the JDBC connection page:
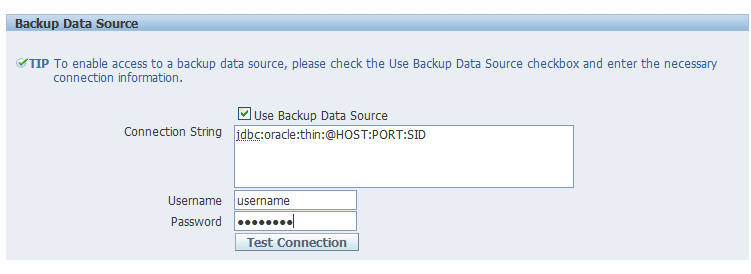
(Optional) Enable a backup database for this connection by entering the following:
Use Backup Data Source - select this box.
Connection String - enter the connection string for the backup database.
Username / Password - enter the username and password for this database.
Click Test Connection. A confirmation will display.
The following figure shows the Backup Data Source region of the page:
Define security for this data source. Use the shuttle buttons to move roles from the Available Roles list to the Allowed Roles list. Only users assigned the roles on the Allowed Roles list will be able to create or view reports from this data source.
The settings defined here will be passed down to the backup data source, if one is defined.
BI Publisher supports connecting to your JDBC data source via a connection pool. Using a connection pool increases efficiency by maintaining a cache of physical connections that can be reused. When a client closes a connection, the connection gets placed back into the pool so that another client can use it. A connection pool improves performance and scalability by allowing multiple clients to share a small number of physical connections. You set up the connection pool in your application server and access it via Java Naming and Directory Interface (JNDI).
After you set up the connection pool in your application server, enter the required fields in this page so that BI Publisher can utilize the pool to establish connections. For information on setting up a connection pool in WebLogic Server, see the chapter "Configuring JDBC Data Sources" in the Oracle Fusion Middleware Configuring and Managing JDBC for Oracle WebLogic Server 11g.
From the Administration page click JNDI Connection. This will display the list of existing JNDI connections.
Click Add Data Source.
Enter the following fields for the new connection:
Data Source Name - enter a display name for the data source. This name will appear in the Data Source selection list in the Data Model Editor.
JNDI Name - enter the JNDI location for the pool. For example, jdbc/BIP10gSource.
Use Proxy Authentication - select this box to enable Proxy Authentication. See About Proxy Authentication for more information.
Click Test Connection. A confirmation message will display.
Define security for this data source. Use the shuttle buttons to move roles from the Available Roles list to the Allowed Roles list. Only users assigned the roles on the Allowed Roles list will be able to create or view reports from this the data source.
From the Administration page select LDAP Connection. This will display the list of existing LDAP connections.
Click Add Data Source.
Enter the following fields for the new connection:
Enter the Data Source Name. This is the display name that will appear in the Data Source selection list in the Data Model Editor.
Enter the LDAP Connection URL for your LDAP server in the format: ldap://hostname:port.
Enter the Username (for example: cn=admin,cn=users,dc=us,dc=company,dc=com).
Password - enter the password if required.
Enter the JNDI Context Factor Class (for example: com.sun.jndi.ldap.LdapCtxFactory).
Click Test Connection.
Define security for this data source. Use the shuttle buttons to move roles from the Available Roles list to the Allowed Roles list. Only users assigned the roles on the Allowed Roles list will be able to create data models from this the data source or view reports that run against this data source.
BI Publisher supports connecting to several types of OLAP databases. Note that to connect to Microsoft SQL Server 2000 Analysis Services, BI Publisher must be installed on a supported Windows operating system.
From the Administration page click OLAP Connection. This will display the list of existing OLAP connections.
Click Add Data Source.
Enter the following fields for the new connection:
Data Source Name - enter a display name for the data source. This name will appear in the Data Source selection list in the Data Model Editor.
OLAP Type - choose from the list of supported OLAP databases. When you choose the type, the OLAP Connection String field will update with the appropriate connection string format for your selection.
OLAP Connection String - enter the connection string for your OLAP database. Following are examples for each of the supported OLAP types:
Oracle's Hyperion Essbase
Format: [server]
Example: myServer.us.example.com
Microsoft SQL Server 2000 Analysis Services
Format: Data Source=[server];Provider=msolap;Initial Catalog=[catalog]
Example: Data Source=myServer;Provider=msolap;Initial Catalog=VideoStore
Microsoft SQL Server 2005 Analysis Services
Format: Data Source=[server];Provider=msolap.3;Initial Catalog=[catalog]
Example: Data Source=myServer;Provider=msolap.3;Initial Catalog=VideoStore
SAP BW
Format: ASHOST=[server] SYSNR=[system number] CLIENT=[client] LANG=[language]
Example: ASHOST=172.16.57.44 SYSNR=01 CLIENT=800 LANG=EN
Username and Password for the OLAP database.
Click Test Connection. A confirmation message will display.
Define security for this data source. Use the shuttle buttons to move roles from the Available Roles list to the Allowed Roles list. Only users assigned the roles on the Allowed Roles list will be able to create or view reports from this the data source.
BI Publisher enables you to use existing XML or Microsoft Excel files created from other sources as input to your BI Publisher reports. To use a file as a data source, it must reside in a directory that BI Publisher can connect to. Set up the connection details to the file data source directory using this page.
From the Administration page click File. This will display the list of existing file sources.
Click Add Data Source.
Enter the following fields for the new data source:
Data Source Name - enter a display name for the data source. This name will appear in the Data Source selection list in the Data Model Editor.
Path - enter the full path to the top-level directory on your server. Users will be able to access files in this directory and any subdirectories.
Define security for this data source. Use the shuttle buttons to move roles from the Available Roles list to the Allowed Roles list. Only users assigned the roles on the Allowed Roles list will be able to create or view reports from this data source.
From the Administration page select the Data Source type to update.
Select the name of the connection to view or update. All fields are updateable. See the appropriate section for setting up the data source type for information on the required fields.
Select Apply to apply any changes or Cancel to exit the update page.
![]()
Copyright © 2010, 2011, Oracle and/or its affiliates. All rights reserved.