After GL cubes are generated in Essbase, the BI Administrator should be directed to configure the connection, see Additional Links and import the cube and map the contents to the logical layer. This task is required for Financials.
If additional BI-enabled attributes are required in the tree-based dimension, then the shape of the view object changes. The administrator re-imports the view object into the Oracle BI repository and remaps the logical layer. See the Oracle Fusion Developer Guide for full information on designing, configuring, and generating BI-enabled view objects (BICVOs) for Fusion Trees."
A chart of accounts segment is a component of the account combination. Each segment has a value set attached to it to provide formatting and validation of the set of values used with that segment. The combination of segments creates the account combination used for recording and reporting financial transactions. Examples of segments that may be found in a chart of accounts structure: company, cost center, department, division, region, account, product, program, and location.
 To re-import the BI Account view object to view the new physical columns available:
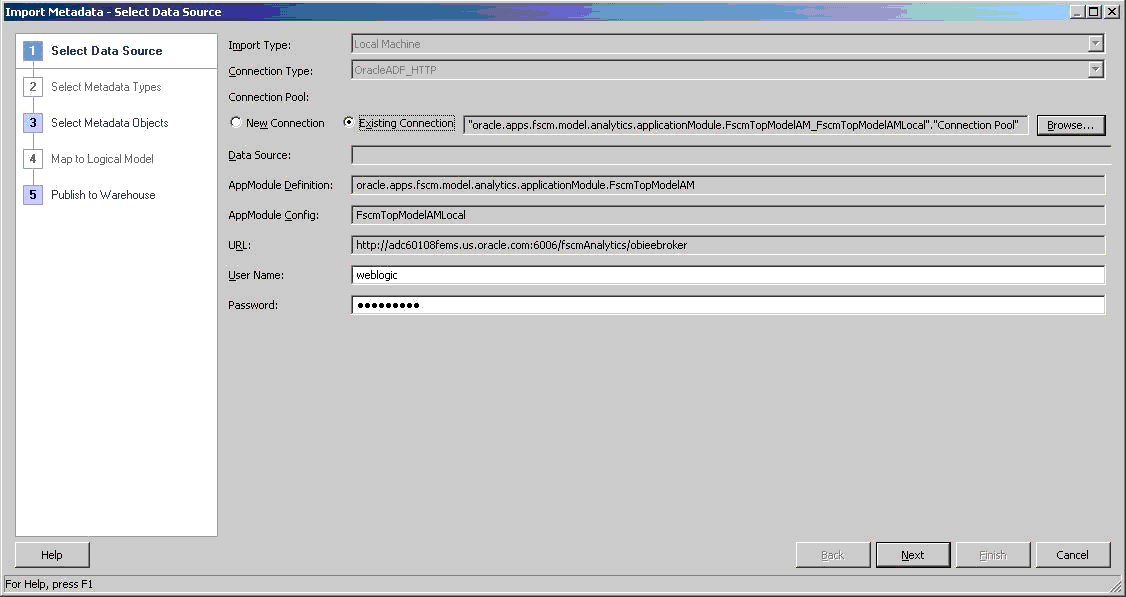
In the Administration Tool, select File then Import Metadata to start the Import Metadata Wizard.
In the Select Data Source screen, select OracleADF_HTTP for Connection Type, and then Existing Connection.
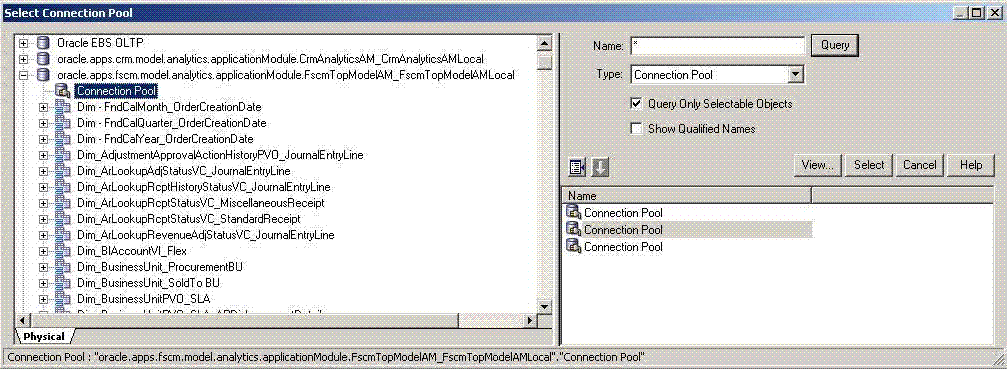
Select Browse to select the existing Financials and Supply Chain Management Connection Pool to fill the data source fields.
You may update the User Name and Password, which must be set up and authenticated in the Oracle WebLogic Server security domain. If all fields are correct, select Next.
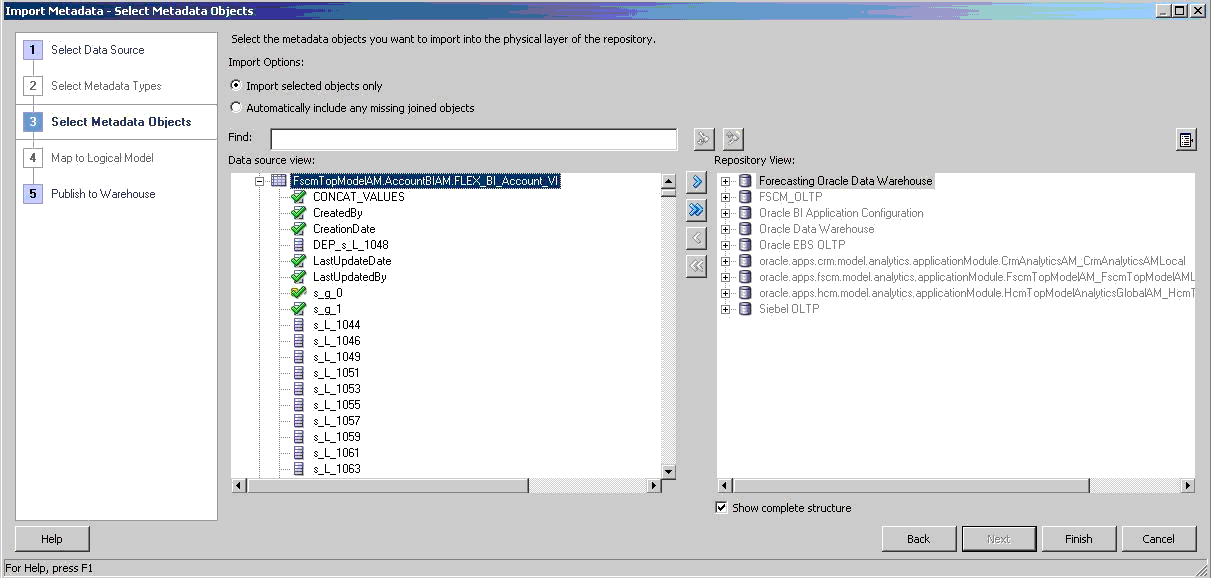
On the Select Metadata Objects screen, select Import selected objects only and expand the BI Account view object. For example, in the Data source view, select FscmTopModelAM.AccountBIAM.FLEX_BI_Account_VI.
If the BI Account view object has new physical columns, select the BI Account VO and select
 to move it to the Selected list.
Select Finish to reimport and retrieve the new physical columns. If it does not have new physical columns, skip to .step 2.
In the physical layer of the Oracle BI repository, open the property of following attributes and change the type from DOUBLE to VARCHAR:
FscmTopModelAM.AccountBIAM.FLEX_BI_Account_VI.s_g_0
FscmTopModelAM.FinGlAccountsCodeComboAM.CodeCombinationPVO.CodeCombinationId
Note:
Based on how the chart of accounts are defined, the BI Account view object is generated to have one foreign key physical column for each GL Accounting Segment dimension, and these new physical columns should be imported before importing the GL Accounting Flexfield view objects. Because these new physical columns are not required to be exposed in the logical layer, you can import the BI Account view object alone without going to step 4, to avoid clearing the default mappings of all mapped logical objects, including the GL Accounting Segment logical dimensions and its associated logical facts.
Note: | In the shared master Oracle BI repository, the GL Accounting Qualified Segment logical dimensions are Dim – Balancing Segment, Dim – Cost Center, and Dim – Natural Account Segment. Ten GL Accounting Nonqualified Segment logical dimensions are named Dim – GL Segmentn, where n is an integer from 1 to 10. |
 To import the GL Accounting Flexfield view objects and map them to the corresponding GL Accounting Qualified Segment/Nonqualified Segment logical dimensions:
Repeat step 1 through step 4 to select the Financials and Supply Chain Management connection pool as the data source to import.
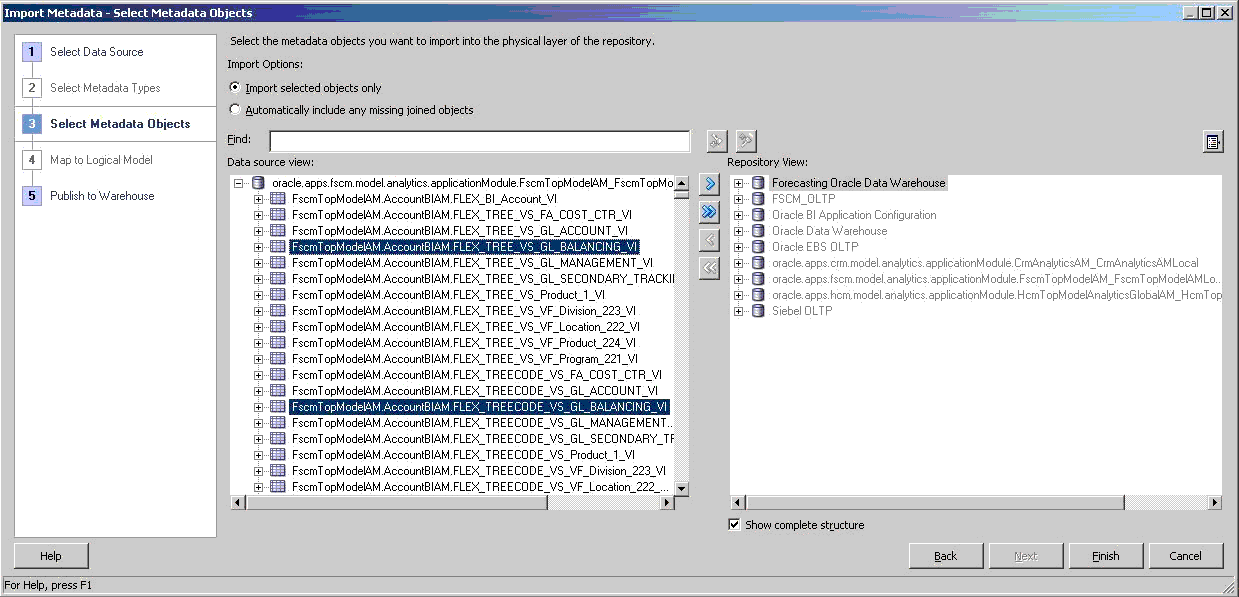
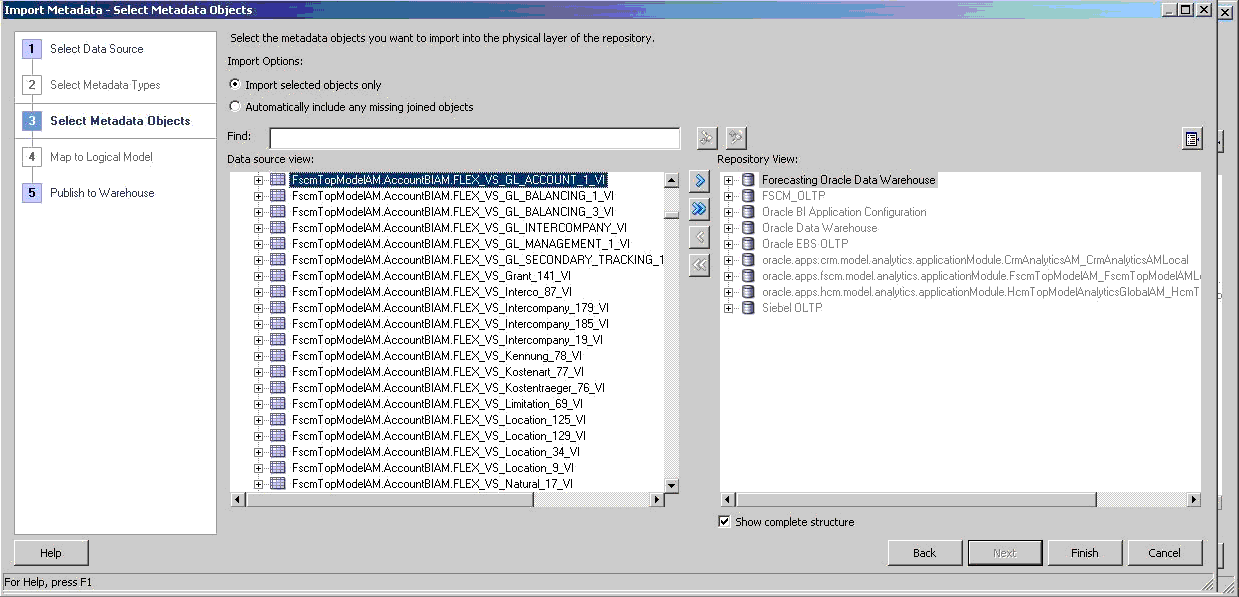
On the Select Metadata Objects screen, in the Import Options section, select Import selected objects only. Then, from the Data source view pane, select the view objects that you want to map to the segment dimensions in the Available list on the left.
Select
 to move them to the Selected list in the Repository View Pane on the right.
After you have moved all the view objects that you want to import to the Selected list, select Next to proceed.
On the Map to Logical Model screen, select Core for Business Model to Map to and verify Create Logical Joins is unchecked. By default, it sets the logical tables and columns with the same names as the imported physical tables and columns.
Under Table Mapping, for each applicable physical table, select VO Type to Query Only and verify that Hierarchy is clear. Then select
 to clear the default logical table mapping and select the existing segment logical dimension that it should map to.
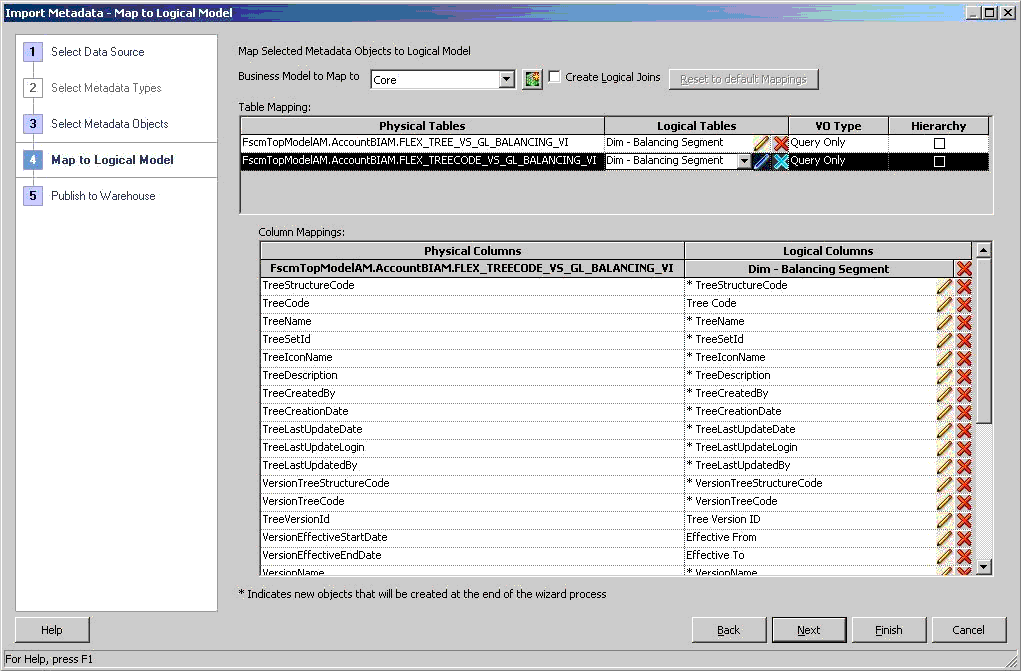
Map the Flexfield Tree Code and Tree view object physical tables to their corresponding Tree Based Segment logical dimensions. Figure 21, Import Metadata Wizard: Select the Tree Based Segment Logical Dimension that The Flexfield Tree Code and Tree view objects Are Mapped To shows the table mapping from the GL Balancing Flexfield Tree Code and Tree view object physical tables to the GL Balancing Segment logical table.
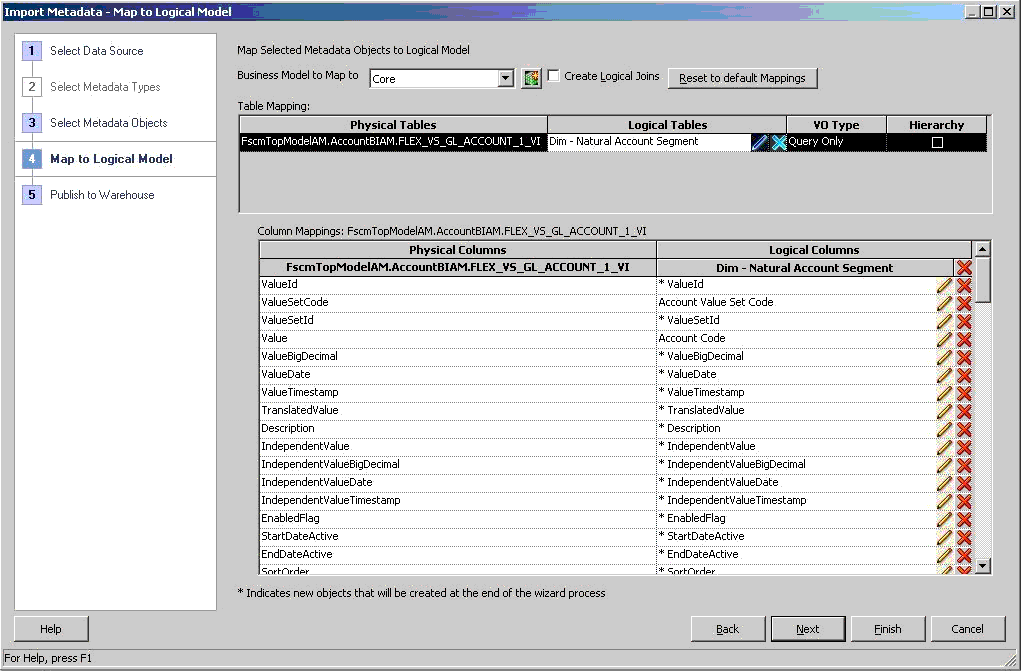
Map the Flexfield Value Set view object physical tables to their corresponding Value Set Based Segment logical dimensions. Figure 22, Import Metadata Wizard: Select the Value Set Based Segment Logical Dimension that the Flexfield Value Set view object is Mapped to shows the table mapping from the GL Natural Account Flexfield Value Set view object physical tables to the GL Natural Account Segment logical table.
Under Column Mappings, for each applicable physical table, select
 next to logical dimension name to clear all default logical columns that are created at the end of the wizard process. Then select the existing logical dimension column that it should map to.
Map these Tree Code view object physical columns:
Map these Tree view object physical columns:
Table 4. Mapping for Tree view object
Physical Columns Logical Columns TreeCode Tree Code TreeVersionId Tree Version ID Dep0Pk1Value Segment Value Set Code Distance Fixed Hierarchy Level Dep0Value Segment Code Dep0Description Segment Description Dep1Value Level 1 Code Dep1Description Level 1 Description Dep2ValueId Level 2 Id Dep2Value Level 2 Code Dep2Description Level 2 Description DepnValue/DepnDescription Level n Code/Level n Description
where n is an integer from 0 to 31
Dep31Value Level 31 Code Dep31Description Level 31 Description Map these Value Set view object physical columns:
 For each segment logical dimension, update the logical table sources:
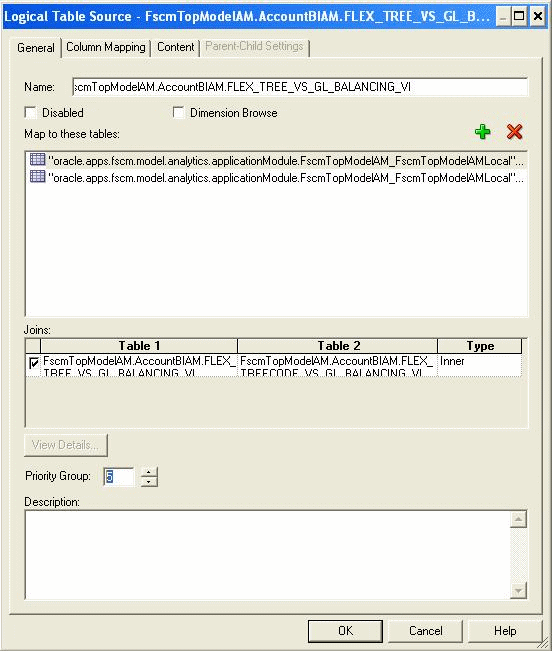
Update the new Transactional Business Intelligence logical table source generated by Import Metadata Wizard:
On the General tab, set Priority Group to 5.
If it is a Value Set Based Segment logical dimension, set the tree filter logical column to a constant string value; for example, Not Applicable.
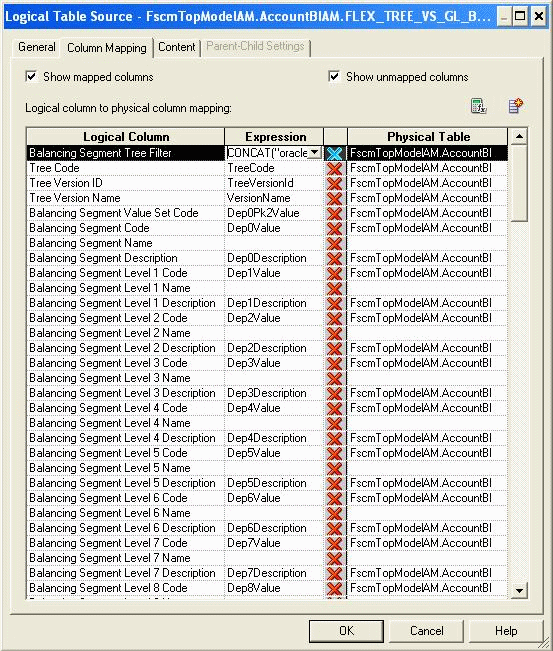
If it is a Tree Based Segment logical dimension, define it as a formula expression to concatenate the physical columns, TreeName and VersionName of the corresponding Tree Code view object, and put a dash ('-') between them. For example, the logical column, Balancing Segment Tree Filter, should be set as follows for the Balancing Segment logical dimension:
CONCAT( CONCAT(
"oracle.apps.fscm.model.analytics.applicationModule.FscmTopModelAM_FscmTopModelAMLocal"."".""."FscmTopModelAM.AccountBIAM.FLEX_TREECODE_VS_GL_BALANCING_VI"."TreeName", '-'),"oracle.apps.fscm.model.analytics.applicationModule.FscmTopModelAM_FscmTopModelAMLocal"."".""."FscmTopModelAM.AccountBIAM.FLEX_TREECODE_VS_GL_BALANCING_VI"."VersionName")
Map the Tree Filter Logical Column to a Formula Expression for Each New OTBI LTS of Tree Based Segment Logical Dimensions.
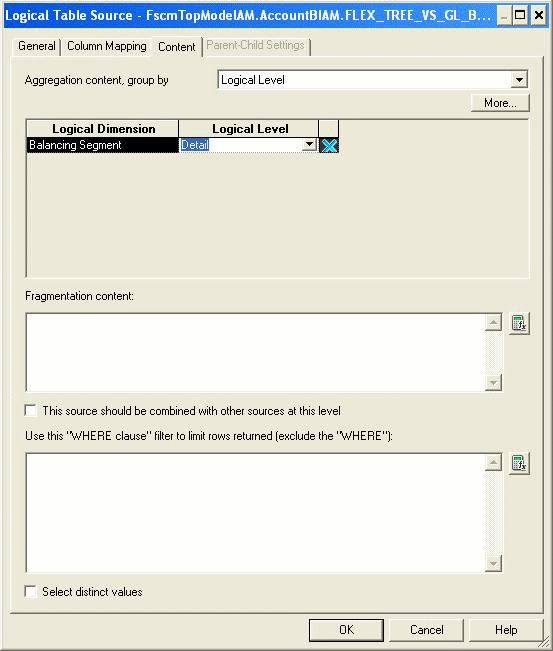
On the Content tab, set the Aggregation Content Logical Level to Detail.
If it is a Qualified Segment logical dimension, disable its original Transactional Business Intelligence logical table source, SegmentValueHierarchyPVO.
 For each Unqualified Segment logical dimension, perform these additional steps:
Define a logical join from this segment logical dimension to each logical fact to be analyzed by this segment logical dimension. Keep the default values of the logical join.
Update the applicable logical table sources of the logical facts. On the Content tab, set the Logical Level of this segment dimension aggregation content to Detail.
Create the presentation table, columns, and hierarchy of this Unqualified Segment logical dimension in the applicable Transactional Business Intelligence subject areas. Do one of the following:
If this is Value Set Based Unqualified Segment logical dimension, create the presentation columns for the two Detail level logical columns, Segment Code and Segment Description, only. It is no need to create the presentation hierarchy.
If this is Tree Based Unqualified Segment logical dimension, create the following presentation dimension levels and their columns in the applicable OTBI subject areas:
Create the dimension level, Tree Code And Version, and its columns for all applicable Transactional Business Intelligence subject areas.
Create the applicable dimension levels, Leveln, where n is an integer from 1 to 31, and their columns for the Transactional Business Intelligence subject area, General Ledger - Balances Real Time, only.
Create the dimension level, Detail, and its columns for all applicable Transactional Business Intelligence subject areas.
 For each Value Set Based Qualified Segment logical dimension, update the corresponding presentation tables in the Transactional Business Intelligence subject areas:
Delete the complete dimension hierarchy in Transactional Business Intelligence subject areas. Only the Detail level is applicable for Value Set Based Segment logical dimensions.
Delete the tree-specific presentation columns, which are not applicable to Value Set Based Qualified Segment logical dimensions, in Transactional Business Intelligence subject areas. For example, Segment Tree Filter and Segment Level n Code, where n is an integer from 1 to 31.
