 Working with Interface Definitions
This chapter discusses how to:
Work with interface definitions.
Work with character sets.
Work with text translate values.
Work with company filtering.
Work with key fields.
Work with COBOL processes.
Work with smart select.
Work with transactions.
Working with Interface DefinitionsThis section discusses how to:
(USF) Set up an NFC export interface definition.
Set up a DETI import interface definition.
Set up a new import interface definition.
 (USF) Setting Up an NFC Export Interface Definition
Use the National Finance Center (NFC) sample data definition to set up an export interface for federal agencies, who primarily use the National Finance Center as the third-party payroll system.
Note. Federal agencies generally do not import NFC data (the processed payroll results) back into PeopleSoft Enterprise HRMS. You can configure Payroll Interface to import the data, but most agencies do not take advantage of this feature
Payroll Interface uses the NFC system ID as well as the Industry and Industry Sector codes set up in PeopleSoft Enterprise Human Resources to identify federal workers. Because the NFC sample data definition is configured to export position and job data, you should implement full position management within PeopleSoft Enterprise Human Resources.
The NFC sample data definition includes two export files: the Personnel Action Data (PACT) file contains employee data; the Position Management Data (PMSO) file contains position and job code data. Both files include the appropriate header information required by the NFC. When you export a full set of records, the NFC export sends only the last effective-dated row for both employee data and position and job code data.
The NFC sample data definition includes six additional tables (views):
|
Table |
Description |
|
GVT_PI_AWD_VW |
SF50/52 award information for the NFC's 110 record. |
|
GVT_PI_DATA_VW |
The personal, employment, and job data that is used to process SF50/52 forms for the NFC's PACT 063 Data record. |
|
GVT_PI_EDUC_VW |
Education information for the NFC's PACT 063 Data record. |
|
GVT_PI_RMKS_VW |
SF50/52 remarks information for the NFC's Remark (RMK) record. |
|
GVT_PI_POIP_VW |
The NFC's PMSO Individual Position record (2056). |
|
GVT_PI_POMR_VW |
The NFC's PMSO Position Master record (2055). |
See Also
(USF) National Finance Center Processing
Setting Up a DETI Import Interface Definition
Use the Detail Interface (DETI) sample data definition to set up an import interface definition that loads the employee check detail information produced by the third-party payroll system.
To set up the import interface, obtain a copy of the data file from the third-party payroll vendor that matches the DETI sample data definition. Then, examine the Payroll Interface fields and records that are associated with it:
Ensure that the key values that you map using the PI_CHECK table are the same values that are mapped on the three DETAIL child records, plus one more to make it a unique child.
You must also create a field definition for each data field that is present in the file, including a filler for unwanted data when the data is defined by its position in the record.
Define the import records.
Attach your file definition to the Payroll Interface configuration ID and define the external file handle to enable the COBOL program to find the input file.
For physical file types, some data fields may be defined according to type (such as OASDI tax type) by their position in the import record. As shown in this example, Payroll Interface reflects this tax type by creating a separate row for each occurrence and captures the tax type during import by attaching a group ID:
As shown in this example, Payroll Interface uses the entry in the PS Key Value (PeopleSoft key value) field to populate the field defined in PS Field1 Name with OASDI, as it is builds the data for the record given by PeopleSoft Record Name from the import row being processed:
As shown in this example, group ID D03 is attached to the field ID DPD03:
Defining a New Import Interface Definition
This section discusses how to set up a new import file definition. For this example, you use a physical, fixed-length data file to import pay period data into the PI_CHECK, PI_EARN_DETAIL, PI_DED_DETAIL, and PI_TAX_DETAIL import tables.
Basic File Layout
Header and footer records are optional. To use data that's not at the employee level, place it here. For examples, see the DETI sample data file header and footer.
Note. You can map fields that are derived from the PeopleSoft pay calendar or that are derived during the Payroll Interface process. At the field level, select value as the type, and view the text list.
Record Identifiers
For each physical record to be read, set up an interface field as a record flag. On the Interface Field 1 page, enter value in the Type field and External Record Code in the Text field. Then each record has a unique flag at the beginning of the input data record.
Sample Values
This table lists sample values:
|
Default Value |
Record Name |
Field Name |
|
A |
PI_CHECK |
CHK01 |
|
B |
PI_EARN_DETAIL |
ERN01 |
|
C |
PI_DED_DETAIL |
DED01 |
|
D |
PI_TAX_DETAIL |
TAX01 |
Record Key Fields
Examine each PeopleSoft system record definition into which you want to import data. Examine the DETI sample data file and ensure that you map the same key fields from the data file into the Payroll Interface tables, as a minimum.
Sample Data File Layout
Each record is physical, with a fixed length, but the records do not have to be the same length. Enter the longest record length on the Definition Table component - Interface Definition File page, PI Record Length field.
Record A: Contains PI_EMPLID and all other data fields that are mapped to PI_CHECK. Key record fields are:
CHK01
Check Number
PI_EMPLID, as defined on the System Table component - Interface System Table 1, Employee Field ID field.
Record B, C, D, and subsequent records: These records do not need the PI_EMPLID field. The Import process uses the same Payroll Interface employee ID for these data records until it reads another record A with another Payroll Interface employee ID.
To process multiple records repeatedly, set the Definition Table component - Interface Definition Record page, Occur Ind field to Multi Recs to Single Defn Rec. For an example, see the DETI sample data file, Record ID DPE, Coded Hours.
Record B (Earn Detail)
ERN01 (RECORD)
Earn Type (NON KEY)
Earn Code (NON KEY)
Amount (NON KEY)
The data file might look like this:
A, Emplid, check nbr, data field, data field, etc.

B , earn type, code, amount

B, earn type, code, amount

B , earn type, code, amount

B, earn type, code, amount
Each subsequent record repeats many times as necessary (using Multi Recs to Single Defn Rec).
Record C (Deduction Detail)
DED01 (RECORD)
Ded Code (NON KEY)
Ded Amount (NON KEY)
The data file might look like this:
A, Emplid, check nbr, data field, data field, etc.

B , earn type, code, amount

B, earn type, code, amount

B , earn type, code, amount

B, earn type, code, amount

C, code, amount

C, code, amount

C, code, amount

C, code, amount

C, code, amount

C, code, amount
The PeopleSoft system imports subsequent records in the same way.
Working with Character Sets
Use the System Table component - Interface System Table 1 page, Character Set field to select a character set for export or import processing.
See Setting Up the System Table.
The following table lists the character sets that Payroll Interface supports.
For example, suppose your headquarters is in the U.S., but you have an office in Japan where the payroll system uses Kanji. When Payroll Interface is run for the U.S., the Character Set field is set to ISO 8859–1, the Latin character set. When Payroll Interface is run for the Japanese site, the Character Set field must be set to JIS X 0208, the Kanji character set.
|
Character Set |
Description |
|
ANSI |
Current ANSI Code Page |
|
ASCII |
US 7-bit ASCII |
|
Big5 |
Big5 (Traditional Chinese) |
|
CCSID1027 |
IBM EBCDIC 1027 (Jap.-Latin) |
|
CCSID1047 |
IBM EBCDIC 1047 (Latin1) |
|
CCSID290 |
IBM EBCDIC 290 (Katakana) |
|
CCSID300 |
IBM EBCDIC 300 (Kanji) |
|
CCSID930 |
IBM EBCDIC 930 (Kana-Kanji) |
|
CCSID935 |
IBM EBCDIC 935 (Simpified Chinese) |
|
CCSID937 |
IBM EBCDIC 937 (Traditional Chinese) |
|
CCSID939 |
IBM EBCDIC 939 (Latin-Kanji) |
|
CCSID942 |
IBM EBCDIC 942 (Japanese PC) |
|
CP1026 |
Windows 1026 (EBCDIC) |
|
CP1250 |
Windows 1250 (Eastern Europe) |
|
CP1251 |
Windows 1251 (Cyrillic) |
|
CP1252 |
Windows 1252 (Latin1) |
|
CP1253 |
Windows 1253 (Greek) |
|
CP1254 |
Windows 1254 (Turkish) |
|
CP1255 |
Windows 1255 (Hebrew) |
|
CP1256 |
Windows 1256 (Arabic) |
|
CP1257 |
Windows 1257 (Baltic) |
|
CP1258 |
Windows 1258 (Vietnamese) |
|
CP1361 |
Windows 1361 (Korean Johab) |
|
CP437 |
MS-DOS 437 (US) |
|
CP500 |
Windows 500 (EBCDIC 500V1) |
|
CP708 |
Windows 708 (Arabic - ASMO708) |
|
CP720 |
Windows 720 (Arabic - ASMO) |
|
CP737 |
Windows 737 (Greek - 437G) |
|
CP775 |
Windows 775 (Baltic) |
|
CP850 |
MS-DOS 850 (Latin1) |
|
CP852 |
MS-DOS 852 (Latin2) |
|
CP855 |
MS-DOS 855 (IBM Cyrillic) |
|
CP857 |
MS-DOS 857 (IBM Turkish) |
|
CP860 |
MS-DOS 860 (IBM Portuguese) |
|
CP861 |
MS-DOS 861 (Icelandic) |
|
CP862 |
MS-DOS 862 (Hebrew) |
|
CP863 |
MS-DOS 863 (Canadian French) |
|
CP864 |
MS-DOS 864 (Arabic) |
|
CP865 |
MS-DOS 864 (Nordic) |
|
CP866 |
MS-DOS 866 (Russian) |
|
CP869 |
MS-DOS 869 (Modern Greek) |
|
CP870 |
Windows 870 |
|
CP874 |
Windows 864 (Thai) |
|
CP875 |
Windows 875 (EBCDIC) |
|
CP932 |
Windows 932 (Japanese) |
|
CP936 |
Windows 936 (Simplified Chinese) |
|
CP949 |
Windows 949 (Korean) |
|
CP950 |
Windows 950 (Traditional Chinese) |
|
EBCDIC |
IBM EBCDIC CCSID37 (USA) |
|
EUC-JP |
Extended Unix Code (Japanese) |
|
EUC-KR |
Extended Unix Code (Korean) |
|
EUC-TW |
Extended Unix Code (Taiwan) |
|
EUC-TW-1986 |
Extended Unix Code (TW-1986) |
|
GB12345 |
GB 2312 (Simplified Chinese) |
|
GB2312 |
GB 2312 (Simplified Chinese) |
|
ISO-2022-JP |
ISO-2022-JP Japanese |
|
ISO-2022-KR |
ISO-2022-JP Korean |
|
ISO_8859-1 |
ISO 8859-1 (Latin1) |
|
ISO_8859-10 |
ISO 8859-10 (Latin6) |
|
ISO_8859-11 |
ISO 8859-11 (Thai) |
|
ISO_8859-14 |
ISO 8859-14 (Latin8) |
|
ISO_8859-15 |
ISO 8859-15 (Latin9 / Latin0) |
|
ISO_8859-2 |
ISO 8859-2 (Latin2) |
|
ISO_8859-3 |
ISO 8859-3 (Latin3) |
|
ISO_8859-4 |
ISO 8859-4 (Latin4) |
|
ISO_8859-5 |
ISO 8859-5 (Cyrillic) |
|
ISO_8859-6 |
ISO 8859-6 (Arabic) |
|
ISO_8859-7 |
ISO 8859-7 (Greek) |
|
ISO_8859-8 |
ISO 8859-8 (Hebrew) |
|
ISO_8859-9 |
ISO 8859-9 (Latin5) |
|
JIS_X0201 |
Japanese Half-width Katakana |
|
JIS_X_0208 |
Japanese Kanji |
|
Java |
Java (Unicode encoding) |
|
Johab |
Johab (Korean) |
|
Shift_JIS |
Shift-JIS (Japanese) |
|
UCS2 |
Unicode UCS-2 |
|
UTF7 |
Unicode UTF-7 |
|
UTF8 |
Unicode UTF-8 |
Working with Text Translate Values
Use the Field Definition Table component - Interface Field1 page, Text field to select translate values.
See Setting Up the Field Definition Table.
Translate values correspond to data elements that are already available to the COBOL process. The following table lists the field values, their translate values, and where the data originates.
|
Value |
Translate Value |
Source |
|
B |
Pay Period Begin Date |
PAY_CALENDAR.PAY_BEGIN_DT |
|
C |
Constant |
PI_FIELD_TBL.PI_DFLT_VALUE |
|
D |
Compare Date |
PI_RUN_PYGRP.COMPARE_DTTM |
|
E |
Export Date |
System date at runtime |
|
F |
PI Config ID |
PAYGROUP.PI_CONFIG_ID |
|
G |
Termination Count |
Process Calculation |
|
H |
Hire count |
Process Calculation = Hired this run |
|
I |
External Record Code |
PI_DEFN_RECORD.PI_RECORD_ID |
|
L |
Logical Record Count |
Process Calculation |
|
M |
Société de Traitement |
(Processing Paygroup) Derived during Processing |
|
N |
Interface Run Number |
PI_RUN_TBL.PI_RUN_NUM |
|
O |
Process Option |
PI_RUNCTL.PI_RUN_OPT |
|
P |
Pay End Date |
PAY_CALENDAR.PAY_END_DT |
|
Q |
Check Date |
PAY_CALENDAR.PAY_CHECK_DT |
|
R |
Pay Run ID |
PI_RUN_CTL.RUN_ID |
|
S |
System ID |
PI_CONFIG_TBL.PI_SYSTEM_ID |
|
T |
Compare Time |
PI_RUN_PYGRP.COMPARE_DTTM |
|
U |
Lot de Paie de Traitement |
(Processing Company) Derived during Processing |
|
X |
Export Time |
System Date Time value at runtime |
|
Y |
Physical Record Count |
Process Calculation |
Working with Company Filtering
Use the Definition Table component - Interface Definition Fields page, Key Field field to select Company as the key field.
See Setting Up the Definition Table.
Company filtering restricts Payroll Interface processing to a single company. With company filtering, the Company value that is assigned to a particular row of data must be the same as the company that you are processing in order for the row to be formatted and passed to the interface. If company filtering is not used, all rows created by Payroll Interface for each company and pay group combination are available for export.
For example, in PeopleSoft, you indicate that an employee has transferred from one company to another by adding a new JOB row with the Transfer action. In some third-party payroll systems, however, the company is part of the employee key; therefore, when an employee transfers to another company, Payroll Interface creates a new employee dossier (pool of data). For the transferred employee, you issue a termination on the old company and a hire on the new company.
After a transfer occurs, the system creates two images within Payroll Interface, one for each company. With company filtering, a change in employee data may apply to both images (the case for personal data rows, which would not have Company as a key field). In other cases, it may apply to one image (such as JOB row data, which you would generally want to filter by company). You can track retroactive changes even if the changes pertain to a company that the employee has already left. If you had not used company filtering, the third-party payroll system would store one set of transactions, without creating separate dossiers and without redundant data (like personal data rows).
This graphic shows how company filtering maps an employee's company data into separate files:
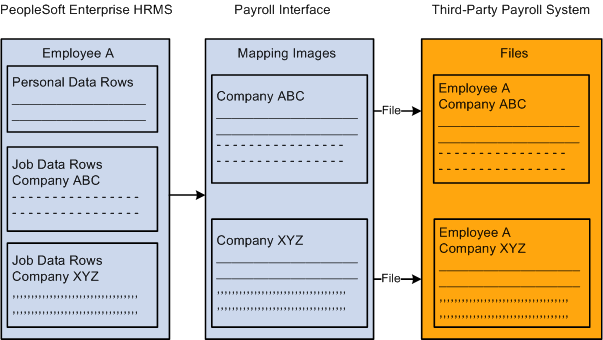
Company filtering
This example shows a worker employed in multiple companies over a period of five years. Assume that only one pay group exists per company.
|
Company |
Effdt |
Comprate |
|
CCB |
01-01-1999 |
500 |
|
CCB |
01-01-1998 |
450 |
|
PST |
01-01-1997 |
425 |
|
PST |
01-01-1996 |
400 |
|
CCB |
01-01-1995 |
325 |
If you change data in the 1995 row, you must send the data to company CCB. If you change the 1997 row, you send the data to company PST.
To implement company filtering:
Select Company for the System Table component, Interface System Table 1 page, Process Filter field.
Select Company for the Definition Table component - Interface Definition Fields page, Key Field field for those records that will be filtered by company.
For the company fields, use either a constant value equal to the processing company (used for personal data) or use the company from the Job Data component (or from a view based on the tables underlying the Job Data component).
Note. The system compares the field that is mapped as company to the processing company only after translation.
Working with Key Fields
Use the Definition Table component - Interface Definition Fields page, Key Field field to define a field as an occurrence (Occurrence) key or and effective-date (Effdt) key.
See Setting Up the Definition Table.
When you define a field as an occurrence key, multiple records (rows) are formatted for export. When you define a field as an effective-date key, the retrieved data is put through an extra process to eliminate redundant records (rows) from the PI_PARTIC_EXPT table.
For example, suppose the Job Data table contains the data shown in this table:
|
Effective Date |
Effective Sequence |
Comprate |
Department ID |
|
1999-01-15 |
0 |
100 |
00100 |
|
1998-12-12 |
0 |
100 |
00200 |
|
1998-12-10 |
0 |
85 |
00200 |
|
1997-06-10 |
0 |
85 |
00300 |
|
1997-05-31 |
0 |
75 |
00400 |
If you define the Effective Date field as an occurrence key, the following data is formatted for export:
|
Effective Date |
Comprate |
|
1999-01-15 |
100 |
|
1998-12-12 |
100 |
|
1998-12-10 |
85 |
|
1997-06-10 |
85 |
|
1997-05-31 |
75 |
If you define the Effective Date field as an effective-date key, the following data is formatted for export:
|
Effective Date |
Comprate |
|
1998-12-12 |
100 |
|
1997-06-10 |
85 |
|
1997-05-31 |
75 |
Warning! Accurate processing depends on the collate order that you specify for the effectived-dated field. On the PS Tables component - PS Tables page, Collate Order field, you must select Asc (ascending). If you do not select the ascending collate order, you will eliminate all but the last row.
Working with COBOL ProcessesThis section discusses how to:
Review delivered COBOL processes.
Review delivered COBOL processes for special events.
Create COBOL routines.
Reviewing Delivered COBOL Processes
Use the Process Table component - Interface Process Table page, Process Description field to review descriptions of the COBOL processes that are delivered with Payroll Interface.
The delivered COBOL processes are either field or record processes (you can associate a process with either a field or a record) that perform processing tasks outside the normal scope of Payroll Interface.
See Setting Up the Process Table.
Example: Process ID 000015
This COBOL process performs a validation against some data values and sets the value of the field to which the process is attached to one of the values listed in the Interface Process Table page, Returned Value field. Because the timing is Before Field Translation, you can then use these values in the Field Translation list. The list of values in the Returned Value field documents the process so that you know which values can be used in the Field Translation list and what they represent. This technique enables you to leverage one COBOL routine for two fields.
This process is useful because the PeopleSoft system stores certain tax values in two separate fields: one field for percents and another field for flat amounts. For this type of field, some payroll systems have one field with a Type code to specify whether it is a percent or an amount. The COBOL process determines which PeopleSoft field contains the value and returns those fields that are equal to the one identified in the Returned Value field. The Payroll Interface process then converts or translates the value in the Returned Value field to another value based on the Field Translation list.
Delivered Processes
This table lists and describes the COBOL processes that are delivered with Payroll Interface:
|
Process ID |
Process Phase |
Description |
Type |
User Defined Process |
User Exit Program |
Description |
|
000001 |
Record Processing |
Ded End Dt |
Record |
No |
None |
When the primary PeopleSoft source for the transaction is additional earnings, matches the earnings end date against the pay end date to determine whether the additional earnings should be stopped. |
|
000001 |
Export File Creation |
0N1 Change |
Record |
Yes |
PIPXPADP |
Stops a deduction from exporting a field with the external field ID equal to "0N1". When the amount changes to zero, this field must be a lowercase X; otherwise, it is blank. . When 0N2 is zero and the change code is greater than zero, this process sets the change code to "0" and set its own change code to "2". Data in PI_PARTIC_EXPT for this field will always be "x". |
|
000002 |
Before Field Translation |
Area Code |
Field |
No |
None |
Extracts the U.S. area code from the phone number field if the field contains 10 characters. If the field contains fewer than 10 characters, spaces are returned. |
|
000003 |
Before Field Translation |
City Code1 |
Field |
Yes |
PIPSPADP |
Returns the locality code for the City 1 field. If the employee has more than one locality code defined, the code returned is where he or she works. |
|
000004 |
Before Field Translation |
City Code2 |
Field |
Yes |
PIPSPADP |
Uses the City2 Code value only if resident state and work state are different. Uses the translate entries when needed. |
|
000005 |
Before Field Translation |
Cnt Deduct |
Field |
Yes |
PIPSPADP |
Adds 1 to a counter for deductions using fields that are mapped to the ON1 field. Issues a warning message when the employee has more than 24 deductions. |
|
000005 |
Export File Creation |
Tilde Chr |
Field |
No |
None |
For delimited data file structures only. Inserts a Delete character as defined in the working storage of the COBOL program PIPXPRCS.CBL A tilde (~) follows the value of the field to be deleted. Only works when invoked from a Process Control record definition. |
|
000006 |
Record Processing |
Co change |
Record |
No |
None |
Recognizes that the PeopleSoft company ID for this employee has changed. When using this process, the PeopleSoft company ID must be mapped to a field within the record. If the converted value for the PeopleSoft company ID changes, the record containing this process ID is formatted. |
|
000008 |
After Field Translation |
Excess |
Field |
Yes |
PIPSPADP |
Returns the translated deduction code for the direct deposit bank account identified to contain the "excess" within PeopleSoft. |
|
000008 |
Export File Creation |
Skip Blank |
Field |
Yes |
PIPXPADP |
Bypasses this field in the output file if the Export Full option is selected and the field is blank. |
|
000009 |
Before Field Translation |
Lcl recip |
Field |
Yes |
PIPSPADP |
Creates values to apply to the translate table. If Local 2 exists, then Field 1 will be resident local and Field 02 will be work local. |
|
000010 |
Before Field Translation |
First Name |
Field |
No |
None |
Extracts the first name from the PeopleSoft Name field on the Personal Data Table. |
|
000011 |
Before Field Translation |
Last Name |
Field |
No |
None |
Extracts the last name from the PeopleSoft Name field on the Personal Data Table. |
|
000012 |
After Field Translation |
New Hire |
Field |
Yes |
PIPSPADP |
Sets the new hire action to a lowercase N. This is set when no history records exist for the employee. |
|
000013 |
Before Field Translation |
Old PI ID |
Field |
No |
None |
Uses the employee's previous PI_EMPLID. |
|
000014 |
Before Field Translation |
Before Field Translation |
Field |
No |
None |
Maps the previous export value for this field into the current record. |
|
000015 |
Before Field Translation |
Pct or Amt |
Field |
No |
None |
Derives a type code from data in two related numeric fields. The first is the amount; the second is the percent. Both fields must be on the same table and row. The return values reflect non-zero entries in the fields. Examples include Federal Tax Data, Additional Amount, and Additional Percent. |
|
000016 |
Export File Creation |
Bypass Rec |
Record |
No |
None |
Bypasses the entire record on the output file. |
|
000016 |
Import Processing |
Bypass Rec |
Record |
Yes |
PIPMPADP |
Validates and bypasses the record during the import process. |
|
000017 |
Before Field Translation |
Phone No |
Field |
No |
None |
Extracts the 7-digit phone number from the free-form Phone field. |
|
000018 |
Record Processing |
Pygrp chg |
Record |
No |
None |
Recognizes that the PeopleSoft pay group for this employee has changed. When using this process, the PeopleSoft pay group must be mapped to a field within the record. If the translated value for the PeopleSoft pay group changes, the record containing this process ID is formatted. |
|
000019 |
After Field Translation |
Rehire Cd |
Field |
Yes |
PIPSPADP |
If the employee's status code was terminated the last time this employee's data was exported, but the current status code is Active, sets the Rehire code. |
|
000020 |
Before Field Translation |
RmSlsh/Dsh |
Field |
No |
None |
Returns the data value from the PeopleSoft database minus any embedded slashes or dashes. Use to return the U.S. ZIP code value without the separating dash and to return a phone number without dashes. |
|
000021 |
Before Field Translation |
State 2 Cd |
Field |
Yes |
PIPSPADP |
Uses the Resident State Code if resident state and work state are different. Uses the translate entries when needed. |
|
000022 |
Before Field Translation |
Std Hours |
Field |
No |
None |
Calculates standard hours per pay period from standard weekly hours and pay frequency of the pay group. |
|
000023 |
Record Processing |
Stop DirDp |
Record |
No |
None |
Recognizes that the Direct Deposit code no longer applies for this employee. The record containing this process ID is formatted. |
|
000024 |
Record Processing |
Stop AdPay |
Record |
No |
None |
Recognizes that Additional Payment no longer applies for this employee. The record containing this process ID is formatted. |
|
000025 |
Before Field Translation |
Stop Code |
Field |
No |
None |
Returns a Yes indicator (a returned value of "Y") when one of the following events occurs: Stop Deduction, Stop Direct Deposit, Stop Additional Pay, PI Employee ID change, Company change or Pay Group change. |
|
000026 |
Record Processing |
Stop Ded |
Record |
No |
None |
Recognizes that the deduction code no longer applies for this employee. The record containing this process ID is formatted. |
|
000027 |
Record Processing |
Stop Goals |
Record |
No |
None |
Recognizes that deduction goals no longer apply for this employee. The record containing this process ID is formatted. |
|
000028 |
Before Field Translation |
Stop Date |
Field |
No |
None |
Returns a stop date when any of the following events occur: Stop Deduction, Stop Direct Deposit, Stop Additional Pay, PI Employee ID change, Company change and Pay Group change. The date supplied is the pay begin date minus one day. If the event does not occur, spaces are supplied for the stop data. |
|
000029 |
Record Processing |
Stop Save |
Record |
No |
None |
Recognizes that the savings plan deduction no longer applies for this employee. The record containing this process ID is formatted. |
|
000030 |
Before Field Translation |
ST Recip |
Field |
Yes |
PIPSPADP |
Creates values to apply to the translate table. If State 2 exists, then Field 1 is the resident state and Field 2 is the work state. |
|
000031 |
Record Processing |
Transfer |
Record |
Yes |
PIPSPADP |
Detects when the transfer transaction should be formatted. |
|
000031 |
Export File Creation |
Transfer |
Record |
Yes |
PIPXPADP |
Recognizes when the PI_EMPID for an employee has changed. The transfer transaction is generated to include the appropriate change indicators for the fields that have changed. |
|
000032 |
Before Field Translation |
MD Local % |
Field |
No |
None |
Calculates the Maryland locality percentage. Translate values apply only when State 1 is Maryland. |
|
000033 |
After Field Translation |
SUI/SDI |
Field |
Yes |
PIPSPADP |
Generates an error message and does not export the employee's data to ADP if a change is detected in this field and the employee has not been assigned a new PI_EMPLID. Use to validate a change to the SUI/SDI state tax code. |
|
000034 |
Before Field Translation |
> 3 DirDep |
Field |
Yes |
PIPSPADP |
Edits the employee data for more than three direct deposit accounts. |
|
000035 |
After Field Translation |
New PI ID |
Field |
No |
None |
Uses the current or "new" PI-EMPLID when the old PI_EMPLID is not the same as the current PI_EMPLID assigned to the PeopleSoft employee ID. |
|
000036 |
Import Processing |
DPA09 |
Field |
Yes |
PIPMPADP |
Saves pay date 1 from the Direct Pay header record for access by process 000040. |
|
000037 |
Import Processing |
DPA10 |
Field |
Yes |
PIPMPADP |
Saves the pay period end date 1 from the Direct Pay header record for access by process 000040. |
|
000038 |
Import Processing |
DPA11 |
Field |
Yes |
PIPMPADP |
Saves the pay date 2 from the Direct Pay header record for access by process 000040. |
|
000039 |
Import Processing |
DPA12 |
Field |
Yes |
PIPMPADP |
Saves pay period end date 2 from the Direct Pay header record for access by process 000040. |
|
000040 |
Import Processing |
DPB11 |
Field |
Yes |
PIPMPADP |
Selects pay dates 1 or 2 from the Direct Pay header record. PI_CHECK key fields are based upon the value of this field. |
|
000041 |
Import Processing |
PCX 3E8 |
Field |
Yes |
PIPMPADP |
Updates PI-BALANCE_YEAR PI_BALANCE_PERIOD and PI_BALANCE_QTR based upon the as of date. |
|
000042 |
Import Processing |
PCX 3E9 |
Field |
Yes |
PIPMPADP |
Updates all of the current employee's balance entries before they are inserted in the database. |
|
000043 |
After Field Translation |
Goal Amts |
Field |
Yes |
PIPSPADP |
Paired with special process 000044. Does not send the goal limit amount if it is zero on setup. Formats the reset of a goal limit amount to zero when needed. |
|
000044 |
After Field Translation |
Goal Code |
Field |
Yes |
PIPSPADP |
Pairs the Goal Limit codes with the Goal Limit Amount. |
|
000045 |
Before Field Translation |
Middle Int |
Field |
No |
None |
Retrieves the person's middle initial from the Name field. Names are entered last name, first name, and middle name. This routine takes the first character following the space after the first name. |
|
000046 |
Before Field Translation |
Middle Nme |
Field |
No |
None |
Retrieves the person's middle name from the Name field. |
|
000047 |
Export File Creation |
Skip Field |
Field |
Yes |
PIPXPADP |
Causes the export process to bypass the field on the output file when the Export Full option is used and the field is blank. |
|
000048 |
Export File Creation |
Bypass Fld |
Field |
No |
None |
Bypasses the field in the output transaction file. |
|
000049 |
Record Processing |
Eff Status |
Record |
No |
None |
Checks the effective status field. If it is not active, the data will not be formatted for export. |
|
000050 |
Record Processing |
CSV |
Record |
Yes |
PIPSPRCS |
Marks records with a stop deduction as having a stop on the PI Partic Export. |
|
000200 |
Before Field Translation |
GVT Remark |
Field |
No |
None |
(USF only) Creates an array of remarks codes from the SF50 remarks for inclusion in PACT Record. |
|
000201 |
Before Field Translation |
Tang Amt |
Field |
No |
None |
(USF only) If Tangible Benefits > 0 sets to "Y" else blank. |
|
000202 |
Before Field Translation |
Intang Amt |
Field |
No |
None |
(USF only) If Intangible Benefits > 0 sets to "Y" else blank. |
|
000203 |
Export File Creation |
Geo Code |
Field |
No |
None |
(USF only) Process GVT_GEOLOC_CD Code. |
|
000204 |
Before Field Translation |
Hire Date |
Field |
No |
None |
(USF only) Hire Date evaluation. |
|
000205 |
Before Field Translation |
Posn Title |
Field |
No |
None |
(USF only) Position Title Code/Description. |
Reviewing Delivered COBOL Processes for Special Events
The Definition Table component - Interface Definition Record page, Process ID field enables you to access COBOL processes that signal special events (transactions) such as a Stop Deduction. These events set an indicator that can be used later by another special process indicator. The following table lists the processes that Payroll Interface delivers for special events.
See Setting Up the Definition Table.
Note. The processes listed in this section are a subset of the COBOL processes that are delivered with Payroll Interface.
See Reviewing Delivered COBOL Processes.
See Working with Transactions.
|
Process ID |
Description |
Record Type |
Special Event |
|
00001 |
0N1 Change |
Data |
Used for logical file types. Assigned to data records for DED_CALC and savings. |
|
000023 |
Stop DirDP |
Process |
Stops direct deposit. |
|
000024 |
Stop AdPay |
Process |
Stops additional payment. Assigned the stop record. |
|
000026 |
Stop Ded |
Process |
Stop deduction. Assigned the stop record. |
|
000027 |
Stop Goals |
Process |
Stop deduction goal. Assigned the stop record. |
|
000029 |
Stop Save |
Process |
Stop savings plan deduction. Assigned the stop record. |
|
000050 |
Savings, Additional Pay |
Data |
Assigned to the data records for non-logical file formats (such as CSV) for additional pay and savings plan before and after tax. These record IDs must be named: "SAVE" for before-tax savings "SPAT" for after-tax savings "APAY" for additional pay |
Creating COBOL Routines
You can create your own COBOL routines for use with Payroll Interface. The system isolates your COBOL routines from the delivered Payroll Interface COBOL processes and calls them by retrieving the name specified on the Process Table component - Interface Process Table page, User Exit Program field.
Shell programs for three user exit invocation points are provided with Payroll Interface. You can use these programs as templates for your COBOL routines:
PIPMPOTH: For routines performed during the Import process.
PIPSPOTH: For routines performed during the Export process select/compare phases.
PIPXPOTH: For routines performed during the Export process create export file phase.
To define your own COBOL routine:
Make a copy of the shell program that is associated with the Payroll Interface process phase in which your special process routine will be performed.
Do not modify the shell programs. These programs are set up with all the necessary working storage and linkage section data elements already defined and should be preserved as modules for future development.
Change all references to the shell program name to the name of your new routine.
Follow the PeopleSoft naming convention to make it easier to identify the timing of your own routines. You should change the last three characters of the program name to the system ID for which the routine is written. For example, the ADP system ID has three routines: PIPMPADP, PIPSPADP, and PIPXPADP.
Select a process ID for your new routine.
Review copy member PICPRCSW.CBL and select an unassigned number between 80000 and 899999. These numbers will not be used by PeopleSoft development. Add an 88 level description for your new routine in the copy member. Code your program logic and compile your program.
Define your new routine to Payroll Interface by setting up a process ID using the Process Table component.
Note. For AS400 and Oracle/VMS platforms, you must specify the calls to your user exit programs in copy member PICUEXIT.CBL. Edit this copy member to add your new program in the appropriate place.
See Also
Working with Smart Select
The Select Type field on the Import/Export Payroll Data component - Import/Export Payroll Data page has three options: All Employees in Group, Manually Select, and Smart Select. The Smart Select option provides substantial performance benefits by enabling you to process only those employees who have had online changes since the last time the Export process was run.
When deciding whether to use Smart Select, consider the following:
Smart Select is recommended for use with very large companies.
To activate Smart Select, you must add a PeopleCode function, UPDATE_SMARTSELECT, to each EMPLID-keyed table that is set up in the PS Tables component—including those EMPLID-keyed tables that are referenced indirectly through views.
When data changes in these tables, a record that includes the EMPLID and EMPL_RCD key fields, as well as the data change, is written to the PS_PI_PRESELECT table. When you run the Export process using the Smart Select option, Payroll Interface processes only those records in the PS_PI_PRESELECT table.
Smart Select detects online changes only.
At least once per payroll cycle you should run the Export process with the All Employees in Group option selected to process records that have changes but do not have the PeopleCode function attached, or to process records that have changes that were made outside of the online system (for example, deduction calculations or a batch update to your employees).
Note. If you update employees other than online, but they represent only a small percentage of all employees, you can manually update the PS_PI_PRESELECT table for these employees and then run the Export process with the Smart Select option selected.
Smart Select detects changes to EMPLID-keyed tables only. You should run the Export process with the All Employees in Group option selected whenever you change the Payroll Interface definition, change any tables referenced in the PS Tables component that is not keyed on the EMPLID field, or are processing a group of employees for the first time.
Activating Smart Select
Payroll Interface provides a PeopleCode function, UPDATE_SMARTSELECT, which tracks online changes and makes the information available to the Export process. To activate Smart Select, you must add this function to each EMPLID-keyed table that is referenced by the PS Tables component—including those EMPLID-keyed tables that are referenced indirectly through views. The example in this section shows how to activate Smart Select for the Citizenship table (record). Follow these same steps to activate Smart Select for other EMPLID-keyed tables.
To activate the Smart Select code for the Citizenship table:
Start PeopleSoft Application Designer.
Select File, Open.
The Open Definition dialog box appears.
From the Open Definition dialog box, do the following:
For the Definition field, select Record.
For the Name field, enter CITIZENSHIP.
Click Open.
The CITIZENSHIP (Record) dialog box appears.
Select View, PeopleCode Display.
The CITIZENSHIP (Record) dialog box displays a grid.
For the EMPLID field, locate the SPo (SavePostChange) cell in the grid.
PeopleCode may or may not be indicated for the EMPLID field in the SPo cell.
Double-click the SPo cell to open the PeopleCode editor.
The CITIZENSHIP.EMPLID.SavePostChange (Record PeopleCode) dialog box appears.
For the EMPLID field, add the following PeopleCode:
Declare Function UPDATE_SMARTSELECT PeopleCode PI_PRESELECT.PI_SELECT_TYPE FieldFormula;
For the EMPLID field, add the following PeopleCode:
If EMPL_RCD is a field in the CITIZENSHIP table, add:
UPDATE_SMARTSELECT (EMPLID, EMPL_RCD, 'Y');
If EMPL_RCD is not a field in the CITIZENSHIP table, add:
UPDATE_SMARTSELECT (EMPLID, 0, 'N');
Note. The 'Y' or 'N' at the end of the parameter list indicates whether EMPL_RCD exists in the record. If it does not exist, then all jobs for a multijob employee will be processed in the next Smart Select export.
Save the PeopleCode and the table (record).
This example shows the Citizenship table (record):
This example shows the PeopleCode that is required to activate Smart Select:
PeopleCode Function UPDATE_SMARTSELECT
The PeopleCode function UPDATE_SMARTSELECT tracks and records online data changes using the PS_PI_PRESELECT table.
Function UPDATE_SMARTSELECT(&EMPLID, &EMPL_RCD, &EMPL_RCDN_FLAG) &COUNT = 0; SQLExec("SELECT COUNT(*) FROM PS_PI_PRESELECT WHERE EMPLID=:1 AND EMPL_RCD = :2 AND PI_SELECT_TYPE='C' AND PI_RUN_NUM= 0", &EMPLID, &EMPL_RCD, &COUNT); If &COUNT > 0 Then SQLExec("UPDATE PS_PI_PRESELECT SET DATETIME_STAMP=%CurrentDateTimeIn WHERE EMPLID=:1 AND EMPL_RCD = :2 AND PI_SELECT_TYPE='C' AND PI_RUN_NUM= 0", &EMPLID, &EMPL_RCD); Else SQLExec("INSERT INTO PS_PI_PRESELECT (PI_SELECT_TYPE,EMPLID,EMPL_RCD,DATETIME_STAMP, EMPL_RCDN_FLAG,PI_RUN_NUM) VALUES ('C',:1,:2,%CurrentDateTimeIn,:3,0)", &EMPLID, &EMPL_RCD, &EMPL_RCDN_FLAG); End-If; End-Function;
Working with Transactions
This section provides an overview of transactions and discusses how to:
Set up a transaction.
Set up a stop transaction.
Verify a transaction.
Verify a stop transaction.
Understanding TransactionsThe LOG sample data that is delivered with Payroll Interface includes transactions and corresponding stop transactions for deductions, savings plans, and additional pay. This section describes how to set up the transaction and the stop transaction for deductions using the LOGEXP export file.
When setting up transactions, the implementation details will vary depending on the type of transaction and the requirements of the third-party payroll system. The following procedures, however, show which Payroll Interface components need to be defined.
To set up a transaction:
Set up the PS Tables component—identify the tables and fields that are required for the transaction.
Set up the Field Definition Table component—define the fields that will be included in the export file.
(Optional) Set up the Instance Table component—create an instance ID if you want to restrict or modify the data that is sent to the third-party payroll system.
Set up the Definition Table component—define the transaction record and field sequences.
To set up a stop transaction:
Set up the Field Definition Table component—define the fields that will be included in the export file.
Review the Process Table component—identify the COBOL process that will perform the stop transaction.
Set up the Definition Table component—define the stop transaction record and field sequences.
Setting Up a TransactionFollow these steps to set up a deduction transaction using the LOGEXP export file.
Step 1: Set Up the PS Tables Component
Identify the PeopleSoft tables and fields that store the data that is required for the transaction:
Table: DED_CALC.
Fields: DEDCD (deduction code), DED_CLASS (deduction class), and DED_CUR (deduction amount).
Use the PS Table (PI_PSREC_PNL) page (Set Up HRMS, Product Related, Payroll Interface, Interface Controls, PS Tables, PS Table) to set up the PeopleSoft table and fields:
Step 2a: Set Up the Field Definition Table Component, Export File Fields
Define the fields for the deduction transaction: DEDAMT (shown in the following example) and DEDCD (not shown).
The default value for DEDAMT is the calculated deduction amount. The default value for DEDCD is the deduction code.
Note. The DED_CLASS field, identified in the PS Tables component, is not included in the export file. However, an instance ID for this field is set up in step 3.
Use the Field Definition Table - Interface Field1 page (Set Up HRMS, Product Related, Payroll Interface, Interface Controls, Field Definition Table, Interface Field1) to set up the field definition for the DEDAMT field:
Step 2b: Set Up the Field Definition Table Component, PeopleSoft Table and Fields
Identify the corresponding PeopleSoft table and field for the DEDAMT field:
Table: DED_CALC
Field: DED_CUR
Note. You must set up the DED_CALC table and DED_CUR field in the PS Tables component before you can access them through the Field Definition component.
Use the Field Definition Table - Interface Field2 page (Set Up HRMS, Product Related, Payroll Interface, Interface Controls, Field Definition Table, Interface Field2) to identify the PeopleSoft record (table) and fields:
Step 3: (Optional) Set Up the Instance Table Component
Instance IDs enable you to restrict or modify the data that is sent to the third-party payroll system.
Deduction class values are A (after tax), B (before tax), N (non-taxable or employer paid), and T (taxable or imputed income). The Calculate Deductions process calculates deductions for all classes (A, B, N, T). In this example, the third-party payroll system wants to receive deductions only for class values A and B. Therefore, set up an instance ID DEDCLS for the DED_CLASS field to export calculated deductions for class values A and B. (Alternatively, you can set up the instanced ID to exclude class values N and T.)
Note. When setting up an instance ID, you can either include the values that you want to export or exclude values that you don't want to export. You may need to experiment to determine which set up works best. Alternatively, you can create a view to retrieve a restricted data set.
Use the Interface Table - Interface Instance Table page (Set Up HRMS, Product Related, Payroll Interface, Interface Controls, Instance Table, Interface Instance Table) to set up instance IDs:
Step 4a: Set Up the Definition Table Component, File
Define the file, record, and field sequences for the export file.
Note. If you change any of the records or fields for a transaction, be sure to make the same changes to the records or fields for the corresponding stop transaction.
Use the Definition Table - Interface Definition File page (Set Up HRMS, Product Related, Payroll Interface, Interface Controls, Definition Table, Interface Definition File) to access the LOGEXP export file:
Step 4b: Set Up the Definition Table Component, Record
The LOGEXP export file includes nine record sequences. Record 40 is the deduction transaction. Record 50 is the deduction stop transactions.
|
Record Sequence |
Record ID |
Description |
|
10 |
PERS |
Personal Data |
|
20 |
EMPL |
Employment Data |
|
30 |
JOB |
Job Data |
|
40 |
DED |
Deductions |
|
50 |
SDED |
Stop Deductions |
|
60 |
SAVE |
Savings |
|
70 |
SSAV |
Stop Savings |
|
80 |
APAY |
Additional Pay |
|
90 |
SPAY |
Stop Additional Pay |
Record 40, the deduction transaction (DED), includes:
Record type: Data
Instance ID: DEDCLS—the instance ID created in step 3.
Process ID: 000001 ON1 Change—a process required for the deduction transaction.
Use the Definition Table - Interface Definition Record (Set Up HRMS, Product Related, Payroll Interface, Interface Controls, Definition Table, Interface Definition Record) page to set up the record sequences for the export file:
Step 4c: Set Up the Definition Table Component, Fields
Record 40, the deduction transaction, includes five field sequences:
Field Seq#: 10–50.
Field Seq 40 and 50 are a grouped field (Group ID 001).
Field Seq 50 is DEDAMT, the actual deduction amount.
Note. The field sequences (10–50) for transaction record 40 must be identical to the field sequences for stop transaction record 50. The value of field sequence 50 changes from DEDAMT to ZAMT.
Use the Definition Table - Interface Definition Fields page (Set Up HRMS, Product Related, Payroll Interface, Interface Controls, Definition Table, Interface Definition Fields) to set up the field sequences for the record:
Setting Up a Stop TransactionFollow these steps to set up a stop transaction for deductions using the LOGEXP export file.
Step 1a: Set Up the Field Definition Table Component, Export File Fields
For Payroll Interface to recognize a stop transaction, the delivered record-level process IDs must be used. PeopleSoft code moves the pay period end date (of the pay calendar entry being used with the run control) to the DATE_VAL field in the PI_PARTIC_EXTBL table when a stop process is identified. Along with the date, you'll see the corresponding field ID and CHAR_VAL (for example, for a deduction code).
See Export Processing.
Define the field for the deduction stop transaction: ZAMT. When the stop transaction is processed, the ZAMT default value, rather than the DEDAMT default value, is written to the export file.
The default value is determined by the requirements of the third-party payroll system (refer to the vendor documentation). For LOG systems, the default value may be 000.00 or zero. For CSV systems, the default value may be probably ~, the tilde character.
Use the Field Definition Table - Interface Field1 page (Set Up HRMS, Product Related, Payroll Interface, Interface Controls, Field Definition Table, Interface Field1) to set up a field definition for the ZAMT field:
Step 1b: Set Up the Field Definition Table Component, PeopleSoft Table and Fields
Because the ZAMT field does not correspond to a PeopleSoft table or field, the Field Definition Table - Interface Field2 page does not need to be set up.
Step 2: Review the Process Table
Identify the COBOL process that will perform the stop transaction. This can be one of the processes delivered with Payroll Interface or a user-defined process. In this example, use Payroll Interface Process ID 000026.
See Working with COBOL Processes.
After the process is attached to the stop transaction record (see step 3), it runs in the background during the Export process. If the process determines that a deduction code is missing, the ZAMT default value (rather than the DEDAMT default value ) is written to the export file and a flag on the PI_PARTIC_EXPT table is set to P.
See Export Processing.
Use the Process Table - Interface Process Table page (Set Up HRMS, Product Related, Payroll Interface, Interface Controls, Process Table, Interface Process Table) to view the processes that are delivered with Payroll Interface:
Step 3a: Set Up the Definition Table Component, File
Define the file, record, and field sequences for the export file.
Use the Definition Table - Interface Definition File page (Set Up HRMS, Product Related, Payroll Interface, Interface Controls, Definition Table, Interface Definition File) to access the LOGEXP export file:
Step 3b: Set Up the Definition Table Component, Record
Record 50, the deduction stop transaction (SDED), includes:
Record Type: Process
Base Rec: 40—the corresponding record for the deduction transaction.
Process ID: 000026—the process that stops the deduction.
Note. The Base Rec field joins the transaction to the stop transaction: record 40 is joined to record 50.
Use the Definition Table - Interface Definition Record (Set Up HRMS, Product Related, Payroll Interface, Interface Controls, Definition Table, Interface Definition Record) page to set up the record sequences for the export file:
Step 3c: Set Up the Definition Table Component, Fields
Record 50, the deduction stop transaction, includes five field sequences:
Field Seq#: 10–50.
Field Seq 40 and 50 are a grouped field (Group ID 001).
Field Seq 50 is now ZAMT, the zero amount that is sent when the deduction is stopped.
Note. The field sequences (10–50) for stop transaction record 50 must be identical to the field sequences for transaction record 40. The value of field sequence 50 changes from DEDAMT to ZAMT.
Use the Definition Table - Interface Definition Fields page (Set Up HRMS, Product Related, Payroll Interface, Interface Controls, Definition Table, Interface Definition Fields) to set up the field sequences for the record:
Verifying a TransactionTo verify the transaction:
Run the Calculate Deductions and Confirmation processes.
Run the Export process.
Step 1: Run the Calculate Deductions and Confirmation Processes
Calculate and confirm the deductions for the employee.
Use the Calculate Deductions page (Payroll Interface, Pay Period Deductions, Calculate Deductions, Calculate Deductions) to calculate the deductions:
Review the results. The employee has medical and dental before-tax and nontaxable deductions. However, because the DEDCLS instance ID is set up, only the before-tax deductions will appear in the export file.
Use the Review Deductions page (Payroll Interface, Pay Period Deductions, Review Deductions, Review Deductions) to review deductions:
Step 2: Run the Export Process
Use the Import/Export Payroll Data - Import/Export Payroll Data page (Payroll Interface, Payroll Data Exchanges, Import/Export Payroll Data, Import/Export Payroll Data) to run the Export process:
Review the export file. Because the instance ID DEDCLS is set up, only the before-tax deductions appear in the export file. Notice, however, that the transaction has worked. The DEDAMT or 59.77 value appears in the export file for deduction code KUHMOK:
Verifying a Stop TransactionTo verify the stop transaction:
Terminate one of the benefits for the employee.
Run the Calculate Deductions and Deduction Confirmation processes.
Run the Export process.
Step 1: Terminate a Benefit
Terminate the medical benefits for the employee, deduction code KUHMOK.
Use the Health Benefits page (Workforce Administration, Benefit Information NLD, Enroll in Benefits, Health Benefits, Health Benefits) to terminate the medical benefits:
Step 2: Run the Calculate Deductions and Confirmation Processes
Calculate and confirm the deductions for the employee. The terminated medical benefits no longer appear.
Use the Review Deductions page (Payroll Interface, Pay Period Deductions, Review Deductions, Review Deductions) to review the deductions.
Step 3: Run the Export Process
Run the Export process and review the export file. Notice that the stop transaction has worked. The ZAMT or 000.00 value appears in the export file for deduction code KUHMOK, the terminated medical benefit: