 Understanding the Content Categorization Spider Process
This chapter provides an overview of the content categorization spider process and discusses how to:
Set up to run the content categorization spider.
Run the content categorization spider.
Debug a run of the content categorization spider.
Make categorized content available on other sites.
Review delivered sample Categorized Content data.
Understanding the Content Categorization Spider Process
In Oracle’s PeopleSoft Enterprise Portal, the Categorized Content feature of the Content Management system enables you to categorize data originating from many sources. You can incorporate content from file servers and web servers together with manually added entries and place them in the categorized content hierarchy. Users then search this folder hierarchy to locate relevant documents. By granting access to the folders, you control which users—by user ID or role—can edit, publish, and view data.
Folder administrators and content authors can populate the hierarchy manually. But, you can also import content in bulk, using the content categorization spider, a web crawler program that will retrieve folders and documents from a local file server or from a remote website. You can automatically update your portal with the information that you consider pertinent, and retain the information where you deem necessary. You control the crawler, telling it what type of content to retrieve, where to look, and how much information to recall. Using Process Scheduler to refresh folders, you can keep your information current by the day, or even hour.
The features of automated categorization include:
A document that can appear in multiple folders and hierarchies.
Thus, users can find documents via whichever navigation scheme is most intuitive for them.
The ability to map documents from different sources or folders to the same folder.
Thus, users can aggregate related documents from a variety of sources.
Folders that are mapped individually, so a hierarchy does not need to reflect the exact structure of the source server.
Thus, users can organize documents in the most logical fashion.
To invoke the spider, you schedule an Application Engine program. The Application Engine program passes parameters, such as the type of crawl (file system versus HTTP), starting directory or URL, number of files to crawl, and so on, to the spider.
As the spider finds files and directories, it returns them to the Content Categorization system. The primary data passed back into the Content Categorization system is a URL and its directory path.
PeopleCode then maps the file to the appropriate folders. If the administrator has enabled and selected autocategorization, then the file is passed to the autocategorization engine.
The file is analyzed, and the directory path is replaced with a folder path or paths. If the resulting paths match a folder, the URL or file is mapped or placed within it. The spider can do this for hundreds or thousands of documents, thus filling in a hierarchy.
Any files and any auto-expanded subfolders created with the spider can only be added, modified, or removed by the spider. This restriction prevents having manually added entries orphaned if the spider no longer finds a directory path upon subsequent passes.
Note. The HTTP categorization spider does not operate on DB2/OS390.
Using the Content Categorization Spider
Two procedures are available for creating categorized content: manually and automatically using the content categorization spider. Using the content categorization spider to automatically populate categorized content folders consists of these high-level steps:
Identify data source folders and files.
Create a spider run control entry, which defines the content source.
Associate the content source with a folder.
Run the content categorization spider.
The following diagram highlights the content categorization spider along with the manual steps for creating categorized content:
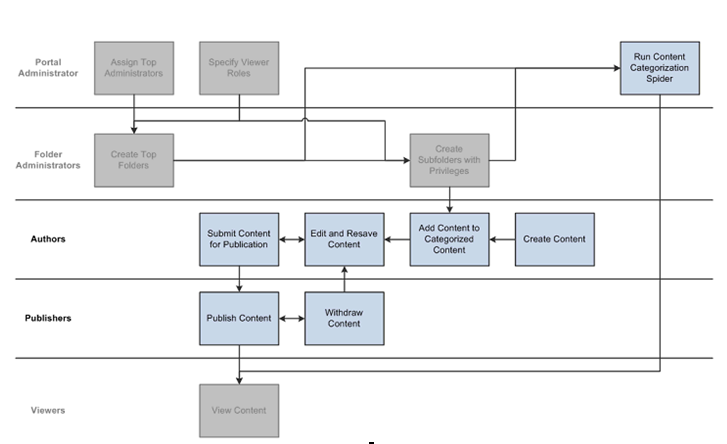
Content categorization spider along with the manual steps for creating categorized content
See Setting Up and Working with Categorized Content.
Setting Up to Run the Content Categorization SpiderThis section discusses how to:
Identify data source folders and files.
Create a spider run control entry.
Associate a content source with a folder.
 Pages Used to Set Up to Run the Content Categorization Spider
|
Page Name |
Definition Name |
Navigation |
Usage |
|
Categorization Spider |
EPPCM_SPIDR_RUN |
Content Management, Categorized Content, Categorization Spider |
Identify the content source and establish control parameters for running the Application Engine process. |
|
Content Source |
EPPCM_CATG_SPIDR |
Content Management, Categorized Content, Browse Folders Click a folder title link on the Browse Categorized Content page to navigate through the folder levels. Click a folder Properties link or click the Add Folder button at the appropriate folder level on the Browse Categorized Content page. Select the Content Source tab on the Folder Properties page. |
Associate an already defined content data source with the selected folder in categorized content. Note. The content data source was previously defined on the Categorization Spider page. |
|
Process Scheduler Request |
EPPCM_SPIDR_RUN |
Content Management, Categorized Content, Categorization Spider Click the Run button on the Categorization Spider page. |
Specify process variables. |
Identifying Data Source Folders and FilesBefore running the content categorization spider, you should become familiar with the folder hierarchy and documents available on the source system. You will want to examine the source system to determine:
The root folder in which to begin the spider.
The depth to which you want the spider to crawl.
The type of documents you want to retrieve.
For example, to traverse folders on a local file server to determine the characteristics of the source, you will:
Begin by using Windows Explorer to traverse the folder hierarchy of a local file server.
This drive is local to the application server that will run the content categorization spider Application Engine program.
Access and open the root folder, for example, the EPAdmin folder.
Select the source folder name.
Notice the folder hierarchy beneath the root folder.
You will select EPAdmin as the root of the folders to be traversed by the spider.
Also, notice the file names and file types in the source folder.
These files, along with files in parallel folders under EPAdmin, will be transferred by the spider during the crawl process.
Creating a Spider Run Control Entry
Access the Categorization Spider page (select Content Management, Categorized Content, Categorization Spider).
|
Run Control ID |
Enter the run control name that is similar to the source name. |
|
Source Type |
Select the type of crawl that will be performed. Available options are:
|
|
Source Name |
Enter the source name, such as a folder or hierarchy name. This name is an arbitrary name that you use to identify the source. |
|
Index URL |
Enter the source location as it relates to the batch server. For example, for a file server crawl, this value should be a file protocol-based URL that is accessible from the machine on which the spider runs. This URL represents the starting point from which the spider begins its search for files, such as c:/mydocuments, \\myserver\my _shared_folder\News Articles, c:\mydocs, or /usr/local/public_docs. For an HTTP crawl, this value can be any valid and accessible HTTP-based URL. |
|
Remap Path to This URL |
This field is relevant only for jobs that are based on file protocol-based URLs. Since all documents must be accessible by HTTP, this parameter specifies the HTTP URL equivalent of the file-based URL specified in the URL field. It is used to construct valid URLs for other directories and files that are encountered during a crawl. For example, if the specified URL is c:/news, when a file server crawl encounters the URL c:/news/article.html, the HTTP alias http://myserver/news indicates that article.html is accessible at http://myserver/news/article.html. Typically, you are required to incorporate content file systems into the document tree of an accessible web server using symbolic links, virtual directories, and so on. |
|
Index only in this hostname |
Available only when the source type is HTTP Crawler. Select to prevent the spider from searching other web sites to which the source is linked. Warning! You can potentially mix up data from multiple hosts if you perform a crawl with the Host Affinity option deselected. |
|
Link Depth |
Enter the number of levels of links that the job should process. |
|
Maximum Document Count |
Enter the maximum number of documents and directories that the job should process before terminating. This value establishes reasonable limits for extremely large or open-ended crawls. Note. The content categorization crawler can process a maximum of 99,999 files. |
|
Create Log File |
Select to create a log file. The log file appears in the files subdirectory of process scheduler: $PS_HOME/appserv/prcs/<server domain name>/files. This file provides details about the processed URLs and their associated folder path directories. |
|
Mime Types |
Enter the file types to include in the search. Confirm that your browser can view these file types. Autocategorization search engines might have additional file type limitations. For file server crawls, this value should be a comma-delimited list of file extensions, such as .txt, .xml, or .html. For HTTP protocol-based crawls, this value should be a comma-delimited list of Multipurpose Internet Mail Extensions (MIME) types, such as text/html, application/pdf. |
The Autocategorization section appears only when the source type is Autocategorized File Server.
|
Autocat Name (autocategorization name) |
Select the name of the autocategorization engine from the list of source names entered when vocabularies were defined. |
|
Vocabulary Name |
Select a defined vocabulary name that is used by the selected autocategorization engine for a hierarchy into which it can classify documents. |
|
Max. Categories (maximum categories) |
Enter the maximum number of categories (folders) into which the autocategorization engine autoclassifies each document. Some engines may not support this feature. |
|
Autocategorization Threshold |
Enter a value to override the threshold on the Content Source page. Note. Some autocategorization engines rank their categorization scores that indicate how confident the engine is about its recommendation. Not all autocategorization engines support rankings, and the range of allowable values is engine-dependent. |
Associating a Content Source with a Folder
Access the Content Source page (select Content Management, Categorized Content, Browse Folders; click a folder title link on the Browse Categorized Content page; click a folder Properties link, or click the Add Folder button at the appropriate folder level on the Browse Categorized Content page; and select the Content Source tab from the Folder Properties page).
This page is used to specify the crawled spider source that generates the child content and child folders in this parent folder.
Note. You must set up your content sources using the Categorization Spider page before you enter information on this page.
|
Source Type |
Specify the same source type that was specified on the Categorization Spider page. Available options are:
|
|
Source Name |
Select a source name from a list of available names. The source names is restricted to those that you defined on the Categorization Spider page with the selected source type. |
|
Source Path |
Specify the content location within the source:
When you select a value for the source name using the lookup prompt, the system automatically inserts the correctly formatted string into the Source Path field based on the value defined for the Spider Start Location field on the Categorization Spider page. |
|
Auto Expand Folder |
Select to have the spider crawl subfolders on the source. For example, if the path /docs is specified as the source detail of a file-server-based folder course, then all the subfolders and content below the /docs directory is processed recursively during a crawling job. Every subfolder on the source becomes a new subfolder beneath the current folder within the hierarchy if the subfolder does not already exist. If this option is deselected, only the content that resides directly at the root of the source path is processed. |
|
Score |
Enter the rank that a piece of content must have to be retrieved from an autocategorization engine. Some autocategorization engines rank categorizations with scores that indicate how confident the engine is about its recommendation. Stipulating a minimum allowable score establishes the degree of relevancy that content must have before being allowed into a folder. All autocategorization engines might not support rankings, and the range of allowable values is engine-dependent. |
Running the Content Categorization Spider
The Categorization Spider page is used to run the content categorization spider Application Engine process. The spider job must be run as a batch process because the actual time needed to complete the task can vary widely, depending on the scope and depth of the content to be crawled.
When you click the Run button on the Categorization Spider page, the Process Scheduler Request page appears, enabling you to enter or update parameters, such as server name and process output format. Click the OK button on the Process Scheduler Request page to start the process. Notice that your process has been assigned a process instance number, and you should make a note of the process instance number for future tracking.
See Creating a Spider Run Control Entry.
This is an example of the Process Scheduler Request page:
After you have run your process using the Process Scheduler Request page, use the Process Monitor page to monitor the status of your process request. You use Process Monitor to:
Check the status of your submitted process requests.
Cancel process requests that have been initiated or are currently processing.
Hold process requests that are queued, and queue process requests that you have put on hold.
You can also use the Process List page to view the status of submitted process requests.
See Also
Enterprise PeopleTools 8.50 PeopleBook: PeopleSoft Process Scheduler.
Debugging a Run of the Content Categorization Spider
All crawled content is automatically published and immediately appears to the appropriate users. If you discover a document that is not appropriate for viewing, access the Unpublish Content page to unpublish the content item or click the Save/Unpublish button on the individual content item.
If the spider runs successfully but no content is mapped into your hierarchy, there could be a number of causes and resolutions. Most likely, you may not have mapped a folder to a valid directory or folder path returned by the spider. Content source paths for file server crawls should be the directory path minus any drive indicator and the filename. Content source paths for HTTP crawls should be the directory path of the URL, so remove the domain and filename.
On the Content Source page for a folder, you should ensure that the source details are set to a text string or path that is the same as found by the spider. In the log file, look for log entries containing the phrase Got path from url.
See Withdrawing News Articles.
Making Categorized Content Available on Other SitesYou can use the content categorization spider to make retrieved content available on other sites. To accomplish this, after you have run the content categorization spider on the main site, create a folder on the other site that uses the same content source as the main site. Then, run the spider process while on the other site using the same run control ID as the main site. The system creates an index used by both sites that picks up the same content and marks it as located in both sites.
To make content on one site available from another site:
Run the content categorization spider on the main site.
Make a note of the content categorization spider run control ID for use later.
On the other site, create a folder in categorized content that specifies the same content source as the main site.
Run the content categorization spider on the other site specifying the same run control ID that you used on the main site.
After you successfully run the content categorization spider, the subfolders and files viewed on the main site are available on this site. Notice that the content IDs for the files are the same as they are on the main site, indicating that the content is shared, not copied to the second site.
Reviewing Delivered Sample Categorized Content Data
This section discusses how to:
Browse categorized content.
Use the Products folder.
Use the Portal Implementation folder.
Browsing Categorized ContentAccess the Browse Categorized Content page (EPPCM_HIERTOP_MAIN) (select Content Management, Categorized Content, Browse Folders) to view delivered folder sample data.
This page displays the top-level list of folders to which you have security to view. Clicking further down the hierarchy allows you to navigate or discover subfolders and related documents. Clicking the link for a document displays the document contents.
The sample data delivered with the PeopleSoft Enterprise Portal includes one folder called PeopleSoft Documents. This folder shows some representative documents from http://www.peoplesoft.com, such as product information, white papers, and case studies. It is designed to show a combination of manually added folders, documents, and crawled content.
This is an example of the sample data delivered with the PeopleSoft Enterprise Portal - PeopleSoft Documents folder:
The first-level folders are divided into two groups of user access:
The two general information folders, About PeopleSoft and Products, are visible to all users (PAPP_USER, PAPP_CUSTOMER, PAPP_EMPLOYEE, and PAPP_SUPPLIER).
The other two folders, Portal Implementation and Support, contain documents relevant to customers and, therefore, have restricted access (PAPP_CUSTOMER and PAPP_EMPLOYEE only).
There is difference in how content was added by clicking the Properties link and reviewing the property details; some documents were added manually, others were added by the categorization spider. The latter collection is from a directory structure that simulates data from the PeopleSoft corporate web site.
After the PeopleSoft Enterprise Portal is installed, you will find these files on your web server under one of the following directories:
For WebLogic:
<weblogic install directory> bea\wlserver6.1\config\peoplesoft\applications\PORTAL\ps\images\portal_pa\website
For WebSphere:
<websphere install directory>\WebSphere\Appserver\installedApps\peoplesoft\PORTAL\ps\images\portal_pa\website
Using the Products Folder
The Products folder is an example of an auto-expanded folder. The About PeopleSoft and Support folders are also auto-expanded folders. The directory structure under the Products folder is divided into three types of product lines with many products under each. Each product directory typically has subdirectories containing articles, case studies, or both.
The auto-expand feature enables an administrator to define just the desired top folder. Subfolders underneath are then automatically created as they are encountered. Look at the definition for the Products folder.
Creating a source path on the Content Source page (EPPCM_CATG_SPIDR) means that content from the spider should potentially be mapped into this folder. First, it defines the content source—a file server crawl called PeopleSoft Documents. Within that spider run, it will map all documents contained within that directory to this Content Categorization folder if it encounters a specified directory.
In this example, Source Details is the subdirectory, as in /ps/images/portal_pa/website/products:
Start the auto-expand feature by selecting the Auto Expand Folder option. The 45 subfolders under the Products folder are created as subfolders, and the 148 documents contained in those subfolders are mapped to their appropriate subfolder. If the publish and remove dates are specified, then all 148 documents found under the Products folder inherit these dates.
Access the Folder Security page (EPPCM_CATG_MEM) for the Products folder:
Four roles are assigned for viewing since this folder contains documents applicable to almost all users. The sublevel folders created with the auto-expand feature also inherit these viewer and administrator roles. Click the Return to Browse Categorized Content link, and then click the Products folder and view its contents.
This folder contains no documents because no files were contained in the directory C:\bea\wlserver6.1\config\peoplesoft\applications\PORTAL\ps\images\portal_pa\website\products (only subfolders).
Note that no Delete buttons are associated with the three sublevel folders, and property information is read-only. Any folder or content that is automatically created by the spider cannot be edited or removed by manual administration because it may change or disappear the next time the spider is invoked. All auto-expanded folders and content can only be added, modified, or removed with the spider.
Note. You should activate the Auto Expand Folder option at a strategic level that minimizes manual administration and is not too high in the taxonomy to maximize flexibility.
Portal Implementation FolderThe Portal Implementation folder is an example that combines manual entries with auto-expand functionality. First, note that its folder definition does not activate the expand option. Thus, folders and content can be manually added below it. The Portal Implementation folder contains both manual and automated entries.
The three sublevel folders at this level were all defined manually. This way, they can contain both manual and automated entries (see the Technology folder). Note that the Auto Expand Folder option is activated in each case, so that any subfolders are automatically created. The two documents, Portal Solutions and Portal Solutions Overview, were manually added and reference-approved documents in the Content Management system.
The business_persons_guide.pdf document was added by the spider. Access the Folder Properties page and see that most of the attributes of the auto-created document entry cannot be modified. However, an administrator can manually change the title so that it is more meaningful for users. Also, an administrator can unpublish the document if it is inappropriate for any reason.