 Understanding Categorized Content
This chapter provides an overview of categorized content and discusses how to:
Manage folders.
Add categorized content manually.
Managing categorized content.
Understanding Categorized Content
The Categorized Content feature of the content management system enables you to categorize data originating from many sources. You can incorporate content from file servers and web servers together with manually added entries and place them in the categorized content hierarchy. Users then search this folder hierarchy to locate relevant documents. By granting access to the folders, you control which users, by user ID or role, can edit, publish, and view data.
Folder administrators and content authors can populate the hierarchy manually. But, you can also import content in bulk. Using the content categorization spider that crawls through collections of documents on file servers and websites, you can automatically update your portal with the information that you consider pertinent. You control the crawler, telling it what type of content to retrieve, where to look, and how much information to recall. Using Process Scheduler to refresh folders, you can keep your information current by the day, or even hour.
The following figure shows the Browse by Category page plus an inset of another Browse by Category page with categorized content incorporated from several sources including the content from Marketing and PeopleBooks:
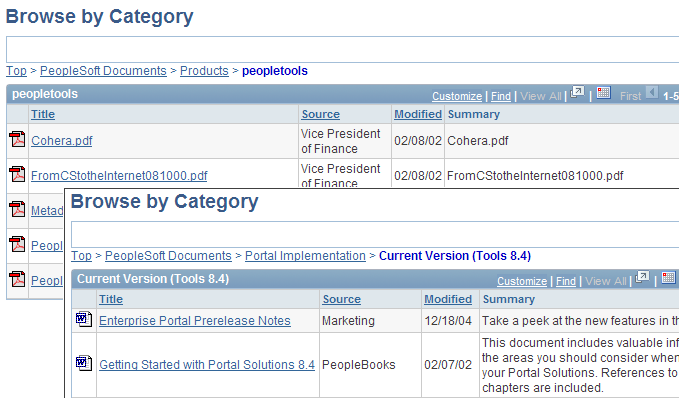
Browse by Category page with an inset of another Browse by Category page
Creating Categorized Content
You can create categorized content in two ways: manually and automatically with the content categorization spider. The manual method consists of these high-level steps:
Create top folders and subfolders in the categorized content feature (folder administrators).
Assign members with specific privileges for the folders.
Also, assign viewer roles for viewing published content in these folders (folder administrators).
Create and save content in these folders (authors).
Submit content for publication (authors).
Review submitted content and publish individual content items (publishers).
Browse by category to retrieve published categorized content (viewers).
The following diagram highlights these steps for creating and publishing categorized content:
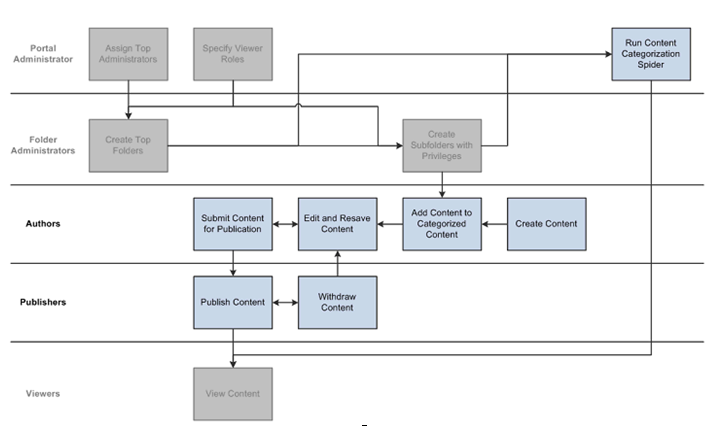
Steps for creating and publishing categorized content
See Also
Running the Content Categorization Spider
Performing Content Autocategorization
Enterprise PeopleTools 8.50 PeopleBook: PeopleSoft Process Scheduler.
Managing FoldersThis section discusses how to:
Maintain folder properties for categorized content.
Update folder security for categorized content.
Assign member privileges.
Move folders.
Publish categorized content folders.
Select folder data sources.
 Pages Used to Manage Folders
|
Page Name |
Definition Name |
Navigation |
Usage |
|
Browse Categorized Content |
EPPCM_HIERTOP_MAIN |
Content Management, Categorized Content, Browse Folders Click the Add Top Folder button on the Browse Categorized Content page. Click the Properties link for the folder you want to access on the Browse Categorized Content page. |
Create hierarchies for classification and navigation. |
|
Folder Properties |
EPPCM_CATG_MAIN |
Content Management, Categorized Content, Browse Folders Click the Add Top Folder button, and click the Properties link for the folder that you want to access on the Browse Categorized Content page. |
Set the properties for a new folder or to update property details for an existing folder. Note. The Folder Properties page is used for top folders as well as for subfolders. |
|
Top Folder Properties - Advanced Feed Options |
EPPCM_FEED_ADVOPT |
Content Management, Categorized Content, Browse Folders Click the Add Top Folder button, and click the Publish as Feed link. Click the Edit or Add Feed button. Click the Advanced Option link. |
Set up advanced options to publish a folder in the content management system so that it is accessible as a feed. Note. The Publish as Feed link is available on all folder properties pages if the folder can be published and you have permissions to publish the folder. |
|
Move Content |
EPPCM_CONT_TREEMOD |
Content Management, Categorized Content, Browse Folders Click a content Properties link for the content that you want to move. Click the Locations link on the Content Properties page, and click the Move button on the Content Locations page. |
Move content to a new folder. |
|
Folder Security |
EPPCM_CATG_MEM |
Content Management, Categorized Content, Browse Folders Click the Add Top Folder button, and click the Properties link. Select the Folder Security tab on the Folder Properties page. |
Add the administrators who can edit this folder and the users who can view the folder and its content. Note. This page lists the members and privilege sets for the current folder. Actual privileges are assigned on the Folder Security - Set Members Privileges page. |
|
Folder Security - Set Members Privileges |
EPPCM_CATG_PRIV |
Content Management, Categorized Content, Browse Folders Click the Add Top Folder button, and click the Properties link. Select the Folder Security tab on the Folder Properties page. Click the Add Member button or the Edit button on the Folder Security page. |
Assign privilege sets to the selected member. |
|
Folder Properties - Move Folder |
EPPCM_CATG_TREEMOD |
Content Management, Categorized Content, Browse Folders Click the Add Top Folder button, and click the Properties link. Click the Move Folder link on the Folder Properties page. |
Change the location of a subfolder. If the user performing the move is a top administrator, a subfolder can also be promoted to be a top folder for the content management feature. |
|
Content Source |
EPPCM_CATG_SPIDR |
Content Management, Categorized Content, Browse Folders Click the Add Top Folder button, and click the Properties link. Click the Content Source tab on the Folder Properties page. |
Select folder data sources. Note. Information on this page is required only if you are going to use the categorization spider to automatically create folders and add content. |
Maintaining Folder Properties for Categorized Content
Access the Folder Properties page (select Content Management, Categorized Content, Browse Folders; click the Properties link).
Users can add folders or update properties at any level for which they have authorization. Only top administrators can create top folders at the root of a feature’s folder hierarchy. At subsequent levels, any folder members with the proper privilege can add folders or update properties.
|
Summary |
Add a brief description of the content. This field supports HTML entries. |
|
Owner |
Assign the owner of the folder. Click the name link of the owner to access the Instant Message page, where you can send an instant message to the owner. |
|
Folder can be Published |
Select to allow for publishing of this folder as a pagelet or menu item. Even with this option selected, only users with the Publish Folder or Unpublish Folder privilege will see the Publish as Pagelet, Publish as Feed, and Publish as Menu Item links. |
|
Do Not Allow Deletes |
Select to prevent this folder from being deleted from the folder hierarchy or from being deleted during the purge process. |
|
Auto Generated Folder |
Indicates whether this folder was created manually or by the spider process. |
|
Publish as Pagelet |
Click to access the Publish Pagelet Wizard Definition page, where you can publish a folder in the PeopleSoft Content Management system as a pagelet. Note. This link is available only when the Folder can be Published option is selected. |
|
Publish as Menu Item |
Click to access the Publish as Menu Item page, where you can publish a folder in the content management system so that it's accessible as a link in the left navigation menu. Note. This link is available only when the Folder can be Published option is selected. |
|
Publish as Feed |
Click to access the Publish Feed Definition page, where you can publish a folder in the content management system so that it is accessible as a feed. Note. This link is available only when the Folder can be Published option is selected. |
|
Move Folder |
Click to access the Top Folder Properties - Move Folder page, where you can change the location of this folder. |
Child Content Defaults
Child content created from this folder uses the default values specified here.
|
File Storage |
Select the storage locations for any content that is attached files. Available locations are based on those defined on the Define File Storage page. |
|
Date Type |
Select either Relative Date or Absolute Date to define content default publish and expiration dates for this folder. |
|
Publish Date |
Select the publish date for the default values of the content in this folder. |
|
Expire Date |
Select the expiration date for the default values of the content in this folder. |
|
Inactive Date |
Select different periods of time as dates when the content will become inactive. You can also select the option to not inactivate the content. Available options are:
|
Updating Folder Security for Categorized Content
Access the Folder Security page (select Content Management, Categorized Content, Browse Folders; click the Properties link; select the Folder Security tab on the Folder Properties page).
A new folder automatically inherits the members and privileges of its parent folder. However, privileges added later are not automatically transferred down the folder hierarchy and must be updated on a folder-by-folder basis. To assist with this process, an Inherit Members button appears when you view folder security for any subfolder, enabling you to quickly duplicate the same members as assigned to the parent folder.
The Folder Security page is also used to manage the audiences allowed to view the published content of categorized content folders. These viewing audiences are similar to the viewer roles defined on the Viewer Roles page. Within categorized content, the folder administrator should try to choose among the same limited set of roles.
Note. A top administrator is automatically granted all privileges for all content and folders of the feature without being an explicitly assigned or listed member a folder.
|
Member Privileges |
Displays type, name, and privilege sets for the members of the folder. Privileges specify the actions that a member can perform on the folder and the content contained in this folder. Note. A viewer member privilege defined in the Member Privileges section of the page is not equivalent to a viewer role defined in the Viewer Roles section of the page, even if the same role ID is used. In the case of the former, a viewer member privilege allows that member to view the folder and all of its contents (in draft, pending, or published states) through the folder hierarchy. The latter allows users with that role to view published content only and only through the Browse by Category page. |
|
Edit |
Click to edit privileges of this member. |
|
Delete |
Click to remove the member and prohibit him or her from accessing content from this folder. |
|
Add Member |
Click to access the Folder Security - Set Members Privileges page to assign members and determine the actions that they can perform on the folder and the content located in that folder. |
|
Inherit Members |
Click to inherit members from the parent folder. |
|
Viewer Roles |
Displays name and description for viewer roles. The viewer roles:
Note. When you are publishing folders with security roles, folders are published based on your defined viewer roles rather than member privileges. |
|
Add Viewer |
Click to add another row and select a user role to add to the list. |
|
Inherit Viewers |
Click to add viewers from the parent folder. |
|
Cascade Viewer Roles to Child Folder on Save |
Select to add these roles to all child folders that you have access to when you save this folder. Note. If this process encounters a child folder that you do not have privileges for, the cascading of viewer roles stops at that folder and does not continue to the child folders that follow. Changes to viewer roles can be cascaded to subfolders; however, changes to member privileges must be updated in the subfolders manually. |
Assigning Member Privileges
Access the Folder Security - Set Members Privileges page (select Content Management, Categorized Content, Browse Folders; click the Properties link; click the Folder Security tab; click the Add Member button or the Edit button on the Folder Security page).
|
Member Type |
Select a membership type of User or Role. |
|
Member Name |
Select a member name. |
|
Privilege Set |
Assign privileges to this member by selecting privilege sets. Note. The privilege sets and privileges listed for each set reflect the privilege sets that were defined for the Categorized Content feature. |
Moving Folders
Access the Folder Properties - Move Folder page (select Content Management, Categorized Content, Browse Folders; click the Properties link; and click the Move Folder link).
Use this page to move a folder to a different parent folder. The folder in bold type represents the folder's current location. Only top administrators can move a folder to the top folder position. To do so, select the 0–Categorized Content location. Auto-generated folders cannot be moved.
Navigate the tree by clicking the folders. Select a new location from the available values. These values are based on your privileges. You must have the Delete Folder privilege in the current location, as well as Add Folder privileges on the new parent location to move a folder.
Publishing Categorized Content Folders
In the Folder Properties page (select Content Management, Categorized Content, Browse Folders; click the Properties link), the Folder can be Published option enables approved content to be imported and published in features outside of categorized content. You must select this option for publishing features to import or reference categorized content. In addition, the Folder can be Published option enables you to publish this folder as a pagelet, menu item, or feed.
Note. Even with the Folder can be Published option selected, only users with the Publish Folder or Unpublish Folder privilege will see the Publish as Pagelet, Publish as Menu Item, or Publish as Feed link.
|
Publish as Pagelet |
Click to access the Publish Pagelet Wizard Definition page, where you can publish a folder in the content management system as a pagelet. Note. This link is available only when the Folder can be Published option is selected. |
|
Publish as Menu Item |
Click to access the Publish as Menu Item page, where you can publish a folder in the content management system so that it's accessible as a link in the left navigation menu. Note. This link is available only when the Folder can be Published option is selected. |
|
Publish as Feed |
Click to access the Publish Feed Definition page, where you can publish a folder in the content management system so that it is accessible as a feed. Note. This link is available only when the Folder can be Published option is selected. |
See Also
Maintaining Folder Properties for Managed Content
Selecting Folder Data Sources
Access the Content Source page (select Content Management, Categorized Content, Browse Folders; click the Add Top Folder button; click the Properties link; select the Content Source tab on the Folder Properties page).
Note. Values on this page are required only if you use the categorization spider to automatically create folders and add content.
See Associating a Content Source with a Folder.
Adding Categorized Content Manually
This section provides an overview of adding categorized content and discusses how to add new categorized content.
Understanding Adding Categorized Content
Using the Categorized Content navigation menu item Browse Folders, you can navigate through the hierarchy and manually add folders and content. You can also edit the attributes of manually added folders and content, as well as add menu items and import managed content.
See Also
Importing Managed Content into Other Features
Pages Used to Add Categorized Content Manually|
Page Name |
Definition Name |
Navigation |
Usage |
|
Browse Categorized Content - Add Content |
EPPCM_ADDCONT_SEC |
Content Management, Content Categorization, Browse Folders Click a title link in the Browse Categorized Content page, and click the Add Content button on the Content Properties page. |
Specify the type of content that you want to add to a folder in categorized content. |
|
Categorized Content Properties |
EPPCM_CONT_MAIN |
Click the Add Content button on the Browse Categorized Content page. Select the type of content to add, and then click OK on the Add Content page. |
Enter content properties such as title, summary, and content location; submit content for publication; and maintain comments or discussions specific to that piece of content, among other functions. Note. The name of this page and its fields that appear depend on the content type that you selected on the Browse Categorized Content - Add Content page. |
|
Content Locations |
EPPCM_CONT_LOC |
Content Management, Content Categorization, Browse Folders Click the Add Content button on the Browse Categorized Content page. Click the Locations link on the Content Properties page. |
Move content to a different folder or add content to multiple folders. |
|
Add Content Locations |
EPPCM_CONT_TREEADD |
Content Management, Content Categorization, Browse Folders Click the Add Content button on the Browse Categorized Content page. Click the Locations link on the Content Properties page. Click the Add Location button on the Content Locations page. |
Select new locations for the content. |
|
Move Content |
EPPCM_CONT_TREEMOD |
Content Management, Content Categorization, Browse Folders Click the Add Content button on the Browse Categorized Content page. Click the Locations link on the Content Properties page. Click the Move button on the Content Locations page. |
Move content to a different folder. |
|
Content Notification |
EPPCM_CONT_NTFY |
Content Management, Content Categorization, Browse Folders Click the Add Content button on the Browse Categorized Content page. Click the Notifications link on the Content Properties page. |
Send email notifications of saved content to the list of interested parties. |
|
Comments |
EPPCM_CONTCOMM_SEC |
Content Management, Content Categorization, Browse Folders Click the Add Content button on the Browse Categorized Content page. Click the Comments link on the Content Properties page. |
Enter any additional comments about this content item. |
|
Post Details |
EPPDF_VIEW_TOPIC |
Content Management, Content Categorization, Browse Folders Click the Add Content button on the Browse Categorized Content page. Click the Start Discussion link on the Content Properties page. Click the Yes-Start Discussion button on the Start Discussion Confirmation page. |
Start a new discussion or edit an existing discussion for this content item. |
|
Edit a Post Add a Reply |
EPPDF_REPLY_TOPIC |
Content Management, Content Categorization, Browse Folders Click the Add Content button on the Browse Categorized Content page. Click the Start Discussion link, and click the Yes-Start Discussion button. Click the Edit button or the Reply button on the Post Details page. |
Edit an existing discussion or respond to a discussion. |
Adding New Categorized Content
Access the Browse Categorized Content - Add Content page (select Content Management, Content Categorization, Browse Folders; click an entry in the Title column, and click the Add Content button).
|
Content Type |
Select a content type. Available options are:
|
|
OK |
After you select a content type and click this button, a Categorized Content Properties page appears based on the content type you selected. When content is added to managed content, its status is set to checked out. |
Adding Categorized Content Attachments
Access the Categorized Content Properties page (select the type of content to add, and then click OK on the Browse Categorized Content page).
Note. The name that appears on this page depends on the content type that you selected on the Browse Categorized Content - Add Content page.
This example shows the Web Site URL Properties page with the Web Site URL option selected in the Browse Categorized Content - Add Content page:
|
Menu Item |
Use the search icon to select an approved menu item. |
|
Save as Draft |
Click to save this content item in draft format. You can continue to edit the content property fields for this item. Content in draft status does not appear on the Browse by Category page because it is not published. |
|
Publish |
Click to save and publish this content item. All fields become read-only. Published content appears on the Browse by Category page to users who have the viewer roles for the parent folder where the content is located. |
|
Unpublish |
Click to save the content and save it to Pending Publishing. Nonpublished content does not appear on the Browse by Category page. |
|
Locations |
Click to set the publish and expiration date for the content in this location and set the item to be published. |
|
Notifications |
Click to create a list of interested parties or send email notifications of saved content to the list of interested parties. |
|
Save |
Click to save the content item without changing the publish status. |
|
Submit |
Click to save and submit the content item for publishing. |
|
Comments |
Click to add additional comments about this content item. |
|
Search Content |
Click to search existing content within the Categorized Content feature. |
|
Start Discussions |
Click to begin a discussion topic. Note. Discussion topics stay with the content item and cannot be accessed outside of the Content Properties page. |
|
View Discussions |
This link is available if the discussion topic already exists for this content item. Click to view, edit, or enter a response to a discussion. |
See Adding Content Attachments.
Translating Content Management HTML/Text Content
To translate Content Management HTML/Text content, you must translate the same content version into the various languages you want to display. This means that you must save the content version as a draft, and translate it for each appropriate language. Check in or submit the content version after it is translated for all appropriate languages.
If content is being translated into one or more foreign languages, perform the language translations on the content after the content is checked out. When all translations are completed, you can check content in.
Note. Content comments are not translated. You will see the comments from the language that you entered last.
Managing Categorized ContentThis section discusses how to:
Edit and view categorized content.
Submit content items for approval.
Approve content items.
Select content locations.
Start and view discussions.
Create and use tags.
Manage categorized content items by status.
Pages Used to Manage Categorized Content|
Page Name |
Definition Name |
Navigation |
Usage |
|
My Categorized Content Status |
EPPCM_STAT_MAIN |
|
View, at a glance, the work that you need to perform based on the status of categorized content. |
|
My Categorized Content |
EPPCM_USER_MAIN |
|
View and edit all of your categorized content. |
|
Content Properties |
EPPCM_CONT_MAIN |
Content Management, Managed Content, Browse Folders Click the Properties link on the Browse Managed Content or My Managed Content page. |
Manage the content. |
|
Content Versions |
EPPCM_CONT_VER |
Content Management, Managed Content, Browse Folders Click the Properties link on the Browse Managed Content or My Managed Content page. Click the Versions link on the Content Properties page. |
Review, delete, or check out different versions for a specific content item. |
|
Content Locations |
EPPCM_CONT_LOC |
Content Management, Managed Content, Browse Folders Click a folder title link, and click a subfolder title link. Click an appropriate Properties link, and click the Locations link on the Content Properties page. |
View information about the folders in which the content is published. From this page, you can move content to a new folder on the Move Content page, and specify additional folders in which the content is available on the Add Content Locations page. Specifying an additional location does not create another copy of the content; instead, it creates a link so that only one instance of the content is present within managed content. |
|
Add Content Location |
EPPCM_CONT_TREEADD |
Content Management, Managed Content, Browse Folders Click a folder title link, and click a subfolder title link. Click an appropriate Properties link, and click the Locations link on the Content Properties page. Click the Add Location button on the Content Locations page. |
Select an additional location for the content. |
|
Start Discussion Confirmation |
EO_PE_YESNOCONFIRM |
Content Management, Managed Content, Browse Folders Click a folder title link, and click an appropriate Properties link. Click the Start Discussion link on the Content Properties page. |
Use to confirm the start of a discussion on this piece of content. |
|
Post Details |
EPPDF_VIEW_TOPIC |
Content Management, Managed Content, Browse Folders Click a folder title link, and click an appropriate Properties link. Click the Start Discussion link on the Content Properties page. Click the Yes-Save and Start button. |
Use to start a new discussion, edit an existing discussion, or view an existing discussion for a content item. From the Post Details page, you can edit the existing discussion, delete the discussion entirely, and add a reply, among other tasks. |
|
Discussion |
EPPDF_REPLY_TOPIC |
Content Management, Managed Content, Browse Folders Click a folder title link, and click an appropriate Properties link. Click the Start Discussion link on the Content Properties page. Click the Yes-Save and Start button, and click the Edit button. |
Enter or edit a discussion topic. |
|
Content Notification |
EPPCM_CONT_NTFY |
Click the Notifications link on the Content Properties page. |
Send email notifications of saved content to the list of interested parties. |
|
Comments |
EPPCM_CONTCOMM_SEC |
Click the Comments link on the Content Properties page. |
Enter any additional comments about this content item. |
|
Edit a Post Add a Reply |
EPPDF_REPLY_TOPIC |
|
Edit an existing discussion or respond to a discussion. |
Editing and Viewing Categorized Content
Access the My Categorized Content page: Published Content (select My Content, My Categorized Content, Published Content).
Use this page to easily locate and review content items of a particular status. If necessary, you can enter additional search criteria to filter the results.
|
Include Crawled Content |
Select to bring up all the auto-generated content that was generated by the current user if that user ran the categorization spider process. The amount of data can be quite large, so use this filter with caution. |
|
Title |
Click the title link to preview the item. |
|
Properties |
Click to view the property details. |
Submitting Content Items for Approval in Categorized Content
You can select an approver at your discretion from the users who have been granted approval privileges for this folder. Before you can submit content items for approval, you must check in the content.
To submit content items for approval:
Select Content Management, Categorized Content, Browse Folders, or
Select My Content, My Managed Content.
Access the File Attachment Properties page.
Click the Properties link on the Browse Categorized Content page or the My Categorized Content page.
Select an approver user ID or role.
Click the Save button, and click the Check in buttons.
Click the Submit for Approval button.
Note that:
The content is automatically checked out and locked to the approver.
The fields on the Content Properties page are editable only by the listed approver because the content is checked out to the approver.
The Version Status and Locked To fields have been updated.
The icon also indicates that the file is locked. When you submit content for approval, it is automatically checked out to the approver by the system.
The Check Out and Submit for Approval buttons disappear. The Cancel Check Out button appears.
Approving Content Items in Categorized Content
You use the Content Attachment Properties page to modify content properties such as content location, content approver, and content version; to check out and check in content and to submit it for approval; and to maintain comments or discussions specific to that piece of content, among other tasks.
When you approve an item of categorized content, you make that item available to be reused in other content management features such as News Publications, Managed Content, Collaborative Workspaces, and so on.
To approve a content item:
Select My Content, My Managed Content to access the My Managed Content page to view content items of a particular status, including a list of all content that requires your review and approval.
Click the Properties link for the desired content on the My Managed Content page.
Click the link to review the content.
For example, if the content is a file attachment, click the file name.
Click the Approve button if the content is ready to be published.
Click the Rework button if the content requires additional work.
Notice that the Modified and Version Status fields have been updated and the locked icon has been removed.
Approved content is now available for publishing.
Selecting Content Locations in Categorized Content
Access the Content Locations page (Content Management, Categorized Content, Browse Folders; click a folder title link, and click a subfolder title link; click an appropriate Properties link, and click the Locations link on the Categorized Content Properties page).
The Content Locations page in the Categorized Content feature lists all the folders where content is located. When the Content Locations page is accessed from a non-managed feature such as Workspaces or Categorized Content, it shows only the content locations for that feature. You can move content only between folders of the current feature in the current site.
Note. When moving content or adding new locations for the content, be aware that the location (parent folder) determines the access security for the content.
See Moving Folders in Managed Content.
|
Move |
Click to change the current location of the content. |
|
Add Location |
Click to add an additional location for this content. |
Access the Add Content Location page (select Content Management, Categorized Content, Browse Folders; click a folder title link; click an appropriate Properties link and click the Locations link; click the Add Location button on the Content Locations page).
To select an additional location for the content:
Click the folder icons to navigate through the hierarchies.
Select the new location by clicking the folder title.
The Content Location page appears with the new location listed.
Click the Return button to return to the Content Properties page.
Click the Save button.
The document is now listed in two folders.
Starting and Viewing Discussions in Categorized Content
Access the Start Discussion Confirmation page (select Content Management, Managed Content, Browse Folders; click a folder title link and click an appropriate Properties link; click the Start Discussion link on the Content Properties page).
Use this page to start a discussion, which is then attached to the content item. After a discussion has been started, the link changes to View Discussions and is used it to edit, respond to, and view discussions.
Note. These discussions stay with the content item, and can be accessed only from the Categorized Content Properties page.
See Starting and Viewing Discussions.
See Also
Working With Discussion Forums
Creating and Using Tags in Categorized Content
Tags for categorized content are displayed on the properties pages as well as the view page for the content. However, some types of content—such as attachments and URLs—open the content in a new window directly without using the application view page. In these instances, tags are available only on the properties page. Application pages can be displayed in only edit or view mode.
To create and use tags for categorized content:
Access the pages by using one of the following navigations:
Select Content Management, Categorized Content, Browse Folder.
Select My Content, My Categorized Content.
Select any content property link.
Click an appropriate link to view, edit, or add tags.
Enter the tag name, and click the Update Tags button.
Note. Security considerations: Users that have access to the content must have the add and view tag permissions. Users that are assigned the Administrator, Author, or Expert roles also are assigned the modify permissions. All users have access to delete their own tags, both public and private. User with Admin privileges can delete all tags in the content, and an Admin user cannot delete the Private tags of other users.
See Working With Tags.
Managing Categorized Content Items by Status
Access the My Categorized Content Status page (select Content Management, Categorized Content, My Content Status).
The My Categorized Content Status page enables you to see, at a glance, the work that you need to perform based on content status.
|
Content Item Status |
Click to access the My Categorized Content page, where you can preview the content items for the selected status, view their property details, or add new content. |
Note. The total item count does not include any content item that is located in an automatically generated folder, such as crawled content items.