 Understanding Managed Content
This chapter provides an overview of the Managed Content feature and discusses how to:
Manage folders.
Add new managed content.
Manage content versions.
Work with the My Managed Content pagelet.
Import managed content into other features.
Understanding Managed Content
In Oracle’s PeopleSoft Enterprise Portal, the Managed Content feature of the Content Management system enables you to manage the development of content. Managed content serves as a proving ground for new content that is to be used in the portal. The system assigns a status to each piece of content based on where the content is in the process flow and what action the user performs.
The Managed Content feature enables you to create content, manage it collaboratively in folders, check content in and out, create new versions of content, and make approved content available to other content management features, such as news publications, content categorization, collaborative workspaces, related information pagelets, and others.
This example shows the My Managed Content Status page (My Content, My Migrate Content) plus an inset of the My Managed Content pagelet listing the number of content items that require your attention by status:
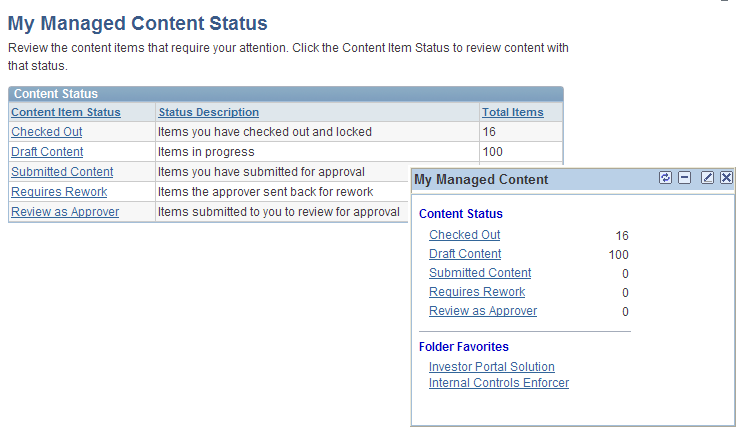
My Managed Content Status page and an inset of the My Managed Content pagelet
Process of Creating Managed Content
The Managed Content feature offers a proving ground for new content that is to be used in the portal.
This feature enables you to create content, manage it collaboratively in folders, check content in and out, create new versions of content, and make approved content available to other content management features, such as News Publications, Content Categorization, and more.
The system assigns a status to each piece of content based on where content is in the process flow and what action the user performs.
This flowchart illustrates the Content Management Managed Content process and the roles involved in each step:
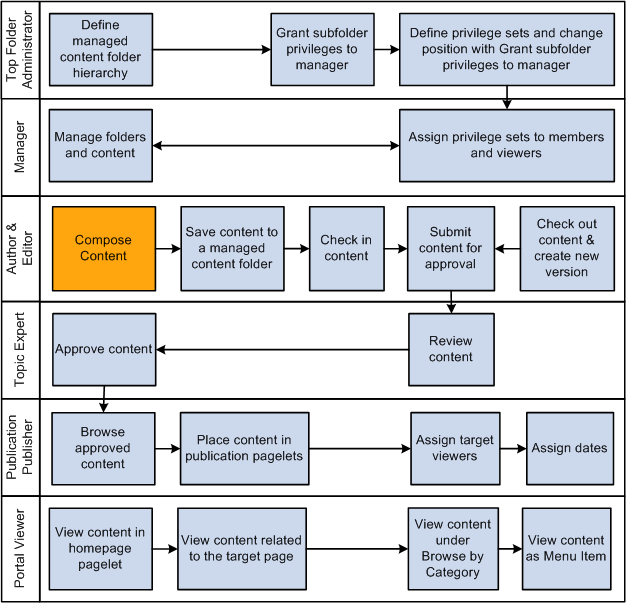
Managed Content process
When you add new content to a Managed Content folder, it is automatically locked and checked out to you. Checking in content releases the lock so that other authorized folder members can check out and edit the content. Each time the content is checked out, it creates a new version. The system assigns new versions a status of Draft, while old versions maintain their previous status. Members can access previous versions, but the current checked out version is locked and only accessible to the user who checked out the content.
Note. New versions are based on whichever old version was
checked out. If four versions exist and you check out the latest version,
version five will be based on version four. However, if you check out version
two, version five will be based on that version. The current version is always
indicated on the Content Properties page.
If content is being translated into one or more languages, perform the
language translations on the content after the content is checked out. When
all translations are completed, you can check content in.
See Translating Content Management HTML/Text Content.
Canceling Check Out
Content that is checked out is locked to a given user. Canceling the check out causes different behaviors depending on the status of the last version of the content that is checked out:
If only one version exists, canceling the check out unlocks the content.
If the checked out version is submitted for approval, canceling the check out unlocks the content and sets the version status back to Draft.
If the checked out version is at draft status and more than one version exists, canceling the check out deletes the last version.
Submitting Content for Approval
After the content is completed, the author or reviewer submits it for approval. The system assigns the submitted content a status of Pending Approvaland automatically checks it out to the approver. The current version becomes locked and accessible only to the approver.
The approver can either approve the content or return it to the submitter for rework.
When the content is approved, the system assigns the content a status of Approved. This content can be selected by a publication if it is in a folder that allows content to be published. Users can still check out and edit the content. This check-out creates a new version, leaving the approved version intact and usable by publishing features if it is in a publishable folder.
If content is returned for rework, the system assigns the status Requires Rework and unlocks it.
Managing Folders
This section discusses how to:
Maintain folder properties for managed content.
Update folder security.
Assign member privileges.
Move folders in Managed Content.
Publish a folder as a menu item.
Publish a folder as a feed.
 Pages Used to Manage Folders
|
Page Name |
Definition Name |
Navigation |
Usage |
|
Folder Properties |
EPPCM_CATG_MAIN |
|
Used to set the properties for a new folder or to update property details for an existing folder. Note. Used for top folders as well as for subfolders. |
|
Folder Security |
EPPCM_CATG_MEM |
Content Management, Managed Content, Browse Folders Click the Properties link on the Browse Managed Content page. Select the Folder Security tab on the Folder Properties page. |
Used to manage the folder members and their privileges. This page lists the members and privilege sets for the current folder. Actual privileges are assigned on the Folder Security - Set Members Privileges page. |
|
Folder Security - Set Members Privileges |
EPPCM_CATG_PRIV |
Content Management, Managed Content, Browse Folders Click the Properties link on the Browse Managed Content page. Select the Folder Security tab. Click the Add Member or the Edit button. |
Assign privilege sets to the selected members. |
|
Folder Properties - Move Folder |
EPPCM_CATG_TREEMOD |
Content Management, Managed Content, Browse Folders Click the Add Top Folder button, and click the Move Folder link on the Folder Properties page. |
Used to change the location of a subfolder. If the user performing the move is a top administrator, a subfolder can also be promoted to be a top folder for the content management feature. Note. This option is only available for Managed Content, Categorized Content, and Workspaces. |
|
Folder Properties - Publish as Menu Item |
EPPCM_CATG_CREF |
Content Management, Managed Content, Browse Folders Click the Add Top Folder button on the Browse Managed Content page. Click the Publish as Menu Item link on the Folder Properties page. |
Publish a folder in the Content Management system so that it is accessible as a link in the left navigation menu. |
|
Folder Properties - Advanced Feed Options |
EPPCM_FEED_ADVOPT |
Content Management, Managed Content, Browse Folders Click the Add Top Folder button, and click the Publish as Feed link. Click the Edit or Add Feed button. Click the Advanced Option link. |
Set up advanced options to publish a folder in the content management system so that it is accessible as a feed. Note. The Publish as Feed link is available on all folder properties pages if the folder can be published and you have permissions to publish the folder. |
Maintaining Folder Properties for Managed Content
Access the Folder Properties page (select Content Management, Managed Content, Browse Folders and click an appropriate Properties link on the Browse Managed Content page).
Users can add folders or update properties at any level for which they have authorization. Only top administrators can create or update top folders at the root of a feature’s folder hierarchy. At subsequent levels, any folder members with the proper privilege can add folders or update properties.
|
Title |
Enter the desired information into the Title field. |
|
Summary |
Add a brief description of the content. This field supports HTML entries. |
|
Owner |
Assign the owner of the folder. Click the name link of owner to access the Instant Message page, where you can send a instant message to the owner. |
|
Content can be Published |
Select this option to enable approved content to be imported and published in features outside of managed content. You must select this option for publishing features to import or reference managed content. Note. If you want approved content to remain private, you can create a development or work-in-progress folder that is nonpublishable. As content is completed and approved, you can then add a new publishable folder location for the content. The development folder should have only publishing and viewing members. |
|
Folder can be Published |
Select this check box to allow for publishing of this folder as a pagelet or menu item. Note. Even with this option selected, only users with the Publish Folder or Unpublish Folder privilege will see the Publish as Pagelet, Publish as Feed, and Publish as Menu Item links. |
|
Do Not Allow Deletes |
Select this option to prevent this folder from being deleted from the folder hierarchy or from being deleted during the purge process. |
|
Folder ID |
Displays the ID of the folder. |
|
Feature |
Displays the features to which the folder belongs. |
|
Modified |
Displays the date when the folder was last modified. |
|
Modified By |
Displays the user ID who last modified the folder. |
|
Return to Browse Managed Content |
After you have completed creating a top folder in the managed content feature, click this link to return to the Browse Managed Content page. The folder that you created now appears as a top folder in the managed content feature. |
|
Publish as Pagelet |
Click this link to access the Publish Pagelet Wizard Definition page, where you can publish a folder in the content management system as a pagelet. Note. This link is available only when the Folder can be Published option is selected. |
|
Publish as Menu Item |
Click this link to access the Publish as Menu Item page, where you can publish a folder in the content management system so that it is accessible as a link in the left navigation menu. Note. This link is available only when the Folder can be Published option is selected. |
|
Publish as Feed |
Click this link to access the Publish Feed Definition page, where you can publish a folder in the content management system so that it is accessible as a feed. Note. This link is available only when the Folder can be Published option is selected. |
|
Move Folder |
Click this link to access the Top Folder Properties - Move Folder page, where you can change the location of this folder. |
Child Content Defaults
Child content created from this folder uses the default values specified here.
|
File Storage |
Select the document storage location for the folder's child content. The value appears by default from entries set up for attachment locations. As delivered, two locations are set up: one for storage of attachments in a database table; and another as a file server placeholder. The file server choice will not function properly until you edit the URL entry with your server information. The database storage choice functions for the underlying database table that exists within the PeopleSoft Enterprise Portal. |
|
Approvals |
The Approvals field determines the approval mode for the folder:
Note. This setting cannot be changed after content has been created. If you need to change the approval setting, you must delete the content and add it back in with the new approval setting. |
|
Cascade Approval Default to Child Folders on Save |
Select to set the default approvals for all new content in child folders. The approval settings are transferred to all child folders when you save the page. This setting does not affect existing child content approval settings. |
|
Inactivate Date |
Select the default inactivation date for content created in this folder. Content with an archive date previous to the current date does not show in the content list in the Browse Content or My Content pages. However, the content is still accessible from the Maintain Content search page. Content that is archived and published elsewhere is still visible from where it is published. Publishing features such as News Publication and Categorized Content use the expiration date to control when the content no longer appears. Available options are:
|
See Also
Updating Folder Security
Access the Folder Security page (select Content Management, Managed Content, Browse Folders; click the Add Top Folder button; and select the Folder Security tab on the Folder Properties page).
Use this page to manage the folder members and their privileges. This page lists the members and privilege sets for the current folder. Actual privileges are assigned on the Folder Security - Set Members Privileges page.
A new folder automatically inherits the members and privileges of its parent folder. However, privileges added later are not automatically transferred down the folder hierarchy and must be updated on a folder-by-folder basis. To assist with this process, an Inherit Members button appears when you view folder security for any subfolder, enabling you to quickly duplicate the same members as assigned to the parent folder.
Note. A top administrator is automatically granted all privileges for all content and folders of the feature without being an explicitly assigned or listed member in a folder. Privileges specify the actions a member can perform upon the folder and the content located in that folder.
|
Member Type |
Displays the membership type of User or Role for each member. |
|
Member Name |
Displays a membership name for each member. |
|
Privilege Set |
Displays the privilege set of each member. |
|
Edit |
Click to edit the privileges of this member. |
|
Delete |
Click to remove the member and prohibit them from accessing content from this folder. |
|
Add Member |
Click to access the Folder Security - Set Members Privileges page to assign members and determine the actions they can perform upon the folder and the content located in that folder. |
|
Inherit Members |
Click to inherit the members assigned to the parent folder. Note. This button will not available if this folder is a top folder. |
Assigning Member Privileges
Access the Folder Security - Set Members Privileges page (select Content Management, Managed Content, Browse Folders; click the Add Top Folder button; select the Folder Security tab, and click the Add Member or the Edit button on the Folder Security page).
|
Member Type |
Select a membership type of User or Role, and then select the member. |
|
Member Name |
Select or enter the desired information into the Member Name field. |
|
Privilege Set |
Assign privileges to this member by selecting privilege sets. |
|
Privileges |
Displays the privilege sets that were defined for the Manage Content feature. |
|
OK |
Click this button to accept changes on the privilege sets and return to the Folder Security page. |
Note. The privilege sets and privileges listed for each set reflect the privilege sets that were defined for the Managed Content feature.
See Also
Moving Folders in Managed Content
Access the Top Folder Properties - Move Folder page (select Content Management, Managed Content, Browse Folders; click the Add Top Folder button; and click the Move Folder link on the Folder Properties page).
Use this page to change the location of a subfolder. If the user performing the move is a top administrator, a subfolder can also be promoted to be a top folder for the content management feature, or vice versa.
The folder in bold type represents the current parent location. To move a folder to a top folder position, select the 0-Managed Content location.
Navigate the tree by clicking the folder icons and selecting a folder from the available values. The available values depend on your privileges. You must have the proper privileges to relocate to a new location—for example, you must have the Delete Folder privilege in the current location and the Add Folder privilege in the new location.
After you make the move, notice the locator links that indicate that the folder is now in a new location.
Publishing a Folder as a Menu Item
Access the Folder Properties - Publish as Menu Item page (select Content Management, Managed Content, Browse Folders; click the Add Top Folder button; click the Publish as Menu Item link on the Folders Properties page).
|
Site Name |
Select the portal or site of the managed content that is being published. |
|
Menu Folder |
Select a folder to publish to. Only folders from the current site are available to select. |
|
Menu Item |
Enter the menu item title that will identify the menu item. |
|
Description |
Enter a meaningful description for this menu item. |
|
Menu Item Security |
Select the security options for viewing the menu item. Available options are:
Note. If no roles are defined on the Folder Security page, the system automatically selects to publish the menu item as Public. |
|
Publish |
Click to save and publish this content item. Published content appears on the Browse by Category page to users who have the viewer roles for the parent folder where the content is located. |
Publishing a Folder as a Feed
Access the Top Folder Properties - Advanced Feed Options page (select Content Management, Managed Content, Browse Folders; click the Add Top Folder button; click the Publish as Feed link; click the Edit or Add Feed button; and then click the Advanced Option link).
Note. You can also publish subfolder if its publishing property is set to Folder can be Published.
|
Max Number of Entries |
Specify the maximum number of feed entries that you want to display in the feed document. |
|
Selected |
Select appropriate folders to publish as feeds. |
|
Reset to Defaults |
Click to reset all parameters: Max Number of Entries is back to 10, and sub-folder is selected. |
|
OK |
Click to return to the Folder Properties - Publish as Menu Item page, and then click the Publish button to save and publish this content item as feed. |
Note. See the Using Portal Features PeopleBook for how to view a list of feeds, define feed definition, and publish feed to site.
See Working With Feeds and Alerts.
Publishing a Folder as a Pagelet
This section discusses how to:
Publish a pagelet from a folder.
Publish a folder from Pagelet Wizard.
Edit a published pagelet.
Publish a pagelet to multiple portals.
Pages Used to Publish a Folder as a Pagelet|
Page Name |
Definition Name |
Navigation |
Usage |
|
Folder Properties - Publish Pagelet Wizard Definition |
EPPPB_PGLT_PUB |
|
Create a pagelet definition for a folder. |
|
Preview Pagelet |
EPPPB_PGLT_PREVIEW |
Click the Preview Pagelet link on the Folder Properties - Publish Pagelet Wizard Definition page. |
Preview a list pagelet. |
|
Pagelet Wizard - Specify Pagelet Information |
PTPPB_WIZ_INFO |
|
Provide information to identify and categorize a pagelet. |
|
Pagelet Wizard - Select Data Source |
PTPPB_WIZ_DATASRC |
|
Select the type of data source for the pagelet. |
|
Pagelet Wizard - Specify Data Source Parameters |
PTPPB_WIZ_DATAPRMS |
|
Configure the data source parameters that are required for data to be displayed in the pagelet. Note. This page is accessible only when you are building a pagelet with a data source that allows modification of associated parameters. |
|
Pagelet Wizard - Specify Data Source Parameter Values |
PTPPB_WIZ_PRMVALS |
Click the Values link on the Pagelet Wizard - Specify Data Source Parameters page. |
Specify prompt values for the end user to select from when personalizing the pagelet. Note. This page is accessible only for data source parameters for which you have selected the User Specified or Admin Specified usage types. |
|
Pagelet Wizard - Select Display Format |
PTPPB_WIZ_DISPFRMT |
|
Specify the data transformation method and display format for the pagelet. |
|
Pagelet Wizard - Specify Display Options (passthru format) |
PTPPB_WIZ_DISP_PST |
|
Enter pagelet pass through formatting details and header and footer options. Preview the pagelet. |
|
Pagelet Wizard - Specify Display Options (menu format) |
PTPPB_WIZ_DISP_NAV |
|
Enter the pagelet menu formatting details and header and footer options. Preview the pagelet. |
|
Pagelet Wizard - Specify Display Options (custom format) |
PTPPB_WIZ_DISP_CUS |
|
Enter the custom formatting details for the pagelet as well as header and footer options. Preview the pagelet. |
|
Pagelet Wizard - Specify Publishing Options |
PTPPB_WIZ_PUBOPT |
|
Specify the manner in which the pagelet is published. Provide registration, caching, and security details, and register the pagelet. |
|
Pagelet Wizard - Pagelet Creation Confirmed |
PTPPB_WIZ_FINISH |
Click the Finish button on the Pagelet Wizard - Specify Publishing Options page. |
Confirm that the creation of the pagelet is complete. |
|
Folder Properties - Publish as Pagelet |
EPPCM_CATG_PGLT |
|
Administer pagelet definitions for an action item list. |
|
Publish to Multiple Portals |
PTPP_PMPUBPRTL |
|
Publish the pagelet definition to additional portals and sites. |
|
Publish Multiple Pagelets |
PTPP_PMPUBPGLT |
|
Publish multiple pagelet definitions to another portal or site. |
Publishing a Pagelet from a Folder
Access the Folder Properties - Publish Pagelet Wizard Definition page (select Content Management, Managed Content, Browse Folders; click the Properties link; click the Publish as Pagelet link on the Folders Properties page).
Note. The Folder Properties - Publish Pagelet Wizard Definition page appears when a folder has never been published as a pagelet. The Folders Properties - Publish as Pagelet page appears after a folder has been published as a pagelet.
Pagelet
The pagelet title and description from the Folder Properties page appear in the pagelet section. You may edit these two fields as necessary.
|
Pagelet Title |
Enter the pagelet title that will identify the pagelet. |
|
Description |
Enter a meaningful description for this pagelet. |
|
Pagelet Folder |
Select a folder to publish to. Only folders from the current site are available to select. |
|
Pagelet Security |
Select the security options for viewing the pagelet. The available options are:
Note. If no roles are defined on the Folder Security page, the system automatically selects to publish the pagelet as Public. |
Homepage Tabs
Use the Homepage Tabs section to define the homepage tab labels and behavior for the pagelet.
|
Homepage Tab |
Select the tabs that will display the pagelet. |
|
Pagelet Behavior |
Select the behavior options for the pagelet. The available options are:
|
|
Publish |
Click to display the Publish as Pagelet page, where you can review or edit the pagelet definition. |
Publishing a Folder from Pagelet Wizard
Pagelets for folder can be created and published using Pagelet Wizard and then managed from the Folder Properties page. This section provides an overview of how to use Pagelet Wizard to complete the following six steps:
Step 1: Entering Pagelet Identifying Information.
Step 2: Selecting a Pagelet Data Source.
Step 3: Specifying Data Source Parameters.
Step 4: Selecting a Pagelet Display Format.
Step 5: Specifying Pagelet Display Options.
Step 6: Specifying Pagelet Publication Options.
Note. If you access Pagelet Wizard from the Go to Pagelet Wizard link, you will be modifying an existing pagelet definition. If you want to create a new pagelet definition, start from the Portal Administration or PeopleTools navigation path.
Where appropriate, this section provides details specific to using Pagelet Wizard to publish a folder as a pagelet. The PeopleTools 8.50 PeopleBooks provide detailed information on using Pagelet Wizard.
See Enterprise PeopleTools 8.50 PeopleBook: PeopleTools Portal Technology, “Using Pagelet Wizard.”
Step 1: Entering Pagelet Identifying Information
Access the Pagelet Wizard - Specify Pagelet Information page (click the Go to Pagelet Wizard link on the Folder Properties - Publish Pagelet Wizard Definition page).
Use the Pagelet Wizard - Specify Pagelet Information page to identify and categorize a pagelet.
See Enterprise PeopleTools 8.50 PeopleBook: PeopleTools Portal Technology, “Using Pagelet Wizard,” Step 1: Entering Pagelet Identifying Information.
Step 2: Selecting a Pagelet Data Type
Access the Pagelet Wizard - Select Data Source page (click the Next button on the Pagelet Wizard - Specify Pagelet Information page.
Note. The fields that appear on this page depend on the Data Type value that you select.
This example shows Pagelet Wizard - Select Data Source page with Content Management data type:
Use the Pagelet Wizard - Select Data Source page to select the Pagelet Wizard data source type.
|
Data Type |
Use the Content Management data type (CMDATASOURCE) to make a Pagelet Wizard pagelet a publishing tool for a single piece of managed content or categorized content that is stored in content management system. If you select the Content Management option, these fields appear: Folder ID, Content ID, and Content Path.
Note. Approved text or HTML content in the PeopleSoft Content
Management system can be used as base data for a Pagelet Wizard pagelet. See Enterprise PeopleTools 8.50 PeopleBook: PeopleTools Portal Technology, “Using Pagelet Wizard,” Step 2: Selecting a Pagelet Data Type. |
|
Folder ID |
Select the Content Management folder in which the content resides. |
|
Content ID |
Select the Content Management content that you want to use as the data source for the pagelet. |
|
Content Path |
Displays the Content Management site and folder path to the content. |
This example shows Pagelet Wizard - Select Data Source page with Content Management Folder data type:
|
Data Type |
Use the Content Management Folder data type (CMFOLDERDATASOURCE) to create a Pagelet Wizard pagelet that displays the content management child items (content and folders) for a given managed content or categorized content folder. If you select the Content Management Folder option, these fields appear: Site Name, Folder ID, and Folder Title. See Enterprise PeopleTools 8.50 PeopleBook: PeopleTools Portal Technology, “Using Pagelet Wizard,” Step 2: Selecting a Pagelet Data Type. |
|
Site Name |
Select the name of the site you want to use as the source of content for the pagelet. |
|
Folder ID |
Select the parent folder that you want to use as the source of content for the pagelet. |
|
Folder Title |
The system displays the name of the folder you've selected. |
See Enterprise PeopleTools 8.50 PeopleBook: PeopleTools Portal Technology, “Using Pagelet Wizard,” Step 2: Selecting a Pagelet Data Type.
See Setting Up and Working With Managed Content.
Step 3: Specifying Data Source Parameters
Access the Pagelet Wizard - Specify Data Source Parameters page (select Content Management Folder as the data type on the Pagelet Wizard - Select Data Source page, and click the Next button).
Use the Pagelet Wizard - Specify Data Source Parameters page to configure the data source parameters that are required for data to be displayed in the pagelet.
Note. This page is accessible only when you are building a pagelet with a data source that allows modification of associated parameters.
|
Field Name |
Displays the name of the data source parameter.
|
|
Description |
Displays a description of the data source parameter. |
|
Usage Type |
Select the type of accessibility that you want to grant for the data source parameter when it appears in the pagelet. Options are:
|
|
Required |
This check box is selected and disabled for parameters specified as administrator-specified, context-sensitive, fixed, and system variable; otherwise, it is selected but enabled for user-specified parameters. |
|
Default Value |
You can enter a value that includes the % and * wildcards at the beginning or end of a value in the Default Value field. Note the following about default values:
|
|
Values |
If you select User Specified or Admin Specified as the usage type, click the Values link to access the Pagelet Wizard - Specify Data Source Parameter Values page. |
|
Text |
Use the Personalization Instructions group box to enter custom personalization instructions for the pagelet. These personalization instructions appear on the personalization page of the pagelet. Note. Personalization instructions must be translatable. |
Specifying Prompt Values for Data Source Parameters
Access the Pagelet Wizard - Specify Data Source Parameter Values page (click the Values link on the Pagelet Wizard - Specify Data Source Parameters page).
Use the Pagelet Wizard - Specify Data Source Parameter Values page to specify the prompt values, which are displayed to users when they personalize the pagelet. In addition, specify the default value for the parameter.
|
Parameter Value |
Specify the parameter value. |
|
Description |
Provide an optional description of the parameter value. |
|
Default |
Select one value as the default value. If the parameter is required, then a default value is required; otherwise, it is optional. |
See Enterprise PeopleTools 8.50 PeopleBook: PeopleTools Portal Technology, “Using Pagelet Wizard,” Step 3: Specifying Data Source Parameters.
Step 4: Selecting a Pagelet Display Format
Access the Pagelet Wizard - Specify Display Format page by one of the following methods:
Selecting Content Management as the data type and click the Next button on the Pagelet Wizard - Select Data Source page.
Clicking the Next button on the Pagelet Wizard - Specify Data Source Parameters page.
Note. The display formats that appear on this page depend on the data type that you selected on the Pagelet Wizard - Select Data Source page.
This example shows the Pagelet Wizard - Select Display Format page with Content Management data type selected in the Pagelet Wizard - Select Data Source page:
Use the Pagelet Wizard - Select Display Format page to specify the data transformation method and display format for the pagelet.
|
Passthru |
Display the pagelet with no visual transformation. |
|
Custom |
Content Management data source pagelets will not be compatible with the Custom display format, when the contents are not well formatted XML. If you select the Custom option, in that case an error message appears asking you to correct the problem before continuing. |
This example shows the Pagelet Wizard - Select Display Format page with Content Management Folder data type selected in the Pagelet Wizard - Select Data Source page:
|
Menu |
Select to display the pagelet as a categorized tree or list-based navigation menu. |
|
Custom |
Select to specify a custom display transformation (XSL template) for your pagelet. |
See Enterprise PeopleTools 8.50 PeopleBook: PeopleTools Portal Technology, “Using Pagelet Wizard,” Step 4: Selecting a Pagelet Display Format.
Step 5: Specifying Pagelet Display Options
Access the Pagelet Wizard - Specify Display Options page by one of the following methods:
Selecting Passthru as the display format and click the Next button on the Pagelet Wizard - Select Display Format page.
Selecting Menu as the display format and click the Next button on the Pagelet Wizard - Select Display Format page.
Selecting Custom as the display format and click the Next button on the Pagelet Wizard - Select Display Format page.
Note. The fields that appear on this page depend on the display format that you selected on the Pagelet Wizard - Select Display Format page.
This example shows Pagelet Wizard - Select Display Options page with Passthru display format selected in the Pagelet Wizard - Select Display Format page. Use this page to enter the pass through formatting details for the pagelet as well as header and footer options, and to preview the pagelet:
This example shows Pagelet Wizard - Select Display Options page with Menu display format selected in the Pagelet Wizard - Select Display Format page. Use this page to enter the menu formatting details for the pagelet as well as header and footer options, and to preview the pagelet:
This example shows Pagelet Wizard - Select Display Options page with Custom display format selected in the Pagelet Wizard - Select Display Format page. Use this page to enter the custom formatting details for the pagelet as well as header and footer options, and to preview the pagelet:
Note. If you are modifying an existing pagelet definition or if you modify data source parameter definitions, you might need to reselect the XSL template, regenerate the XSL, or both to have the modified pagelet display actual data.
See Enterprise PeopleTools 8.50 PeopleBook: PeopleTools Portal Technology, “Using Pagelet Wizard,” Step 5: Specifying Pagelet Display Options.
Step 6: Specifying Pagelet Publication Options
Access the Pagelet Wizard - Specify Publishing Options page (click the Next button on the Pagelet Wizard - Specify Display Options page).
Use the Pagelet Wizard - Specify Publishing Options page to specify the type of pagelet that you want to publish. In addition, provide registration, caching, and security details, and register the pagelet.
See Enterprise PeopleTools 8.50 PeopleBook: PeopleTools Portal Technology, “Using Pagelet Wizard,” Step 6: Specifying Pagelet Publication Options.
Editing a Published Pagelet
Access the Folder Properties - Publish as Pagelet page (click the Publish button on the Folder Properties - Publish Pagelet Wizard Definition page; or if this action item list has already been published as a pagelet, click the Publish as Pagelet link on the Folder Properties page).
Use the Folder Properties - Publish as Pagelet page to review, edit, or add Pagelet Wizard pagelet definitions for this folder. To edit a pagelet definition, it must be marked as published and have a content reference in the current site.
Note. Pagelets for this folder published directly from Pagelet Wizard also appear in this list.
|
Published |
Indicates the whether the pagelet is published. |
|
Edit |
Click to access the Folders Properties - Publish Pagelet Wizard Definition page, where you can edit pagelet definitions. |
|
Delete |
Deletes this pagelet definition and the published pagelet content references in all sites. |
|
Add Pagelet |
Click to access the Folder Properties - Publish Pagelet Wizard Definition page, where you can publish content as a pagelet to a site or portal. |
Publishing a Pagelet to Multiple Portals
Access the Publish to Multiple Portals page (click the Publish Pagelet in Other Sites link on the Folder Properties - Publish Pagelet Wizard Definition page).
Two pages are available for you to publish pagelets to multiple portals:
Use the Publish to Multiple Portals page to publish the pagelet definition to additional portals and sites.
Use the Publish Multiple Pagelets page to publish multiple pagelet definitions to another portal or site.
See Enterprise PeopleTools 8.50 PeopleBook: PeopleTools Portal Technology, “Working With Navigation Pages,” Publishing Pagelets.
Adding New Managed Content
This section provides an overview of content types and discusses how to:
Add new content to Managed Content folders.
Add content attachments.
Understanding Content TypesBased on the type of content you select, you must either upload attachments, enter URL information, or create the document using text or HTML.
This table describes the types of content you can add:
|
Content Type |
Description |
|
File attachment |
Upload a file to the file storage (record based BLOB or the web server). |
|
Text or HTML |
Create a document using either text or HTML. |
|
Image attachment |
Upload a file attachment image to the web server and enable it to render as an image. |
|
Image URL |
Enter the URL of an already web-enabled image. |
|
Web site URL |
Enter the URL of a web site. |
Pages Used to Add New Managed Content|
Page Name |
Definition Name |
Navigation |
Usage |
|
Browse Managed Content - Add Content |
EPPCM_ADDCONT_SEC |
Content Management, Managed Content, Browse Folders Click a folder title and click the Add Content button on the Browse Managed Content page. |
Specify the type of content you want to add to a folder in managed content. |
|
Content Attachment Properties |
EPPCM_CONT_MAIN |
Content Management, Managed Content, Browse Folders Click a folder title and click the Add Content button on the Browse Managed Content page. Select a content type from the drop-down list and click the OK button. |
Enter content properties such as title, summary, and content location to submit content for publication and to maintain comments or discussions specific to that piece of content, among other functions. Note. After you select a content type, a Content Attachment Properties page appears based on the content type you selected. When content is added to managed content, its status is set to checked out. |
|
Content Attachment Properties - Content Locations |
EPPCM_CONT_LOC |
Content Management, Managed Content, Browse Folders Click a folder title link and click a content title link. Click the Locations link on the Content Properties page. |
Move content to a different folder or add more locations. |
|
Content Attachment Properties - Add Content Locations |
EPPCM_CONT_TREEADD |
Content Management, Managed Content, Browse Folders Click a folder title link and click a content title link. Click the Locations link on the Content Properties page. Click the Add Location link on the Content Attachment Properties - Content Locations page. |
Select new locations for the content. |
|
Content Attachment Properties - Move Content |
EPPCM_CONT_TREEMOD |
Content Management, Managed Content, Browse Folders Click a folder title link and click a content title link. Click the Locations link on the Content Properties page. Click the Move button on the Content Locations page. |
Move content to a new folder. |
|
Content Notification |
EPPCM_CONT_NTFY |
Content Management, Managed Content, Browse Folders Click a folder title link and click a content title link. Click the Notifications link on the Content Properties page. |
Send email notifications of saved content to the list of interested parties. |
|
Comments |
EPPCM_CONTCOMM_SEC |
Content Management, Managed Content, Browse Folders Click a folder title link and click a content title link. Click the Comments link on the Content Properties page. |
Enter additional comments about this content item. |
|
Post Details |
EPPDF_VIEW_TOPIC |
Content Management, Managed Content, Browse Folders Click a folder title link and click a content title link. Click the Start Discussion link on the Content Properties page. Click Yes-Start Discussion on the Start Discussion Confirmation page. |
Start a new discussion or edit an existing discussion for this content item. |
|
Edit a Post |
EPPDF_REPLY_TOPIC |
Content Management, Managed Content, Browse Folders Click a folder title link and click a content title link. Click the Start Discussion link and click the Yes-Start Discussion button. Click the Edit button on the Post Details page. |
Edit an existing discussion. |
|
Add a Reply |
EPPDF_REPLY_TOPIC |
Content Management, Managed Content, Browse Folders Click a folder title link and click a content title link. Click the Start Discussion link and click the Yes-Start Discussion button. Click the Reply button on the Post Details page. |
Respond to a discussion. |
Adding New Content to Managed Content Folders
Access the Browse Managed Content - Add Content page (select Content Management, Managed Content, Browse Folders; click a folder title link, and click the Add Content button on the Browse Managed Content page).
|
Add To Folder |
Displays the name of the folder that the content is being added to. |
|
Content Type |
Select a content type. The available options are:
|
|
OK |
After you select a content type and click this button, a Content Attachment Properties page appears based on the content type you selected. |
Adding Content Attachments
Access the Content Attachment Properties page (select Content Management, Managed Content, Browse Folders; click a folder title, and click the Add Content button; select a content type and click the OK button).
Note. The name that appears on this page depends on the content type that you selected on the Browse Managed Content - Add Content page.
This example shows the File Attachment Properties page with the File Attachment option selected in the Browse Managed Content - Add Content page:
Use the File Attachment Properties page to add new file contents to Managed Content folders.
|
Feed |
Click to open the feed contain this item, if available. |
|
Inactive Date |
Displays the inactive date based on the default inactive date of the folder. Content with an inactive date previous to the current date does not appear in the content list of the Browse Content or the My Content pages. However, inactive content is still accessible from the Maintain Content search page. Content that is archived and published elsewhere is still visible from where it is published. The publishing feature such as News Publication or Manage Navigation uses the expiration date to control when the content no longer appears. |
|
Check Out |
Displays the date and time when the content was last checked out. |
|
Check Out By |
Displays the user name who checked out the content. Click the name link to access the Instant Message page, where you can send a instant message to the person who checked out the content. |
|
Upload File |
Click to open a new browser window where you can select a file to upload.
Note. Uploaded files are saved automatically. |
|
Approver |
Select the ID of the user who is assigned to approve the content. After this field is populated and the content is checked in, the Submit for Approval button appears. Approvers are folder members with the approval privilege.
Note. Only one approver can be assigned and only one level
of approval is built in. If you need more levels of approval, you can increment
the version as each version has its own approval cycle. |
|
Version Status and Version |
System assigns a status of In Draft and the version number 1 for new content. Note. When the folder properties are set to auto-approved, the Version Status field indicates that new content is approved when it is added. |
|
Tag |
Click to expand and access the content properties to view or edit tags. See Working With Tags. |
|
Save |
Click to add content to managed content. After you click this button, the content status is set to checked out and the Cancel Check Out button appears. |
|
Check in |
Click to unlock the content item and make it accessible to authorized folder members for review or edit. Note. The Check In and Cancel Check Out buttons are replaced with the Check Out and Submit For Approval buttons. |
|
Locations |
Click to move this content item to a different folder or add it to multiple folders, as well as view all the locations for the content. Note. When using the Managed Content feature, the Locations page shows all the locations for all the feature types where the content exists. The Location page for all other feature types will show only the locations for the current feature type. |
|
Versions |
Click to access the File Attachment Properties - Content Versions page, where you can review, delete, or check out different versions of a specific content item. |
|
Notifications |
Click to create a list of interested parties or to send email notifications of saved content to the list of interested parties. |
|
Comments |
Click to add additional comments about this content item. Note. Comments are auto-generated for created versions. Comments can be added or updated only to the current version for the content. |
|
Search Content |
Click to search for existing content items. |
|
Start Discussions |
Click the Start Discussions link to begin a discussion topic. Note. Discussion topics stay with the content item. They cannot be accessed outside of the Content Properties page. |
|
View Discussions |
If a discussion topic already exists, click to view, edit, or enter a response to it. |
|
Return to Browse Managed Content |
After you have completed attaching a file, click this link to return to the Browse Managed Content page. |
This example shows the Image Attachment Properties page with the Image Attachment option selected in the Browse Managed Content - Add Content page:
Use the Image Attachment Properties page to add new image contents to Managed Content folders.
|
Height |
Use this property to specify the height of the image. This property takes a numeric value. The unit of measurement is pixels. |
|
Width |
Use this property to specify the width of the image. This property takes a numeric value. The unit of measurement is pixels. |
|
Border Width |
Specify the width of lines in the border. This property takes a numeric value. The unit of measurement is pixels. |
|
Hover Text |
Enter the text or mouse-over text that displays additional or supplemental information about the image. |
This example shows the Image URL Properties page with the Image URL option selected in the Browse Managed Content - Add Content page:
Use the Image URL Properties page to add new image URL contents to Managed Content folders.
|
URL |
Enter any HTTP-accessible URL as the new image URL for the content folder. |
This example shows the Text or HTML Properties page with the Text or HTML option selected in the Browse Managed Content - Add Content page:
Use the Text or HTML Properties page to add text or HTML contents to Managed Content folders.
|
Text or HTML |
Enter the text or HTML code that you want to use as the source for the content folder. |
This example shows the Web Site URL Properties page with the Web Site URL option selected in the Browse Managed Content - Add Content page:
|
URL |
Enter any HTTP-accessible URL as the new content URL for the managed content folder. |
Managing Versions
This section provides an overview of the Managed Content approval process and discusses how to:
Edit and view managed content.
Check in content items.
Check out content items.
Review content versions.
Submit content items for approval.
Approve content items.
Select content locations.
Start and view discussions.
Create and use tags in Managed Content.
Manage Managed Content items by status.
See Also
Understanding the Managed Content Approval Process
Managed content enables users to share content among users. It offers a check-in and check-out function, version controls, and an approval process to safeguard and manage the quality of content that is made available for publishing to a wider audience.
To approve content for publishing:
Add new content.
Select locations and verify folder membership.
Check content in.
Other authorized folder members can now check out and review or edit the content.
Submit completed content for approval.
Approve content.
Pages Used to Manage Content Versions|
Page Name |
Definition Name |
Navigation |
Usage |
|
Content Properties |
EPPCM_CONT_MAIN |
Content Management, Managed Content, Browse Folders Click the Properties link on the Browse Managed Content or the My Managed Content page. |
Modify content properties, such as content location, content approver, and content version; check content out, check it in, and submit it for approval; and maintain comments or discussions specific to that piece of content, and other functions. |
|
My Managed Content - Check Out |
EPPCM_USER_MAIN |
|
Edit and view all content that was checked out by you. |
|
Browse Managed Content |
EPPCM_HIERTOP_MAIN |
Content Management, Managed Content, Browse Folders Click a title link. |
Edit and view all content that was checked out by you. |
|
Content Versions |
EPPCM_CONT_VER |
Content Management, Managed Content, Browse Folders Click the Properties link on the Browse Managed Content or My Managed Content page. Click the Versions link on the Content Properties page. |
Review, delete, or check out different versions for a specific content item. |
|
Content Locations |
EPPCM_CONT_LOC |
Content Management, Managed Content, Browse Folders Click a folder title link and click a subfolder title link. Click an appropriate Properties link and click the Locations link on the Content Properties page. |
View information about the folders in which the content is published. From this page, you can move content to a new folder on the Move Content page. In addition, from this page, you can specify additional folders in which the content is available on the Add Content Locations page. Specifying an additional location does not create another copy of the content; instead, it creates a link so that only one instance of the content is present within managed content. |
|
Add Content Locations |
EPPCM_CONT_TREEADD |
Content Management, Managed Content, Browse Folders Click a folder title link and click a subfolder title link. Click an appropriate Properties link and click the Locations link on the Content Properties page. Click the Add Location button on the Content Locations page. |
Select an additional location for the content. |
|
Start Discussion Confirmation |
EO_PE_YESNOCONFIRM |
Content Management, Managed Content, Browse Folders Click a folder title link and click an appropriate Properties link. Click the Start Discussion link on the Content Properties page. |
Use to confirm the start of a discussion on this piece of content. |
|
Post Details |
EPPDF_VIEW_TOPIC |
Content Management, Managed Content, Browse Folders Click a folder title link and click an appropriate Properties link. Click the Start Discussion link on the Content Properties page. Click the Yes-Save and Start button. |
Use to start a new discussion, edit an existing discussion, or view an existing discussion for a content item. From this page, you can edit the existing discussion, delete the discussion entirely, and add a reply, among other tasks. |
|
Discussion |
EPPDF_REPLY_TOPIC |
Content Management, Managed Content, Browse Folders Click a folder title link and click an appropriate Properties link. Click the Start Discussion link on the Content Properties page. Click the Yes-Save and Start button and click the Edit button. |
Enter or edit a discussion topic. |
|
My Managed Content Status |
EPPCM_STAT_MAIN |
Content Management, Managed Content, My Content Status |
View, at a glance, the work that you need to perform based on the status of managed content. |
|
Content Notification |
EPPCM_CONT_NTFY |
Click the Notifications link on the Content Properties page. |
Send email notifications of saved content to the list of interested parties. |
|
Comments |
EPPCM_CONTCOMM_SEC |
Click the Comments link on the Content Properties page. |
Enter additional comments about this content item. |
|
Edit a Post |
EPPDF_REPLY_TOPIC |
Click the Edit button on the Post Details page. |
Edit an existing discussion. |
|
Add a Reply |
EPPDF_REPLY_TOPIC |
Click the Reply button on the Post Details page. |
Respond to a discussion. |
Editing and Viewing Managed Content
Access the My Managed Content – Checked Out page (select My Content, My Managed Content; click the Check out link).
When clicking a Content Item Status link on the My Managed Content Status page, you are redirected to the My Managed Content page with the filters set according to the status selected. These filters can be adjusted directly on the My Managed Content page. The content is automatically filtered to only return content rows where the user is the creator, updater, or approver of the last version.
Selecting the Search All Versions option filter will check all versions; however, data retrieval will take longer with this filter selected. The preceding example shows the My Managed Content page when the Checked Out content item status is selected.
Note. The newly added content item How to Retrieve Secure Content is listed as checked out and locked. You can also see that it is a Microsoft Word document, its latest version is 1, and it is located in two folders.
|
Add Content |
Clink to access the Add Content page, where you can add a new content to this section. |
|
Status |
Select to search articles with a status of Draft, Pending, Published, Rejected, Rework, or All. |
|
Checked Out to Me |
Select to limit your search to articles that were checked out to you. |
|
Search All Versions |
Select this option to check all versions of content; data retrieval will take longer with this filter selected. |
|
Filter |
Click to limit the number of articles displayed on the page based on the values entered for the Status and Checked Out to Me fields. |
|
|
Indicates content is in Microsoft Word format. |
|
|
Indicates content is a file attachment. |
|
|
Indicates content is an image attachment. |
|
|
Indicates content is in either text or html format. |
|
Title |
Click the content title link to view the content details. |
|
|
Indicates content is checked out and locked. |
|
|
Indicates content is published. |
|
Status |
Displays the current publishing status of this article: Draft, Pending, Publish, Reject, or Rework. Note. You can use the Status drop-down list to search based on a selected status. |
|
Version |
Displays the version number of the content. |
|
Location Path |
Displays the path to the content location. Note. Content that is in multiple locations appears multiple times in the list. |
|
Properties |
Click to access the content properties page, where you can specify the type of content you want to add to a section of a news publication. |
Checking In Content Items
Use the Content Attachment Properties page to modify content properties such as content location, content approver, and content version; to check content out, to check it in, and to submit it for approval; and to maintain comments or discussions specific to that piece of content, among other functions.
When you check in a file attachment, you are prompted to upload it from a local drive and folder.
To check in a content item:
Access the My Managed Content page for a list of all content currently checked out to you.
Select My Content, My Managed Content, Check Out.
Click the Properties link to access the Content Attachment Properties page.
Click the Check In button to unlock the content item and make it accessible to authorized folder members for review or edit.
Members can access the content using a variety of methods, including their own in-box or using browse.
Note. The Check In and the Cancel Check Out buttons disappear. The Check Out and the Submit For Approval buttons appear.
See Accessing Content.
Return to the My Managed Content page.
The content item is no longer listed. You will need to change the filtering criteria to see it.
Checking Out Content Items
Access the Browse Managed Content page (select Content Management, Manage Content, Browse Folders; click an appropriate folder title link).
Use the Content Attachment Properties page to modify content properties such as content location, content approver, and content version; to check content out, to check it in, and to submit it for approval; and to maintain comments or discussions specific to that piece of content, among other functions.
When you check out a file attachment, you are prompted to save it to a local drive and folder.
If you navigate to the folder containing the required content, a lock is no longer associated with the file because the content is now checked in. Instead, a star icon indicates the content item was recently added.
Note. The My Managed Content page takes you directly to the content. To find your content using the browse option, you need to know where the content is located.
To check out content items:
Click the Properties link on the Browse Managed Content page.
Click the Check Out button on the Content Properties page.
The content item opens in its original format ready for you to review, edit, or save. For example, the How to Retrieve Secure Content item opens in Microsoft Word.
Save the content to a location on your computer.
The Content Properties page reappears. Notice the changes to the Version, Version Status, Created, and Modified fields. Checking out a piece of content creates a new version with a status of draft.
Return to the Browse Managed Content page.
Notice the icon indicating that this content is checked out and locked, and the version number has changed.
See Understanding Managed Content.
Reviewing Content Versions
Access the Content Versions page (select Content Management, Managed Content, Browse Folders; click the Properties link; and click the Versions link on the Content Properties page).
Use this page to review, delete, or check out different versions of a specific content item. New versions can only be created by checking content out.
|
Delete |
This button is only available for content that has more than one version, and the version to be deleted is not the latest approved version. |
|
Check Out |
This button is only available for content that is checked in. Click to check out content and create a copy of the specific version it is used. |
Submitting Content Items for Approval
You can select an approver at your discretion from the users who have been granted approval privileges for this folder. Before you can submit content items for approval, you must check in the content.
To submit content items for approval:
Select Content Management, Managed Content, Browse Folders.
Alternatively, select My Content, My Managed Content.
Access the Content Properties page.
Click the Properties link on the Browse Managed Content page or the My Managed Content page.
Select an approver user ID or role.
Click the Submit for Approval button.
Note the following:
The content is automatically checked out and locked to the approver.
The fields on the Content Properties page are only editable by the listed approver because the content is checked out to the approver.
The Version Status and Locked To fields have been updated.
The icon also indicates that the file is locked. When you submit content for approval, it is automatically checked out to the approver by the system.
The Check Out button and the Submit for Approval buttons disappear. The Cancel Check Out button appears.
See Understanding Managed Content.
Approving Content Items
The Content Attachment Properties page is used to modify content properties such as content location, content approver, and content version; to check content out, to check it in, and to submit it for approval; and to maintain comments or discussions specific to that piece of content, among other functions.
When you approve an item of managed content, you make that item available to be reused in other content management features such as news publications, categorized content, collaborative workspaces, and so on.
To approve a content item:
Select My Content, My Managed Content to access the My Managed Content page to view content items of a particular status, including a list of all content that requires your review and approval.
Click the Properties link for the desired content on the My Managed Content page.
Click the link to review the content.
For example, if the content is a file attachment, click the file name.
Click the Approve button if the content is ready to be published.
Click the Rework button if the content requires additional work.
Notice that the Modified and Version Status fields were updated and the locked icon was removed.
Approved content is now available for publishing.
Selecting Content Locations
Access the Content Locations page (select Content Management, Managed Content, Browse Folders; click a folder title link, and click a subfolder title link; click an appropriate Properties link and click the Locations link on the Content Properties page).
Note. The Content Locations page in the Managed Content
feature lists all the folders where the content is located, including the
locations of other publishing features that imported the managed content.
When the Content Locations page is accessed from a nonmanaged feature, such
as Workspaces or Categorized Content, it will only show the content locations
for that feature. You can only move content between folders of the current
feature in the current site.
When moving content or adding new content locations, be aware that the
location (parent folder) determines the access security for the content.
See Moving Folders in Managed Content.
|
Move |
Click to change the current location of the content. |
|
Add Location |
Click to add an additional location for the content. |
Access the Add Content Location page (select Content Management, Managed Content, Browse Folders; click a folder title link, and click a subfolder title link; click an appropriate Properties link, click the Locations link on the Content Properties page; and click the Add Location button on the Content Locations page).
To select an additional location for the content:
Click the folder icons to navigate through the hierarchies.
Select the new location by clicking the folder title.
The Content Locations page appears with the new location listed.
Click the Return button to return to the Content Properties page.
Click the Save button.
The document is now listed in two folders.
Starting and Viewing Discussions
The Start Discussions link on the Content Properties page enables users to start a discussion, which is then attached to the content item. After a discussion has been started, the link changes to View Discussions and is used to edit, respond to, and view discussions.
Note. These discussions stay with the content item, and they can only be accessed from the Content Properties page.
Starting Discussion
Access the Start Discussion Confirmation page (select Content Management, Managed Content, Browse Folders; click a folder title link, and click an appropriate Properties link; click the Start Discussion link on the Content Properties page).
Use the Start Discussion Confirmation page to confirm the start of a discussion on this piece of content.
Access the Post Details page (select Content Management, Managed Content, Browse Folders; click a folder title link, and click an appropriate Properties link; click the Start Discussion link on the Content Properties page and click the Yes-Save and Start button).
Use the Post Details page to start a new discussion, edit an existing discussion, or view an existing discussion about a content item.
From the Post Details page, you can edit the existing discussion, delete the discussion entirely, and add a reply, among other tasks. Unlike discussion forums, a discussion for a content item contains only one topic, but it can contain one or more replies.
Notice that the title for the topic is the same as the title for the piece of content being discussed.
Access the Discussion page (select Content Management, Managed Content, Browse Folders; click a folder title link, and click an appropriate Properties link; click the Start Discussion link on the Content Properties page and click the Yes-Save and Start button; click the Edit button).
Use the Discussion page to edit a discussion topic. A discussion for a content item contains only one topic, but it can contain one or more replies.
After you post a discussion, click the Content Properties link; the Start Discussion link is now a View Discussions link.
See Also
Working With Discussion Forums
Creating and Using Tags for Content Management
Tags for Content Management appear on the properties pages as well as the view page for the content. However, some types of content—such as attachments and URLs—open the content in a new window without using the application view page. In these instances, tags are only available on the properties page. Application pages appear only in edit or view mode.
To create and use tags for Content Management:
Access the pages either by:
Selecting Content Management, Managed Content, Browse Folder.
Selecting My Content, My Managed Content.
Select any content item.
Click an appropriate link to view, edit, or add tag.
Enter the tag name, and click the Update Tags button.
Note. Security considerations: Users that have access to the content must have the add and view tag permissions. Users that are assigned the Administrator, Author, or Expert roles also are assigned the modify permissions. All users have access to delete their own tags, both public and private. User with Admin privileges can delete all tags in the content, and an Admin user cannot delete the Private tags of other users.
See Working With Tags.
Managing Managed Content Items by Status
Access the My Managed Content Status page (select Content Management, Managed Content, My Content Status).
The My Managed Content Status page and the My Managed Content page enable you to see, at a glance, the work that you need to perform based on the status of managed content.
|
Content Item Status |
Click an appropriate link to access the My Managed Content page, where you can preview the content items for the selected status, view their property details, or add new content. |
Note. Enterprise Portal provides a My Managed Content homepage pagelet that gives you easy access to the content items that require your attention.
Working With the My Managed Content PageletThis section provides an overview of the My Managed Content pagelet and discusses how to:
Personalize the My Managed Content pagelet.
Add a Folder Favorite.
Understanding the My Managed Content Pagelet
Access the My Managed Content pagelet (click the Content link from the menu bar on the homepage and then select the My Managed Content option on the Personalize Content page).
The My Managed Content pagelet provides an alternative access path to the My Managed Content page and to the Browse Managed Content page for a specific folder.
|
Content Status |
Select one of the links under Content Status to access the My Managed Content page with content filtered by your selection.
Click a content status link to access the My Managed Content page, where you can access the content item in the selected status. The number adjacent to the content status link indicates the number of content items at that status. |
|
Folder Favorites |
Lists the Managed Content folders that you have added to the pagelet. Select a link under the Folder Favorites section to access the Browse Managed Content page for that folder. Add folders that are most important to you, or which you access frequently, or modify them as your needs change. Note. Add or delete folders by personalizing the pagelet. |
|
|
The star icon indicates that new content has been added to the folder. |
Pages Used to Work With the My Managed Content Pagelet|
Page Name |
Definition Name |
Navigation |
Usage |
|
Personalize My Managed Content |
EPPCM_FAV_PREF |
Click the Customize icon on the My Managed Content pagelet. |
Modify the favorite folders that appear in the My Managed Content pagelet. |
|
Add Folder Favorite |
EPPCM_FAV_TREEADD |
Click the Customize icon on the My Managed Content pagelet. Click the Add Folder button on the Personalize My Managed Content page. |
Select a folder to add as a favorite for the My Managed Content pagelet. |
Personalizing the My Managed Content Pagelet
Access the Personalize My Managed Content page (click the Customize icon on the My Managed Content pagelet).
Use the Personalize Content page to select the pagelets that you want to appear on your homepage. Optionally, you can personalize the name of your homepage tab and add a welcome message.
You can add managed content folders to which you have access. The memberships and privileges assigned in Content Management apply.
|
Order |
Specify the order in which the folders will appear on the pagelet. Complete the list of folders that you want to display before specifying their display order. |
|
Nickname |
Specify the name of the link that will appear on the pagelet. If no name is specified, the managed content folder name appears. |
|
Title |
Displays the managed content folder name. |
|
Path |
Displays the path to the selected folder from the managed content root. The path matches the folder hierarchy represented in the tree on the Add Folder Favorites page. |
|
Edit |
Click to access the Add Folder Favorites page, where you can select a different managed content folder. When you return to the Personalize My Managed Content page, edit the folder order and nickname values, if needed. |
|
Delete |
Click to delete the folder. You will be prompted to confirm your deletion. |
|
Click to access the Add Folder Favorites page, where you can select a managed content folder that you want to add to the pagelet. |
Adding a Folder Favorite
Access the Add Folder Favorite page (click the Customize icon on the My Managed Content pagelet, and then click the Add Folder button on the Personalize My Managed Content page).
Expand each managed content folder to display additional subfolders, if any. Select a folder to add it to your folder favorites.
The selected folder will be added to the list of folder favorites on the Personalize My Managed Content page.
The system displays only the folders for which you have viewing privileges.
Importing Managed Content into Other Features
This section discusses how to import Managed Content.
Using the Add Content page (EPPCM_PUB_SELECT), you can import Managed Content into these publishing features:
News Publication
Categorized Content
Content Pagelets
Manage Navigation
Discussion Forums
Action Items
Community Calendar Events
To import managed content:
Browse folders to navigate to the folder where you want to import the managed content.
For example, select Content Management, Categorized Content, Browse Folders.
Click the Add Content button.
The Add Content page appears, enabling you to specify the type of content that you want to import to a published feature folder.
Select the Managed Content option as the content type, and then click the OK button.
The Managed Content search page appears.
Note. The Select Managed Content page appears when you use the Action Items. Other features use a common search page to select Managed Content to import.
Enter search criteria to filter the search results.
Click the Search button.
Select the content item that you want to import by clicking the content title.
The Content Properties page appears with the content item's information. The origin type displays as Managed Content.
Use the Content Properties page to review content properties such as title, source, and summary; to specify content location; to submit content for publication; and to maintain comments or discussions specific to that piece of content, among other functions.
Click the Submit button to save your work and submit the content for publication.
The new content appears in the folder with a status of pending publication. The modified date indicates when the content was approved in the Managed Content feature.