 Understanding Setup of the Content Management System
This chapter provides an overview of the setup of the Content Management system and discusses how to:
Administer the Content Management system.
Purge or inactivate content.
Define features.
Migrate content.
Understanding Setup of the Content Management System
The implementation of PeopleSoft Enterprise Portal Content Management requires the following initial setup steps:
Identify how to divide and manage responsibilities.
Responsibilities are divided by privilege sets. Specific duties, such as adding folders and publishing content, are assigned to privilege sets on the Privilege Sets page. Privilege sets list the actions that a user can perform on a folder or the content that is located in that folder. When you're creating each content management folder, these privilege set definitions are associated with member roles and user IDs.
Privilege sets are segregated by content management features, and each feature requires a top administrator to create its top folders. The user IDs on the Top Administrators page define who can create the top folders.
Note. Oracle delivers a number of permission lists to support Content Management-related features. These features are discussed in detail in the Enterprise Portal Application Technology PeopleBook.
Identify where document content can be stored.
Administrators register Content Management storage locations on the Define File Storage page. You can store content on File Transfer Protocol (FTP) file servers or in database binary large objects (BLOBs). The choice of URLs is based on the information from the URL Maintenance page that is found in the PeopleTools, Utilities, Administration, URLs menu path.
See Defining Document Storage Locations.
See Enterprise PeopleTools 8.50 PeopleBook: System and Server Administration, “Using PeopleTools Utilities,” Using Administration Utilities, URL Maintenance.
Identify where image attachments can be stored.
PeopleSoft Enterprise Portal can upload, access, and render image files by way of an FTP service. To render image files as actual images, the FTP service must exist in a web server directory in the PeopleSoft domain.
Note. The web server directory extension and the FTP service should be installed only on a single web server that is used by the Enterprise Portal database. For clustered web servers, all image attachments are rendered and stored on a selected single web server.
See Also
Enterprise PeopleTools 8.50 PeopleBook: Security Administration, “Understanding PeopleSoft Security.”
Enterprise PeopleTools 8.50 PeopleBook: PeopleSoft System and Server Administration, “Using PeopleTools Utilities,” Using Administration Utilities.
Enterprise PeopleTools 8.50 PeopleBook: PeopleCode Developer's Guide, “Understanding File Attachments and PeopleCode,” Using File Attachments in Applications, File Attachment Architecture.
PeopleSoft Enterprise Portal 9.1 Installation, “Setting the FTP URL for Content Management Images.”
Administering the Content Management System
This section provides an overview of the administration of the Content Management system and discusses how to:
Assign top administrators.
Define privilege sets.
Create a top folder.
Add a subfolder.
Specify viewer roles.
Define document storage locations.
Set up an FTP service for image attachments.
 Understanding Administration of the Content Management System
PeopleSoft Enterprise Portal enables you to organize your content-creation processes and the resulting content. PeopleSoft Enterprise Portal’s Content Management system includes features for content creation, content versions, approval, organization, publication, automatic acquisition (crawling), and management. The resulting content is ready and available for placement in various portal pagelets, including news publications, related information, and categorized content.
Before content can be created, published, and used, the Content Management system folder hierarchy and privilege sets must be set up by administrators. Depending on the needs of the site, the tasks of administering the Content Management system can be distributed across multiple administrator roles.
This flowchart summarizes the Content Management system folder hierarchy and privilege settings that must be set up by administrators before content can be created, published, and used:

Content Management system folder hierarchy and privilege settings
The following list highlights the administration tasks by role:
Assign top administrators for each feature of the Content Management system (portal administrator).
Define privilege sets for each feature of the Content Management system (portal administrator).
Specify viewer roles for viewing published content from the Content Management system (portal administrator).
Create the top folders for a feature (top administrators by feature).
Set top folder properties, add administrators, and set privileges to each top folder (top administrators by feature).
Create subfolders, set folder properties, and assign privileges for each of those subfolders (subfolder administrators).
Pages Used to Administer the Content Management System|
Page Name |
Definition Name |
Navigation |
Usage |
|
Top Administrators |
EPPCM_TOP_CAT_ADMN |
Content Management, Administration, Top Administrators |
Assign specific users who will be able to create top folders within the Content Management system. A top administrator must be defined for each Content Management-based feature that is actively being used. |
|
Privilege Sets |
EPPCM_PRIVILEGES |
Content Management, Administration, Privilege Sets |
Define the security privilege sets to secure row-level access to a specific feature in the Content Management system. |
|
Folder Properties |
EPPCM_CATG_MAIN |
Content Management, Managed Content, Browse Folder Click the Add Top Folder button. |
Set the properties for a new folder or to update property details for an existing folder. Note. Use the Folder Properties page for top folders as well as for subfolders. |
|
Folder Securities |
EPPCM_CATG_MEM |
Content Management, Managed Content, Browse Folder Click the Add Top Folder button. Select the Folder Security tab. |
Manage the folder members and their privileges. This page lists the members and privilege sets for the current folder. |
|
Folder Security - Select Member Privileges |
EPPCM_CATG_PRIV |
Content Management, Managed Content, Browse Folder Click the Add Top Folder button. Select the Folder Security tab. Click the Add Member button or the Edit button. |
Assign privilege sets for the current folder. |
|
Viewer Roles |
EO_PE_ROLE_TBL |
Content Management, Administration, Viewer Roles |
Define the viewer (audience) roles to use to secure published content. |
|
File Storage |
EPPCM_DEFAULT_URL |
Content Management, Administration, File Storage |
Define the storage location for file attachments in the Content Management system. |
|
URL Maintenance |
URL_TABLE |
Content Management, Administration, File Storage Click the Edit link that is associated with the desired URL ID on the File Storage page. |
Set up the FTP URL addresses or record names of the document repositories. Note. This setup must be done before you access the Content Management setup pages; it is the responsibility of the system administrator. |
|
Purge/Inactivate |
EPPCM_PRG_RUN |
Content Management, Administration, Purge/Inactivate |
Purge content or folders, inactivate content, unpublish content, or delete versions from the Content Management system. |
Assigning Top Administrators
Access the Top Administrators page (select Content Management, Administration, Top Administrators).
Use this page to assign specific users who will be able to create top folders within the Content Management system. A top administrator must be defined for each Content Management-based feature that is actively being used.
For example, within the Categorized Content feature, at least one user must be able to create top folders to delegate more specific responsibilities within those top folders. Similar top administrator responsibilities must be assigned for managed content, news publications, discussion forums, and other features.
Note. The top administrator is automatically granted all privileges for all content and folders of the feature without being an explicitly assigned member.
|
Feature |
Use the drop-down list box to select a feature for this privilege set. Available features are:
Note. For non-Content Management features, such as Discussion Forum, top administrators can view the content through Content Management. |
|
User ID |
Use the search icon to select the user who is to be granted top folder authorization for the corresponding feature. For Discussion Forum, the search prompt limits the selection to users who have security access to the browse component. Note. You can also enter a value manually. |
|
Description |
Display the description for this privilege set. This value is set in the Folder Properties - Security page. |
Defining Privilege Sets
Access the Privilege Sets page (select Content Management, Administration, Privilege Sets).
Use this page to create and maintain privilege sets, which are unique to each Content Management feature. Within each privilege set, three groupings of privileges are available: content privileges, folder privileges, and discussion privileges. Each privilege controls the visibility of an action button on the folder and content management pages. You typically need to set up the administrator privilege set for each feature.
Note. Some features require additional privilege sets such as author (or contributor), expert (or approver), and viewer. Some privileges may not apply to every feature.
|
Privilege Set |
Displays the unique privilege set name that is entered on the search page. |
|
Feature |
Displays the selected feature for this privilege set. The available options are:
|
|
Description |
Enter a meaningful description for this privilege set. This description appears on the Folder Properties - Security page. |
|
System Item |
Indicates whether this privilege set is used by the system. Note. Only non-system privilege sets can be deleted. |
|
Assigned |
Indicates whether this privilege set is currently assigned to a folder member. Note. Privilege sets that are assigned to folder members cannot be deleted. |
Use this section to select the content privileges for this privilege set.
|
View Content |
Select to provide read-only access to content and the ability to send email notifications. The system automatically assigns the view privilege. |
|
Subscribe to Content |
Select to enable the user to add members to the interested party list. |
|
Add Content |
Select to enable the user to add new content to a folder and edit his or her authored versions. |
|
Edit Content |
Select to enable the user to check out and edit content. |
|
Edit Content Metadata |
Select to enable the user to edit the descriptive attributes, but not the content detail itself. |
|
Delete Content |
Select to enable the user to delete content from a folder. |
|
Delete Approved Content |
Select to enable the user to delete content that is approved or that is pending approval. |
|
Release Locked Content |
Select to enable the user to release content that is checked out by another user. |
|
Publish Content |
Select to enable the user to publish, reject, or submit content for rework. This option is applicable to the Company News Publication feature. |
|
Approve Content |
Select to enable the user to approve, reject, or mark content for rework. This option is applicable to the Workgroups feature. |
Use this section to select the folder privileges for this privilege set.
|
View Folder |
Select to provide read-only access to content and the ability to send email notifications. |
|
Add Folder |
Select to enable the user to add a new folder below a top folder. |
|
Edit Folder |
Select to enable the user to change the properties of a folder. |
|
Delete Folder |
Select to enable the user to delete a folder. |
|
Assign Members |
Select to enable the user to assign members and their privilege sets to a folder. |
|
Publish Folder |
Select to enable the user to publish the folder as a pagelet or publish to the left navigation as a menu item. |
|
Unpublish Folder |
Select to enable the user to unpublish a published folder. The user must have security access to the content reference to unpublish it. |
Use this section to select the discussion privileges for this privilege set.
|
View Content Discussions |
Select to provide read-only access to discussion forums. |
|
Add Content Discussions |
Select to enable the user to add new discussion topics and responses to forums that he or she can access. |
|
Moderate Content Discussions |
Select to enable the user to edit and remove posts in addition to adding topics and responses. |
Creating a Top Folder
Access the Folder Properties page (select Content Management, Managed Content, Browse Folder; click the Add Top Folder button).
Use this page to set the properties for a new folder or to update property details for an existing folder.
Note. The Folder Properties page is used for top folders as well as for subfolders.
Users can add folders at any level for which they have authorization. Only top administrators can create top folders at the root of a feature’s folder hierarchy. At subsequent levels, any folder members with the proper privilege can add folders.
|
Title |
Enter the desired information. |
|
Summary |
Add a brief description of the content. This field supports HTML entries. |
|
Owner |
Assign the owner of the content. Click the name link of the owner to access the Instant Message page, where you can send an instant message to the owner. |
|
Content can be Published |
Select to enable approved content to be imported and published in features outside of managed content. You must select this option for publishing features to import or reference managed content. Note. If you want approved content to remain private, you can create a development or work-in-progress folder that is nonpublishable. As content is completed and approved, you can then add a new publishable folder location for the content. The development folder should have only publishing and viewing members. |
|
Folder can be Published |
Select to allow for publishing of this folder as a pagelet or menu item. Note. Even with this option selected, only users with the Publish Folder or Unpublish Folder privilege will see the Publish as Pagelet, Publish as Feed, and Publish as Menu Item links. |
|
Do Not Allow Deletes |
Select to prevent this folder from being deleted from the folder hierarchy or from being deleted during the purge process. |
|
File Storage |
Select the document storage location for the folder's child content. The value appears by default from entries set up for attachment locations. As delivered, two locations are set up: one for storage of attachments in a database table and another as a file server placeholder. The file server choice will not function properly until you edit the URL entry with your server information. The database storage choice functions for the underlying database table that exists within the PeopleSoft Enterprise Portal. |
|
Approvals |
This field determines the approval mode for the folder. Available options are:
Note. This setting cannot be changed after content has been created. If you need to change the approval setting, you must delete the content and add it again with the new approval setting. |
|
Inactivate Date |
Select the default inactivation date for content created in this folder. Content with an archive date previous to the current date does not show in the content list in the Browse Content or My Content pages. However, the content is still accessible from the Maintain Content search page. Content that is archived and published elsewhere is still visible from where it is published. Publishing features such as News Publication and Categorized Content use the expiration date to control when the content no longer appears. Select a default inactivation date for content created in this folder from the following values:
|
Adding Members to the Folder with Administrator Privileges
After you set the properties for a new folder or to update property details for an existing folder, you add a member to the folder with administrator privileges. The administrator privilege allows this user to create subfolders within the new top folder among other administrative privileges.
Access the Folder Securities page (select Content Management, Managed Content, Browse Folder; click the Add Top Folder button, and select the Folder Securities tab.)
Use this page to manage the folder members and their privileges. This page lists the members and privilege sets for the current folder. Actual privileges are assigned on the Folder Security - Set Members Privileges page. A new folder automatically inherits the members and privileges of its parent folder. However, privileges added later are not automatically transferred down the folder hierarchy and must be updated on a folder-by-folder basis. To assist with this process, an Inherit Members button appears when you view folder security for any subfolder, enabling you to quickly duplicate the same members as assigned to the parent folder.
Note. A top administrator is automatically granted all privileges for all content and folders of the feature without being an explicitly assigned or listed member of a folder.
See Administering the Content Management System.
|
Edit |
Click to edit the privileges of this member. |
|
Delete |
Click to remove the member and prohibit him or her from accessing content from this folder. |
|
Add Member |
Click to access the Folder Security - Set Members Privileges page to assign members and determine the actions they can perform upon the folder and the content located in that folder. |
|
Return to Browse Managed Content |
After you finish creating a top folder in the Managed Content feature, click this link to return to the Browse Managed Content page. The folder that you created now appears as a top folder in the Managed Content feature. |
Access the Folder Security - Set Members Privileges page (select Content Management, Managed Content, Browse Folder; click the Add Top Folder button; select the Folder Securities tab; and click the Add Member button or the Edit button).
Use this page to assign privilege sets to the selected member.
|
Member Type |
Select either Role or User for member type. |
|
Member Name |
Enter or select the desired information. |
|
Privilege Set |
Select appropriate privileges for this member. Available options are Administrator and Author. |
|
Privileges |
Displays the privilege sets that were defined for the Manage Content feature. |
|
OK |
Click to accept changes to the privilege sets and return to the Folder Security page. |
Adding a Subfolder
Access the Folder Properties page (select Content Management, Managed Content, Browse Folder; click an entry in the Title column to select a top folder in which to add the subfolder; and click the Add Folder button).
This page is used to set the properties for a new folder or to update property details for an existing folder.
Note. This Folder Properties page is used for top folders as well as for subfolders.
Users can add folders at any level for which they have authorization. Only top administrators can create top folders at the root of a feature’s folder hierarchy. At subsequent levels, any folder members with the proper privilege can add folders.
The settings for the Content can be Published, Folder can be Published, and Do Not Allow Deletes options as well as for the options in the Child Content Defaults section have been inherited from the parent folder. The members and privileges defined for the parent folder have also been inherited and you cannot modify those privileges.
Specifying Viewer Roles
Access the Viewer Roles page (select Content Management, Administration, Viewer Roles).
Use this page to specify the roles that you want to make available to content publishers. Specifying viewer roles creates a short list from all of the PeopleTools security roles defined in the system. Only the roles that are specified on this page are available to publishers when they select roles to make up the authorized viewing audience for published content.
|
Role Name |
Use the search button to select a role name from PeopleTools security roles. Only the roles that are selected are available to users when they select roles that comprise the viewing audience of published content for news articles and promotions. |
|
Description |
Displays the description for each role. |
See Also
Enterprise PeopleTools 8.50 PeopleBook: Security Administration, “Setting Up Roles.”
Defining Document Storage Locations
Access the File Storage page (select Content Management, Administration, File Storage).
Use this page to specify the locations where document file attachments can be stored for the content management features. When users add a new Managed Content folder or News Publication section, they can specify any location that is listed in this table as the storage location for all document files that are in that folder.
|
URL Identifier |
Use the search button to select the desired URL identifier from a list of available URLs. The system uses this ID when referring to document locations. The URL list is populated from the URL Maintenance page. |
|
Description |
Displays the description for each URL identifier. |
|
Default |
Select to define the location that you want to use as the default whenever a new folder or new publication section is created. |
|
Edit |
Click to access the URL Maintenance page to set up the URL address for this storage location. |
Note. This page defines locations for document files only. Image files are stored in a specific location on the web server.
See Setting Up an FTP Service for Image Attachments.
Files can be stored on FTP servers or in the Enterprise Portal database as BLOBs. Two locations are predefined, one for each type. However, the FTP server definition is not complete; it is just a placeholder. You must edit the actual FTP URL address for your server, or delete it and add multiple new URL ID choices, as needed, with the actual server and directory addresses. You can specify as many file server locations as necessary. Use the PeopleTools URL maintenance utility to define these URL identifiers:
CMDOCFS - File server location: An FTP service must be running for the PeopleTools file attachment functions to work properly.
CMDOCDB - Database Location (BLOB): The record PS_EPPCM_DOCINDB is delivered with the PeopleSoft Enterprise Portal database for this purpose.
You can also create additional database records to store attachments by using the same structure that is defined in PS_EPPCM_DOCINDB. Assign them to the desired tablespace.
Note. You should discuss these options with the database and system administrators and consider the advantages and disadvantages of each. Physical storage requirements, backup procedures, virus scanning, and access rights should all be considered. You can implement Content Management by using one or both options.
Security within content management is enforced through the member and privilege set concept. Document content is accessible by members of all folder locations where the content resides.
See the "Securing Your PeopleSoft System in a Web Environment" red paper on the My Oracle Support website.
Setting Up URL Addresses for Document Storage
Access the URL Maintenance page (select Content Management, Administration, File Storage; click the Edit link that is associated with the desired URL ID on the File Storage page).
The system administrator is responsible for setting up actual URL addresses for document storage. This must be completed before you use the Content Management Attachment Locations page.
|
URL Identifier |
Name that uniquely identifies the URL that is entered on the search page. This name appears later as the selection on the Content Management's Define File Storage page. |
|
Description |
Enter a meaningful description for this URL identifier. This value appears on the File Storage page. |
|
URL |
Enter the location of the document repository. The required formats are:
|
|
Comments |
Add any additional comments about this URL identifier. |
|
URL Properties |
Click to access the URL Properties page, where you can specify or update URLs. URLs that are saved here can be referenced from page controls such as a button or link. The associated URL can be either an internet or intranet link. See Enterprise PeopleTools 8.50 PeopleBook: System and Server Administration, Using PeopleTools Utilities, Using Administration Utilities, URL Maintenance |
Using Document File Storage Locations
A folder administrator selects document file storage locations when he or she creates new Managed Content folders, News Publication sections, or Categorized Content taxonomy folders.
See Setting Up and Working With Managed Content, Setting Up and Working with Categorized Content, Setting Up and Working With News Publications.
Each time that a new version of a document file is attached, the Content Management feature stores the document location's URL identifier of the current Managed Content folder. Upon later retrieval, the system dynamically creates a fully qualified URL address by appending the information that is stored in the ATTACHSYSFILENAME field to the underlying URL address that is associated with the URL identifier.
The following table lists the fields that the system uses to store this data:
|
EPPCM_DOC Record Field Names |
Usage |
|
URL_ID |
The URL identifier description from the PeopleTools URL table. Underlying the identifier is the full URL address of the server and directory location where the file is stored. For example, CMDOCFS is the URL identifier for the defined URL address: ftp://userID:password@fileserver/directory. |
|
ATTACHSYSFILENAME |
The unique file name that is assigned by the system each time a new version of the document is saved. It is composed of the content ID, a version ID, and the name of the file itself, for example, 10403ROI.pdf. |
|
ATTACHUSERFILE |
The original name of the uploaded file, for example, ROI.pdf. |
|
URL |
This field is not used. |
If the administrator exchanges the document location for a Managed Content folder, the folder content might be spread across multiple physical locations. Changing a file server location does not change the URL_ID references for previously created document file versions, and everything should still work correctly. However, if the underlying URL address for an identifier is changed, you can no longer access previously stored content unless it is physically moved to the new location.
Note. Content can be shared between multiple Managed Content folders. If the content is checked out and revised from multiple folders, the various versions of one content entry might be located in different physical locations if each Managed Content folder is assigned a different document location. The URL ID is based on the document location that is assigned to the current folder at the time of attachment.
Important! If you are in a DB2 OS/390 and z/OS environment, restrictions are placed on file attachment sizes. You are limited to chunk sizes of 3862 for a 4K tablespace or 32444 for a 32K tablespace.
See Enterprise PeopleTools 8.50 PeopleBook: PeopleCode Developer's Guide, "Understanding File Attachments and PeopleCode," Using File Attachments in Applications, Using Chunking With Attachments.
Setting Up an FTP Service for Image Attachments
Images are not attached to the storage location that is specified by the Managed Content folder. Images are always attached to the FTP server that is set up in the PeopleTools URL table with the EPPCM_IMAGE identifier. You need to verify that the identifier is updated with your specific environment information. To render image files as actual images, the FTP service must exist in a web server directory in the PeopleSoft domain.
To set up the FTP service in a web server directory in the PeopleSoft domain, you must complete the following tasks:
Extend the web server directory to include the folder path ps/images/portal_pa/.
Create an FTP service on the web server machine with an absolute path to the extended folder path of the web server directory.
Set the FTP path in the EPPCM_IMAGE URL identifier definition to point to the created FTP service.
Update the Image Attachment URL Path field on the Portal Solutions Installation Options page to contain the web server’s relative or absolute URL of the extended path that will contain the image files from the FTP server.
This setup is fully documented in the PeopleSoft Enterprise Portal 9.1 Installation Guide, which is available on My Oracle Support.
Note. If you are using DB2, size limitations exist for images to be saved to the database based on the database platform.
See Also
PeopleSoft Enterprise Portal 9.1 Installation Guide, “Setting the FTP URL for Content Management Images.”
Purging and Inactivating ContentThis section provides an overview of purging and inactivating content and discusses how to:
Purge and inactivate content.
Preview items selected from the Purge/Inactivate page.
Understanding Purging and Inactivating ContentYou use the Purge/Inactivate page to set parameters for the Purge/Inactivate process, an Application Engine program. You can set up the Purge/Inactivate process to perform one of several actions depending on the selected feature within the content management system:
Delete Past Versions deletes the noncurrent versions of a piece of content.
Only the last approved version and any successive versions of the content are retained.
Purge Items deletes content, folders, or both from the system.
This action excludes folders that do not allow deletes and content in folders that do not allow deletes.
Set Inactive Date updates the inactive date for the selected content.
Unpublish Content changes the content’s status from published to pending (or blank).
Only items that meet all of the selection criteria are processed.
Note. Use care in selecting and processing items from this page. Content or folders that are purged from the system cannot be retrieved.
Pages Used to Purge and Inactivate Content|
Page Name |
Definition Name |
Navigation |
Usage |
|
Purge/Inactivate |
EPPCM_PRG_RUN |
Content Management, Administration, Purge/Inactivate |
Purge content or folders, inactivate content, unpublish content, or delete versions from the Content Management system. |
|
Purge/Inactivate - Preview Selection |
EPPCM_PRG_VIEW |
Content Management, Administration, Purge/Inactivate On the Purge/Inactivate page, click the Preview button. |
Preview items to be purged or inactivated. |
|
Process Scheduler Request |
PRCSRQSTDLG |
Content Management, Administration, Purge/Inactivate Click the Run button on the Purge/Inactivate page. |
Specify process variables. |
Purging and Inactivating Content
Access the Purge/Inactivate page (select Content Management, Administration, Purge/Inactivate).
Options available to use on this page are based on the feature definition. For example, with Managed Content, if you select to purge content, the system purges only unpublished content. If you select to delete past versions, the system deletes versions prior to the last approved one.
Warning! Use care in selecting and processing items from this page. Content or folders that are purged from the system cannot be retrieved.
|
Run Control ID |
Displays the run control ID for the purge/inactive process. |
|
Report Manager |
Click to access the Report Manager module to view report results. |
|
Process Monitor |
Click to access the Process Monitor to view the status of job requests. |
|
Preview |
Click to view the pieces of content, folders, published menu items, and pagelet definitions that have been selected and what action will be performed on them on the Purge/Inactive - Preview Selection page. See Previewing Items Selected from the Purge/Inactivate Page. |
|
Run |
Click to access the Process Request page, where you can start the Application Engine process to purge or inactivate content or folders. See Enterprise PeopleTools 8.50 PeopleBook: PeopleSoft Process Scheduler, “Submitting and Scheduling Process Requests.” |
|
Feature |
Select a feature from the drop-down list box to perform. The available features are:
|
|
Action |
These are the available actions:
|
|
Include Published Content |
This field appears if the Action field is set to Purge Items. Select this option to include published content in the action. |
|
Inactive Date |
This field appears if the Action field is set to Inactive Date. Select a date to use as the date that the content is considered inactive. Leaving this field blank creates a blank inactive date for the content. |
|
Selection |
Select whether the specified action should be performed on Content or on a Folder. When you select the Folder option, this selection becomes your starting folder. |
|
Site Name |
This field appears if the Folder option is selected. Select the name of the site if you select to purge folders. |
|
Folder |
This field appears if the Folder option is selected. Select the folder name and ID if you are purging folders. |
|
Folder Selection Options |
Select the Only Direct Content Children option if the content is published in more than one location. This action is performed only on the children content directly under the folder. Select the Cascade to All Child Items option to perform action on child folder and child content. |
|
Folder Cascade Options |
This section appears if the Cascade to All Child Items option is selected. The available options are:
|
The Content Selection Options section includes these options:
Content ID enables you to select a comparison operator and a content ID.
Created by User ID enables you to select a comparison operator and a user ID.
Expire Date enables you to select a comparison operator and a date from the calendar or the current date.
Inactive Date enables you to select a comparison operator and a date from the calendar or the current date.
Last Updated Date enables you to select a comparison operator and a date from the calendar or the current date.
Last Updated by User ID enables you to select a comparison operator and a user ID.
Previewing Items Selected from the Purge/Inactivate Page
Access the Purge/Inactivate - Preview Selection page (select Content Management, Administration, Purge/Inactivate; click the Preview button on the Purge/Inactivate page).
The Purge/Inactivate - Preview Selection page: Content Location tab enables you to preview the list of items that will be affected by the Purge/Inactivate process. If you select a folder to purge, and the folder is published as a pagelet or a menu item, the folder and all its content is purged.
Access the Purge/Inactivate - Preview Selection page: Selection Details tab (select Content Management, Administration, Purge/Inactivate; click the Preview button, and select the Selection Details tab).
Access the Purge/Inactivate - Preview Selection page: Content Details tab (select Content Management, Administration, Purge/Inactivate; click the Preview button, and select the Content Details subtab).
When you select the Versions option on the Content Versions page, the Content Details tab shows the different content versions being acted upon.
The Content Versions page lists each version of the content and gives you the status of the action that will occur to each version of the content. The system retains the Max Approved version, which is also the last updated date, and any version thereafter. The system deletes any version before the Max Approved version.
See Managing Versions.
Defining FeaturesThis section discusses how to:
Set feature definitions.
Set component options.
Define content types.
Pages Used to Define Features|
Page Name |
Definition Name |
Navigation |
Usage |
|
Feature Definitions |
EPPCM_CATG_TYPE |
Content Management, Administration, Feature Definitions |
Configure content management features. |
|
Component Types |
EPPCM_COMP_TYPE |
Content Management, Administration, Feature Definitions Select the Component Types tab. |
Control the page display and link destinations between content management components. |
|
Content Types |
EPPCM_CONT_TYPE |
Content Management, Administration, Feature Definitions Select the Content Types tab. |
Control the content types that are available when you add content from components. |
Setting Feature Definitions
Access the Feature Definitions page (select Content Management, Administration, Feature Definitions).
Note. The options that appear on this page depend on the feature that you selected on the search page.
|
Top Breadcrumb Label |
Lists the breadcrumb label to use to access the list of accessible top folders. |
|
Top Folder ID |
The ID of the top folder type. |
|
Shared Site Name |
Select a site name from the prompt. This is used as the default value to store shared content. |
|
Shared Folder ID |
Used as the default value (the selected folder cannot be deleted). This is prompted from the Managed Content Folder, where content can be published. |
|
Days to Show as New |
Specify how many days the star icon will appear indicating that the content item has been recently added for the hierarchy or news display. |
|
Disable Child Count if Rows > |
Enter a limit for hierarchy page row processing. Limits count display and location path on user pages. |
Options selected in the Content Properties group box enable these functions in the respective Content Management features. These options include whether a field is available for display or editing; or whether a subfeature such as notifications are enabled within a Content Management feature.
Note. If an option is not available for selection, then that option is not enabled at the system level for that Content Management feature.
|
Enable Content Notification |
Select to show the Notify link on content properties to access interested parties and ad hoc notifications. |
|
Enable Content Comments |
Select to show the Comments link on content properties. |
|
Enable Content Discussions |
Select to enable creation or viewing of discussions based on the current content item. |
|
Enable Content Search |
Select to show the Search link on content properties and in the hierarchy. Search uses Verity to search for content. |
|
Show Content Source |
Controls the display of the content source on content properties. This option can be edited on all features with enabled Content Management. |
|
Show Content Summary |
Controls the display of content summary on content properties. This option can be edited on all features with enabled Content Management. Note. Content summary is required with News Publication pagelets, for use in top stories. Therefore, this option cannot be edited for News Publication pagelets. |
|
Show Content Inactive Date |
Controls the display of the inactive date on content properties. This option can be edited on all features with enabled Content Management. |
Options selected in the Folder Properties group box enable these functions in the respective Content Management features.
|
Enable Folder Viewer Roles |
Select to enable adding folder viewer roles in Categorized Content. This option sets viewer security in the Hierarchy Viewer pages (from published folders) to use the folder viewer roles instead of the viewer privilege. The Categorized Content requires viewer roles for the Browse by Category feature. Note. When publishing content with security roles, the system publishes based on your defined viewer roles rather than member privileges if this option is selected. |
|
Auto Inherit Members |
When a child folder is created, the system automatically inserts parent members and privileges. |
|
Show Folder Summary |
Controls the display of the summary on folder properties and hierarchy management. This option can be edited on all features with enabled Content Management. |
Content created or stored in PeopleSoft Content Management can be viewed from a variety of feature areas in the PeopleSoft Enterprise Portal. For example, you can view content when selecting an article in the News Publication feature, when clicking a search results content link, or when selecting preview in any of the Content Management features.
The content is rendered in a viewer page. The viewer pages can be configured to show or hide the source, modified date, or an associated image based upon the feature type settings. Because HTML content often comes with its own images and summary, an additional flag also exists to show or hide content information for HTML type content. This flag setting overrides the settings for the source, modified dates, summary, and images when the content is HTML. This setting also enables the administrator to show the summary, source, image, or modified date on file or URL content, but hide it on HTML content.
|
Show Page Title on Viewer |
Select to display the page title on render content (viewer or preview modes). |
|
Show Content Title on Viewer |
Select to display the content title on render content (viewer or preview modes). |
|
Show Info on HTML Viewer |
Select to display the source, modified dates, image, and summary on HTML content on render content (viewer or preview modes). This setting overrides other settings for the viewer when it is HTML-type content. |
|
Show Assoc. Image on Viewer (show associate image on viewer mode) |
Select to display associated images on render content (viewer or preview modes). |
|
Show Modified Date on Viewer |
Select to display the modified date on render content (viewer or preview modes). Also affects the hierarchy viewer grid from published Content Management folders. |
|
Show Source on Viewer |
Select to display the source on render content (viewer or preview modes). Also affects the hierarchy viewer grid from published Content Management folders. |
|
Show Summary on Viewer |
Select to display the summary on render content (viewer or preview modes). Also affects the hierarchy viewer grid from published Content Management folders. |
Setting Component Options
Access the Component Types page: Folder and Content tab (select Content Management, Administration, Feature Definitions; select the Component Types tab).
The Component Types page: Folders and Content tab controls the page title and the button labels on the components.
Access the Component Types page: Component Details tab (select Content Management, Administration, Feature Definitions; select the Component Types tab; then select the Component Details subtab).
The Component Types page: Component Details tab controls the link destinations between components.
Defining Content Types
Access the Content Types page (select Content Management, Administration, Feature Definitions; select the Content Types tab).
The Content Types page controls what content types are available when you add content from the listed component type.
Migrating ContentThis section provides an overview of the content migration and discusses how to:
Configure the source and target systems.
Set up content migration.
Steps used to migrate content.
Preview content migration.
Steps used to preview content migration.
Approve content migration.
Run content migration.
Review content migration results.
Manage content migration by status.
Complete content migration.
Understanding Content Migration
Content migration is an easy end-to-end solution that you can use to migrate content data being developed in a staging database before it is required on the production database. A content migration cycle consists of:
Configuring and setting approver.
Previewing results and sending notification to approver.
Previewing and approving the data by approver.
The preview and approval processes can be repeated many times per migration cycle if multiple approval phases are necessary.
Running migration.
After the content migration is run, the migration cycle is complete regardless of whether it succeeds or fails. And then, a new migration ID is generated for the next migration cycle.
This diagram provides a high-level overview of requirements to run content migration:
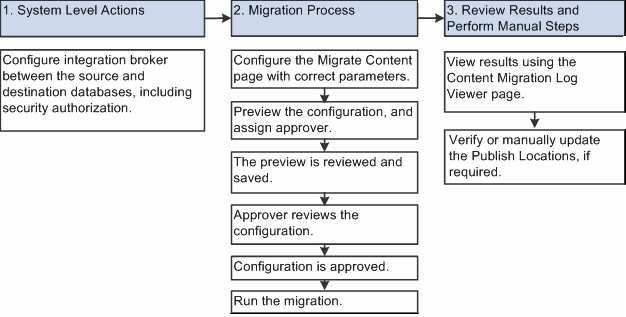
High-level overview of requirements to run content migration
In a migration process:
Each migration cycle—from migration definition creation to data validation and actual execution—is identifiable by a migration ID, and complete logs for each migration cycle are available in both source and target databases.
The security authorization for the process execution can be set as appropriate in Integration Broker gateway, Integration Broker messages security, Application Engine process security, Content Migration page, and Log Viewer page.
See Enterprise PeopleTools 8.50 PeopleBook, PeopleSoft Integration Broker.
See Enterprise PeopleTools 8.50 PeopleBook, PeopleSoft Application Engine.
Previewing of the expected results is required before a migration can occur.
Source folders with Require Approval setting need migration approval.
Source folders with Optional Approval or Auto-Approved Content setting do not need migration approval.
Content security authorization is not migrated to the target database, and content owner and administrator are responsible for setting as appropriate.
Security is inherited from the target folder set for the migration.
Pages Used to Migrate Content|
Page Name |
Definition Name |
Navigation |
Usage |
|
Migrate Content |
EPPCM_MIG_RUN |
Content Management, Administration, Migrate Content |
Migrate content data being developed in a staging database before it is required on the production database. |
|
Content Migration - Preview Selection |
EPPCM_MIG_PVIEW |
Content Management, Administration, Migrate Content Click the Preview button on the Migrate Content page. |
Preview your selections before the content is migrated and determine whether the content can be migrated. Also define actions for each content ID when migrating. |
|
Content Migration - Log Viewer |
EPPCM_MLOG_VIEWER |
Content Management, Administration, View Content Migration Log |
View all changes that are associated with the content migration. |
|
My Content Migrations |
EPPCM_MIG_STATMAIN |
My Content, My Content Migrations |
View migration requests requiring attention. |
Configuring the Source and Target Systems
Before you perform content migration, ensure that:
A target folder exists.
Both target and source database are at the same Enterprise Portal version.
Note. You must set up Integration Broker for the source the target databases before you run the migration.
Oracle recommends that:
Before you run the migration to a production database, follow necessary database backup and recovery procedures in the event of data corruption due to migration process failure.
Security roles, permissions, and users should be synced between the two databases.
You run only one migration at a time to prevent conflicts that arise from concurrent migration attempts.
Content migration should be performed by users who have the Content Administrator permissions. The Content Administrator permission settings are delivered by default. Take preventive measures such as previewing the expected results using the Content Migration - Preview Selection page and requiring an approver to review the migration configuration before allowing an actual migration to occur.
Data that is migrated takes on the privileges as assigned by the target database. Because privileges are assigned to folders and not content within Content Management, privileges are inherited from the target folder ID. Viewer roles are not migrated over from the source database and instead use the viewer roles as defined in the target database.
Also note that:
The document storage of the source folder is retained upon migration.
For example, if migrating from the source folder is defined with storage CMDOCDB, the content will be stored in the target folder as CMDOCDB.
If migrating content for files on an ftp server, the attachment file storage of the target portal must point to the same location.
If the attachment file storage of the target portal does not point to the same location, the source file should be located using its attachsysfilename and manually copied to the target location.
See Using Integration Broker for Content Migration.
Setting Up Content Migration
Access the Migrate Content page (select Content Management, Administration, Migrate Content).
Note. This page enables you to submit the Application Engine program that launches the migration using the Integration Broker.
|
Run control ID |
Displays the run control ID of this application engine process. |
|
Report Manager |
Click to access the Report Manager module to view report results. |
|
Process Monitor |
Click to access the Process Monitor to view the status of job requests. |
|
Preview |
Click to run the preview Integration Broker message and display the expected results. When you click the Preview button, the target database analyzes the information and sends back a message containing the expected result. No content changes are made to the target database. The information generated during the preview process is saved in the source and the target database. Also, in the Content Migration - Preview Selection page:
|
|
Run |
Click to access the Process Scheduler Request page, where you can start the Application Engine process to migrate content. The results of the migration are saved and viewable on the Content Migration - Log Viewer page. A copy of the migration results is saved on the source database. A message that includes the details of content migration configuration is sent to the destination database. See Enterprise PeopleTools 8.50 PeopleBook, “PeopleSoft Process Scheduler”, Submitting and Scheduling Process Requests. |
|
Migration ID |
The migration ID is a system-generated identifier to uniquely identify a migration cycle. After the migration is run, the migration cycle is complete regardless of whether it succeeds or fails. And then a new migration ID is generated for the next migration cycle. |
|
Feature |
Available options are:
Note. All content types within managed content and collaborative workspace documents are valid for migration. For CW, documents imported from Managed Content cannot be migrated. If required, user should migrate the original content from Managed Content, and then import into the workspace. |
|
Include Comments |
Select to also migrate comments associated with the content. |
|
Include Discussions |
Select to also migrate discussions associated with the content. |
|
Keep Publish Flag |
Select to keep the content that is published when migrated to target database. When this option is selected, a separate project that will be imported into the target database to satisfy the publish flags. For example, if you want to migrate content that is published using the Pagelet Wizard, you need to create a project containing the content references (CREF) and objects of the pagelet pointing to this content to be imported on the target database, and select the Keep Publish Flag option for the migration. When this option is deselected, you must manually re-create the publish locations. For example, if you want to migrate content that is published using the Pagelet Wizard, and you want to manually run the steps to re-create the pagelet after the content has been migrated over, you need to deselect the Keep Publish Flag option for the migration. |
|
Source Node |
Displays the source database information if that information is available. |
|
Site Name |
The portal or site from which the managed content that is being copied. If the Collaborative Workspaces option is selected in the Feature field, this site name is the name of the source workspace. |
|
Folder |
The source folder of the content for migration. Data is updated based on folder selection as well as content criteria. You must specify the source folder of the content. |
|
Approver |
Optionally, select an approver who must review changes that are made to the Migrate Content page before migration can proceed. The lists of possible approvers are defined at a global level from the Enterprise Portal Options page based on a role. The role can be user-defined, but the default role is Content Administrator. Approval requirement is determined from the source folder approval definition. If approver is set in the Migrate Content page, the Run button is not active. An email notification is sent to the approver requesting that the approver access the Migrate Content page. The Approve and Reject buttons are available for approvers on this page with a link to the preview results. If the content migration is approved, the Run button is active and an email is sent to the user who created the content migration that approval has been sent. If the content migration is rejected, an email is sent to the user that the changes have not been accepted. |
|
Target Node |
Select the target database information. |
|
Target Site |
Select the name of the portal that the content will be copied to for managed content. If the Collaborative Workspaces option is selected in the Feature field, this is the target workspace of the content. |
|
Target Folder ID |
Select the destination folder to which content will be migrated. This destination folder must exist. If the Collaborative Workspaces option is selected in the Feature field, the default value is 0 (for top folder). |
|
Only Direct Content Children |
Indicates that only content that is directly in the folder will be migrated. |
These are examples of migrating data to a target database with no conflicts:
Migrating direct children only: suppose that content ID 45, 60, and 89 are residing in the source folder. After the migration, all content ID (45, 60, and 89) will be migrated to the target folder ID.
Migrating direct children only: Suppose that content ID 45, 60, and 89 are residing in the source folder, with a criterion migrate only data with content ID greater than 50. After the migration, content 60 and 89 will be migrated to the target folder ID.
This is an example of migrating data to a target database with conflict: Suppose that content ID 145 exists in the source database and this content ID 145 also exists in the target database. With a default action of Skip, the data is not migrated. With an action of Create new ID, the data is migrated but with a new content ID as assigned by the target system. With an action of Create new version, the data is migrated to the same content ID but is added as the latest version of the content.
|
Versions |
Select All Versions to migrate all versions, or select Latest Approved to migrate only the latest approved version of the content. |
This section enables you to specify the criteria you can use to select content.
|
Content Selection Option |
Available options are:
|
|
Operator |
Available options are:
|
Steps Used to Migrate Content
This section discusses how to:
Migrate content that already exists in the target database.
Migrate content that does not exist in the target database.
Migrate content with discussions.
Migrate content without discussions.
Inquire migrations.
Migrating Content that Already Exists in the Target Database
To migrate content that already exists in the target database:
Select Content Management, Administration, Migrate Content.
Create a new run control or select an existing one.
Confirm that at least two of the contents selected already exist in the target database.
Of the two existing contents in the target database, verify the default action as Skip if Exists for one content and set action to Create New ID for the other content.
Save your settings.
If approval is required, get the run control approved.
Click the Run button to submit the migration and verify the process runs to Success.
In the target database, access the target folder and note that:
The content with action Create new ID has been added with the Migration ID of the target database.
The content with action Skip has not been added.
In the target database, select Content Management, Administration, View Content Migration Log.
Select the Migration ID and verify the Results log that shows only the added content.
In the source database, select Content Management, Administration, View Content Migration Log.
Select the Migration ID and verify the Results log that is the same as the log of the target database.
Migrating Content that Does Not Exist in the Target Database
To migrate content that does not exist in the target database:
Select Content Management, Administration, Migrate Content.
Create a new run control or select an existing one.
Confirm that at least two of the contents selected do not exist in the target database.
Of the two existing contents in the target database, verify the default action as Create New ID for one content and set action to Skip if Exists for the other content.
Save your settings.
If approval is required, get the run control approved.
Click the Run button to submit the migration and verify the process runs to Success.
In the target database, access the target folder and note that:
The content with action Create New ID has been added with the next Content ID of the target database.
The content with action Skip has been added with the Content ID of the source database.
In the target database, select Content Management, Administration, View Content Migration Log.
Select the Migration ID and verify the Results log that shows the added contents.
In the source database, select Content Management, Administration, View Content Migration Log.
Select the Migration ID and verify the Results log that is the same as the log of the target database.
Migrating Content with Discussions
To migrate content with discussions:
Select Content Management, Administration, Migrate Content.
Create a new run control or modify an existing one.
Select a content with discussions.
Select the Include Discussion option.
Run the migration.
Verify in the target database that migrated content has discussions.
Migrating Content Without Discussions
To migrate content without discussions:
Select Content Management, Administration, Migrate Content.
Create a new run control or modify an existing one.
Select a content with discussions.
Clear the Include Discussion option.
Run the migration.
Verify in target database that migrated content does not has discussions.
To inquire migrations:
Select Content Management, Administration, Migrate Content.
Select an existing run control.
Note that:
All input fields are available for the processes that have a status of Previewed, Approved, or Rejected.
All input fields are not available, except the Preview button, for the processes that have a status of Awaiting Approval or Success.
Previewing Content Migration
Access the Content Migration - Preview Selection page (select Content Management, Administration, Migrate Content; click the Preview button from the Migrate Content page).
|
Run Control ID |
Displays the run control ID that is used for the migration process. |
|
Migration ID |
Displays the ID of the content migration attempt. |
|
Feature |
Indicates the features to which the content is migrating. Value is either Managed Content or Collaborative Workspaces. |
|
Target Folder |
Displays the destination folder to which content will be migrated. |
|
Run Control Created |
Displays the ID of the user who initiates the migration, and the time that the migration was initiated. |
|
Run Control Last Modified |
Displays the ID of the user who last modified the run control, and the time that the run control was last modified. |
|
Approver |
Displays the approver, if an approver exists. |
|
Approval Date |
Displays the approval status and the date when the migration was approved. |
|
Migrate discussion and comments |
Indicates whether discussions and comments will be migrated along with content. |
|
Versions |
Indicates the versions of the content that will be migrated. |
This table lists and summarizes the actions when you selected the All Versions option on the Migrate Content page:
|
Action |
Content Exists in Target Database |
Content Does Not Exist in Target Database |
|
Skip If Exists |
Skip the migration of this content ID. |
Create all versions with the source content ID. |
|
Create New Version |
N/A. This is not a valid action for the All Versions option. |
N/A. This is not a valid action for the All Versions option. |
|
Create New ID |
Create all versions with a new content ID. |
Create all versions with the source content ID. Note. The Content Migration function always uses the same content ID first. |
This table lists the actions when you selected the Latest Approved option on the Migrate Content page:
|
Action |
Content Exists in Target Database |
Content Does Not exist in Target Database |
|
Skip If Exists |
Skip the migration of this content ID. |
Create the latest approved version with the source content ID and version 1. |
|
Create New Version |
Create the latest approved version with the source content ID and the next target version. |
Create the latest approved version with the source content ID and version 1. |
|
Create New ID |
Create the latest approved version with a new content ID and version 1. |
Create the latest approved version with the source content ID and version 1. |
For example, you can migrate content 2002 and 2003 in the source database to the target database with the action set to Create New ID. In the target database, by default, the Last Content ID in the EO_PE_OPTIONS table is 2000. The Content Migration function first uses the same source content ID and adds content to target database as 2002 and 2003, because these IDs do not exist in the target database.
You can then submit a second migration process with the same content 2002 and 2003 with the action set to Create New ID. In this second migration, because content ID 2002 and 2003 already exist in the target database, the new content ID is auto increment from the Last Content ID plus 1 in the EO_PE_OPTIONS table, so the function that generates the next ID verifies if the ID is being used. If the ID is being used, the Content Migration function assigns the next available ID. In this second migration, content 2002 is added to the target database as content 2001, and content 2003 is added to the target database as content 2004.
This is an example of the Content Migration - Preview Selection page, Content Location tab:
|
Publish Status |
Indicates whether the content is published, pending, approved, rejected, or draft. |
|
Properties |
Click to access the content properties page, where you can view and edit property details for this content. |
This is an example of the Content Migration - Preview Selection page, Content Details tab:
|
Versions |
Click to access the File Attachment Properties - Content Versions page, where you can review, delete, or check out different versions of a specific content item. |
Steps Used to Preview Content Migration
This section discusses how to:
Preview a new content that exists in the target node.
Preview a new content that does not exist in the target node.
Preview an existing content that was updated.
Preview a migration whose header was updated.
Preview a migration whose content list was updated.
Preview a migration that was successfully.
Previewing a New Content that Exists in the Target Node
To preview a new content that exists in the target node:
Select Content Management, Administration, Migrate Content.
Create a new run control.
Enter values for the required fields.
For example, Source Folder, Target Folder, Target Node, and so on.
Set the Content Selection field to indicate the content already exists in the target database.
Click the Preview button.
Verify that the default values of the Migration Status and the Action fields areSkip.
Save your settings.
Note. If the Migration Status and the Action values are Skip, an error message appears requiring at least one Action value to be Create.
Modify and save your settings.
Select Content Management, Administration, View Content Migration Log.
Select the newly-added Migration ID.
The Preview link is enabled and the Results link is disabled.
Click the Preview link.
The Content Migration Status and Actions fields match the values on the run control.
Log into the target node and verify the Preview Log matches the log on the source node.
Previewing a New Content that Does Not Exist in the Target Node
To preview a new content that does not exist in the target node:
Select Content Management, Administration, Migrate Content.
Create a new run control.
Set the Content Selection to indicate the content does not exist in the target database.
Click the Preview button.
Note that:
The Migration Status field is set to New.
The Action field is set to Create New ID.
Save your settings.
Select Content Management, Administration, View Content Migration Log.
Select the newly-added Migration ID.
The Preview link is enabled and the Results link is disabled.
Click the Preview link.
The Content Migration Status and Actions values match the values on the run control.
Log into the target node and verify the Preview Log matches the log on the source node.
Previewing an Existing Content that was Updated
To preview an existing content that was updated:
Select Content Management, Administration, Migrate Content.
Select an existing migration run control with that status of Previewed.
Click the Preview button.
Modify the Action option.
Save your settings.
Select Content Management, Administration, View Content Migration Log.
Select the Migration ID and click the Preview link.
The Action value for the updated content matches the value on the run control.
Log into the target node and verify the Preview Log matches the log on the source node.
Previewing a Migration Whose Header was Updated
To preview a migration whose header was updated:
Select Content Management, Administration, Migrate Content.
Select an existing migration run control with the status of Previewed.
Modify a field that does not affect the content selection.
For example, Include Comments, Include Discussions, or Keep Publish Flag.
Save your settings.
Select Content Management, Administration, View Content Migration Log.
Select the Migration ID and click the Preview link.
The new field value was updated to the log.
Log into the target node and verify the Preview Log matches the log on the source node.
Previewing a Migration Whose Content List was Updated
To preview a migration whose content list was updated:
Select Content Management, Administration, Migrate Content.
Select an existing migration run control with the status of Previewed.
Select a new source folder so there is a new set of content selected.
Save your settings.
Select Content Management, Administration, View Content Migration Log.
Select the Migration ID and click the Preview link.
The content list was updated to the Preview Log.
Content Migration - Preview Selection page, Content Location tab
Log into the target node and verify the Preview Log matches the log on the source node.
Previewing a Migration That Run Successfully
To preview a migration that run successfully:
Select Content Management, Administration, Migrate Content.
Create a new run control or select an existing one.
Submit the run process.
Select an existing migration run control with the status of Success.
All fields are disabled and the Preview button is active.
Click the Preview link.
The Migration Status of the content is set from the Preview Log. For example, if the content has been successfully updated into the target node, the Content status value is the same as before the run.
Managing Content Migration Approvals
Approval and request for approval occurs on the source database. If the approver is set on the Migrate Content page, the Run button is not active and an email is sent to the approver to access the Migrate Content page. The approver either approves or rejects the migration. If the approver approves the migration, the Run button is active and an email is sent to the user who created the run control that approval has been sent. If the approver rejects the migration, an email is sent to the user that the changes have not been accepted; the user can make changes to the migration configuration and repeat the migration process until it is approved.
This section discusses how to:
Verifying content migration with the source folder that does not require approval.
Set the source folder to skip the content migration approval.
Submit a migration for approval.
Approve a migration.
Reject a migration.
Verifying Content Migration with the Source Folder that Does Not Require Approval
To view content migration with the source folder that does not require approval:
Select Content Management, Administration, Migrate Content.
Create a new run control or modify an existing one.
Select a source folder that does not require approval.
Note that:
The Approver field is not visible.
The Approver field in the Migration Content page is not visible when the Approval field in the Folder Properties page is set to Auto-approved or Optional Approval.
The Migration Status field is set to Previewed.
The Run button is visible and enabled.
Setting the Source Folder to Skip the Content Migration Approval
To set the source folder to skip the content migration approval:
Select Content Management, Administration, Migrate Content.
Create a new run control or modify an existing one.
Select a source folder that requires approval (the Approver field is visible).
Clear the Approver field.
Preview the migration content and save your settings.
The Migration Status field is set to Previewed. The Submit for Approval button is visible and enabled.
Submitting a Migration for Approval
To submit a migration for approval:
Select Content Management, Administration, Migrate Content.
Select a migration with the status of Previewed and a source folder that requires approval (a blank approver).
A source folder needs approval if the Approvals field in the Folder Properties page is set to Requires Approval.
Click the Submit for Approval button.
An error message appears requiring an approver's ID.
Click the Approver search icon.
User IDs appear depending on the setting of the Approver role in the Installation Options page.
Select an approver.
Save your settings.
Note that:
The migration status changes to Awaiting Approval.
All fields are disabled except the Preview button.
An email notification is sent to the approver.
Select Content Management, Administration, View Content Migration Log.
Select the Migration ID.
The migration status was updated in the Preview Log.
To approve a migration:
Login as an approver.
Select Content Management, Administration, Migrate Content.
Select a migration with the status of Awaiting Approval.
The Reject and Approve buttons are visible and enabled.
Click the Approve button.
Note that:
The Migration Status is set to Approved.
All fields are enabled.
The Run button is visible and enabled.
The Approve and Reject buttons are invisible.
An email notification is sent to the migration initiator.
Select Content Management, Administration, View Content Migration Log.
Select the Migration ID.
The status was updated in the Preview Log.
To reject a migration:
Login as an approver.
Select Content Management, Administration, Migrate Content.
Select a migration with the status of Awaiting Approval.
The Reject and Approve buttons are visible and enabled.
Click the Reject button.
A secondary page opens asking approver to enter an optional reason.
Optionally, enter a reason and click the OK button.
Note that:
The Migration Status is set to Rejected.
All fields are enabled.
The Approve and Reject buttons are invisible.
The Preview button is visible and enabled.
An email notification is sent to the migration initiator.
Select Content Management, Administration, View Content Migration Log.
Select the Migration ID.
The status was updated in the Preview Log.
Running Content Migration
Migration is carried out by an application engine job (EPPCM_MIG), which is a batch process. You trigger the process by clicking the Run button on the Migrate Content page.
This is an example of the Process Scheduler Request page:
After you have run your process using the Process Scheduler Request page, use the Process Monitor page to monitor the status of your process request. You use Process Monitor to:
Check the status of your submitted process requests.
Cancel process requests that have been initiated or are currently processing.
Hold process requests that are queued, and queue process requests that you have put on hold.
You can also use the Process List page to view the status of submitted process requests.
See Also
Enterprise PeopleTools 8.50 PeopleBook: PeopleSoft Process Scheduler, “Submitting and Scheduling Process Requests,” Scheduling Process Requests.
Reviewing Content Migration Results
Access the Content Migration - Log Viewer page (select Content Management, Administration, View Content Migration Log).
|
Migration ID |
Displays the identification of a migration attempt. |
|
Migration Direction |
Displays the value of Source or Target, depending on which database the log is viewed from. If the value is Source, the database from which you are viewing the log is the source database. If the value is Target, the database from which you are viewing the log is the target database of the migration. |
|
Preview Logs |
Click the Preview link to access the Content Migration - Preview Selection page with saved preview results based on the migration ID. |
|
Migration Logs |
Click the Results link to access the logged results based on the migration ID. |
|
Migration Status |
Displays the progress of the migration. Available options are:
|
Note. The logs are stored and synced on both the source and the target databases, so you can view those logs on either system.
Migration log results are stored in the source and the target database. Logging includes full details of running the content migration process, including:
The user who created the run control.
The time the run control was created.
The time the run control was last modified.
The approver, if one exists.
The approval date and time.
The user who initiates the migration.
The time the migration starts.
The time the migration ends.
The migration ID.
The migration configuration parameters, including all information about the Migrate Content page.
Content details, including data from the content tables EPPCM_CONTENT that will be migrated.
The migration status of each content ID, including:
New: The content ID does not exist in the target database.
Skip: The content ID exists in the target database.
Action of each content ID is either Skip, already exists, or Create New ID.
Create new version: The content ID exists in the target database, so a new version of the content will be created.
Error: An error occurred while you were trying to migrate the data.
If an error occurred, a detailed error message is logged so that the content administrator can take proper actions.
Source and target nodes.
Source and target database names.
Note. The logging details above applies to both the Content Migration - Preview Selection page and the actual results of running a migration.
Errors During the Content Migration
The content migration process cannot proceed if you receive any of these error messages:
Invalid target folder ID.
The folder ID does not exist, or the folder cannot store the type of content selected for migration.
Invalid content selection options.
The criteria set does not have any content migrated.
Errors for Migration to Fail on Content
The migration fails on content if you receive any of these error messages:
SQL error (problem updating tables).
To rectify, verify the database configuration.
See Enterprise PeopleTools 8.50 PeopleBook: System and Server Administration.
Integration Broker errors.
To rectify, review the Integration Broker logs and verify the Integration Broker configuration.
See Enterprise PeopleTools 8.50 PeopleBook: PeopleSoft Integration Broker.
Application Engine errors.
To rectify, review the Application Engine logs and verify the Application Engine configuration.
See Enterprise PeopleTools 8.50 PeopleBook: PeopleSoft Application Engine.
Managing Content Migrations by Status
Access the My Content Migrations Status page (select My Content, My Content Migrations).
|
Content Status |
Click a status link to access the My Content Migrations Status page where you can preview the content items for the selected status:
|
Verifying Permissions, Updating Publish Locations, and Reversing a
Content MigrationAfter you run a content migration, Oracle recommends you to:
Verify permissions of the migrated content.
Note. The migration does not copy permissions to the target; the migrated content inherits the permissions from the target folder.
Update the publish locations.
To update locations by import, use a project to import updates to a database.
To update locations manually, use the Locations page or the Pagelet Wizard.
If the content migration completed either successfully or in error, and that content migration must be undone, the Content Migration - Log Viewer page contains all the information required to manually undo, or delete, changes that were made during the migration. You cannot resume the migration process; the migration process must be restarted.
See Reviewing Content Migration Results.