6 Working with ADF Desktop Integration Form-Type Components
This chapter describes how you can insert and configure components that ADF Desktop Integration provides to allow end users to manage data retrieved from a Fusion web application.
This chapter includes the following sections:
-
Section 6.1, "About ADF Desktop Integration Form-Type Components"
-
Section 6.7, "Displaying Output from a Managed Bean in an ADF Component"
-
Section 6.8, "Displaying Concatenated or Calculated Data in Components"
6.1 About ADF Desktop Integration Form-Type Components
The ADF Desktop Integration From-type components allow end users to manage data retrieved from the Fusion web application in the integrated Excel workbook. Rather than expose an ADF Form component in the components palette described in Section 5.5, "Using the Components Palette," ADF Desktop Integration uses the following components to create form-type functionality in an integrated Excel workbook:
-
ADF Input Text
-
ADF Output Text
-
ADF Label
-
ADF List of Values
-
ADF Button
Figure 6-1 shows these components.
Note:
ADF Desktop Integration does not support components inserted in a merged cell.6.1.1 ADF Desktop Integration Form-Type Components Use Cases and Examples
The ADF Desktop Integration Form-type components are used to build forms in the integrated Excel workbook for user input, and output from the Fusion web application. As shown in Figure 6-2, the form-type components used in Search area of EditPriceList-DT.xlsx enable end users to search for a product, and display result in a ADF Table component.
6.1.2 Additional Functionality for ADF Desktop Integration Form-Type Components
After you have added a component to the worksheet, you may find that you need to add functionality such as responding to events or end user actions. Following are links to other functionality that form components can use:
-
Displaying output from a managed bean: You can use ADF Label or ADF Output Text components to display output from a managed bean. For more information, see Section 6.7, "Displaying Output from a Managed Bean in an ADF Component."
-
Styles: You can configure the display of your form-type components using several predefined Excel styles. For more information, see Section 9.2, "Working with Styles."
-
EL Expressions: You can use EL expressions with form-type components. For more information, see Appendix B, "ADF Desktop Integration EL Expressions."
6.2 Inserting an ADF Button Component
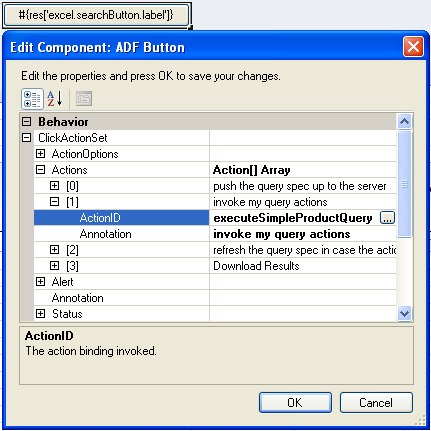
The ADF Button component renders a button in the Excel worksheet at runtime. End users click this button to invoke one or more actions specified by the ClickActionSet group of properties.
The LowerRightCorner and Position properties determine the area that the button occupies on the Excel worksheet at runtime.
Figure 6-3 shows an ADF Button component with its property inspector in the foreground. The property inspector for the button is in the foreground. When an end user clicks the button at runtime, it invokes the array of actions specified by ClickActionSet.
For more information about the properties of the ADF Button component, see Section A.8, "ADF Button Component Properties."
To insert an ADF Button component:
-
Open the integrated Excel workbook.
-
Select the cell in the Excel worksheet where you want to anchor the component.
-
In the components palette, select ADF Button and click Insert Component. Alternatively, in the Oracle ADF tab, select ADF Button from the Insert Component dropdown list.
-
Configure properties in the property inspector to determine the actions the component invokes at runtime in addition to the appearance, design, and layout of the component. Table 6-1 outlines some properties you must specify values for, and provides links to additional information.
Table 6-1 ADF Button component properties
For this property... Specify... LabelA string or an EL expression that resolves to a label at runtime to indicate the purpose of the ADF Button component. For example, the
Labelproperty for the Advanced Search button in the runtimeEditPriceList-DT.xlsxworkbook of the Master Price List module has the following value in design mode:#{res['excel.advSearchButton.label']}This EL expression references a string key in the
resresource bundle. For more information about resource bundles, see Section 10.2, "Using Resource Bundles in an Integrated Excel Workbook." For more information about using labels in integrated Excel workbooks, see Section 9.4, "Using Labels in an Integrated Excel Workbook."If you want to include the ampersand (
&) character in the label, use&&. A single&character acts as a special character and is not displayed in the label.ClickActionSetSpecify one or more actions in the
Actionsarray of theClickActionSetthat the end user invokes when he or she clicks the ADF Button component. For more information about action sets, see Section 8.2, "Using Action Sets." -
Click OK.
Figure 6-4 shows an example of the ADF Button component (in red box) at runtime.
Notes:
-
If you change the view mode of the Excel worksheet to the Page Layout or Page Break mode, the ADF Button components may be rendered in an unexpected position. You must return back to Normal mode without saving the workbook, and then Run and stop the integrated Excel workbook to render the buttons to their original positions.
-
You can modify the properties of the component at a later time by selecting the cell in the worksheet that anchors the component and then displaying the property inspector.
-
The ADF Button components are active at 100% zoom only, and are disabled when the end user zooms in or out on an integrated Excel worksheet.
Tip:
In design mode, you can click the button, or press the spacebar when the button is in focus, to open the property inspector. The right-click context menu is disabled for a button.If you want to add navigation buttons in your integrated Excel workbook to navigate to previous or next record, see Section 6.9, "Using Navigation Buttons."
6.3 Inserting an ADF Label Component
The ADF Label component is a component that you can insert into the active worksheet to display a static string value. You specify a value in the input field for Label in the property inspector or alternatively you invoke the expression builder to write an EL expression that resolves to a string at runtime. The retrieved string can be defined in a resource bundle or in an attribute control hint for an entity or view object. For example, the following EL expression resolves to the value of a string key defined in a resource bundle at runtime:
#{bindings.ProductList.label}
The value that you specify for the Label property in an ADF Label component or other Oracle ADF components is evaluated after the worksheet that hosts the Oracle ADF component is initialized (opened for the first time).
You can configure a number of properties for the component, such as style and position, in the worksheet using the property inspector.
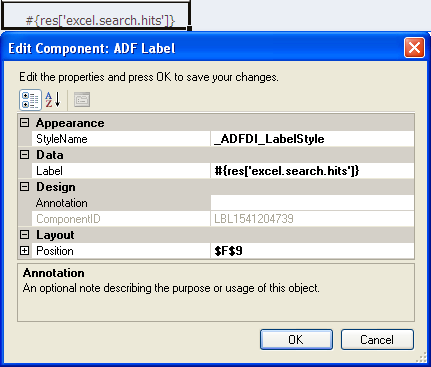
Figure 6-5 shows an ADF Label component with its property inspector in the foreground. The ADF Label component references an EL expression that resolves to the value of a string key defined in the res resource bundle at runtime.
To insert an ADF Label component:
-
Open the integrated Excel workbook.
-
Select the cell in the Excel worksheet where you want to anchor the component.
-
In the components palette, select ADF Label and click Insert Component. Alternatively, in the Oracle ADF tab, select ADF Label from the Insert Component dropdown list
-
Configure properties in the property inspector to determine the appearance, design, and layout of the component.
-
Click OK.
Figure 6-6 shows an example of the ADF Label component (in red box) at runtime.
Note:
You can modify the properties of the component at a later time by selecting the cell in the worksheet that anchors the component and then displaying the property inspector. You can also right-click in the cell and choose Edit ADF Component Properties from the context menu to open the property inspector.For more information about using labels in an integrated Excel workbook, see Section 9.4, "Using Labels in an Integrated Excel Workbook."
6.4 Inserting an ADF Input Text Component
The ADF Input Text component is a component that you can insert into the active worksheet using the components palette. The active cell in the worksheet when you insert the component displays the current value from the component's binding after the worksheet DownSync action is invoked. End users can edit this value at runtime. You configure the worksheet UpSync action to transfer changes end users make to the value back to the Fusion web application and a Commit action binding to commit the changes in the Fusion web application.
You can configure a number of properties for the component, such as its position, style and behavior when a user double-clicks the cell (DoubleClickActionSet properties), in the worksheet using the property inspector. For more information about DoubleClickActionSet, see Section 8.2, "Using Action Sets."
The ADF Table component can invoke this component as a subcomponent when you set values for the ADF Table component column's InsertComponent or UpdateComponent properties. In this context, the ADF Input Text component enables the end user to input data into the ADF Table component. For more information, see Section 7.5, "Configuring an ADF Table Component to Insert Data."
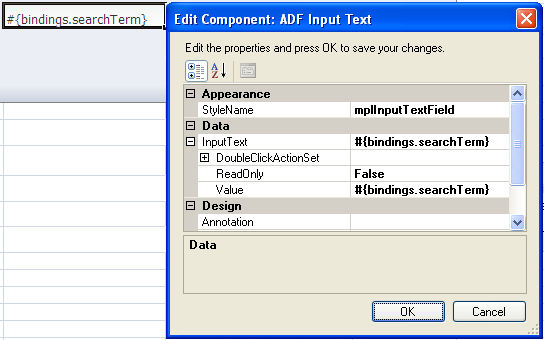
Figure 6-7 shows an ADF Input Text component with its property inspector in the foreground. The ADF Input Text component binds to the searchTerm attribute binding in the Master Price List module of the Fusion Order Demo application. The end user enters a search term in this component and then uses an ADF Button component to invoke a search.
To insert an ADF Input Text component:
-
Open the integrated Excel workbook.
-
Select the cell in the Excel worksheet where you want to anchor the component.
-
In the components palette, select ADF Input Text and click Insert Component. Alternatively, in the Oracle ADF tab, select ADF InputText from the Insert Component dropdown list
-
Configure properties in the property inspector to determine the appearance, layout, and behavior of the component. Table 6-2 outlines some properties that you must specify values for. For information about the component's other properties, see Section A.2, "ADF Input Text Component Properties."
Table 6-2 ADF Input Text component properties
For this property... Specify... InputText.ValueAn EL expression for the
Valueproperty to determine what binding the component references.InputText.ReadOnlyAn EL expression that resolves to
Falseso that changes the end user makes are uploaded. Write an EL expression that resolves toTrueif you want the component to ignore changes.Falseis the default value. -
Click OK.
Note:
You can modify the properties of the component at a later time by selecting the cell in the worksheet that anchors the component and then displaying the property inspector. You can also right-click in the cell and choose Edit ADF Component Properties from the context menu to open the property inspector.
Figure 6-8 shows an example of the ADF Input Text component (in red box) at runtime.
6.5 Inserting an ADF Output Text Component
The ADF Output Text component is a component that you can insert into the active worksheet using the components palette. The active cell in the worksheet when you insert the component displays the current value from the component's binding after you invoke the worksheet DownSync action. The value the component displays is read-only. Changes that the end user makes to the value in the cell that anchors the component are ignored when changes are sent to the Fusion web application.
This component can also serve as a subcomponent for the ADF Table and ADF Read-only Table components. Columns in the ADF Table and ADF Read-only Table components can be configured to use the ADF Output Text component.
You can configure a number of properties for the component such as style, behavior when a user double-clicks the cell (DoubleClickActionSet properties), and position, in the worksheet using the property inspector.
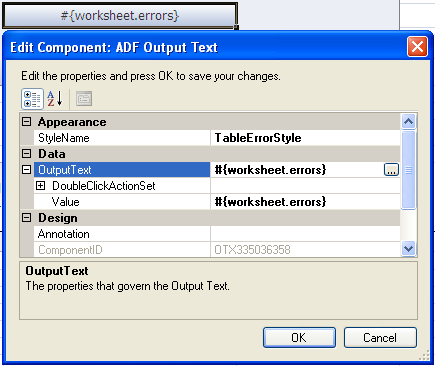
Figure 6-9 shows an ADF Output Text component with its property inspector in the foreground. The ADF Output Text component references an ADF Table component in the Master Price List module of the Fusion Order Demo application. At runtime, the cell that anchors the ADF Output Text component displays any errors returned by the ADF Table component.
To insert an ADF Output Text component:
-
Open the integrated Excel workbook.
-
Select the cell in the Excel worksheet where you want to anchor the component.
-
In the components palette, select ADF Output Text, and click Insert Component. Alternatively, in the Oracle ADF tab, select ADF OutputText from the Insert Component dropdown list
-
Configure properties in the property inspector to determine the appearance, layout, and behavior of the component.
For example, you must write or specify an EL expression for the
Valueproperty to determine what binding the ADF Output Text component references. For more information about the values that you specify for the properties of the ADF Output Text component, see Section A.3, "ADF Output Text Component Properties." -
Click OK.
Note:
You can modify the properties of the component at a later time by selecting the cell in the worksheet that anchors the component and then displaying the property inspector. You can also right-click in the cell and choose Edit ADF Component Properties from the context menu to open the property inspector.
Figure 6-10 shows an example of the ADF Output Text component (in red box) at runtime.
6.6 Inserting an ADF List of Values Component
The ADF List of Values component is a component that displays a dropdown menu in the Excel worksheet cell at runtime. It displays a maximum of 250 values at runtime. You can insert the List of Values component into a cell in the Excel worksheet.
You must specify a value for the ListID property. The ListID property references the list binding which populates the dropdown menu with a list of values at runtime after you invoke the worksheet DownSync action.
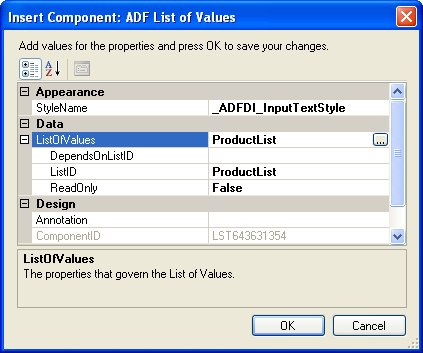
Figure 6-11 shows an ADF List of Values component with its property inspector in the foreground. The ADF List of Values component references a list binding (ProductList) that populates a dropdown menu in the Excel worksheet at runtime.
Note:
You can display a dropdown menu in an ADF Table component's column by selectingTreeNodeList or ModelDrivenColumnComponent as the subcomponent to create when you specify a value for the TableColumn array's InsertComponent property. For more information, see Section 7.13, "Creating a List of Values in an ADF Table Component Column."To insert an ADF List of Values component:
-
Open the integrated Excel workbook.
-
Select the cell in the Excel worksheet where you want to anchor the component.
-
In the components palette, select ADF List of Values and click Insert Component. Alternatively, in the Oracle ADF tab, select ADF List of Values from the Insert Component dropdown list
-
Invoke the binding ID picker by clicking the ellipsis button (...) beside the input field for the ListID property and select a list binding that the page definition file exposes.
-
Configure other properties in the property inspector to determine the appearance, design, and layout of the component. For information about ADF List of Values component properties, see Section A.5, "ADF List of Values Component Properties."
-
Click OK.
Note:
You can modify the properties of the component at a later time by selecting the cell in the worksheet that anchors the component and then displaying the property inspector. You can also right-click in the cell and choose Edit ADF Component Properties from the context menu to open the property inspector.
6.7 Displaying Output from a Managed Bean in an ADF Component
You can configure an ADF component to display output from a managed bean in your Fusion web application. Information about how to use managed beans in a Fusion web application can be found in the "Using a Managed Bean in a Fusion Web Application" section of the Oracle Fusion Middleware Fusion Developer's Guide for Oracle Application Development Framework. You reference a managed bean in an integrated Excel workbook through an EL expression. Add a method action binding to the page definition file you associate with the Excel worksheet to retrieve the value of the managed bean and assign it to an attribute binding. Use an EL expression to retrieve the value of the attribute binding at runtime.
6.7.1 How to Display Output from a Managed Bean
You write an EL expression for a property that supports EL expressions (for example, the Label property).
It may be helpful to have an understanding of managed beans. For more information, see Section 6.7, "Displaying Output from a Managed Bean in an ADF Component."
You may also find it helpful to understand functionality that can be added using other ADF Desktop Integration features. For more information, see Section 6.1.2, "Additional Functionality for ADF Desktop Integration Form-Type Components."
To display output from a managed bean:
-
Open the integrated Excel workbook.
-
Select the ADF component to display the output from the managed bean, and open its property inspector.
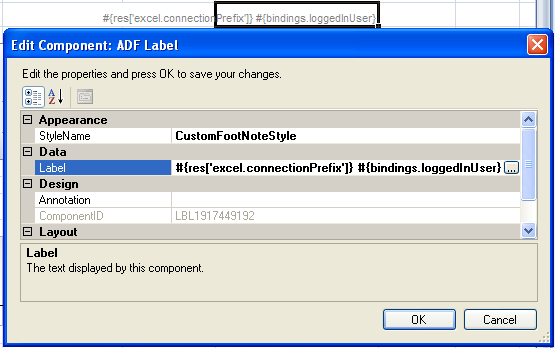
Figure 6-12 shows an example from the
EditPriceList-DT.xlsxworkbook in the Master Price List module where an ADF Label component is configured to display the output from an attribute binding that has its value populated by an action binding. -
Write an EL expression that gets the output from a managed bean at runtime.
The example in Figure 6-12 shows an EL expression that retrieves the value of a string key (
excel.connectionPrefix) from theresresource bundle and the value of theloggedInUserattribute binding. This attribute binding references the output from the managed bean. -
Click OK.
6.7.2 What Happens at Runtime: How an ADF Component Displays Output from a Managed Bean
The method action binding retrieves values from the managed bean and populates the attribute binding. The EL expression that you write retrieves the value from the attribute binding and displays it to the end user through the ADF component that you configured to display output. For example, the ADF Label component shown in design mode in Figure 6-13 displays a string similar to the following at runtime:
Connected as sking
In Figure 6-13, sking is the user name of the user that is logged on to the Fusion web application through the integrated Excel workbook.
6.8 Displaying Concatenated or Calculated Data in Components
The ADF Desktop Integration module supports EL expressions within components that allow a single component to display data that is based on a calculation or concatenation of multiple binding expressions.
6.8.1 How to Configure a Component to Display Calculated Data
You write an EL expression for the Value property of an Input Text or Output Text component.
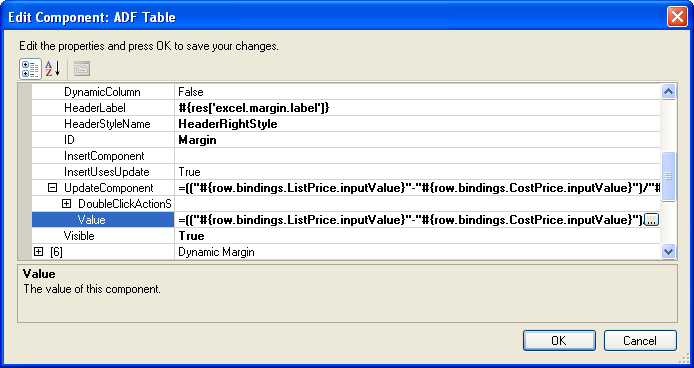
Figure 6-14 shows an EL expression example from the EditPriceList-DT.xlsx workbook in the Master Price List module where an ADF Output Text component of a column is configured to display the margin between the List Price and Cost Price columns.
It may be helpful to have an understanding of how to display concatenated or calculated data in ADF components. For more information, see Section 6.8, "Displaying Concatenated or Calculated Data in Components."
You may also find it helpful to understand functionality that can be added using other ADF Desktop Integration features. For more information, see Section 6.1.2, "Additional Functionality for ADF Desktop Integration Form-Type Components."
To create an EL expression to display calculated data
-
Open the integrated Excel workbook.
-
Select the ADF Input Text or ADF Output Text component to display calculated data.
-
Open the property inspector and click the ellipses button (...) of the
Valueproperty. -
Write an EL expression that gets the output from two, or more, expressions.
Example 6-1 shows an EL expression that calculates the difference between the values of List Price and Cost Price columns of an item, and then divides it with value of Cost Price column to generate a margin.
-
Click OK.
For more information about EL expressions, see Appendix B, "ADF Desktop Integration EL Expressions."
Note:
If theValue property of an ADF Input Text component contains a formula, the ADF Input Text component becomes read-only at runtime regardless of the value of the ReadOnly property.6.9 Using Navigation Buttons
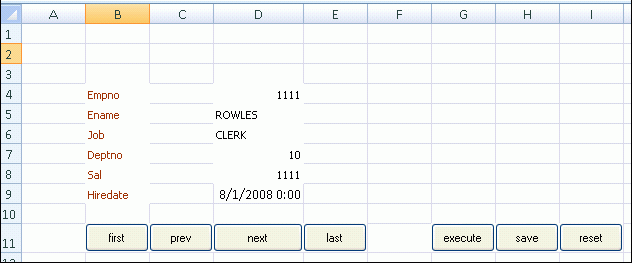
You can create navigation buttons (Next, Previous, First, and Last) to navigate from one record to another as shown in Figure 6-15. If the end user changes a record's data before navigating to another record, you can choose to save those changes or ignore them.
To save changes before navigating to another record, define the action sets of the button in the following order:
-
Worksheet.UpSync -
Commit -
Navigation action (for example, Next)
-
Worksheet.DownSync
Note:
If you omit theCommit action from the action set, any pending changes to multiple records are lost when the end user's web application session ends.To ignore changes before navigating to another record, define the action sets of the button in the following order:
-
Navigation action (for example, Next)
-
Worksheet.DownSync
Note:
If you define button actions to ignore changes, then it is the end user's responsibility to save changes before navigating to another record.

