 Overview of the Student Recruiting Process
This chapter provides an overview of the student recruiting process and includes the following sections:
Using Prospective Student Import
Using the Search/Match Capability
Manually Creating Suspects and Prospects
Using Leads and Opportunities for Recruiting
Integrating with Campus Solutions
Overview of the Student Recruiting Process
One of the biggest challenges higher education institutions are facing today is related to recruiting. There are many choices out there for prospective students: community colleges, public institutions, private institutions, virtual universities, and so forth. In fact many students “swirl” amidst some of these options. With all the choices out there, all the information now readily accessible to prospects on the web, and recruiting efforts starting earlier and earlier, it has become harder to stand out in the crowd. Institutions need to not only generate awareness, but also be able to demonstrate that they have exactly what you are looking for and that they are the right choice—and then to deliver on it so that word of mouth feedback on social networking sites works in your favor.
See Also
PeopleSoft Event Management Preface
PeopleSoft Enterprise Campus Solutions Application Fundamentals 9.0 PeopleBook, "Introducing Customer Relationship Management for Higher Education"
PeopleSoft Enterprise Campus Solutions Recruiting and Admissions 9.0 PeopleBook
Using Prospective Student Import
This section describes the process for importing suspects, prospects, and test scores into CRM. It contains the following sections:
Understanding Prospective Student Import.
Understanding Prospect and Test Score Importing.
Understanding Staging.
Populating the Staging Area.
Managing Import Batches.
Running the Import and Purge Processes.
Understanding the Import Process.
Understanding the Purge Process.
Managing Import Rows.
Creating Suspects and Prospects Manually.
 Pages Used With Prospective
Student Import
Pages Used With Prospective
Student Import|
Page Name |
Definition Name |
Navigation |
Usage |
|
Manage Import Batches |
RB_CIM_BATCH_SRCH |
Customers CRM, Prospective Student Import, Manage Import Batches |
Search for batches to import or purge. |
|
Run Import/Purge |
RB_CIM_BAT_RUN_SEC |
Click the Import or Purge button on the Manage Import Batches page. |
Confirm batches to import or purge. |
|
Import Batch |
RB_CIM_BATCH_DTL |
Click a batch link on the Manage Import Batches page. |
Import or purge batches. |
|
Prospect Import Mapping |
RB_SM_CFG_MAP |
Set Up CRM, Utilities, Search/Match, Prospect Import Mapping |
Maps Test IDs to Configuration IDs. |
|
Manage Import Rows |
RB_CIM_ROW_DTL |
Customers CRM, Prospective Student Import, Manage Import Rows |
Review and change import row status. |
Understanding Prospective Student Import
The Prospective Student Import feature allows the bulk import of suspects and prospects into CRM for Higher Education. Prospective students can be loaded directly into CRM for Higher Education using the import feature, or sourced from the Campus Solutions test score loads. Campus Solutions test scores can be pushed to CRM for Higher Education without creating new persons in Campus Solutions, therefore allowing CRM to be the system of record for suspects and prospects and preventing thousands of prospective students from cluttering the Campus Solutions database.
The following functionality is included in CRM for Higher Education for the Prospective Student Import:
An out-of-the-box integration with Campus Solutions, by which prospect and test score data sent from Campus Solutions can be processed and stored in a temporary staging area for further import processing.
A standard XML message structure for Higher Education prospects, which allows prospect data from an external source to be imported directly into CRM.
An import process that extracts raw data from the staging area, processes the data (validates it, transforms it, and identifies duplicates), and then posts it into the CRM Customer Data Model (CDM) and customer profile tables.
A purge process that permanently deletes staging area data that is no longer needed.
Understanding Prospect and Test Score Importing
You can import prospect information into CRM in two ways:
Import from Campus Solutions.
Import directly into CRM.
The following diagram shows the import process, with data coming from Campus Solutions into CRM and from an external source into CRM.
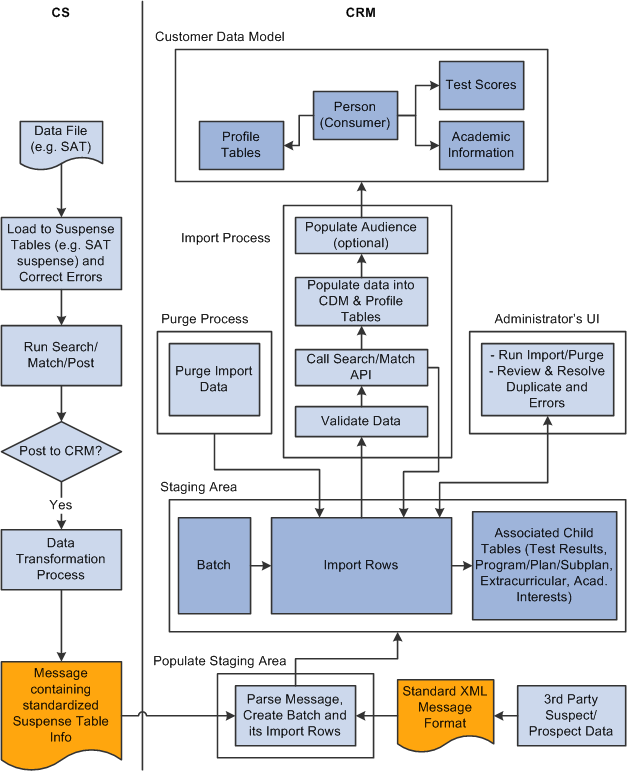
Importing Prospects and Test Scores into CRM
Importing from Campus Solutions
Search Tape (such as CSS) and Test Score (such as SAT or ACT) files, each of which contain a large number of records of individuals, are first loaded into the Campus Solutions staging area. If any errors exist, they are corrected. The Search/Match/Post process is run, one Test ID at a time. This process performs a Search/Match on the records and then posts them either to Campus Solutions tables or to CRM (this option is configurable in Campus Solutions). If data is to be posted to CRM, a standardized message containing each individual's biographical and demographic (“bio/demo”) data and other information if it is available (test scores, program/plan/subplan information, academic interests, and extracurricular activities) is sent to CRM via EIP. The CRM integration broker parses the message and stores it as a batch in the CRM Import Staging Area. Each batch consists of a set of import rows, each of which has associated child records.
Direct Import Into CRM
You can also import a list of prospects directly into the CRM staging area from an external source (such as a spreadsheet created at a recruiting event, or a third-party system). In this case, the external source sends CRM a message conforming to a standard message format that CRM can recognize. At this point, a new batch is created in the CRM staging area.
Staging
After a batch is in the staging area, it can be imported into the final Customer Data Model (CDM) tables by an import process that is run by the CRM Administrator. The import process performs the tasks of validating each of the batch's import rows, calling the Search/Match functionality to identify potential duplicates, transforming the data, optionally populating an audience list, and then posting it to Customer Data Model (and Profile) tables. The administrator manually resolves import rows that are not posted to CDM because of errors, or those that are put in suspended state (because potential duplicates were found in CDM) and the import process is re-executed on the batch. Afterward, a purge process cleans up the staging area tables by deleting data that the import process no longer needs.
Prospect and test score data is received by CRM in the form of XML messages. These messages are processed by the integration broker subscription code and then stored in the staging area for processing by the import process. Messages sent by Campus Solutions after a Search/Match/Post run are in a standardized form so that CRM can process them the same way irrespective of the type Search Tape or Test Score they represent. Messages sent by external sources (other than Campus Solutions) must also conform to a standard message format, and the import process handles them in the same manner as messages from CS.
You can import the following test score data from Campus Solutions (CS) into CRM:
ACT
AP
CRS
DAT
EOS
GMASS
GMAT
GRE
LSAT
SAT
SSS
TOEFL
Understanding StagingCRM receives prospect and test score data in the form of XML messages. These messages are processed by the integration broker's subscription code and then stored in the Staging Area for processing by the Import Process. Messages sent by Campus Solutions after a Search/Match/Post run are in a “standardized” form so that CRM can process them the same way regardless of the type of search tape or test score that they represent. Messages sent by external sources (other than Campus Solutions) must also conform to a standard message format, and the Import Process processes them in the same manner as messages from Campus Solutions.
Messages from Campus Solutions
To summarize, the message consists of the following parts. The specifics of these parts are discussed in the Campus Solutions documentation.
The header record SAD_HEADER_CRM
Standardized Bio-Demo and Prospect combined record (SAD_BIO_PRS_SUS)
Mapped Prospect child records (SAD_PRS_INIT_SUS, SAD_PRS_EXT_SUS, SAD_PRS_COM_SUS)
Standardized test score record (SAD_TST_COM_SUS)
Test-specific suspense records (includes the candidate data): Note that the test-specific suspense record (candidate data) is specific to each type of test and is not processed by CRM even if it is sent by Campus Solutions.
Name/Value pairs (SAT_TEST_POST_NAME_VAL_PART_DS).
See PeopleSoft Enterprise Campus Solutions Recruiting and Admissions 9.0 PeopleBook
See PeopleSoft Enterprise Campus Solutions Application Fundamentals 9.0 PeopleBook, "Introducing Customer Relationship Management for Higher Education"
Messages from External Systems
For loading prospects from sources other than Campus Solutions directly into CRM, CRM includes a standard XML message specification that it recognizes as a Higher Education prospect load message. External sources must convert their prospect data into this format before sending it to CRM. This message is parsed, placed in the Import Staging Area, and processed by the Import Process just as the Campus Solutions messages are processed. The mechanism to load prospect data from Campus Solutions and from other external sources into CRM is the same.
A Test ID named EXT is included as system data in CRM to support external prospect loads. Messages from sources other than Campus Solutions must have Test ID set to EXT in the messages that they send to CRM.
The Staging Area
Prospect records (and their associated data) to be imported into CRM are first placed in the common staging area. This is a temporary storage area and consists of a set of standard, related tables that are populated from the message data received by CRM. When it is run, the Import Process uses data from the staging area to create the final “production” tables in the Customer Data Model (and other profile tables). Thus, the staging area is the common “gateway” for bulk importing Higher Education-related prospect data into CRM.
A batch (also called an “import batch”) is a collection of prospects, suspects, and test scores sent by Campus Solutions or a third party to CRM as part of a single message. A batch is also the “unit of work” for Import and Purge processing in CRM. That is, the Import Process and Purge Process run on a per-batch basis. Note that if someone on campus re-posts the same test or tape, a new batch is created because it is a separate post
The Batches entity stores the header information of each batch created in CRM. Every batch can be uniquely identified by a Batch ID, which is the primary key of the Batches entity. A Batch usually belongs to single Test ID. However, multiple batches exist at any time for the same Test ID. A new, unique Batch ID is generated for every new batch created.
Note. Batches usually belong to the same Test ID, but TEST_ID_OVRD (Test ID Override) can be used to load different test score values for a different test (for example, it is used by Campus Solutions for SAT, which has SAT I and SAT II scores within the same load. Additionally, TEST_ID_OVRD must be used by external loads, because TEST_ID is required to be EXT in the message structure, in order to load self-reported scores).
When created, a batch consists of one or more import rows. These rows are stored in an Import Rows entity. When the Purge process deletes all of the rows of a batch, it will be an empty batch. Every batch has a Batch Status, which defines the current state of the batch and determines the processes that can be run on it. The following table shows the statuses in which a batch can exist:
|
State |
Description |
|
Active |
The batch has at least one import row, and the Import or Purge process can be run on it. |
|
Purged |
The batch has no import rows, because all the rows have been purged (deleted by one or more runs of the Purge Process). The Import or Purge process cannot be run on this batch. A batch in this status is only stored for auditing/history reasons. |
|
Import in Progress |
The Import Process is currently being run on the batch. Another Import or Purge Process cannot be run on it. |
|
Purge in Progress |
The Purge Process is currently being run on the batch. Another Import or Purge Process cannot be run on it. |
If a batch is created as a result of data received from a Campus Solutions Search/Match/Post run, then the following other information is also saved:
CS Run Control ID.
CS Loaded Date.
Institution.
Career.
These additional fields are not mandatory; they can be empty for batches created with data received from third-party sources
Each batch file has a Source value, that describes the origin of the prospect data. If the data is loaded from Campus Solutions, then the value Campus Solutions is stored in this field. If the data is loaded from an external source, the value External is stored in this field.
See Understanding the Import Process.
See Understanding the Purge Process.
An import row is an individual prospect or suspect imported from a Campus Search Tape/Test Score load or from an external source. Import rows consists of a standard structure that stores bio/demo and recruiting status information for the individual, regardless of the suspect or prospect's origin (for example, SAT load, GRE load, spreadsheet, and so on).
An import row has Test Record number, a Test ID, and always belongs to one and only one batch. It contains the following types of data:
Bio/Demo-related information: Name, Address, Phone, Email (and types), National ID, Sex, and so forth, along with EmplID (if available).
Prospect information: Institution, Career, Recruiting Status, and so on.
Other relevant information such as last school attended, ethnic group code, and so on.
Every row maintains a row status, which defines the current import processing status of the row. The following table shows the possible statuses:
|
Status |
Description |
|
Ready for Processing |
The default initial state of an import row. This status instructs the import process to perform data validation for the row and run Search/Match before posting it to CDM. |
|
Posted |
The import row has been posted to CDM. The row can be purged. |
|
Suspended |
The import process (after running Search/Match) found this row to be a duplicate. The Administrator musts review and resolve it. |
|
Add Person |
Instructs the import process to create a new person. This status is set only after a review process after a row has been marked Suspended. |
|
Update Person |
Instructs the import process to update an existing person. This status is set only after a review process after a row has been marked Suspended. |
|
Ignore |
Instructs the import process to ignore the row. This row can be purged. This status is set only after a review process after a row has been marked Suspended. |
|
Error |
The row has encountered an error during the import process. The Administrator must review and resolve it. |
After an import row is created, its row status can be changed automatically by the import process or manually by the Administrator.
The Test Results entity stores test results for an import row. It includes Test ID, Test Record number Test Date, Test Component and Data Source.
Note. When Campus Solutions runs Search/Match/Post for SAT I, scores for both SAT I and SAT II type Test IDs are sent over. This means that SAT II scores are sent along with SAT I scores even if SAT II is not explicitly selected in the Search/Match/Post. When these scores arrive on the CRM side, they are all stored under the SAT I Test ID. For SAT II scores, the Test ID field in the Test Results Entity still contains SAT I, but the Test ID Override value is populated with SAT II. This is an indication to the import process to consider the Test Components (and other attributes) as belonging to SAT II (and not SAT I) when posting to the final CRM Test Scores tables.
Other Import Row Information
An import row also contains other entities that can store prospect Program/Plan/Sub Plan details, Academic Interests, and Extracurricular Activities.
Populating the Staging Area
This section describes the process for populating the staging area.
To define configuration mappings, use the Test Score to Results Configuration Mapping component. Use the RB_SM_CFG_MAP component interface to load data into the tables for this component.
Creating Batch and Import Rows
When an import occurs, an input message (a single message or multiple related messages) containing prospect and test score data is received by CRM as a result of a Campus Solutions Search/Match/Post run or from another external source. This message is parsed and processed in the CRM integration broker. The following steps occur:
The incoming message first goes through a data validation step where the batch-level fields are validated. The following fields are verified if to see if they exist in CRM:
Test ID.
Institution.
Career.
If this validation fails, no batch is created and the message is marked as an error (the message can be resubmitted after the errors have been corrected).
If the validation succeeds, a new Batch ID is generated, and then a batch with this Batch ID is created in the staging area
If the batch is created as a result of a Campus Solutions message, then the Created By value is set to the Operator ID (OPRID) sent on the message, but if the batch created from an external source, then the Created By value is set to a System user.
If the batch is created as a result of a Campus Solutions message, then the batch Source is set to Campus Solutions. If the message originated from a third party, then the Source is set to External.
Individual import rows are created for the batch rows. Test Record Numbers are not generated—they are part of the key structure of the message and must be generated by the entity that creates the XML Message (either Campus Solutions or the external loading code). Associated child records (Test Results, Prospect Program/Plan/Sub Plan, Academic Interests, and Extracurricular Activity information) are also created for each import row if they were provided on the incoming message.
All import rows of the batch are defaulted to the Row Status of Ready for Processing. The Batch Status is then set to Active.
Messages From Search/Match/Post in CRM
When Search/Match/Post for a particular Test ID is run in Campus Solutions, it is done in context of a Run Control ID. You can also provide additional run control parameters (such as default prospect institution and career information). Every run of a Search/Match/Post (with the post to CRM option) results in suspect, prospect, and test score (if a test score exists for the person) data being messaged to CRM. When a new batch is created for this data in the CRM staging area, the following additional run control related information is also stored along with it:
CS Run Control ID.
CS Loaded Date.
Institution.
Career.
Operator ID (OPRID), as Created By.
The HE Administrator can use this information as search criteria when querying for a batch (or set of batches) before running the Import or Purge processes.
Messages from External Sources
An external source can also send CRM a list of prospects/suspects conforming to the standard input message. In this case, each prospect in the message can potentially be associated with a different institution and career, so these fields are typically not populated for the batch that is created. Also, in the case of data from an external source, the CS Run Control ID and CS Loaded Date are empty. However, the Created By field is still set to a CRM system user.
Managing Import Batches
A batch is the “unit of work” on which the Import and Purge processes operate. You can run the Import or the Purge processes on an active batch at any time and as many times as needed.
To import, the Administrator identifies the batch or batches to be imported and runs the import process. Typically, not all import rows in the batch are posted the first time, because rows can fail due to errors (for example, data validation errors) or due to their being potential duplicates. The administrator resolves such rows and then reruns the import process on the batch. This process is continued until all rows are posted or marked as Ignored.
To purge, the administrator identifies the batch or batches to be purged and runs the purge process. The purge process deletes only the rows from the batch that are no longer needed (such as those that are already posted or marked Ignored). Thus, it cleans up the staging area of rows which are no longer to be processed by an import execution, thus improving import process performance. After they have been purged, rows are deleted and cannot be recovered.
Running the Import and Purge Processes
Access the Manage Import Batches page (Customers CRM, Prospective Student Import, Manage Import Batches).
To perform an import or purge process, you must first identify the batches. The Manage Import Batches page displays a search page where you can search for batches. Note that you must scroll to the right to see all of the information on the Manage Import Batches page.
|
Batch ID |
Click the link to display details about the batch. |
|
Test ID |
The identifier for the test. |
|
Date/Time Created |
The full date and time when the batch was created. |
|
Created By |
The name of the person who created the batch. |
|
Source |
Campus Solutions or External. |
|
Batch Status |
The current status of the batch: Active, Purged, Import in Progress, or Purge in Progress. |
|
Total Count |
The total number of rows in the batch. |
|
Awaiting Import |
The sum of the number of rows in Ready for Processing, Add Person, and Update Person statuses. |
|
Awaiting Purge |
The sum of the number of rows in the Posted and Ignore statuses. |
|
Posted |
The number of rows in the Posted status. |
|
Ready for Processing |
The number of rows in the Ready for Processing status. |
|
Suspended |
The number of rows in the Suspended status. |
|
Error |
The number of rows in the Error status. |
|
Ignore |
The number of rows in the Ignore status. |
|
Add Person |
The number of rows in the Add Person status. |
|
Update Person |
The number of rows in the Update Person status. |
Importing or Purging Multiple Batches
Access the Run Import/Purge page (click the Import or Purge button on the Manage Import Batches page).
You can only import or purge batches that are in the Active status. If you want to import or purge more than one active batch, select the check box next to each desired batch, then click the Import or Purge button to go to the Run Import/Purge page. You can select all active batches by clicking Select All, or clear the selection by clicking Clear All.
The Run Import/Purge page acts as a confirmation page, displaying the list of batches you have selected. You can remove a batch from the list by clicking the trash can icon next to it, or click Cancel to go back to the search page. )
If you are performing an import, the Import Options section is displayed (this section is not displayed if you are performing a purge).
|
Generate Audience |
Select this check box if you want to populate an audience as part of the import process. |
|
Audience SetID |
Select an audience Set ID to choose an audience name from that Set ID. The Audience SetID option is available only if the Generate Audience check box is selected. |
|
Audience Name |
Select an audience name from the specified SetID. This option is available only if the Generate Audience check box is selected. Only audiences of type Internal using Import in the In Design or Designed status are available for selection. |
If you choose to generate an audience, when the import process executes, import rows (from all selected batches) that are posted are also appended to the existing list of the specified audience (after deduplication occurs). The audience itself is set to Generated status during the import process—you must manually set it back to the In Design or Designed status if you want it available to be selected again in another import.
After you have specified the options on the Run Import/Purge page, click OK to launch the process scheduler request page.
Access the Import Batch page (click a batch link on the Manage Import Batches page).
|
Batch Details |
Displays the attributes of a batch that are common to batches created from Campus Solutions message data and those created from external sources. |
|
Campus Run Parameters |
Displays data that is specific to batches created from Campus Solutions message data. For batches created from eternal data, the fields in this section are empty. If the source is Campus Solutions, this section is expanded by default; if the source is external, it is collapsed. |
|
Row Status Summary |
This section shows the status summary of the import rows currently belonging to the batch. These counts are computed when the batch component is loaded only if the last process run on the batch ended abnormally. Otherwise, the values are loaded from the counts stored on the batch in the staging area. When a batch is first created, the Total Count value is equal to the total number of rows in the batch; all other statuses have a count of 0. If the batch is in Purged status, the counts for all statuses are set to 0. Each count in the Row Status Summary is linked if it is greater than 0. Clicking on the count link takes you to the Manage Import Rows search page and execute the appropriate search query. You can use these links as a quick way to view rows in a particular status. |
|
Import Options |
These options were described in the section on importing and purging multiple batches.
Note. If the Higher Education installation
option is set on the CRM instance and you try to commit an audience that has
the source Internal using Import, the system checks
whether the audience has been populated from any of the import batches in
the system. If it has, the system displays a warning that setting the audience
to Committed will make it permanently unavailable
for use in future import process runs. You can then choose whether you want
to change the audience's status. |
Access the Run History page (click the Run History tab on the Import Batch page).
The Run History tab shows a summary of all the import and purge process runs that have been performed on the batch. The default display order is reverse chronological order by the Start Time. A row appears on the grid after an import or purge is initiated, but you cannot view details about the process instance until the process has actually begun.
Note. This details on this page are refreshed each time you access it.
|
Run Type |
This value is either Import or Purge, depending on the process run. |
|
Run By |
The name of the person who ran the process. |
|
Start Date/Time |
The date and time when the process was initiated. |
|
End Date/Time |
The date and time when the process completed. |
|
Audience SetID |
The SetID for the audience used in generation. This value can appear only for imports; the field is empty if the Run Type is Purge. |
|
Audience Name |
The audience to which the Import is added. This value can appear only for imports; the field is empty if the Run Type is Purge. |
|
Rows Processed |
For an import, the total count of the rows in Ready for Processing, Add Person, and Update Person statuses. For a purge, the total count of the rows in the Posted and Ignore statuses. |
|
Run Status |
The current status of the process. |
|
Process Instance |
The Process Instance ID (from the process scheduler). Click the link to view details of the process scheduler process. |
Handling the Abnormal Termination of the Import or Purge Process
In rare instances, the import or the purge process run on a batch can abnormally end after processing only some rows of the batch. If this occurs, the batch can remain in a locked state (in the Import in Progress or Purge in Progress status); the row counts for the various statuses stored on the batch will not reflect the actual counts because the import or purge process should update them at the end of processing. If this occurs, you might think that the batch is being processed, where in fact the process instance for the import or purge process is dead.
To recover from this situation, the Batch component on load performs the following actions:
If the batch is in Import in Progress or Purge in Progress status, check whether the Process Instance of the process last run on this batch is still running. This process instance information is obtained from the Batch History.
If the Process Instance is not running, this means the process has ended abnormally. The system then does the following:
Updates the latest Row Status Summary counts on the batch (in the staging area) and sets the Batch Status to Active.
Displays a warning message informing you that the import or purge process that was last run on this batch terminated abnormally, the Row Status Summary shows the most current counts, and that you should rerun the import or purge process.
Access the Prospect Import Mapping page (Set Up CRM, Utilities, Search/Match, Prospect Import Mapping).
The import process run for a batch invokes the Search/Match API with a particular Result Action Configuration ID. The Configuration ID used for a batch depends on which Test ID the batch belongs to. The Prospect Import Mapping page maps Test IDs to Configuration IDs. A Test ID cannot be mapped to multiple Configuration IDs, but the same Configuration ID can be used for several Test IDs.
See Using the Search/Match Capability.
Understanding the Import Process
The goal of the import process is to move import row data (bio/demo, prospect, test scores, program/plan/sub plan, academic interests and extracurricular activities) belonging to a batch from the staging area to CDM and profile tables. This is called posting. The import process performs the following activities:
Extract import rows (and their child data) from the staging area, provided that they are in the Ready for Processing, Add Person, or Update Person status.
Validate the data.
Transform the data to the format required by CDM.
Run Search/Match logic on the data to identify duplicates.
Write the transformed data to CDM:
Create new Consumers along with their contact methods, test results, and lifecycle information.
Update existing persons, adding consumer information if needed, and adding or updating their contact information, test results, and lifecycle information.
Append data from import rows to the member list of an existing audience, if this option is specified at the time of import.
Update the Row Status of each import row processed.
The illustration below is the functional flow diagram of the import process.
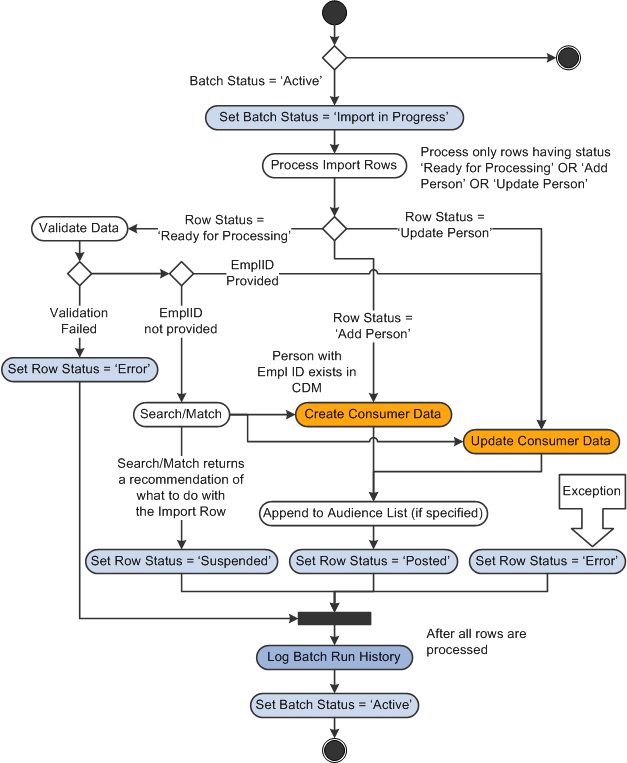
Import Process
The process performs the following steps:
Ensure that the batch being imported is Active and set it to Import in Progress status. This ensures that no other import or purge process runs can occur on this batch. Clear any error messages logged for the batch due to a previous import process run.
Process only import rows in the batch that have the Row Status of Ready for Processing, Add Person, or Update Person. Each row must processed independently of the others (that is, the status of one row—for example, if an error occurs—should not affect the processing of other rows).
For rows that are in the Ready for Processing status:
Run all data validations on the row. If a data validation fails on a row, then set it to Error status and display the appropriate error message. Continue performing all other data validations that could lead to more error messages to be logged for the same row, in order to gather as many errors for the row as possible at each run. This allows the administrator to resolve all of them before the next run.
Check if EmplID is available on a row.
If EmplID is not available, invoke Search/Match logic to check for potential duplicates. Based on the results provided by Search/Match, perform one of the following operations and set the row status as indicated.
|
Action |
Row Status |
|
Create a new Consumer |
Posted |
|
Update an existing person |
Posted |
|
No action |
Error |
If EmplID is available, this means that the imported individual already exists as a Person in CDM and there is no need to call Search/Match. In this case, the system updates the existing person with the matching EmplID and then sets the row to Posted status.
For rows that are in the Add Person status, add a new Consumer to the system and then set the row to Posted status.
For rows that are in the Update Person status, update the person specified on the import row and then set the row to Posted status
For rows that are in the Add Person or Update Person statuses, if an audience is specified in the import options then append this consumer to the member list of the audience.
If any exceptions occur during the processing, set the rows to Error status and display the appropriate error message. Note that import processing does not stop because a row encounters an error. The other rows are still processed.
After all rows are processed, log a run history row for the batch.
Set the batch status back to Active.
Data Validation at the Import Row Level
Every import row (and its associated child records) first goes through a data validation process. If one of the data validations fails for a row, the row is marked as Error and an error message is logged along with it. However, the processing of the row is not aborted immediately after a data validation failure. Other data validations can still be performed and more errors logged on the same row before processing of the row is aborted. This is so that as many data validation errors as possible for the row can be collected and displayed on the row, and the administrator can handle all of them before the next run.
The following validations are performed:
Ensure that entries for control-type fields specified on the import rows exist in control tables synced to CRM from Campus Solutions. This ensures that invalid values are not sent for these fields. For example, a batch is to be imported and the Test ID field in the batches entity has a value of SAT I, then a validation step ensures that SAT I exists in the Test control table. The following control field type data in the staging area is validated against control tables:
|
Staging Area Entity |
Field |
|
Import Rows |
Test ID |
|
Import Rows |
Institution |
|
Import Rows |
Career |
|
Prospect Program/Plan/Sub Plan |
Program |
|
Prospect Program/Plan/Sub Plan |
Plan |
|
Prospect Program/Plan/Sub Plan |
Sub Plan |
|
Import Rows |
Admit Type |
|
Import Rows |
Admit Term |
|
Import Rows |
Academic Level |
|
Import Rows |
Referral Source |
|
Test Results |
Test Component |
|
Test Results |
Test Data Source |
|
Test Results |
Test ID Override |
|
Import Rows |
Last School Attended |
|
Import Rows |
Housing Interest |
|
Import Rows |
Campus |
Ensure that each of the following fields have valid values.
|
Staging Area Entity |
Field |
|
Import Rows |
Recruiting Status is one of the following values: Prospect, Suspect, Inquiry, Applicant |
|
Import Rows |
National ID Type |
|
Import Rows |
Primary NID |
|
Import Rows |
Marital Status |
|
Import Rows |
Recruitment Status |
|
Prospect Extracurricular Activities |
Extracurricular - Internal/External |
|
Prospect Academic Interests |
Academic Interests - Priority |
Ensure that the EmplID provided (in the Import Rows entity) exists in CRM. If it does not, this means that Person Basic Sync has not occurred or it has failed.
Ensure that the Academic Information conforms to the Academic Information hierarchy synced from Campus Solutions. This error does not occur if the data source is Campus Solutions.
Ensure that a Test Score (in the Test Results entity) is in the valid range of the Test Component for that Test ID. Valid ranges are sent over via EIP from Campus Solutions. This validation is omitted if the Source is Campus Solutions.
Calling the Search/Match API
Because the import process creates new persons (Consumers), it is necessary to ensure that a person being created already does not exist in CDM. The Search/Match API facilitates duplicate identification and thus discourages the introduction of duplicates. The Search/Match is run on the bio-demo portion of every row by invoking the Search/Match API. The Result Action Configuration ID mapped to the Test ID are passed to the API, along with bio-demo information. The results of the Search/Match API indicate to the import process whether the individual on the row already exists in CDM as a duplicate and what is to be done with the import row:
Add: Create a new consumer and its associated data.
Update: Update an existing person (specified by the Search/Match API result) and its associated data.
Suspend: Do not do anything with the row and let the administrator decide how to resolve it.
See Using the Search/Match Capability.
Creating Consumer Data
If prospect data is received for a person who is not already a Consumer and who does not exist in CDM as determined by Search/Match, then a new Consumer (person with the Consumer role) is created in the default SetID for inbound EIPs. This default SetID is specified in Set Up CRM, Common Definitions, Customer, Customer Installation Options. Associated data, such as academic information, test scores, and so on, is then created for the person.
The following fields are used and rules are followed when creating consumer data in CDM:
Name related fields: The Last Name, First Name, Middle Name, Name Suffix, and Name Prefix fields from the import row.
Person related fields: The Sex, Birth Date, and Marital Status fields from the import row.
National Identification (NID) related fields: The National ID Type, National ID, and Primary NID fields from the import row. Note that the NID row created is required to be set to Primary even if the Primary NID value is N. This is because no other NID rows exist for the person at this time. The country is always USA. Note also that if the source is Campus Solutions, the Primary NID field is not sent, because it is always set to Y.
Other fields: The Ethnic Group Code, Ethnic Group Set ID, Citizenship Status, Religious Preference, and Regulatory Region fields from the import row.
Contact Methods: An import row can only have up to one address, one email and one phone specified. The system uses this information to create the create Address, Email and Phone type contact methods for the Consumer role. The Address Type, Email Type and Phone Type fields are used to derive the Contact Method Purpose Types for the Contact Methods.
The Address Type, Address1, Address2, Address3, City, State, Country, and Postal import row fields are used to create the Address contact method. The effective date is set to the current system date, with no end date.
The Phone and Phone Type import row fields are used to make up the Phone contact method. The effective date is set to the current system date, with no end date.
The Email Address and Email Address Type import row fields are used to make up the Email contact method. The effective date is set to the current system date, with no end date.
See Setting Up General Options.
Creating Academic Information
The following fields are used and rules are followed when creating academic information data in CDM:
Institution and Career: The Institution, Career, Admit Type, Admit Term, Campus, Recruiting Status, Academic Level, Housing Interest, Financial Aid Interest, and Referral Source import row fields.
Last School Info: The Last School Attended and Graduation Date import row fields.
Academic Program: The Program, Recruiting Status (which becomes the Lifecycle status), and Campus import fields. The Creation Date is set to the current system date. Note that if Recruiting Status values of Inquiry or Applicant are sent by Campus Solutions, the corresponding Lifecycle Status in CRM is set to Prospect.
Academic Plan and Sub Plan: The Plan and SubPlan import row fields.
Creating Test Score Information
Test Score rows for a person are created in CDM from the Test Results entity tied to the import row. If the Test ID Override field has a value (that is, it is not empty), then create Test Scores for this Test ID.
Note. Note that if you create an external import (that is, not through Campus Solutions), you must create the message. The Test ID for the message must be EXT. If you have gathered self-reported test scores (test scores that did not come from load media from a confirmed organization through the Campus Search/Match/Post), you should use the TEST_ID_OVRD (Test ID Override) to populate the correct TEST_ID that you want to report.
Creating Extracurricular Activities Information
Extracurricular activities for a person are created in the Customer Profile Table for Extracurricular Activities from the Prospect Extracurricular Activities entity tied to the import row. The Start Date is set to the current system date.
Note. Not all fields in the Profile Table are received on the Campus Solutions message. Those that are not received are left empty.
Creating Academic Interests Information
Academic interests for a person are created in the Customer Profile Table for Academic Interests from the Prospect Academic Interests entity tied to the import row. The Effective Date is set to the current system date.
Updating Consumer Data
If prospect data is received for a person who already exists in CDM, then a new person is not created. However, if the person exists but does not belong to the Consumer role, then that role is added to it. Inserts or updates are made to the person’s bio-demo data (name, address, and so on) and its associated information (academic info, test scores, and so on). The following table illustrates the rules that are followed for updates.
|
Information to be Updated |
Rules |
|
Name related fields |
Name related fields in CDM are never updated (even if empty). Also, no new Name entry is created. In other words, name related fields are never touched as part of updating consumer information. |
|
Person related fields |
The CDM fields corresponding to the Sex and Birth Date import row fields are updated only if previously empty. The CDM field corresponding to the Marital Status import row is never updated (even if empty). |
|
NID related fields |
If National ID with NID Type already exist on the import row for the Person, it is not updated. Otherwise, an NID row is inserted from the National ID Type, National ID, and Primary NID import row fields. Note. If the Source is Campus Solutions, the Primary NID value is not sent because it is always set to Y. In this case, the newly created NID row is designated primary (and the current primary row is made non-primary). |
|
Contact methods |
If Address Type on the import row matches with an existing, active Address of same contact method Purpose Type as the Consumer, the person's address is not updated. Otherwise, a new Address contact method of that type is added for the person’s Consumer role, effective as of the current system date (no end date). If Phone Type on the import row matches with an existing, active Phone of same contact method Purpose Type as the Consumer, the person's phone information is not updated. Otherwise, a new Phone contact method of that type is created for the person’s Consumer role, effective as of the current system date (no end date). This created contact method is not set to Primary unless there is no other Phone contact method for the Consumer If Email Type on the import row matches with an existing, active Email of same contact method Purpose Type as the Consumer, then the email information is not updated. Otherwise, a new Email contact method of that type is created for the person’s Consumer role, effective as of the current system date (no end date). This created contact method is not to Primary unless there is no other Email contact method for the Consumer. The Address Book entries (ABEs) are rebuilt. |
Updating Academic Information
The following table shows the rules for updating academic information.
|
Information to be Updated |
Rules |
|
Institution and Career |
If the Institution/Career combination available on the import row does not exist for the person in CDM, that combination is inserted and the Career Detail fields are created from the following import row fields:
If the Institution/Career combination already exists, the Housing Interest and Financial Aid Interest Career Detail fields from the import row are updated only if they are empty. The Recruiting Status field is updated if it is empty or if it is set to a more advanced status than currently exists on the row (for example, if the current status in CDM is Suspect, and the import row is set to Prospect, then the field is updated). Note that if the value Applicant or Inquiry is received on the Recruiting Status field, it is interpreted as the Prospect status. No other fields are updated, even if they are empty. |
|
Last School and Graduation Date |
The Last School Attended and Graduation Date fields from the import row are created for the person in CDM only if they do not already exist in CDM. If they already exist, they are not updated. |
|
Academic Program |
If Academic Program on a Prospect Program/Plan/Subplan entity row of the import row does not exist for person in CDM, then the Program is inserted for the person’s Institution/Career combination. For each Program, Program level fields are created using the Recruiting Status (which becomes Lifecycle Status) and Campus fields. The Creation Date value is set to the current System Date. If the Academic Program already exists, then the Recruiting Status is updated only if it is empty or if it is of a more advanced status than the status currently on the row (for example, if the current status in CDM is Suspect, and the import row status is Prospect, then it is updated. Note that if the value Applicant or Inquiry is received on the Recruiting Status field, it is interpreted as the Prospect status. The Campus field is not updated even if it is empty. |
|
Academic Plan and Sub Plan |
If the Academic Plan/Sub Plan combination that is available on the Prospect Program/Plan/Subplan entity import row does not exist for the person in CDM, the Plan/SubPlan combination for the person’s Institution/Career/Program is inserted. If the Academic Plan/Sub Plan combination already exists, nothing is updated. |
Updating Test Scores
Each Test Result tied to an import row is matched with the Test ID, Test Component, Test Date, and Data Source of the person's CDM Test Scores tables.
If no match is found, a Test Result row is inserted for the person in CDM.
If a match is found, the CDM tables for the person are updated with the Test Result row data, provided that the REV_SCORE_IND flag (Revised Score Indicator flag) has the value of U on the Import Row. If this value is set to N, then no update occurs. If it is set to C, then update only if the score on the import row is greater than that in CDM.
Note. If the Test ID Override field has a value (that is, it is not empty) then this value is used to perform match and insert/update Test Scores for this Test ID.
Updating Extracurricular Activities
For every extracurricular activity associated with the import row (for example, the Prospect Extracurricular Activities entity), the system determines whether it matches an extracurricular activity for the person in the Customer Profile Table for the same Institution and Career (from the import row entity), Internal/External Flag and Start Date (current date). If such a match does not exist, that extracurricular activity is inserted.
Updating Academic Interests
For every academic interest associated with the import row (for example, the Prospect Academic Interests entity), the system determines whether it matches an External Subject Area for the person for the same Academic Career (from the import row) and Effective Date (current date) in the Custom Profile Table for Academic Interests. If such a match does not exist, that is inserted with the current date as the effective date.
The BO_ID of the updated person (Consumer) is saved on the import row.
Errors
Any row level errors encountered during import processing are stored on the row, so that the Administrator can review and resolve them later. Errors can arise in various stages of processing:
Data validation errors.
Errors returned by the Search/Match API.
Errors while building an audience.
Errors returned by the CDM.
Understanding the Purge Process
The purge process permanently deletes import rows (and the child rows) of a batch from the staging area, provided that they are in the Posted or Ignore status. The purge process cleans up rows that are no longer needed, thus saving storage space and improving the performance of the import process.
The following diagram shows the logical flow of the purge process.

Purge process flow
The process performs the following steps:
Ensures that the batch being purged is Active and sets it to the Purge in Progress status. This ensures no other runs of the import or purge process will affect this batch.
Deletes all the import rows belonging to the batch provided that they have the Posted or Ignore status. This includes all the associated child records of each import row.
Logs a run history row for the batch.
If the batch has no rows left after the deletion of import rows, sets the Batch Status to Purged. This ensures that this batch can no longer be imported or purged. Otherwise, it sets the Batch Status back to Active.
Managing Import Rows
Access the Manage Import Rows page (Customers CRM, Prospective Student Import, Manage Import Rows).
Managing an import row primarily means reviewing its data and changing its status as needed, so that the import or purge process can process it in its next run. Updates to import rows (and their associated child data) are not allowed.
Note that updating a row status does not instantly run the import or purge process—it simply saves the updated status in the staging area.
To manage import rows, you use the Manage Import Rows component. This displays a Configurable Search screen that allows the Administrator to search for import rows using various search criteria.
Search results are rows from the Import Rows entity in the staging area that match the search criteria. Note that associated child rows like Test Results, Academic Interests, and so on are not displayed. The Search Result fields are separated into different tabs based on their categorization. Each field is read-only and displayed as stored in the Import Rows entity (no lookups, transformations or translations are performed).
Mass Update of Row Statuses
In certain cases, the HE Administrator might want to perform a mass update of certain rows' statuses of certain rows. (for example, change all Error rows to Ready for Processing after the errors have been fixed, or change all rows that are in Ready for Processing status to Ignore.
You do this by using the Reset, Ignore, Suspend, and Add buttons at the bottom of the configurable search results. If one or more import rows are selected (by selecting the check boxes for each row or by using the Check All/Clear All link) and one of the buttons is clicked, then the system attempts to change the status of all the selected rows to the new status indicated by the button you clicked. The following table shows the status to which the selected rows are changed based on the button clicked:
|
Button |
Status Change |
|
Reset |
Ready for Processing |
|
Ignore |
Ignore |
|
Suspend |
Suspended |
|
Add |
Add Person |
Only those rows that can be changed to the selected status are changed. If any rows cannot be changed, a warning message displays to inform you of the number of rows that were not changed.
For example, assume three rows in the following statuses: Ready for Processing, Suspended and Ignore. If the Add button is clicked, a warning message displays informing you that two rows could not be updated to the Add Person status. Selecting OK changes the status of Row 2 (Suspended) to Add Person and its Select check box is cleared. Rows 1 and 3 (Ready for Processing and Ignore) retain their original statuses, and their Select check boxes remain selected.
Click Save on the toolbar to commit the changes you have made.
Note. Update is not available as a mass action because a row cannot be changed to the Update Person status unless the person (Consumer) to be updated is known. Hence, this action can only be performed after reviewing one import row at a time.
Reviewing Import Rows One at a Time
Click the Record Number link of any of the search results to display the Manage Import Rows page.
This page allows you to review one import row at a time. The content and the action buttons displayed on this page depend on the current status of the import row. The toolbar and the Import Row Summary group box are common to all statuses; other sections and action buttons are as shown in the following table.
|
Import Row Status |
Sections Displayed |
Buttons Enabled |
Buttons Disabled |
|
Suspended |
|
|
Suspend |
|
Add Person |
|
|
Add |
|
Update Person |
|
|
None |
|
Error |
|
|
|
|
Ignore |
|
Reset |
|
|
Posted |
|
None |
|
|
Ready for Processing |
|
Ignore |
|
|
Toolbar |
The toolbar summary shows the Batch ID, Test ID, Record Number and Import Row Status of the import row. You can use the Previous and Next links to move backward and forward. The Return to Search button takes the user back to the Manage Import Rows search screen. |
|
“Select an existing person to update with import row” grid |
Shows the potential duplicates as returned by the Search/Match API, which is executed when this page is displayed for the Suspended, Add Person, and Update Person statuses. If the Update button is enabled, selecting Update immediately changes the status of the import row to Update Person. The page is redisplayed for the new Update Person status. Note. The address displayed on the duplicates grid for each person is the primary address at the role level (in the following order: Consumer, Worker, Contact, Person). The National ID displayed is the person's Primary NID. |
|
Import Row Summary |
Displays a summary of import row information. This section appears for all statuses; action buttons are enabled or disabled depending on the status of the import row. Select an enabled action button to immediately change the status of the import row and redisplay the page for the new status. |
|
Search/Match Results |
This collapsible section appears only for the Suspended, Add Person, and Update Person statuses. It displays information returned by the Search/Match API invoked for the import row. The first row of the grid is arbitrarily selected if the row is in Suspended or Add Person status; if the row is in Update Person status, then the previously selected row continues to be selected. |
|
Errors |
This grid is displayed only if the import row is in Error status. It shows the complete list of errors for the row from previous import runs. Also it shows the process instance number and the date and time of the run corresponding to each error. |
Using the Search/Match Capability
To ensure that duplicate constituents are not imported from Student Administration (SA) to CRM (that is, that constituents that already exist in the CRM database are not imported again from SA), the Search/Match feature checks for such duplicates when imports occur. Additionally, when a new constituent is created either in SA or CRM, Search/Match checks for duplicates and can bring over any additional data (such as test scores) to the SA system from CRM system.
Understanding Search/MatchRegardless of the application that calls it (for example, a PeopleSoft application program, an online PeopleSoft application component, or a web service), the Search/Match functionality performs duplicate checking for imported person data.
The Search/Match is performed against CRM Persons regardless of role. Other search types (Organization and Company) are not supported.
You can create and maintain Search/Match rules and parameters according to your organization's requirements.
Standalone Search/Match test functionality is included, allowing you to perform search/match duplicate checking and view the results so that you can determine that your rules and parameters are functioning as expected.
A set of Search/Match APIs to perform duplicate checking of the input constituent or prospect data against CRM Person data regardless of the role and based on the functional need of different calling applications such as an application engine program, an online PeopleSoft transactional component, the PeopleSoft CRM Search/Match test functionality, or a web service. The Search/Match rules can be different for Campus Solutions and for CRM. For example, the CRM Search/Match rules might be less restrictive than the Campus Solutions Search/Match logic.
Setting Up Search/MatchThis section describes how to set up Search/Match.
Pages Used to Set Up Search/Match|
Page Name |
Definition Name |
Navigation |
Usage |
|
Search/Match Rule |
HCR_SM_RULE |
Set Up CRM, Utilities, Search/Match, Define Rules |
Define sets of fields to search for, and identify search criteria to use for searching. |
|
Search/Match Parameters |
HCR_SM_PARM |
Set Up CRM, Utilities, Search/Match, Define Parameters |
Combine and order search rules prior to performing a search to determine the search fields that are permitted for the search. |
|
Search/Match – Test Harness |
SEARCH_MATCH |
Set Up CRM, Utilities, Search/Match, Test Harness |
Perform ad hoc duplicate checking of the test input data entered in the search criteria fields. |
|
Result Action Configuration |
RB_SM_CONFIG |
Set Up CRM, Utilities, Search/Match, Result Action Configuration |
Specify actions for the system to take for imported records. |
|
Prospect Import Mapping |
RB_SM_CFG_MAP |
Set Up CRM, Utilities, Search/Match, Prospect Import Mapping |
Associates a Result Action Configuration with a test. |
Defining Search Match Rules
Access the Search/Match Rule page (Set Up CRM, Utilities, Search/Match, Define Rules).
|
Search Rule Code |
A unique identifier for the search. |
|
Search Type |
The type of business object for which this search is performed. Only the Person type is currently supported. |
|
Description |
A brief description of the search rule. |
|
Sequence |
The order of field appearance inside a search parameter. |
|
Search Field |
The field to be assigned to this search rule code. When the user tabs out, the associated field description is automatically populated in the Field Description field. Note. The search fields are delivered as system data, and you should not modify them. |
|
Field Description |
A brief description of the search field. |
|
Required |
Select this check box to make the value for the search field required for use in the search rule. If the check box is not selected, blank or nonexistent data is permitted in the field. |
|
Usage |
The criteria for evaluating the field. The following options are available:
|
|
Start Position |
The starting position where character comparison is to start (this value is read-only unless the Usage value is Contains). |
|
Number of Characters |
The number of characters from the start position to include in the comparison. |
|
Length |
The number of characters in the search field. When the user tabs out of the search field after specifying a field, the system automatically displays the total number of characters associated with the selected search field. |
Defining Parameters
Access the Search/Match Parameters page (Set Up CRM, Utilities, Search/Match, Define Parameters).
|
Search Parameter |
The name of the search parameter. |
|
Search Type |
The type of business object for which this search is performed. Only the Person type is currently supported. |
|
Description |
A brief description of the search parameter. |
|
Status |
Select Active or Inactive from the list. |
|
Search Order |
The order in which to apply the search rule codes for this search parameter. The most restrictive search rule should be ordered lowest and least restrictive ordered highest. |
|
Search Rule Code |
The search rule code to be used in the search. When the user tabs out of this field after selecting a rule code, the Rule Code Description is automatically populated. |
|
Description |
A brief description of the search rule code. |
|
View Definition |
Click the link to navigate to the Search/Match Rules Codes Setup page where you can view or edit the rule definition. |
|
Save |
Click this button to save the Search/Match parameter. At this point, new Search/Match rules are added to and deleted rules are removed from the corresponding Result Action Configuration. |
Using the Search/Match Test Harness
Access the Search/Match – Test Harness page (Set Up CRM, Utilities, Search/Match, Test Harness).
This standalone page allows you to perform ad hoc duplicate checking of the test input data entered in the search criteria fields. With it, you can quickly find any duplicates for the data of interest and validate that the Search/Match functionality is working correctly.
|
Search Criteria |
The Search Criteria are delivered as system data; you should not modify them. |
|
Search |
Click this button perform standard duplicate checking based on the selected search parameter. The search checks duplicates based on the order of its configured search rules from the most restrictive to the least restrictive. |
|
Search by Order Number |
Initially, this section is empty because no Search/Match parameter has been specified. After the user selects a Search/Match parameter, its corresponding Search Rule codes are displayed. |
|
View Definition |
Click this link to view the details of the specific search/match rule for that row. |
|
Selective Search |
Click this button next to its corresponding Search Rule order if you want the Test Harness to find duplicates satisfying only the criteria defined in the selected Search Rule. If you click Selective Search and not enough required fields are populated to carry out the specific rule, then an error message is displayed. |
The results page displays the following information:
|
Search Order Number |
The order number of the Search/Match Rule that found duplicate records in the CRM database. For a standard search, this is the first instance of the search/match rule that found duplicates based on the order of the most restrictive to the least restrictive based on the configuration of the search parameter. For a selective search, it is the corresponding user-selected search order. |
|
Rule Code |
This value corresponds to the Search Order Number in the original search as listed in the Search By Order Number section. |
|
Total Count |
The total number of duplicate matches found. |
|
Person Details |
A summary of the person information for the matched person. |
|
Person ID |
Click this link to view more detailed information about the person. |
Defining Result Action Configuration
Access the Result Action Configuration page (Set Up CRM, Utilities, Search/Match, Result Action Configuration)
The Result Action Configuration page defines the actions you want the system to take regarding imported records, based on specified parameters.
|
Rule Code |
Indicates the order in which the parameters are processed, from lowest number (most restrictive) to highest (least restrictive). |
|
Description |
A description of the parameter. |
|
One Match Action |
Select the action for the system to take if one match is found for the imported person. Typically this is Update. |
|
Multiple Matches |
Select the action for the system to take if multiple matches are found for the imported person. Typically this is Suspend, so the administrator can review the records manually and determine the action to take. |
|
No Match Found |
Select Add if you want to add the person to the database if no matches are found, or select Suspend to place the person in the Suspended state so that an Administrator must review the record and decide on an action. |
Setting Up Prospect Import
Mapping
Access the Prospect Import Mapping page (Set Up CRM, Utilities, Search/Match, Prospect Import Mapping).
The Prospect Import Mapping page associates a Result Action Configuration with a test, to determine what is done with imported records.
|
Test ID |
The identifier for the test. |
|
Description |
A brief description of the test. |
|
Configuration ID |
The configuration ID designated to specify what is to be done with imported records in the case of duplicates. The configuration ID is defined on the Result Action Configuration page. |
|
Configuration Description |
A brief description of the configuration. |
Manually Creating Suspects and Prospects
With the integration of CRM 9.1 and Campus Solutions 9.0, prospective students are created in CRM instead of being created in Campus Solutions. This allows the Campus Solutions database to be kept clean of suspects and prospects who do not end up becoming applicants.
You can manually create and maintain suspects and prospects directly in CRM for Higher Education rather than having to create them in Campus Solutions and push them across. The career, program or plan, school, and test score information can now be maintained for a prospective student.
The Academics component is the place where a constituent's academic lifecycle information is stored for marketing and recruiting purposes. You can access the Academics component directly from the main menu, or from the Toolbars of the Person (Consumer) and Constituent 360-Degree View pages.
A constituent's Academic Information is keyed by Institution and Career. This means that for a given institution, a constituent can have one set of academic information for one career and a different set of academic information for a different career. For example, an existing undergraduate student in an institution could be created as a prospect for a graduate level career.
See Also
Integrating with Campus Solutions
Pages Used to Manually Create Suspects and Prospects|
Page Name |
Definition Name |
Navigation |
Usage |
|
Person (Consumer) |
RD_PRSN_PRIMARY |
Customers CRM, Search Person or Customers CRM, Add Person |
View information about a constituent. |
|
Academics – Career |
RD_ACAD_CAREER |
Click the Career tab on the Academics page. |
Displays information about the constituent's academic career. |
|
Academics – Program and Plan |
RD_ACAD_PROGRAM |
Click the Program and Plan tab on the Academics page. |
Displays information about the constituent's academic program, plan, and subplan. |
|
Academics – Last School |
RD_ACAD_SCHOOL |
Click the Last School tab on the Academics page. |
Displays information about the last school the constituent attended. |
|
Test Scores |
RD_SCORES |
Customers CRM, Academics, Test Scores or Click the Test Scores button on the Person (Consumer) page toolbar. |
Displays information about the constituent's self-reported and official test scores. |
Viewing Personal Information
Access the Person (Consumer) page (Customers CRM, Search Person).
|
Person Information section |
Use this section to enter biographical information about the constituent (such as name, birth date, gender, and so forth). |
|
Contact Info Entries section |
You can enter multiple types of postal addresses, phone numbers, and email addresses in this section. For each contact method, if multiple entries exist then one of the entries is selected as primary. |
|
Toolbar |
Two Higher Education specific links are available in the Toolbar: Academics and Test Scores. Note that these two links are displayed only if the Higher Education installation option has been enabled. Clicking the Academics link takes you to the Academics component, while clicking the Test Scores link transfers you to the Test Scores component of the constituent. |
Defining Academic Career Details
Access the Academics – Career page (Customers CRM, Academic Information, Academics).
The Career tab displays recruiting information associated with a Suspect or Prospect.
After a suspect or prospect's information is saved on this page, the Name, Institution, and Career fields become read-only.
Prompts are secured by user. The security is defined in Campus Solutions and the information is synchronized using EIPs.
|
Admit Type |
Select the prospect’s admit type for this career (for example, First Year). |
|
Admit Term |
Select the admit term for the prospect's career (for example, 2008 Fall). |
|
Campus |
Enter a specific campus with which to associate the prospect. Campuses are defined on the Campus Table page in Student Administration. |
|
Recruiting Status |
Select the person’s recruiting status. The recruiting status indicates the level of interest, at the academic career level, that your institution has in the prospective student. For example, you might consider a person who attended an on-campus event a suspect (someone whom you suspect is interested in your institution). Conversely, you might consider a person who sends a prospect card a prospect (someone whom you know is interested in your institution). Note. Recruiting status exists only in CRM, and is never updated on the Campus Solutions side. |
|
Academic Load |
Select the appropriate academic load for this career (for example, Full Time or Part Time). |
|
Academic Level |
Select the academic level for this career (for example, Freshman or Post-Bacc). |
|
Housing |
Select the housing interest that the person indicated. Values for this field are delivered with your system as translate values that you can modify. Delivered values are (none), Commuter, Off Campus, and On Campus. This field is for informational purposes only. |
|
Financial Aid Interest |
Select to indicate that this prospect has an interest in financial assistance. This field is for informational purposes only. |
|
Referral Source |
Enter the appropriate referral source for this prospect. A referral source indicates how this person became a prospect, and is a high level indicator of how your institution came into contact with the person. Example referral sources include Drop-In, Campus Event, or College Fair. |
|
Source Date |
Enter the date, if different than the default date, on which you entered this referral source. The default date is the system date on the day the record was added. |
|
Sponsored By |
If this constituent is sponsored by a company , then enter the Company here. Only one sponsored company per constituent per career is currently supported (if a constituent has more than one career, he or she can have more than one sponsor). If the company does not exist in the system, you can use Quick Create to add its information. |
See Also
PeopleSoft Enterprise Campus Solutions Application Fundamentals 9.0 PeopleBook, "Introducing Customer Relationship Management for Higher Education"
PeopleSoft Enterprise Campus Solutions Recruiting and Admissions 9.0 PeopleBook
Defining the Academic Program and Plan
Access the Academics – Program and Plan page (click the Program and Plan tab).
This tab displays all of the academic program , plan and subplan information, along with the lifecycle status of each program for the constituent , institution, and career.
|
Program |
Enter an academic program such as Arts or Science. |
|
Lifecycle Status |
Select the lifecycle status for this constituent. Choices are Suspect, Prospect or Inactive. Additionally Applicant , Student, and Alumnus statuses are set automatically by Campus EIPs. |
|
Campus |
Enter the campus in which this prospect is interested. This value is updated to the actual campus when the prospect becomes an applicant. |
|
Status Date |
The date that this Program’s lifecycle status was last updated. |
|
Plan |
Enter an academic plan if it is known. You can enter multiple academic plan and sub plan pairs for a specific program. |
|
Subplan |
Enter an academic sub plan if known. It is possible to enter a plan without an associated sub plan. |
|
Application Number |
The admissions application number in Campus Solutions so that more details of the application can be viewed. |
|
Application Status |
The status of the application (taken from the Application program status). |
|
Student Status |
The current status of the student (for example Withdrawn, Transferred, Active, and so on). |
|
Status Date |
The date on which either the application status or student status was last updated. |
The Lifecycle status can be set to Suspect, Prospect, or Inactive at the Program level manually, but after the application process begins in Campus Solutions and the Applicant EIP sets the Program to the Applicant lifecycle status, then the status is grayed out and the Application ID and application status displayed. This is to ensure data integrity between CRM and Campus Solutions. Additionally, as the constituent moves through the process (becoming a Student, then an Alumnus, and so on), then the lifecycle status is updated and the Student status displayed . For more details of the application, student programs, and so forth, you can view the information in the 360–degree view or in the actual Campus Solutions components.
The following table shows the lifecycle statuses and their descriptions:
|
Status |
Description |
|
Suspect |
A prospective student who has not yet contacted the Program. |
|
Prospect |
A prospective student who has expressed an interest in the Program. |
|
Applicant |
A person who has initiated or submitted an application for admission to the Program. |
|
Student |
A person who has enrolled in the Program. |
|
Alumnus |
A former participant in one or more of the Program's offerings. |
|
Inactive |
A person who is no longer active in the Program. |
Viewing Last School Attended Information
Access the Last School page (click the Last School tab).
The Last School tab displays information on the last school attended, which is used for marketing and recruiting purposes.
|
Last School Attended |
Enter the last school that the prospect attended. Because a person might attend several schools in his or her external academic career, it is helpful to know which school the person attended most recently. The postal code of the last school attended is added as one of the assignment fields within the Sales component for assigning recruiters. |
|
Graduation Date |
Enter the graduation date from the last school that the person attended. |
|
School Type |
Specifies the school type (for example, Secondary). |
|
Proprietorship |
Specifies whether the school is public or private. |
|
City |
The city in which the school is located. |
|
State |
The state in which the school is located. |
|
Country |
The country in which the school is located. |
|
Postal Code |
The school's postal code. This field is used in the Sales module to aid in assigning recruiters. |
|
Self Reported GPA |
Grade point average, as reported by the constituent. |
|
Class Size |
The number of students in the constituent's class group at the school. |
|
Class Rank |
The rank that the constituent attained at the school. |
|
Class Percentile |
The constituent's percentile in his or her class. |
Viewing Constituent Test Scores
Access the Test Scores page (click the Test Scores link in the Toolbar).
The Test Scores page displays information relating to official and self-reported test scores for the selected constituent. Test Score details are also automatically created by the Test Scores-related EIP that syncs data from Campus Solutions and by the Prospective Student Import process.
|
Test ID |
Enter the test you are recording. |
|
Component |
Enter the first test component. Values for this field are determined by the test ID that you enter. |
|
Score Percentile |
Enter the score, percentile, or both for this test component. |
|
Test Date |
The date on which this test was taken. |
|
Data Source |
Select how this test information was reported. For example, the data could have been self-reported or received from a testing agency. |
|
Academic Level |
Select the applicant’s academic level at the time this test was taken. This level can be different from the applicant’s current level. |
|
Letter Score |
Enter a letter score for this test component, if applicable. |
|
Date Loaded |
The default for the loaded date is your system date. You can edit this field if necessary. If this information is electronically loaded, this field is automatically populated with your system date the day the data is loaded. |
|
Index |
The LSAT 3-Year Test Index appears if this information has been loaded. |
|
Standard Administration |
The system selects this check box by default, which indicates that this test was administered in a standard way. Clear this check box if the test was administered in a nonstandard or non-timed way. |
In Campus Solutions, test score ranges are set up to define minimum and maximum values for each test score type. When the information is synced, the system validates the entered self-reported values to ensure that they fall within the specified ranges. Test ID security is also included in Campus Solutions, and is taken into account when prompting on the Test ID field. User ID-based security for test IDs ensures that users can see only prompt values for which they have permission. Test ID and Test Components are defined in Campus Solutions and the data is synchronized to CRM. Test ID and Test Component access security is also defined by User ID in Campus Solutions. The security data is synchronized to CRM and CRM ensures that the Campus Solutions security is validated in CRM.
Custom Profiles
In addition to the Academics and Test Score related information, a constituent's Higher Education data is also stored in custom profile tables. Custom profiles act as extensions to the CRM Customer Data Model and their data is used for purposes such as building Marketing audiences or personalizing Online Marketing email or web documents.
Custom profile tables that contain constituent data are populated by EIPs that sync data from Campus Solutions, the Prospective Student Import process, and also by the Online Application process in CRM.
Examples of custom profile tables are the Extracurricular Activity and Academic Interests profiles. These profiles are populated by an EIP from Campus Solutions and also by the Prospect Student Import process.
Constituent Data Security
In Campus Solutions, entities such as Academic Institution, Career, Program, Plan, and Test ID are secured by User ID. For example, a user might be authorized to view or access only a certain subset of all Programs available under a Career.
This user security setup information specified in Campus Solutions is synced over to CRM. These setups are then used to enforce user security in CRM. In other words, security is applied consistently across both Campus Solutions and CRM.
When creating a new Academics entry for a Constituent, a user is only prompted for Institution, Career, Program, and Plan values for which he or she is authorized, based on the security definition. This validation prevents users from creating information for which they are not responsible. Similarly, when Test Scores are added for a constituent, users can create them only for Test IDs that they have been authorized to access. Thus, a user who is only authorized for the SAT and ACT Test IDs is not allowed to create Test Scores for other Test IDs.
Using Leads and Opportunities for RecruitingLeads and opportunities are used by recruiters to track the history of their communication with a prospective student, track prospect contacts, and determine the current status of that prospect is in the recruiting cycle.
When a prospect is qualified from marketing activities , a lead is typically created in the Sales module and assigned to a recruiter. In CRM for Higher Education, you can assign recruiters by zip code of the last school attended and by institution, career, program, and plan for a more specialized recruiter. The recruiter can then follow up on the lead and track the progress of the prospect through the multiple lead statuses available.
The academic information for a prospect is displayed directly on the lead so that a recruiter can view and update the program and plan information in which a prospect may be interested. Once a lead progresses to a certain point (for example, when a constituent applies), the lead is converted to an opportunity and the recruiting process continues until the constituent becomes an applicant and then, it is hoped, an enrolled student.
This process is described in more detail in the Sales documentation.
See Also
Creating Sales Leads and Opportunities
Integrating with Campus SolutionsTo fully leverage constituent relationships for the purpose of recruiting, retention and fundraising, you need to understand where your constituents are in the overall lifecycle. Without this insight, you might try to recruit students for programs in which they are already enrolled, send student retention surveys to graduated students, or worse, send admittance-related communications to prospects who were denied acceptance. CRM for Higher Education 9.1 provides a robust integration between CRM and Campus Solutions for tracking the constituent life cycle status from suspect to prospect to applicant to student to alumnus in order to ensure that recruiting, retention, and alumnus communications are targeted to the right audience.
The following diagram shows the typical Higher Education process flow, highlighting the points at which EIPs are run and how the lifecycle status changes throughout the process.
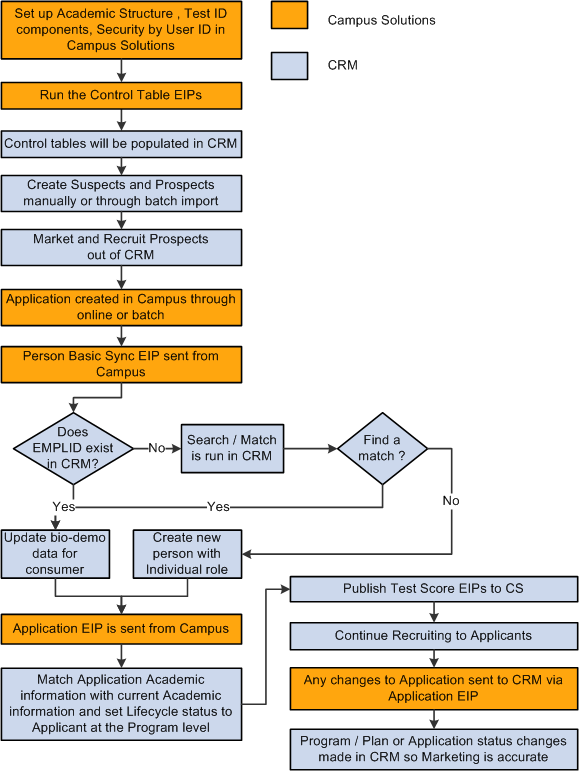
Higher Education business process incorporating EIP flows (1 of 2)
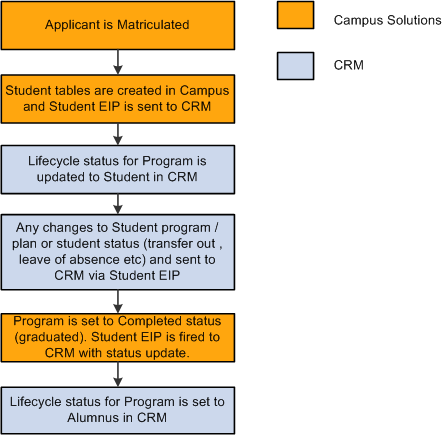
Higher Education business process incorporating EIP flows (2 of 2)
Note. The diagrams are connected—consider an arrow to exist pointing between “Program/Plan or Application status changes made in CRM so Marketing is accurate” in the first diagram, and “Applicant is Matriculated” in the second.
Page Used to Integrate With Campus Solutions|
Page Name |
Definition Name |
Navigation |
Usage |
|
Customer Data Management System Options |
BO_INSTALLATION |
Set Up CRM, Common Definitions, Customer, Customer Installation Options, Customer Data Management System Options |
Configure the system to allow users to call Search/Match functionality from PERSON_BASIC_SYNC |
Syncing Control TablesSetup information including academic structure, academic type and load, and school information will be sent to CRM for Higher Education so that prospective students can be created in CRM for Higher Education. Additionally, security constructs including institution, career, program and plan security by user ID, and test ID security are sent to CRM for Higher Education so that PeopleSoft CRM for Higher Education will respect the same security out of the box as the Campus Solutions system.
The following table shows the control table information that is synced from Campus Solutions.
|
Functionality |
Message Name |
CRM Records to Update |
|
Academic Structure |
SSR_ACADINST_SETUP_FULLSYNC |
INSTITUTION_TBL |
|
SSR_ACADCAMP_SETUP_FULLSYNC |
CAMPUS_TBL |
|
|
SSR_ACADCAR_SETUP_FULLSYNC |
ACAD_CAR_TBL |
|
|
SSR_ACADPROG_SETUP_FULLSYNC |
ACAD_PROG_TBL |
|
|
SSR_ACADPLAN_SETUP_FULLSYNC |
ACAD_PLAN_TBL |
|
|
SSR_ACADSUBPLAN_SETUP_FULLSYNC |
ACAD_SUBPLN_TBL |
|
|
SSR_ACADTRM_SETUP_FULLSYNC |
TERM_TBL |
|
|
SSR_ACADINST_SETUP_SYNC |
INSTITUTION_TBL |
|
|
SSR_ACADCAMP_SETUP_SYNC |
CAMPUS_TBL |
|
|
SSR_ACADCAR_SETUP_SYNC |
ACAD_CAR_TBL |
|
|
SSR_ACADPROG_SETUP_SYNC |
ACAD_PROG_TBL |
|
|
SSR_ACADPLAN_SETUP_SYNC |
ACAD_PLAN_TBL |
|
|
SSR_ACADSUBPLAN_SETUP_SYNC |
ACAD_SUBPLN_TBL |
|
|
SSR_ACADTRM_SETUP_SYNC |
TERM_TBL |
|
|
External Org |
SCC_EXT_ORG_SYNC |
EXT_ORG_TBL |
|
ORG_LOCATION |
||
|
EXT_ORG_TBL_ADM |
||
|
SCC_EXT_ORG_FULLSYNC |
EXT_ORG_TBL |
|
|
ORG_LOCATION |
||
|
EXT_ORG_TBL_ADM |
||
|
School Type Setup Table |
SCC_SCHL_TYPE_SETUP_SYNC |
LS_SCHL_TYP_TBL |
|
SCC_SCHL_TYPE_SETUP_FULLSYNC |
LS_SCHL_TYP_TBL |
|
|
Test Component - Setup |
SAD_TEST_SETUP_SYNC |
SA_TEST_TBL |
|
SA_TCMP_REL_TBL |
||
|
SAD_TEST_SETUP_FULLSYNC |
SA_TEST_TBL |
|
|
SA_TCMP_REL_TBL |
||
|
SAD_TEST_COMP_SYNC |
SA_TEST_CMP_TBL |
|
|
SAD_TEST_COMP_FULLSYNC |
SA_TEST_CMP_TBL |
|
|
SAD_TEST_SCRTY_SYNC |
SAD_TEST_SCTY |
|
|
SAD_TEST_SCRTY_FULLSYNC |
SAD_TEST_SCTY |
|
|
Admit Type Setup |
SAD_ADMITTYPE_SETUP_FULLSYNC |
ADMIT_TYPE_TBL |
|
SAD_ADMITTYPE_SETUP_SYNC |
ADMIT_TYPE_TBL |
|
|
Academic Structure Security |
SSR_SCRTY_INST_UID_FULLSYNC |
SCRTY_TBL_INST |
|
SSR_SCRTY_INST_UID_SYNC |
SCRTY_TBL_INST |
|
|
SSR_SCRTY_CAR_UID_FULLSYNC |
SCRTY_TBL_CAR |
|
|
SSR_SCRTY_CAR_UID_SYNC |
SCRTY_TBL_CAR |
|
|
SSR_SCRTY_PROG_UID_FULLSYNC |
SCRTY_TBL_PROG |
|
|
SSR_SCRTY_PROG_UID_SYNC |
SCRTY_TBL_PROG |
|
|
SSR_SCRTY_PLAN_UID_FULLSYNC |
SCRTY_TBL_PLAN |
|
|
SSR_SCRTY_PLAN_UID_SYNC |
SCRTY_TBL_PLAN |
|
|
Referral Source Sync |
SAD_RFRL_SRC_SETUP_SYNC |
REFERL_SRCE_TBL |
|
SAD_RFRL_SRC_SETUP_FULLSYNC |
REFERL_SRCE_TBL |
Syncing Constituent InformationTo provide a real time update from Campus Solutions to CRM for Higher Education, incremental syncs are included for prospect, applicant, and student data. As changes are made in Campus Solutions to the prospect, applicant, or student (including applicant status, change of program, plan, and so on), real time messages are sent to CRM so that CRM always has the most up-to-date information about that constituent, ensuring accurately targeted communications.
|
Functionality |
Message Name |
CRM Records to Update |
|
Person Data Extended Sync |
SCC_SRVC_IND_SYNC |
Profile - CS-ADM Service Indicators |
|
CS_SRVC_IND_DAT |
||
|
SAD_ADM_INTEREST_SYNC |
Profile - CS-ADM Academic Interests |
|
|
CS_INTERESTS |
||
|
SSR_EXTRACUR_ACTVTY_SYNC |
Profile - CS-ADM Extracur Activity |
|
|
CS_EXCR_ACTVTY |
||
|
SAD_EXT_ACAD_DATA_SYNC |
Profile - CS-ADM Academic History |
|
|
CS_ACAD_HISTORY |
||
|
SCC_PERSON_SYNC |
Profile - CS-Person |
|
|
CS_PERS_DATA_SA |
||
|
Prospect |
SAD_ADM_PRSPCT_DATA_SYNC |
RD_CONSTITUENT |
|
RD_CAREER |
||
|
RD_PROGRAM |
||
|
RD_PLAN |
||
|
RD_SUBPLAN |
||
|
CS_ADM_PRSPCT_DATA_FULLSYNC |
RD_CONSTITUENT |
|
|
RD_CAREER |
||
|
RD_PROGRAM |
||
|
RD_PLAN |
||
|
RD_SUBPLAN |
||
|
Applicant |
SAD_ADM_APPL_DATA_SYNC |
RD_CONSTITUENT |
|
RD_CAREER |
||
|
RD_PROGRAM |
||
|
RD_PLAN |
||
|
RD_SUBPLAN |
||
|
CS_ADM_APPL_DATA_FULLSYNC |
RD_CONSTITUENT |
|
|
RD_CAREER |
||
|
RD_PROGRAM |
||
|
RD_PLAN |
||
|
RD_SUBPLAN |
||
|
Test Score Sync |
SAD_TEST_SCORES_SYNC |
RD_TEST |
|
RD_TEST_SCORE |
||
|
CS_TEST_SCORES_FULLSYNC |
RD_TEST |
|
|
RD_TEST_SCORE |
||
|
Student Status Change |
SSR_ACAD_PROG_SYNC |
RD_CONSTITUENT |
|
RD_CAREER |
||
|
RD_PROGRAM |
||
|
RD_PLAN |
||
|
RD_SUBPLAN |
||
|
SSR_ACAD_PROG_FULLSYNC |
RD_CONSTITUENT |
|
|
RD_CAREER |
||
|
RD_PROGRAM |
||
|
RD_PLAN |
||
|
RD_SUBPLAN |
Using Search/Match with PERSON_BASIC_SYNCWhen a person is created in Campus Solutions, the person information is sent over to CRM via the PERSON_BASIC_SYNC process. Because suspects and prospects are brought directly into CRM, these individuals exist in the system, but do not have an EmplID. Because of this, it is important that when the person information is processed in CRM, the system must recognize whether that person already exists in order that his or her information can be updated. If this link is not made, then the person could end up existing in the system in two different places, once as a suspect or prospect, and once as a student or applicant.
Because of this, and in order to ensure that the number of duplicates between CRM and Campus Solutions is limited, the Search/Match process is called when the system does not find the EmplID associated with an individual.
The following flow chart illustrates the path that the PERSON_BASIC_SYNC process follows as it determines whether to create a new Person record or update an existing one.
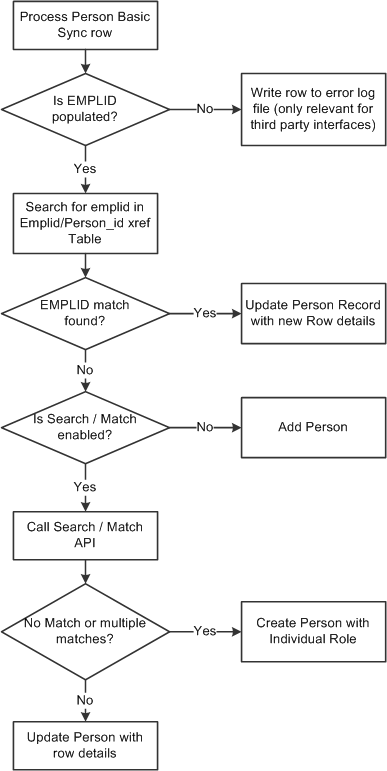
PERSON_BASIC_SYNC process flowchart
If the system does not find an EmplID and Search/Match is enabled, the Search/Match functionality is invoked, passing the API a PERSON_BASIC_SYNC-specific Configuration ID that does not allow the person to be placed in suspense. If multiple matches occur, the person is added with the individual role but a message is logged to inform you that multiple matches exist.
Configuration Setup to Enable Search/Match
Access the Customer Data Management System Options page (Set Up CRM, Common Definitions, Customer, Customer Installation Options, Customer Data Management System Options).
You can configure the system to allow users to call Search/Match functionality from PERSON_BASIC_SYNC. By default, this capability is not enabled. To configure the capability, you use the Customer Data Management System Options page.
|
Enable Search Match for EIP |
Select this check box to enable the calling of the Search/Match functionality when processing the PERSON_BASIC_SYNC and PERSON_BASIC_FULLSYNC messages. |
|
Search Match Configuration ID |
When calling the Search/Match functionality from PERSON_BASIC_SYNC, the SMRA_PBSEIP configuration is required (this configuration does not permit matches to be placed into the Suspense state). You cannot change this value. |
When Search/Match is enabled, records that are imported using PERSON_BASIC_SYNC and PERSON_BASIC_FULLSYNC and that do not have an EmplID are not permitted to be placed in the Suspense state (they must be added to the database). To ensure that this occurs, the SMRA_PBSEIP configuration is used with this import.
By default, records that match a single existing record in the CRM database are updated (you can change this action to Add), and records matching multiple existing records are added (you cannot change this action). If no match is found, the new record is added to the CRM database. Only the Add option is available for records for which an EmplID is not found.
Campus Solutions Changes That Can Affect Academic Information and Lifecycle
StatusThere are a number of different functions on the Campus Solutions side that can affect the academic information and lifecycle status. These include:
Adding a suspect or prospect in Campus Solutions.
Creating an application in Campus Solutions.
Student status change.
Adding a Suspect or Prospect in Campus Solutions
Because suspects and prospects can be created in CRM, typically they are not created in Campus Solutions. The reason for this is to reduce the number of prospective students in the Campus Solutions database who might not subsequently enroll. However, it is still possible to create suspects and prospects in Campus Solutions; these are synced to CRM through the existing EIPs.
A suspect or prospect can be created in Campus Solutions using the Maintain Prospect component or other Campus Solutions batch load processes, and the prospect EIPs sync this data over to CRM.
See PeopleSoft Enterprise Campus Solutions Application Fundamentals 9.0 PeopleBook, "Introducing Customer Relationship Management for Higher Education"
See PeopleSoft Enterprise Campus Solutions Recruiting & Admissions 9.0 PeopleBook
Creating an Application in Campus Solutions
There are a number of ways to create an application in Campus Solutions, either manually through the Application Entry process or through the Admissions load process. After an application is created , the Application EIPs send the application information to CRM. If a new person was created as part of the application process, then PERSON_BASIC_SYNC and the search/match logic in CRM should have created the link between the new person in Campus Solutions and the existing person in CRM. The Application EIP then attempts to match on the Career, Institution, Program and Plan (which are mandatory fields for the application process). If a match is found, then the lifecycle status of the matching program is set to Applicant and the Application Number and Application Status (Program Status field from the application in Campus Solution) are displayed.
This is the process whereby the lifecycle status of Suspect or Prospect is set to Applicant through the Application EIP. After a person becomes an applicant, any official or self-reported test scores are published to Campus Solutions; these are used as part of the application evaluation process. As the application's status changes, those changes are sent to CRM in real time so that CRM has the most current information about the applicant for accurate targeted marketing.
After the application status is set to Matriculate, the Student Status Change message is sent to CRM and the applicant's status updated to Student.
Student Status Change
The Student Status Change message (SSR_ACAD_PROG_SYNC ) is synced to CRM any time a change in either program or plan occurs (for example, a students decides to change major or do a double major), or a change occurs in the status of the student (for example, the student transfers out or takes a leave of absence). These changes are reflected in CRM in real time so that the most accurate information is available. After the constituent becomes a student, the focus of CRM moves from recruiting to retention.
The lifecycle status is set to Alumnus when the Program Action is COMP and Program Status is Completed. The CRM focus then shifts to fundraising from retention. The trigger points for the SSR_ACAD_PROG_SYNC message are described in the Campus Solutions documentation.
See PeopleSoft Enterprise Campus Solutions Recruiting and Admissions 9.0 PeopleBook
See PeopleSoft Enterprise Campus Solutions Application Fundamentals 9.0 PeopleBook, "Introducing Customer Relationship Management for Higher Education"
See Retaining Students.