 Setting Up Statement Processing
This chapter discusses how to:
Set up statement processing.
Set up parallel processing for statements.
Set up dunning letter processing.
Set up follow-up letter processing.
Set up delivery information for correspondence.
Note. This chapter is required. You must complete the tasks discussed in this chapter to implement statement, dunning letter, and follow-up letter processing.
Setting Up Statement Processing
To set up statement processing, use the Statement component (STATEMENT_TABLE) .
This section provides an overview of statement IDs and discusses how to:
Set up statement IDs.
(Optional) Add fields to customer statements.
 Understanding Statement IDs
Statement IDs determine the statement type—open item or balance forward—and conditions under which items are excluded from statements (collection, deduction, and disputed items, credit items, and items that are more then a certain monetary amount). Statement IDs also determine the circumstances under which statements should not be produced (collection, deduction, and disputed items, credit items, and items that are less than a certain monetary amount).
You assign a default statement ID to each business unit and override it, if applicable, for individual correspondence customers. When you run the process that generates statements, the system looks for a statement ID at the customer level and uses the business unit default if the customer does not have one.
Page Used to Set Up Statement IDs|
Page Name |
Definition Name |
Navigation |
Usage |
|
STATEMENT_TABLE |
Setup Financials/Supply Chain, Product Related, Receivables, Payments, Statement, Statement |
Create statement IDs. |
Setting Up Statement IDs
Access the Statement page. (Select Setup Financials/Supply Chain, Product Related, Receivables, Payments, Statement, Statement.)
The Document Has Credit Total and Document Total < check boxes apply to the balance of the statement, which is always at the correspondence customer level. Therefore, a customer with a small debit balance would be overridden by a customer with a larger credit balance if both balances belonged to the same correspondence customer, and the process would not create the statement.
Note. If the statement type is Bal Fwd, only items that have not appeared on a previous balance forward statement are eligible for exclusion.
Adding Fields to Customer Statements
You rarely need to modify the Statements Application Engine process (AR_STMTS). The Statements process populates a temporary table with dozens of fields that can be added to statements. This table lists fields that exist in the temporary table and are not in the sample statement that is delivered. To include these fields on the statement, modify the Crystal Report for statements:
|
Field Type |
Field |
|
Additional discount fields |
DISC_AMT1 (discount amount 1) DISC_DT (discount date) DISC_DT1 (discount date 1) |
|
Bill of lading fields to identify the payment |
BILL_OF_LADING |
|
User fields |
USER_AMT1 through USER_AMT8 USER_DT1 through USER_DT4 USER1 through USER10 |
Setting Up Parallel Processing for Statements
This section provides an overview of parallel processing for statements and discusses how to:
Define the maximum instances for PSAdmin.
Define the maximum concurrent processes for the server.
Define the number of parallel processes.
Add more parallel processes to the Statements - Parallel multiprocess job (AR_STMT).
Add additional Statements process (AR_STMTS) definitions.
Understanding Parallel Processing for Statements
PeopleSoft Receivables enables you to process multiple Statements processes in parallel to achieve higher performance. You initiate the processes using one run control and the process automatically divides the work between the number of partitions that you specify in your setup.
The Statements Preprocessor multiprocess job (ARSTMT) includes:
The Statement Parallel Preprocessor Application Engine process (AR_STMTPP).
The Statements - Parallel multiprocess job (AR_STMT).
The following diagram illustrates how the Statements Preprocessor Application Engine parallel processor processes four different statement jobs AR_STMT1, AR_STMT2, ARSTMT3, and AR_STMT4 at the same time and extracts data to prepare customer statements for each job.
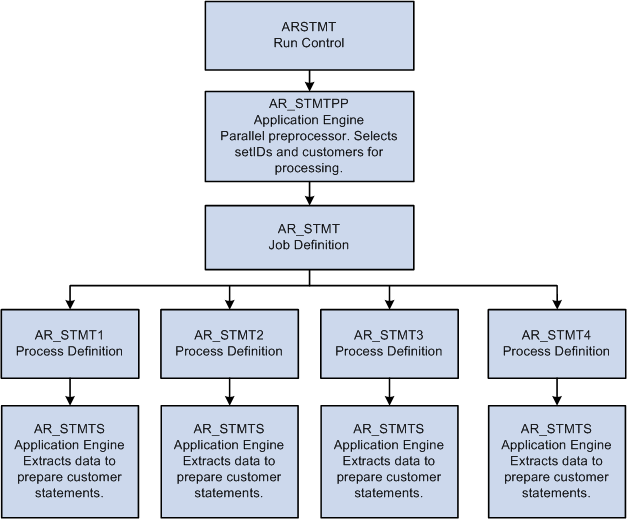
Statement parallel processing workflow for multiprocess jobs
When you use the Process Monitor to check the status of the process, you view the status of the AR_STMTPP process and each process within the AR_STMT multiprocess job. The system does not indicate that the Statements Preprocessor multiprocess job (ARSTMT) is successful until each parallel process completes. The Job Message Log Summary page summarizes all the individual parallel process message log messages for the entire ARSTMT job.
Note. PeopleSoft Receivables also provides the Statements-Parallel/Prnt multiprocess job (STATEMNT), which runs the Statements Preprocessor multiprocess job (ARSTMT) and prints the Open Item Statement and the Balance Forward Statement.
The AR_STMTPP process acts as a preprocessor for the Statements process and also:
Selects setIDs and customers for processing.
Places the qualified data in temporary tables.
Partitions the data between the child processes.
Initiates the AR_STMT multiprocess job that starts child processes in parallel.
The distribution of the data among the child or parallel processes is based on the composition of the data and the number of parallel processes. The process attempts to spread the data volume evenly among the processors. The staging phase takes a little longer, but the overall processing time is faster because multiple children processes run concurrently. You should balance the decision of using parallel processing or single thread processing based on the volume of data and the hardware capacity to get the maximum benefit from this feature.
The AR_STMT multiprocess job contains all of the Application Engine process definitions that you use for parallel processing, such as AR_STMT1. Each process definition calls the AR_STMTS Application Engine process, which actually extracts the data, prepares the statements, and performs table cleanup before the process ends.
PeopleSoft Receivables delivers eight process definitions—AR_STMT1 through AR_STMT8. If you want to run more than eight partitions of the Statements process at once, you must define additional process definitions. Use the AR_STMT1 process definition as an example.
The standard setup for the AR_STMT multiprocess job is to run a single threaded process that contains only the AR_STMT1 process definition. If you want to use parallel processing, you must assign additional process definitions to the job definition. You must also specify the number of partitions that your organization will use. You might have to experiment with the number of partitions that works for you. We recommend that you assign just a couple of additional partitions and increase the number, if needed.
You might also have to override the server settings for your organization. By default, you can run up to three instances of a process at one time. If you want to run additional instances, you must change your configuration. If you also use parallel processing for the Payment Predictor (AR_PREDICT), Aging (AR_AGING), and Receivable Update (AR_UPDATE) processes, the maximum instances applies to those processes, as well. For example, if you want to run eight instances for the Receivable Update process and four for the Statements process, you must configure your server for eight instances.
Pages Used to Set Up Parallel Processing for Statements|
Page Name |
Definition Name |
Navigation |
Usage |
|
SERVERDEFN |
PeopleTools, Process Scheduler, Servers, Server Definition |
Define the maximum concurrent processes for Application Engine processes. |
|
|
PARALLEL_AR_SBP |
Set Up Financials/Supply Chain, Install, Installation Options, Receivables Click the Parallel Processing Options link. |
Specify the exact number of parallel processes or partitions that you want for statements. |
|
|
PRCSJOBDEFN |
PeopleTools, Process Scheduler, Jobs, Job Definition |
Add additional Statements process definitions to run the AR_STMT multiprocess job. |
|
|
PRCSDEFN |
PeopleTools, Process Scheduler, Processes, Process Definition |
Add additional Statements process definitions if you need to run more than eight parallel processes. |
Defining the Maximum Instances for PSAdmin
Open the PSAdmin tool on your server to change the configuration settings.
To change the maximum instances:
Scroll to the section titled Values for config section – PSAESRV.
The section looks as follows:
Values for config section - PSAESRV.

Max Instances = 3.

Recycle Count=0

Allowed Consec Service Failures=0.
Change the value for Max Instances to the maximum number of parallel processes that you want to run at once.
Defining the Maximum Concurrent Processes for the Server
Access the Server Definition page. (Select PeopleTools, Process Scheduler, Servers, Server Definition.)
|
Process Type and Max Concurrent |
For the Application Engine process type, enter the maximum number of parallel processes that you run at once. This figure must be the same as or greater than the maximum instances that you defined for PSAdmin. |
See Also
Enterprise PeopleTools PeopleBook: PeopleSoft Enterprise Process Scheduler
Defining the Number of Parallel ProcessesAccess the AR Parallel Processing Options page. (Select PeopleTools, Process Scheduler, Servers, Server Definition.)
|
Parallel Process and Maximum Partitions |
Enter the exact number of partitions or parallel processes that you want to run for the AR_STMT parallel process. |
Adding More Parallel Processes to the AR_STMT Multiprocess JobAccess the Job Definition page for the AR_STMT job. (Select PeopleTools, Process Scheduler, Jobs, Job Definition.)
|
Run Mode |
Always select Parallel. |
|
Process Type and Process Name |
Enter Application Engine for the type and select from AR_STMT2 to AR_STMT8 for each separate partition or process that you want to run. If you define additional process definitions, select the name of the definitions that you added. Note. You must have the same number of rows in the process list as you enter in the Maximum Partitions field on the AR Parallel Processing Options page. |
|
Run Always On Warning and Run Always On Error |
You must select these check boxes. |
See Also
Enterprise PeopleTools PeopleBook: PeopleSoft Process Scheduler
Adding Additional Statements Process Definitions
Access the Process Definition page. (Select PeopleTools, Process Scheduler, Processes, Process Definition.)
Complete the fields on this page and the other pages in the Process Definition component (PRCSDEFN) to match the AR_STMT1 process definition with two exceptions:
Use another name.
Use another description.
Use this format for the name: AR_STMT#, for example AR_STMT9.
See Also
Enterprise PeopleTools PeopleBook: PeopleSoft Process Scheduler
Setting Up Dunning Letter Processing
To set up dunning letter processing, use the Letter Code (LETTER_CD) and the Dunning (DUNNING_TABLES) components.
This section provides an overview of dunning letter setup and discusses how to:
Define letter codes and letter content.
Define dunning IDs.
Define the dunning levels.
(Optional) Change dunning letter layouts.
Understanding Dunning Letter Setup
You define letter codes that specify the text that you want to print on a dunning letter. However, the letter code that you use when you print the letters depends on several other setup factors.
When you define the dunning ID, select a dunning method that determines which items appear in the letters and which letter code to use when you print the letters. You assign the dunning ID to a business unit and override it for individual customers. The AR Dunning Application Engine process (AR_DUNNING) uses the rules for the dunning ID associated with the business unit or customer to generate the dunning letters. This table describes how the method that you select determines which items appear on a letter and which letter code to use for each letter:
If you use dunning by level or dunning by days, you associate each letter code with a dunning level and assign the letter code with the least severe text to the lowest dunning level and the letter code with the most severe text to the highest dunning level. When you run the AR Dunning process, you choose to use either the highest or lowest dunning level. For example, if you have items that fall into the defined bracket for levels two and three and you select to use the lowest dunning level for a letter that includes all past due items, then the process prints the text from the letter code that you assigned to the second dunning level.
Besides the dunning method, the dunning ID determines when items are excluded from a letter—such as deduction or disputed items—and whether the letter is generated.
See Also
Understanding the Dunning Letter Process
Pages Used to Set Up Dunning Letter Processing|
Page Name |
Definition Name |
Navigation |
Usage |
|
LETTER_CD_TBL |
Setup Financials/Supply Chain, Product Related, Receivables, Options, Letter Code, Letter Code |
Define letter codes for different levels of dunning letters and the default letter text for the code. |
|
|
DUNNING_TBL |
Setup Financials/Supply Chain, Product Related, Receivables, Credit/Collections, Dunning Methods, Dunning ID |
Define dunning IDs and select a dunning method (by level, by days past due, or by action list). |
|
|
DUNNING_LVL_TBL |
Setup Financials/Supply Chain, Product Related, Receivables, Credit/Collections, Dunning Methods, Dunning Level |
Define the levels for the dunning method that you selected on the Dunning ID page. (This page is not available for a dunning by action list method.) |
Defining Letter Codes and Letter Content
Access the Letter Code page. (Select Setup Financials/Supply Chain, Product Related, Receivables, Options, Letter Code, Letter Code.)
Each letter code should be unique. You should create a letter code for each text variation and not use the same letter code that you used for other letters.
To print a separate letter for outstanding items in each age range, create a separate letter template for each letter code.
|
Letter Code Type |
Select Dunning Letter. |
|
Dunning Letter Text |
Enter the text of the dunning letter. The text should be appropriate for the dunning level (first, second, and so on). The text appears before the list of open items on the dunning letter, unless you change the format of the letter using Crystal Reports. |
If you do not use the delivered letter codes provided, then you must change the query that retrieves the data and the Crystal template that formats the letter.
See Also
Changing Dunning Letter Layouts
Defining Dunning IDs
Access the Dunning ID page. (Select Setup Financials/Supply Chain, Product Related, Receivables, Credit/Collections, Dunning Methods, Dunning ID.)
See Also
Setting Up Actions and Action Templates
Defining Dunning Levels
Access the Dunning Level page. (Select Setup Financials/Supply Chain, Product Related, Receivables, Credit/Collections, Dunning Methods, Dunning Level.)
The fields that appear on this page depend on the method that you selected and on whether you selected the Include Dunning Letter Charge check box on the Dunning ID page.
|
Level |
Assign a dunning level. |
|
Sequence |
Assign a sequence number to a level. |
|
Start Day, End Day, or Interval |
For a dunning method by days, select a start and end day for each level. The first start day for the first level must be 1, and the last end day for the last level must be 9999. For a dunning method by levels, indicate the number of days between levels. |
|
Letter Code |
Enter the letter code corresponding to the text that you want to send to customers whose outstanding items fall within the category. If you use the AR33000 report template, the system uses the dunning level for either the oldest or newest item, based on your selection on the Dunning Letter Extract - Parameters page. |
|
Letter Charge |
Specify the charge for each letter that you send. This field is available only if you selected the Include Dunning Letter Charge check box on the Dunning ID page. |
Changing Dunning Letter Layouts
You can create your own dunning letters and configure them to match the different credit approaches that you take with your customers or to change the letter layout. If you use the All Levels Dunning Letter (AR33000 or AR33A00) report template that includes all past due items regardless of their age, you use the Letter Code page to configure the text for each dunning level. Specify whether or not to use the letter code assigned to the highest or lowest level when you run the AR Dunning process.
To print a separate letter for past due items in each age range associated with dunning levels, use the Level 1 Dunning Letter (AR33001 or AR33A01), Level 2 Dunning Letter (AR33002 or AR33A02), and Level 3 Dunning Letter (AR33003 or AR33A03) report templates. The system uses the text for the letter code assigned to the appropriate dunning level. For example, if all items fall in the age range for dunning level one, use the Dunning Level 1 letter template. If you have more than three dunning levels and letter codes, you must create your own dunning letters for each additional letter code and dunning level combination.
Note. (NLD) Use the AR33A00, AR33A01, AR33A02, and AR33A03 report templates only if you have enabled business units to print the acceptgiro data on dunning letters.
See (NLD) Understanding Acceptgiro Form Printing.
When creating new dunning letters, we recommend that you copy an existing dunning letter and save it using the naming conventions established for existing files. All the delivered files begin with AR. We recommend using ARU to differentiate files that are user-created or modified.
This section discusses how to:
Modify and create queries.
Add fields to dunning letters.
Create additional letter layouts.
Modifying and Creating Queries
If you do not use the delivered letter codes, you must modify the WHERE clause of the query to reflect the new letter codes in PeopleTools. This procedure can also be used to add fields to dunning letters or to create new queries by copying, renaming the files, then modifying the new file.
To modify the WHERE clause of a query:
Select Reporting Tools, Query, Query Manager.
In the Search By field, enter the AR33001 (AR33001- Level 1 Dunning Letter) or the report ID for the appropriate letter that you want to change and click Search.
Click the Edit button and then select the Criteria tab.
The Criteria page displays the fields in the query.
Click the Edit button for the criteria that you want to change.
The Edit Criteria Properties page appears.
Change the Expression 2 fields, as needed. For example, to use letter code 8 instead of 1, enter 8 in the Constant field for Expression 2.
Click OK and then select the appropriate option at the bottom of the Criteria page.
Click Save to save the query with the exact name and the same criteria as the original query.
Click the Save As link to save the query with a different name; the original query does not change.
Click the New Query link to create a new query; any changes to the existing query are lost.
After you save the query, click Run to run the query.
Adding Fields to Dunning Letters
Suppose that one of the sample dunning letters comes close to suiting your needs, but you want to display one or two additional database fields on the letter. To do so, you must change the AR Dunning Application Engine extract (AR_DUNNING), the query, and the Crystal Reports report layout.
To add fields to dunning letters:
Review the fields on the DUN_CUST and DUN_CUST_DTL tables that store the data, adding more fields if necessary.
Try to use the additional fields that already appear on these tables. If you do not see a field that provides the information that you want to appear on the dunning letter, then you must add that field.
Add fields to the AR Dunning process and the temporary table AR33000_TMP.
Add fields to the query.
Place fields on the report and update the letter layout.
Open the Crystal report directly in Crystal or in two-tier using PeopleSoft Application Designer.
Select Go, Query, then click the Run to Crystal Report button. Select Insert, Database Field, and select the new field from the list.
Use Crystal Reports to make any necessary formatting changes to the report.
Creating Additional Letter Layouts
If you have more than three letter codes and you generate dunning letters that include items in a single dunning level, you must create additional letter layouts.
To create additional letter layouts:
Create a new query in PeopleSoft Query that references AR33000_TMP using Crystal Reports to copy one of the other dunning letter reports.
Name the file using the first seven characters of the query name plus the .RPT file extension (for example, ARU3304.RPT).
Create a new letter layout (called a report in Crystal Reports terminology).
Add or delete the desired fields in the report, format the new report, and save it.
Link the new letter and query.
Format the letter.
Add a process definition for the new dunning letter to the Process Scheduler Request page by copying an existing process definition, using RUN_AR33000 as the page group, and adding the new process definition to the AR ALL security group.
Setting Up Follow-Up Letter Processing
To set up follow-up letters, use the use the Letter Code (LETTER_CD) component.
PeopleSoft Receivables ships letter codes for follow-up letters. The system requires that you use the letter code of F for follow-up letters.
PeopleSoft also delivers a sample follow-up letter that you can modify to fit your needs.
This section discusses how to:
Set up follow-up letter codes.
Modify the sample follow-up letter.
Page Used to Set Up Follow-Up Letter Codes|
Page Name |
Definition Name |
Navigation |
Usage |
|
Letter Code |
LETTER_CD_TBL |
Setup Financials/Supply Chain, Product Related, Receivables, Options, Letter Code, Letter Code |
Define letter codes for follow-up letters. |
Setting Up Follow-Up Letter Codes
Access the Letter Code page. (Select Setup Financials/Supply Chain, Product Related, Receivables, Options, Letter Code, Letter Code.)
|
Letter Code Type |
Select Follow Up Letter. |
Modifying the Sample Follow-Up Letter
PeopleSoft Receivables delivers a sample follow-up letter created using Crystal Reports that you can modify to create a follow-up letter that is more suitable to your organization's needs.
If you just want to change the text of the letter, use Crystal Reports to modify the AR33004.rpt file.
If you want to add one or two more database fields to the letter, you must change the PeopleSoft Application Engine extract, the query, and use Crystal Reports to change the report layout as follows:
Review the fields on the Customer Conversation Header table (CUST_CONVER_HDR) that store the data.
If more fields on this table must be used on the follow-up letter, add these fields to one of the conversation pages (Conversations, Reference, or Attachment) to enable users to enter data. If you do not see a field that provides the information that you want to appear on the follow-up letter, you must add that field to the table and to the page.
Add the new fields to the Follow Up Letters Extract Application Engine process (AR_FOLLOWUP) and the temporary table AR33004_TMP.
Add the new fields to the query.
Place the new fields on the report and update the letter layout.
Open the Crystal report directly in Crystal or in two-tier using PeopleSoft Application Designer.
Select Go, Query, then click the Run to Crystal Report button. Select Insert, Database Field, and select the new field from the list.
Use Crystal Reports to make any necessary format changes to the report.
Note. If you save the report file with a different name, you must create a process using the Process Definition page in PeopleSoft Enterprise Process Scheduler that follows the model of the existing AR33004 report. You also must create a new process definition that includes the two processes used to generate follow-up letters on the Job Definition page.
See Also
Entering and Reviewing Conversations
Setting Up Delivery Information for Correspondence
To set up delivery information for correspondence, use the Contact Info component (CONTACT_INFO).
This section provides an overview of correspondence delivery setup and discusses how to:
Specify the preferred delivery method and the email address for a contact.
Enter fax information.
See Also
Understanding Correspondence Delivery SetupIf you use fax or email delivery methods for correspondence, you must set up information for contacts. Dunning letters and statements use the contacts that you specified for the correspondence customer. Follow-up letters use the contacts that you specified for the bill to customer, unless you override the contact on the Letter Delivery page.
PeopleSoft Receivables interfaces with Merkur DeliveryWare from the Merkur Group to deliver correspondence by fax or email.
Note. You must purchase and install the Merkur DeliveryWare and Merkur Connector software to fax or email correspondence. You must also ensure that the logon value of the windows service BEA ProcMGR is This Account. Then, the specified windows user account should have printing permission to the printer where the Crystal Reports print. You also must define the appropriate paper size in the Crystal process type definition.
See Enterprise PeopleTools PeopleBook: Crystal Reports for PeopleSoft, "Using Crystal Reports."
Pages Used to Set Up Delivery Information for Correspondence|
Page Name |
Definition Name |
Navigation |
Usage |
|
CONTACT |
Setup Financials/Supply Chain, Product Related, Receivables, Options, Letter Code, Letter Code |
Enter general information about each contact, including the email address and preferred delivery method. |
|
|
CONTACT_PHONE_PAGE |
Click the Contact Phone and Type link on the Contact page. |
Enter phone information and the contact type for the internal and external contact. |
Specifying the Preferred Delivery Method and the Email Address for
a Contact
Access the Contact page. (Select Setup Financials/Supply Chain, Product Related, Receivables, Options, Letter Code, Letter Code.)
|
Email ID |
Enter the email address to which to send correspondence. |
|
Preferred Communication |
Select the type of delivery method for the document type: Email Only or Fax. |
Entering Fax InformationAccess the Contact Phone and Type page. (Click the Contact Phone and Type link on the Contact page. )
|
Phone Type |
Select FAX. |
|
Phone Number |
Enter the phone number for the fax machine to which you will send the correspondence. |