 Understanding History Calculations
This chapter provides an overview of history calculations and discusses how to:
Set up history IDs.
Set up aging.
Set up subcustomer qualifiers.
Set up parallel processing for Aging.
Note. This chapter is required. You must complete the tasks discussed in this chapter to implement history and aging.
Understanding History Calculations
Both the Receivable Update Application Engine process (AR_UPDATE) and the Aging Application Engine process (AR_AGING) update the system-defined customer history elements.
This section discusses:
Customer history calculations in the Receivable Update process.
Customer history calculations in the Aging process.
 Customer History Calculations in the Receivable Update Process
The Receivable Update process updates these system-defined customer history elements:
Average Days Late (AVGDAYS).
Days Sales Outstanding (DSO30 and DSO90).
Highest Balance (HI_BAL_AMT).
Weighted Average Days Late (WTAVGDAYS).
Weighted Average Terms (WTAVGTERMS).
Weighted Average Days Paid (WTAVGPAID).
Days late is the number of days between the due date and the accounting date of the entry that closed the item. The Receivable Update process calculates average days late as:
sum (days late) ÷ number of items
For example, suppose that a customer has these closed items: a 1,000.00 USD item 2 days late, a 2,000.00 USD item 5 days late, and a 3,000.00 USD item 4 days late.
The average days late for this customer = (2 + 5 + 4) ÷ 3, or 11 ÷ 3, or 3.67
Use the Receivable Update Request page to indicate that you want to update the Average Days Late figures for subcustomer levels (assuming subcustomer is enabled). The system date at the start of the Receivable Update run and the accounting calendar determine the accounting period for the result.
The Receivable Update process considers items only if they have been closed since the last time the history was updated.
It can exclude items for a variety of reasons:
The dispute reason governs exclusion of disputed items.
The deduction reason governs exclusion of deduction items.
The entry type governs exclusion by entry type.
The item was originally negative (such as a credit memo).
For each item that meets the inclusion criteria, the system determines the number of day's difference between the due date and the accounting date of the entry that closed the item. Consider two examples:
Payment in full.
A 1,000.00 AUD invoice is posted with an accounting date of September 1 and a due date of September 30. An 1,000.00 AUD payment with an accounting date of October 1 is posted on October 5, bringing the balance of the invoice to 0 AUD and changing its status from open to closed.
Days late = 1
Partial payment.
A 1,000.00 AUD invoice is posted with an accounting date of September 1 and a due date of September 30. A partial payment of 900.00 AUD with an accounting date of October 1 is posted against the invoice on October 5, bringing the balance of the invoice to 100.00 AUD. A 100.00 AUD credit memo with an accounting date of October 15 closes the invoice.
Days late = 15
Previous activity for the fiscal year and accounting period determine how the Receivable Update process updates history. If a value for Average Days Late does not exist for the fiscal year and accounting period, the Receivable Update process updates the history ID by adding the number of days and dividing by the count of closed items. Here are two examples:
Example one.
Two items are closed for a customer. One item is 10 days late, and the other is 5 days late. Total days late is 15, which when divided by 2 equals 7.5 Average Days Late.
Example two.
Two items are closed for a customer. One is 10 days late, and the other is 5 days early. Total days late is 5, which when divided by 2 equals 2.5 Average Days Late.
If a value for Average Days Late does exist, the system computes a running average. It adds the sum of the days late of the closed items to the product of the existing value and the number of existing closed items, and then divides by the sum of the existing items and the newly closed items. For example, the previous values are 15 days late, 3 items; the recent closed items values are 40 days late, 2 items. The formula is:
[(15 * 3) + 40)] ÷ (3 + 2) = 17 days late, 5 items
Days Sales Outstanding (DSO30 and DSO90)
Days sales outstanding (DSO) is reported as two different history IDs: a 30-day based figure and a 90-day based figure. The system uses the calculation year and period from the Receivables Options - Options 1 page as the basis for calculations to determine the accounting period for the resulting history.
Use the Receivable Update Request page to indicate whether you want to update the DSO and the subcustomer history DSO figures. You should request user-defined history when you request DSO, because DSO calculations use the SALES figures updated as part of user-defined history. If you run DSO alone, the results do not reflect the latest sales figures.
The Receivable Update process calculates DSO30 by multiplying the customer's current balance by 30 and dividing by prior period sales. The prior period is the DSO calculation period on the Receivables Definitions - Accounting Options 1 page, even if it crosses a fiscal year.
The Receivable Update process calculates DSO90 by multiplying the current customer balance by 90 and dividing by the sum of sales for the previous three periods. Use a view to sum sales for the three periods before the calculation period, even if a fiscal year boundary is crossed.
This is the highest balance for the customer for the accounting period. The system uses the system date at the time you run the Receivable Update process, as well as your accounting calendar, to determine the accounting period. If no activity occurs during an accounting period, the system does not create a history record for that period.
Weighted Average Days Late (WTAVGDAYS)
Use the Receivable Update Request page to indicate whether you want to update Weighted Average Days and Weighted Average Days Late figures for subcustomer levels (assuming that subcustomer levels are enabled). The system date at the start of the Receivable Update run and the accounting calendar determine the accounting period for the result.
The amount of the closed item is used to weight the days based on the assumption that a 100,000.00 EUR invoice paid 10 days late is more serious than a 10.00 EUR invoice paid 10 days late. The formula is:
sum (item amount * days late) ÷ sum (item amount)
The item amount is drawn from the first instance of item activity that has the same entry type as the closed item. Days late is the number of days between the due date and the accounting date of the item activity that closed the item.
For example, suppose that a customer has the following closed items: a 1,000.00 USD item 2 days late, a 2,000.00 EUR item 5 days late, and a 3,000.00 EUR item 4 days late. For this customer, WTAVGDAYS equals:
(1,000.00 * 2) + (2,000.00 * 5) + (3,000.00 * 4)] ÷ (1,000.00 + 2,000.00 + 3,000.00) = 24,000.00 ÷ 6,000.00 or 4
The Receivable Update process updates history for Weighted Average Days Late based on the previous activity for the fiscal year and accounting period. If a Weighted Average Days Late value does not already exist for this fiscal year and accounting period, the history is updated. If a Weighted Average Days Late value exists, a running average is computed, using additional information stored by customer history and subcustomer history, if appropriate, similar to the example for Average Days Late. The system date at the start of the Receivable Update run and the accounting calendar determines the accounting period for the result.
When an item is created, the Item Activity line contains an entry type. This entry type is stored with the item, unless a subsequent Item Activity line has an entry type with the Prevent Posting of Duplicate Entries option selected. In this case, the entry type stored with the item changes to the entry type of the subsequent entry.
The Prevent Posting of Duplicate Entries option is used when a debit or credit memo is posted before the invoice. Because the system uses the entry type on the item for aging redirection and correspondence inclusion, you can use the invoice entry type as the controlling entry type even though the invoice is not posted first. This is important because Weighted Average Days Late uses the amount associated with the controlling entry type rather than the original amount of the item.
Weighted Average Terms (WTAVGTERMS)
Weighted Average Terms calculates the average number of days allowed for a customer before payment is due, weighted according to the item amount. By default, the calculation is based on the accounting date unless the terms code on the item specifies a different basis date.
Customer payment terms impose limits on the allowable days, and a customer can buy with multiple payment terms. Some invoices can be due in 20 days, others in 30 or 40 days. For example, the Weighted Average Days Late calculation informs you that the customer pays, on average, 5 days late. However, that number is more meaningful when you know that the customer had an average of 25 days to make payments.
The Receivable Update process performs the calculations only if you select Payment Performance on the Receivable Update Request page. Settings on the Receivable Update Request page also determine whether the subcustomer history module runs (assuming it is enabled). The accounting period for the result is determined by the Receivable Update run date and your accounting calendar.
Weighted Average Days Paid (WTAVGPAID)
Weighted Average Days Paid is the number of days a customer takes to make payments. The average is weighted by the payment amount, on the assumption that a 1,000.00 USD payment is more significant than a 100.00 USD payment. Weighted Average Days Paid is calculated by adding weighted average terms and Weighted Average Days Late:
days allowed + days late = days taken
For example, weighted average terms of 25, plus Weighted Average Days Late of 5, means that the customer pays an average of 30 days from the invoice date—25 days were allowed, and 5 extra were taken.
The Receivable Update process performs the calculations only if you select Payment Performance on the Receivable Update Request page. Settings on the Receivable Update Request page determine whether the subcustomer history module runs (assuming it is enabled). The accounting period for the result is determined by the Receivable Update run date and your accounting calendar.
See Also
Creating Run Control IDs for Receivable Update
Customer History Calculations in the Aging Process
This section discusses the due and high-due formulas for each history calculation performed during aging.
The Due Family
The Aging process updates these history IDs:
Current Due
Future Due
Past Due
Other Due
The amounts are based on how you defined an aging ID (the sum category that you selected for each aging category). The history calculations are also affected by any special handling that was defined for entry types. The system date for starting the Aging run determines the fiscal year and accounting period.
The High-Due Family
The Aging process updates these history IDs:
High Current Due
High Future Due
High Past Due
High Other Due
The amounts are based on the highest amount reached for a given fiscal year and accounting period. The system date for starting the Aging run determines the fiscal year and accounting period.
Setting Up History IDs
To set up history IDs, use the System Defined History (SYSTEM_HIST_TABLE) and the User Defined History (CUST_HIST_TABLE) components.
This section discusses how to:
Review system-defined history IDs.
Define user-defined history IDs.
Note. You must define at least one user-defined history ID called SALES.
Pages Used to Set Up History IDs|
Page Name |
Definition Name |
Navigation |
Usage |
|
CUST_HIST_S_TABLE |
Setup Financials/Supply Chain, Product Related, Receivables, Options, System Defined History, System Defined History |
Link system-defined history IDs to the setIDs associated with customers for whom you want to track history. |
|
|
CUST_HIST_U_TABLE |
Setup Financials/Supply Chain, Product Related, Receivables, Options, User Defined History, User-Defined History |
Create the customer history IDs used to summarize history about customer receivables activity. For each history ID that you create, the system maintains the total specified customer activity for each fiscal year and accounting period. |
Reviewing System-Defined History IDs
Access the System Defined History page. (Select Setup Financials/Supply Chain, Product Related, Receivables, Options, System Defined History, System Defined History.)
This table lists the available system-defined history IDs:
|
History ID |
Description |
|
AVGDAYS |
Average Days Late |
|
CURRENTDUE |
Current Due |
|
DSO30 |
30 Days Sales Outstanding |
|
DSO90 |
90 Days Sales Outstanding |
|
FUTUREDUE |
Future Due |
|
HI_BAL_AMT |
High Balance Amount |
|
HI_CURRENT |
High Current Balance |
|
HI_FUTURE |
High Future Due |
|
HI_OTHER |
High Other Due |
|
HI_PAST |
High Past Due |
|
OTHERDUE |
Other Due |
|
PASTDUE |
Past Due |
|
WTAVGDAYS |
Weighted Average Days Late |
|
WTAVGPAID |
Weighted Average Paid |
|
WTAVGTERMS |
Weighted Average Terms |
Defining User-Defined History IDs
Access the User-Defined History page. (Select Setup Financials/Supply Chain, Product Related, Receivables, Options, User Defined History, User-Defined History.)
Define as many history IDs as you need.
The system requires a minimum of one user-defined history ID called SALES. The Receivable Update process uses the SALES history ID to calculate DSO. If you cannot use the name SALES for this history ID, then you must change the Receivable Update process to ensure that calculations for DSO are correct.
Note. If an entry type does not require an entry reason, you must list the entry type, but leave the entry reason blank. The history then includes those items with the entry reason that you indicated.
See Also
Setting Up Entry Types and Reasons
Setting Up Aging
To set up aging, use the Aging component (AGING_TABLE).
This section provides an overview of aging setup and discusses how to set up aging IDs.
Understanding Aging Setup
Aging IDs define how the Aging process and aging reports age open items. They also enable you to define unique rules for aging deduction, disputed, and collection items.
When you age deduction, disputed, and collection items, you choose to do one of the following:
Age them like normal open items and place them in a category based on the age of the item.
Define a separate category for either all disputed, deduction, or collection items, regardless of their age, or create a separate category for each type of item.
This categorization is useful when you do not want these item types aged in a date range, but you want to see the total aged amount for these types of items separately.
You can also set up separate categories based on the dispute or deduction reason, or the collection code.
Exclude deduction, dispute, or collection items from aging.
You have two options:
Exclude all deduction, disputed, or collection items aged using the aging ID or any combination of these item types.
For example, you can exclude deduction and disputed items, but age collection items normally.
Exclude deduction and disputed items by their reason or collection items by their collection codes.
For example, you can exclude authorized deductions that are associated with a promotion, but age the remaining deductions normally or in a deduction category.
The Aging process uses the aging ID assigned to the business unit to age items unless you override it for individual customers. The aging reports use the aging ID that you enter on the run control page to age the items on the reports.
Page Used to Define Aging IDs|
Page Name |
Definition Name |
Navigation |
Usage |
|
AGING_TABLE |
Set Up Financials/Supply Chain, Product Related, Receivables, Credit/Collections, Aging, Aging |
Defines aging IDs that describe how the system ages open items. |
Setting Up Aging IDs
Access the Aging page. (Select Set Up Financials/Supply Chain, Product Related, Receivables, Credit/Collections, Aging, Aging.)
When you run the aging reports or view aging information on inquiry pages, the system uses the aging categories that you define to determine in which bucket to place an item. Each category represents an age range for the items. For example, suppose that you run an aging report using the 30–60 aging ID, as shown in the Aging page. You use an as of date of March 1. If you created an item on January 15, the system puts the item in the 31–60 category, which indicates the item is between 31 and 60 days old. If you defined unique categories for deduction, disputed, or collection items, the system places items flagged as deductions, in dispute, or in collection in the appropriate category.
Dispute Aging, Deduction Aging, and Collection Aging
Note. Use the Entry Type page to place all items for an entry type in a specific aging category.
See Also
Setting Up Entry Types and Reasons
Setting Up Exception Reasons and Collection Codes
Setting Up SubCustomer Qualifiers
To set up subcustomer qualifiers, use the SubCustomer Qualifier 1 (SUBCUST1) and the SubCustomer Qualifier 2 (SUBCUST2) components. This section provides an overview of subcustomer qualifiers and list pages used to set up subcustomer qualifiers.
Understanding SubCustomer QualifiersUse subcustomer qualifiers to record history and aging information for a subset of your business with a customer or for a cross-section of your business across different customers. Based on the selection on the Installation Options - Overall page, the system can use one subcustomer qualifier, both qualifiers, or neither. If installation options enable both subcustomer qualifiers, you can limit their use for individual customers by allowing both, one, or none for a customer on the Miscellaneous General Info page.
If you elect to use one or both qualifiers, you must define valid qualifiers by tableset.
This table provides an example of how you might use subcustomers for a large customer to whom you sell and ship products throughout the world:
|
SubCustomer Qualifier 1 - Collector Locations |
SubCustomer Qualifier 2 - Shipping Locations |
|
Sydney |
New York |
|
London |
Tokyo |
You run the Receivable Update process to update DSO for the customer and discover that their DSO is at 40 days. If you select the SubCustomer check box when you run the Receivable Update process, you find that:
SubCustomer qualifier 1 shows that the DSO in Sydney is 60 days and in London is 20 days.
This result might mean that the collector in Sydney is not doing as good a job as the collector in London.
SubCustomer qualifier 2 shows that when shipments are made from Tokyo, payments are received in 25 days.
When shipments are made from New York, payments are received in 55 days. Therefore, the DSO for the entire customer is calculated at 40 days. You might use this information to contact customers in New York to determine if they are experiencing a problem with their shipments, so that you can correct the problem.
Note. SubCustomer qualifiers are also available as search criteria on some inquiry pages, such as the Item List page or the Outstanding Customer Payments page.
Pages Used to Define SubCustomer Qualifiers|
Page Name |
Definition Name |
Navigation |
Usage |
|
SUBCUST_QUAL1_TBL |
Set Up Financials/Supply Chain, Product Related, Receivables, Customers, SubCustomer Qualifier 1, SubCustomer Qualifier 1 |
Define the first set of customer qualifiers that the system uses to categorize the customers' data for recording balance, historical, aging, and reporting purposes. |
|
|
SUBCUST_QUAL2_TBL |
Set Up Financials/Supply Chain, Product Related, Receivables, Customers, SubCustomer Qualifier 2, SubCustomer Qualifier 2 |
Define the second set of customer qualifiers that the system uses to categorize the customers' data for recording balance, historical, aging, and reporting purposes. |
Setting Up Parallel Processing for Aging
This section provides an overview of parallel processing for aging and discusses how to:
Define the maximum instances for PSAdmin.
Define the maximum concurrent processes for the server.
Define the number of parallel processes.
Add more parallel processes to the Aging - Parallel multiprocess job (AR_AGE).
Add additional Aging process definitions.
Understanding Parallel Processing for the Aging Process
PeopleSoft Receivables enables you to process multiple Aging processes in parallel to achieve higher performance. You initiate the processes using one run control and the process automatically divides the work between the number of partitions that you specify in your setup.
The Aging - Parallel multiprocess job (AR_AGE) includes:
The Aging Parallel Preprocessor Application Engine process (AR_AGEPP).
The Aging Parallel multiprocess job (AR_AGE).
The following diagram illustrates the process flow of the AR Parallel Aging process (AR_AGE) for four separate AR jobs. After setting up the AR_AGE Run Control page, the AR_AGEPP application engine parallel preprocessor selects business units and customers, then the AR_AGE runs the job definition for the jobs AR_AGE1, AR_AGE2, AR_AGE3, and AR_AGE4. The AR_AGING Application Engine ages open items and updates customer aging categories for each job.
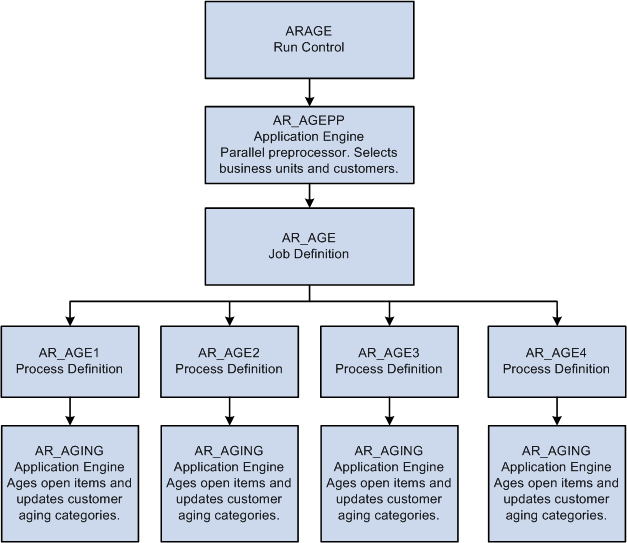
Aging parallel multiprocessing workflow for multiple jobs
When you use the Process Monitor to check the status of the process, you view the status of the Aging Parallel Preprocessor process (AR_AGEPP) and each process within the Aging Parallel multiprocess job (AR_AGE). The system does not indicate that the Aging - Parallel multiprocess job (AR_AGE) is successful until each parallel process completes. The Job Message Log Summary page summarizes all the individual parallel process message log messages for the entire AR_AGE job.
This section discusses:
AR_AGEPP process
AR_AGE multiprocess job
The Aging Parallel Preprocessor process (AR_AGEPP) acts as a preprocessor for the aging process and also:
Selects business units and customers for processing.
Places the qualified data in temporary tables.
Partitions the data between the child processes.
Initiates the Aging Parallel multiprocess job (AR_AGE) that starts child processes in parallel.
The distribution of the data among the child or parallel processes is based on the composition of the data and the number of parallel processes. The process attempts to spread the data volume evenly among the processors that you previously set up. The staging phase takes a little longer, but the overall processing time is faster because multiple children processes run concurrently. You should balance the decision of using parallel processing or single thread processing based on the volume of data and the hardware capacity to get the maximum benefit from this feature.
The Aging Parallel multiprocess job (AR_AGE) contains all the Application Engine process definitions that you use for parallel processing, such as AR_AGE1. Each process definition calls the AR_AGING Application Engine process, which actually ages the open items, updates the customer aging categories, and performs table cleanup before the process ends.
PeopleSoft Receivables delivers eight process definitions, AR_AGE1 through AR_AGE8. If you want to run more than eight partitions of the Aging process at once, you must define additional process definitions. Use the AR_AGE1 process definition as an example.
The standard setup for the Aging Parallel multiprocess job (AR_AGE) is to run a single threaded process and contains only the AR_AGE1 process definition. If you want to use parallel processing, you must assign additional process definitions to the job definition. You must also specify the number of partitions that your organization will use. You might have to experiment with the number of partitions that works for you. We recommend that you assign just a couple of additional partitions and increase the number, if needed.
You might also have to override the server settings for your organization. By default, you can run up to three instances of a process at one time. If you want to run additional instances, you must change your configuration. If you also use parallel processing for the Payment Predictor (AR_PREDICT), Statements (AR_STMT), and Receivable Update (AR_UPDATE) processes, the maximum instances apply to those processes, as well. For example, if you want to run eight instances for the Receivable Update process and four for the Aging process, you must configure your server for eight instances.
Pages Used to Set Up Parallel Processing for Aging|
Page Name |
Definition Name |
Navigation |
Usage |
|
SERVERDEFN |
PeopleTools, Process Scheduler, Servers, Server Definition |
Define the maximum concurrent processes for Application Engine processes. |
|
|
PARALLEL_AR_SBP |
Set Up Financials/Supply Chain, Install, Installation Options, Receivables Click the Parallel Processing Options link. |
Specify the exact number of parallel processes or partitions that you want for Aging. |
|
|
PRCSJOBDEFN |
PeopleTools, Process Scheduler, Jobs, Job Definition |
Add additional Aging process definitions to run the Aging Parallel multiprocess job (AR_AGE). |
|
|
PRCSDEFN |
PeopleTools, Process Scheduler, Processes, Process Definition |
Add additional Aging process definitions if you need to run more than eight parallel processes. |
Defining the Maximum Instances for PSAdmin
Open the PSAdmin tool on your server to change the configuration settings.
To change the maximum instances:
Scroll to the section titled Values for config section – PSAESRV.
The section looks as follows:
Values for config section - PSAESRV.

Max Instances = 3.

Recycle Count=0

Allowed Consec Service Failures=0.
Change the value for Max Instances to the maximum number of parallel processes that you want to run at once.
Defining the Maximum Concurrent Processes for the Server
Access the Server Definition page. (Select PeopleTools, Process Scheduler, Servers, Server Definition.)
|
Process Type and Max Concurrent |
For the Application Engine process type, enter the maximum number of parallel processes that you run at once. This figure must be the same or greater than the maximum instances that you defined for PSAdmin. |
See Also
Enterprise PeopleTools PeopleBook: PeopleSoft Enterprise Process Scheduler
Defining the Number of Parallel ProcessesAccess the AR Parallel Processing Options page. (Select Set Up Financials/Supply Chain, Install, Installation Options, Receivables, and click the Parallel Processing Options link.)
|
Parallel Process and Maximum Partitions |
Enter the exact number of partitions or parallel processes that you want to run for the AR_AGE parallel process. |
Adding More Parallel Processes to the AR_AGE Multiprocess JobAccess the Job Definition page for the AR_AGE job. (Select PeopleTools, Process Scheduler, Jobs, Job Definition.)
|
Run Mode |
Always select Parallel. |
|
Process Type and Process Name |
Enter Application Engine for the type and select from AR_AGE2 to AR_AGE8 for each separate partition or process that you want to run. If you define additional process definitions, select the name of the definitions that you added. Note. You must have the same number of rows in the process list as you enter in the Maximum Partitions field on the AR Parallel Processing Options page. |
|
Run Always On Warning and Run Always On Error |
You must select these check boxes. |
See Also
Enterprise PeopleTools PeopleBook: PeopleSoft Process Scheduler
Adding Additional Aging Process Definitions
Access the Process Definition page. (Select PeopleTools, Process Scheduler, Processes, Process Definition.)
Complete the fields on this page and the other pages in the Process Definition component (PRCSDEFN) to match the AR_AGE1 process definition, with two exceptions:
Use another name.
Use another description.
Use this format for the name: AR_AGE#, for example AR_AGE9.
See Also
Enterprise PeopleTools PeopleBook: PeopleSoft Process Scheduler