 (USF) Referring Delinquent Items to the DMS
This chapter discusses how to:
(USF) Refer delinquent items to the Debt Management Service (DMS).
(USF) Submit transactions between agencies using the Intra-Governmental Payment and Collection System (IPAC).
(USF) Reclassify receivables accounting entries, direct journal accounting entries, and open items.
(USF) Track memo status changes.
Write off by ChartFields.
(USF) Generate the Receivables Due From the Public report.
Generate the 1099-C report.
(USF) Create federal customer statements.
(USF) Referring Delinquent Items to the DMS
This section provides an overview of the delinquent debt referral process, lists prerequisites and common elements, and discusses how to:
Select items for referral.
Create a DMS referral file.
Create a debt adjustment file.
Process DMS receipts.
 Understanding the Delinquent Debt Referral Process
The Debt Collection Improvement Act (DCIA) requires that any non-tax debt or claim owed to the United States that has been delinquent for a period of 180 days be turned over to the DMS of the U.S. Department of Treasury for appropriate action. This is known as cross-servicing. Debts less than 180 days delinquent can be voluntarily submitted to private collection agencies and agency Debt Collection Centers (DCCs). These are referred to as pass-through debts.
Using the PeopleSoft Receivables Delinquent Accounts feature, you can:
Enter DMS information for individual items on the DMS Information page.
Select items for referral.
Run the DMS Referral Application Engine process (AR_DMSREFRRL) to create the electronic flat file for submission to the DMS.
Run the DMS Adjustment Application Engine process (AR_DMSADJST) to create an electronic flat file containing adjustments and corrections to previously referred debt for submission to the DMS.
Run the DMS Process Receipts Application Engine process (AR_DMSRECEIP) to process any inbound files from the DMS containing collections or adjustments against the previously referred debt.
You can verify that each process runs successfully by viewing the log files for errors.
Prerequisites
Before creating debt referral files:
Enable DMS processing by selecting the DMS Interface check box on the Installation Options - Receivables page.
Enter business unit-level DMS data on the DMS Information page.
Enter customer DMS information in the DMS Customer 1, DMS Customer 2, and DMS Customer 3 pages.
See Also
(USF) Defining Debt Management Information
Defining Receivables Installation Options
Entering Customer DMS Information
Common Elements Used in This Section|
Admin Debt Classification (administrative debt classification) |
Select the appropriate value for credit bureau reporting. Values are Employee Advance, Fee, Fine, Miscellaneous Debt, Overpayment, and Penalty. |
|
Business Unit |
Enter the business unit for which you want to select items for referral. Generally, you process referrals monthly for a given business unit. |
|
Program ID |
Enter a code that enables the DMS to group related debts in their system for processing under specific business rules. |
|
Referral Type |
Select the type of referral for the items. Values are: Passthrough: Debts for referral to the Debt Management Service Center (DMSC) and Financial Management Service (FMS) system for referral to Private Collection Agencies (PCAs) under existing FMS contracts. Cross-Servicing: Debts for referral to the DMS for general collection activities. |
|
Destination File Name |
Enter the file path and file name of the delinquent account file that you are creating. |
|
Secured Debt |
Select to indicate that the debt is secured with collateral. |
|
Manual Selection |
Select to refer debts that are less than 180 days. |
Pages Used to Refer Delinquent Items to the DMS|
Page Name |
Definition Name |
Navigation |
Usage |
|
View/Update Item Details - Detail 1 |
ITEM_MAINTAIN |
|
View item information and access the DMS Information page. |
|
DMS_ITEM_SEC |
Click the DMS Information link on the View/Update Item Details - Detail 1 page. |
Update DMS information for the item. |
|
|
DMS_CONTROL |
Accounts Receivable, Customer Accounts, Delinquent Accounts, Select Referral Items, Select Referral Items |
Select items to be referred to the DMS. |
|
|
DMS_REFERRAL |
Accounts Receivable, Customer Accounts, Delinquent Accounts, Create Referral File, Create Referral File |
Create a file of referred debt for submission to the DMS. |
|
|
RUN_DMS_ADJST |
Accounts Receivable, Customer Accounts, Delinquent Accounts, Create Adjustment File, Create Adjustment File |
Create a file of subsequent collections and adjustments of previously referred debt. |
|
|
RUN_DMS_RECEIPT |
Accounts Receivable, Customer Accounts, Delinquent Accounts, Process Receipts, Process Receipts |
Process an inbound file of collections or adjustments against previously referred debt. |
Selecting Items for ReferralAccess the Select Referral Items page. (Select Accounts Receivable, Customer Accounts, Delinquent Accounts, Select Referral Items, Select Referral Items.)
Select a business unit and referral type. The system processes one file for each business unit and referral type combination.
The page displays delinquent items for referral.
Viewing Item-Level Information
For each item listed in the grid, you can view the business unit, item ID, customer ID, and due date.
|
|
Click the View Detail button for an item to access the View/Update Item Details - Detail 1 page and access and change the DMS information for the item. |
|
Selected Flag |
Select to mark individual items for referral. |
Viewing and Adjusting DMS Information
Select the DMS Detail tab to view the DMS Information for the item. This information is automatically supplied based on the business unit and customer DMS setup. You can override these default values as needed.
Creating a DMS Referral FileAccess the Create Referral File page. (Select Accounts Receivable, Customer Accounts, Delinquent Accounts, Create Referral File, Create Referral File.)
Select the business unit for which you want to create the referral file, the referral type that you want to process (Cross-Servicing or Passthrough), and enter the file path and name for the destination file.
Run the DMS Referral process to create the referral file for the DMS.
Creating a Debt Adjustment File
Access the Create Adjustment File page. (Select Accounts Receivable, Customer Accounts, Delinquent Accounts, Create Adjustment File, Create Adjustment File.)
Select the business unit and enter the destination file path and name.
Run the DMS Adjustment process. This process generates a file of subsequent adjustments or collections for debt that was previously referred to the DMS.
Processing DMS ReceiptsAccess the Process Receipts page. (Select Accounts Receivable, Customer Accounts, Delinquent Accounts, Process Receipts, Process Receipts.)
|
Attached File |
Displays the name of the file received from the DMS. |
|
|
Click the Add Attachment button to browse for the file to attach. Once you have located the file, click the Upload button to load the file. |
|
|
Click the Delete Attachment button to delete the currently selected attachment. |
|
|
Click the View Attachment button to view the currently selected attachment. |
Run the DMS Process Receipts process to insert delinquent account data from the DMS into the Pending Item PS_PENDING_ITEM table using the DMS Inbound process.
Completing the Process Receipts Process
To complete the Process Receipts process:
Check the message log for errors.
View the group using the External Pending Item Entry component (ENT_EXTAID_UPDT) and select a posting action for the group.
Run the Receivable Update Application Engine process (ARUPDATE) to post the pending items.
See Also
(USF) Submitting Transactions Between Agencies Using the IPAC System
This section provides an overview of IPAC processing, lists prerequisites, and discusses how to:
Enter IPAC information for an item.
Enter additional IPAC information.
Enter override options for the Format EFT File Application Engine process (FIN2025).
Understanding IPAC Processing
The IPAC system is maintained by the U.S. Department of Treasury for intra-governmental transactions. The IPAC system transmits billing information electronically, using a formatted file, to the U.S. Department of Treasury specifications so that bills and payments can be applied to the correct account. If your organization requires that you use the IPAC system, you can use PeopleSoft Receivables to create an extract file with receivables data that you send to the U.S. Department of Treasury. You create a request to collect funds from customers that are federal agencies by creating a flat file in PeopleSoft Receivables and sending the file online or in a bulk file connection to the IPAC system.
PeopleSoft Receivables supports four types of IPAC transactions:
Collection, which is associated with the 810 format.
Use this transaction type to collect funds from other agencies.
Adjustment, which is associated with the 812 format.
Use this transaction type to correct payment or collection information received by your agency, including the amount and the Standard General Ledger (SGL) account information. This transaction type is not available if you initiated the IPAC transaction.
Note. A credit item cannot be selected for refund processing until an IPAC adjustment transaction is entered. If an item that belongs to a customer, who requires IPAC processing, is selected for refund and the adjustment transaction is not created for the item, then an error message appears on the Maintenance Worksheet - Worksheet Application page.
Zero dollar, which is associated with the 835 format.
Use this transaction type to add or change collection information that you sent in an earlier transmission. This transaction type does not change the transaction amount or SGL account information.
Post SGL, which is associated with the 840 format.
Use this transaction type to add or change SGL account information for previously received or sent transactions. You can add or change the sender's information, the receiver's information, or both.
The system includes transactions in the file only if they are marked as Not Processed in the IPAC record.
This diagram shows the flow of the IPAC information. Your agency creates an item, enters the IPAC information, and creates an EFT file, which is sent to the Treasury Department and updated in the IPAC system. The Treasury Department sends the IPAC file to another agency, which creates the payment.
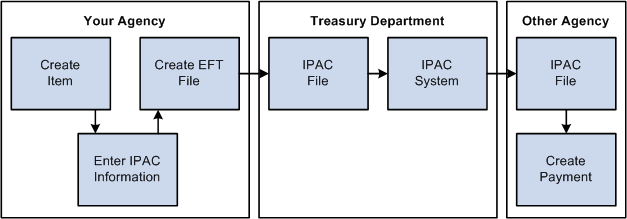
IPAC processing from your agency to the Treasury Department to another agency where payments are created.
See Also
Changing and Reviewing Item Information
Prerequisites
Before you export PeopleSoft Receivables transactions to IPAC:
Enable the IPAC interface on the Installation Options - Receivables page.
Assign an IPAC billing agency location code and sender DO (disbursing office) to a setID for each business unit.
When defining customers, select the options for the IPAC interface and the customer agency location code.
Select a primary IPAC contact for each customer.
If you want to automatically supply the SGL account information, you must perform these tasks:
Create entry event codes that include the WS-01 step for the ARUPDATE entry event process on the Entry Event Code Definition page.
Add two ChartField attributes for accounts to which IPAC processing applies on the ChartField Attributes page:
IPAC: Enter Y for the ChartField attribute value.
USSGL: Enter the four-character SGL account that you want to interface with the IPAC system for the ChartField attribute value.
When you run the Receivable Update process (ARUPDATE), the system compares the GL accounts in the entry event code definition to the Account ChartField attributes to determine whether IPAC processing applies. If IPAC processing applies, the system uses the four-character GL account that you enter for the USSGL attribute value to populate the SGL Account fields.
If invoices are loaded from an external billing source, the IPAC interface option is selected on the Installation Options - Receivables page, and the IPAC interface option is selected for the customer who is associated with the invoice, then the Receivable Update process performs these edits:
Billing ALC - The pending item is marked in error if the ALC is not defined on the Receivables Business Unit options page.
Sender DO - The pending item is marked in error if the sender do is not defined on the Receivables Business Unit options page.
Customer ALC - The pending item is marked in error if the ALC is not defined on the Customer-General Options page.
Sender TAS - The pending item is marked in error if the TAS string is not defined and associated with the fund code on the item AR accounting line.
Unit Price - The pending item is marked in error if the item entry amount is zero.
SGL Account - The pending item is marked in error if the SGL Account is not defined and associated with an entry event code on the item.
Obligation Document and Purchase Order Id - Both fields default from the Purchase Order reference field. The pending item is marked in error if the purchase order reference is not populated.
See Also
Defining Receivables Installation Options
Adding Customer Names and Levels and Assigning Roles
Defining and Using Account Types and Attributes
Setting Up and Generating Federal Government and Statutory Reports
Pages Used to Submit Transactions Between Agencies Using IPAC|
Page Name |
Definition Name |
Navigation |
Usage |
|
View/Update Item Details - Detail 1 |
ITEM_MAINTAIN |
Accounts Receivable, Customer Accounts, Item Information, View/Update Item Details, Detail 1 |
Change information about open and closed items. |
|
AR_IPAC_SEC |
Click the Transfer to IPAC Transactions link on the View/Update Item Details - Detail 1 page. |
Enter information required by IPAC. |
|
|
AR_IPAC_DESCR_SEC |
Click the Description link on the Receivable IPAC Transactions page. |
Enter a detailed description for an IPAC transaction. |
|
|
AR_IPAC_MISC_SEC |
Click the Misc Info (miscellaneous information) link on the Receivable IPAC Transactions page. |
Enter additional text to describe an IPAC transaction and additional sender and receiver information. |
|
|
AR_IPAC_SGLCMT_SBP |
Click the SGL Comments link on the Receivable IPAC Transactions page. |
Enter standard general ledger comments. |
|
|
PRCSDEFNOVRD |
PeopleTools, Process Scheduler, Processes, Override Options |
Enter override options for the Format EFT File process. |
|
|
IPAC_EXP_RQST |
Accounts Receivable, Receivables Maintenance, Request IPAC Interface, AR IPAC Run Request |
Run the Format EFT File process, which creates a file that can be uploaded to IPAC. |
Entering IPAC Information for an Item
Access the Receivable IPAC Transactions page. (Click the Transfer to IPAC Transactions link on the View/Update Item Details - Detail 1 page.)
Some of the information displayed on this page comes from the default values for IPAC that you assigned to business units, customers, and contacts. You can override the default values as needed.
Entering IPAC Header Information
Entering Detail Information
Only the Original Line Item Number field is available for adjustment types. No other fields are available.
|
Trace ID |
Displays the user-assigned identification number to enable back-end systems to match transactions. |
|
Cross Ref Doc (cross-reference document) |
Displays the document reference number on the header of the original transaction. This field appears only for zero dollar transaction types. |
|
Original Line # (original line number) |
Displays the detail line number from the original transaction, which is used for adjustments only. |
|
Misc Info (miscellaneous information) |
Click to add additional information about the transaction. |
|
Description |
Click to add information about the IPAC description. |
|
Quantity |
Displays the quantity amount that can be used to verify that the amount on each IPAC detail record equals the quantity times unit price, except for the Zero Dollar record type. |
|
UOM (unit of measure) |
Displays the units by which goods and services are measured. This field is not available for adjustment type. |
|
Unit Price |
Displays the total amount of each IPAC unit, which is quantity multiplied by unit price. This field is required for payment and collection. |
|
Obligation Doc (obligation document) |
Displays the billing agency's internal accounting document associated with a specific bill. |
|
Final Pay |
Select to indicate whether a payment is final (F) or partial (P). |
|
Contract |
Displays a number that uniquely identifies a contract between two trading partners. |
|
Contract Line |
Displays a contract line item number. |
|
Requisition |
Displays whether a payment is from a requisition or a partial payment. |
|
PO ID (purchase order ID) |
Displays a purchase order number. This field is required for IPAC collections. A PO must exist before IPAC is created. |
|
Contact Name and Phone |
Displays information about the primary IPAC contact that you assigned to a customer. |
Entering Sender/Receiver TAS/BETC Information
The fields that are available in this section vary based on the IPAC transaction type. This table shows the fields that are available based on the IPAC type:
|
IPAC Transaction Type |
Available Fields |
|
Collection |
All fields. |
|
Adjustment |
All fields except sender and receiver DUNS and DUNS4. |
|
Zero Dollar |
All fields except sender and receiver BETC. |
|
TAS (treasury account symbol) |
For the sender, select the account number assigned by the U.S. Department of Treasury to classify transactions. Indicates the agency that initiated the billing. For the receiver, select the account of the fund that will receive the payment. |
|
BETC (business event type code) and |
Select the code used in the Government-wide Accounting and Modernization Project (GWA) system to indicate the type of activity being reported, such as payments, collections, and so on. This code must accompany the Treasury Account Symbol (TAS) and the dollar amounts to classify the transaction against the fund balance with the Treasury. |
|
DUNS (Dun and Bradstreet number) and |
Enter the Dun and Bradstreet number used to identify the sender (your agency) or the receiver (the customer's agency). The sender DUNS appears by default from the values defined on the Receivables Business Unit Options page. The receiver DUNS appears by default from the values defined on Customers - Additional General Information page. |
|
DUNS4 |
Enter the four-character identifier, along with the DUNS number, which identifies individual business locations for federal vendors and federal customers. The sender DUNS4 appears by default from the values defined on the Receivables Business Unit Options page. The receiver DUNS4 appears by default from the values defined on Customers - Additional General Information page. |
|
Department |
Displays the receiver department code of the customer. This field appears by default from the first two characters of the Customer ALC. |
Entering SGL Information
If you entered an entry event code for the item in PeopleSoft Billing or during pending item entry on the Pending Item 1 page, the Receivable Update process populates the fields in the SGL Information grid. You can override the values if needed. If you did not enter an entry event code, you must enter SGL account information for Post SGL transaction types, and you can optionally enter SGL account information for the Collection and Adjustment transaction types. The SGL information fields are not available for zero dollar transaction types.
Entering Additional IPAC InformationAccess the IPAC Miscellaneous Description page. (Click the Misc Info (miscellaneous information) link on the Receivable IPAC Transactions page.)
Enter comments about the collection request in the text box.
|
Fiscal Year Obligation ID |
Select a value to indicate the fiscal year of the obligation. Values are Not Applicable, Current Fiscal Year, and Prior Fiscal Year. |
|
ACL/CD (account classification code) |
Displays a project code and is supplied to the billing agency by the customer on the original request for services. |
|
ACRN (account classification reference number) |
Appears for adjustment type only. |
|
Job |
Not available for adjustment type. |
|
JAS (job agency site) |
Displays a combination of job order number, accounting classification record number, and site ID. |
|
FSN (fiscal station number) |
Displays an 8-digit number identifying the subdivision of an agency location code. |
|
DoD (activity address code) |
Displays the activity address code. |
The fields that are available on this page vary based on the IPAC transaction type. This table shows the fields that are available based on the IPAC type:
|
IPAC Transaction Type |
Available Fields |
|
Collection |
All fields. |
|
Adjustment |
All fields. |
|
Zero Dollar |
All fields except Fiscal Year Obligation ID. |
|
Post SGL |
Only the text box. |
Entering Override Options for the Format EFT File ProcessAccess the Override Options page. (Select PeopleTools, Process Scheduler, Processes, Override Options.)
If you run PeopleSoft Receivables on a DB2 database on a Microsoft Windows NT or IBM OS390 server, you must manually insert an owner ID parameter in the list of parameters for the process definition before you can run the Format EFT Files process.
|
Parameters List |
Enter Prepend. |
|
Parameters |
In the Parameters field next to the Parameters List field, enter %%OWNERID%% :EFT_WRK_PARM1 as shown in the preceding example. Note that a space is between the owner ID parameter ( %%OWNERID%%) and :EFT_WRK_PARM1. |
Running the Format EFT File ProcessAccess the AR IPAC Run Request page. (Select Accounts Receivable, Receivables Maintenance, Request IPAC Interface, AR IPAC Run Request.)
|
IPAC Interface Options |
Select an IPAC Interface option: Values are Generate for All Units, Generate for One Unit, Generate for One Customer, and Rerun for Previous Job. |
(USF) Reclassifying Receivables Accounting Entries, Direct Journal
Accounting Entries, and Open Items
To set up agency location codes (ALCs) and government wide accounting (GWA) reporting options for reporting, use the Agency Location component (AGENCY_LOC_CD).
To create Partial SF224 reports, use the SF224/ SF1220 Report Definition component (SF224_SF1220_DEFN).
This section provides an overview of Partial SF224 reporting and discusses how to:
Reclassify receivables item accounting entries.
Reclassify direct journal accounting entries.
Reclassify open receivables items.
Understanding Partial SF224 ReportingThe Financial Systems Integration Office (FSIO) has issued Core Systems Requirements that impact the SF224 report and the electronic interface that is used to report cash receipt and cash disbursement activity by Agency Location Code (ALC) to the U.S. Treasury. The FSIO Core System Requirements are based on new Government-wide Accounting (GWA) Partial 224 Business Rules. The GWA business rules set the stage for ultimately phasing out the SF-224 report over the next several years and replacing it with the Partial SF224 report. The new GWA Business Rules dictate how specific activity is to be excluded from SF224 reporting as the U.S. Treasury systems are modified in the future. When agencies can finally report cash activity by the Business Event Type Codes (BETC), the agencies will report only non-BETC-coded cash activity and cash reclassifications using the Partial SF224 report.
The U.S. Treasury will be implementing the BETC for federal agencies to use to identify and report specific information about cash receipt and disbursement transactions in lieu of that provided by the SF224 report. The BETC is being implemented by the U.S. Treasury during the next few years for IPAC (collections and payments), Cashlink II (collections), Electronic Certification System (payments), and the Treasury Disbursement Office (TDO) systems.
Agency financial systems will be modified so that the BETC code can be specified for all cash transactions. The evolution of the BETC drives the need for agency financial systems in the short term to be configurable so as to identify those interfaces (IPAC, CA$HLINK, TDO Payments) when they are modified to pass BETC with the associated cash activity to the U.S. Treasury.
Note. The Partial 224 report will not be available for use
until the U.S. Treasury implements BETC.
Contact the U.S. Treasury Financial Management Service (FMS) for its
schedule for implementation of the BETC. Until such time as the BETC is implemented
by the FMS, you must continue to produce the full SF224 - Statement of Cash
Transactions report.
See Also
Defining, Generating, Creating, and Printing SF224, SF1219, and SF1220 Reports
(USF) Setting Up Agency Location Codes
Pages Used to Reclassify Accounting Entries and Items|
Page Name |
Definition Name |
Navigation |
Usage |
|
Reclassify AR accounting entries |
PAR224_ARENTRIES |
Accounts Receivable, Receivables Maintenance, Reclassify AR Entries |
Change the fund associated with posted accounting entries. You can reclassify the entire stream of the transaction. The reclassification entries are recorded in the PS_ITEM_DST table with a sequence number starting from 600. |
|
Reclassify Direct Journal Entries |
PAR224_DIRJRNL |
Accounts Receivable, Receivables Maintenance, Reclassify Direct Jrnl Entries |
Identify accounting entries for direct journals and reclassify the entries to correct the fund. The reclassification entries are recorded in the PS_PAY_MISC_DST table with a line number starting from 600. |
|
Transfer Selection |
PAR224_TRANSFER |
Accounts Receivable, Receivables Maintenance, Reclassify Open Item |
Create a new worksheet or add items to a transfer worksheet. |
|
Worksheet1 |
TRN_WORKSHEET1 |
Accounts Receivable, Receivables Maintenance, Reclassify Open Item, Worksheet 1 |
Select the items to transfer. |
|
Worksheet2 |
TRN_WORKSHEET2 |
Accounts Receivable, Receivables Maintenance, Reclassify Open Item, Worksheet 2 |
Override the default receivable distribution code. |
|
Transfer Action |
TRN_ACTION |
Accounts Receivable, Receivables Maintenance, Reclassify Open Item, Transfer Action |
Select a posting action for a worksheet. Also use this page to delete a worksheet, create accounting entries online for the worksheets, or to delete accounting entries. |
Reclassifying Receivables Accounting EntriesAccess the Reclassify AR accounting entries Page. (Select Accounts Receivable, Receivables Maintenance, Reclassify AR Entries.)
|
Item Search |
Click to display the accounting lines that match the entered business unit, item ID, customer ID, fund code, and accounting date. |
|
Selection Criteria |
Select the types of entries to display in the Accounting Lines area. the values are All Entries and Reclassification Entries. |
|
Update |
Click to generate new accounting entries for the selected accounting lines after you have entered the appropriate fund code and accounting date. The system generates reversal entries for the selected accounting lines and creates new accounting entries with the following attributes:
|
Reclassifying Direct Journal Accounting EntriesAccess the Reclassify Direct Journal Entries page. (Select Accounts Receivable, Receivables Maintenance, Reclassify Direct Jrnl Entries.)
|
Search |
Click to display the accounting lines that match the entered deposit unit, payment sequence, fund code, and accounting date. |
|
Selection Criteria |
Select the types of entries to display in the Accounting Lines area. the values are All Entries and Reclassification Entries. |
|
Update |
Click to generate new accounting entries for the selected accounting lines after you have entered the appropriate fund code and accounting date. The system generates reversal entries for the selected accounting lines and creates new accounting entries with the following attributes:
|
Reclassifying Open Receivables ItemsThis section discusses how to:
Build a transfer worksheet for reclassifying receivables items.
Reclassify open receivables items.
Modify the distribution code.
Choose an action for a receivables reclassification worksheet.
Building a Transfer Worksheet for Reclassifying Receivables Items
Access the Transfer Selection page. (Select Accounts Receivable, Receivables Maintenance, Reclassify Open Item.)
Enter your customer and reference selection criteria.
|
Build |
Click to build a worksheet that reclassifies an open item. |
See Building a Customer or Business Unit Transfer Worksheet.
Reclassifying Open Receivables Items
Access the Worksheet1 page. (Select Accounts Receivable, Receivables Maintenance, Reclassify Open Item, Worksheet 1.)
|
Sel (select) |
Select the items to reclassify. |
Modifying the Distribution Code
Access the Worksheet2 page. (Select Accounts Receivable, Receivables Maintenance, Reclassify Open Item, Worksheet 2.)
|
Dist ID AR (receivables distribution code) |
Override the default distribution code that was assigned to the business unit. For reclassification, use the RECLASSIFY distribution code. |
See Modifying Item Information.
Choosing an Action for a Receivables Reclassification Worksheet
Access the Transfer Action page. (Select Accounts Receivable, Receivables Maintenance, Reclassify Open Item, Transfer Action.)
See Selecting a Transfer Worksheet Action.
(USF) Tracking Memo Status Changes
This section provides an overview of the track memo status changes process, lists prerequisites, and discusses how to:
Check an item's current memo status.
Change an item's memo status.
Run the Memo Status Changes report.
Understanding the Track Memo Status Changes Process
The DMS requires you to maintain account information about individual accounts receivable. To support this requirement, PeopleSoft Receivables enables you to track multiple statuses for a receivable item.
This involves:
Updating the memo status and details on the View/Update Item Details - Detail 2 page.
Running the Memo Status Changes report, which lists, by item, the history of changes to the memo status field.
Two tables are required to use the track memo changes:
The Memo Status Codes table (PS_MEMO_STATUS_TBL) contains the valid statuses.
The Memo Status Changes Control table (PS_ ITEM_MEMO_CHGS) contains each change made to the memo status field, along with the user ID.
Prerequisites
Before tracking memo status:
Enable the Track Memo Status Changes feature by selecting the Use Memo Status check box on the Installation Options - Receivables page.
Set up memo status codes.
See Also
(USF) Setting Up Memo Status Codes
Defining Receivables Installation Options
Pages Used to Track Memo Status Changes|
Page Name |
Definition Name |
Navigation |
Usage |
|
View/Update Item Details - Detail 2 |
ITEM_MAINTAIN_2 |
Accounts Receivable, Customer Accounts, Item Information, View/Update Item Details, Detail 2 |
Check an item's current memo status. |
|
MEMO_STATUS_SEC |
Click the Detail button on the View/Update Item Details - Detail 2 page. |
Add and maintain a history of memo status code changes. |
|
|
RUN_AR34006 |
Accounts Receivable, Customer Accounts, Item Information, Memo Status Change Report, Memo Status Changes |
Generate the Memo Status Changes report (AR34006). Use the report to see the history of memo status changes by item. |
Checking an Item's Current Memo Status
Access View/Update Item Details - Detail 2 page. (Select Accounts Receivable, Customer Accounts, Item Information, View/Update Item Details, Detail 2.)
|
Memo Status Code |
Displays the current memo status for the item. This field appears only if you have enabled this feature on the Installation Options - Receivables page. |
|
Detail |
Click to access the Memo Status Changes page, where you can review a history of status changes for the item and add a status change as needed. |
Changing an Item's Memo StatusAccess the Memo Status Changes page. (Click the Detail button on the View/Update Item Details - Detail 2 page. )
Change an item's memo status by adding a new row to the Memo Status Changes grid.
Running the Memo Status Changes ReportAccess the Memo Status Changes (report) page. (Select Accounts Receivable, Customer Accounts, Item Information, Memo Status Change Report, Memo Status Changes.)
You can specify a date range for the report, a specific business unit, a customer ID, and whether to include closed items on the report. If you specify a date range, the report includes only items with a memo status change within the specified date range.
Writing Off by ChartFieldsThis section provides an overview of the Write-Offs By ChartField Application Engine process (AR_WOBYCF) and discusses how to run the Write-Offs by ChartField process.
Understanding the Write-Offs By ChartField Application Engine Process
The Write-Offs By ChartFields process searches for items that contain distribution lines with ChartField values that match the selection criteria that you enter on the run control. Run this process to close out a specific ChartField, such as a Fund. If all the distribution lines for an item qualify, the process assigns the entire open amount of the items to a pending group and sets the posting action to Batch Standard. The next time you run the Receivable Update process, the process writes off the items and closes the group. If the qualifying distribution lines for an item make up only a portion of the open amount, the Write Off by ChartField process assigns the remaining balance of the items to a maintenance worksheet. You must access the maintenance worksheet and decide how to write off the item.
Page Used to Write Off by ChartField|
Page Name |
Definition Name |
Navigation |
Usage |
|
AR_WOBYCF_REQ |
Accounts Receivable, Receivables Maintenance, Automatic Maintenance, Write-Offs by Chartfield, Write Offs By ChartField |
Enter ChartField selection criteria to select items to write off by running the Write Off by ChartField process. |
Running the Write-Offs By ChartField Process
Access the Write-Offs By ChartField page. (Select Accounts Receivable, Receivables Maintenance, Automatic Maintenance, Write-Offs by Chartfield, Write Offs By ChartField.)
Select a business unit and customer to process. You can process only one business unit at a time. The system uses the setID for the business unit to provide prompt values for the customer and the write-off reason.
|
Write-off Reason |
Enter an entry reason that the process assigns to the write-off items that it creates. |
|
Field Name |
Select the ChartField values that you want to select in the ChartField value fields. |
|
ChartField Value and ChartField TO Value |
Select the range of ChartField values that are in the distribution lines for the items that you want to write off. |
Treasury Report on Receivables (TROR) and Debt Collection Activities
This section provides an overview of the Treasury Report on Receivables (TROR) and Debt Collection Activities, and describes how to:
Add a TROR Template.
Update a TROR Template.
Set up the Reporting Entity Code.
Generate the Treasury Report on Receivables.
Understanding TROR and Debt Collection Activities
The Treasury Report on Receivables and Debt Collection Activities is the U.S. Department of Treasury's means for periodically collecting data on the status and condition of the federal government's nontax department portfolio in accordance with the requirements of the Debt Collection Act of 1982 and the Debt Collection Improvement Act of 1996 (DCIA).
This report creates a form used by the U.S. Department of Treasury to collect data on the status and condition of the federal government's non-tax debt portfolio. This report is used if an agency has debts but is pursuing them through collection. The Department of Treasury shares the information in this report with other government agencies, some private sector organizations, and the public.
Process Flow
Set up the following:
Receivables Installation Options
Receivables Types
Customer Types
Delinquency Codes
TROR Templates
Reporting Entity Codes
Assign an entity code and receivable type to an item in one of the following places:
TROR Report Types page, which you access from the Pending Item 1 page.
This assigns the codes to pending items.
View/Update Item Details - Detail 2 page.
This assigns the codes to posted items.
Post pending items by running the Receivable Update process.
Assign a delinquency code on the Item Delinquency page to items whose amounts you want to include in various report lines.
Access Treasury Report on Receivables, enter report parameters, and run the report.
View the XML and PDF report output in the Report Manager.
You must perform these setup procedures prior to setting up and updating one or more TROR templates:
Access the Receivables installation options page (Set Up Financials/Supply Chain, Installation Options, Receivables) and select the Treasury Report on Receivables check box to enable the fields and buttons that are associated with the Treasury Report on Receivables report to appear on the business unit, pending item entry, and item maintenance pages.
Access the Add a Report Template page (Set Up Financials/Supply Chain, Product Related, Receivables, TROR Report, Add Report Template) to define a new report template name and version.
Access the Update Report Template page (Set Up Financials/Supply Chain, Product Related, Receivables, TROR Report, and Update Report Template) to search for the template that you just added and set up the characteristics of each system-defined line, which is associated with a system-defined part and section.
Access the Receivable Type page (Set Up Financials/Supply Chain, Product Related, Receivables, and Options, Receivable Type) to define the codes that represent the receivable types.
Access the Reporting Entity Code page (Set Up Financials/Supply Chain, Product Related, Receivables, and Options, Reporting Entity Code) to define the report entity codes for the government agencies and divisions to which the Treasury Report on Receivables is submitted.
The entity code component now includes TROR reporting options. These reporting options enable users to set up and report behavior and map Receivable business units to the entity code.
Access the Delinquency Code page (Set Up Financials/Supply Chain, Product Related, Payments, and Delinquency Code) to define delinquency codes.
Note. You can also set up user-defined customer types.
TROR Template
The TROR Template provides you with the flexibility to set up one or more effective dated report templates. There are two ways to add a TROR Template:
Access the Add a Report Template page (Set Up Financials/Supply Chain, Product Related, Receivables, TROR Report, Add Report Template) to define a new report template name and version. Next, access the Update Report Template page (Set Up Financials/Supply Chain, Product Related, Receivables, TROR Report, Update Report Template) to search for the template that you just added and set up the characteristics of each system-defined line, which is associated with a system-defined part and section.
Access the Update Report Template search page (Set Up Financials/Supply Chain, Product Related, Receivables, TROR Report, Update Report Template) to search for an existing template. Click the Copy Template icon on the Report on Receivables Setup page to display the Report on Receivables Template Copy page. You can select a new setID and enter a new template name on this page. The version is display only and is controlled by the system defined version control table. For example, user can create a new template using sample template TRORV1 under SetID SHARE, report version 2007.01, if wish to reuse the set up data for the sample template.
Once the new template has been copied, you can return to the Update Report Template search page and search for the new template that you just created. You can modify the characteristics of this template as needed.
Use the TROR template to select data that you want to appear on the TROR report. The template enables the inclusion and exclusion of receivables based on the setup. This means that item entry use Id's can be included or excluded from certain lines in the report, as well as item delinquency codes.
The report version system data controls the output and template structure. Lines cannot be added or deleted to a template by the end user. The end user can set up a new template for a report using the system-defined version of the report. The system-defined version of the report cannot be modified. This ensures that the generated report is current and complies with the output specifications of the US Treasury.
When a newer version of the report is released by the US Treasury in the future, the system data and report output will be updated using the support development process.
The TROR template consists of these categories.
Report Template
The report template is created by the end user to select and report on receivables within their system.
Report Part
The number of Report Parts in the template is defined in the report version control record. Report parts cannot be added or deleted to a template. This ensures that the report output is consistent with the US Treasury's version of the report.
Report Section
The number of Report Sections in the template is defined in the report version control record. Report sections cannot be added or deleted to a template. This ensures the report output is consistent with the US Treasury's version of the report.
Report Line
The number of Report Lines in the template is defined in the report version control record. Report lines cannot be added or deleted to a template. This ensures the report output is consistent with the US Treasury's version of the report.
The lines in the report display as one line or many sub-lines. The report template component will treat each line line/sub line combination as one line. Each line has its own select statement where you define the receivable select criteria as well as delinquency code selection criteria.
Since the TROR uses setup data defined specific to your implementation of Receivables, the process of establishing a new template with selection and exclusion criteria can be an involved process. To expedite the setup process, a sample template is delivered as demo data. The sample template can be copied and used as a starting point to create a template for your implementation.
Entity Code Setup
You set up reporting entity codes (Set Up Financials/Supply Chain, Product Related, Receivables, Options, Reporting Entity Code) to represent the government agencies and divisions for which the Treasury Report on Receivables is submitted.
Setting up an entity code enables you to set up report behavior and map Receivable business units to the entity code. You select a TROR reporting template for an entity code. When you run the report, this template is applied based on the setID and entity code that you select on the Preparer run control page. You select the receivable types that can be applied to a report, and select only one of these receivable type options to apply to the specific report you are running.
You select business units for the entity code. When you select a setID on the Preparer run control page, it determines which entity codes are available for selection, which in turn determines the business units and associated data that are selected to the Treasury Report on Receivables that you generate. There is an edit on the Reporting Entity Code page that verifies that the business units you select on the Reporting Entity Code page have the same setID as the setID the entity code that you are setting up.
Treasury Report on Receivables Run Control
Users run the Treasury Report on Receivables by entering the entity code on which to report. Users select the range of periods to include in the processing on the Treasury Report on Receivables run control Preparer's page. When the entity code is set up, the system verifies that all selected business units have the same calendar id to ensure that the selected period range is valid. The beginning and ending dates for generating the report are determined by the begin date of the From Period and the ending date of the To Period.
The report output can be viewed in a pdf format.
Adding a TROR TemplateAccess the Add Report Template page (Set Up Financials/Supply Chain, Product Related, Receivables, TROR Report).
|
SetID |
Select the SetID that applies to your organization. |
|
Template Name |
Assign an identifiable name for this TROR template. |
|
Report Version |
Select the version of this report. This number represents the most current report version and is derived from the version control record (AR_RPT_VERSION), which is delivered as system data. |
Updating a TROR TemplateAccess the Report on Receivables Setup page (Set Up Financials/Supply Chain, Product Related, Receivables, TROR Report, Update Report Template).
|
SetID, Template Name, Report Version |
These values displayed based on the values selected on the Update Report Template search page. |
|
Effective Date |
Select the date from which this report template setup is applicable. |
|
Status |
Select whether the data on this report template is an Active or Inactive. Note. You can modify the information on this template as of a selected effective date by clicking the + icon, changing the effective data and making that date active. |
|
Description |
Enter a description of this template. |
|
Basis Date for Aging |
Select either the Due Date, which is the due date assigned to an item, or the As of Date of an item. |
|
Customer Type |
Customer Types are defined based on your implementation setup. You can select a specific type of customer to exclude from this report or you can leave the field blank to include all customer types in the report. If you want to exclude more than one customer type, you can click the + icon to the right of the Customer Type field and select another customer type to exclude from the report. You can continue to add the customer types that you want to exclude using the + icon. |
|
Report Setup |
Click the Report Setup arrow to display the Report Setup and Line Setup group boxes. The Report Setup group box consists of a consecutive series of Parts, Sections, and Lines along with their descriptions. When you click View All on the right side of the Report Setup header row, you can display all of the Report Setup and Line Setup for each part, section and line of the report. |
|
Line Setup |
Name indicates the name of the part, section, and line that will be printed on the report. To define the Line Setup, you can select from these options (some of which are active or inactive due to your selection):
For example, to define the line setup for: Part I Name: Status of Receivables Section A Name: Receivables and Collections Line 4A Name: (A) At Agency (-) You can select from these options:
|
Setting Up the Reporting Entity CodeAccess the Reporting Entity Code page (Set Up Financials/Supply Chain, Product Related, Receivables, Options, Reporting Entity Code, Reporting Entity Code).
|
Entity Code |
Enter the entity code for the reporting entity that you want to define. The first two digits identify the agency, the next two digits identify the bureau, and the remaining digits identify the entity. |
|
Reporting Template |
Select the TROR reporting template to use when generating the Treasury Report On Receivables based on the selection of this reporting entity code. |
|
Default Delinquency Code |
Select the delinquency code that you prefer as the default value for new receivables. |
|
Exclude Prepaid Items |
Select this check box if you want to exclude prepaid items on the Treasury Report on Receivables for this reporting entity code. |
|
Receivable Types |
Select the Receivable Types that identify a receivable as Administrative, Default Guaranteed Loans, and Direct Loans. The receivable type can be defined as any value in the system and is mapped from this entity code to the receivable type on the TROR. Note. Only one Receivable Type appears on a given report. |
|
Calendar ID |
Select the calendar that you want to apply to the generation of data for the Treasury Report on Receivables report. The calendar ID that you select for the entity code determines the fiscal year and accounting periods that appear on the report. |
|
Included AR Business Units |
Select any business units that you want to include in the processing of the data for the Receivable Due From the Public report. An error message will display If the calendar ID for the selected business unit does not match the calendar ID selected for this reporting entity code. |
Generating the Treasury Report on ReceivablesAccess the Preparer run control page (Accounts Receivable, Receivables Update, Posting Results - Upd Pend Item (update pending items), Treasury Report on Receivables).
|
SetID |
Select the SetID that is associated with the entity code selected for this report. |
|
Entity Code |
Select the reporting entity code that will be included in this report. The selected entity code contains the TROR template to be used for this report and all business units defined for this entity. |
|
Receivable Type |
Select the Receivable Type to apply to this report. The possible Receivable Types for this entity are set up on the Reporting Entity Code page. |
|
Fiscal Year |
Select the fiscal year to apply to this report. The fiscal year that you select is based on the Calendar ID setup for the selected entity code. |
|
Accounting Period From, Accounting Period To |
Enter the accounting period range that you want to include in this report. |
|
Preparer's Information |
Enter the name, phone number, fax number, and email address of the preparer depending on the information that is available. |
|
Supervisor Information |
Enter the name, phone number, fax number, and email address of the preparer's supervisor depending on the information that is available. |
Access the Address tab.
Enter the Address Information for the entity associated with this report.
Access the Debt Disposition tab.
|
PCA (private collection agency) Debt Disposition, Amount |
Enter the number and amount of written-off delinquent debts that are still being pursued by the U. S. Department of Treasury or a private collection agency. |
|
TXS (treasury or debt collection center) Debt Disposition, Amount |
Enter the number and amount of written-off delinquent debts that are still being pursued by the U. S. Department of Treasury or a designated debt collection center. |
|
TOP (treasury for offset) Debt Disposition, Amount |
Enter the number and amount of written-off delinquent debts that are still being pursued by the U. S. Department of Treasury for offset. |
|
OTH (other) Debt Disposition, Amount |
Enter the number and amount of written-off delinquent debts that are still being pursued by means other than those listed. |
|
IRS 1099-C Submitted Number, Amount |
Enter the number and amount of written-off delinquent debts that have been reported to the IRS on Form 1099-C. |
|
IRS Not Reported 1099-C Number, Amount |
Enter the number and amount of written-off delinquent debts that have been not been reported to the IRS on Form 1099-C. |
|
Footnote |
This field does not print to the Treasury Report on Receivables. |
Click the Run button.
The Process Scheduler Request page is displayed:
Select AR_TROR_XML to display this report in an XML format.
Select OK to return to run control page.
Click the Report Manager link.
Select the Administration tab.
Search for the Process Instance that created the report and view the PDF report.
Generating the 1099-C Report
This section provides an overview of 1099-C report generation, lists prerequisites, and discusses how to run 1099-C report.
Understanding 1099-C Report GenerationThe 1099-C form for Cancellation of Debt is required by the Internal Revenue Service (IRS) in the United States to summarize how much debt has been written off for a specific customer.
To generate the 1099-C form:
Run the Receivables 1099-C SQR process (AR20006), which supplies data to the 1099C_CUST_DATA table. Then run the 1099-C Crystal (AR20006) report to display the formatted 1009-C.
The report displays the dollar value of debt that has been written off and identifies the portion of the debt that the agency is pursuing in collection action. Line 1 of this section displays the number and dollar amount of receivables that have been written off and not closed out. Line 2 displays debts that are written off and are closed out.
Run the Receivables 1099-C Crystal report process (AR20006) to print the 1099-C form for Cancellation of Debt.
You can run each step separately or select the Produce 1099C multiprocess job (1099C) that runs both the Receivables 1099-C SQR process and prints the 1099-C form in one step.
PrerequisitesTo generate the 1099-C report, enable this feature by selecting the 1099-C Forms check box on the Receivables Installation Options page.
Page Used to Generate the 1099-C Report|
Page Name |
Definition Name |
Navigation |
Usage |
|
RUN_AR20006 |
Accounts Receivable, Receivables Update, Posting Results - Upd Pending Items, Receivables 1099-c Report, Receivables 1099-c |
Enter run parameters for the 1099-C report (AR20006). Use this report to create a completed 1099-C, Cancellation of Debt form. |
Running the 1099-C ReportAccess the Receivables 1099-c page. (Select Accounts Receivable, Receivables Update, Posting Results - Upd Pending Items, Receivables 1099-c Report, Receivables 1099-c.)
Select the setID, control ID, and from and to dates for the report. You can also run the report for a specific business unit or customer ID.
|
Control ID |
Select the code that identifies which government reporting entity to use. The system generates a different IRS report for each control ID. |
(USF) Creating Federal Customer StatementsThis section provides an overview of federal customer statements, lists prerequisites, and discusses how to generate federal customer statements.
Understanding Federal Customer StatementsThe Federal Customer Statements report is used internally by the federal government to track agreements between federal government agencies. This feature gathers information from the PeopleSoft General Ledger, PeopleSoft Receivables, and PeopleSoft Contracts systems to produce the Federal Customer Statements report.
To create federal statements, run the Federal Customer Statements multiprocess job (ARSTFED), which includes:
The AR_FED_STMTS Application Engine process, which merges information from the PeopleSoft General Ledger and PeopleSoft Contract systems with PeopleSoft Receivables data and updates these tables:
Reimbursable Agreements Federal Statement table (PS_FEDST_TBL_RA), which stores information from PeopleSoft General Ledger and PeopleSoft Contracts for reimbursable agreements.
PeopleSoft Receivables Federal Statement table (PS_FEDST_TBL_AR), which contains customer-related information for the period that the report is run.
The Federal Customer Statement report (AR80019).
If a customer has reimbursable activity and nonreimbursable activity, the report displays summary totals for both.
PrerequisitesBefore creating federal customer statements:
Enable the Federal Customer feature on the General Info page for the customer.
Enable the Federal Reimbursable Agreement feature on the Installation Options - Contracts page.
Set up the account mappings on the Reimbursable Agreement Account page.
Note. If you do not have PeopleSoft General Ledger or PeopleSoft Contracts installed on your system, disable the products on the Installed Products page to ensure that the reports show correct information.
See Also
Adding Customer Names and Levels and Assigning Roles
Defining Contracts Installation Options
Setting Up Federal Reimbursable Agreement Accounts in General Ledger
Page Used to Create Federal Customer Statements|
Page Name |
Definition Name |
Navigation |
Usage |
|
FEDERAL_CUST_STMT |
Accounts Receivable, Customer Interactions, Statements, Create Federal Statements, Create Federal Statements |
Enter the run control parameters for the Federal Customer Statements multiprocess job that creates federal customer statements. |
Generating Federal Customer StatementsAccess the Create Federal Statements page. (Select Accounts Receivable, Customer Interactions, Statements, Create Federal Statements, Create Federal Statements.)
|
Unit |
Enter a business unit to create statements for all customers with transactions in a specific business unit. If you leave this field blank, a default business unit will automatically appear in the field. |
|
From Date and To Date |
Enter a date range for the accounting date of items that are included in the statement activity. The dates determine the fiscal year and accounting periods used to select information from PeopleSoft General Ledger. |
|
SetID |
Select a setID or accept the default setID. If you leave this field blank, a default setID will automatically appear in the field. |
|
Customer |
Enter only a customer ID to create statements for the specified customer. If you select a customer who is part of a correspondence group, the system addresses the statement to the correspondence customer, but includes only the specified customer's information. |
|
Correspondence Customer |
Enter only the customer ID for a correspondence customer to create statements for all customers in the correspondence group. |
|
Project |
Optionally, enter a project ID that is associated with a reimbursable agreement to include information only for customers that have reimbursable activity for that project. |
Provide more than one parameter to tailor statements even further. The following table describes the results of combining different parameters. It assumes that a parameter in the left column is combined with one or more parameters to the right of that parameter:
|
Parameter |
SetID |
Business Unit |
Customer ID |
|
Business Unit |
One statement for each correspondence customer in the business unit. |
Not applicable (NA) |
NA |
|
Customer ID |
A single statement for the customer. If the customer is part of a correspondence customer group, the process addresses the statement to the correspondence customer but includes only items that are for the specified customer. |
A single statement for the customer, containing only items in the business unit. If the customer is part of a correspondence customer group, the process addresses the statement to the correspondence customer but includes only items for the specified customer. |
NA |
|
Correspondence Customer |
A single statement, for the correspondence customer, containing items for all customers in the correspondence group. |
A single statement for the correspondence customer, containing items in the business unit for all customers in the correspondence group. |
A single statement that is addressed to the correspondence customer, containing only items for the specified customer. |