 Establishing Resource Groups
This chapter discusses how to:
Establish resource groups.
Define flexible attributes.
Set up and maintain the Verity Search engine and Resource Matching cache tables.
Establishing Resource Groups
To establish resource groups, use the Resource Groups component (RS_RESOURCE_GROUPS).
This section provides an overview of resource groups and discusses how to:
Define resource groups.
Establish resource group details.
The tasks that are discussed in this section are required.
 Understanding Resource Groups
Resource groups are collections of resources that you define by organizational unit, supervisor ID, or resource pool. You use them to limit a search for resources on the Express Search page and the Staffing Workbench - Fulfill Orders page. In addition, a manager selects the resources to appear on the Staffing Workbench - Manage Utilization page by specifying a resource group.
Users can access only the resource groups that they create.
See Also
Pages Used to Establish Resource Groups|
Page Name |
Definition Name |
Navigation |
Usage |
|
Add or modify resource groups and select active resource groups. |
||
|
Add or modify resource group details. |
Defining Resource GroupsAccess the Resource Group Definition - Resource Groups page (Resource Management, Define User Options, Resource Group Setup, Resource Group Definition - Resource Groups).
|
Active |
Select the resource groups to appear as options in the Resource Group ID field (RS_RSRCGRP_NAME) on the Express Search page, the Staffing Workbench, and the My Workbench Options - Workbench page. The default value is Active (check box selected) for new resource groups. |
|
Group ID and Name |
Displays information about the resource group. |
|
Edit |
Click to access the Resource Group Definition - Resource Group Details page to view or edit the group. |
|
Delete |
Click to delete the group. |
|
Add |
Click to access the Resource Group Definition - Resource Group Details page to add a new resource group. |
Establishing Resource Group DetailsAccess the Resource Group Definition - Resource Group Details page (Click the Add button on the Resource Group Definition - Resource Groups page).
|
Resource Group ID |
Enter a unique group identifier. This is a required field that is not editable after you save the page. |
|
Description |
Enter a name that describes the resource group. This is a required field. If you designate the resource group as active on the Resource Group Definition - Resource Groups page, the resource group name is available for selection on the Express Search page, the Staffing Workbench, and the My Workbench Options - Workbench page. |
|
Select Organization Structure |
Select to establish a resource group based on organization units. |
|
Select by Pool |
Select to establish a resource group based on resource pools. |
|
Select by Supervisor ID |
Select to establish a resource group based on supervisor IDs. Important! You must enter a supervisor on the Update Employee Data - Employee Job page for all resources before you can use resource groups that are based on a supervisor ID. |
|
Advanced Search or Basic Search |
Select either method by clicking the respective link to search for organizations to include in the resource group. The Advanced Search or Basic Search options appear only when you create a resource group based on organization structure. |
|
OK |
Click the OK button to return to the Resource Group Definition - Resource Groups page. The new resource group appears in the Available Groups group box. Click Save on the Resource Group Definition - Resource Groups page to save new or modified resource groups. |
|
Cancel |
Click to discard the changes and return to the Resource Group Definition - Resource Groups page. |
Finding Organizations by Using the Basic Search
Access the Resource Group Definition - Resource Group Details basic search page.
Use this page to select organizations from the organizational unit tree to associate with the resource group.
Finding Organizations Using the Advanced Search
Access the Resource Group Definition - Resource Group Details advanced search page.
Use this page to search for organizations to associate with the resource group.
|
Organization Hierarchy Name |
Enter the setID that is associated with the organizational unit tree. |
|
Find Organizations Like |
Enter an organization name, or enter the first characters of the name followed by a wildcard (* or %). To search using characters within the name, enter a wildcard, enter any contiguous characters, and then enter another wildcard. Searches are case-sensitive. Note. To view all organizations in the tree, use the Resource Group Definition - Resource Group Details basic search page. |
|
Find |
Click this button to perform the search. The list of organizations that match the search criteria appears in the Select an Organization grid. |
|
Select |
Click this button to add selections to the Selected organization group box. |
|
Select an Organization |
Select the check box next to organizations to include in the resource group. You can select tree nodes or tree detail values. You must select at least one organization for the resource group. |
Creating Resource Groups by Supervisor ID
Access the Resource Group Definition - Resource Group Details page. Select the Select by Supervisor ID option.
Use this page to create a resource group based on one or more supervisor IDs.
|
Search by and Last Name |
Select the search type and enter the supervisor's last name, first name, or employee ID. You can search using the first characters of the name or employee ID. To search using characters within the name or employee ID, enter the wildcard (%), enter any contiguous characters, and then enter another wildcard. A supervisor is available for selection if the supervisor's employee ID appears in the Supervisor ID field (SUPERVISOR_ID) on the Employee Job - Update Employee Data page for at least one eligible resource. Searches are not case-sensitive. |
|
Search |
Click this button to execute the search. The list of supervisors that match that search criteria appears in the Search Results group box. |
|
Search Results |
Select the check box next to one or more supervisors. |
|
Select |
Click this button to add selections to the Selected Supervisors group box. You must select at least one supervisor to establish the resource group. |
|
Selected Supervisors |
Displays the supervisor name and ID for each selection. |
Creating Resource Groups by Resource Pool
Access the Resource Group Definition - Resource Group Details page. Select the Select by Pool option.
|
Pool Name |
Select the pools to use to create the resource group from a pool hierarchy showing only active pools. You can select a parent pool or expand the hierarchy and select a specific pool. If you select a parent pool, the system automatically selects all of the pools that belong to the parent pool. |
|
Select |
Click this button to add the selected pools to the Resource Group Definition group box. |
Defining Flexible Attributes
To define flexible attributes, use the Flexible Attributes Setup component (RS_ATTRIB_SETUP).
This section provides an overview of flexible attributes and discusses how to specify flexible attributes.
Note. The tasks in this section are optional. If you do not use flexible attributes in PeopleSoft Resource Management, you do not need to complete these tasks.
See Also
Understanding Flexible Attributes
You can define and instantly implement a new attribute for resources and resource requests using a flexible attribute. If you modify the attribute, such as changing the valid values, the PeopleSoft Resource Management system immediately implements the changes.
Page Used to Define Flexible Attributes|
Page Name |
Definition Name |
Navigation |
Usage |
|
Set Up Financials/Supply Chain, Product Related, Resource Management, Define Flexible Attributes, Define Flexible Attributes |
Define flexible attributes. |
Specifying Flexible AttributesAccess the Define Flexible Attributes page (Set Up Financials/Supply Chain, Product Related, Resource Management, Define Flexible Attributes, Define Flexible Attributes).
Attribute Basics
|
Attribute ID |
Enter a unique identifier. |
|
Attribute Name |
Enter a name that is recognizable to users when the system prompts them to enter values for the attribute. |
|
Attribute Description |
Enter a description that is used for documentation only. The attribute description does not appear elsewhere in PeopleSoft Resource Management. |
Attribute Values
In the Attribute Values group box, specify the record containing the valid values for an attribute, or define the values on this page.
|
Use values listed elsewhere |
Specify the table from which users select valid values for this attribute if you don't want to list the valid attribute values on this page. The table must be a valid PeopleSoft prompt table and have only one key field. |
|
Use values listed here |
Enter the attribute value name and description, and click Add to insert additional values. Use a name that is recognizable to users when the system prompts them to select attribute values for a resource or resource request. Select this option if you do not select the Use values listed elsewhere option. |
|
Only one value |
Select to permit users to specify only a single value of the attribute for resources or resource requests. |
|
Many values |
Select to permit users to specify multiple values of the attribute for resources or resource requests. Each flexible attribute can be defined to enable either a single value or multiple values for a resource or resource request. An example of a single-value resource attribute is region. Typically, each resource is assigned to only one region; therefore, you would define the region attribute to allow only one value for each resource. An example of a multiple-value resource attribute is industry specialty. Because a resource may have more than one industry specialty, the industry specialty attribute would allow multiple values for each resource. |
Attribute Use
In the Attribute Use group box, specify how the attribute is used. Your selection controls where the attribute appears in PeopleSoft Resource Management. Modify the selection as business needs change.
|
Use this attribute for informational purposes only |
Select if the attribute is for information only and is not used as a factor in the Resource Matching process to determine fit scores. |
|
Track this attribute for each service order |
Select to establish a service order attribute. The user specifies values for this attribute on the Service Order - Additional General Information page for the resource request. |
|
Track this attribute for each resource |
Select to establish a resource attribute. The resource can specify values for this attribute on the Resource Profile - General Info page. |
|
Use this attribute to help match resources to assignments |
Select to establish the attribute as a factor in the Resource Matching process to determine fit scores. |
|
Let the service order user request resources with specific values for this attribute |
Select to establish the factor as a Flexible Qualification factor. The attribute is used to:
Enter the name of the factor—either the name that is established for the attribute or a different name—to appear on the Search Configuration - Factor Weights page, if the search type selected is RSFSR (Express Search/Fulfill Orders) or RSRSR (Job Spy and Manage Utilization). Note. Users can select as many values as they need for a flexible qualification factor on a resource request. For multiple-value attributes, users indicate if each value is desired or required. For single-value attributes, users indicate an importance weighting of Desirable or Very desirable for each value. Users can also indicate that only resources with one of the requested single-value attributes will be considered. |
|
Let the project resource list user request resources with specific values for this attribute |
Select to enable users to specify a value for this attribute on the Update Generic Resource Qualifications page in PeopleSoft Program Management. If you select this option and specify a value for this flexible attribute on the Update Generic Resource Qualifications page, the system sends the value to the Qualifications tab of the:
This option appears only if you use PeopleSoft Program Management. |
|
Let resources indicate their preferences for assignments with regard to this attribute |
Select to establish this factor as a Flexible Preference factor. The attribute is used to:
Enter the Name of the factor—either the name that is established for the attribute or a different name—to appear on the Factor Weights page, if the search type selected is RSFSR or RSRSR. |
Important! After you create a new flexible factor, you must indicate its relative importance within the factor family on the Factor Weights page.
See Defining Resource Management Installation Options.
Setting Up and Maintaining the Verity Search Engine and Resource Matching
Cache Tables
This section provides overviews of cache administration processes, Resource Matching work tables, the Verity search index, and Verity search index automatic update processes, and discusses how to:
Configure the servers with the location of the Verity search index.
Define the Verity settings.
Define factor weights.
Refresh cache tables and build the Verity indexes.
Maintain and schedule the Verity Index File Creation process and the Cache Creation process.
Refresh the Optimization Cache table.
Run the Cache Administration program.
Manage the Search Index Agent process.
Understanding Cache Administration Processes
The Cache Administration Application Engine program (RS_CACHE_AD) manages the execution of cache and maintenance processes that are required periodically in PeopleSoft Resource Management. The cache processes update cache tables that are used by various PeopleSoft Resource Management activities such as fulfilling service orders, managing resource utilization, and capacity planning. The maintenance processes purge unnecessary data from the system such as obsolete resource schedules.
You can select processes and—using PeopleSoft Process Scheduler—run them immediately or schedule them to run at intervals during a time when system usage is low. You can run processes individually or they can be logically run in batch, such as by required interval.
Cache administration does not include processes that are typically required only at implementation (such as a process to load holidays) or as part of a normal business process (such as a process to create resources in batch).
Understanding Resource Matching Work Tables
Resource Matching uses temporary work tables when calculating availability factor fit scores and retrieving search results. To maintain optimal system performance you must routinely clear the tables of unnecessary data as part of your database maintenance procedure.
Understanding the Verity Search Index
Verity is a free text search engine used to search structured and unstructured data. Verity quickly calculates qualifications and preferences fit scores for each resource. PeopleSoft uses the Verity search engine for these purposes:
Resource Matching uses Verity to determine a resource's fit for a resource request for the all the factors except the Availability factor.
The Express Search features uses the Verity search engine to determine which resources meet the specified qualifications and keywords criteria and calculate a fit score.
The Verity search index is separate from the database. The indexing process is a snapshot of the database at one point in time and does not remain synchronized with the data stored in the database unless you routinely update the index. The system logs changes to resource requests and resource profiles in the Resource Management Log table (RS_SRCH_LOG). When the Create Search Index Application Engine program (RS_SRCH_INDX) runs, it updates the Verity search index with the changes in the Resource Management Log table. Alternatively, you can create a new Verity search index with current database information.
Use the Verity searching capabilities that are delivered with PeopleSoft Financials. If you do not use the Verity searching capabilities, PeopleSoft Resource Management cannot calculate fit scores for resources, find the best resources for resource requests, find the best requests to fit resources, or perform optimization.
How PeopleSoft Resource Management Creates the Verity Search Index
To create the Verity index, the Create Search Index program reads data from a number of tables and creates two files with that data. These files are called batch input files (BIF). These batch input files are used by a Verity utility named mkvdk.exe to build the actual Verity index. Thus, creating the Verity index is really a two step process that is executed by the Create Search Index program.
There is additional complexity in the Create Search Index program for these reasons:
You can update the Verity index after it has been created.
The Verity index uses an A-B model that is discussed in more detail later in this chapter.
If multiple languages are installed, you can create an index for each language.
There are two types of indexes—RSFSR for forward searches and RSRSR one for reverse searches.
The forward search index contains resources with all of their competencies, accomplishments, resumes, and so on. The reverse search index contains resource requests with competency and accomplishment information, but without resume information.
The Create Search Index program creates these files when you create an index from scratch:
<SRCH_TYPE_CD>_INP_<LANGUAGE_CD>_C.BIF
<SRCH_TYPE_CD>_DAT_<LANGUAGE_CD>_C.DAT
For example, for a forward search, the English files are:
RSFSR_INP_ENG_C.BIF
RSFSR_DAT_ENG_C.DAT
The _C filename suffix indicates that the files contain information about every available document in the database where a document is either a resource or a resource request.
Changes are made to the data while the index is being created, and therefore each creation is immediately followed by an update. This happens automatically and is triggered by the Create Search Index program. During this update, the program first removes documents that were updated or deleted. Next the program reinserts the documents that were updated. These steps create two additional sets of files that contain filename suffixes of _D (deleted) and _U (updated). The .BIF file contains most of the information that identifies a document. Primarily, the .BIF file contains what is known as a veggie key, which is a surrogate key for each document in the index. The veggie key field name in the file is VdkVgwKey. PeopleSoft Resource Management uses the employee ID as a veggie key for the forward search, and a combination of business unit, service order ID, and service order line to identify a resource request in the reverse search.
The remaining information in the .BIF file are references to the .DAT file and resume file. The .BIF file contains the starting offset and size of each document in the referenced .DAT file. These offsets and sizes are used by the mkvdk.exe utility to create the index.
PeopleSoft uses a Verity model structure—known as the A–B model structure—that guarantees that the Verity search index is available at all times for searching. The Create Search Index program creates an A version of the index, which is used for searching. When you refresh the index, the program creates a B version and switches all searching to the new model when the creation is complete. During the next update cycle the program refreshes the A model and makes it available for searching when the update is complete.
Style files are delivered with PeopleSoft Resource Management and are used to define the index structure for Verity. Do not change the style files. When you install PeopleSoft Resource Management, the following style files are installed in the directories $PS_HOME\data\search\RSFSR_Master\Style\ and $PS_HOME\data\search\RSRSR_Master\Style\:
style.ddd
style.dft
style.did
style.ngm
style.pdd
style.prm
style.sfl
style.sid
style.tkm
style.ufl
style.uni
style.vgw
style.wld
style.xfl
style.xml
vgwfsys.cfg.
vgwfsys.gfl
vgwfsys.prm
vgwfsys.vgw
vgwhttp.cfg
vgwhttp.gfl
vgwhttp.prm
vgwhttp.vgw
Prerequisites
To use the Verity search engine, you must:
Establish and maintain the Verity search index by running the Cache Administration program to create or update an index of competencies, accomplishments, work experience, and default resume-attachment information for each eligible resource.
There are two types of searches you establish: forward, which is used for Express Search, Staffing Workbench - Fulfill Orders, and Pool Manager Workbench; and reverse, which is used for Staffing Workbench - Manage Utilization and Job Spy.
Configure the Application server and Process Scheduler with the location of the Verity search index.
Verity Search Index Automatic Update ProcessesPeopleSoft Resource Management provides two Application Engine processes that work together to monitor data changes and automatically trigger the Create Search Index program to update the Verity search index:
The Search Index Agent Application Engine process (FO_SRC_AGENT), known as the agent process.
The Automatic Agent Monitoring Application Engine process (FO_AGENT_DMN), known as the daemon process.
Note. This section discusses one option for maintaining the Verity search index. Alternatively, you can use the Maintain Search Index page to create or update the index, independent of the Search Index Agent and Automatic Agent Monitoring processes.
The Agent Process
Agent processes monitor data changes and determine the best time to trigger the Create Search Index program to update the Verity collection. You enable agents for PeopleSoft Resource Management search types (RSFSR and RSRSR) on the Verity Settings page. The system creates one agent for each search type that you enable on the Verity Settings page.
The Search Index Agent process has no run control page. The agent creates a run control ID for the Create Search Index program when it triggers the process. The run control ID is a concatenation of the search type code and language code. If this run control ID already exists when the agent starts, the system deletes the existing run control and creates a new one by using the same run control ID and the updated run control options. The agent uses the same process instance ID as the Create Search Index program that it triggers. If the Create Search Index program fails, the agent process also fails.
Administrators use the Search Index Agent Manager page to view the status of agent processes, and start and stop agent processes. Agent processes can be in a status of:
Running (RUN)
Starting (STAR)
Stopping (STOP)
Stopped (END)
Time Out (TOUT)
The Daemon Process
The daemon process monitors the status of the agents, and cancels and reschedules any inactive processes. An inactive agent process is one that does not have an end status but has shown no activity for a period of two sleep intervals plus two minutes. The sleep interval is defined in seconds in the Sleep Interval (secs) field on the Verity Settings page.
Process Flow
This diagram shows the relationship between the Automatic Agent Monitoring, Search Index Agent, and Create Search Index processes:
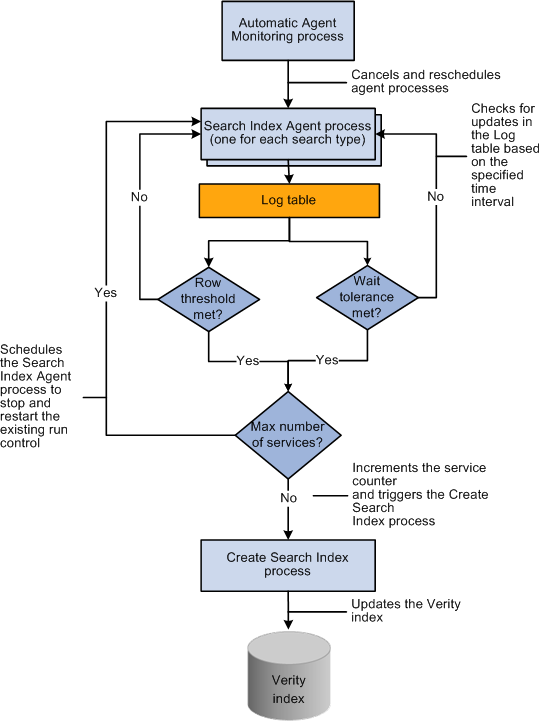
Verity search index automatic update process flow
Prerequisites
To use the Verity search index automatic update processes, administrators must:
Configure the Process Scheduler to run enough process types and processes simultaneously to cover the needs of all server agents and any other Application Engine processing requirements.
Set up the daemon group in PeopleTools and associate the group to the appropriate Process Scheduler definition.
Note. We recommend that you configure the Automatic Agent Monitoring process on the same Process Scheduler as the Search Index Agent process and Create Search Index program. This prevents the Automatic Agent Monitoring process from trying to trigger the Search Index Agent process if the Process Scheduler is down.
See Enterprise PeopleTools PeopleBook: PeopleSoft Process Scheduler, "Setting Server Definitions," Defining Daemon Groups.
Pages Used to Set Up and Maintain the Verity Search Engine and Resource
Matching Cache Tables|
Page Name |
Definition Name |
Navigation |
Usage |
|
Set Up Financials/Supply Chain, Common Definitions, Resource Search, Search Configuration, Verity Settings |
Configure parameters for the Verity search engine. |
||
|
Set Up Financials/Supply Chain, Common Definitions, Resource Search, Search Configuration, Factor Weights |
Define the relative importance of each factor within its family. |
||
|
Set Up Financials/Supply Chain, Common Definitions, Resource Search, Cache Administration, Miscellaneous |
Specify processes to refresh cache tables and create verity collections. |
||
|
Set Up Financials/Supply Chain, Common Definitions, Resource Search, Cache Administration, Maintain Search Index |
Capture the parameters needed to create the Verity search index files. |
||
|
Set Up Financials/Supply Chain, Common Definitions, Resource Search, Cache Administration, Refresh Optimization Cache |
Refresh the Optimization cache data. |
||
|
Set Up Financials/Supply Chain, Common Definitions, Resource Search, Cache Administration, Summary |
Confirm the list of processes that you want to run or schedule for the future. |
||
|
Setup Financials/Supply Chain, Common Definitions, Resource Search, Search Index Agent Manager |
View, start, and stop agent processes. |
Configuring the Servers with the Location of the Verity Search Index
You must configure the Application server and Process Scheduler with the location of the Verity search index. This step must occur before the index is created and before the index can be used to search for resources.
To set up the Verity environment:
Open the Application server (psappsrv.cfg) and Process Scheduler (psprcs.cfg) configuration files.
Under the section [Search Indexes], add entries RSFSRA and RSFSRB for forward searches (Express Search and Fulfill Orders) and entries RSRSRA and RSRSRB for reverse searches (Manage Utilization and Job Spy), and set the path to the Verity search index by using the following format:
<INDEX NAME>=<LOCATION>
A Windows NT example is: RSFSRA=C:\PT846\DATA\SEARCH\.
A UNIX example is: RSFSRA=/ds1/pt846/data/search.
A folder with the name of the index (RSFSRA, RSFSRB, RSRSRA, RSRSRB) is created in the specified path, so both entries can point to the same location.
The default path to the Index File Path directory in the Process Scheduler configuration file is $PS_HOME\data\search\<index name>\<database name>\<language code>.
Note. The index name is case-sensitive in a UNIX environment; use upper case.
If the Application server is on a different machine than the Process Scheduler, map a network drive on the Application server to the Process Scheduler. Alternatively, copy or move the index to the machines running the application server.
In a multiple Application server environment, add these entries to each Application server.
Provide the Application server and Process Scheduler with security access to the directory containing the index.
Provide the Process Scheduler with security access to the directory containing resume attachments.
Note. Configure the File Transfer Protocol (FTP) server on the same platform as the Process Scheduler—either Windows NT or UNIX—so that Verity can read the resume files.
Defining the Verity Settings
Access the Verity Settings page (Set Up Financials/Supply Chain, Common Definitions, Resource Search, Search Configuration, Verity Settings).
|
Search Type |
Displays the type of search that you selected on the Search Configuration search page:
|
|
Verity Model |
Displays the model version (A or B) that is currently in use read by the Verity search engine. |
File Settings
|
Style Files |
Enter the location of the style files for this search type. The directory that you enter in this field must contain the delivered style files. When you install PeopleSoft Resource Management, the style files for forward searches are installed in this location: $PS_HOME\data\search\RSFSR_Master\Style\. The style files for reverse searches are installed in this location: $PS_HOME\data\search\RSRSR_Master\Style\. |
|
Resume Files |
Enter the directory path of the folder where you store the resume files, such as c:\resumes\hold. The system reads the resumes in this folder when building the Verity collection. The attachment process uses FTP to move the resumes from user workstations to the designated system directory. This field is not required for the indexing process to run. Leave this field blank if you do not have resume attachments set up and there are no resumes attached to any of the resource profiles. This field appears when you select the Express Search/Fulfill Orders search type, and is not applicable to the Job Spy and Manage Utilization search type. Note. To simplify setup, configure the FTP server on the same platform as the Process Scheduler—either a Microsoft Windows or UNIX operating system. |
Performance Settings
|
Buffer Resultset Size (in rows) |
Enter a value that determines the size of the result set. The buffer result set size determines the number of documents that Verity will fetch during each search. This result set may differ from the actual result set shown on the page. The primary reason for this is because the availability calculation occurs after the Verity search is complete, and this calculation occurs only for the items that Verity returns. Therefore, if you specify a large buffer result set size, you have less of a possibility of missing an item in the result set that is more available than other items in the result set that appear on the page. The disadvantage of increasing the buffer result set size is that the system will calculate availability on more items, which can adversely affect system performance. PeopleSoft Resource Management delivers default values of 500 for the forward search and 300 for the reverse search. You determine the correct balance between accuracy and performance based on the needs of your organization. |
Search Agent Processing
The remaining fields in the group box are required if you select the Enable Agent option.
|
Sleep Interval (secs) |
Enter the frequency with which the Search Index Agent process checks for updates in the Resource Management Log table (RS_SRCH_LOG). |
|
Language Code |
All Languages: Select for the Create Search Index program to update all installed languages on each run. This option appears only if you installed multiple languages. Select a specific language for the Create Search Index program to update only one language. Only installed languages are available for selection. Warning! If you installed multiple languages and only select one language in this field for the Create Search Index program to update, the search data for all other languages will be outdated in the system until the next time that you create the full index. This is because the Resource Management Log table is cleared of all previous changes each time the Create Search Index program runs. |
|
Minimum Row Threshold (rows) |
Enter the minimum number of rows needed to trigger the Create Search Index program. |
|
Maximum Number of Services |
Enter the maximum number of times that the agent will cycle through the sleep interval before rescheduling itself and then shutting itself down. The agent increments a counter (SVC_COUNTER) by one every time that it completes an interval. When the counter is equal to the value that you specify in this field, the agent schedules itself to start again, and then ends the current process. |
|
Maximum Wait Tolerance (secs) |
Enter the maximum amount of time that a row of data waits before it is updated in the Verity collection by the Create Search Index program. |
All of the fields in the Search Agent Processing group box are disabled when the agent is in a status of Running, Stopping, or Starting. If the agent fails or is canceled, the fields remain disabled until an administrator accesses the Search Index Agent Manager page to change the run status to Time Out. The fields in this group box are available when the run status is Time Out
Note. Files with a .BIF file extension are bulk insert files that are used with the Verity search engine to specify the documents to submit to a collection. This requires the search index update processes to delete documents before reinserting them into the collection. It is possible for users to notice that for a brief moment in time, an updated document may be missing from the collection and thus not returned in search results. In these rare instances, by the time the user repeats the search, the collection will be updated and available for searching.
Defining Factor WeightsAccess the Factor Weights page (Set Up Financials/Supply Chain, Common Definitions, Resource Search, Search Configuration, Factor Weights).
|
Preferences and Qualifications |
Enter the relative importance of each individual factor in the Resource Matching calculation of the Preference and Qualifications factor family fit scores. Available values are: 0 - Not at all important 1 - Much less important 2 - Less important 3 - Important 4 - More important 5 - Much more important |
Refreshing Cache Tables and Building the Verity IndexesAccess the Cache Administration - Miscellaneous page (Set Up Financials/Supply Chain, Common Definitions, Resource Search, Cache Administration, Miscellaneous).
Maintaining and Scheduling the Verity Index File Creation Process and
Cache Creation ProcessAccess the Maintain Search Index page (Set Up Financials/Supply Chain, Common Definitions, Resource Search, Cache Administration, Maintain Search Index).
Process Selection
|
Maintain Search Index |
Select to create, update, or optimize the search index as part of this Cache Administration run control. |
Indexing Options
|
Create New |
Select this option and run the process as often as you want to refresh the search index with current database information. This option deletes the existing index and creates a new one. Use this option to routinely replace the Verity search index. |
|
Update Existing |
Select to update the existing index without deleting it by inserting new documents and updating documents that changed since the last time the update process ran. |
|
Optimize |
Select to adjust the index for changes that are made through updates and deletions. This option compresses the deleted documents and improves the search response time after updates. |
Note. This page provides one option for scheduling Verity search index updates. Alternatively, you can enable the Search Index Agent process to monitor data changes and automatically trigger the Create Search Index program to update the Verity search index.
Index Language
Specify whether the index should be created for all installed languages or a single language.
|
All Installed Languages |
Select to create a collection for each installed language. |
|
Specific Language |
Select to specify a language, and enter the language for which you want to create index files in the adjacent drop-down list box. Warning! If you installed multiple languages and only select one language in this field for the Create Search Index program to update, the search data for all other languages will be outdated in the system until the next time that you create the full index. This is because the Resource Management Log table is cleared of all previous changes each time the Create Search Index program runs. |
Index
|
Search Type |
Enter a search type of Express Search/Fulfill Orders or Job Spy and Manage Utilization to create an index for searches in PeopleSoft Resource Management. |
|
Save |
Click Save to save the run control, or select Miscellaneous, Refresh Optimization Cache, or Summary to access other Cache Administration pages. |
The length of time it takes to update the index depends on the number of active resources and language translations that are processed.
At the end of the index creation process, the input and data files contain the database information. The indexing process then calls the Verity search engine to build the index as a set of directories and files. If any problems occur during the creation of the index, the errors are captured in the log file sysinfo.log, which is located in the same directory as the index.
Refreshing the Optimization Cache TableAccess the Refresh Optimization Cache page (Set Up Financials/Supply Chain, Common Definitions, Resource Search, Cache Administration, Refresh Optimization Cache).
Run the program at implementation and as required.
|
Refresh Optimization Cache |
Select to include the Refresh Optimization Cache Application Engine process (RS_DF) as part of this Cache Administration run control. |
|
Save |
Click to save the run control, or select Miscellaneous, Maintain Search Index, or Summary to access other Cache Administration pages. |
See Also
Refreshing the Optimization Cache
Running the Cache Administration ProgramAccess the Summary page (Set Up Financials/Supply Chain, Common Definitions, Resource Search, Cache Administration, Summary).
Select any of these processes to include in the Cache Administration run control:
Refresh Resource Organizational Unit Cache
Refresh Resource Schedule Cache
Refresh Current Eligible Resources
Maintain Search Index
Refresh Supply/Demand Cache
Refresh Supply Category Analytics Cache
Refresh Optimization Cache
|
Run |
Click to save the run control and proceed to the Process Scheduler Request page to run the program or schedule it to run later. |
|
Save |
Click to save the run control but not run the program. |
|
Process Monitor |
Click to review the status of the process scheduler job. |
Managing the Search Index Agent Process
Access the Search Index Agent Manager page (Setup Financials/Supply Chain, Common Definitions, Resource Search, Search Index Agent Manager).
|
Run Status |
Displays the agent run status of Error, Running, Starting, Stopping, Stopped, or Time Out. |
|
Process Instance |
Displays the process instance ID of the running agent process. This same process instance ID is used by the Create Search Index program that is invoked by the agent. When you click the Start button to start the agent, and the previous run status is Time Out, the agent cancels the previous process instance ID and assigns a new one. |
|
Last Run On |
Displays the last time that the agent triggered the Create Search Index program. |
|
Last Activity |
Displays the last time that the agent checked the Resource Management Log table to determine if any action was necessary. |
|
Start |
Click to start the agent and create a new process instance ID if the previous run status was Time Out. |
|
Stop |
Click to stop the agent. This button is disabled if the run status is Stop or Time Out. |
|
Refresh |
Click to trigger the Search Index Agent process to:
|
Warning! Do not manually change the run control record for the Create Search Index program while the Search Index Agent process is running. Doing so will result in inconsistent search data because the Create Index Agent process will update different data than is specified for the agent.