 Understanding Collaborative Planning Schedules
This chapter provides an overview of collaborative planning schedules and discusses how to:
Define vendor information for collaborative planning schedules.
Define and maintain schedule groups and related information.
Define item information for collaborative planning schedules.
Create new schedules.
Maintain current schedules.
View past schedules.
Build multiple schedules.
Dispatch multiple schedules.
Delete past schedules.
Enable suppliers to view recently dispatched schedules using the PeopleSoft Supplier Portal.
Enable suppliers to update and approve schedules.
Enable suppliers to view past schedules.
Apply collaborative changes (scheduler).
Understanding Collaborative Planning Schedules
Collaborative planning schedules enable you to take advantage of the internet to improve collaboration with suppliers for planned purchases. Collaborative planning schedules give suppliers up-to-date bucketed information regarding future planned purchases in the form of a schedule which the supplier can suggest changes and then approve. Collaborative schedules can be used in combination with blanket purchase orders (POs), Kanban signals, or vendor managed inventory (VMI) as suppliers delivery mechanism to reduce the need for purchase orders. Collaborative schedules enable you to group items together to consolidate purchase requirements, and also enables you to bucket those requirements into future fixed, firmed, and forecast periods. You can also define and manage information to trigger exceptions related to supplier capacity (allocated units over a defined period of time) as well as upside and downside allowable Flex for required quantities during the fixed and firmed periods.
With PeopleSoft collaborative planning schedules, you can:
Build, review, and maintain a supply plan.
Dispatch the supply plan to a supplier.
Collaborate on the supply plan with a supplier, or optionally define the plan as a display-only schedule.
Enable the supplier to review and approve the collaborative changes to the supply plan, and then be notified when the plan is approved.
Apply collaborative changes to the supply plan.
PeopleSoft Enterprise Purchasing and PeopleSoft Enterprise Supply Planning provide the data for the supply schedule. Purchasing provides purchase order data and Supply Planning provides planned purchase order data.
The following diagram illustrates the basic flow of the collaborative planning schedules process from the creation of the supply schedule to the final approval of the schedule by the supplier.
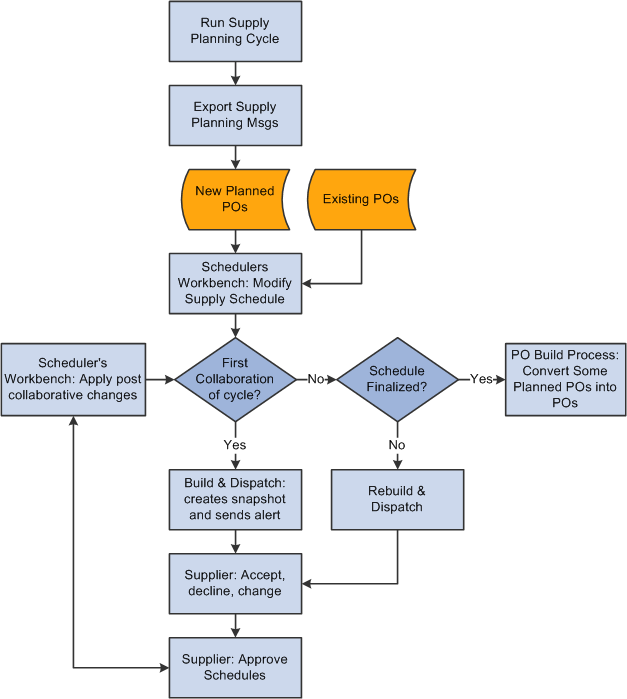
Collaborative Supply Management process flow
This section lists common elements and discusses:
Standard buttons.
Supply schedule statuses.
Scheduler's Workbench row types.
Supplier's Approve Schedule row types.
See Also
Delivered Workflows for Collaborative Supply Management
 Common Elements Used in This Chapter
|
Apply mode |
Refers to the reconciliation Apply mode in the Scheduler's Workbench which enables the scheduler to compare and reconcile approved supplier quantities and suggested changes with actual required quantities (planned orders). Clicking the Apply link for approved schedules in the Scheduler's Workbench - List page enables you access in Apply mode. Within this page proposed quantities are calculated based on supplier feedback and the latest actual required quantities. The scheduler can review and change proposed quantities in the schedule and then directly update the schedule with the click of a button. |
|
Baseline Quantity |
Represents the approved quantity which existed for the same range of days for the prior approved schedule. When using Flex within a schedule, this upside or downside flex is measured against the baseline quantity for the day or range of days. |
|
Scheduler |
The name of the person within the organization who is responsible for reviewing, building, and dispatching the schedule to the supplier. The scheduler (for example, a buyer or planner) also approves and applies the changes suggested by the supplier. |
|
Schedule Group |
A logical grouping of similar vendor items within Collaborative Supply Management. |
|
Supplier's Schedule |
The name of the (supplier side) schedule that shows the time-phased quantities that the scheduler proposes. The supplier reviews the schedule that the scheduler dispatches and decides whether to accept, reject, or change the data. |
|
IN Unit (inventory business unit) |
The Inventory business unit for which you are purchasing the items. Schedule groups can include supply requirements from multiple Inventory business units. |
|
Period Duration |
The period of time for which the system buckets the quantity data for a schedule. Values are Day, Week (default), and Month. |
|
Start Date |
The beginning date for a given schedule. Typically this is a future date (for example one week out). When you build a new schedule, the system generates a snapshot of the supply requirements (purchase orders and planned orders) between the start date (beginning date for the collaborative schedule) and the end date. |
|
Number of Periods |
The number of periods based on the period duration (days, weeks, or months) for a specific schedule. The maximum number is 52. |
|
Week starts on |
The day of the week on which weeks begin for schedules with a period duration of Week. |
|
Row Types |
Describes the quantities displayed within a particular row of data within a supplier schedule. Depending on the status of the schedule and the person receiving the schedule (scheduler or supplier), different row types display within a schedule. For example, the Actual Required Qty row type represents the actual purchase orders and planned quantities currently existing for the item or schedule group as shown within the Scheduler's Workbench for a new schedule. |
|
Status |
The status of the schedule. For a new schedule, the status is New Schedule. For current schedules, status values are Current, Dispatched, and Approved. For past schedules, item status values are Previous and History. |
|
Created Date/Time |
The date and time that the schedule was built. |
|
Dispatched Date/Time |
The date and time that the schedule was dispatched. |
|
Approved Date/Time |
The date and time that the schedule was approved. |
|
Scheduler's Comment |
The comments entered by the scheduler for a specific schedule. |
|
Supplier's Comment |
Comments that the supplier enters for a specific schedule. These comments are visible only after the schedule has been approved by the supplier. |
|
Previous Comments |
Comments associated with a previous schedule |
|
Include PO Data (include purchase order data) |
Select to include the purchase order data in the schedule. If the check box is deselected, only planned purchase order data is included. This option is available only when creating new schedules. |
|
Dispatch |
Select to send a built schedule to the supplier for review. You must specify a dispatch method. Options are Email and Other. If you do not select Dispatch, the built schedule retains the status Current. |
|
UOM to View Quantities (unit of measure to view quantities) |
Select the unit of measure (UOM) in which to view the quantities on the schedule. The supplier can select either the standard UOM or the vendor default UOM for the schedule summary. If the supplier selects the vendor default UOM and the schedule is a group of items, all items must have the same vendor default UOM. Otherwise, a message displays and the summary information displays in the standard UOM. The vendor default UOM is the default UOM associated with the default vendor location for the specified vendor. |
|
View Only Schedule |
Indicates that you want to send the schedule to the supplier, but the supplier cannot change the schedule. The schedule status is set to Approved, and the schedule is dispatched to the supplier. |
|
Show new schedules only |
Select to view newly dispatched schedules only. Approved schedules are excluded. This field applies to suppliers only. |
|
Show Std Qty/UOM (show standard quantity unit of measure) |
Select to display the various quantity values for the schedule detail sections in terms of the standard UOM. The buyer will automatically be able to view these columns, but the supplier has the option of viewing the summary data in terms of the vendor default UOM. This enables suppliers to view the detail quantities in standard and vendor default UOMs. |
|
Show Order Qty/UOM (show order quantity unit of measure) |
Select to display the various quantity values for the schedule detail sections in terms of the ordering UOM. Since the summary section is displayed in terms of the standard UOM or the vendor default UOM, this enables you to also see the detail quantities in terms of the actual ordering quantity, if it is different. |
|
Show Vendor Qty/UOM (show vendor quantity unit of measure) |
Select to display the various quantity values for the schedule detail sections in terms of the vendor's default UOM. The Scheduler's Workbench always displays the summary quantities in terms of the standard UOM; thus this option enables the scheduler to also view the quantities in terms of the vendor default UOM. The supplier can view the summary quantities in the vendor or standard UOM, so if they are viewing the summary in the standard UOM, this enables suppliers to also see the quantities in terms of the vendor default UOM. |
Standard Buttons
These are buttons that are used throughout this chapter.
|
Preview Schedule |
List all the items to be dispatched. This button appears in the dispatch batch process. |
|
Update |
Update in workbenches implies updating the schedule summary with changes made in the detail. In Apply mode, this button appears in the header section of the schedule and it is used to update the entire schedule based on proposed quantities. |
|
Search |
Click to retrieve data after you define the parameters. |
|
Update |
Click to update the quantities on the Summary page for the affected row types. |
|
Save, Return |
Click to save the data and return to the Summary page. |
|
Add |
Click to add a new planned purchase order. Applicable on the supplier's side. |
|
Send |
Click to send the message. |
|
Calculate capacity/Flex |
Click to calculate the supply schedule values against capacity or flex requirements. |
|
|
This red box denotes that there is a violation. For capacity violations, clicking the Calculate Date button will generate the date on which the violation first appears. If the date is within the schedule being maintained, it becomes a link that you can click which takes you to the actual bucket containing this date. |
|
|
Click the Add button to add a new planned purchase order. Applicable on the scheduler side. |
|
|
Click the Delete button to delete a planned order row. You can delete rows only if Supply Planning is not installed. Applicable on the scheduler's side. |
|
|
Click the left scroll arrow to go backward through the bucket columns and save changes. |
|
|
Click the right scroll arrow to go forward through the bucket columns and save changes. |
|
|
Click the Approve All button to approve all rows. You indicate that planned purchase orders are ready to be converted to purchase orders. (Clicking the button is the same as approving the line on the Receive Purchase Messages page.) |
|
|
Click to reset approval for all rows. |
Supply Schedule Statuses
The supply schedule statuses are:
|
Current |
After you build a new schedule, the status is Current. The status does not change until you dispatch the schedule. The current schedule is a snapshot of the purchase orders and planned purchase orders. Once a schedule is built, any changes to actual purchase orders or planned purchase orders are not incorporated into the current schedule unless it is rebuilt. |
|
Dispatched and New |
The schedule status is Dispatched after the you run the Dispatch process to send the schedule to the supplier through email. Once the schedule is dispatched, it becomes available for collaboration with the supplier. From the supplier's perspective, a schedule dispatched from the scheduler has the status New. The status does not change until the supplier approves it. |
|
Supplier Approved |
The schedule status is Supplier Approved after the supplier approves it by clicking the Approve button on the Approve Schedules - Item Summary page. The scheduler cannot view the supplier's collaboration quantities until the supplier approves the schedule. |
|
Previous |
The current schedule's status changes from Current to Previous when you build a new schedule. |
|
History |
The previous schedule's status changes from Previous to History when you build a new schedule. |
Scheduler's Workbench Row Types
When you access a schedule for a particular item or group of items, the system displays several quantity-related rows that pertain to the item or group of items. These quantity-related rows provide the context of the status in the overall schedule. This table describes the row types and the relationship between them (from the scheduler's perspective):
|
Row Type |
Schedule Statuses |
Description of Row Type |
|
Actual Required Qty (actual required quantity) |
|
The system derives this quantity from the purchase order schedule lines and planned purchase order data. The system populates the planned purchase orders when you run the Export Supply Planning process. |
|
Additional Qty Since Approved |
|
This is the difference between the current requirements and the quantity that was previously agreed on. (Actual Required Qty − Previous Approved Qty) = Additional Qty Since Approved |
|
Additional Qty Since Build |
|
This is the difference between the current requirements and the requirements when you built the schedule. (Actual Required Qty – Current Required Qty) = Additional Qty Since Build |
|
Previous Required Qty |
|
This is the required quantity on the last schedule that you dispatched to the supplier. When you view the previous or history schedule, this row displays the final required quantity for the schedule being reviewed. |
|
Previous Approved Qty |
|
This is the quantity on the last schedule that the supplier approved. When you view the previous or history schedule, this row displays the final approved quantity for the schedule being reviewed. |
|
Current Required Qty |
|
This is the required quantity at the time that the schedule was built. The quantity includes any purchase order (if requested) and planned purchase orders. |
|
Current Approved Qty |
Supplier Approved |
This is the quantity that the supplier approved. |
|
Shortage/Overage |
Supplier Approved |
This is the shortage or surplus that you might have with the supplier's approved quantity for a particular bucket (day, week, or month). (Current Required Qty) − (Current Approved Qty) = (Shortage/Overage) |
|
Short/Over Rolling |
Supplier Approved |
This is the rolling cumulative total for overage or shortage across all buckets. (Last Buckets Over/Under Rolling Total) + (Current Column Over or Under Value) = (Short/Over Rolling) |
|
Proposed Apply Qty |
Supplier Approved |
This is the quantity that is updated to the live data (actual planned orders). The Apply process updates planned orders directly. However, you must perform purchase order updates manually. This row type only appears when you click the Apply link on the schedule list. |
|
Actual Shortage/Overage |
Supplier Approved |
This is the actual shortage or overage. (Proposed Apply Qty − Actual Required Qty) = (Actual Shortage/Overage) This row type appears when you click the Apply link on the schedule list. |
|
Actual Short/Over Rolling |
Supplier Approved |
This is the rolling cumulative total for actual shortage or overage. This row type appears only when you click the Apply link on the schedule list. |
Supplier's Approve Schedule Row Types
When a supplier accesses a schedule for a particular item or group of items, the system displays several quantity-related rows that pertain to the item or group. These quantity-related rows provide the context of the status in the overall schedule. This table describes these row types and the relationship between them (from the supplier's perspective):
|
Row Type |
Schedule Statuses |
Description of Row Type |
|
Previous Required Qty (previous required quantity) |
|
This is the requested quantity on the last schedule that the scheduler dispatched to the supplier. When you view the previous or history schedule, this row displays the final requested quantity for the schedule that is being reviewed. |
|
Previous Approved Qty |
|
This is the quantity on the last schedule that the supplier approved. When you view the previous or history schedule, this row displays the final approved quantity for the schedule that is being reviewed. |
|
Additional Qty Since Approved |
|
This is the net change in requested quantity since the last approved schedule. |
|
Current Required Qty |
|
This is the current quantity on the requested schedule. The quantity includes any purchase order schedule lines and planned purchase orders. (Previous Required Qty + Additional Qty Since Approved) = (Current Required Qty) |
|
Pending Approval Qty |
New (same as Dispatched on the scheduler's Workbench) |
This is the quantity that the supplier is willing to provide. By default, it is the current required quantity. Once the schedule is approved, this row type changes to Current Approved Qty. |
|
Current Approved Qty |
Supplier Approved |
This is the quantity that the supplier approved. |
|
Shortage/Overage |
|
This is the shortage or surplus that the scheduler will have if the pending approval quantity is accepted. If the schedule status is approved, then: (Current Approved Qty − Current Required Qty) = (Shortage/Overage) If the schedule status is dispatched, then: (Pending Approval Qty − Current Required Qty) = (Shortage/Overage) |
|
Short/Over Rolling |
|
This is the rolling cumulative total for the overage or shortage across all buckets. (Last Buckets Over/Under Rolling Total) + (Current Column Over/Under Value) = (Short/Over Rolling) |
Defining Vendor Information for Collaborative
Planning Schedules
This section lists the page used to define vendor information.
Page Used to Define Vendor Information|
Page Name |
Definition Name |
Navigation |
Usage |
|
ITM_VENDOR |
Items, Define Items and Attributes, Purchasing Attributes, Item Vendor |
Establish and update prioritized item-supplier combinations. You can identify any number of vendors and track information (such as the vendor's item ID or status) for each item. You can also specify lead time, price, tolerance, and the vendor's priority level. |
See Also
Defining Attributes and Priorities for Purchasing Item Vendor Relationships
Defining and Maintaining Schedule Groups
and Related Information
To set up schedule groups, use the Group Capacity component (ITM_CAPACITY_GROUP).
Schedule groups enable you to group similar vendor items together so that a consolidated supplier schedule can be created for the group versus each item. For example, if you purchase several similar items where the only difference is color, and from the suppliers' perspective require a similar effort (capacity) to produce, you can group these items together to generate a consolidated schedule for planned supply.
This section provides an overview of schedule groups and discusses how to define and maintain schedule groups and related information such as vendors, items, capacity, and flex.
Understanding Schedule Groups
Keep a few things to keep in mind when creating and using schedule groups:
You can have the same vendor item associated with different Inventory business units in the same group.
This enables you to summarize requirements from business units into a single schedule.
All items in a schedule group should be similar in nature and must share the same unit of measure.
All items in a schedule group must share the same quantity precision and rounding rules.
Spot buy items cannot be assigned to a group or item defined as a schedule item.
Flex information can only be defined for a group or item defined as a schedule item.
Pages Used to Define and Maintain Schedule
Group and Related Information|
Page Name |
Definition Name |
Navigation |
Usage |
|
ITM_CAP_GRP_BU |
Purchasing, Supplier Schedules, Schedule Group, Item/Business Unit |
Define a schedule group of vendor items. |
|
|
ITM_VND_BU_ATT_ADD |
|
Add a single item or multiple items to a schedule group. |
|
|
ITM_CAP_GRP_RANGE ITM_CAP_RANGE |
|
(optional) Define beginning and end dates and maximum capacity for suppliers. Indicates a supplier's ability to deliver the quantity for a particular time frame. |
|
|
ITM_CAP_GRP_FLX ITM_CAP_FLEX |
|
Indicate the fences and tolerances for the supplier associated with the schedule group or item Note. This page is available for scheduled items or groups only. |
Defining a Schedule Group
Access the Item/Business Unit page (Purchasing, Supplier Schedules, Schedule Group, Item/Business Unit).
|
Std UOM (standard unit of measure) |
Select the unit of measure for the schedule group. This field is unavailable for selection if there are items already associated with the schedule group. All items in a schedule group must have the same standard unit of measure. |
|
Schedule Item |
Select to indicate that the group is available to be used to build a supply schedule. |
|
VMI Item Default (vendor-managed inventory) |
Select if the inventory for this item is maintained by the vendor and you want to enable suppliers visibility to the quantity on hand (QOH) for this item by using Collaborative Supply Management. This will be the default value for all items to be added to this group, but can be modified for each item. Changing this option does not affect this option for items previously added to the group. |
|
Buyer/Planner |
(Optional) Select the buyer or planner (scheduler) who is responsible for this schedule group. This field is used for workflow and email notifications when the supplier approves a schedule. |
Vendors
After you have defined a schedule group, you need to associate vendors and vendor locations to the schedule group.
Click the Add button to add vendors to the schedule group.
Select the SetID, Vendor ID, and vendor Location.
Add items individually or click the Add Multiple Items button to add several items at one time to the same vendor and vendor location.
Note. All items added to the vendor must have the same standard UOM as the schedule group.
Select an Item ID and Business Unit for each item that you want to add to this vendor.
Make sure to save the changes.
See Also
Delivered Workflows for Collaborative Supply Management
Adding Multiple Items to a Schedule Group
Access the Add Items page (click the Add Multiple Items button on the Schedule Group page).
|
Vendor SetID, Vendor ID, and Location |
These fields are default values for the items that you are adding. These values come from the Item/Business Unit page. |
|
Consigned items only |
Select to retrieve only the items that are consigned. |
|
Search |
Click to retrieve the information based on the selection criteria. |
|
OK |
Click to add the selected items to the schedule group or to the schedule item grid and to return to the Group definition page or Item/Vendor/BU attributes page. |
Associate
|
Schedule Group |
Select the schedule group with which you want to associate items. When you click OK, the system assigns all selected items to this schedule group. The default value for this field is the group to which you are adding items. However, this same add page can be accessed from the Item/Vendor/BU Attribute page and then you can select a schedule group to be associated with all items selected. |
Adding Individual Items to a Schedule Group
Access the Item/Business Unit page (Purchasing, Supplier Schedules, Schedule Group, Item/Business Unit).
To add items one at a time to a vendor in a schedule group:
Click the Add button in the Items group box.
Select an Item ID and Business Unit for each item you add.
Make sure to save the changes.
Defining Vendor Capacity
Access the Capacity page (Purchasing, Supplier Schedules, Schedule Group, Capacity).
This page can be used to indicate how much capacity (in terms of units) that the supplier can allocate to you during a specific period of time. For example, this capacity can be defined per contractual agreement with the supplier. This capacity is used to manage and identify exceptions for the scheduler and supplier to review and take action.
Capacity
|
From Date and To Date |
Enter the beginning and ending dates. Gaps can exist between capacity date ranges which indicates that no capacity check is to be done for that range of time. Note. Dates cannot overlap. |
|
Maximum Capacity |
Enter the capacity that the supplier can fulfill for the time frame specified. Enter 0 if the supplier cannot supply any capacity during the range entered. Note. Specifying a zero quantity in the Maximum Capacity field indicates that the supplier has no capacity during the time frame. |
Defining Fixed or Firmed Attributes
Access the Flex page (Purchasing, Supplier Schedules, Schedule Group, Flex).
Fix Attributes and Firm Attributes
|
Fixed Fence Days or Firm Fence Days |
Fixed: Enter the number of days from the start of the schedule that you consider to be the fixed period. Firm: Enter the number of days after the Fixed period that you consider to be the firmed period. |
|
Use Upside % and Percent |
Select this check box and enter a percentage that determines the quantity above the baseline quantity that is considered acceptable during the fixed or firm period. If the quantity is changed above this tolerance, a violation is triggered. |
|
Use Downside % and Percent |
Select and enter a percentage that determines the quantity below the baseline quantity that is considered acceptable during the fixed or firm period. If the quantity is changed below this tolerance, a violation is triggered. |
|
Check Fix Tolerances by |
Select to indicate how to verify the upside or downside percentages. Options are:
|
|
Set to Approve |
Select to approve any planned orders within the fixed or firmed period defined during the Apply process. (The Apply link on the Scheduler's Workbench appears after the supplier responds to a schedule). When using a purchase order as the delivery mechanism this enables additional releases against the blanket order while reconciling supplier feedback. |
|
Set Status to Firm |
Select to set the planned order status to Firm within the fixed or firmed period defined during the Apply process. |
|
Set to Frozen |
Select to freeze planned orders within the fixed or firmed period defined during the Apply process. |
Defining Schedule Item Information for Collaborative
Planning Schedules
To define schedule item attributes, use the Schedule Item Attributes component (ITM_VND_INVBU).
To include an item as a collaborative planning schedule item, you must first define it. This section discusses how to define schedule item attributes if you want to maintain collaborative schedules by item versus group.
Pages Used to Define Schedule Item Information
for Collaborative Planning Schedules|
Page Name |
Definition Name |
Navigation |
Usage |
|
ITM_VND_BU_ATTR |
Purchasing, Supplier Schedules, Schedule Item Attributes, Item/Vendor/BU attributes |
Use this page when you intend to maintain schedules at the item level versus group level. Prior to defining schedule attributes for an item, the item must have purchasing attributes as well as Inventory business unit attributes defined.
|
See Also
Defining Purchasing Item Attributes
Defining Schedule Item Attributes
Access the Item/Vendor/BU attributes page (Purchasing, Supplier Schedules, Schedule Item Attributes, Item/Vendor/BU attributes).
|
Vendor SetID, Vendor ID, Item SetID, Item ID, and Location |
Select to filter the schedule items that you want to review or modify. When you define new schedule items, you can enter the header criteria such as set ID and vendor ID to simplify data entry. Note. Prior to adding items for a specific vendor, select the vendor ID and click the Search button to ensure that the item does not already exist |
|
Search button |
Click to retrieve the information based on the selection criteria. |
|
Add button |
Click this button to add items. |
|
Schedule Item and VMI Item (vendor managed item) |
These check boxes are available only if you are accessing this page from the Item/Vendor/BU attributes page. (This page is also used to add individual items to schedule groups or to add individual items.) Select to indicate if you want all items selected to be schedule items or vendor managed (VMI) items. The VMI option indicates the item quantity on hand information will be made available to the supplier by using an internet browser. |
Note. You must save the component before you can add any items.
|
Vendor SetID, Vendor ID, and Location |
These fields are default values from the Item/Business Unit page for the vendor and vendor location that you are adding items. |
|
Consigned items only |
Select to retrieve only the items that are consigned. |
|
Search |
Click to retrieve the information based on the selection criteria. |
|
OK |
Click to add the selected items to the schedule group or to the schedule item grid and to return to the Group definition page or Item/Vendor/BU attributes page. |
Items Tab
Select the Items tab.
|
Group |
Select the appropriate existing schedule group, if you want to associate the item to a group. |
|
Capacity |
Click to access the Capacity and Flex pages, where you can view and change the maximum quantity and fixed and firmed periods for the vendor. If a group is specified, the Capacity link will take you to the capacity or flex information for the group. Note. If no group is specified for the item, click the Capacity link for capacity or flex information for the item. See Defining and Maintaining Schedule Groups and Related Information. |
|
Schedule Item |
Displays whether the item is currently enabled for collaborative planning schedules. |
|
Schedule Priority |
Displays the priority for each item. This field is also used to filter the items for the schedule that you are creating. For example, you might collaborate on a high-priority item first. |
|
Buyer |
Displays the buyer for each item. The system uses the buyer associated to the schedule item for workflow notifications and email notifications when the supplier approves a schedule. |
|
VMI Item (vendor-managed item) |
Select to indicate that inventory for this item is managed by the supplier, and that you intend to make available quantity on hand for this item to the supplier by using an internet browser. Since quantity on hand displayed to the supplier is at the Inventory business unit level, PeopleSoft assumes this item is single-sourced to one vendor. |
Note. You cannot delete a row (item) if there are current or dispatched schedules for that item.
Creating New Schedules
Use the scheduler's workbench to create a new schedule or change an existing schedule.
This section lists common elements and discusses how to:
Define Scheduler's Workbench search parameters.
View the schedule list.
View the item or group summary row types.
Edit and view actual item quantities.
Review and modify previous approved quantities.
Build a supply schedule.
Send email to internal employees or to suppliers.
Common Elements Used in This Section|
Due Date |
Displays the date that the purchase order schedule line or planned purchase order is due. When you add a new planned order, the default due date relates to the period duration. If the period duration is Week, then the default due date is the first valid receiving date for that week, beginning on Sunday. If the period duration is Month, then the default due date is the first receiving day of the month. If the period duration is Day, then the default due date is the date to which you navigate. The receiving days are defined in the closure calendar. |
|
Time Due |
Enter the time that the purchase order schedule line or planned purchase order is due. This is an optional field. The default is blank. |
|
Quantity |
Displays the current quantity required for the PO schedule line or the planned PO. This number can be changed. |
Pages Used to Create New Schedules|
Page Name |
Definition Name |
Navigation |
Usage |
|
PO_BUY_SEL |
Purchasing, Supplier Schedules, Scheduler's Workbench, Selection Criteria |
Retrieve schedule data. |
|
|
PO_BUY_LIST |
Click the Search button on the Scheduler's Workbench - Selection Criteria page |
View all the items or groups that can have a schedule built. |
|
|
PO_BUY_ITEM_SUM |
Click the item ID or group link on the Scheduler's Workbench - List page. |
View, edit, and build a schedule. |
|
|
PO_BUY_ITM_COMMENT |
Click the Edit Comment link on the Scheduler's Workbench - Summary page. |
View or edit comments. Both the scheduler and supplier can use this page. |
|
|
PO_BUILD_RUN_SP |
Click the Build button or the Rebuild button on the Scheduler's Workbench - Summary page. |
Build and dispatch a schedule. |
|
|
WV_PE_EMAIL |
Click the Send E-mail link on the Summary page. |
Send an email message to the supplier or to internal employees. |
Defining Scheduler's Workbench Search Parameters
Access the Scheduler's Workbench - Selection Criteria page (Purchasing, Supplier Schedules, Scheduler's Workbench, Selection Criteria).
|
Create New Schedule |
Select to display a list of items or groups that are available for building a schedule. New schedules can be created for items or groups if no schedules exist with a status of Current or Dispatched. Any existing schedules in current or dispatched status must be approved by the supplier or deleted by the scheduler before a new schedule can be created. |
|
Maintain Current Schedules |
Select to retrieve schedules for items or groups with the status Current (built but not yet dispatched), Dispatched, or Supplier Approved. |
|
Show Approved Schedules with Changes only |
Select to retrieve dispatched schedules that have been approved by the supplier including those that may have supplier changes. Once a schedule has been approved by the supplier, the scheduler can use the Apply link to reconcile and update the schedule based on supplier feedback. |
|
View Past Schedules |
Select to view past schedules. |
Filter
The filter options within the search page vary slightly depending on whether you are creating a new schedule or modifying a current schedule, and whether you are maintaining schedules by item or by group.
|
Vendor, Vendor ID, Vendor Location, and SetID |
Select to specify the selection criteria. Use these fields if you are creating or modifying a schedule created by item or group. |
|
IN Unit (inventory unit) Category, and Schedule Priority |
Select these additional filter options when you create or modify a schedule by item. |
|
Item ID |
Select when you create or modify a schedule by item. The Item ID field appears in the Filter group box if you are creating a new schedule by item. In addition, select to include items that are not associated with a schedule group. |
|
Group |
Select to filter based on schedule group. The Group field appears in the Filter group box if you are creating a new schedule by group. Only groups with scheduled items are available for selection. |
|
Show Schedules with Capacity Violations only |
Select to include any schedules that have capacity violations. A capacity violation occurs when any capacity period overlaps with any portion of the schedule and the schedule is over capacity (more cumulative PO and planned quantities exist than the capacity allows). |
|
Show Schedules with Flex Violations only |
Select to include any schedules that have flex violations. A flex violation occurs when the actual schedule values (PO and planned quantities) exceed the upside or downside percentage of baseline quantities for the specific day or range of days. The baseline values used are the approved quantities from the previous schedule. |
|
Pre-Load Capacity/Flex data |
Select to pre-load or calculate all the capacity and flex information for the search criteria. This option is applicable only if you are not selecting capacity violations or flex violations. Selecting this option will help improve performance when going back and forth from the List page to the Summary page for multiple schedules. Otherwise, once you are on the Summary page, you can calculate the capacity and flex information for each schedule one at a time. |
|
Search |
Click to retrieve the selected criteria. |
Viewing the Scheduler's Workbench List
Access the Scheduler's Workbench - List page (click the Search button on the Scheduler's Workbench - Selection Criteria page).
Depending on the mode (New, Current, or Past) that you select on the Scheduler's Workbench - Selection Criteria page, the system retrieves a list of items and groups.
|
Group |
Click the Group link to access the Scheduler's Workbench - Summary page. For New schedules: If the Group option is selected, the system lists all schedule groups available for schedule creation. This includes groups that have no schedules as well as those where the last schedule is in the Approved status. |
|
Item ID |
Click an item ID to access the Scheduler's Workbench - Summary page. For New schedules: If the item option is selected on the Scheduler's Workbench - Selection Criteria page, the system lists all items that do not belong to a schedule group and are available for schedule creation. This includes items that have no schedules as well as those where the last schedule is in the Approved status. |
Note. For all other schedule modes, you may see both item and group links.
Viewing the Scheduler's Workbench Summary
Page
Access the Scheduler's Workbench - Summary page (click the item ID or group link on the Scheduler's Workbench - List page).
Depending on the Mode (New, Current, or Past) you select on the filter page pertinent row types are displayed in the summary. The quantities shown with each row type can be clicked to review the details. When creating a new schedule, the actual required quantities are used as the basis for the schedule once built. These quantities are derived from planned orders and purchase orders. Certain row types such as Actual Required Quantity enable you to modify underling planned required quantities and dates for the schedule.
Note. You can click any quantity link to navigate to the item details.
|
|
When working with a new schedule and if you are satisfied with the actual required quantities for the suppliers, click this button to display the Build Schedule Options page which enables building and dispatching the schedule online. |
See Scheduler's Workbench Row Types.
Checking and Calculating Capacity Information
The grid displays all date ranges defined for the group or item in the capacity setup that overlap the start and end dates of the schedule being viewed.
|
Calculate Capacity/Flex |
Click the Calculate Capacity/Flex button to calculate the capacity for this schedule. If the capacity and flex information has already been calculated, this button will change to Recalculate Capacity/Flex. As changes are made to the item details, the capacity/flex information is NOT automatically updated. Clicking this button will save any pending detail changes and recalculate the capacity and flex information. |
|
|
This red box denotes that there is a violation. Clicking the Calculate Date button will generate the date on which the violation first appears. If the date is within the schedule being maintained, it becomes a link that you can click which takes you to the actual bucket containing this date. |
|
Actual Qty (actual quantity) |
This column includes the PO schedule quantities for open and closed POs, and planned orders for the date range of the capacity bucket. This actual quantity is compared against the capacity quantity identified if you are ordering over the agreed upon supplier capacity. In Apply mode, this quantity can be changed to compare against the proposed quantities so that you can simulate changes prior to applying changes to the schedule. Note. On the supplier side, the capacity quantity will be compared against the pending approval quantity so that a supplier can view capacity to suggested changes on the supplier side. |
|
Date Exceeded |
If there is a capacity violation, you can click the Calculate Date button to generate the exact date when the quantity exceeded the defined capacity quantity. If the date falls within the schedule start and end range, then the date will be a link that will enable you to navigate into the corresponding bucket (period) containing that date in the Actual Required Qty row type. |
Click the Calculate Capacity/Flex button to calculate flex information for the schedule.
The Flex collapsible section displays both Fixed and Firmed periods. The header information displays the period type (Fixed or Firmed), the date range for the period specific to this schedule, whether tolerance is by Day or Range, and the upside or downside percentages defined for this item or group.
The contents of the each grid displays any days or ranges which are in flex violation where the actual required quantity for the schedule exceeds the baseline quantities set from the prior schedule.
In Apply mode, you can also compare baseline values versus proposed apply quantities to factor in any suggested changes by the supplier.
Flex Details Tab
Select the Flex Details tab.
|
Date |
If the period is defined as by day, then each day within the range is displayed in the grid separately. Note. Only the days where there are quantities defined are displayed; days with a zero quantity are not displayed. |
|
Start Date or End Date |
If the period is defined as by range, then there will be one row in the grid with the entire range together. |
|
Baseline Qty (baseline quantity) |
The quantity for the given day or range that was approved for the prior schedule. |
|
Actual Qty (actual quantity) |
The current actual quantity (planned orders and POs) for the given day or range. |
|
Over/Under Flex Qty (over or under flex quantity) |
This column displays the difference between the actual quantities and the baseline quantity ± Flex upside or downside quantity (quantity over or under the flex). This value will be highlighted if the flex has been exceeded for a fixed or firmed range. This value indicates how far over or under the acceptable flex quantity the buyer is for that specific date. This value is 0 if the buyer is within the flex tolerance quantity. When violating flex on the downside, this value will be negative. This value is useful to indicate the quantity that needs to be adjusted to meet flex requirements. |
|
Maximum Upside Qty (maximum upside quantity) |
This quantity is the total acceptable upside quantity for the day or fixed or firmed range (based on setup options). This quantity is calculated based on the (baseline value + the % upside × the baseline value). This value is displayed independent of a violation and is useful to see the total maximum quantity that can be ordered. |
|
Minimum Downside Qty (minimum downside quantity) |
This quantity is the total acceptable downside quantity for the day or fixed or firmed range (based on setup options). This quantity is calculated based on the (baseline value − the % downside × the baseline value). This value is displayed independent of a violation and is useful to see the total minimum quantity that should be ordered. |
More Calculations Tab
Select the More Calculations tab.
|
Upside (Delta) Qty (upside delta quantity) |
This column displays the delta acceptable upside quantity for the day or fixed or firmed range (based on setup options). This quantity is calculated based on the maximum quantities − actual quantities. This quantity is useful to determine if additional quantities can be ordered. |
|
Downside (Delta) Qty (downside delta quantity) |
This column displays the delta acceptable downside quantity for the day or fixed or firmed range (based on setup options). This quantity is calculated based on the actuals quantities − minimum quantity. This quantity is useful to determine if fewer quantities can be ordered |
|
Over/Under Baseline % |
This column displays the current over or under percentage based on actuals versus baseline. For example, if the baseline quantity is 100, and actual quantity is 105, then the percentage is 5. This percentage is useful for the buyer to see how much flex is being utilized based on actuals. When the actual quantities are equal to the baseline quantities, this value is zero. |
Editing and Viewing Actual Item or Group
Quantities
Access the Scheduler's Workbench - Summary page (click the item ID or group link on the Scheduler's Workbench - List page) and click an Actual Required Qty bucket for one of the periods in the schedule. This expands the details for the quantity bucket below the summary page.
Note. These columns are visible only for groups.
|
IN Unit and Item |
These fields are used to filter the details to display only one particular item (from within the group) and its related information. In addition, these values can be used as defaults when adding new planned orders into the grid for a specific Inventory business unit or item. |
|
Total Quantity |
This display-only field reflects the total quantity for the specific Inventory unit and the item. |
|
Refresh button |
This button uses the filters entered (IN Unit and Item) to filter the rows that show appear in the detail section. It also refreshes the total quantity for the specific time period and based on the IN Unit and Item values. |
Schedule Navigation and Updates
The Item Detail and Schedule Summary pages work together so that changes to the item details (such as quantity and date) can be updated as part of the navigation. For example, you can update quantities in the details and navigate by clicking other buckets in the summary, or by using the << >> navigation buttons in the schedule detail to traverse bucket by bucket.
The Update button can be also used to update the Required Actual Qty without navigating elsewhere within the component.
Note. There is no Save button on this component. Therefore, updates are being made to the actual planned order quantities as you change and navigate within the component or by clicking the Update button.
Date/Qty Details Tab
Select the Date/Qty Details tab.
|
PO No. |
Displays the purchase order ID that you include in the schedule. For a planned purchase order, the order ID will be blank, and the Type column will be New. |
|
Due Date, Time Due, and Quantity |
Enter values for these fields. |
|
Frozen |
If this check box is selected, then the order or operation is frozen, and Supply Planning does not automatically reschedule the line. |
|
Approved |
If this check box is selected, the planned PO is approved and is ready to be converted to a purchase order. (Behaves the same as if you had approved the line on the Receive Purchase Messages page.) |
|
Plan Status |
The status of the planned purchase order. Options are Canceled, Firmed, and Planned. If you add a new planned purchase order, the default value is Planned. If the row is a PO, this field is blank. If the status of a planned order is Canceled, Supply Planning deletes the order during the next planning cycle and prevents the row from appearing in the workbench. If the status of a planned order is Firmed, Supply Planning retains the planned purchase order. |
Vendor Tab
Select the Vendor tab.
|
Vendor ID and Vendor Location |
Enter a new vendor ID or location here if necessary. These fields can be used to push required quantities between vendors schedules. The system updates the total quantity when you click the Update button. Once you move a quantity to a new vendor ID or location, you must maintain the schedule separately for the alternative vendor or location. |
Description Tab
Select the Description tab.
Note. This tab appears only when viewing a Group schedule, since groups can contain multiple items.
This tab appears for new schedules based on groups. Use it to view the item description.
Configuration Code Tab
Select the Configuration Code tab.
This tab appears only if an item is a configured item. Use it to view the configuration code.
Reviewing Previous Approved Quantities
Access the Scheduler's Workbench - Summary page (click the item ID or group link on the Scheduler's Workbench - List page) and click a Previous Approved Quantity bucket for a period.
Date/Qty Details Tab
Select the Date/Qty Details tab.
The system displays schedule information concerning the Inventory unit, item, original due dates and times, and current standard and confirmed standard quantities for the schedule.
PO Details Tab
Select the PO Details tab.
The system displays PO information regarding the schedule.
Building a Supply Schedule
Access the Build Schedule Options page (click the Build button or the Rebuild button on the Scheduler's Workbench - Summary page).
In addition to building schedules online from the Scheduler's Workbench, you can also build schedules in batch. This provides an automated method to build and dispatch multiple schedules to suppliers.
|
Dispatch Flag |
Select to determine how the system dispatches the schedules to the supplier. Options are:
|
|
Dispatch Email Address |
Enter the email address of the supplier. By default, the field contains the email address for the ordering location of the vendor. If the field is blank, then the Dispatch process cycles through all vendor locations associated with all purchase orders for the schedule and concatenates all the ordering locations' email addresses together. |
|
Scheduler's Email Address |
Enter the email address of the scheduler. This email address is the default when the supplier sends an email. The email address is also used to send a notification to the scheduler when the supplier approves the schedule. If the schedule group or item has a buyer ID associated to it, the email address defined for this buyer ID will be used as the default. |
Sending Email to Internal Employees or to
Suppliers
Access the Email Message page (click the Send E-mail link on the Scheduler's Workbench - Summary page).
|
Email Subject |
Enter the subject of the email. The default is View Supplier's Schedule. |
|
Message |
Enter the text of the message. The message text includes a link to the Scheduler's Workbench - Summary page. For the supplier to access that page, you must first grant the supplier security permissions. |
If you have enabled Workflow, the supplier is notified that the schedule has been dispatched.
See Also
Delivered Workflows for Collaborative Supply Management
Maintaining Current Schedules
A current schedule is one which has been built and may have a status of Current, Dispatched, or Approved.
This section discusses how to:
View the item summary row types for a current schedule.
Review current required quantities.
Review and edit current approved quantities.
Rebuild schedules.
Dispatch supply schedules.
Pages Used to Maintain Current Schedules|
Page Name |
Definition Name |
Navigation |
Usage |
|
PO_BUY_SEL |
Purchasing, Supplier Schedules, Scheduler's Workbench, Selection Criteria |
Retrieve current schedule data by selecting the Maintain Current Schedules option. |
|
|
PO_BUY_LIST |
Purchasing, Supplier Schedules, Scheduler's Workbench, List |
View all the schedules that match the criteria. |
|
|
PO_BUY_ITEM_SUM |
Click the link for an item ID or group on the Scheduler's Workbench - List page. |
View, edit, and rebuild a schedule. |
|
|
PO_BUY_ITM_COMMENT |
Click the Edit Comments or Previous Comments link on the Scheduler's Workbench - Summary page. |
View or edit comments. Both the scheduler and supplier can use this page. |
|
|
PO_BUILD_RUN_SP |
Click the Build button or the Rebuild button on the Scheduler's Workbench - Summary page. |
Build and dispatch a schedule. |
|
|
WV_PE_EMAIL |
Click the Send E-mail link on the Scheduler's Workbench - Summary page. |
Send an email message to the supplier or to internal employees. |
Viewing the Item Summary Row Types for a
Current Schedule
Access the Scheduler's Workbench - Summary page (click the link for an item ID or group on the Scheduler's Workbench - List page).
A current schedule can have these statuses:
Current
Dispatched
Supplier Approved
See Scheduler's Workbench Row Types.
Reviewing Current Required Quantities
Access the Scheduler's Workbench - Summary page (click the link for an item ID or group on the Scheduler's Workbench - List page). Click one of the current required quantities.
Note. The Item Detail - Current Required Qty collapsible group box appears only after you click one of the links.
|
Current Standard Quantity |
Displays the current required quantity based on the standard UOM. |
Reviewing and Editing Current Approved Quantities
Access the Scheduler's Workbench - Summary page (click the link for an item ID or group on the Scheduler's Workbench - List page). Click one of the links for current approved quantities.
Note. The Item Detail - Current Approved Qty collapsible group box appears only after you click one of the links. This row type only appears after a schedule has been approved by the supplier.
|
Original Due Date |
Displays the original due date of the purchase order schedule line or the planned purchase order. |
|
Original Due Time |
Displays the original due time of the purchase order schedule line or the planned purchase order. |
Rebuilding Schedules
Access the Scheduler's Workbench - Summary page (click the link for an item ID or group on the Scheduler's Workbench - List page).
Depending on the status of the schedule, one of these buttons is available:
|
Rebuild |
Click to rebuild if the schedule has the status Dispatched, Current, or Approved. If you rebuild a schedule that has been previously dispatched, the system overwrites the dispatched schedule. The same start and end dates are used for the schedule. |
|
Dispatch |
Click to build if the schedule has the status of Current. If the status is Current, the schedule has not yet been dispatched to the supplier. |
Dispatching Supply Schedules
Access the Dispatch Schedule Options page.
|
OK button |
Click to dispatch the schedule. |
|
Cancel |
Click to cancel dispatching the schedule. |
See Building a Supply Schedule.
Viewing Past Schedules
This section discusses how to review past quantities.
Pages Used to View Past Schedules|
Page Name |
Definition Name |
Navigation |
Usage |
|
PO_BUY_SEL |
Purchasing, Supplier Schedules, Scheduler's Workbench, Selection Criteria Select View Past Schedules on the Selection Criteria page and click Search. |
View all the items with the status Previous or History. |
|
|
PO_BUY_LIST |
Click a link for a previous approved quantity on the Scheduler's Workbench - Summary page. |
View past schedules. |
Reviewing Past Quantities
Access the Scheduler's Workbench - Summary page (click the link for an item ID or group on the Scheduler's Workbench - List page). Click the link for a previous approved quantity.
Note. The Previous Approved Qty collapsible group box appears only after you click one of the links.
Building Multiple Schedules
This section discusses how to run the Supplier Collaboration (PO_DISPCOLLB) process to build multiple supply schedules.
Page Used to Build Multiple Schedules|
Page Name |
Definition Name |
Navigation |
Usage |
|
PO_BUILD_COLLAB |
Purchasing, Supplier Schedules, Build Schedules, Build Schedule |
Build multiple schedules based on selection criteria and, if you want, dispatch the schedules. |
Running the Build Multiple Supply Schedules
Process
Access the Build Schedule page (Purchasing, Supplier Schedules, Build Schedules, Build Schedule).
|
Create By |
Select the method to create the schedule. Options are Item and Group. |
Schedule Parameters
|
Schedule Start |
Enter the number of days before or after the current date for the starting date of the schedule. Enter a negative number for days before or a positive number for days after the current date. Enter 0 if you want the schedule to start on the current date. |
|
From Date |
Displays the starting date of the schedule. The system calculates this date by adding the value in the Schedule Start field to the current date. |
|
Number of Periods |
Enter the number of periods in the schedule. The maximum number is 52. |
|
Period Duration |
Select the length of time used to establish the periods. Values are Day, Week (the default), and Month. When you specify the number of periods, the system uses this duration. |
|
To Date |
Displays the last date for which the system collects schedule data. The system calculates this date based on the values for number of periods, period duration and from date. |
|
Include PO Data (include purchase order data) |
Select to have the system include both purchase order data and planned purchase order data. If the check box is deselected, only planned purchase order data is included in the schedule. |
Dispatch Parameters
Select the parameters for dispatching the schedule.
See Dispatching Supply Schedules.
Dispatching Multiple Supply Schedules
This section discusses how to run the Supplier Collaboration (PO_DISPCOLLB) process to dispatch multiple supply schedules.
Page Used to Dispatch Multiple Supply Schedules|
Page Name |
Definition Name |
Navigation |
Usage |
|
PO_BUILD_COLLAB |
Purchasing, Supplier Schedules, Dispatch Schedules, Dispatch Schedule |
Dispatch multiple schedules to the supplier. Display all the schedules that are pending dispatch. |
Running the Dispatch Multiple Supply Schedules
Process
Access the Dispatch Schedule page (Purchasing, Supplier Schedules, Dispatch Schedules, Dispatch Schedule).
Click the Preview Schedule button to view all schedules matching the selection criteria that are available to be dispatched.
Dispatch Parameters
|
Method |
Select the method for the dispatch. Options are Email and Other, which includes telephone, fax, or other method. If you select Email, then you must enter the supplier's email address. |
|
Email Address |
Enter the email address of the supplier. If the field is blank, then the Dispatch Multiple Supply Schedules process cycles through all vendor locations associated with all purchase orders for each schedule, and it concatenates all the ordering locations' email addresses together. You can override the concatenated email addresses and enter a specific email address for the notification. |
Deleting Past Schedules
This section discusses how to run the Delete Past Schedules (PO_BLDCLEAN ) process.
Page Used to Delete Past Schedules|
Page Name |
Definition Name |
Navigation |
Usage |
|
PO_COLLAB_CLEANUP |
Purchasing, Supplier Schedules, Delete Schedules, Delete Schedules |
Delete multiple past schedules based on aging relative to the current date. |
Running the Delete Past Schedules Process
Access the Delete Schedules page (Purchasing, Supplier Schedules, Delete Schedules, Delete Schedules).
|
Delete schedules older than … days |
Enter a positive number. When you press Tab to exit the field, the Earlier than field reflects the change. For example, to delete schedules that are older than 20 days when the current date is 01/24/2006, enter 20. The Earlier than field then displays 01/04/2006. The system deletes all schedules that match the criteria and that were created on or before the date in the Earlier than field. |
Enabling Suppliers to View Dispatched Schedules
When the schedule is dispatched by email, a link is included in the email which will take the supplier directly to the schedule requiring approval. A supplier can also view a pagelet with a list of the recently dispatched schedules. Depending on the system setup, the location of this pagelet varies. You can change the setup on the page or allow the supplier to determine the location.
In addition, with collaborative planning schedules, you can use workflow to send notification of scheduling tasks to the supplier. A supplier can access a pagelet in Collaborative Supply Management to view task details.
See Also
Delivered Workflows for Collaborative Supply Management
Enabling Suppliers to Update and Approve
Schedules
This section provides an overview of supply schedule approval and discusses how to:
Define approve schedules search parameters.
Maintain a supplier's current schedules.
View the item summary row types for new schedules.
Edit and view pending approval quantities.
Calculate capacity information.
Calculate flex information.
Confirm approvals.
Understanding Supply Schedule Approval
Suppliers can approve schedules that you dispatch, and they can review previously approved schedules. You must provide access for each supplier with whom you plan to collaborate. After entering certain selection criteria, a supplier can access a list of dispatched schedules associated with a Inventory business unit.
Note. The scheduler can only build and dispatch schedules. Only suppliers can approve schedules unless the schedule is a display-only schedule, and if so, the schedule is automatically approved when dispatched.
A supplier can:
See the schedule in a similar format as the scheduler.
View any capacity or flex information for the latest schedule.
Change the approved quantities, due dates and/or times within the schedule.
Approve a schedule which creates an email response to the scheduler.
Enter comments.
Send email.
View recently dispatched schedules from the scheduler.
A supplier cannot:
Modify any actual required quantities (actual planned or purchase order quantities).
See actual required quantities for schedules pertaining to other suppliers.
Pages Used to Enable Suppliers to Update
and Approve Schedules|
Page Name |
Definition Name |
Navigation |
Usage |
|
WV_SS_VND_LIST |
Manage Supply, Approve Schedules, Select Vendor |
Select the vendor for whom the schedule is maintained. A supplier clicks a vendor name to access the Filter Options page and enter search criteria for the schedule item. If only one vendor ID is associated with the user ID, the Select Vendor page does not appear. Instead, the supplier accesses the Filter Options page directly. |
|
|
PO_BUY_SEL |
|
Narrow the list of items for which the supplier maintains a schedule. Define selection criteria to determine the type of schedule (current or past) to review. |
|
|
PO_SS_COLLITM_LIST |
Select Maintain Current Schedule on the Filter Options page then click Search. |
View all the items that have been dispatched from the scheduler and those that were previously approved. |
|
|
PO_BUY_ITEM_SUM |
Click an Item ID or Group link on the Schedule List page |
View, edit and approve a schedule. |
|
|
PO_BUY_ITM_COMMENT |
Click the Edit Comment link on the Summary page to maintain or add new comments. Click the Previous Comments link on the Item summary page to view comments from the previous schedule. |
View or edit the comments. Both the scheduler and the scheduler can use this page. |
Defining Approve Schedules Search Parameters
Access the Approve Schedules - Filter Options page (Manage Supply, Approve Schedule, Filter Options).
Note. This component is used for suppliers only.
|
Maintain Current Schedules |
Select to display a list of schedules with the status New or Approved. |
|
Show new schedules only |
Select to view only new schedules awaiting approval. Approved schedules are excluded. |
|
View Past Schedules |
Select to display a list of schedules that have been previously approved. The supplier must select a date range to view the past schedules. |
|
From |
Enter the start date for the period of time for which the supplier views past schedules. |
|
To |
Enter the end date for the period of time for which the supplier views past schedules. |
Maintaining a Supplier's Current Schedules
Access the Approve Schedules - Schedule/Item List page (click Search after selecting Maintain Current Schedule on the Filter Options page).
Suppliers use this page to view details relating to the schedules.
Viewing the Item Summary Row Types for New
Schedules
Access the Approve Schedules - Item Summary page (click an Item ID or Group link on the Approve Schedules - Schedule/Item List page).
Note. Click a quantity link to navigate to the item details.
See Scheduler's Workbench Row Types.
Editing and Viewing Pending Approval Quantities
Access the Approve Schedules - Summary page (click an Item ID or Group link on the Schedule List page). Click a link for a pending approval quantity.
Note. The Pending Approved Qty collapsible group box appears only after you click one of the links.
|
Revised Vendor Quantity |
The schedule quantity to which the supplier can suggest updates. The default value is the current required quantity. |
Note. The revised quantity UOM is based on the value selected in the UOM to View Quantities field on the Filter Option page. If you select Standard UOM in the UOM to View Quantities field, the system prompts you to enter the revised standard quantity. The system then calculate and displays the revised vendor quantity if you selected the Show Vendor Qty/UOM Columns option.
Calculating Capacity Information (Suppliers)
Click the Calculate Capacity/Flex button to calculate the capacity for this schedule.
If the capacity and flex information has already been calculated, this button changes to Recalculate Capacity/Flex. As changes are made to the item details, the capacity and flex information is not automatically updated. Clicking this button saves any pending detail changes and recalculates the capacity and flex information.
The grid displays all date ranges defined for the group or item in the capacity setup that overlap the start and end dates of the schedule being viewed.
|
|
This red box denotes that there is a violation. |
|
Actual Qty (actual quantity) |
This column displays the pending approval quantity values for the specific range. This compares the defined capacity quantity against the actual data. |
|
Date Exceeded |
If there is a violation for this row type, you can click the Calculate Date button to generate the exact date when the quantity exceeded the defined capacity quantity. If the date falls within the schedule start and end range, then the date will be a link that enables you to navigate into the corresponding bucket (period). |
Calculating Flex Information (Suppliers)
If flex has been defined for the group or item, you can click the Calculate Capacity/Flex button to calculate flex information for the schedule.
The Flex collapsible section shows both fixed and firmed periods. The first section shows the detailed information such as fixed or firmed periods, the date range for the period, whether tolerance is by day or range, and the upside or downside percentages are defined.
The quantity comparisons all behave similar to capacity as they are compared against the pending approval quantities.
Flex Details Tab
Select the Flex Details tab.
|
Date |
If the period is defined as by day, then each day within the range will be displayed in the grid separately. Note. Only the days where there are quantities defined are displayed; days with zero quantity are not displayed. |
|
Start Date or End Date |
If the period is defined as by range, then there will be one row in the grid with the entire range together. |
|
Baseline Qty (baseline quantity) |
The quantity for the given day or range that was approved for the last schedule. |
|
Actual Qty (actual quantity) |
The pending approval quantity for the given day or range. |
|
Over/Under Flex Qty (over or under flex quantity) |
This column will display the difference between the actual quantities and the baseline quantity ± Flex upside or downside quantity (quantity over or under the flex). This value is highlighted if the Flex has been exceeded for fixed or firmed ranges. This value indicates how far over or under the acceptable flex quantity the buyer is for that specific date. This value is 0 if the buyer is within the flex tolerance quantity. This value is useful to indicate the quantity that needs to be adjusted to meet flex requirements. |
|
Maximum Upside Qty (maximum upside quantity) |
This quantity is the total acceptable upside quantity for the day or fixed or firmed range, based on setup options. This quantity is calculated based on the baseline value + the % upside × the baseline value. This value will be displayed independent of a violation and is useful to see the total maximum quantity that can be ordered. |
|
Minimum Downside Qty (minimum downside quantity) |
This quantity is the total acceptable downside quantity for the day or fixed or firmed range, based on setup options. This quantity is calculated based on the baseline value − the % downside × the baseline value. This value displays independent of a violation and is useful to see the total minimum quantity that should be ordered. |
More Calculations Tab
Select the More Calculations tab.
|
Upside (Delta) Qty (upside delta quantity) |
This column displays the delta acceptable upside quantity for the day or fixed or firmed range, based on setup options. This quantity is calculated based on the maximum quantities − actual quantities. This quantity is useful to determine if additional quantities can be ordered. |
|
Downside (Delta) Qty (downside delta quantity) |
This column displays the delta acceptable downside quantity for the day or fixed or firmed range, based on setup options. This quantity is calculated based on the actuals quantities − minimum quantity. This quantity is useful to determine if fewer quantities can be ordered. |
|
Over/Under Baseline % |
This column displays the current over or under percentage based on actuals versus baseline. For example, if the baseline quantity is 100, and actual quantity is 105, then the percentage is 5. This percentage is useful for the buyer to see how much flex is being utilized based on actuals. When the actual quantities are equal to the baseline quantities, this value is zero. |
Confirming Approvals (Suppliers)
When the supplier clicks the Approve button on the Approve Schedules - Item Summary page, the system immediately generates an approval confirmation to indicate which item was approved and the start and end date of the schedule. In addition, if the scheduler entered an email address when the schedule was created, the system notifies the scheduler by email of the approval.
After a schedule is approved, the item status on the scheduler's workbench changes from Dispatched to Supplier Approved.
Viewing Past Schedules
This section discusses how to review previous approved quantities.
Pages Used View Past Schedules|
Page Name |
Definition Name |
Navigation |
Usage |
|
WV_SS_VND_LIST |
Manage Supply, Approve Schedules |
Select the vendors whose Kanban requests you want to review. |
|
|
PO_BUY_SEL |
|
Narrow the list of schedules for which the supplier maintains a schedule. |
|
|
PO_SS_COLLITM_LIST |
Select the View Past Schedules button, enter a date range, and click the Search button on the Filter Options page. |
View all the schedules with a status of Previous or History. |
|
|
PO_BUY_ITEM_SUM |
Click an Item ID or Group link on the Approve Schedules - Schedule/Item List page. |
View past schedules. |
Reviewing Previous Approved Quantities
Access the Approve Schedules - Schedule/Item List page (select the View Past Schedules button, enter a date range, and click the Search button on the Filter Options page). Click the link for a previous approved quantity.
Note. The Previous Approved Qty group box appears only after you click one of the links.
Applying Collaborative Changes (Scheduler)
After the supplier approves a schedule, the scheduler can reconcile the supplier's feedback and apply changes to the collaborative schedule. When entering in Apply mode for an approved schedule, the system calculates a proposed apply quantity using a combination of supplier feedback regarding quantity changes and dates, along with any potential changes in the actual plan since the time the schedule was dispatched to the supplier. Both planned orders and purchase orders are included when you review changes and determine which ones to apply. Purchase orders are included only if selected for inclusion when the schedule was created (built). Planned order changes (including supply-side collaborative changes and scheduler changes) can be applied automatically. What-if scenarios can be simulated for purchase orders within the apply process. However, actual changes to purchase orders are done manually.
This section lists the common elements and discusses how to review and modify the proposed apply quantity.
Common Elements Used in This Section|
Calculate |
Click to calculate the new Proposed Apply quantity for the affected row types. The system does not update the data until you click the Update button. |
|
Update |
Click to update the quantities on the Scheduler's Workbench - Summary page for the affected Required Actual Quantity (planned orders). Actual quantities are updated to match the Proposed Apply quantities. Note. The Update button can be clicked only once within Apply mode for a schedule. |
|
Apply |
Click this link next to an schedule with the status Supplier Approved on the Scheduler's Workbench - List page. After you apply the changes, the link is no longer visible on the item list. |
|
Total Quantity |
Displays the running total based on the selected action, planning status, the actual (or live) data quantity or the collaborated quantity. If the action is Collab, the collaborated quantity is used. If the action is Ignore or the planning status is Canceled, no quantity is added to the total. The Total Quantity field is updated when you click the Calculate button after modifying any proposed quantities in the detail page. |
|
Chg (change) |
Rows marked as Chg (change) are used to identify which rows have changes since the initial schedule was dispatched to the supplier. Displays whether a change has taken place in the quantity or date and time by the supplier, scheduler, or planning since the schedule was dispatched. |
|
Quantity |
Represents the quantity used for the actual data. If the planning status is not Canceled, the quantity cannot be 0. You can change this quantity for PO-related lines to reflect related impact on the schedule. However, purchase order changes are always made manually. |
|
Collab Due Date (collaborated due date) |
Displays the due date of the collaborative quantity. |
|
Collab Time Due (collaborated time due) |
Displays the time due of the collaborative quantity. |
|
Collaborated Qty (collaborated quantity) |
Displays the agreed upon or proposed quantity changes from the supplier. |
Pages Used to Apply Collaborative Changes|
Page Name |
Definition Name |
Navigation |
Usage |
|
PO_BUY_SEL |
Purchasing, Supplier Schedules, Scheduler's Workbench, Selection Criteria |
View a list of items that have been approved by the supplier. These items must have the status Supplier Approved. |
|
|
PO_BUY_LIST |
Click Search on the Scheduler's Workbench - Selection Criteria page. |
Select a supplier approved schedule to apply changes. |
|
|
PO_BUY_ITEM_SUM |
Click the Apply link for a schedule with the status Supplier Approved on the Scheduler's Workbench - List page. |
Review and modify the proposed apply quantity. Determine which type of data to select based on the selected action. |
Reviewing and Modifying the Proposed Apply
Quantity
Access the Scheduler's Workbench - Summary page (click the Apply link for a schedule with the status Supplier Approved on the Scheduler's Workbench - List page).
This page enables you to:
Review the changes that the supplier suggested in line with any actual (or live) data for the schedule.
Review impact on capacity and flex in relation to the proposed quantity as well as actual quantities.
Modify the data and track the cumulative impact on the schedule (that is, perform what-if scenarios) without affecting the actual underlying planned orders.
This enables you to maintain actual orders and include the supplier changes for a given schedule.
To review and modify proposed apply quantity:
In the Summary group box, click the Proposed Apply Qty link to display the item details and supplier feedback.
Review the rows of actual and collaborative feedback from the supplier.
Change the actions, quantities, dates, and planning settings depending on the desired effect. Click the Add button to add a new row (new planned order).
Note. When you change the data on this page, the system does not modify the underlying planned orders until you click the Update button. If you make changes on this page and exit without clicking the Update button, the changes are lost.
|
Action |
Select to indicate the action to take for the specific row during the update of actual planned orders. The action defaults are based on the assumptions made in the apply process. Generally, if collaborative changes have been made on the supply side only, the system uses Collab. If changes have been made to both the live data (on the scheduler side), the system uses the action Actual by default. Values are:
|
|
Planning Status, Frz (frozen), and Aprv (approved) |
When you click the Update button, the planned orders are updated with these values. The values apply to rows with the action Actual or Collab selected. For example, the supplier might request a new planned quantity in the fixed period which appears to the buyer as a Collab row. If the buyer leaves the action as Collab and selects Aprv, when the Update button is clicked, the new approved planned quantity is added to the system which, once processed, will result in a new purchase order schedule line for the item. Note. Depending on the settings for group or item, when you click the Update button, the planned orders for the appropriate number of days in the fixed or firmed period will be automatically set to Approved, Firmed, or Frozen. Approved orders are approved for new purchase orders. Frozen and Approved settings identify the planned orders so that subsequent Supply Planning runs will honor these settings (they won't be rescheduled). |
This table describes the rules that the system applies to determine the default actions that appear for the proposed apply quantity. Actual refers to the existing planned orders in the system, and Collab refers to the changes made by the supplier.
|
Actual Data |
Collaborated Data |
Default Action |
Notes |
|
No change in actual data. |
No change in collaborated data. |
Actual |
No changes made by scheduler or supplier, so the system leaves the data intact. |
|
No change in actual data. |
Change in collaborated data. |
Collab |
The system applies the supplier changes to the schedule. |
|
Change in actual data. |
No change in collaborated data. |
Actual |
The actual planned orders changed because the schedule was dispatched. The system keeps the actual planned orders intact. |
|
Change in actual data. |
Change in collaborated data (excluding date changes). |
Actual |
The actual planned orders changed because the schedule was dispatched. The system keeps the actual planned orders intact and disregards the supplier's changes |
|
Changes in actual data. |
Change in collaborated data (date changes). |
Actual and Collab |
Two rows appear: one with the action Actual for the changes on the actual side and the other with the action Collab for the changes on the supply side. The system keeps track of both changes, because both changes may be important, and they may need to be reconciled. |
|
Add a new planned purchase order. |
Not applicable. |
Actual |
The new planned order was added because the schedule was dispatched. The system keeps the actual planned order. |
|
Not applicable. |
Add a new planned purchase order. |
Collab |
Supplier suggested a new quantity. The system applies supplier's changes to the schedule. |
Performance Considerations
To improve performance when using the PeopleSoft Supply Planning system in conjunction with the Apply Collaborative Change feature, you can add a user index to the PL_PLAN_PO_ORD table on the Change Record Index page in PeopleTools. These are the values to use when creating the index:
|
Field |
Value |
|
Index |
A |
|
Type |
User |
|
Uniq |
N |
|
Clust |
N |
|
Custom Order |
Y |
|
Platfm |
All |
|
Key Fields |
|
|
BUSINESS_UNIT_IN |
Asc |
|
SEQ_NBR |
Asc |
See Enterprise PeopleTools PeopleBook: PeopleSoft Application Designer