 Understanding Inventory Stock Counts Using Mobile Devices
This chapter provides an overview of counting stock in PeopleSoft Inventory using mobile devices and discusses how to:
Define installation options and user preferences for Mobile Inventory Management counts.
Set up inventory stock counts in PeopleSoft Inventory.
Perform guided counts in PeopleSoft Mobile Inventory Management.
Perform counts by location in PeopleSoft Mobile Inventory Management.
Perform counts by item in PeopleSoft Mobile Inventory Management.
Perform manual counts in PeopleSoft Mobile Inventory Management.
Understanding Inventory Stock Counts Using Mobile DevicesCounting inventory stock within a location is a common use for mobile devices. Inventory stock is item stock that is currently recorded in a PeopleSoft Inventory business unit. Counting items can involve counting an entire business unit (such as a warehouse) or a section of a business unit (such as a stockroom on a hospital floor).
After the stock count quantities are recorded, PeopleSoft Inventory can produce a reconciliation report showing the differences between the counted item quantities and the item quantities currently recorded in the inventory business unit. After you have analyzed your count results, you can recount items as needed. When an inventory count is complete, you can run the Stock Quantity Update process in PeopleSoft Inventory to adjust your item quantities within the business unit to match your count results.
To count inventory stock, you must start in PeopleSoft Inventory by defining and creating a counting event. A counting event is a selection of items to be counted based on your criteria. A counting event is identified by a counting event ID.
Using the PeopleSoft Inventory, you can perform two different types of counting events:
A physical inventory count performs a stock count of the entire PeopleSoft Inventory business unit. You must prohibit material movement for the business unit before performing this type of count.
A cycle count performs a stock count on a portion of the PeopleSoft Inventory business unit. Cycle counts can be created to count selected material storage locations, items, item families, and other options.
When counting inventory stock you have a number of options, including:
Using blind counts. A blind count does not display the current quantity of the item within the location. A blind count forces the user to count each item quantity rather than assume the displayed quantity is correct. In contrast, a non-blind count displays the expected item quantity and the user only needs to override it for discrepancies discovered during the counting process.
Not displaying zero-quantity items. Eliminating zero-quantity records from the count excludes material storage locations identified by the system as empty.
Breaking up a count into groups. Counting groups enable multiple users to count different locations or items within the same counting event. One counting event can be broken up into multiple counting groups.
The following diagram illustrates the inventory stock counting process when using mobile devices and PeopleSoft Mobile Inventory Management:
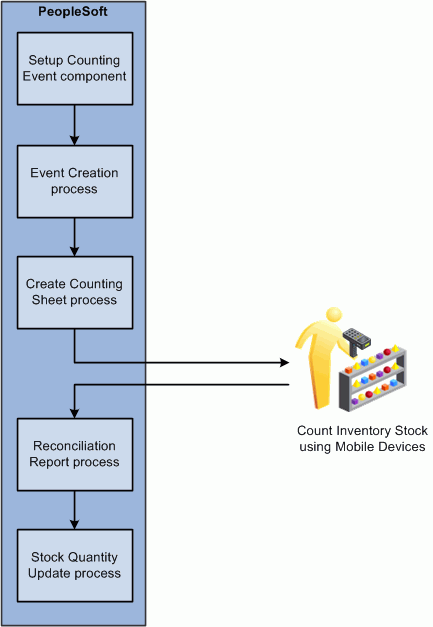
The inventory stock counting process with PeopleSoft Mobile Inventory Management
Using Mobile Inventory Management, you can count inventory using four types of mobile counts. These counts include:
Guided count
Count by location
Count by item
Manual count
These counts are described in the next sections.
 Guided Counts
Using the Guided Count application, the system provides you a list of items and locations to be counted. You use the list to count each item in the order they are given. You can perform physical inventory counts or cycle counts using a system-define (guided) count.
You can choose a counting event and group ID to perform from a list of business units that have a count header status of Open. The system enables you to file locations and items based on the item's status, sort location and items, view additional item information, and use default values defined in the PeopleSoft Inventory system.
Other guided count features enable you to:
Enter a count quantity for an item ID, storage location and unit of measure, container, lot ID, serial ID, and count unit of measure.
View errors from PeopleSoft on the mobile device.
Default the count item status based on whether the counting event is blind or non-blind, and the ability to override the count item status.
Display or hide expected count quantity, based on whether the counting event is blind or non-blind.
Count by LocationYou use the Count by Location feature to count items based on their locations and send the count information back to the PeopleSoft Inventory system. The system provides a unique list of locations that exist in the count, and you then manually enter the items for a given location and their counts. Counting by location is a mixed approach between a guided count and a manual count. You are guided through the locations to be counted, and then for each location you perform a manual count.
If an item is serial controlled, part of the counting event and pre-load serials are selected, then the serials are loaded when that item is selected.
This application can be used to perform either a physical inventory count or a cycle count, depending on how the selected counting event ID was defined. The count is recorded in the COUNT_INV component.
Count by ItemYou use the Count by Item feature to count items and send the information back to the PeopleSoft Inventory system. The system provides a unique list of items that exist in the count, and you then manually enter the locations and their counts for each item. Counting by item is a mixed approach between a guided count and a manual count. You are guided through the items to be counted, and then for each item, you perform a manual count. The count is recorded in the COUNT_INV component.
Manual Count Use the Manual Count feature to manually count items at a location and send the information back to the PeopleSoft Inventory system. The transaction is recorded in the COUNT_INV_INF component. Using manual counts, you can select the business unit in which to perform the count. You can enter count quantities for an item ID, storage location and unit of measure, container, lot ID, serial ID, and count unit of. You can save the counting event data at any time during the mobile transaction.
Note. Using the Mobile Count application, you can count zero quantities; whereas, with other count applications, the system displays an error for zero count quantities.
Inventory Count Process The sequence of events in the inventory stock counting process using PeopleSoft Mobile Inventory Management is:
Define the parameters for your counting event using the Setup Counting Event component in PeopleSoft Inventory. These parameters are defined at the business unit level and are used when the system creates the next counting event. In this component you define the parameters for:
Creating a physical inventory count or a cycle count.
Creating a blind count or a non-blind count.
Displaying or excluding zero-quantity items.
Defining the tolerance settings of the reconciliation report.
For a cycle count, determining what subsection of the business unit should be selected for counting.
This can be done by a number of options including; certain material storage locations, specific items or item families, items with a negative balance, or items that are due to be counted.
Create the counting event by running the Event Creation process in PeopleSoft Inventory.
A unique counting event ID is assigned to the counting event which includes a header and a list of the items being counted. The item information includes material storage location, lot ID, serial ID, container ID, quantity, and unit of measure (UOM). When using PeopleSoft Mobile Inventory Management to count inventory stock, the counting event is a system-defined count that obtains the item information from the PHYSICAL_INV record.
Run the Create Counting Sheet process to sort the counting event by item or material storage location.
You can also use this process to break the counting event into counting groups to enable multiple users to count different sections of the same counting event.
Use mobile devices to count inventory items.
Run the Physical Accounting Reconciliation report to detect any recovery or shrinkage and to determine whether you need to correct any mistakes.
When you are satisfied with the count, run the Stock Quantity Update process to update PeopleSoft Inventory with the count data.
Common Elements Used in This ChapterDefining Installation Options and User Preferences for Mobile Inventory
Management CountsThis section discusses how to:
Define user preferences for Mobile Counts.
Define guided count installation options.
Define count by location installation options.
Define count by item installation options.
Define manual count installation options.
Pages Used to Define Installation Options and User Preferences for
Mobile Inventory Management Counts|
Page Name |
Definition Name |
Navigation |
Usage |
|
Setup Component Interfaces |
MIN_CMPINTFC |
Setup Mobile Transactions, Setup Component Interfaces |
Define the component interface for the inventory mobile pages. |
|
Setup Mobile Services |
MIN_SERVICES |
Setup Mobile Transactions, Setup Mobile Services |
Identify and setup the PeopleSoft Integration Broker services to be used with the Par Count mobile page and the Par Count Ad Hoc mobile page. |
|
User Preferences - Mobile Inventory |
MIN_USER_TASK_OPT |
Set Up Financials/Supply Chain, Common Definitions, User Preferences, Define User Preferences, Mobile Inventory, and select a task flow mode |
Define user preferences for Mobile Counts. |
|
Installation Options - Mobile Inventory |
INSTALLATION_MIN |
|
|
Defining User Preferences for Mobile CountsAccess the User Preference - Mobile Inventory page (Set Up Financials/Supply Chain, Common Definitions, User Preferences, Define User Preferences, Mobile Inventory, and select a task flow value).
Use the User Preferences - Mobile Inventory pages to define user preferences. If a user preference exists, it will be used instead of the Installation level definition. All task flows are required to have an installation-level definition. Some fields are not available on all counts based on the task requirements, for example, a guided count is the only task with the Initial Display Mode field.
Select the Use Installation Values check box if you want the value define for installation option to override values that you define on this page when you are using a mobile device to perform counts.
See Common Elements Used in This Chapter.
Defining Guided Count Installation OptionsAccess the Installation Options - Mobile Inventory page (Set Up Financials/Supply Chain, Install, Installation Options and select the Guided Count task flow).
Guided counts are system-defined counts that provide the items for counting. The Guided Count task flow installation page is similar to other count Installation Options pages, except that you can define an initial display mode and have fewer sorting options.
Also, with guided counts, you are provided a list of items to count.
See Also
Common Elements Used in This Chapter
Defining Count by Item Installation Options Access the Installation Options - Mobile Inventory page (select the Count by Item task flow on the Installation Options page).
Counts by item are counts where you select an item and add the item to a location. The items are provided to you by the system, and you manually enter the count quantity. Count by item means that the available items are grouped; therefore, the Group By field is set to Group By Item and is not enabled. In addition, the Sort By Item is removed from the available list of Sort By options. Since it is already grouped by item, it would be a redundant grouping.
The installation options for the Count by Item task flow are similar to other Mobile Inventory Management count installation options.
See Also
Common Elements Used in This Chapter
Defining Count by Location Installation OptionsAccess the Installation Options - Mobile Inventory page (select the Count by Location task flow on the Installation Options page).
Counts by location are counts where you select a location and add items to a location. The locations are provided to you by the system, and you manually enter the count quantity for the items. Count by location means that the available items are grouped by location; therefore, the Group By field is set to Group By Location and not enabled. In addition, the Sort By Location is removed from the available list of Sort By options. Since it is already grouped by location, it would be redundant.
The installation options for the Count by Location task flow are similar to other Mobile Inventory Management count installation options.
See Also
Common Elements Used in This Chapter
Defining Manual Count Installation Options Installation Options - Mobile Inventory page (select the Manual Count task flow on the Installation Options page).
Manual counts are counts where you select an item and add the item to a location. Unlike other counts, the system does not provide you a list of items or locations to be counted except that the Count Status field is removed. This count is based on the Manual Count Component in PeopleSoft. In addition, the Pre-Load Serial ID check box is also removed since there is no counting event on which to base the manual count. You manually enter the count quantity.
The installation options for the Manual Count task flow are similar to other Mobile Inventory Management count installation options.
See Also
Common Elements Used in This Chapter
Performing Guided Counts in PeopleSoft Mobile Inventory ManagementThis section discusses how to:
Define guided count search criteria.
Manage item counts using mobile devices.
Add single items to guided counts.
Look up guided count objects.
Display all items in guided counts.
Maintain count statuses for guided count items.
Add lot-controlled items to guided counts.
Add serial-controlled items to guided counts.
Pages Used to Perform Guided Counts in PeopleSoft Mobile Inventory
ManagementUse these page to perform guided counts.
|
Page Name |
Navigation |
Usage |
|
Guided Count (search) |
Mobile Inventory, Guided Count, and enter search criteria |
Define guided count search criteria. |
|
Guided Count |
Mobile Inventory, Guided Count, and select a search results value |
Manage item counts using mobile devices. |
|
Guided Count – Add Item |
Mobile Inventory, Guided Count, and click the Add Item button |
Add single items to guided counts. |
|
Look Up |
Mobile Inventory, Guided Count , and click a Lookup icon |
Look up guided count objects. Note. The Lookup example used in this section if for Storage Locations. |
|
Display All |
Mobile Inventory, Guided Count, and click the Display All link. |
Display all items in guided counts. |
|
Guided Count (Count Status field) |
Mobile Inventory, Guided Count, and click the Expand button for an item. |
Maintain count statuses for guided count items. |
|
Guided Count – Add Item |
Mobile Inventory, Guided Count, click the Add Item link and select to add a lot-controlled item to the count |
Add lot-controlled items to guided counts. |
|
Guided Count – Add Item |
Mobile Inventory, Guided Count, click the Add Item link and select to add a serial-controlled item to the count |
Add serial-controlled items to guided counts. |
Defining Guided Count Search CriteriaAccess the Guided Count page (Mobile Inventory, Guided Count).
Use this page to search for a guided count using a business unit, event, or group. To view additional search criteria, click the Selection Criteria link. Click the Options link to view search options. These options are predefined using user preferences and installation options in the PeopleSoft Inventory system.
|
Unit |
Select a PeopleSoft Inventory business unit in which counts have been defined. This field is required. |
|
Event |
Select an inventory counting event. You must start a count by defining and creating a counting event. This is a selection of items to be counted based on search criteria. A counting event is identified by a counting event ID. |
|
Group |
Select a counting group. A counting group enables multiple users to count different locations or items within the same counting event. One counting event can be broken up into multiple counting groups. Note. Zero is a valid value that you can enter. A value of blank does not mean zero. |
|
Search |
Click to perform a search based on the criteria that you entered. The Search Results table displays the results of the search. If the search criteria results in one row being returned, the flow automatically loads that result. |
Selection Criteria
Using the Selection Criteria table, you can override default values that have been established in the Installation Options. This criteria is related to how the system processes counts.
|
New |
Select to search for detail lines in a non-blind, system-defined counting event for which you have not run the Counting Sheet process. Deselect the check box to not include these lines in the search results. |
|
Counting |
Select to search for detail lines in a blind system-defined counting event. |
|
Quantity Entered – Hold |
Select to search for items that have had their count quantities prevented from being applied to system tables by the Stock Quantity Update process. |
|
Ready to Update |
Select to search for counting event detail lines with quantities that are to be used to update the system tables when you run the Stock Quantity Update process. |
Option
Access the Options section (click the Options link on the Guided Count page).
Using the Options table, you can override default values that have been established in the Installation Options. These options are related to how information appears on count pages. After completing the options section scroll to the top of the page and click the Search button.
Search Results
After you click the Search button, the system returns the events and groups that match the search criteria that you entered. In the next example, the event ID was entered without a group ID. The system returned all groups within that event. You could narrow the search by entering a specific group.
The Search Results table displays the results of the search including the business unit, event, group, and the date on which the count was started. Click any of the Search Results links to access the Guided Count page with the guided count details for the event detail line.
Note. If the system returns only one row, then you are immediately provided access to the count.
If you selected to count individual items using the Options section, the Guided Count page displays the first item and location in the count. If you selected to display all the items in the count, the items are listed on the Guided Count page.
Managing Item Counts Using Mobile DevicesAccess the Guided Count page (Mobile Inventory, Guided Count, and click the Search button).
The Guided Count page is the basis for working with guided counts. The system displays the business unit, event, and group IDs in the header. The initial page also displays the first event detail line item for the system-defined count. You can scroll through the items using the scrolling arrows.
Fields that appear on the page are based on the PeopleSoft Inventory system installation settings and the search criteria and search options that you defined when access the Guided Count page.
Using the page, you can:
Further filter count items.
Enter count quantities for individual items.
Complete the item count.
Return to the Search page to define a different set of search options.
Change the count options.
Navigate to the Display All page to view a listing of all items in the count.
Navigate to the Add Item page to include another item in the count.
|
Filter (field) |
Enter a character string by which you want filter items in the list. The system searches for the string based on string values in the storage location ID, item ID and description, lot ID, or container ID. If you do not enter filter criteria, the filtered list contains all items. |
|
Filter (button) |
Click to create a list that contains the items matching the filter string that you entered. |
|
Clear |
Click to remove the filter criteria, clear the contents of list and replace it with the original list. |
|
|
Click to advance to the last area with items for the inventory count. Note. These sets of arrows appear when you select either Group By Item or Group By Location value in the Group By field. The value displayed is based on the Group By Option that you selected; either Item or Storage Location. |
|
|
Click to advance to the next set of items to be counted. After accessing the list, you can count individual items within the list. |
|
|
Click to advance to the first set of items. |
|
|
Click to advance to the previous set of items. After accessing the list, you can count individual items within the list. |
|
Location |
Displays the location. The location changes when you scroll through the count list. The location provides the levels of a location starting with the area. |
|
Item |
Displays the system-supplied item. Use the scroll arrows to change the item and click the Expand icon to view additional item details. |
|
|
Click to expand additional information about the item. This information can include the item's description, the manufacturing item's or the vendor item's descriptions and count status. The system provides count status values as default values on mobile devices. You can override the default values using a mobile device. The system default value for the count status initially appears when you click the Expand button to view access the Count Status field. |
|
|
Click to collapse (hide) additional information about an item. |
|
Stor UOM (storage unit of measure) |
Displays the unit of measure in which the item is stored. For example EA or BOX. The storage unit of measure default value is the item's default stocking unit of measure. If this value is changed, then the Count UOM field is automatically changed to match the new storage unit of measure value. |
|
Count UOM (count unit of measure) |
Select the unit of measure in which you want to count the item. The count unit of measure default value is the item's default stocking unit of measure. You can override the value. This option is not enabled if the Enable Count UOM check box is deselected in the Options table. |
|
Count Qty (count quantity) |
Enter a count quantity for the item. You can update the quantity before sending the count to the PeopleSoft Inventory system. |
|
Count |
Click to add the counted item as part of the guided count that the system places into the PeopleSoft Inventory system when you click the Save button. When you count an item, you add the count quantity, but the item isn't actually counted until you save the count transaction. Use the Display All button to view all items that have been added to the count. When you count the item, the mobile device displays the item as the last item counted. You can update the count quantity after it is displayed or use the Delete button to delete the count. This does not delete the item, it only deletes the count. |
|
Serial |
Enter a serial ID that you want to count. This field is only displayed if the item is serial controlled. If the serial being entered already exists in the Serial table, then a new row is not added and the existing serial is marked as counted. |
|
Add Item |
Click to access the Guided Count - Add Item page where you can select an item to count. |
|
Display All |
Click to view the entire list of items that have been defined for a guided count. The list also includes items that have been added to the count. You can filter the list to just view the items that have already been added to the count, but have not been counted. |
|
Save |
Click to save the information that you've entered for the guided count item. This completes the count for this transaction. Upon saving, the count information is recorded in the PeopleSoft Inventory system, and you can start a new mobile count. |
|
Return to Search |
Click to return to the search page where you can define search criteria and options to perform another search for a guided count. When you access the Guided Count page again, the selection criteria and options retain any changes that you might have made using the initial search for a guided count. When you navigate back to the Mobile Inventory task flow menu, the system will reset the search values back to the default values defined in the PeopleSoft Inventory system. |
|
Options |
Click to update the display options for the page. When you return to the page, the new display values are applied to the page. |
Scrolling Among Locations and Items
Mobile Counting provides an advanced scroll feature for accessing specific areas and specific items within those areas. Using a combination of forward and backward scrolling arrows, you can navigate among locations and after accessing the location, navigate to specific sets of items in the location.
For example, to scroll forward from one area to another, click the double right arrows or to scroll backward from one item to another, click the left single arrow. The system updates location information as you scroll.
The next example illustrates the use of the double right arrow icon after you select to count items in a group:
Note that the location has four sets of items. You can use the single right arrow icon to go to the next set in the location as shown in this example:
The system updates the page to indicate that the set item is the second of four item sets. Also, the system updated the location information to indicate that the item in storage location 4.
When you scroll to the beginning or end of the list, the system does not update the page.
Adding Single Items to Guided CountsAccess the Guided Count - Add Item page (click the Add Item button on a Guided Count page).
Use this page to add a single item to a guided count. You complete the fields similar to how you add an item using the Guided Count page.
For more information about fields and serial information on this page, see the previous "Counting Items for Guided Counts" section.
Required fields for this page include the Location, Item, and Stor UOM fields. You can also provide the lot, configuration code, container, count unit of measure, count quantity, and serial items.
|
Location |
Select a storage location for the item that you are adding. You can either enter a location or select a value from the Lookup icon. If you select to look up a location, the system displays the Look Up Storage Location page. |
|
Item |
Select an item to add to the count. This field is required. You can use the Lookup icon to search for items. The prompt is available if you selected the Display Prompts check box for guided count searches. You can view the item description by clicking Expand next to the Lookup icon. |
|
Fetch |
Click to retrieve the item attributes for the item that you selected. This retrieves the attributes of the item to determine what fields to display. For example, if the item is lot controlled, then the Lot field appears on the page. Fetch is not a search function. The item Lookup icon also retrieves the item attributes so only one of these options is required. If you don't use either option, when you click the Add button, the system checks the item attributes and ensures that required fields are not missing. |
|
Lot |
Enter the lot ID if the Item is lot controlled. This field only appears if the item is lot controlled. The field appears after you use the Fetch or item Lookup icon. |
|
Config Code |
Enter the configuration code if the item is a configured item. This field only appears if the item is configured. This field appears after you use the Fetch or item Lookup icon. |
|
Container |
Enter the container ID that relates to how the item is stored. For example, it could be stored on a certain sized skid or in a certain sized box. |
|
Stor UOM (storage unit of measure) |
Displays the unit of measure in which the item is stored. For example EA or BOX. The storage unit of measure default value is the item's default stocking unit of measure. If this value is changed then the count unit of measure is automatically changed to match the new value. |
|
Count UOM (count unit of measure) |
Select the unit of measure in which you want to count the item. The count unit of measure default value is the item's default stocking unit of measure. You can override the value. This option is not enabled if the Enable Count UOM field is deselected page in the Options table. |
|
Count Qty (count quantity) |
Enter a count quantity for the item. You can update the quantity before sending the count to the PeopleSoft Inventory system. |
|
Add |
Click to add this item to the guided count. When you click the button, the system returns to the Guided Count page. Now, the Last Item Counted table displays the item that you just added along with the count quantity. The item will also display in the list of items defined for the guided count when you display all items. After adding the item, you can click the Add Item link to add another item to include in the guided count. |
|
Cancel |
Click to cancel the addition of this detail line item to the current guided count. The system returns to the Guided Count page without adding the item information. |
Looking Up Guided Count ObjectsAccess the Guided Count - Add Item page (click the Lookup icon).
Use this page to search for specific item values. The previous example illustrates the Storage Location lookup. All Lookup pages provide the appropriate fields based on the value that you are looking up. Lookup is supported for all non-quantity fields.
Using the storage location example, the page displays the business unit along with the Area field and Lev 1-4 (level) fields. You can search for locations using a variety of search options. For example, you can search for all locations in an area by entering the area ID and clicking the Lookup icon. The system displays all area locations for the business unit along with the storage levels.
Or, you can search for a specific location level by entering the number in the location, such as 2 in the Level 2 field. In this case, the system displays all level 2 storage locations for a business unit. The Lookup supports partial value lookup. For example, if you enter AREA in the area field it will return all storage locations where the area contains the value AREA. The lookup is not case sensitive, so lower or upper case characters will return the same result.
Click the location link to insert the value in the Location field and return to the Add Item page.
|
Area |
Enter a location on which you want to base a location search. You can enter the first character of a location and the system will display the search results for all locations beginning with that character, along with all the storage levels in the locations. After entering a location, click the Lookup icon to retrieve the search results. Using the search results, you can select a specific storage location in which to count the item. |
|
Lev (1 -4) (level 1-4) |
Enter a level value in one or more of the Lev fields. When you click the Lookup icon, the system retrieves the location name and the levels that match the levels you entered. |
|
Look Up |
Click to search for the locations that match the location and level criteria that you entered for the search. |
|
Clear |
Click to remove the results of the previous search and begin a new search. |
|
Cancel |
Click to cancel the search and return to the Guided Count page without selecting a location. |
|
Storage Location |
Click a link in the search results of this column to select the location in which you want to count items in a guided count. The Guided Count page reappears with the location that you selected. You can scroll through the list using the Previous and Next links. |
Displaying All Items in Guided CountsAccess the Guided Count display all page (click the Display All link on the Guided Count page).
Use this page to view and work with all event detail items in the guided count. This page provides you an overview of count items. You can update count quantities, display additional item information, update the count status for an item, or, if necessary, delete the item from the count. The page header provides the business unit, event ID, and group ID for the guided count.
Note. If a location and item combination already exists, but in a different group, the system displays an error when you attempt to add the count.
The Display All feature provides the same functions as the page used for single items, but you can work with multiple items, reducing the time it takes to perform the inventory count. For example, you can insert count quantities for each of the items. As you add counts for each item, the system automatically advances the count to the next guided count item or item and location combination.
|
Location |
Displays the location in which you are counting. The item ID that is being counted is also included in the table. Click the Expand icon to view additional details about the item. |
|
Count Qty |
Enter a count quantity. The system automatically selects the check box next to the Count Qty field when you enter a quantity and tab out of the field. When you display the item, and a count has been added, the check box will be selected. |
|
Delete |
Click to delete this item from the list of items to be counted. |
Maintaining Count Statuses for Guided Count ItemsAccess the Count Status field (click the Expand icon to view an item's description)
You use the Count Status field to update the count status of the counting event detail line. When you save the event detail line, the system applies your updates to the PeopleSoft Inventory system.
|
New |
Select to include an uncounted line in the Counting Sheet report or file when you run the Counting Sheet process. The Counting Sheet process changes the status to Counting for blind counts or to Ready to Update for non-blind counts. Events with new detail lines have a header status of Open. |
|
Counting |
Select to place the detail line in a Counting status. Detail lines with a status of Counting are considered uncounted. The Counting Sheet process changes the status of detail lines in a blind, system-defined counting event from New to Counting. When you enter a count quantity for items with a Counting status, the status automatically changes to Ready to Update. Events with items in a Counting status have a header status of Open. |
|
Qty Entered-Hold (quantity entered-hold) |
Select to prevent the count quantity of a detail line from being applied to system tables by the Stock Quantity Update process. Events with items in a Hold status have a header status of Open. |
|
Ready to Update |
Select to use the quantities of a counting event detail line to update tables when you run the Stock Quantity Update process. If you change the quantity of a detail line, the PeopleSoft Inventory system automatically changes the status to Ready to Update. Events with detail lines in a Ready to Update status have a status of Open. |
Adding Lot-Controlled Items to Guided CountsAccess the Guided Count: Add Item page (Mobile Inventory, Guided Count, click the Add Item link, and select to add a lot-controlled item to the count).
Lot control is the process of using procedures such as assigning lot IDs, and tracking parameters, such as status and expiration date, for each lot (batch) as it moves through the system. Using mobile counts, you can count lot-controlled items and send the information to the PeopleSoft Inventory system.
|
Lot |
Select a lot value. This field appears when the item is lot controlled. When you are counting a lot-controlled item, the Lot is a required field. |
|
Count Qty (count quantity) |
Enter the count quantity for this event detail line item. |
|
Add |
Click to add the lot-controlled item to the guided inventory count. When you click the button the item for which you added the count appears as the last item counted at the bottom of the page. You can now add another item, delete the item you just added, display all items, cancel the count and return to the search page, or save the item count. Note. The system provides a warning if you select to return the search without saving the count data you entered. Click the Return link to return to the Add Item page, or click the Continue link to access the Guided Count page. |
|
Cancel |
Click to cancel the addition of an item and return to the Guided Count Search Results page. |
Adding Serial-Controlled Items to Guided CountsAccess the Guided Count - Add Item page (Mobile Inventory, Guided Count, click the Add Item link and select to add a serial-controlled item to the count).
Serial control enables you to track an item as it moves from one material storage location to another. Using mobile counts, you can count serial-controlled items and send the information to the PeopleSoft Inventory system.
See Adding Single Items to Guided Counts.
When an item is serial-controlled, the system provides a Serial field for you to add the item's serial ID. The system calculates the count quantity automatically, based on the number of serial IDs that you assign to the Serial table. Click the Add Serial button to add additional serial IDs to the count.
|
Count Qty (count quantity) |
Count quantity reflects the number of serials that have been counted for this item. This field is display-only. |
|
Serial |
Enter a serial ID to be counted. This field is only displayed if the item is serial controlled. If the serial being entered already exists in the Serial table, than a new row is not added and the existing serial is marked as counted. |
|
Add Serial |
Click this button to add the entered serial to the count. This button is only displayed if the item is serial controlled. |
|
Add |
Click to add the serial-controlled item to the guided inventory count. When you click the button the item for which you added the count appears as the last item counted at the bottom of the page. You can then add another item, delete the item you just added, display all items, cancel the count and return to the search page, or save the item count. |
Performing Counts by Location in PeopleSoft Mobile Inventory ManagementThis section discusses how to:
Define count by location search criteria.
Add and count items for counts by location.
Pages Used to Perform Counts by Location in PeopleSoft Mobile Inventory
ManagementUse these page to perform counts by location.
|
Page Name |
Navigation |
Usage |
|
Count by Location |
Mobile Inventory, Guided Count and enter search criteria |
Define count by location search criteria. |
|
Add Item |
Mobile Inventory, Guided Count, and click the Add Item button |
Add and count items for counts by location. |
Defining Count by Location Search CriteriaAccess the Count by Location page (Mobile Inventory, Count by Location).
Use this page to search for locations using a business unit, event, or group. To view additional search criteria, click the Selection Criteria link.
The header section of the Count by Location page provides Lookup icons for the unit, event and group. When you click the Selection Criteria link, you can select the count item statuses to include in the location search. The options that you select remain selected for this transaction until you return to the main menu. Then when you access the selection criteria again, the system provides the default values from PeopleSoft Inventory installation options and user preferences.
See Maintaining Count Statuses for Guided Count Items.
Click the Options link to view and update how and which options the system will display when you are using count by locations pages.
The fields and processes for the Count by Location page Option table are similar to the fields and processes on the Guided Count page. The initial value for this page is the default value defined for Mobile Inventory Management installation option and user preference options. When user preferences are defined for displays, they override installation options settings.
See Also
Performing Guided Counts in PeopleSoft Mobile Inventory Management
Adding and Counting Items for Count by LocationAccess the Count by Location - Add page (Mobile Inventory, Count by Location, search for counting events, and open an event).
Use this page count the items for a location. You can filter and select locations, items, containers, and storage and count units of measure. The page functionality is similar to guided count pages except that you are not provided the items to count.
See Managing Item Counts Using Mobile Devices.
After defining count information for the required fields for an item, click the Count button to add the item to the location count. As each item is added, the system provides a section with the last item that was counted. After all items have been added, you can select the Display All to view and item counts.
Click the Save button to add the item counts for the location to the PeopleSoft Inventory system. When you save the count, the system verifies the count data and displays any errors associated with the count. If errors occur, you need to resolve them and save the count again.
Click the Return to Search button to cancel any location counts that you've added and display the Count by Location page where you can define another search. The system displays the Save Warning page indicating that you have unsaved data on the page. Click the Continue button to continue to the Search page, or click the Return button to go back to the count page and continue with the count by location.
Note. Adding a lot- or serial-controlled item behaves exactly the same as if you are adding an item in a guided count.
See Adding Lot-Controlled Items to Guided Counts.
See Adding Serial-Controlled Items to Guided Counts.
Performing Counts by Item in PeopleSoft Mobile Inventory ManagementThis section discusses how to:
Define count by item search criteria.
Add and count items for counts by item.
Pages Used to Perform Counts by Item in PeopleSoft Mobile Inventory
ManagementUse these pages to perform counts by item.
|
Page Name |
Navigation |
Usage |
|
Count by Item |
Mobile Inventory, Count by Item |
Define count by item search criteria. |
|
Count by Item - Add Location |
Mobile Inventory, Count by Item, and click the Add Location button |
Add and count items for counts by item. |
Defining Count by Item Search CriteriaAccess the Count by Item page (Mobile Inventory, Count by Item).
Use this page to search for items using a business unit, event, or group. To view additional search criteria, click the Selection Criteria link.
The header section of the Count by Item page provides Lookup prompts for the unit, event and group. When you click the Selection Criteria link, you can select the count item statuses to include in the item search. The options that you select remain selected for this transaction until you return to the main menu. Then when you access the selection criteria again, the system provides the default values from PeopleSoft Inventory installation options and user preferences.
See Defining Count by Location Search Criteria.
Click the Options link to view and update how and which options the system will display when you are using count by item pages. When you click the Search button, the system populates the Search Results table with the items that match the criteria you entered. The fields and processes on the Count by Item page are similar to the fields and processes on the Guided Count page. This section provides information unique to the Count by Location feature.
See Also
Performing Guided Counts in PeopleSoft Mobile Inventory Management
Adding and Counting Items for Counts by ItemAccess the Count by Item - Add Location page (Mobile Inventory, Count by Item, click an event or group in the Search Results section).
Use this page count the items for a location. You can filter and select locations, items, containers, and storage and count units of measure. The page functionality is similar to guided count pages except that you are not provided the items to count.
The difference between the count by item and count by location is that the system provides a unique list of items that exist in the count, and you then manually enter the locations and their counts for each item. Counting by item is a mixed approach between a guided count and a manual count.
Note. You can use the right and left arrow around the item number to navigate from one item to another and from one location to another.
See Adding Single Items to Guided Counts.
After defining count information for the required fields for an item, click the Count button to add the item to the location count. As each item is added, the system provides a table with the last item that was counted. After all items have been added, you can select the Display All to view and item counts.
Click the Save button to add the item counts for the location to the PeopleSoft Inventory system. When you save the count, the system verifies the count data and displays any errors associated with the count. If errors occur, you need to resolve them and save the count again.
Click the Return to Search button to cancel any location counts that you've added and display the Count by Location page where you can define another search. The system displays the Save Warning page indicating that you have unsaved data on the page. Click the Continue button to continue to the Search page, or click the Return button to go back to the count page and continue with the count by item.
After you have entered an item count, you can use the Display All link to update the count, count status, or delete the count before you save the count back to the PeopleSoft Inventory system.
Note. Adding a lot- or serial-controlled item behaves exactly the same as if you are adding an item in a guided count.
See Adding Lot-Controlled Items to Guided Counts.
See Adding Serial-Controlled Items to Guided Counts.
Performing Manual Counts in PeopleSoft Mobile Inventory ManagementThis section discusses how to:
Add an item to a manual count.
Change manual count options.
Display all items for a manual count.
Pages Used to Perform Manual Counts in PeopleSoft Mobile Inventory
ManagementUse these pages to perform counts by item.
|
Page Name |
Navigation |
Usage |
|
Manual Count |
Mobile Inventory, Manual Count |
Add an item to a manual count. |
|
Manual Count (Options) |
Mobile Inventory, Manual Count, and click the Options link |
Change manual count options. |
|
Manual Count (Display All) |
Mobile Inventory, Manual Count, and click the Display All link |
Display all items for a manual count. |
Adding an Item to a Manual CountAccess the Manual Count - Add Item page (Mobile Inventory, Manual Count)
Use this page to manually count items at a specific location and send the information back to the PeopleSoft Inventory system.
Click the Options link to view and update mobile device display options. After you define search criteria and options, click the Search button to retrieve event detail lines that meet the criteria and are displayed in the options that you select. Options for this page are initially defined using PeopleSoft installation options and user preferences options.
The fields and processes on the Manual Count page are similar to the fields and processes on the Guided Count page. This section provides information unique to the Manual Count feature
See Performing Guided Counts in PeopleSoft Mobile Inventory Management.
To manually count an item:
Select the business unit, location, and item for the count.
This is required information for the page. After you count an item the system makes the Business Unit field unavailable. To change the business unit, save the count and then you can enter a different business unit.
Enter a count quantity.
Click the Count button.
The system adds the item count and updates the Last Item Counted table. After defining all items for the count, you can review, update count quantities and delete items from the count using the Display All link.
Click the Save button.
Note. Adding a lot- or serial-controlled item behaves exactly the same as if adding an item in a guided count. For more information about adding a lot- or serial-controlled item, see the "Adding Lot-Controlled Items to Guided Counts" or "Adding Serial-Controlled Items to Guided Counts" sections.
You use manual count to manually count items at a location and send the information back to the PeopleSoft Inventory system.
Changing Manual Count OptionsAccess the Manual Count - Options page (click the Options link on a Manual Count page).
You use options define display and processing options for count pages. You can access this page at any time to update optional settings, regardless of the transaction you are performing. After updating the options, and clicking the Return button, the system navigates to the page from which you selected the Options link.
Displaying All Items in a Manual CountAccess the Manual Count page (Mobile Inventory, Manual Count and click the Display All link).
You use this page to view all items that have been selected for a manual count. When you work with a list of items you can review items and their locations that will be counted when you save the count.
You can also view additional item details, update item counts, and delete items from the count. In addition, you can click on the Business Unit or Location links for an item to access and update that item. This is useful when you are updating a serial-controlled item.
Click the Save button to save the count to the PeopleSoft Inventory system.
See Also
Displaying All Items in Guided Counts