 Understanding Time Management in PeopleSoft Services Procurement
This chapter provides an overview of time management in PeopleSoft Services Procurement, lists prerequisites, and discusses how to:
Create timesheets.
Manage timesheets.
Submit and approve timesheets.
Manage timesheet worklists.
Understanding Time Management in PeopleSoft Services ProcurementThe service provider uses the timesheet to record and submit time to an approver for immediate, online approval through the Approval Workflow Framework (AWF). The service provider can also track daily activities and report issues. The timesheet approver can provide feedback to the service provider, including performance-rating information through the approval process.
When the service provider logs time against a work order, the time template determines the time reporting codes for that work order. There could be different rules for applicable pay types. For instance, you may pay the pay rate, fixed cost and markups for the first eight hours but only pay the pay rate and fixed costs after eight hours. There could be shift pay differentials or assignment pay differentials associated with the time being logged. When creating invoices against timesheets, the invoicing process considers the rates defined on the work order and the pay types and multipliers associated with the time reporting code, as well as any applicable shift or assignment adjustments, to determine the rate for the supplier.
The timesheet provides the following capabilities:
Records the number of hours worked on a project as hours per day or as start and stop times, and submits it to the time approver for approval.
Records specific activities and tracks progress on a project.
Records and reports project-related problems or issues to the time approver.
Summarizes all the information entered to create a comprehensive time report.
Records performance information about a service provider's performance on a project.
Creates individual services timesheets related to work orders for multi-resource services.
You use the Manage Timesheets page as the focal point for all time activity in PeopleSoft Services Procurement. Use this page to:
Create, edit, submit, or view timesheets (supplier service provider).
Filter reports by selecting the criteria in the timesheet status, service provider, or date fields.
Access pages used to modify time details.
The timesheet approval process begins when the service provider submits his time, along with any project issues, to the designated timesheet approver for review and approval. Any rejected timesheets are returned to the service provider for correction. Submitted timesheets are eligible for adjustment before approval. Approved timesheets are eligible for adjustment upon invoicing.
The following diagram illustrates the timesheet approval process:
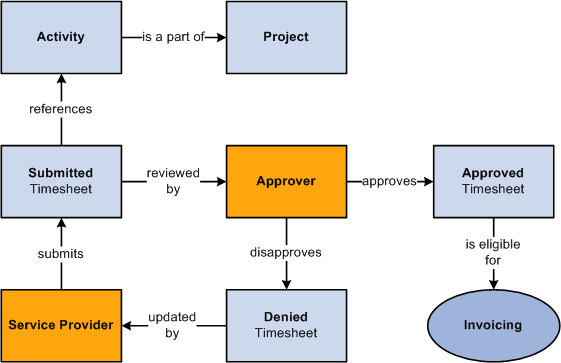
Timesheet approval process
A timesheet can be approved in these ways:
Mass approval of multiple timesheets.
Mass line approval for multiple lines.
Line-by-line approval.
 Prerequisites
These attributes must be set up before you enter time information:
Service methods.
Services time templates.
Time reporting rules.
(Optional) Shifts and assignments, and any associated services.
Calendars.
Email messaging.
Time reporting codes.
Approval process definition set up.
A work order must also be defined before time transactions can be logged against it. The work order must be resource-based services (versus deliverables-based for progress logs), and it must be in a released status.
See Also
Creating Timesheets
This section discusses how to:
Access timesheets.
Enter time worked by week using a non-24-hour clock template.
Enter time worked by calendar and 24-hour clock.
Enter time against multi-resource work orders.
Pages Used to Create Timesheets|
Page Name |
Definition Name |
Navigation |
Usage |
|
SPA_SP_R_MAIN_PG |
Services Procurement, Maintain Timesheets (external) |
Access timesheets. |
|
|
Enter Time |
SPA_TIME_ENTRY |
Click a linked time report on the Manage Timesheets page to view an existing timesheet. Click the Create button on the Manage Timesheets page to enter time on the timesheet. |
Enter time worked by week using a non-24-hour clock template. Enter time worked by calendar and 24-hour clock. Enter time against multi-resource work orders. |
See Also
Accessing Timesheets
Access the Manage Timesheets page (Services Procurement, Maintain Timesheets (external)).
Use this page to create timesheets, view active timesheets, and timesheet history.
Create New Timesheet
The Create New Timesheet grid groups a unique combination of work orders for a given work order time template.
If multi-resource work orders are available, the individual child work orders appear in the Create New Timesheet section, and the Active Timesheets and Timesheet History grids.
Available Work Order(s)
This grid displays work orders that are available to enter time against.
|
Work Order |
Displays work orders for which you can create timesheets. This field also displays multi-resource work orders. |
|
Time Template |
Indicates the time template that is used by the work order. The template determines how you enter time for the timesheet. Time templates from the lower-level services of a multi-resource service work order also appear in this column. |
|
Date Range |
Displays the dates that are available for timesheet entry. To see additional dates, click the down arrow at the right of the field. When the work order is a multi-resource order, the date range that appears is the range for the individual child work orders. The system considers the date ranges for the lower-level services to populate the values for the Date Range field. Note. This value always appears by default on the next available time template date range. |
|
Create |
Click to create a new timesheet for the selected time template. The system displays the Enter Time for page for data entry. All work orders for the service provider and the selected template and time period will be available on the timesheet, including any individual child work orders for a multi-resources service |
Active Timesheets
This section displays timesheets that are in an active status. These timesheets can include timesheets that were created but never submitted or timesheets that were denied and require re-submission.
To modify a timesheet, click the link that corresponds with the active timesheet.
Timesheet History
Use this section to search for and view past timesheets. You can search for a specific timesheet or timesheets in a certain status. Click the Advanced Search Criteria link to also search for a specific work order or work orders in a certain status.
Manual Entry of TRCs for Timesheets
PeopleSoft Services Procurement enables service providers to manually enter TRCs (time reporting codes) for timesheets. This feature adds flexibility in meeting unique time-recording requirements for scenarios in which you are unable to define a generic rule that covers unusual or complex time keeping requirements. Using manual TRC entry, you can specify the appropriate TRCs to meet time reporting requirements.
The system enables service providers or time approvers to manually identify the correct TRC for special situations in which the system cannot automatically derive the correct TRC. When you create a service time/progress template, you can indicate that you want the capability to manually enter TRCs. Then, when a service provider logs time against a work order for that template, the approver can manually specify TRCs for the time reported. This feature is available for templates using both percentage and actual allocation, as well as both the 24- and non-24-hour clock. To use the feature:
Access the Service Time/Progress Template page.
A services administrator can either create a new template or update an existing template. If an existing template already has associated timesheets, you cannot modify the setting for manually entered TRCs.
Complete the template and ensure that you select the Manually enter Timesheet TRCs check box.
A services coordinator or requester can then create a resource-based work order that references the template you created or updated in the first step.
The service provider can then enter a timesheet against the work order.
Using the manual time entry feature, the time for each day can be allocated into the appropriate TRC categories based on your specific requirements.
Submit the timesheet for approval.
Approvers can view whether the provider has specified the TRCs or if they were automatically assigned by the system.
The time approver can then approve the timesheet.
Approvers can view and, if necessary, manually adjust the TRCs before approving the timesheet.
Note. Approvers with appropriate permissions can override a TRC that the system automatically assigned from the Review/Override Time Categories page when manual TRC entry is not allowed. The manual TRC assignment capability does not change the override process, but you can make adjustments to manually assigned TRCs on the timesheet directly when manual TRC entry is allowed.
Entering Time Worked by Week Using a Non-24-Hour
Clock Template
Access the Enter Time page (Services Procurement, Maintain Timesheets (external) and click a linked time report on the Manage Timesheets page).
The format of the time entry page is determined by the time template specified on the work order. In the previous example, the time template makes it possible to enter time on a weekly basis. The Enter Time page header provides basic information about the timesheet. To copy an existing timesheet, select a timesheet in the Copy Timesheet field and click the Go button.
The page displays the lower-level individual service and sequence number when you are entering time related to a lower-level service for a multi-resource, service-method work order. The hours that you enter are assigned by work order and by lower-level services and sequence numbers. If time has been reported against multiple lower-level services in the same timesheet, you can distinguish the time reported for lower-level services.
When using multi-resource work orders, the work order ID and name, time template, job title, distribution, activities, shifts, and assignments and assignment incidents available on the timesheet are from the lower-level services of the work order.
|
Timesheet Name |
Displays the name of the timesheet that you selected on the Manage Timesheets page. The name can be assigned by the user or the system when the timesheet is created. |
|
Timesheet ID |
Displays the system identifier for the timesheet. |
|
Date Range |
Displays the from and to dates to which the timesheet applies. |
|
Timesheet Status |
Displays the status of the timesheet. Values include: Approved, Denied, Open, Submitted, Line Denied,and Line Pending |
|
Time Template |
Displays the time template used to create the timesheet. If the service method is multi-resource, the time template is the one assigned to the associated lower-level service. |
|
Time Category Status |
Indicates how the system assigned the time categories for this timesheet. Values include: Manually Assigned: Indicates that the service provider manually entered the time reporting codes during time entry. System Generated: Indicates that the system automatically assigned the time reporting codes based on predefined rules. |
|
Adjusted After Approval |
Indicates if the timesheet was updated after it was initially approved. This field appears after an adjustment has been made to the timesheet. |
|
Comments |
Enter comments related to the timesheet. The comments are available for use during approvals and reviews. |
|
Save Timesheet |
Click to save the timesheet. When you save the timesheet, the timesheet appears in the Active Timesheet group box on the Manage Timesheets page. |
|
Review and Submit |
Click to review and submit the timesheet to the timesheet approver. |
Report Time for Work Order
This section displays basic information about a work order.
|
Work Order Name |
Displays the work order name. |
|
Work Order ID |
Displays the work order ID. |
|
Job Title |
Displays the job title for this work order. If this is a multi-resource work order, the job title is for the associated lower-level service. |
|
Parent Work Order Name |
When entering time for lower-level service related to a multi-resource work order, the parent work order name is displayed in addition to the work order name of the lower-level service itself. |
|
Parent Work Order ID |
When entering time for lower-level service related to a multi-resource work order, the parent work order ID is displayed in addition to the work order ID of the lower-level service itself. |
Distribution
|
|
Click the Work Order Distribution button to access the View/Select Work Order Distribution For: page to select the appropriate accounting line for the work order. This column is available only for actual allocation time reporting. |
|
Distribution |
This field is populated with the work order distribution line number selected on the View/Select Work Order Distribution For: page or can be manually selected for actual allocation time reporting. For multi-resource work orders, values for this page are retrieved from the lower-level service. |
|
TRC (time reporting code) |
Select a time reporting code to use with this timesheet line. The column appears for timesheets associated to a service time/progress template that is set for manual TRC selection. |
|
Activity |
This field is available if Project Costing is not installed. It is populated with resource-based service activities associated with the work order and generic service activities. |
|
Shift |
Select the valid shift for the project, if applicable. This column is available if the Enable Shifts check box is selected on the Services Procurement Bus Unit definition page and if shifts are associated with the service for the reporting time period. |
|
Assignment |
Select the valid assignment for the project, if applicable. This column is available if the Enable Assignments option was selected on the Services Procurement Bus Unit definition page and if assignments are associated with the service for the reporting time period. |
|
Time Period |
Enter the number of hours worked for the time period. |
|
Hours |
Displays the total hours by line for the time period reported. |
See Enabling the Use of Shifts and Assignments.
Report Incidents for Work Order
This section appears if the Enable Assignments option is selected on the Services Procurement Bus Unit definition page, if valid assignments are associated with the service during the time period reported, and if the Based on Incidents option is selected on the Assignment by Service page.
Assignment pay rates come from the Assignment by Service definition if the Define for This Service option is selected; otherwise, the assignment pay rates come from the Assignment definition.
Assignments can be based on time or number of incidents. Any applicable managed service provider (MSP) or enable vendor managed services (VMS) fees are in addition to the assignment pay rate.
Assignment incidents have the following attributes:
They do not require associated time.
Multiple assignments can occur in the same day.
They can have both time and number of incidents associated to them on the same timesheet.
|
Date(s) |
Select the dates for the incident. You can report time against multiple assignments in the same day. |
|
Assignment |
Select the appropriate assignment for the time period. |
|
Incident(s) |
Enter the number of incidents for the assignment during the time period. The number of incidents is entered on a per line basis. |
See Also
Entering Time Worked by Calendar and 24-Hour ClockAccess the Enter Time page (click a linked time report on the Manage Timesheets page).
The format of the time entry page is determined by the time template specified on the work order. In this example, the time template enables you to enter time using a 24-hour clock. This method of reporting time enables users to record time on a day-by-day basis, with both start and end times. For example, a user can enter time for a day with a start time of 8:00 a.m., a lunch break from 12:00 noon until 1:00 p.m., and an end time of 5:00 p.m. Time can be reported across two days. For such a timesheet, any hours reported as a.m. following hours reported for p.m. will be considered as a.m. of the next day.
Report Time for Work Order
|
Shift |
Select the valid shift for the project, if applicable. This column is available if the Enable Shifts option was selected on the Services Procurement Bus Unit definition page and if shifts are associated with the service for the reporting time period. In addition, the Derive Shift From Time of Day option on the Service/Time Template page cannot be selected or this column will not appear during time entry. Shifts can be selected manually or automatically based on the time template. Pay rates come from the service itself if the Define for this Service option is selected on the Shift by Service definition page. Otherwise, the pay rates come from the Shift definition page. Values are:
|
Shift Pay Rate Calculations
Shift rate calculation is based on the shift pay type. Any applicable MSP or VMS fees are added in addition to the shift rate.
See Defining Shifts for Use on Timesheets.
|
Assignment |
Select the valid assignment for the project, if applicable. This column is available if the Enable Assignments option was selected on the Services Procurement Bus Unit definition page and if assignments are associated with the service for the reporting time period. |
|
Hours |
Displays the total number of hours worked for a week. |
|
Review/Adjust Time Category |
Click to access the Review Time Categories page where you can review the time reporting categories for timesheet. |
|
Details |
Click to access the Timesheet details page where you can view the work order and timesheet details, along with the comments and history for the timesheet. |
|
Add Expenses |
Click to access the Create Services Expense Report page where you can define expenses associated with this timesheet. |
|
Save Timesheet |
Click to save the timesheet. The system verifies field values that you entered and saves the timesheet. |
|
Review and Submit |
Click to access the Review Timesheet page. Using the page, you can submit the timesheet for approval, preview approvers, and view charted values for time reporting codes contained in the timesheet. |
|
Add Attachment |
Click to access the Timesheet Attachments page. You use the page to upload attachments. |
Report Incidents for Work Order
This section appears if the Enable Assignments option is selected on the Services Procurement Bus Unit definition page, if valid assignments are associated with the service during the time period reported, and if the Based on Incidents option is selected on the Assignment by Service definition page.
|
Date(s) |
Select the dates for the incident. You can report time against multiple assignments in the same day. |
|
Assignment |
Select the appropriate assignment for the time period. |
|
Incident(s) |
Enter the number of incidents for the assignment during the time period. The number of incidents is entered on a per line basis. |
Entering Time Against Multi-Resource Work OrdersAccess the Enter Time for page (click the Create button on the Manage Time page).
When you are working with multi-resource work orders, each individual service provider reports time and expenses individually for work associated to the same time template. Time approval for service providers can have the same or individual approval workflow.
Consumption is recorded against the overall total for the parent work order as well as the individual service work order.
Approvals and notifications for timesheets are also individual within the work order.
See Also
Setting Up Multi-Resource Services
Entering Time Worked by Week Using a Non-24-Hour Clock Template
Entering Time Worked by Calendar and 24-Hour Clock
Managing TimesheetsThis section provides an overview of overriding timesheets and discusses how to:
Adjust timesheets.
Review timesheet summaries.
Override time categories on timesheets.
Understanding Time Category Overrides With PeopleSoft Services Procurement, you can override time categories on timesheets. To accomplish this:
The Enable Time Categories Override option must be selected on the Services Procurement Bus Unit definition page.
The role action of SP_TIME_ADJUST_TRC must be associated with users who will be able to override time categories.
The following diagram illustrates the setup of the time category override feature:
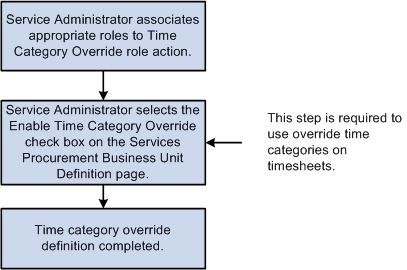
Time Category Override setup
Pages Used to Manage Timesheets|
Page Name |
Definition Name |
Navigation |
Usage |
|
SPA_SP_R_MAIN_PG |
Services Procurement, Maintain Timesheets (external) |
View, search, and sort the list of timesheets. Access the timesheet that you want to modify. To add a new timesheet, select a business unit, work order, time template, and date range. Click the Create button. |
|
|
Enter Time |
SPA_TIME_ENTRY |
Click the Create button on the Manage Timesheets page |
Enter time and incident information related to assigned work orders, including any associated shift or assignment information, such as time line type or number of incidents. |
|
Review/Adjust Time |
SPA_TIME_ENTRY |
Click the View Summary button on the Enter Time page |
Adjust timesheets. |
|
Maintain Timesheets as Proxy |
SPA_SUP_R_MAIN_PG |
Services Procurement, Maintain Timesheets as Proxy |
Manage time on behalf of other users. |
|
Timesheet Details |
SPA_TIME_DETAILS |
|
View timesheet details, including time category, distribution, and history information. Also included on the page are multi–resource work order IDs, name, job title, and sequence number. |
|
Review/Override Time |
SPA_TM_EDIT_TRC |
Select a value in the Review/Override Time Category field on the Review/Override Time page. |
Override time categories on timesheets. |
|
Review Timesheet |
SPA_TIME_SUBMIT |
Click the View Summary button or the View and Submit button on the Enter Time page. |
Review the timesheet summary. |
|
SPA_TIME_ATTACH |
Click the Add Attachment link on the Enter Time page. |
Add, delete, or view an attachment for the timesheet. Note. You can add more than one attachment for each timesheet. Click the plus sign to include more attachments for the timesheet. |
|
|
SPA_TIMEWO_DISTRIB |
|
(Optional) Select the appropriate accounting line for the work order. |
Adjusting TimesheetsAccess the Review/Adjust Time page (click the View Summary button on the Enter Time page).
After you make an adjustment to a timesheet, the View Adjustments link becomes available for you to review the adjustment or adjustments that have been made to the timesheet. Click the link to access a search page where you can select an adjustment to view.
Note. You cannot change the work order ID if you are adjusting approved timesheets. You can; however, change the distribution, activity ID, shift, assignment, and time fields as required, if they are available.
When you adjust and submit a timesheet against a multi-resource work order, the system:
Uses the tolerance percentage of the multi-resource work order to validate the timesheet amount.
Updates the multi-resource work order's consumption, along with the lower-level service work order's consumption.
Report Time for Work Order
If you do not have the appropriate role action to adjust time, the label displays as Review Time for Work Order.
|
(Time Reporting Period) |
Revise the number of hours and then click the Adjust Timesheet button. |
|
Adjust Timesheet |
Click this button to update the timesheet and save your changes. |
|
Review/Override Time Category |
Select the time period for which you want to override the time category on the Review/Override Time Categories page. The actual navigation that you'll use to access the Review/Override Time Categories page is determined upon which service time template was used to create the timesheet. After you select the time period that you want to override:
|
Report Incidents for Work Order
This grid box appears if the Enable Assignments option is selected on the Services Procurement Bus Unit definition page, if valid assignments are associated with the service during the time period reported, and if the Based on Incidents option is selected on the Assignment by Service definition page.
Reviewing Timesheet SummariesAccess the Review Time page (click the View Summary button on the Review/Adjust Time page).
You can review the timesheet for the correct allocation of time using this page. The page provides basic information about the timesheet, such as the status and the template used to create the timesheet. If you accessed this page using the Review and Submit button on the Review/Adjust Time page, the Submit button appears for you to submit the timesheet for approval.
The page also provides graphical information about the hours.
Time Sheet Summary by TRC
Use this grid box to review timesheet summaries based on time recording codes.
Note. User roles that have the SP_TIME_HIDE_TRC_SUM role action applied to the roles cannot view the Timesheet Summary by TRC grid box or the related graphical display.
|
TRC (time reporting code) |
Displays the time reporting codes that are a part of this timesheet. A time reporting code is a collection of predefined values and rules that determine how the system applies the code. |
|
Time Category |
Displays the time category used by the corresponding time reporting code. A time category defines the type of time, such as overtime or standard time. |
|
Hours |
Displays the number of hours worked for each time reporting code and time category combination. |
Timesheet Summary by Work Order
Use this grid box to review timesheet summaries based on work order.
|
Work Order ID |
Displays the work orders that are included on this timesheet. |
|
Job Title |
Displays the job title for the person. |
|
Hours |
Displays the number of hours applied to the corresponding work order. |
Assignment Incidents Summary
Use this grid box to review incidents logged against assignment IDs. The grid appears when time is based on incidents.
|
Assignment ID |
Displays the assignments for this timesheet. Assignments are the types and conditions of work. |
|
Incidents |
Displays the number of incidents for the assignment during the time period. |
Overriding Time Categories on TimesheetsAccess the Review/Override Time page (click a linked time report on the Manage Timesheets page to view an existing timesheet).
Note. The title of this page displays as Review Time Categories if the user does not have the appropriate role to override time categories.
Note. Fields on this page will appear differently based on the use of a 24-hour or a non-24-hour clock time template. Differences are discussed.
|
Time Category Status |
This field displays the current time category status for the reporting period. Values are:
The Enable Time Reporting Override option on the Services Procurement Bus Unit definition page must be selected for this field to be available. |
|
Time Category |
If the business unit is not enabled to override time categories, the label for this group box is Time Category. In addition, information is display-only. |
Report Time for Work Order
If you do not have the appropriate role action to approve time, the label will be Review Time for Work Order and the Review/Override Time Category field will be unavailable.
In addition, if you do not have the appropriate approval role action, you will only be able to review the time information in this section.
|
Review/Override Time Category |
Select the time period for which you want to override the time category on the Review/Override Time Categories page. The actual navigation that you will use to access the Review/Override Time Categories page is determined by which service time template was used to create the timesheet. After you select the time period that you want to override:
|
|
Adjust Timesheet |
Click this button to accept and save the changes. You will receive a confirmation message after the changes are successfully saved. The Timesheet Status changes to Adjusted. |
Reviewing and Overriding Time Categories
When the Time Category Status is Approver Override, a warning will appear if an approver makes a subsequent adjustment to the hours. Clicking the Adjust Timesheet button will trigger the warning in this case. You will have an opportunity to cancel the adjustment before the TRC values are recalculated.
Important! If a timesheet has multiple approvers, a warning message will appear to indicate that subsequent changes will affect previous overridden time. For example, if one approver changes the time categories so that overtime will not be charged against a certain work order, another approver may need to make an associated change to pick up the overtime on a different work order.
Adjusting Timesheet After TRCs Have Been Overridden
The system displays a confirmation message when time categories have been successfully overridden.
|
OK |
Click to accept the changes. The system returns the approver to the Adjust Timesheet page. |
|
Cancel |
Click to indicate that the hours should not be changed. The system returns to the Adjust Timesheet page. |
Submitting and Approving Timesheets
This section discusses how to:
Submit timesheets for approval.
Approve, deny, and hold timesheets.
Edit time categories on timesheets.
Establish proxy time entry.
Note. Before you can approve timesheets, you must have a role action of SP_TIME_APPROVER.
See Also
Setting Up Roles for Role Actions
Pages Used to Approve Timesheets|
Page Name |
Definition Name |
Navigation |
Usage |
|
Review Timesheet |
SPA_TIME_SUBMIT |
|
Submit timesheets for approval. |
|
Worklist |
WORKLIST |
Worklist, Worklist, Filter By Submitted Timesheets |
View timesheets that require your approval. |
|
SPA_TIME_APPROVE |
Select timesheets from the Worklist page that require your approval. |
Approve, deny, and hold timesheets. |
|
|
Enter Time |
SPA_TIME_ENTRY |
Click the View/Adjust Timesheet button on the Approve Timesheet page. |
View a list of adjustments entered for the timesheet. |
|
SPA_TM_EDIT_TRC |
Click the View/Adjust Timesheet button on the Approve Timesheet page. Select the time period for which you want to override the time category and click the Go button. |
Edit time categories for a specific time period. |
|
|
Timesheet Details |
SPA_TIME_DETAILS |
Click the Timesheet Details button on the Enter Time page. |
View the details for the timesheet. |
|
SPA_TIME_VWADJUST |
Services Procurement, Manage Approvals, select a time report ID, and click the View Adjustments button. |
View timesheet adjustment history. The View Adjustments button is available for a time report when adjustments have been made to a timesheet. |
Submitting Timesheets for ApprovalAccess the Review Timesheet page (Services Procurement, Maintain Timesheets, access a timesheet, click the Review and Submit button on the Enter Time for page, and then click the Submit Timesheet button on the Review Timesheet page).
Timesheet approvals use the Approval Framework feature to streamline the approval process. Service providers (or service provider contacts by proxy) can self approve a timesheet if the business unit enables timesheet approval and the service provider has been defined for self approval on the approval process definition. After all approvers complete the approval process, the timesheet history indicates that the status of a timesheet is Approved.
After creating a new timesheet or reviewing timesheets, timesheet approvers and reviewers can be viewed and the timesheet can be submitted for approval. To submit the timesheet without reviewing approvers, click the Submit Timesheet button. The system immediately submits the timesheet and displays the Save Confirmation page for the submission.
To preview approvers and then submit timesheets for approval:
Click thePreview Timesheet Approver(s) button.
The system displays the Approval Status page. This page provides a graphical map of the workflow. The next example illustrates the timesheet Approval Status page for multi-resource timesheets:
The graphical map for the workflow displays timesheet approvers and reviewers and the status of their reviews. It is possible to insert additional approvers or reviewers or create a new approval path for a timesheet. If you insert an ad hoc approver or reviewer is inserted, as an approver or reviewer you can also subsequently remove the ad hoc approver or reviewer.
The title for the workflow is the name of the stage or path defined in the Approval Process Definition. The timesheet thread description is a concatenation of the business unit, timesheet ID, work order ID, and line number. The graphic includes the work order and overall status of the approval. The graphics provide information about individual approvers and the status of their approvals and vary in color depending on the approval status.
Click the Return to: Timesheet link.
Click the Submit Timesheet button on the Review Timesheet page.
Click OK on the Save Confirmation page to complete the submission and go to the Maintain Timesheets page.
Approving, Denying, and Holding TimesheetsAccess the Approve Timesheet page (Services Procurement, Manage Approvals or Worklist, Worklist, Filter By Submitted Timesheets and select a timesheet that requires your approval).
Along with approving, denying, holding, or pushing back a timesheet, you can use this page to review work order and timesheet details. If the work order is a multi-resource work order, the page displays parent work order details and lower-level individual service details. Fields for both are similar. When the Select check box indicates that a line has been selected, approval action buttons at the bottom of the page are available for selection. Clicking Select/Deselect All below the grid will select or deselect the Select check box for all lines of the timesheet. For parent work orders, only the work order ID and name are displayed.
Amount Details
Use this section to view a graphical presentation of timesheet amounts, including logged, available, timesheet, and remaining amounts. If you are approving a multi-resource work order with individual services, you can switch graphical views. Click the View Multi Resource Service Graph link to view details about the parent work order. Click the View Individual Service Graph to view graphical details about lower-level services.
The section also provides tab data that you can use to select the timeframe that includes the timesheet you want to view. After you select the tab, the system populates the grid with time category and calendar information for individual timesheets.
Time Line Approvals
Use this section to approve, deny, hold, or push back timesheet lines. The columns that appear differ depending upon whether assignments are associated with projects for the reported time period.
Note. If any incidents are associated with the time line, the system displays Incidents for Work Order grid.
|
Select |
Select to indicate that you want to perform an approval task for a time line. When you select the check box, the system makes the Approve, Deny, Hold, and Pushback buttons available at the bottom of the page. If the check box is selected, click the check box to deselect the time line. Any lines that are selected when you click an action button will have that action performed for them. |
|
Status |
Displays the status of the time line approval. |
|
Amount |
Displays the monetary value for this timesheet. |
|
Quantity |
This column displays the number of incidents for each time line. This column appears if assignments (based on incidents) are associated with the time reporting period. |
|
|
Click to access the Timesheets Details page, where you can view the details of the timesheet and select the rating for the work that the service provider performed for this time line. |
|
Select/Deselect All |
Use this link to select or deselect all the available timesheets. |
Incidents for Work Order
This group box appears if time is being reported that is based on assignment incidents. If no incidents are reported for the work order for the timesheet, the group box will not appear.
|
Incidents |
This column summarizes and displays the number of incidents per assignment for each work order on the timesheet. |
|
Amount |
This column summarizes and displays the total amount of incidents for each assignment for each work order on the timesheet. |
Incident Approvals
This group box appears if any assignment incidents are associated with the time being reported. If no incidents are reported for the work order for the timesheet, the group box will not appear.
|
Action |
Select an option to approve or deny the incident. Values include: Approve: Changes status to Approved if no subsequent approvals are needed by other approvers. Once fully approved, the incident is available for invoicing. Deny: Changes status to Denied by Approver. If you deny the time line, enter a comment to indicate a reason. The time line returns to the service provider for modifications and re-submission. Hold: Changes status to On Hold. The time line remains with the current approver awaiting further action. |
Editing Time Categories on TimesheetsAccess the Edit Time Categories page (click the View/Adjust Timesheet button on the Approve Timesheet page).
Note. This page is available only if the Enable Time Reporting Override option is selected on the Services Procurement Bus Unit definition page and if the user has the appropriate role action that enables time category overrides.
|
Time Quantity |
Enter the new quantity for the time category. You can add additional time quantities for each time reporting code. |
|
Save |
Click to save your changes. |
Establishing Proxy Time EntryService Provider Contacts can create timesheets for service providers within the supplier office location.
When an approver approves, denies, or holds a timesheet, the person who created the timesheet will receive a notification.
When a service provider contact resubmits the timesheet, the denied worklist entry is removed from all other provider contacts within the same supplier office location.
Manage Timesheet Worklists
This section discusses how to trigger worklist and email notifications.
Triggering Worklist and Email Notifications
The following status changes trigger a worklist entry or email notification based on the definition of the transaction configuration for the SP_TIMESHEET process:
The service provider receives a worklist entry and an email notification if the timesheet status changes to Deny.
The service provider receives notification if the timesheet status changes to Approved.
The approver receives notification when a timesheet is submitted.
The user can either access the timesheet using the email link or by navigating using the worklist.
The email notifications contain values from the Enter Time page and a URL that the recipient should use to access the timesheet.
Managing Timesheets from External SourcesThis section provides an overview of external timesheet management and discusses how to:
Set up Integration Broker for the SOA for Inbound Timesheets feature.
Import and convert time data from external sources.
View a timecard (provider).
Understanding External Timesheet ManagementMany PeopleSoft Services Procurement customers use external time tracking and project management tools. This often requires service providers to enter time in two systems: PeopleSoft Services Procurement for billing and the supplier system or other external system to track time for a project. The SOA (Service Oriented Architecture) for Inbound Timesheets feature enables third parties to capture time information on an external web-based system using an industry-standard generic HR-XML 2.5 timecard schema and then send the XML file to your system without having to enter the information directly into Services Procurement. Your system then uses the XML file to generate and submit a timesheet.
The feature includes:
The ability for service providers to submit time information electronically to your system through a web service.
A process for converting the time information into XML that can be used to generate a timesheet.
Processing for timesheets (including approvals and history) that is the same as time processing that is used when you manually enter information into PeopleSoft Services Procurement. The timesheet is processed and invoiced just like a time sheet entered directly in Services Procurement.
The use of XML schema elements and attributes that map to Services Procurement application fields.
The primary benefit is that service providers can enter time in one system instead of two with little difference in processing time for manually entered timesheets. Specifically, the feature:
Enables the quick and cost-effective receipt of time reporting data from any external web-based, time-capture system that uses industry-standard generic HR-XML 2.5 timecard schema.
Is broad enough to be used globally without having to establish, engineer, and implement many separate transformation mechanisms.
Validates the data and enables sending a response message to the external system for any invalid data.
Handles the time data the same as it would a timesheet that is entered manually in PeopleSoft Services Procurement after the system accepts the data.
Provides an email notification to notify the external system of any timesheets that were denied in Services Procurement.
Provides an email notification to notify the external system of any timesheet adjustments that were made in Services Procurement.
Receives resubmitted timesheets that were rejected previously or that were changed after being submitted to Services Procurement.
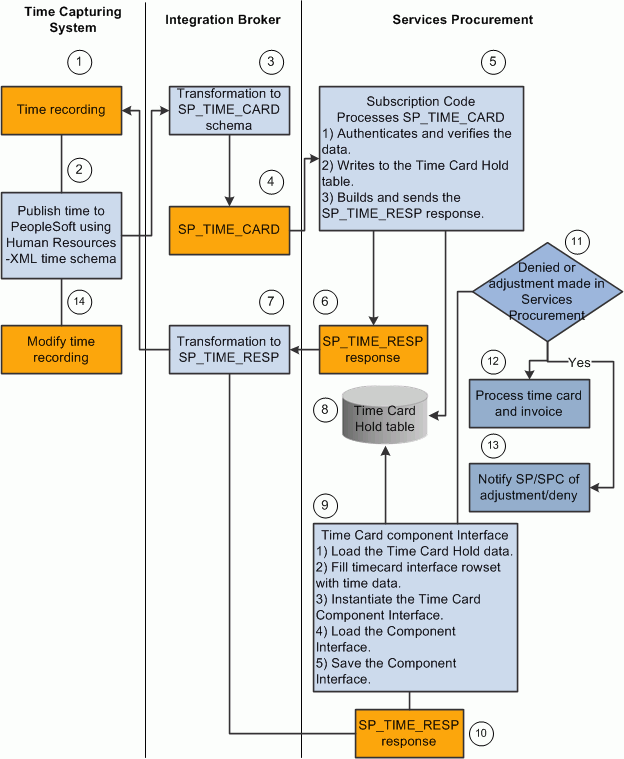
How the SOA for Inbound Timesheets Feature Works
The following diagram shows how data flows between the service provider and PeopleSoft Services Procurement:
Data flows between the service provider and PeopleSoft Services Procurement
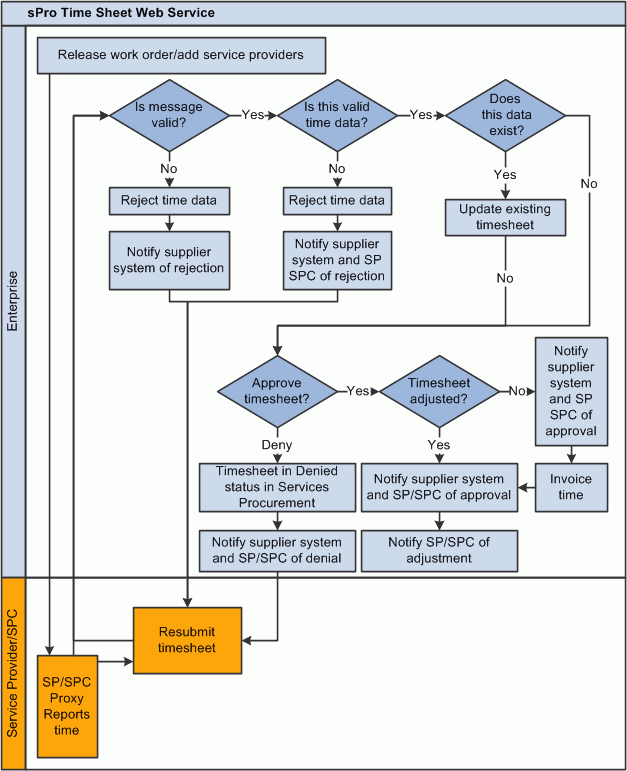
The following diagram shows the main components of the SOA for Inbound Timesheets feature and shows how data flows between these components:
Main components of the SOA for Inbound Timesheets feature
The following process is a high-level overview of the steps depicted in the preceding diagrams:
Time data is recorded in an external time-capturing system.
A message is created in the time-capturing system and sent to your system in the format of the HR-XML 2.5 timecard schema. This message is sent asynchronously two-way (request and response) from the external time-capturing system to the Services Procurement database.
The PeopleSoft Integration Broker receives the HR-XML time data and transforms it into the PeopleSoft Message SP_TIME_CARD.
The On Notify request handler is invoked to receive the transformed message. The On Notify application class processes the time card message and invokes the SP:SP_INTEGRATION: TimeCard application class.
The TimeCard application class validates and verifies the data, and it rejects the invalid data.
The TimeCard application class builds and sends a response message for the rejected data.
The response message is published to the Gateway.
The accepted data is written into the Timecard hold table.
Timecard data is loaded into the timecard rowset. The rowset supplies the Timecard Component Interface properties. Timecard Component Interface validates all the business logic and accepts or rejects the time information. It then saves the timesheet for the valid timecard.
For rejected timecards, the Timecard Component Interface builds and sends a response message. The response message is published to the Gateway.
The timecard is routed to the approver (based on the timesheet status and the timecard approval setting at the business unit level).
The service provider SPC is notified of any timesheet adjustments made in PeopleSoft Services Procurement or timesheets that are denied in Services Procurement.
Approved timesheets are processed and invoiced.
Any updates to the timesheet in the external system are resubmitted to Services Procurement and steps 2 through 13 are repeated.
The following table shows the validations that the TimeCard application class performs on HR-XML time data sent from an external system (step 5 in the preceding process):
|
Condition |
Error or Warning |
Action |
|
Invalid message format. |
Error : Invalid Time Message. |
Reject the TimeCard message. |
|
External ID is missing. |
Error: External TimeSheet required. |
Reject the TimeCard message. |
|
Business unit is missing. |
Error: Business Unit is required. |
Reject the TimeCard message. |
|
Work order is missing. |
Error: Work Order is required. |
Reject the TimeCard message. |
|
Period start and end dates are missing. |
Error: Period Start and End Dates are required. |
Reject the TimeCard message. |
|
Required fields are missing, |
Error: Required "field name" is missing. |
Reject the TimeCard message. |
|
Field format or date is invalid. |
Error: "Field" format is invalid. |
Reject the TimeCard message. |
|
A timesheet already exists for the time period for the provider for the given template. |
Warning: TimeSheet exists for the %Time Period. |
Send a warning when the action for the incoming time data is Add and the timesheet already exists in Services Procurement for the time period. |
|
The person ID of the service provider is invalid. |
Person is not valid in PeopleSoft Services Procurement system. |
Send an error message for the invalid service provider. |
|
Work order ID is invalid. |
Error : Work order not found. |
Reject the TimeCard message. |
|
Work order and purchase order for the time period were missing. |
Error : Work order not found for the Time period. |
If an overlap occurs in the time period or if the start date and end date are both outside of work order time period, then reject the TimeCard message. |
|
The time date entered for the reported time (time interval, time event) is outside of the work order period. |
Error : Reported time is outside of the work order period. |
Reject the TimeCard message. |
|
The work order consumption amount is exceeded. |
Error : Work order over amount. |
Reject the TimeCard message. |
|
The time template period is in error. |
Error: The reported time format is wrong for the time template. |
Reject the TimeCard message. |
|
An Expense time element was found. |
Warning: "Expenses" are currently not supported. |
Accept the time message, ignore the expense message, and generate a warning. |
|
For an action code of Change, the Services Procurement timesheet that was sent by the external system was not found in Services Procurement. |
Error : Invalid sPro Timesheet id. |
Reject the TimeCard message. |
|
For an action code of Change, the status is anything other than Rejected. |
Error: Timecard in Raw/Submitted/Processed/Approved status cannot be processed in Change mode. |
Reject the TimeCard message. |
|
For an action code of Add, the status is Processed or Final. |
Error: Timecard in Processed/Final status cannot be processed in Add mode. |
Reject the TimeCard message. |
|
Any information data sent from the external system is not used by Services Procurement. |
Warning message |
Accept the time data and generate the warning message for unused data. |
Technical Dependencies
To use the SOA for Inbound Timesheets feature, you need:
Tools Integration Broker web services, release 8.5 or later.
The new Approval Framework feature implemented for timesheets for release 9.1 of PeopleSoft Software.
Field Mappings
The following table shows the elements and attributes of an external system that need to be mapped to fields in PeopleSoft Services Procurement to use the SOA for Inbound Timesheets feature:
|
External System Element or Attribute |
Services Procurement Field |
|
Timecard ID |
SP_EXT_TIME_HDR.SP_EXTERNAL_ID SPA_TIME_HDR.SP_EXTERNAL_ID |
|
Reported Resource Person ID |
SP_EXT_TIME_HDR.PERSON_ID SPA_TIME_HDR.PERSON_ID |
|
Reported Time Status |
SP_EXT_TIME_HDR.SP_EXT_STATUS SPA_TIME_HDR.TIME_HDR_STATUS |
|
Period Start Date |
SP_EXT_TIME_HDR.PERIOD_START_DT SPA_TIME_HDR.PERIOD_START_DT |
|
Period End Date |
SP_EXT_TIME_HDR.PERIOD_END_DT SPA_TIME_HDR.PERIOD_END_DT |
|
Time Interval Type |
SP_EXT_TIME_DTL.SP_TRN_TYPE SPA_TIME_DTL.Activity_id |
|
Time Interval Billable |
SP_EXT_TIME_DTL.SPA_BILLING_ACTION SPA_TIME_DTL.SPA_BILLING_ACTION |
|
Time Interval Action Code |
SP_EXT_TIME_DTL.SP_ACTION_CODE |
|
Time Interval ID |
SP_EXT_TIME_DTL.SP_EXTERNAL_ID SPA_TIME_DTL.SP_EXTERNAL_ID |
|
Start Date Time |
SP_EXT_TIME_DTL.STARTDATETIME SPA_TIME_DTL.STARTDATETIME |
|
End Date Time |
SP_EXT_TIME_DTL.ENDDATETIME |
|
Duration |
SP_EXT_TIME_DTL.SP_TIME_DURATION |
|
Approval Information Person ID |
SP_EXT_TIME_DTL.Approval_OPRID |
|
Time Event Type |
SP_EXT_TIME_DTL.SP_TRN_TYPE |
|
Time Event Billable |
SP_EXT_TIME_DTL.SPA_BILLING_ACTION SPA_TIME_DTL.SPA_BILLING_ACTION |
|
Time Event Action Code |
SP_EXT_TIME_DTL.SP_ACTION_CODE |
|
Event DateTime |
SP_EXT_TIME_DTL.START_DATETIME (IF clock-in) or SP_EXT_TIME_DTL.ENDDATETIME ( IF clock-out) |
|
Expense Billable |
SP_EXT_TIME_DTL.SPA_BILLING_ACTION SPA_TIME_DTL.SPA_BILLING_ACTION |
|
Expense Action Code |
SP_EXT_TIME_DTL.SP_ACTION_CODE |
|
External Order Number |
SP_CUST_REP_SUB.WORK_ORDER_ID SPA_TIME_WO.WORK_ORDER_ID |
|
Customer Reporting Requirements Entity |
SP_EXT_TIME_DTL.BUSINESS_UNIT |
Pages Used to Manage Timesheets from External Sources|
Page Name |
Definition Name |
Navigation |
Usage |
|
PTIB_ADMIN |
PeopleTools, Integration Broker, Configuration, Quick Configuration, Domains |
Activate the domain. |
|
|
IB_GATEWAY |
PeopleTools, Integration Broker, Configuration, Gateways |
Activate the local gateway. |
|
|
IB_SVCSETUP |
PeopleTools, Integration Broker, Configuration, Service, Configuration |
Set up the service configuration and listening connector. |
|
|
IB_MONITOR_QUEUES |
PeopleTools, Integration Broker, Service Operations Monitor, Administration, Queue Status |
Activate the queue for your message. |
|
|
IB_SERVICEDEFN |
PeopleTools, Integration Broker, Integration Setup, Services On the Services search page, enter SP_TIME_CARD in the Service field and click Search. |
Activate your service, handler, and routing. |
|
|
IB_TRANSFORM_PAGE |
PeopleTools, Integration Broker, Service Utilities, Transformation Test On the Transform Test Utility search page, enter SP_TIME_CARD in the Search by field and click Search. |
Convert XML from a service provider. |
|
|
IB_EVENTTESTER |
PeopleTools, Integration Broker, Service Utilities |
Use the converted XML to create a timecard. |
Setting Up Integration Broker for the SOA for Inbound Timesheets FeatureBefore using the SOA for Inbound Timesheets feature, you need to set up PeopleSoft Integration Broker to accept time information from external service providers. This section discusses how to:
Activate the domain.
Activate the local gateway.
Set up the service configuration and listening connector.
Activate the queue for your message.
Activate your service, handler, and routing.
For general information about setting up the Integration Broker,
See PeopleTools PeopleBook: PeopleSoft Integration Broker Administration, "Understanding Setting Up PeopleSoft Integration Broker."
Activating the Domain
To process asynchronous messages, one application server domain must be active.
See PeopleTools PeopleBook: PeopleSoft Integration Broker Administration, "Understanding Setting Up PeopleSoft Integration Broker," Activating Pub/Sub Server Domains.
Activate the Local Gateway
To activate the local gateway:
See PeopleTools PeopleBook: PeopleSoft Integration Broker Administration, "Understanding Setting Up PeopleSoft Integration Broker," Defining Integration Gateways and Loading Connectors.
See PeopleTools PeopleBook: PeopleSoft Integration Broker Administration, "Understanding Setting Up PeopleSoft Integration Broker," Configuring Integration Gateway Properties.
Setting Up the Service Configuration and Listening Connector
To set up the service configuration and listening connector:
See PeopleTools PeopleBook: PeopleSoft Integration Broker Administration, "Configuring PeopleSoft Integration Broker for Handling Services."
See PeopleTools PeopleBook: PeopleSoft Integration Broker Administration, "Understanding Setting Up PeopleSoft Integration Broker," Defining Integration Gateways and Loading Connectors.
See PeopleTools PeopleBook: PeopleSoft Integration Broker Administration, "Using the Delivered Listening Connectors and Target Connectors."
Activating the Queue for Your Message
To activate the queue for your message:
See PeopleTools PeopleBook: PeopleSoft Integration Broker, "Managing Service Operation Queues."
Activating Your Service, Handler, and Routing
Access the Services page (PeopleTools, Integration Broker, Integration Setup, Services and on the Services search page, enter SP_TIME_CARD in the Service field and click Search).
On the Services page, select Services Procurement in the Object Owner ID field.
Click the SP_TIME_CARD.v1 link on the Operation tab at the bottom of the page.
On the General tab, select the Active check box in the Default Service Operation Version group box.
Select the Handlers tab.
Select Active from the Status drop-down list box.
Note. The handler must be active for the Message subscription PeopleCode/Application package logic to run. If the handler is not active, the message will appear to be done, but nothing will be processed by the code.
Select the Routings tab.
In the Routing Definitions group box, select the check box next to the routing name that you want to use and click Activate Selected Routings.
Note. The routing and operation must be active or you will receive a message in the Send Master stating that the routing cannot be found.
See Also
PeopleTools PeopleBook: PeopleSoft Integration Broker Administration, "Configuring PeopleSoft Integration Broker for Handling Services."
PeopleTools PeopleBook: PeopleSoft Integration Broker, "Managing Services."
PeopleTools PeopleBook: PeopleSoft Integration Broker, "Managing Service Operation Handlers."
PeopleTools PeopleBook: PeopleSoft Integration Broker Administration, "Configuring PeopleSoft Integration Broker for Handling Services," Understanding Configuring PeopleSoft Integration Broker for Handling Services, Setting Service Configuration Properties.
PeopleTools PeopleBook: PeopleSoft Integration Broker, "Managing Service Operation Routing Definitions," Creating Routing Definitions
Importing and Converting Time Data from External SourcesThe service provider sends time information to your system in HR-XML 2.5 format. Your system then:
Imports the XML file into PeopleTools.
Converts the XML from the service provider into XML that can be used to create a timecard.
Uses the converted XML to create a timecard that can be used in PeopleSoft Services Procurement.
When the timecard is created, it is automatically submitted for approval and a copy is sent to the service provider. This section discusses how to:
Convert XML from a service provider into XML that can be used to create a timecard.
Use the converted XML to create a timecard.
Converting XML from a Service Provider
Access the Transformation Test page (PeopleTools, Integration Broker, Service Utilities, Transformation Test and on the Transform Test Utility search page, enter SP_TIME_CARD in the Search by field and click Search.).
In the File Name field, enter the path and file name where the XML from the service provider is stored.
Click Transform.
The converted XML appears in the Message Text text box.
Copy the XML in the Message Text text box into your buffer, for example, Notepad.
Click Save.
Using the Converted XML to Create a Timecard
Access the Handler Tester page (PeopleTools, Integration Broker, Service Utilities, Handler Tester and on the Handler Tester Search page, enter SP_TIME_CARD in both the Service and Service Operation fields and click Search).
The Select a service operation to test group box appears displaying the service operation to test.
Note. This procedure is only one way to perform the conversion. You can also do it using Sendmaster or with a BPEL process flow.
See PeopleTools PeopleBook: Integration Broker Testing Utilities and Tools, "Using the Handler Tester Utility," Uploading XML Data from Files.
Click the SP_TIME_CARD link under Service Operation.
Select On Notify in the Handler Type drop-down list box.
Select TimeNotifyHandler in the Handler Name drop-down list box.
Click the Provide XML button in the Populate Input Message group box.
On the Enter XML page, copy the XML from your buffer into the XML text box.
Click OK.
The Handler Tester page appears with the XML in the Input Message text box.
Click Execute Event.
The process creates a timecard that can be used in Services Procurement. It automatically submits the timecard for approval and sends a copy of the time sheet to the service provider to view.
See Also
PeopleTools PeopleBook: PeopleSoft Integration Broker, "Transformation Example: Integration Between Two PeopleSoft Nodes," Testing the Transformation.
Viewing a Timecard (provider)When your system generates a timecard for a service provider, the system sends a copy of the timecard to the service provider. The service provider can then view the timecard in PeopleSoft Services Procurement. The imported timecard has a status attached to it. The following table shows the valid statuses for the imported timecard and the corresponding valid actions in the client Services Procurement system. If no status is specified in the external system, then the default status is Pending.
|
Status in External System |
Status in Services Procurement |
|
Raw |
Accept in both Add and Update status. |
|
Processed |
Accept and submit the timesheet unless status is Final. |
|
Submitted |
Accept in both Add and Update status. If status is Update, create an adjustment in Services Procurement. |
|
Approved |
If the timesheet is passed to Services Procurement already having a status of Approved in the external system, it will not go through the approval process again within Services Procurement. The timesheet will be automatically approved and will be available for invoicing. |
|
Rejected |
Reject the timesheet, but accept resubmitted timesheets. For resubmitted timesheets in Update status, create an adjustment row in Services Procurement. Rejected is also a valid status for resubmitted timesheets. |
If you are a provider who has had a timecard generated based on XML that you sent to an enterprise for whom you provide services and the timecard has been submitted, to view the timecard:
Sign in to the PeopleSoft system.
Select Services Procurement, Maintain Timesheets.
The Manage Timesheets page appears.
Click the Search button in the Timesheet History group box.
The system displays a list of timesheets.
To view details of a timesheet, click the link for the date range of the timesheet that you want to view.