| Oracle® WebCenter Wiki and Blog Server Installation, Configuration, and User's Guide 10g Release 3 (10.1.3.4.0) E14106-01 |
|
 Previous |
 Next |
| Oracle® WebCenter Wiki and Blog Server Installation, Configuration, and User's Guide 10g Release 3 (10.1.3.4.0) E14106-01 |
|
 Previous |
 Next |
Oracle WebCenter Wiki and Blog Server provides useful tools for creating and managing wiki and blog content. This chapter describes how to use content creation and management tools for working with wiki pages and blog entries.
The chapter includes the following sections:
You can view your wiki pages and blogs in different modes. This section describes the various modes and explains how to quickly access wikis and blogs.
On Oracle WebCenter Wiki and Blog Server, wiki pages provide three main modes: View, Edit, and Info. Use View mode to view page content. Use Edit mode to revise page content, and use Info mode to view information about the current page, including its creator and date created, its modifier and date modified, total number of times edited, and the like (see Section 7.3.4, "Accessing Information About a Wiki Page"). Additionally, the Info page provides a means of restoring an earlier version of the current page (see Section 7.3.6, "Restoring an Older Version of a Wiki Page").
You can modify the look and feel of the wiki and blog server and the management tools displayed by using query string parameters. Use the query string parameter inline to control how much wiki capability to render. For example, Figure 7-1 depicts a wiki page rendered with inline=0 in its target URL. For more information, see Table 6-3, "Query String Parameters to Use in Application Wiki and Blog URLs".
Figure 7-1 Wiki Page Rendered in Inline=0 Mode
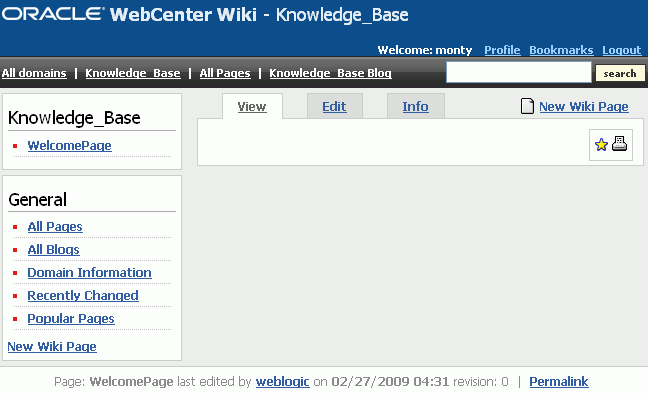
This mode is recommended for wiki administrators. It includes a toolbar of useful links across the top of the page, a search feature, and additional navigation under the General heading.
Figure 7-2 depicts a wiki page rendered in inline=1 mode.
Figure 7-2 Wiki Page Rendered in Inline=1 Mode

Note the absence of the banner and the rows of links. Also note that the topmost link in the navigation panel is automatically titled Information. This mode is recommended for general wiki users.
Figure 7-3 depicts a wiki page rendered in inline=2 mode.
Figure 7-3 Wiki Page Rendered in Inline=2 Mode

Note the absence of left-column navigation. Use this mode only for wiki pages where you plan to exclude any additional form of wiki navigation.
Blogs provide a useful tool for evangelizing technology, technique, or technical expertise from the perspective of one or more subject matter experts. Blogs, like wikis, can be private or published to a wider audience. Typically, blogs additionally invite the entry of reader comments.
Like wikis, blogs present additional information depending on the value you provide for the inline query string parameter. For example, Figure 7-4 depicts a blog rendered in inline=0 mode. For more information, see Table 6-3, "Query String Parameters to Use in Application Wiki and Blog URLs".
Figure 7-4 Blog Rendered in Inline=0 Mode
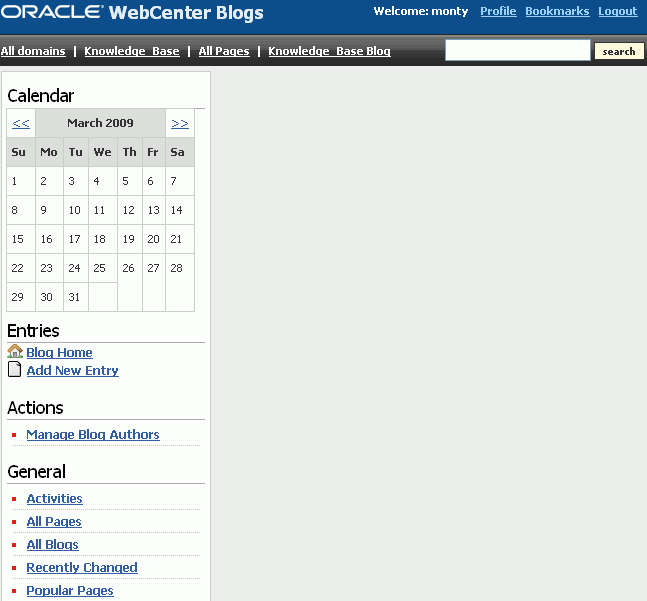
This mode is recommended for blog administrators. It includes a banner and toolbar with useful links and a search feature. Additionally, it provides the General heading with its associated list of blog management and monitoring links. For information, see Section 7.4.5, "Viewing Information About a Blog".
Figure 7-5 depicts a blog rendered in inline=1 mode.
Figure 7-5 Blog Rendered in Inline=1 Mode
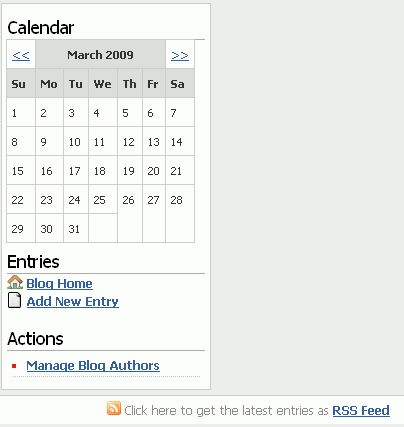
Notice the absence of the page banner, links, and search feature, as well as the General heading and all of its associated links. This mode is recommended for typical blog users.
Blogs rendered in inline=2 mode render exactly like those rendered in inline=1.
Both wikis and blogs provide a swift method for returning to their home pages. For a wiki, this is the start page of the current domain. For a blog, this is the blog home page of a domain.
In the inline=0 mode, to return to a domain wiki home page, you click the domain name link (Figure 7-6).
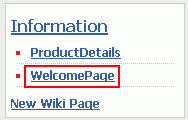
In inline=1 mode, you click start page link of the domain, such as WelcomePage or its equivalent, on the navigation panel on the left (Figure 7-7).
Figure 7-6 Accessing a Domain Wiki Home Page in inline=0 Mode

Figure 7-7 Accessing a Domain Home Page in inline=1 Mode
To return to a blog home page, you click the Blog Home link or its equivalent on the navigation panel (Figure 7-8).
When you introduce a wiki or a blog into your application, it is best to render it within the application context. For example, when a user navigates to an application page, the user can then view your wiki within the context of that application page.
|
Note: The wiki and blog content that is exposed within the context of the application page is not affected by the controls associated with the page. For example, the Edit Page command on a Page Actions menu enables you to edit the application page that exposes a wiki or a blog, but does not enable you to edit the wiki or blog itself. For information about editing a wiki page, see Section 7.3.2, "Editing a Wiki Page." For information about editing a blog entry, see Section 7.4.2, "Editing a Blog Entry." |
You can access information about a current domain on the Domain Information page. This section describes how to access this page and summarizes the types of information it provides.
To access information about a wiki domain:
Navigate to the domain you want to learn about.
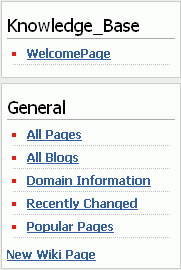
If you are using the inline=1 mode, then click the Information link, the top entry in the navigation panel on the left (Figure 7-10).
Figure 7-9 Accessing Domain Information in inline=1 Mode

If you are using the inline=0 mode, then under General, click the Domain Information link (Figure 7-11).
Figure 7-10 Accessing Domain Information in inline=0 Mode
The domain information page opens (Figure 7-11).
Figure 7-11 Domain Information Page in inline=0 Mode
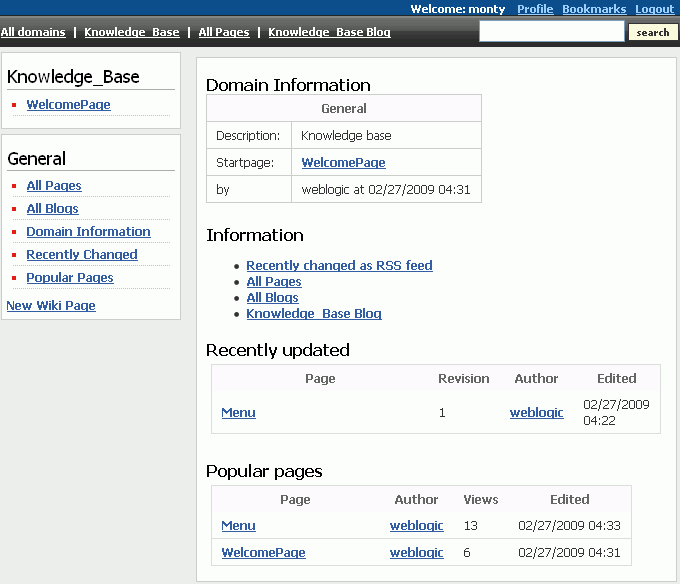
Table 7-1 lists and describes the type of information you can access on the Domain Information page.
Table 7-1 Categories of Content on the Domain Information Page
Use a combination of the left-column navigation and the Back button of your browser to navigate into and out of these pages.
Once you have exposed a wiki in your application, you can start right in creating wiki pages and providing content. Oracle WebCenter Wiki and Blog Server provides simple controls for creating, editing, and deleting wiki pages. This section describes how to use them. It contains the following subsections:
Once you expose a wiki in your application and run the application to your browser, you, the wiki administrator, or users can create new wiki pages.
To create a new wiki page within a domain:
Navigate to the domain where you want to add a page.
Click one of the New Wiki Page links in the domain (Figure 7-12).
The New Wiki Page screen opens (Figure 7-13).
In the Page name field, enter a page name.
Follow the wiki naming convention for pages.
From the Type dropdown list, select the format to use in developing the page content.
Choose from:
HTML—Select to add styles, tables, links, and images using a simple HTML editor. For information about HTML editor controls, see Section 7.5, "Using Wiki HTML Editor Controls,".
Wiki markup—Select to add styles, tables, links, and images using wiki mark-up. For information about wiki mark-up, see Section 7.6, "Using Wiki Mark-Up".
|
Note: HTML and wiki mark-up are almost mutually exclusive. You cannot use wiki mark-up in the simple HTML editor; you can use only a limited set of HTML tags in wiki mark-up. |
Optionally, select a template. The wiki and blog server provides three default templates. Depending on the templates that your administrator created, you may see more templates in the Template dropdown list.
The following are the default templates:
Create empty page—Creates a blank page.
SimpleWikiMarkupPage—Creates a page with a few starter wiki mark-up elements (Figure 7-14).
Figure 7-14 SimpleWikiMarkupPage Template
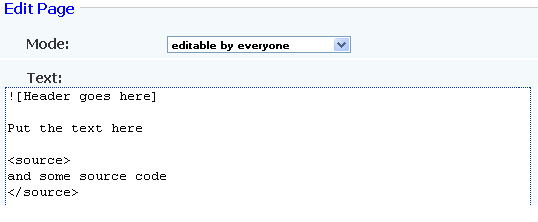
SimpleHTMLPage—Creates a page with a few starter HTML tags (Figure 7-15).
Always select the template for the format type you specified in step 4. That is, for the HTML type, select either Create empty page or SimpleHTMLPage; for the Wiki markup type, select either Create empty page or SimpleWikiMarkupPage.
Click the New Wiki Page button.
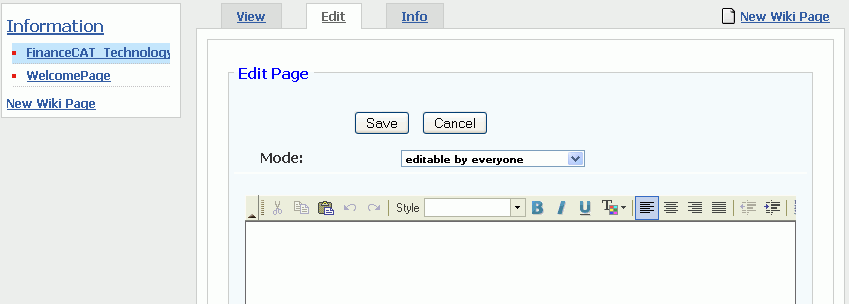
The new wiki page name appears in the list of wiki pages on the navigation panel on the left, and the Edit Page screen opens (Figure 7-16).
Figure 7-16 Wiki Page Navigation and the Edit Page Screen (Plain Text Editor)
|
Note: For the navigation panel shown in Figure 7-16 to display, theinline parameter in the wiki URL must be set to 1. For more information, see Table 6-3, "Query String Parameters to Use in Application Wiki and Blog URLs". |
On the Edit page screen, select a page access mode from the Mode dropdown list.
Choose from:
editable by everyone—Select to enable all users with access to the wiki to edit the page.
restricted to logged in users—Select to restrict editorial access to logged in users.
only admins are allowed to edit—Select to restrict editorial access to wiki administrators. This option appears when the current user is a wiki administrator.
restricted to members of the domain—Select to restrict editorial access to members of the current domain, when domain members are defined. (In WebCenter integrations, users do not typically specify domain members, so this option will not appear most of the time.)
Enter content using HTML or wiki mark-up, depending on the Type you selected in step 4.
For information about HTML editor controls, see Section 7.5, "Using Wiki HTML Editor Controls." For information about wiki mark-up, see Section 7.6, "Using Wiki Mark-Up."
Click the Save button when you are done.
This saves your changes and closes the editor.
To enter edit mode on a wiki page:
Navigate to the wiki page you want to edit.
Click the Edit tab to bring it forward (Figure 7-17).
The page opens in a simple HTML editor or in a plain text editor, depending on the options selected when the page was created.
Edit the page, and then click the Save button when you are done.
To print a wiki page, click the Print icon that displays towards the top of the page (Figure 7-18), and then follow the resulting screen directions from your printer driver.
You can obtain information about a specific wiki page.
To access information about a specific wiki page:
Go to the wiki page of interest.
Click the Info tab of the wiki page.
The wiki Info page opens (Figure 7-19).
Table 7-2 lists and describes the types of information that appear on a wiki Info page.
Table 7-2 Information Types on a Wiki Info Page
| Label | Description |
|---|---|
|
Name |
Specifies the display name of the current wiki page. |
|
Created by |
Displays the user name of the person who created the current wiki page. |
|
Last author |
Displays the user name of the last person to revise the current wiki page. |
|
Created at |
Displays the date and time the current wiki page was created. |
|
Last update |
Displays the date and time the current wiki page was last revised. |
|
Comment |
Displays the comment associated with the current wiki page. |
|
Revision |
Displays the number of times the current wiki page has been revised. |
|
Mode |
Displays the editorial access rule that applies to the current wiki page. |
|
Views |
Displays the number of times the current wiki page has been accessed. |
|
Permalink |
Displays a reusable link to the current wiki page. This can be useful when notifying others about a wiki page, such as in an e-mail. |
|
Recently changed |
Displays a summary table of the most recent changes to the wiki page. Use the view link to open an earlier version of the current wiki page. Use the diff link to compare an older version of the wiki page with the current version. Differences are highlighted in colors showing old content, new content, and deletions (see the following graphic). 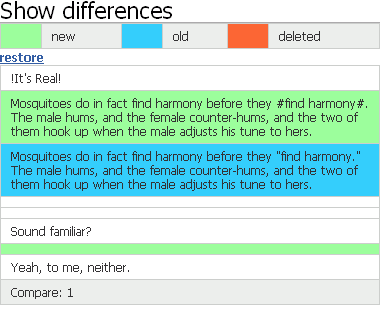
On the diff page, you can use a restore link to make the earlier versions the current version. for more information, see Section 7.3.6, "Restoring an Older Version of a Wiki Page." |
|
The entire history can be found here. |
Provides a link to a full list of all revisions made to the current wiki page. |
|
All references to this page are listed here. |
Provides a link to a page listing all other wiki pages that link to this wiki page. The reference page additionally provides a search feature that enables you to search for the wiki pages on which the specified wiki page is referenced. |
When you delete a wiki page from your application, you are actually deleting it from the wiki and blog server. That is, you are deleting wiki content rather than an application page.
You cannot delete the Welcome page that marks the exposure of your wiki content within your application. However, you can easily delete every other wiki page you create or are permitted to delete.
|
Note: The Delete icon is available only to the wiki page author and the wiki administrator. Only they are able to delete wiki pages. |
To delete a wiki page:
Navigate to the wiki page you want to delete.
Click the Delete icon at the top of the wiki page (Figure 7-20).
In the confirmation dialog box, click OK.
The wiki page is deleted immediately. Its display name is removed from the left-column navigation.
To make an older version of a wiki page the current version:
Go to the wiki page of interest.
Click the Info tab to bring the Info page forward (Figure 7-21).
Under Recently changed, click the diff link next to the version you want to make the current version (Figure 7-22).
Figure 7-22 Diff Link Next to an Older Wiki Page Version
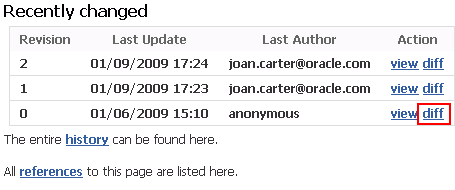
If the version of interest is not listed under Recently changed, click the The entire history can be found here link instead, and then, on the resulting page, click the diff link next to the version of interest.
The Show Differences page opens (Figure 7-23).
Click the restore link towards the top of the page (Figure 7-24).
Figure 7-24 Restore Link on a Show Differences Page
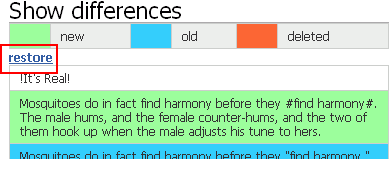
The older version is restored as the current version. The previously current version becomes an older version.
With the creation of each wiki domain, a blog is also automatically created, ready for new blog entries. Blog entries are grouped according to the day they were created (Figure 7-25).
Each entry occupies its own region within the column and each region comes equipped with controls for revising, commenting on, and deleting the entry. Newer entries are added to the top of the blog.
Links under the Entries heading in the navigation panel provide controls for navigating to the blog home page and blog entries, and for creating a new blog entry. Additionally, as entries are added, their headings automatically appear on this list of links.
Where blog entries are grouped according to day, blog pages are grouped according to month. Users can access the various monthly entries using the calendar that appears to the left of the blog content. The dates with associated entries are linked to those entries. Click a date in the calendar to go to the entries for a particular day (Figure 7-26).
Figure 7-26 A Blog Calendar with an Entry on the Ninth
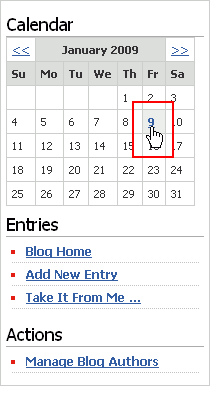
Use the arrows to the left and right of the month to navigate to previous and later months.
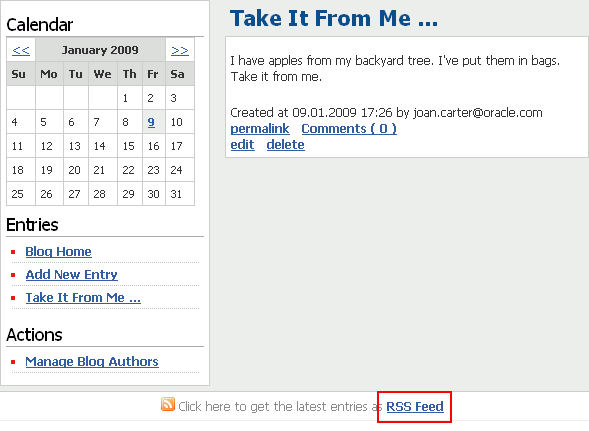
Below the entries for any given day, you will find a link for grabbing a blog news feed, RSS Feed (Figure 7-27).
Figure 7-27 The RSS Feed Link on a Blog Page
This section describes how to create, edit, delete, and offer comments on a blog entry. It contains the following subsections:
Click All Blogs in the navigation panel on the left, and select the blog to which you want to add a blog entry.
You may choose to create a blog entry either in a personal blog or a domain blog.
Click the Add New Entry link under Entries on the navigation panel (Figure 7-28).
The Add new blog entry page opens (Figure 7-29).
In the Title field, enter a display name for this blog entry.
The title displays as a link in the left-side navigation and as the main heading over the text area (Figure 7-30).
In the Text field, enter blog content.
The Text field provides a simple HTML editor for adding style elements and HTML to your content. For illustrations and descriptions of HTML editor controls, see Section 7.5, "Using Wiki HTML Editor Controls".
Click the Save button below the editor to save your changes and exit the editor.
Navigate to the blog where you want to edit an entry.
Click the Edit link below the entry (Figure 7-31).
Use the HTML editor controls as described in Section 7.5, "Using Wiki HTML Editor Controls."
Click the Save button below the editor to save your changes and exit the editor.
One of the great features of blogs is the opportunity to respond to blog entries. This section describes how.
To comment on a blog entry:
Navigate to the desired blog and then to the blog entry to which you want to add a comment.
Click the Comments link below the entry (Figure 7-32).
Figure 7-32 Comments Link on a Blog Entry

Click the resulting Add your comment link (Figure 7-33).
Figure 7-33 Link for Adding a Comment on a Blog Entry

Enter your comment in the Text field (Figure 7-34).
Figure 7-34 Text Field in the Add Your Comment Dialog Box
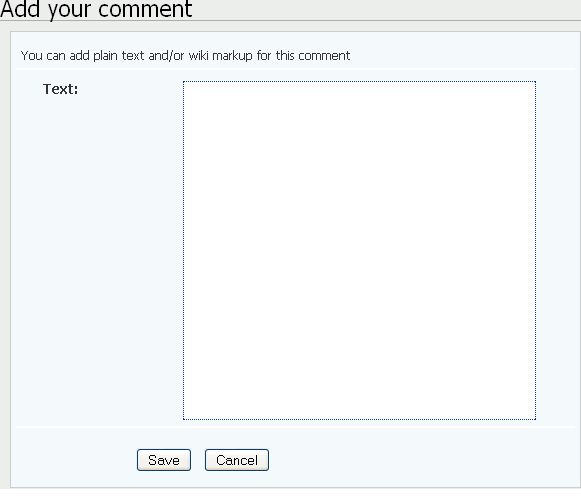
Enter comments in plain text, or, if you prefer, use wiki mark-up. For information about wiki mark-up, see Section 7.6, "Using Wiki Mark-Up."
Click the Save button to save your changes and exit the editor.
Once you click the Delete link under a blog entry, the entry is deleted. There is no confirmation dialog box second-guessing your decision. This increases the efficiency of deleting, but also the risk. Be sure you want to permanently remove a blog entry before you click the Delete link.
Only the author or a wiki administrator can delete a blog entry.
To delete a blog entry:
Navigate to the blog where you want to delete an entry.
Click the Delete link below the entry (Figure 7-31).
The selected entry is deleted from the blog.
Blog information is available in the blog administrator view, inline=0. For more information, see Section 7.1.2, "About Blog Modes". This view provides a General menu with a series of links that lead to useful and interesting information (Figure 7-36).
Figure 7-36 Blog Rendered in Inline=0 Mode

Table 7-3 lists and describes the types of information you can access using the links that appear under the General menu.
Table 7-3 Information Available Under a Blog General Menu
By default, any user can add or edit blog entries. A wiki administrator or a user with the BlogAdmin permission can grant permission to specific users to create or edit blog entries for a domain blog.
The Manage Blog Authors link enables you to restrict the users who can add new blog entries and edit and delete blog entries.
To add or remove blog authors:
Under General on the navigation panel, click All Blogs.
A list of all personal and domain blogs on the server appears on the right.
From the All blogs list on the right, select the blog for which you want to add or remove authors.
Under Actions, click Manage Blog Authors (Figure 7-37).
|
Note: If you navigate to a personal blog of another user, then the Manage Blog Authors link is not available because only the owner of that personal blog can manage the blog. |
On the Add member page, from the Username dropdown list, select the user to whom you want to assign the permission to manage the blog.
Click Add.
The newly added user name displays in the Members section, as shown in Figure 7-38.
Repeat step 4 and 5 if you want to add any other user as the blog author for the selected blog.
Under Members, click the remove link next to a member's name if you do not want that member to be able to create or manage blog entries for the selected blog.
Oracle WebCenter Wiki and Blog Server supports the use of HTML or wiki mark-up language to format page content. When you create or edit a wiki page, you can use either wiki mark-up language or HTML, depending on which was specified when the page was created. Table 7-4 illustrates and describes controls available in the HTML editor provided with the wiki and blog server.
Table 7-4 HTML Editor Controls
| Icon | Description |
|---|---|
 |
Toolbar toggle switch. Click to hide the HTML editor toolbar. Click again to restore the toolbar to view. |
|
Cut icon. Click to cut the selected text of the wiki page. |
|
|
Copy icon. Click to copy the selected text on the clipboard. |
|
|
Paste icon. Click to paste the selected text in the wiki page content. |
|
|
Undo icon. Click to undo your last action. |
|
|
Redo icon. Click to perform your last action again. |
|
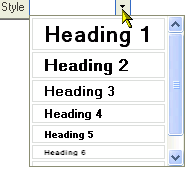 |
Style selection list. Expand to select a style for currently-selected text. Or select a style and enter text in the selected style. Note: To remove a style and return the selected content to the default (<p>), select the text and click the style again. |
 |
Bold icon. Select text, and click the Bold icon to make the text bold. Or click the Bold icon and enter text in bold. Then, to exit bold mode, click the icon again. |
 |
Italic icon. Select text, and click the Italic icon to make the text italic. Or click the Italic icon and enter text. Then, to exit italic mode, click the icon again. |
 |
Underline icon. Select text, and click the Underline icon to draw an underline below text. Or click the Underline icon and enter text. Then, to exit underline mode, click the icon again. |
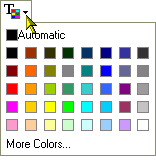 |
Text Color pick list. Select text, and then select a color from this list to make the text the selected color. Or select a color and enter text. To apply a new color, select a second color or Automatic, which equals black. |
|
Left Justify icon. Click to align text with the left margin of the wiki page. |
|
|
Center Justify icon. Click to align text with the center of the wiki page. |
|
|
Right Justify icon. Click to align text with the right margin of the wiki page. |
|
|
Block Justify icon. Click to fully justify the text to the left and right margins. |
|
|
Decrease Indent icon. Click to shift the entire line of text or paragraph to the left by one tab stop. |
|
|
Increase Indent icon. Click to shift the entire line of text or paragraph to the right by one tab stop. |
|
 |
Insert/Remove Numbered List icon. On a new, blank line, click to start a numbered list. Or select a line of text and click to convert it to a numbered list. Click again to exit Numbered List mode. Selecting a numbered item and clicking the icon removes numbered list formatting. |
 |
Insert/Remove Bulleted List icon. On a new, blank line, click to start a bulleted list. Or select a line of text and click to convert it to a bulleted item. Click again to exit Bulleted List mode. Selecting a bulleted item and clicking the icon removes bulleted list formatting. |
 |
Insert/Edit Link icon. Click to open a dialog box for entering a new hyperlink. Or select a hyperlink and click to edit. 
For Link Type, select from:
The values that follow depend on your selection:
|
 |
Remove Link icon. Select a link, and click this icon to remove the link. |
 |
Insert/Edit Table icon. Click to open a Table Properties dialog box and create a new table. Or select a table and click the icon to edit the table properties. 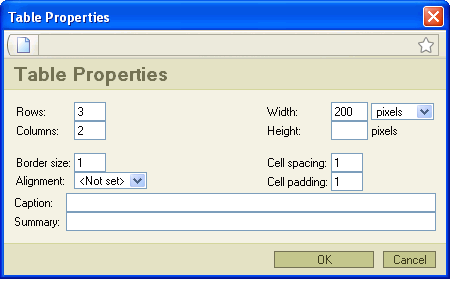 |
 |
Insert/Edit Image icon. Click to open the Image Properties dialog box and provide image-display values. You must specify a URL for the image; therefore the image must already be URL-accessible. The server does not allow you to upload images. The dialog box provides three tabs:
|
|
Insert/Edit Image (cont.) |
|
|
Insert/Edit Image (cont.) |
|
 |
Source button. Click to enter Source view, where you can enter your own HTML code. Click Source again to exit. |
 |
Maximize editor size icon. Click to toggle between maximizing the size of the edit window and restoring the editor to its default size. |
Oracle WebCenter Wiki and Blog Server supports the use of HTML or wiki mark-up language to format page content. When you create or edit a wiki page, you can use either wiki mark-up language or HTML, depending on which was specified when the page was created. Table 7-5 describes some commonly used wiki mark-up rules and examples.
|
Note: For information about HTML editor controls, see Section 7.5, "Using Wiki HTML Editor Controls." |
Table 7-5 Commonly Used Wiki Markup
| Formatting Rule | Description | Syntax Examples |
|---|---|---|
|
Headers |
Define headers using exclamation points (!). The number of exclamation points defines the header depth. |
!Header1 !!Header2 !!!!Header4 |
|
Emphasis |
Wrap the text you wish to emphasize with the following characters: Bold: * Italics: # Underlined: " |
The following is *bold text*. The following is #italicized text#. The following is "underlined text". |
|
Links |
Display external links either by entering the link URL: http://www.oracle.com Or by using the following format to provide a link display name: [ link display name | URL ] Display links to other wiki pages using the following format: [ link display name | wiki page name ] Note that if the internal page does not exist, wiki will create a new one and display a question mark (?) next to the page name in the View mode. Click the question mark to edit the page. |
[ oracle | http://www.oracle.com ] [ Seattle | SeattleSupportPage ] |
|
Wiki Page Names |
Use the camel case notation to name your wiki pages. This notation uses an initial uppercase letter followed by lowercase letters, then another uppercase letter and another series of lowercase letters, for example, [ alternate name | Wiki page name ] |
[ My Page | MyPage ] |
|
Lists |
At the beginning of a new line, use an asterisk (*) to denote a bulleted list or the number sign (#) to denote a numbered list. |
* bulleted item 1 * bulleted item 2 # numbered item 1 # numbered item 2 |
|
Tables |
Use HTML to create a table. Open and close the table with the |
<table width="75%" border="0"> *col1* | *col2* Hello | world Here | I am </table> |
|
Images |
Any forward slashes in the image URL must go outside the quotation marks. |
<img src="" TARGET=_blank http://www.anyserver.com/image.gif"/> |