10 Processing Automatic Payments
This chapter contains the following topics:
|
Note: Country-specific information for automatic payments exists for Brazil, Argentina, Denmark, Ecuador, Finland, Germany, Japan, Norway, Peru, Russia, and Sweden. |
|
See Also: |
10.1 Understanding the Automatic Payment Process
You use automatic payments to group vouchers and produce multiple payments in a single payment run.
Automatic payment processing enables you to manage your payments efficiently and take advantage of favorable discount terms whenever possible. Use automatic payment processing to pay vouchers during your usual payment cycle.
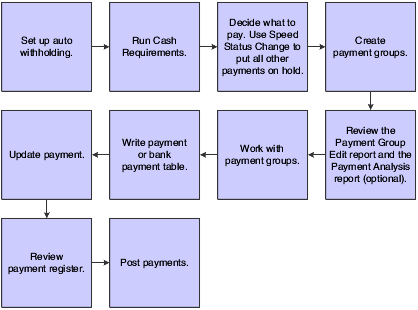
This graphic shows the process for automatic payment processing:
During automatic payment processing, the system works with these document and batch types:
| Field | Value |
|---|---|
| Voucher document type |
|
| Payment document type | PK (automatic payment) |
| Batch type | K (automatic payment) |
This graphic shows the programs you use to process payments:
Figure 10-2 Programs used to process payments
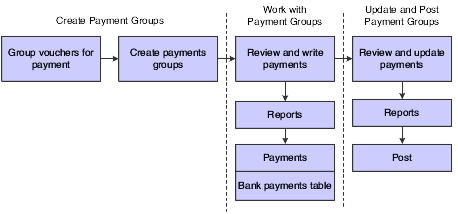
Description of "Figure 10-2 Programs used to process payments"
10.2 Creating Payment Groups
This section provides overviews of the Create Payment Control Groups program (R04570), processing vouchers with discounts, using next numbers for payment groups; and discusses how to:
-
Run the Create Payment Control Groups report.
-
Set data sequence for the Create Payment Control Groups report.
-
Set processing options for Create Payment Control Groups (R04570).
|
See Also: |
10.2.1 Understanding the Create Payment Control Groups Program
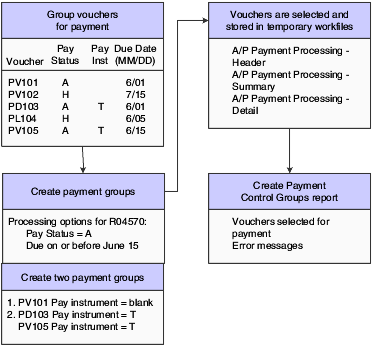
After you process your vouchers, you can prepare to write your payments. Before you write payments, you must create payment groups to organize vouchers that can be paid together. For example, you can organize vouchers by bank account and payment instrument in separate groups. Then, the vouchers can be paid with the proper check stock. You use the payment groups when you review and write payments.
The Create Payment Control Groups program is a batch process that you run once for each payment cycle. The program typically creates more than one payment group. Each payment group contains information that determines how the group is processed, including:
-
Bank account
-
Payment instrument
Each payment group also contains control information that determines which program to use for:
-
Payments
-
Registers
-
Attachments
-
Debit statements
To include additional vouchers in a payment group, you can undo the group, approve those vouchers for payment, and rerun the program. The system displays payment groups after you write them until you undo them or update them to the F0411 table.
When you create payment groups, the system:
-
Selects vouchers with a pay status of A (approved) and a due date that is before or the same as the specified pay-through date.
-
Creates payment groups for all selected vouchers by grouping vouchers with this common information:
-
GL bank account (optional)
-
Payment instrument
-
Business unit (optional)
-
Currency code
Note:
To group vouchers for a supplier for which the vouchers have different GL bank accounts, complete the G/L Bank Account processing option on the Printing tab of the processing options.To group vouchers by business unit, complete the Business Unit processing option on the Process By tab of the processing options.
After the system creates payment groups, each group has this information in common:
-
Version ID
-
User
-
Creation date
-
Output queue
-
-
Assigns each payment group a next status of WRT (write).
-
Changes the pay status of selected vouchers from A to # (payment in-process).
-
Creates these worktables to use in writing payments.
-
The A/P Payment Processing - Header (F04571) table, which contains a single header record for each payment group with information about that group of payments.
-
The A/P Payment Processing - Summary (F04572) table, which contains a record for each payment within a group.
These records are the actual payments that will be written and updated through the Work with Payment Groups program (P04571). This information is the basis for the Accounts Payable Matching Document (F0413) table.
-
The A/P Payment Processing - Detail (F04573) table, which contains a record for each voucher pay item within a payment.
This is the information that will be printed on the payment stub and used to update the F0411 table. This information is the basis for the Matching Document Detail (F0414) table.
-
-
Prints a report that shows the vouchers that are selected for payment. It also shows pay items that were bypassed for payment and prints an error message next to each blank payment total. Examples of error messages include:
-
Hold payment code active
-
Supplier master information missing
-
Amount under payment limit
-
This graphic illustrates the process for creating payment groups:
If you create payment groups that use the Bank Automated Clearing System (BACS) format, set the Print Bank Tape Information processing option to 1 and set the Payee Bank Account Error processing option to 1.
If you create payment groups that use the EFT (electronic funds transfer) payment format, use these guidelines when setting processing options for the Create Payment Control Groups program:
-
If you enter 1 for the Print Bank Tape Information processing option, the system prints bank tape information on the Create Payment Control Groups report.
-
If you enter 1 for the Payee Bank Account Error processing option, the system prints an error on the Create Payment Control Groups report and does not include the supplier in a payment group if it does not find bank account information for a supplier
-
If you enter 1 for the Bank Account X12 Information Error processing option, the system prints an error on the Create Payment Control Groups report and does not create the payment group if it does not find X12 information for the bank account for which you are creating the payment group.
|
Important: You must complete the automatic payment processing (records must written and updated) or you must reset records before you upgrade your system from one release to another. |
10.2.2 Understanding Vouchers with Discounts
The Create Payment Control Groups program (R04570) provides four processing options that enable you to control how the system manages vouchers with discounts.
To process vouchers only on their discount due date, or on or after their net due date, set these processing options as indicated:
-
Enter 1 for the Prohibit Payment Before Due Date processing option.
-
Enter the date through which to process vouchers in the Pay Through Date processing option.
If you leave this processing option blank, the system uses the system date. If you leave this processing option blank and enter a value for the Displacement Days processing option, the date that the system uses is the system date plus the number of days specified in the Displacement Days processing option. All vouchers with discounts due on the date specified for the Pay Through Date processing option are selected for a payment group and discounts are applied. All vouchers that have missed their discount due date but have a net due date on or before the date specified for the Pay Through Date processing option are selected for a payment group and discounts are not applied.
To process vouchers over a range of dates, take discounts that are available, but not pay vouchers earlier than their net due date, set these processing options as indicated:
-
Enter a date in the Pay Through Date processing option or enter a value in the Displacement Days processing option.
-
Enter 1 in the Prohibit Payment Before Due Date processing option.
-
Enter a date in the Discount Cutoff Date processing option.
The range for which the system takes discounts is from the date specified for the Discount Cutoff Date processing option to either the date specified in the Pay Through Date processing option (or the system date if you leave the Pay Through Date processing option blank) or the system date plus the number of displacement days, depending on which of the first two processing options you use.
10.2.3 Understanding Next Numbers for Create Payment Control Groups
When the you run the Create Payment Control Groups program, the system assigns the payment group a number to identify the payment group in the three worktables that are used in the payment process (F04571, F04572, and F04573). This number prevents payments in one payment group from being combined with payments in different payment groups.
The JD Edwards EnterpriseOne Accounts Payable system uses the F0002 table to assign these payment group numbers. The F0002 table is locked during the time a number is being assigned to one payment group, and is released immediately after the payment group has been assigned its identifying number.
The F0002 table increments until it reaches its maximum (a number greater than 99 million) and resets the next number for payment control groups to 1.
|
Note: The next number for the Create Payment Control Groups table is the number assigned to a payment control group, not to the payments within a group. There can be many payments in a single payment control group. Only one number from the F0002 table is assigned to each payment control group. |
10.2.4 Prerequisites
Before you create payment groups for Argentina or Peru:
-
(ARG) Set processing options for PO - PCG process - ARG (P76A570).
10.2.5 Running the Create Payment Control Groups Program
Select Automatic Payment Processing (G0413), Create Payment Control Groups.
10.2.6 Setting Data Sequence for Create Payment Control Groups
The Create Payment Control Groups program sequences payments within payment groups using the default template sequence and the processing option settings. You do not need to change the data sequence to sequence payments properly. It is recommended that you not change the data sequence.
When you run the Create Payment Control Groups program, the system reads records from the F0411 table in an order that is determined by the template sequence and the processing option settings. The system creates a new payment group when it encounters a change in any of the following values as it reads the records:
-
Payment Instrument (PYIN)
-
G/L Bank Account (GLBA) (optional)
The system uses the G/L Bank Account field unless you have entered a G/L Bank Account override on the Printing tab of the processing options.
-
Business Unit (MCU) (optional)
The system uses the Business Unit field only if you have completed the Business Unit processing option on the Process By tab of the processing options.
-
Currency Code (CRCD)
Within the payment groups, the system creates a new payment when it encounters a change in any of these values as it reads the records:
-
Payment Handling Code (CRC)
-
Payee Number (PYE)
-
Company (CO) (optional)
The system uses the Company field only if you have completed the By Company processing option on the Process By tab of the processing options.
-
Statement/Control Number (CTL) (optional)
The system uses the Statement/Control Number field only if either or both of the following situations is met:
The Print Contract Number option on the Report tab of the processing options is completed and the Payment Creation option on the payee's Supplier Master (F0401) record is set to By Contract (C).
The Print Job Number processing option on the Report tab of the processing options is completed, the Payment Creation Option on the payee's Suppler Master (F0401) record is set to By Contract (C), and the Business Unit Type (STYL) of the business unit on the voucher is Job Cost (JB).
-
Purchase Order Number (PKCO) (optional)
The system uses the Purchase Order Number field only if the Print Contract Number option on the Report tab of the processing options is completed and the Payment Creation option on the payee's Supplier Master (F0401) record is set to By Contract (C).
-
Address Number (AN8)
-
Due Date (DDJ) (optional)
The system uses the Due Date field only if you have completed the Due Date processing option on the Process By tab of the processing options.
The system also creates payments within payment groups based on the Payment Creation option on the payee's Supplier Master (F0401) record. For example, if you have specified By Supplier as the Payment Creation option for a payee and that payee is listed on vouchers for three different suppliers in the payment group, the system generates three payments for that payee.
Also, the system can print no more than 99 check stubs per payment. The number of detail lines that you print on each check stub is set up on the Set Up G/L Bank Account form. For example, if you specify 10 detail lines per check stub on the Set Up G/L Bank Account form, the system can print 990 detail lines per payment.
If a payment requires more than 99 check stubs, the system prints the additional detail lines on an attachment if you have completed the Print Attachments processing option. Otherwise, the system creates a new payment for the additional detail lines.
|
Important: The sequence for creating payment groups and payments is separate from the sequence for printing payments using the Write process. The sequence for printing payments using the Write process is determined by the Sequence ID processing option on the Create Payment Control Groups program. The Sequence ID processing option does not affect the sequence of payments when payment groups are created. You can print payments using the Write process in a different sequence from the sequence that is used to create payment groups. |
10.2.6.1 Example of Data Sequenced by Business Unit
In the following example, the F0411 table contains these records:
| Address | Document | Due Date | Amount | Business Unit |
|---|---|---|---|---|
| 1001 | PV 11001 001 | 07/01/05 | 2,000.00 | 9 |
| 1001 | PV 11003 001 | 07/01/05 | 1,500.00 | 1 |
| 1001 | PV 11005 001 | 07/01/05 | 2,500.00 | 9 |
| 1002 | PV 11002 001 | 07/01/05 | 3,000.00 | 9 |
| 1002 | PV 11004 001 | 07/01/05 | 1,000.00 | 1 |
| 1002 | PV 11006 001 | 07/01/05 | 3,500.00 | 9 |
If the Payment Control Groups by Business Unit processing option is set to create separate payment control groups by business unit, the system creates one payment group for the records with business unit 1 and another payment group for the records with business unit 9. In the payment group for business unit 1, the system creates two separate payments because each of the records has a different payee. In the payment group for business unit 9, the system creates two payments, each with two records, because two records exist for each payee.
If you process the same vouchers with the processing option not set to create separate payment control groups by business unit, the system creates one payment group and creates two payments within the payment group, one payment for each payee.
10.2.6.2 Example of Data Sequence by Due Date and Payment Creation by Voucher
In this example, the F0411 table includes the following records:
| Document | Due Date | Amount |
|---|---|---|
| PV 12345 001 | 07/15/05 | 2,000.00 |
| PV 12345 002 | 07/01/05 | 1,500.00 |
| PV 23456 001 | 07/15/05 | 3,000.00 |
| PV 23456 002 | 07/01/05 | 1,000.00 |
If the payee is set up in the F0401 table to create payments by voucher, and the processing option is set to create separate payments by due date, the system creates four payments, even though only two vouchers exist because the pay items on the vouchers have different due dates.
If the payee is set up in the F0401 table to create payments by voucher, and the processing option is not set to create separate payment by due date, the system creates one payment for each voucher, even though the due dates for the pay items are different.
If the payee is not set up in the F0401 table to create payments by voucher, and the processing option is set to create separate payments by due date, the system creates two payments, one for each due date, even though the pay items within the payments are from different vouchers.
10.2.7 Setting Processing Options for Create Payment Control Groups (R04570)
Processing options enable you to specify the default processing for programs and reports.
10.2.7.1 Dates
These processing options enable you to customize payment and discount dates of payment groups. If you leave the Pay Through Date processing option blank and the Displacement Days processing option is zero, the system date is used for the pay through date.
- 1. Pay Through Date
-
Specify a due date through which you want to create a group of vouchers for payment. For example, to create a payment group consisting of vouchers with due dates through March 15, 2009, enter 03/15/09. The system creates a payment group consisting of vouchers with due dates on or before March 15, 2009. Enter the date in this processing option, or leave the processing option blank to select vouchers by displacement days.
Note:
If you leave the Pay Through Date processing option blank and the Displacement Days processing option as zero, the system date is used for the pay through date. - 2. Displacement Days
-
Specify the number of days from the current date through which you want to create a group of vouchers for payment. For example, if the current date is March 10, and you specify three displacement days, the system includes vouchers with due dates through March 13 in the payment group.
Enter the number of days in this processing option, or leave as zero to use the system date as the pay through date.
- 3. Discount Cutoff Date
-
Enter the final date on which you are allowed to take a discount. Pay items with a due date before the date that you enter are not eligible for discounts, so the system sets the discount amounts of these pay items to zero. If this processing option is blank, the program takes all discounts that are currently available for the selected pay items.
- 4. Prohibit Payment Before Due Date
-
Specify whether the system should include vouchers for payment if the discount due date of the voucher has passed but the net due date has not yet occurred. Values are:
Blank: Include vouchers for processing even if the value specified in the Pay Through Date processing option is not on or after the voucher's net due date.
1: Do not include vouchers for processing if the value specified in the Pay Through Date processing option is not on or after the voucher's net due date.
10.2.7.2 Amounts
These processing options specify payment ranges, currency, and payment range exceptions.
The minimum and maximum amounts refer to payment amounts, not voucher amounts. Use data selection to control the maximum and minimum amounts of the vouchers to be selected.
- 1. Payment Amount Range Minimum
-
Enter the beginning of the amount range.
- Payment Amount Range Maximum
-
Enter the end of the amount range.
- 2. Currency Code for Range Amounts
-
Enter a code that specifies the currency for the values that you entered in the Payment Amount Range processing option fields. If necessary, the system converts these amounts to the payment currency of each payment control group. For example, if you enter ranges of 100 to 5,000 in USD, the system converts those USD amounts to EUR for an EUR payment group, to GBP for a GBP payment group, and so on. The conversion allows for the correct minimum and maximum comparisons for all payment groups that are created each time you run this program.
- Minimum Payment Instrument
-
Assign payment instruments to vouchers that are not included in the amount range you specify in the Payment Amount Range processing option. Enter the payment instrument to assign to vouchers that have an amount less than the minimum amount range you specify in the Payment Amount Range processing option.
- Maximum Payment Instrument
-
Assign payment instruments to vouchers that are not included in the amount range you specify in the Payment Amount Range processing option. Enter the payment instrument that you want to assign to vouchers that have an amount more than the maximum amount range you specify in the Payment Amount Range processing option.
10.2.7.3 Printing
These processing options enable you to customize various printing options for payment groups.
- 1. Sequence ID
-
Specify the order that the program processes and prints the AP payments by entering a sequence ID.
To set up and define sequence IDs, select Payment Sequence from the Automatic Payment Setup menu (G04411).
Note:
You must complete this processing option. - 2. Print Attachments
-
Specify whether to print attachments with the payment. For example, you might print an attachment when the payment detail information does not fit on the payment stub. The system can print only 99 payment stubs per payment. The number of detail lines on each payment stub is set up on the Set Up G/L Bank Account form. The standard number of detail lines per payment stub is 10. Values are:
Blank: Do not print attachments.
1: Print attachments.
Note:
If you leave this processing option blank and you have more than 99 payment stubs, the system prints two or more payments. However, if you enter 1, the system prints a single payment with one payment stub referring to the attachment. The attachment prints all pay items.Before using this processing option, you must assign an attachments program to your payment instrument in the Payment Instrument Defaults program. On the Work With Payment Instrument Defaults form, select the payment instrument and click Select. On the Set Up Payment Instrument Defaults form, you can enter a program number in the Attachments field to specify the attachment program you want the payment instrument to use. The default attachment program is R04573.
- 3. G/L Bank Account
-
Specify a bank account to use instead of the bank account that is assigned to the voucher pay item when the voucher is entered.
To specify a GL bank account, enter its short account ID. The short account ID is an eight-digit alphanumeric field that does not allow any special characters. Therefore, if you identify a short account ID in the General Accounting Constants by attaching a special character to it, you do not include the special character in this field.
If the short account ID does not use eight digits, you must fill the remaining digits with zeros. For example, if the short account ID for the bank account you want to use is 108, enter the number as 00000108. If you use the visual assist to select the bank account, the system enters the number into the field correctly.
If the Intercompany Settlements constant in the General Accounting constants is set to N, and you specify a GL override bank account in this field, the system compares each voucher's company to the company of the override GL bank account. If the voucher company is not the same as the company of the override GL bank account, the system does not include that voucher in the payment group.
Before you can enter a GL bank account in this processing option, you must set up the account on your system.
If you use multicurrency, consider these guidelines when using this processing option:
-
If the bank account is a monetary account, it must have the same currency as either the domestic or foreign currency of the voucher.
-
If the bank account is a non-monetary account, its company currency must be the same as the domestic currency of the voucher.
-
- 4. Payment Currency
-
Specify the currency method that the program uses for payment. Values are:
Blank: Pay in the currency of the general ledger bank account. For monetary accounts, this is the currency assigned to the general ledger bank account in the F0901 table. For non-monetary accounts, this is the currency that is assigned to the company in which the business unit of the general ledger bank account resides. For example, the currency that is associated with the general ledger bank account 1.1110.BEAR is USD because business unit 1 belongs to company 00001, for which the currency is USD. If you enter vouchers in the euro (EUR) for company 00001, you can either pay the vouchers from the monetary bank account in EUR, or you can pay them from a bank account that belongs to a company for which the base currency is USD.
1: Pay the domestic amount of the voucher in the domestic currency. For example, if you entered the voucher in EUR for company 00001, for which the base currency is USD, the voucher is paid in USD.
2: Pay the foreign amount of the voucher in the foreign currency. For example, if you entered the voucher in EUR for company 00001, for which the base currency is USD, the vouchers are paid in EUR. Vouchers that do not have a foreign currency are paid in the domestic currency.
3: Pay the current domestic amount of a foreign voucher in the domestic currency. For example, if you entered the voucher in EUR for company 00001, for which the base currency is USD, the foreign amount is converted to the current domestic amount based on the current date's effective exchange rate, and the voucher is paid in USD.
4: Pay the voucher in an alternate currency that is neither the domestic amount nor foreign currency of the voucher. For example, if you entered the voucher in EUR for company 00001, for which the base currency is USD, but you want to pay the voucher in Canadian dollars (CAD), the voucher is paid in the alternate currency. Designate the payment currency in the Alternate Currency Code processing option.
Note:
When you make payments in the current domestic currency, the Create Payment Control Groups program calculates the domestic amounts that are paid using the exchange rate that is effective on that day. This rate might be different from the exchange rate that is effective when you actually make the payment.
Note:
When you specify 2,3, or 4 in this processing option, the program calculates a gain or loss if the exchange rate of the voucher is different from the exchange rate of the payment. - 5. Alternate Currency Code
-
Enter the code for the alternative currency amount. You enter a value in this processing option only if you specified 4 in the Payment Currency processing option.
- 6. Prepayment Selection
-
Enter 1 to include negative prepayment items in the payment group.
10.2.7.4 Process By
These processing options specify the categories by which the system groups payments.
- 1. Company
-
Enter 1 to create separate payments based on company.
- 2. Due Date
-
Enter 1 to create separate payments based on due date.
If you set the Summarized Pay Item processing option on the Summarize tab to 1 to summarize payments, you set this processing option to 1 also because you might have different due dates for the lines on a voucher.
- 3. Payee
-
Use this processing option to specify whether to create payments based on payee, regardless of the supplier. Values are:
Blank: No
1: Yes
For example, the following table illustrates one possible voucher, supplier, and payee combination:
Voucher 1, Supplier 1001, Payee 1001
Voucher 2, Supplier 1001, Payee 1002
Voucher 3, Supplier 1001, Payee 1002
Voucher 4, Supplier 1002, Payee 1002
Voucher 5, Supplier 1003, Payee 1001
If you leave the Payee processing option blank, the system generates four payments, based on the payee, then supplier:
Payee 1001: Supplier 1001, Voucher 1
Payee 1001: Supplier 1003, Voucher 5
Payee 1002: Supplier 1001, Vouchers 2 and 3
Payee 1002: Supplier 1002, Voucher 4
If you set the Payee processing option to 1, you have two payments based only on the payee:
Payee 1001: Supplier 1001, Voucher 1, and Supplier 1003, Voucher 5
Payee 1002: Supplier 1001, Vouchers 2 and 3, and Supplier 1002, Voucher 4
- 4. Business Unit
-
Enter 1 to create separate payment control groups by business unit.
10.2.7.5 Summarize
These processing options enable you to customize the information that appears on the payment stub.
- 1. Summarized Pay Item
-
Enter 1 to summarize pay items within a document on the pay stub or attachment. When you set the processing option to summarize pay items, the Due Date processing option on the Process By tab must have a value of 1.
- 2. Summary Description
-
Enter 1 to print the remark from the first pay item on the pay stub. Leave this processing option blank to print the generic description Invoice Summary on the pay stub.
10.2.7.6 Report
These processing options specify the information that appear on the report.
- 1. Print Mailing Address
-
Enter 1 to print the mailing address for each payee on the report.
- 2. Print Contract Number
-
Enter 1 to print the contract number on the report.
- 3. Print Job Number
-
Enter 1 to print the job number on the report.
10.2.7.7 Bank Tape
These processing options specify the bank information that prints on the report.
- 1. Print Bank Tape Information
-
Enter 1 to print bank tape information on the edit report.
- 2. Payee Bank Account Error
-
Enter 1 to specify that the system issues an error message when bank account information does not exist for the payee.
If you complete this processing option, the system generates a message whenever a payee does not have bank account information stored in the Bank Transit Master (F0030) table, regardless of whether a bank tape is being processed. The system cannot distinguish between pay instruments when using this processing option.
- 3. Bank Account X12 Information Error
-
Enter 1 to specify that the program issues an error when X12 information does not exist for the GL bank account.
10.2.7.8 Withholding
These processing options specify whether to submit the Calculate Withholding program (R04580) before you create payment control groups.
- 1. Calculate Withholding
-
Enter 1 to submit the Calculate Withholding program before creating payment control groups.
- 2. Program Version
-
Specify the version number of the Calculate Withholding program. You must specify a version number if you enter 1 in the Calculate Withholding processing option. If you leave this processing option blank, the system uses version ZJDE0001.
10.3 Working With Payment Groups
This section provides overviews of working with payment groups, reviewing payments, revising unprocessed payments, writing payments, resetting payments, removing processed payments, and updating payments; and discusses how to:
-
Set processing options for the Work With Payment Groups program (P04571).
-
Split a payment.
-
Revise the value date of a payment.
-
Revise control information for a payment group.
-
Write payments.
|
See Also: |
10.3.1 Understanding the Process to Work with Payments
When you create payment groups, the system populates these temporary tables:
-
A/P Payment Control Group (F04571).
-
A/P Payment Header (F04572).
-
A/P Payment Detail (F04573).
Because the system stores the payment group information in temporary work tables, you can revise payment groups, split payments, revise value dates, and undo payment groups without affecting the Accounts Payable Matching Document (F0413) table and the Accounts Payable Matching Document Detail (F0414) table.
When you update a payment group, the system removes the payment group information from the temporary worktables and creates records in the F0413 table and the F0414 table. Therefore, you should verify that you do not need to make any further changes to the payment group before you update the group.
10.3.2 Understanding the Review Process for Payment Groups
You generally review payments twice:
-
After you create payment groups but before you write payments.
This enables you to identify payments and vouchers that you want to change or remove from the payment cycle. You can:
-
Change information at the payment and voucher levels.
-
Remove payment groups, payments, and vouchers from the payment cycle.
-
Change control information for payment groups.
-
-
After you write payments but before you update the AP ledger.
This enables you to identify payments that you want to void or remove from the payment cycle. You can:
-
Void the payments that were written and rewrite them.
-
Remove payment groups, payments, and vouchers from the payment cycle.
-
When you work with payment groups, you work with pay items that are at one of the following statuses:
| Status | Description |
|---|---|
| Write | The pay item is ready to be written. |
| Update | The payment has been written and is ready to be updated in the F0411 table. |
10.3.3 Understanding the Process to Revise Unprocessed Payments
You can make limited changes to payments, vouchers, and payment groups before you write them, such as:
-
Excluding debit memos (credit vouchers).
Debit memos occur when you have overpaid a supplier or have been issued credit from a supplier. You can exclude these debit memos from payment processing. You can exclude an individual debit memo; alternatively, you can exclude all debit memos from the payment group by setting the Minimum Amount processing option for Create Payment Control Groups to the smallest currency unit (for example, .01).
-
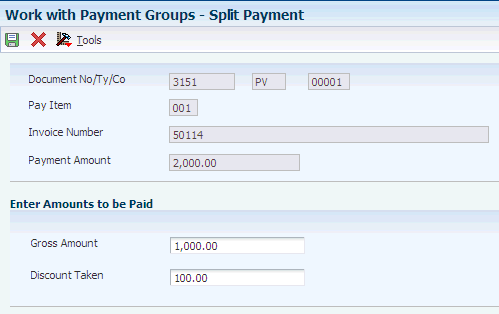
Splitting payments.
When you want to pay part of a voucher now and part later, you can split the payment. When you decrease the gross amount of a voucher, the system creates a new voucher pay item for the remaining balance. The new pay item is created using the default pay status, which is typically A (approved) for payment. The new pay item is not part of a payment group.
-
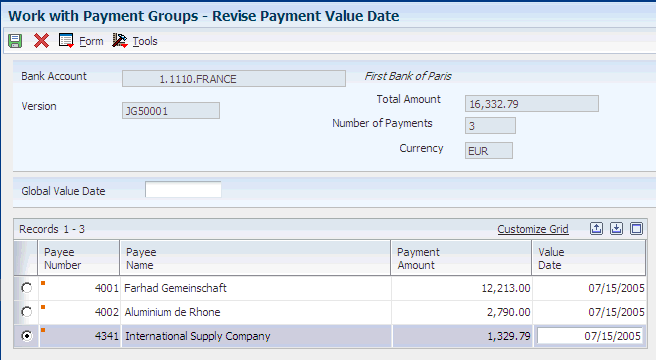
Revising the value date of payments.
Typically, the payment value dates apply to draft processing and indicate the date that a payment reaches a bank. You can revise the value date for one or all payments in a payment group.
-
Removing voucher pay items.
When you do not want to pay a voucher, use the Undo feature to remove it from the payment group.
-
Removing unprocessed payments.
If you do not want to make a payment, use the Undo feature to remove it from the payment group. The system removes the voucher pay items from the payment group and resets their pay status from payment in-process to approved.
-
Removing an entire payment group.
Use the Undo feature to remove an entire payment group. The system removes the payment group from the work tables and resets the pay status of the vouchers to be approved.
-
Revising control information for a payment group.
You can change the programs for printing payments, payment register, attachments, and debit statements by changing the control information for the payment group. You can also change the sequence ID, which determines the order in which the group's payments print.
The system uses payment instrument default values to create the control information when you create payment groups. You can change this information before you write payments. Any change that you make affects the entire payment group.
10.3.4 Understanding the Write Process
When you write payments, you can print the payments or copy them to a bank tape. You either:
-
Write all payments in a payment group.
-
Write selected payments in a payment group.
When you write payments, the system:
-
Creates a matching document with a document type of PK (automatic payment).
This payment closes the voucher.
-
Creates a matching document with a document type of PT (electronic funds transfer).
-
Assigns payment numbers.
-
Changes the next status of the payment group from WRT (write) to UPD (update).
-
Prints payments using control information for payment groups.
-
Prints attachments, if needed.
When you issue a payment, you issue it to the alternate payee. You select whether the alternate payee is the supplier or the factor/special payee in the voucher entry processing options by specifying a version of the Voucher Entry Master Business Function (P0400047). On the Defaults tab for the Voucher Entry Master Business Function program, enter 1 in the Alternate Payee processing option to complete the alternate payee with the factor/special payee. Leave this processing option blank to complete the alternate payee with the supplier number. You can override the alternate payee default value when you enter the voucher.
The system does not update the F0411, F0413, or F0414 tables until the update process. The payments remain in the temporary work tables, including the F04571, F04572, and F04573 tables.
|
Note: When you write a payment whose amount, in words, exceeds the number of characters provided in the print program, the system prints checks with digits for the payment amount instead of words. |
10.3.4.1 Writing Payments for EFT Payment Groups
When you write payment groups for electronic funds transfer (EFT) payments, the system creates records in the A/P Payment Tape (F04572OW) table, in addition to the F04571, F04572, and F04573 tables. The system creates a new record in the F04572OW table for each payment group that you write. Each payment group is uniquely identified in the F04572OW table by the value that is specified in the Member ID field (KNMID).
10.3.4.2 Record Reservation for Payments
Record reservation for payments is a process in which the system determines, before writing payments, how many payment numbers to reserve for a payment cycle. The system adds that number to the next payment number in the Bank Transit Master (F0030) table. The F0030 table has a record for each bank account in the system. Payment numbers are reserved by bank account.
The purpose of using the record reservation process is to prevent more than one payment from having the same payment number. This is especially useful when more than one user is making payments from one bank account at the same time.
To use record reservation, you must add the F0030 table to UDC 00/RR with the Special Handling Code field set to 1.
After the user defined code is set up, the system determines the number of payments to use when you write payments, and increases the value in the Next Check Number field in the F0030 table by that number. In the payment cycle, if the next payment number in the F0030 table is 258, and the record reservation process determines that you use 30 payment numbers, the system updates the next payment number to 288. When another person writes payments from the same bank account, the next payment number will begin at 288. The system uses payment numbers between 258 and 287 only for the payment cycle that reserved those numbers.
If two users access the write payments process at the same time, the system activates the record reservation process for the first user and sends an error message to the second user. When the first user completes the record reservation process, the second user can access a payment number record and reserve the number of payments that are needed for that payment cycle.
10.3.4.3 Payment ID Using Next Numbers
When you run a write payment program (such as R04572, R04572A, R04572C, and so on), the system assigns each payment a number that identifies it throughout the payment process and after the process finishes. This number is the payment ID (PKID), which is a key to both the F0413 and the F0414 tables. The payment ID prevents pay items in one payment from being mixed with pay items that are paid on a different payment.
The JD Edwards EnterpriseOne Accounts Payable system uses the F0002 or the F00021 tables to assign payment ID numbers. The table is locked while a number is being assigned to the pay items that are associated with one payment, and is unlocked immediately after the pay items have been assigned their identifying numbers.
10.3.5 Understanding the Reset Process
After you write payments but before you update them, you might need to rewrite them. For example, you might need to rewrite payments because of an error, such as a paper jam, wrong payment number, or wrong payment date.
Before you can rewrite payments, you must reset them. Written payments have a next status of UPD (update).
When you reset payments, you return them to a next status of WRT (write), so you can correct the problem and rewrite them:
-
To undo or reset a payment, you can identify the tape that was affected on the Copy Bank Tape File program (P0457), which you access from the Automatic Payment Processing menu (G0413). This program shows information such as the file ID and the member ID.
-
If you reset payments that were written to a bank tape, you must delete the bank tape record before you can rewrite the payments.
10.3.6 Understanding the Process to Remove Processed Payments
After you write payments but before you update them, you might need to remove one or all of them from the current payment cycle. To do so, you undo the payment. The system:
-
Voids the payment.
-
Removes the voucher pay items from the payment group.
-
Resets the pay status of the voucher from payment in-process (#) to approved (A).
You can then change vouchers and process them for payment at another time.
To undo a payment, you can identify the tape that was affected on the Work With Bank Tape form in the Copy Bank Tape File program. This form displays the file ID and the member ID so that you can select the payment to undo.
If you undo one or all payments that were written to a bank tape, you must delete the bank tape record before you process the payments again.
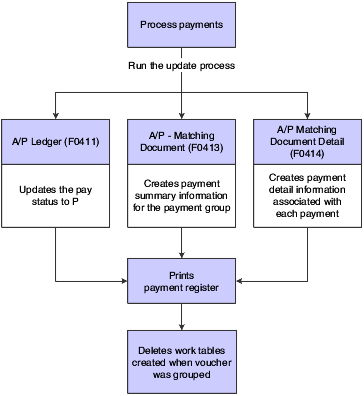
10.3.7 Understanding the Update Process
After you write payments, you must update the F0411 table to create transaction records of your payments and your payment register. You can update payments only if the next status of the payment group is UPD (update). When you select a payment to update, the system locks the record in F04571. To perform this, the system sets the GFL4 value for the payment group before it starts processing the update. This avoids multiple updates on a record at the same time.
When you update the F0411 table, the system:
-
Processes void payments.
-
Changes the pay status of vouchers from payment in-process (#) to paid (P) and sets the open amount to zero.
-
Prints a payment register.
-
Copies payment information to the F0413 table and the F0414 table from the following work tables:
-
F04571
-
F04572
-
F04573
-
Removes the records in the work tables that were created when you grouped vouchers for payment.
Note that bank tape records remain in the table until they are deleted.
The following graphic illustrates what happens when the system updates the F0411 table:
After you update the accounts payable ledger tables, you can post payments to the general ledger. Alternatively, a processing option for the Work With Payment Groups program enables you to automatically submit payments for posting to the general ledger after you update the accounts payable ledger. During the posting process, the system creates the journal entries that debit the AP trade account and credit the payables bank account.
10.3.7.1 Reviewing, Approving, and Posting Payments
After updating automatic payments to the AP ledger, you can verify their accuracy. If you use management approval, you can approve the payment batches before posting them to the general ledger.
When you post automatic payments, the system creates payment disbursement entries and offset entries to the general ledger for the payable account. The system creates journal entries (document types PK and PT) that debit the AP trade account that was originally credited when the voucher was posted. This keeps the AP trade accounts in balance. Posting automatic payments creates records in the F0911 table.
You can set a processing option in Work With Payment Groups program to automatically submit payments for posting to the general ledger after you update the F0411 table.
The following graphic illustrates the process when the system posts payments to the F0911 table:
Figure 10-5 Automatic payment posting process
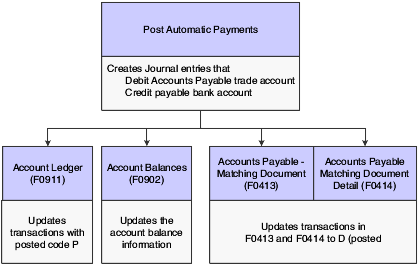
Description of "Figure 10-5 Automatic payment posting process"
10.3.8 Forms Used to Work With Payment Groups
| Form Name | FormID | Navigation | Usage |
|---|---|---|---|
| Work With Payment Groups | W04571A | Automatic Payment Processing (G0413), Work with Payment Groups
Select a record and from the Row menu, do one of the following: Select Undo to remove an entire payment group. Select Write to write a payment group. Select Update to update a payment group. Select Reset to reset a payment group that has already been written. |
Select payment groups to review, Undo, Write, Update, or Reset. |
| Work with Payment Groups - Write Status | W04572WA | Click Select on the Work with Payment Groups form. | To write selected payments from a payment group, select Write from the Row menu.
Select a payee for which you want to review payments (Write Status). Write selected payments from a payment group. |
| Work With Payment Detail | W04573A | Click Select on the Work with Payment Groups - Write Status form. | Select a voucher to review (Write status). |
| Payment Detail | W04573 | Click Select on the Work With Payment Detail form. | Review voucher information associated with a payment at Write status. |
| Payment Header Detail - Write Status | W04572WC | On the Work With Payment Group - Write Status form, select Detail from the Row menu.
To remove a payment from the payment groups, select Undo from the Row menu. |
Review summary information for each payment at Write status.
Select a payment to remove from the payment group. |
| Work With Payment Group - Update Status | W04572UB | Click Select on the Work With Payment Groups form. | Review payment information at Update status. |
| Payment Header Detail - Update Status | W04572UA | On the Work With Payment Group - Update Status form, select Detail from the Row menu. | Review summary information for each payment at Update status. |
| Split Payment | W04573B | On the Work With Payment Detail form, select Split from the Row menu. | Split a payment (Write or Update status).
See Splitting a Payment. |
| Revise Payment Value Date | W04572WB | On the Work With Payment Group - Write Status form, select Value Date from the Form menu. | Revise the value date for a payment (Write status).
Use the Global Value Date field to review the value date for all payments in the group. Click Load Date to update the value date. |
| Write Payments | W04572A | On the Work With Payment Groups form, select Write from the Row menu. | Write a payment group.
See Writing Payments. |
| Reset Payments | W04572B | On the Work With Payment Groups form, select Reset from the Row menu. | Reset payments.
If you do not reset the next payment number, the system creates void payments. |
| Revise Payment Group Controls | W04571C | On the Work With Payment Groups form, select Controls from the Row menu. | Revise control information for a payment group. |
| Copy Bank Tape to Tape | W0457A | Automatic Payment Processing (G0413), select Copy Bank Tape File to Tape
Select Delete on the Copy Bank Tape to Tape form. |
Reset payment processing for a bank tape. |
10.3.9 Setting Processing Options for Work With Payment Groups (P04571)
Processing options enable you to specify the default processing for programs and reports.
10.3.9.1 Print
- 1. Default Print Program Version
-
Specify the version that the system uses for the print program. Enter a version number, or leave this processing option blank to use default version ZJDE0001.
- 2. Payment Control Group Output
-
Specify the output configuration for Payment Control Groups (PCG). You can send a spool file to a printer by PCG or by bank account, or you can send multiple PCGs to a printer simultaneously in one spool file. Values are:
Blank: Separate files by PCG.
1: Separate files by bank account.
2: Send multiple PCGs in one spool file.
- Save Spool File (FUTURE)
-
Specify whether to save a copy of a spool file after it has printed. This option is not yet functional in JD Edwards EnterpriseOne software. Values are:
Blank: Do not save spool file.
1: Save spool file.
- Hold Spool File (FUTURE)
-
Specify whether to hold a spool file, which requires that you release it manually before it prints. This option is not yet functional in JD Edwards EnterpriseOne software. Values are:
Blank: Do not hold spool file.
1: Hold spool file.
10.3.9.2 Update
- 1. Default Register Program Version
-
Specify the version number of the register program. Enter a specific version number or leave this processing option blank to use default version ZJDE0001.
- 2. Post Void Payments
-
Specify whether to post void payments to the general ledger. Void payments include alignment checks and checks that are printed as Void so that the stub can be used for additional information continued from the previous stub. Values are:
Blank: Do not post void payments to the general ledger.
1: Post void payments to the general ledger.
- 3. Submit Post Program
-
Enter 1 to automatically submit the AP payment post after the payments are updated.
10.3.9.3 Display
- 1. Display Business Units
-
Specify whether to display the business unit that is assigned to the payment control groups. If you enter 1, the Business Unit field appears on the Work With Payment Groups form. You can perform a search on a specific business unit by completing the Business Unit field in the Specify Preloaded Values processing option.
Note:
This field is valid if the Create Payment Control Groups program (R04570) was set to process payment groups by business unit.Values are:
Blank: Do not display the Business Units field.
1: Display the Business Units field.
- Write Status
-
Enter 1 to display the payment control group's next status. You can change the selection criteria on the Work With Payment Groups form.
- Update Status
-
Enter 1 to display the payment control group's next status. You can change the selection criteria on the Work With Payment Groups form.
- 3. G/L Bank Account
-
Enter a value for the GL bank account selection criteria. You can change the selection criteria on the Work With Payment Groups form. Enter a specific GL bank account number or leave this processing option blank to display all GL bank accounts.
- Originator
-
Enter the user ID of the person who ran the for the Create Payment Control Groups program to display only the payment control groups of this originator. The value that you enter should be the same as in the Transaction Originator field (data item TORG) in the Create Payment Control Groups program. If you complete this processing option, you can change the selection criteria on the Additional Selection Criteria form.
Leave this processing option blank to search on all transaction originators.
- Payment Control Group Version
-
Enter the number of the version used to create the Payment Control Groups to display only the payment control groups created with this version number. You can change the selection criteria on the Additional Selection Criteria form.
Leave this processing option blank to search on all versions.
- Business Unit
-
Enter the business unit that was originally assigned to the PCG by the Create Payment Control Groups program to display only the payment control groups created for the business unit. You can change the selection criteria on the Additional Selection Criteria form.
Leave this processing option blank to search on all business units.
Note:
This processing option is valid if the Create Payment Control Groups program was set to process payment groups by business unit. Additionally, this processing option is valid only if you enter 1 in the Display Business Units processing option. - Payment Instrument
-
Enter the payment instrument that was originally assigned to the PCG by the Create Payment Control Groups program to display only the payment control groups created with this payment instrument. You can change the selection criteria on the Additional Selection Criteria form. You can enter a specific payment instrument (data item PYIN), or l
Leave this processing option blank to search on all payment instruments.
- Currency Code
-
Enter the payment currency that was originally assigned to the PCG by the Create Payment Control Groups program to display only the payment control groups created with this currency code. You can change the selection criteria on the Additional Selection Criteria form.
Leave this processing option blank to search on all payment currencies.
- Display Alternate Currency Amounts
-
Enter 1 to display the payment control group amounts in the alternate currency.
Note:
This conversion is for display purposes only and affects the amounts on the Work With Payment Groups form. To write foreign payments, complete the processing options on the Currency tab. - Alternate Currency Effective Dates
-
Enter the effective date for the currency's exchange rate, or leave this processing option blank to use the system date.
10.3.9.4 Currency
- Effective Date
-
Use this processing option to specify the date to retrieve the exchange rate when you write foreign or alternate currency payments. If you leave this processing option blank, the system uses the payment G/L date.
If you create a payment group using the domestic amount of a voucher instead of the foreign amount, the system calculates a currency gain or loss based on the pay date exchange rate. The payment is not a foreign currency payment because it is made in the domestic currency.
- Use Voucher's Date
-
Use this processing option to specify the voucher's G/L date when you are writing foreign payments. Values are:
1: Use the voucher's G/L date
Leave this processing option blank to use the exchange rate for the specified effective date.
10.3.9.5 Process
- 1. Interactive Process
-
Enter 1 to process payments interactively. Leave this processing option blank to print and update jobs for batch processing.
Note:
This processing option does not override the Object Configuration Manager (OCM) mapping for server batch jobs; it affects only batch jobs that are run locally.
10.3.9.6 BACS
This processing option specifies whether the system enables the entry of Bank Automated Clearing System (BACS) processing dates. BACS is an electronic funds transfer method used in Great Britain.
- 1. BACS Processing
-
Enter 1 to enable the entry of BACS processing date.
10.3.10 Splitting a Payment
10.3.11 Revising the Value Date of a Payment
Access the Revise Payment Value Date form.
Figure 10-7 Revise Payment Value Date form
Description of "Figure 10-7 Revise Payment Value Date form"
- Value Date
-
Enter the date that the payment amount was debited or credited to the bank account. The value date is not the date the bank reconciled the payment. If you make manual payments and have set a processing option to display the Value Date field, you can manually enter the value date here.
10.3.12 Revising Control Information for a Payment Group
Access the Revise Payment Group Controls form.
- Payment
-
Enter a value that exists in the Produce Bank File (04/PP) UDC table to specify the program used to print accounts payable payments.
- Register
-
Enter a value that exists in the Register Program - Payments (04/PR) UDC table to specify the program used to print the account payable payment register.
- Attachment
-
Enter a value that exists in the Attachment Program - Payments (04/PA) UDC table to specify the program used to print attachments when processing accounts payable payments.
- Debit Statement
-
Enter a value that exists in the Debit Statement Pgm - Payments (04/PD) UDC table to specify the program used to print debit statements when processing accounts payable payments.
10.3.13 Writing Payments
Access the Write Payments form.
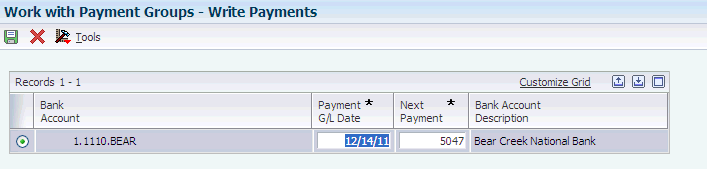
- Next Payment
-
Enter the next payment number to be processed for the specified bank account. The system updates this field during Accounts Payable payment processing.
The default value is from the F0030 table record for the bank account.
- Payment G/L Date
-
Enter the date that identifies the financial period in which the transaction will be posted. The company constants table for general accounting specifies the date range for each financial period. You can have up to 14 periods. If you leave this processing option blank, the system uses the current date.
- Next Payment
-
Enter the next payment number to be processed for the specified bank account. The system updates this field during Accounts Payable payment processing.
The default value is from the Bank Transit Master (F0030) table record for the bank account.
10.4 Voiding Automatic Payments and Vouchers
This section provides an overview of voiding automatic payments and vouchers and discusses how to void automatic payments and vouchers.
10.4.1 Understanding the Process to Void Automatic Payments and Vouchers
You can determine whether a payment was posted by viewing its posted status. The statuses are:
-
Blank: The payment was not posted or voided.
-
D: The payment was posted.
-
P: The payment post ended in an error; the system wrote GL entries to the bank account.
You can tell that a payment was voided if no payment amount exists.
When you void posted payments or vouchers, the system reopens the original batch. You must repost the batch to:
-
Debit the cash account and credit the AP trade account for voided payments.
-
Debit the AP trade account and credit the GL distribution account for voided vouchers.
An unposted payment can be either voided or deleted, depending on how you set a processing option.
You void payments after you update them. You can void both posted and unposted payments. When you void payments, the system:
-
Creates a matching document with a document type of PO (voided payment) in the Accounts Payable Matching Document Detail table (F0414).
This matching document has a gross amount that is equal to the void amount and a pay status of P (paid).
-
Reopens the original vouchers with an open amount and a pay status of A (approved).
-
Voids payments with multiple currencies by voiding both the domestic and foreign sides of the payment.
Note:
You cannot void payments that were reconciled with the Manual Reconciliation program (P09131) or Match Tape File to Recon File program (R09510). Reconciled payments must be unreconciled using the P09131 program and then voided.
10.4.1.1 Voiding an Automatic Payment and Its Vouchers
To void a payment and not repay the vouchers in another payment cycle, you must void both the payment and its associated vouchers. When you void both the payment and the associated vouchers, the system:
-
Removes the payment amount from the record in the F0413 table.
-
Creates a PO record for the voided payment in the F0414 table.
-
Creates an adjustment document with a document type of PE (change to voucher amount) in the F0411 table.
This adjustment document has a gross amount that is equal to the void amount and a pay status of P (paid).
You cannot void vouchers that have not been posted using the following process. If the vouchers are selected, but have not been posted, the system returns an error message and only the payment is voided. You must post this voucher to void it. Then, void it using the A/P Standard Voucher Entry program. You cannot delete an unposted voucher that has been paid.
Important:
Do not use the JD Edwards EnterpriseOne Accounts Payable system to void vouchers that were created in the JD Edwards EnterpriseOne Procurement system. If you created a voucher in the JD Edwards EnterpriseOne Procurement system, you must reverse it in the JD Edwards EnterpriseOne Procurement system. If you void the voucher in the JD Edwards EnterpriseOne Accounts Payable system, you might compromise the integrity of your purchasing data. You can set the Voucher Delete processing option on the Purchasing tab of the A/P Standard Voucher Entry program to prompt you with a warning or error if you attempt to void a voucher that was created in the JD Edwards EnterpriseOne Procurement system.If the voucher that was created in the JD Edwards EnterpriseOne Procurement system has not been paid, you can reverse the voucher. If the voucher has been paid, you must void the payment in the JD Edwards EnterpriseOne Accounts Payable system before reversing the voucher in the JD Edwards EnterpriseOne Procurement system.
|
See Also: |
10.4.2 Forms Used to Void Automatic Payments and Vouchers
| Form Name | FormID | Navigation | Usage |
|---|---|---|---|
| Work with Payments | W0413MB | Automatic Payment Processing (G0413), Void Payment Entry | Locate payments to void. |
| Void Payment | W0413VA | On the Work With Payments form, select Void Pymt from the Row menu. | Void payments and, if necessary, vouchers.
If you select one of several vouchers and click Void Voucher(s), the system voids only that voucher. If you do not select any vouchers and then click Void Voucher(s), the system voids the first voucher in the grid. |
10.4.3 Voiding Automatic Payments and Vouchers

10.5 Copying Payments to a Diskette
This section provides an overview of copying payments to a diskette and discusses how to:
-
Set processing options for Copy Bank Tape File to Tape (P0457).
-
Review and change the status and detail for a tape table.
-
Set processing options for Copy Bank File to Diskette (P0457D).
-
Copy a tape table to diskette.
10.5.1 Understanding the Process to Copy Payments to a Diskette
When you write payments, the payment instrument can be an electronic format. In this case, writing payments creates bank tape tables rather than printed payments. You must copy these tables to a diskette to send the information to a financial institution.
Copying payments to a diskette consists of:
-
Reviewing and changing the status and detail for a tape table.
-
Copying a tape table to a diskette.
Typically, your MIS department presets the detail for a tape table. You should not change this information unless you are instructed to do so. You can, however, change many format specifications before copying the table to a diskette.
You can recopy a bank table to a diskette if you have not deleted the table. This might be necessary if, for example, your financial institution loses the original diskette.
When you create a new bank tape table, you do not overwrite an existing table. The A/P Payment Tape (F04572OW) table is a multimember table, which means that each version (payment group) is a separate table. The system does not automatically delete records in the table. Instead, you must delete the record using the Copy Bank Tape to Tape form. Do not do this until you verify that your bank has received the bank diskette.
10.5.1.1 Additional Tape Copy Options
Additional options for copying a tape table are available, which might be relevant for specific users.
-
You can use IBM system commands to view the tape table. You must specify the table and member IDs, for example, table ID F04572T and member ID AP00000390.
-
Information in tape tables is stored in a standard format. Instead of copying a tape table to tape or diskette, you can upload a tape table to a financial institution using a modem.
-
Bank Automated Clearing System (BACS) clients can approve a bank tape before copying it to tape or diskette. On the Copy Bank Tape to Tape form, select Approve from the Row menu. This Row menu selection is enabled only if the processing option for the Copy Bank Tape File to Tape program (P0457) specifies to display the BACS format.
10.5.2 Forms Used to Copy Payments to a Diskette
10.5.3 Setting Processing Options for Copy Bank Tape File to Tape (P0457)
Processing options enable you to specify the default processing for programs and reports.
10.5.3.1 BACS
- Display BACS Format
-
Enter 1 to display the BACS format
10.5.3.2 Program
- Alternate Processing Program (FUTURE)
-
Enter the name of an alternate program to use. If you leave this processing option blank, the system uses program J0457T
Note:
The system ignores this processing option if BACS processing is turned on.
10.5.3.3 Version
- Version
-
Enter the version to use for the Copy Bank File to Diskette (P0457D) program. If you leave this processing option blank, the system uses version ZJDE0001.
10.5.4 Setting Processing Options for Copy Bank File to Diskette (P0457D)
Processing options enable you to specify the default processing for programs and reports.
10.5.4.1 Defaults
- 1. Record Length
-
Specify the record length of the output file. The maximum length is 1,500 characters. If you leave this processing option blank, the system creates the output table with the original record length.
- 2. Insert Carriage Return
-
Specify whether the system inserts a hard return at the end of each record. If you leave this processing option blank, the system formats the file into a long string instead of multiple separate records.
- 3. Default File Path/Name
-
Specify the default path and the default name for the output file. The path and file name should conform to the file structure and naming standard of the operating system of the computer where the file is stored.
For example, if you store the output file on your local machine C drive, specify the directory path: C:\FolderName\FileName.txt. If you store the output file to a folder on a network machine, you might specify the network path: \\MachineName\FolderName\FileName.
If you leave this processing option blank, the system uses the following for the path and name: A:\DTALSV.
Note:
You should store the files only on a Windows client.
10.5.4.2 Data
- 1. Replace Pre-defined Characters
-
Specify whether the system replaces special characters. If you replace special characters, the system reads the Replaced Character UDC (04/RC) and replaces single characters according to the values in the UDC. The system then reads the Special Characters UDC (04/SC) and replaces special characters according to the values in that UDC. Values are:
Blank: Do not replace
1: Replace
Note:
For programs P0457 and P03B571, the system replaces only the first character in the Description 01 field of UDC 04/RC, with the first character in the Description 02 field. It does not replace more than one character, even if the UDC is mapped in a one-to-many mode. Other programs that use UDC 04/RC replace more than one character if the UDC is mapped in a one-to-many mode. - 2. Capitalize all alpha characters
-
Specify whether the system capitalizes all alphabetic characters in the record. If you leave this processing option blank, the system does not capitalize characters.
- 3. Replacement Character (UDC 04/SC)
-
Specify whether the system replaces characters in fields and tables that match characters that are defined in UDC 04/SC with a specified character or with a blank. To replace the characters with a specified character, enter the character in the processing option. To replace the special characters with a blank, leave the processing option blank.
Note:
The system always replaces the character that is defined in UDC 04/SC with either the character that you specify or a blank. If you do not want to replace any characters, UDC 04/SC must be blank.
10.5.5 Reviewing and Changing the Status and Detail for a Tape Table
Access the Update Tape Information form.
Figure 10-10 Update Tape Information form
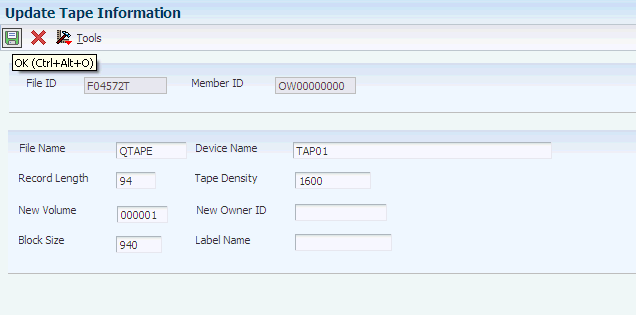
Description of "Figure 10-10 Update Tape Information form"
10.5.6 Copying a Tape Table to Diskette
Access the Write Bank Diskette form.
- Path/Filename
-
Specify the location to which the system writes the file.
- Generate New File
-
Select to delete the existing records in the table and replace them with new records.
- Append Records
-
Select to add new records to the existing records in the table.