13 Processing Manual Payments
This chapter contains the following topics:
|
Note: Country-specific functionality for manual payments exists for Argentina and Brazil. |
|
See Also: |
13.1 Understanding the Manual Payments Process
To issue a payment immediately, you do not need to wait for your next payment cycle. You can enter a manual payment regardless of whether you have received the voucher. Manual payments can include payments:
-
With an existing voucher.
-
Without an existing voucher.
Depending on whether the payment is made for an existing voucher or the voucher is created at the time the payment is made, the system assigns the following document and batch types:
13.1.1 Payment With Existing Voucher
This table shows payment with existing voucher types:
| Field | Value |
|---|---|
| Voucher Document Type | PV |
| Table Row Heading | PR (recurring voucher) |
| Payment Document Type | PN |
| Batch Type | M |
13.1.2 Payment Without Existing Voucher
This table shows payment without existing voucher types:
| Field | Value |
|---|---|
| Voucher Document Type | PM |
| Payment Document Type | PN |
| Batch Type | W |
The entry programs for manual payments store voucher and payment information in the following ledger tables:
-
Accounts Payable Ledger (F0411).
-
Accounts Payable - Matching Document (F0413).
-
Accounts Payable Matching Document Detail (F0414).
-
Account Ledger (F0911).
13.1.3 Revising Unposted Manual Payments
You can change amounts on an unposted manual payment, but you cannot change the vouchers that are paid by it. For example, if you originally applied a payment to voucher 1001 PV, you cannot then change the voucher the payment was applied to so that it pays 1002 PV. You can, however, delete the payment and then apply the payment to a different voucher.
|
Important: If you change any information in the detail area other than the payment amount, you are changing the voucher, not the payment. You run the risk of the payment not posting. If you must change any information on a manual payment, you should delete the payment and start over. |
13.1.4 Reviewing Manual Payments
Use the Review Payments program (P0011) to review manual payments online. To review payments using a report format, print the Manual Payment Journal report (R04311). Use this report for proofing and balancing purposes. If you have a problem balancing the general ledger, the report can be a more workable format for detailed review.
13.1.5 Approving and Posting Manual Payments
If your business requires management approval before posting, after you enter manual payments, you review and approve them. After approving the payments, post them to the general ledger using the General Ledger Post program (R09801).
When you post manual payments, the system creates payment disbursement entries and offset entries in the F0911 table for the payable account. The system creates payment records with a document type of PN. The system typically creates journal entries that debit the AP trade account that was originally credited when the voucher was entered.
|
Note: When manual payments without a voucher match are posted, the system does not generate a gain-loss record. The system interprets this type of transaction as a voucher and check combination. |
|
See Also: |
13.2 Entering Manual Payments with Voucher Match
This section provides an overview of entering manual payments with voucher match and discusses how to:
-
Set processing options for Payment With Voucher Match (P0413M).
-
Enter a manual payment with voucher match.
-
Select pay items for a manual payment.
13.2.1 Understanding Manual Payments with Voucher Match
To create a manual payment for one or more vouchers that you have already entered, you enter a manual payment with voucher match. You specify whether to print the payment. If you do not print it, you must prepare the payment manually.
The system reserves the records (payment numbers) needed for the manual payments, creates a payment record, updates the pay status of the voucher, and reduces the open amount of the voucher. The Print Payment check box on the Manual Payment Entry form determines if the payment is printed. The processing options on the Print tab enable you to specify certain print characteristics such as payment instrument and print program version number.
For greater efficiency when you enter a manual payment, you can set a processing option so that the system calculates the total amount of the pay items that you select for payment. After you select the pay items, the system deducts the full discount, if applicable, and enters the full payment amount.
When the Multi Currency Conversion field in the General Ledger Constants is enabled and the Payment Instrument processing option on the Print tab of the Manual Payments with Voucher Match program is set to ACH IAT Format, the Manual Payments with Voucher Match program validates the account currency code and payment currency code. The Manual Payments with Voucher Match program supports ACH IAT payment transactions only if the currency code is USD.
|
Note: If the processing option is set for the system to automatically calculate the payment amount and you want to select an additional pay item after initially selecting a pay items, do not clear the Payment Amount field. Instead, select Pay Items from the Form menu. On the Select Open Pay Items form, select the pay item and click Select. On the Manual Payment Entry form, the system recalculates the payment amount to include the pay item that you just added.If the processing option is set for you to enter the payment amount manually and you want to select an additional pay item, clear the Payment Amount field. Select Pay Items from the Form menu. On the Select Open Pay Items form, select the pay item and click Select. On the Manual Payment Entry form, enter the new payment amount. |
|
Important: If you override the payment amount, the processing option is overridden. The payment amount is not recalculated again. You must enter any further changes manually. |
Alternatively, you can manually enter the payment amount. You can pay the whole amount of a voucher or pay a partial amount. To enter the payment amount manually, be sure to enter the amount in the header area before moving your cursor to the detail area. The system will calculate the amount to pay on each voucher that you select.
13.2.1.1 Using the Select Open Pay Items Form
Use the Select Open Pay Items form to select the vouchers to pay with a manual payment. The following guidelines apply when using the form:
-
When you select voucher pay items to be paid by the manual payment, press and hold the Control key while selecting each one individually to select pay items that do not appear in succession on this form.
-
The Select Open Pay Items form provides a Summarized option. If you select this option, the system displays payments by document number. You cannot combine summarized and unsummarized pay items on a single manual payment. They must be on separate payments.
-
Once you select pay items and click Select, the system changes the voucher pay status to Z. This prevents it from being selected for payment again.
13.2.2 Forms Used to Enter Manual Payments With Voucher Match
| Form Name | FormID | Navigation | Usage |
|---|---|---|---|
| Work With Payments | W0413MB | Manual Payment Processing (G0412), Payment With Voucher Match. | Enter the default value for the supplier number for manual payment, and locate existing manual payments to review or delete. |
| Manual Payment Entry | W0413MA | Click Add on the Work With Payments form. | Enter payment information. The system populates the fields for grower management when you select a voucher for which grower management information exists. |
| Select Open Pay Items | W0413ME | On the Manual Payment Entry form, select Pay Items from the Form menu. | Select voucher pay items to be paid by the manual payment. |
13.2.3 Setting Processing Options for Payment With Voucher Match (P0413M)
Processing options enable you to specify the default processing for programs and reports.
13.2.3.1 Defaults
- 1. Mode to View Open Pay Items
-
Specify the mode in which to view open pay items on the Select Open Pay Items form. Values are:
Blank: View open pay items in detail mode. The system displays each pay item.
1: View open pay items in summary mode. The system displays pay items by voucher number and due date. The system enters * in each field in the Pay Item column that contains more than one pay item for a voucher. Clear the Summarize option on the Select Open Pay Items form to show the number of pay items on the voucher.
Note:
This option also exists on the Supplier Ledger Inquiry form. However, if you select summary mode on this form, the Pay Item column does not appear on the detail area of the form. - 2. Assign Payment Numbers
-
Enter 1 to enable the system to assign the payment number based on the value for the specified bank account in the Next Payment Number field on the Set Up G/L Bank Account form. You can view this field by choosing Bank Account Information from the Automatic Payment Setup menu (G04411).
Leave this processing option blank to enter the payment number manually in the Payment Number field on the Manual Payment Entry form.
- 3. Enter Payment Amount
-
Enter 1 to enable the system to calculate the payment amount from the pay items you select. Leave this processing option blank to enter the payment amount manually in the Payment Amount field on the Manual Payment Entry form.
Note:
If you enter the payment amount manually, you must enter the amount before choosing Pay Items from the Form menu to select which voucher pay items to pay.
13.2.3.2 Display
- 1. Display Value Date Field
-
Enter 1 to display the Value Date field on the Manual Payment Entry form. If you select to display the field, you must update it manually. The Value Date field is used by companies in Europe and indicates the date that they expect the bank to process a payment.
13.2.3.3 Processing
- 1. Display Draft Entry Option
-
Enter 1 to display the Draft Entry option on the Manual Payment Entry form. Drafts, like vouchers, can be processed to be paid in various currencies.
Note:
If you select the Draft Entry option, the payment type changes from PN to P1. - 2. Duplicate Number Error Message
-
Enter 1 to have the system issue a warning message when someone enters a duplicate payment number using the same bank account. Leave this processing option blank to have the system issue an error message.
- 3. Allow Negative Payments
-
Specify whether the system enables the entry of negative payments. Businesses in some countries are not allowed to have outstanding debit memos. So, you can use negative payments to record reimbursements from suppliers using the supplier's check number. When you post the supplier's check as a negative payment, the system updates the proper accounts with the correct amounts. Values are:
Blank: Do not enable negative payments.
1: Enable negative payments.
- 4. Delete Unposted Automatic Payments
-
Enter 1 to enable the deletion of unposted automatic payments. Leave this processing option blank to prevent the deletion of unposted automatic payments. These payments can be voided.
Note:
If unposted payments are deleted, all records of their existence are physically removed from the system. There is no audit trail. However, if payments are voided, the system creates a PO document type for the payment, which leaves an audit trail. - 5. Delete Unposted Manual Payments
-
Enter 1 to enable the deletion of unposted manual payments. Leave this processing option blank to prevent the deletion of unposted manual payments. These payments can be voided.
Note:
If unposted manual payments are deleted, all records of their existence are physically removed from the tables. There is no audit trail. However, if payments are voided, the system creates a PO document type for the payment, indicating a void payment entry. There is an audit trail.
13.2.3.4 Currency
- 1. Activate Alternate Payment
-
Enter 1 to activate the Alternate Payment option on the Form menu. The Alternate Currency form enables you to pay a voucher in a currency other than the domestic or foreign currency of the voucher. For example, a foreign currency voucher is entered in Canadian dollars (CAD) and has a domestic currency of U.S. dollars (USD). You can pay the voucher in an alternate currency, such as euros (EUR) or any other currency other than CAD or USD.
- 2. Exchange Rate Date Edit
-
Specify whether the system validates that the effective date of the exchange rate is within the same GL reporting period in the Company Constants. Values are:
Blank: The system does not perform the validation; it accepts any date.
1: The system performs the validation and issues a warning message if the effective date is not within the same GL reporting period.
- 3. Exchange Rate Tolerance Limit
-
Specify an exchange rate tolerance limit. During payment entry you can manually override the exchange rate that exists in the Currency Exchange Rate table (F0015). The Exchange Rate Tolerance Limit processing option places limits on how far the exchange rate you enter manually can differ from the exchange rate in the F0015 table.
Valid values are whole numbers that indicate a percent of the exchange rate in the F0015 table. For example, if you enter 5, you can manually override the exchange rate that exists in the F0015 table with a number that is plus or minus 5 percent of the table value.
13.2.3.5 Print
These processing options specify variables that are related to printing manual payments.
- 1. Payment Instrument
-
Specify the payment instrument for the payment. The system uses the value that you enter in this processing option to determine which print program to use when it generates payments.
Each payment instrument has an assigned print program number. To view assigned print programs, select Payment Instrument Defaults from the Automatic Payment Setup menu (G04411). The A/P Payments - Default Print and Update table (F0417) contains the payment instrument and assigned print program information. For example, if you leave this processing option blank, the system uses the print program assigned to a blank value in the F0417 table.
- 2. Print Program Version Number
-
Specify the version number of the print program.
To view valid version numbers, select batch Versions from the System Administration Tools menu (GH9011). Enter the Print program number in the Batch Application field, and click Find. The system displays all available versions.
If you leave this processing option blank, the system uses version ZJDE0001.
- 3. Retain Print Field Value
-
Specify whether the status of the Print Payment option on the Manual Payment Entry form remains the same until you change it. Values are:
Blank: Do not retain the same value. The Manual Payment Entry form opens with the Print Payment option cleared regardless of how you left it the last time you worked on the form while in the same batch.
1: Retain the same value. The Manual Payment Entry form opens with the Print Payment option retaining the value for as long as you are in the same batch.
13.2.3.6 Voids
- 1. Vouchers with Purchase Orders
-
Specify how the system responds to the removal of vouchers that contain a purchase order when you use the Void Payment Entry program. Values are:
Blank: Enable the voiding of vouchers with purchase orders, and issue no message.
1: Issue a warning message.
2: Issue an error message.
Note:
If you use the JD Edwards EnterpriseOne Accounts Payable system to revise or void a voucher that was originally entered from the JD Edwards EnterpriseOne Procurement system, you compromise the integrity of the Purchase Order Detail File table (F4311).
13.2.3.7 Inquiry
- 1. Deactivate OK and Delete
-
Use this processing option to deactivate the OK and Delete buttons on the Manual Payment Entry form when payments are being reviewed. Deactivating these options prevents changes from being made to existing records. You can review manual payments by choosing either Supplier & Voucher Entry from the Supplier & Voucher Entry menu (G0411) or by choosing Payment with Voucher Match from the Manual Payment Processing menu (G0412). Values are:
Blank: Do not deactivate the OK and Delete buttons during review.
1: Deactivate the OK and Delete buttons during review.
Note:
Entering 1 in this processing option does not deactivate the OK and Delete buttons during initial payment entry.
13.2.3.8 Netting
- 1. Netting Program Version Number
-
Specify the version number of the netting program to use. If this you leave this processing option blank, the system uses version ZJDE0001.
13.2.4 Entering Manual Payments With Voucher Match
Access the Manual Payment Entry form.
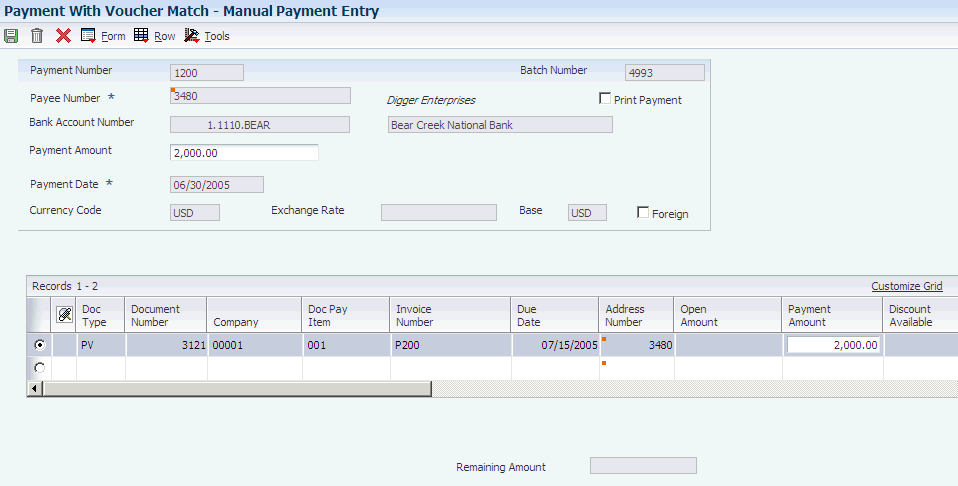
- Payment Number
-
Enter the number of the matching document, such as a receipt, payment, adjustment, or credit. You apply a matching document (data item DOCM) against an original document (data item DOC), such as an invoice or voucher.
It is possible to have duplicate payment numbers for different suppliers. The combination of the following must be unique:
Payment number
Supplier number
Bank account number
You can set a processing option to let the system automatically assign a number to manual checks or drafts. This lets you use a consecutive numbering scheme which will apply to all checks and drafts, whether manual or automated.
- Payee Number
-
Enter the address book number of either a supplier or a payee. If you are using alternate payee numbers to process payments, you must enter the address book number of the payee instead of the supplier.
When you access the Select Open Pay Items form, the system considers the number that you entered to be the payee number and populates the Payee Address Number field with this number. To determine which pay items to display, the system searches the Accounts Payable Ledger table (F0411) for all pay items where the value in the Payee Number field matches the number that you entered.
- Value Date
-
Enter the date that the payment amount was debited or credited to the bank account. The value date is not the date the bank reconciled the payment. Automatic payments populate this field automatically. If you are making manual payments and have set a processing option to display the Value Date field, you can manually enter the value date here.
- Payment Amount
-
Enter the amount of the payment.
If you leave this field blank and set the appropriate processing option, the system adds the pay items you select on the Select Open Pay Items form and enters the full payment amount (deducting any full discount) for you.
- Contract Code
-
If you selected a voucher for which grower information exists, the system displays the contract code.
- Block Code
-
If you selected a voucher for which grower information exists, the system displays the value that exists in the Grower Block (F40G02) table that identifies the block.
- Harvest Period
-
If you selected a voucher for which grower information exists, the system displays the value that exists in the Harvest/Grower Harvest (F40G03) table to identify the harvest period.
- Harvest Suffix
-
If you selected a voucher for which grower information exists, the system displays the additional information about the harvest.
- Contract ID
-
If you selected a voucher for which grower information exists, the system displays the contract number.
- Harvest ID
-
If you selected a voucher for which grower information exists, the system displays the container number for the harvest storage.
13.2.5 Selecting Pay Items for a Manual Payment
Access the Select Open Pay Items form.
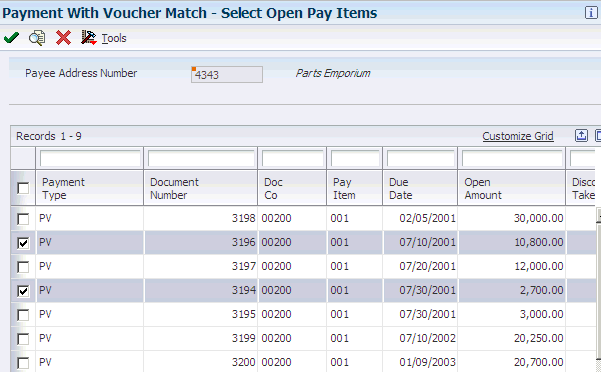
Select the voucher pay items to be paid by the manual payment and click Select.
This form displays all voucher pay items for which the address book number in the Payee Number field (PYE) matches the number that you entered on the Manual Payment Entry form.
For example, assume that you set up an address book record for supplier number 4343, and you enter 4242 in the Factor/Special Payee field. You also set up supplier number 4141, and you enter 4242 in the Factor/Special Payee field for this supplier.
If you enter a manual payment using address book number 4242, then the system displays all open pay items that contain the value of 4242 in the Payee Number field in the F0411 table. The system includes all open pay items for suppliers 4343, 4141, and 4242.
If you enter a manual payment using address book number 4343 or 4141, then the system does not display any open pay items because pay items for supplier 4343 and 4141 contain the value of 4242 in the Payee Number field in the Accounts Payable Ledger table (F0411).
|
Note: Depending on how you set the Alternate/Payee processing option for the Voucher Entry MBF program (P0400047), the address book number in the Payee Number field on the pay items is either the supplier number or the alternate payee number. |
See Setting Processing Options for Voucher Entry MBF (P0400047).
13.3 Entering Manual Payments Without Existing Vouchers
This section provides an overview of entering manual payments without existing vouchers, lists a prerequisite, and discusses how to enter manual payments without existing vouchers.
13.3.1 Understanding Manual Payments Without Existing Vouchers
To create a manual payment without an existing voucher, enter a manual payment without voucher match. You might do this at the time you place an order or take delivery on product. You can enter multiple pay items for several supplier invoices; however, you must use the same invoice number for all pay items.
The system creates a voucher and a payment, both in a W type batch. It assigns the document company to match that of the voucher, and either:
-
You manually assign the payment document number.
-
The system assigns the payment document number from the Next Numbers table.
You can manually produce the payment or have the system print the payment for you. If you have the system print the payment for you, you must do so before posting.
If you choose to cancel the payment record before the voucher GL distribution form has appeared, you receive a warning on the Enter Voucher - Payment Information form that a W type batch must have both a voucher and a payment record that pays that voucher. If you click cancel again after receiving the warning, the system displays the Supplier Ledger Inquiry form. Neither a voucher record nor a payment record are created.
You can enter a manual payment without voucher match using the Standard Voucher Entry program (P0411) or the Speed Voucher Entry (P0411SV) program.
Several restrictions apply to entering manual payments using the Speed Voucher Entry program. You cannot:
-
Change, delete, or void manual payments.
-
Enter multiple pay items or multiple supplier invoices.
-
Create or use model journal entries.
-
Override the GL bank account.
The processing options for the Payment Without Voucher Match program and the Speed Payment Entry program are the same as the Standard Voucher Entry and Speed Voucher Entry programs, respectively.
13.3.2 Prerequisite
Set the appropriate processing option on the Manual Payments tab for Payment Without Voucher Match and the Payments tab for Speed Payment Entry to create manual payments. Otherwise, the system will create only a voucher record. No payment record will be created.
See Setting Processing Options for Standard Voucher Entry (P0411) (Release 9.1 Update).
See Setting Processing Options for Speed Voucher Entry (P0411SV).
13.3.3 Forms Used to Enter Manual Payments Without Voucher Match
| Form Name | FormID | Navigation | Usage |
|---|---|---|---|
| Supplier Ledger Inquiry | W0411G | Manual Payment Processing (G0412), Payment Without Voucher Match. | Review existing vouchers to verify that a voucher has not yet been created. |
| Enter Voucher - Payment Information | W0411A | Click Add on the Supplier Ledger Inquiry form. | Enter voucher information. |
| Payment Information | W0411D | Click OK on the Enter Voucher - Payment Information form. | Enter payment number and date. |
| G/L Distribution | W0411K | Click OK on the Payment Information form. | Enter GL distribution information for voucher. |
| Speed Voucher Entry | W0411SVA | Manual Payment Processing (G0412), Speed Payment Entry. | Enter a manual payment without voucher match using the speed method. |
13.3.4 Entering Manual Payments Without Voucher Match
Access the Enter Voucher - Payment Information form.
The following form appears after you enter voucher information and click OK.

- Invoice Date
-
Enter the date of the supplier's invoice to you.
The default date for a voucher is the GL date.
- Remark
-
Enter a remark that the system prints this information on the check stub.
- Payee Number
-
Enter the address book number of the recipient of the payment.
- Payment Date
-
Enter the date associated with the various types of net pay instructions. This date relates to a payroll check, an interim payment, a bank automatic-deposit advice slip, a payslip (cash), or a claim reimbursement.
- Payment Number
-
Enter the number of the matching document, such as a receipt, payment, adjustment, or credit. You apply a matching document (DOCM) against an original document (DOC), such as an invoice or voucher.
It is possible to have duplicate payment numbers for different suppliers. The combination of the following much be unique:
Payment number
Supplier number
Bank account number
If you set a processing option to do so, the system displays the bank account's next payment number from the Bank Transit Master table (F0030).
13.4 Printing Manual Payments
This section provides an overview of printing manual payments and discusses how to:
-
Print manual payments with voucher match.
-
Print manual payments without voucher match.
13.4.1 Understanding How to Print Manual Payments
You typically print manual payments at the time you enter them. However, you can print them at any time, provided that you have not yet posted the payments. You can print manual payments from the Payment With Voucher Match program (P0413M).
When you print a manual payment, the system runs the following reports, in sequential order:
If any payments result in debit memos, the system runs the Print A/P Payments Debit Statements report (R04574).
You can specify which version of the print program the system runs by using the Print Program Version Number processing option in the Payment With Voucher Match program. The value in this processing option overrides the payment instrument value on the voucher.
13.4.2 Forms Used to Print Manual Payments
| Form Name | FormID | Navigation | Usage |
|---|---|---|---|
| Work With Payments | W0413MB | Manual Payment Processing (G0412), Payment With Voucher Match. | Locate and select a payment to print. |
| Manual Payment Entry | W0413MA | Select a payment and click Select on the Work With Payments form. |
|
13.4.3 Printing Manual Payments With Voucher Match
Access the Manual Payment Entry form.
- Print Payment
-
Specify whether to print a payment when you add or change information on a payment.
To print a manual payment with voucher match, select the Print Payment check box and click OK.
13.4.4 Printing Manual Payments Without Voucher Match
Access the Manual Payment Entry form.
If you try to print a manual payment without voucher match (Batch Type W), notice that the Print Payment check box is available, but the OK button is not. Instead, use the Print option on the Form menu to print these payments.
13.5 Deleting and Voiding Manual Payments
This section provides an overview of deleting and voiding manual payments and discusses how to delete and void manual payments.
13.5.1 Understanding How to Delete and Void Manual Payments
Use the Void Payment Entry program to remove a manual payment with voucher match or a manual payment without voucher match from the system. To remove a payment from the system, you can either void or delete the payment. Voiding a payment provides an audit trail for you, while deleting a payment does not.
If the manual payment is posted, you can only void the payment. When you void the posted manual payment, the system:
-
Reopens the payment batch by changing the batch status back to approved so that you can post the reversing entries.
-
Reopens the vouchers associated with the payment by changing the pay status back to A and populating the open amount field with the original open amount.
If the manual payment is unposted, you can either void or delete the payment. However, if you prefer to have an audit trail of all manual payments, you can prohibit the deletion of unposted payments by using the Delete Unposted Manual Payments processing option for the Payment With Voucher Match program. If you enter 1 for this processing option, the system enables you to delete unposted payments. If you leave this processing option blank, the system generates an error if you attempt to delete an unposted manual payment.
If you void an unposted manual payment, the system:
-
Creates both the entries for the payment and the reversing entries for the void when you post the payment.
-
Reopens the vouchers associated with the payment by changing the pay status back to A and completing the open amount field with the original open amount.
If you delete an unposted manual payment, the system:
-
Deletes the payment records from the system completely.
-
Reopens the vouchers associated with the payment by changing the pay status back to A and completing the open amount field with the original open amount.
13.5.1.1 Voiding the Vouchers Associated with the Payment
If you choose to void a manual payment, you can void the associated vouchers at the same time. When you choose to void the associated vouchers, these guidelines apply:
-
If both the payment and the vouchers are unposted, the system voids the payment and deletes the voucher.
-
If the payment is posted and the vouchers are unposted, the system voids the payment and generates the following error: At least one voucher could not be voided when you attempt to void the voucher. This error prevents you from deleting the vouchers that were associated with the voided payment and from having an audit trail for a payment but no associated vouchers.
-
If the payment is unposted and the voucher is posted, the system voids the payment and voids the voucher.
Note:
You cannot void associated vouchers when you delete unposted payments. You must go back and void the vouchers at another time.
13.5.1.2 Using the Payment Without Match Program to Void Manual Payments
In addition to using the Void Payment Entry program, you can use the Payment Without Voucher Match program to void a manual payment without voucher match.
When you void a payment using the Payment Without Voucher Match program, the option to void the vouchers at the same time is always selected.
The posted status of the payment and vouchers is always the same for a payment without voucher match because the vouchers belong to the same batch.
If the payment and vouchers are unposted, the system:
-
Voids the payment and creates reversing entries for the void when you post.
-
Reopens the vouchers associated with the payment by changing the pay status back to A and completing the Open Amount field with the original open amount.
Note:
If the Delete Unposted Manual Payments processing option for the Payment With Voucher Match program is set to blank, the system deletes both the voucher and the payment.
If the payment and vouchers are posted, the system:
-
Voids the payment and creates reversing entries for the void when you post.
-
Voids the vouchers and creates the reversing entries for the void when you post.
13.5.2 Prerequisite
To delete unposted manual payments using either the Payment With Voucher Match or Payment Without Voucher Match program, verify that the Delete Unposted Manual Payments processing option on the Processing tab of the Payment With Voucher Match program is set to enable payments to be deleted.
13.5.3 Forms Used to Delete and Void Manual Payments With or Without Voucher Match
| Form Name | FormID | Navigation | Usage |
|---|---|---|---|
| Work With Payments | W0413MB | Manual Payment Processing (G0412), Void Payment Entry.
Manual Payment Processing (G0412), Payment Without Voucher Match |
Locate and select the payment to void. You can also delete a payment from this form. |
| Void Payment | W0413VA | On the Work With Payments form, select Void Pymt (void payment) from the Row menu. | Void a payment and, if necessary, void vouchers associated with the payment. You can also change the Void G/L Date field, as the system uses the GL date of the payment as the default date. |
| Payment Void Confirmation | W0413VB | Click OK on the Void Payment form. | Confirm that you want to void the payment. |
13.5.4 Voiding Manual Payments
Access the Work With Payments form.
- Void G/L Date
-
Enter the date that identifies the financial period to which to post the voided transaction. Financial periods are set up in the Company Constants table (F0010).
The system uses the GL date for the payment as the default value for the Void G/L date. If the payment was issued in a prior period, you might need to change the Void G/L date to avoid having to reopen a prior period.
- Void Voucher(s)
-
Select to void associated vouchers.