6 Setting Up Bulk Items
This chapter contains the following topics:
6.1 Understanding Bulk Item Setup
When you set up an item, you define basic information and specify how the system should process transactions for the item. Setting up a bulk item provides the item-level default values used throughout the various processing programs for bulk transactions. In addition, you set up item information specific to a depot.
6.2 Setting Up Standard Conversions for Bulk Items
This section provides an overview of standard conversion setup for bulk items and discusses how to set up standard conversions for bulk items.
6.2.1 Understanding Standard Conversion Setup for Bulk Items
You set up standard unit of measure conversions for conversions that are constant. For example, if 100 centimeters always equals 1 meter, you set this up as a standard unit of measure conversion.
To set up conversions, define all common volume-to-volume and weight-to-weight conversions that the company needs for bulk item transactions. You can also set up volume-to-weight conversions for bulk items.
Whenever a conversion is needed for recording a transaction, the system uses standard unit of measure conversions if it is unable to find item-specific conversions. The system stores standard conversions in the Unit of Measure standard conversion table (F41003).
The system processes transactions according to this hierarchy of conversion factors:
-
Use the unit of measure at the item or item/branch level from the Item Units of Measure Conversion Factors table (F41002).
-
If this table does not exist, use the standard units of measure from the Unit of Measure standard conversion table.
-
If this table does not exist, the system displays an error message.
|
Note: No special logic in the program keeps you from creating conflicting conversion factors, so use care when setting them up. |
You can set up an unlimited number of conversion factors. However, you must set up conversion factors that calculate each unit of measure back to the primary unit of measure.
For example:
-
1 BX = 2 UN
-
1 CR = 2 BX
-
1 PL = 2 CR
To perform volume-to-weight conversions for bulk items:
-
Set up conversion factors from cubic meters to all other units of measure used for volume calculations.
Use the abbreviation M3 for cubic meters.
-
Set up a unit of measure conversion from kilograms to all other units of measure used for weight calculations.
Use the abbreviation kg for kilograms.
6.2.2 Form Used to Set Up Standard Conversions for Bulk Items
| Form Name | FormID | Navigation | Usage |
|---|---|---|---|
| Standard Units of Measure Revisions | W41003B | Inventory Setup (G4141), Standard Units of Measure
On the Work With Standard Units of Measure form, click Add. |
Set up standard conversions for bulk items. |
6.2.3 Setting Up Standard Conversions for Bulk Items
Access the Standard Units of Measure Revisions form.
- From Unit of Measure
-
Enter a user-defined code (UDC), 00/UM, that identifies the unit of measure for an item. For example, it can be each, cases, boxes, and so on.
- Conversion Factor
-
Enter a factor that the system uses to convert one unit of measure to another unit of measure.
6.3 Setting Up a Bulk Item
This section provides overviews of bulk item setup, basic bulk item information setup, default units of measure for bulk items, unit of measure conversion setup by bulk item, item temperature and density, and conversion table setup, lists prerequisites, and discusses how to:
-
Set processing options for Item Master (P4101).
-
Set up basic bulk item information.
-
Associate lot numbers to tanks.
-
Define default units of measure for bulk items.
-
Set up unit of measure conversions by bulk item.
-
Define item temperature and density.
-
Set up conversion tables.
6.3.1 Understanding Bulk Item Setup
You set up all bulk item information in the Item Master program (P4101) on the Inventory Master/Transaction menu G4111. You define the basic information that the system uses to process transactions. This information includes:
-
Item number and description.
-
Price and cost rules.
-
Lots and country of origin. (Release 9.1 Update)
-
Availability and inventory commitment rules.
-
Item-specific system messages.
You can set the processing options for the Item Master program, to display certain forms automatically when you enter information. Otherwise, you can select the forms that you need from the Item Master form.
6.3.2 Associating Lot Numbers to Tanks
To associate lot numbers to tanks, you run the Associate Lot Number to Tanks (R41B110) report.
|
Note: You run the Associate Lot Number to Tanks (R41B110) report only once to associate lot numbers to tanks. |
6.3.2.1 Setting Processing Options for Associate Lot Numbers to Tanks Report (R41B110)
Processing options enable you to specify the default processing for programs and reports.
- 1. Process Mode
-
Specify whether the system runs the program in proof or final mode.
Blank: The system runs the report in proof mode.
1: The system runs the report in final mode.
- 2. Display Output
-
Specify the records to display on the report output.
Blank: The system displays all the records.
1: The system displays only those records where lot is associated with tank.
2: The system displays only those records where lot is not associated with tank.
6.3.3 Understanding Basic Bulk Item Information Setup
You must set up basic item information, such as stocking information and pricing groups that the system needs to process transactions for stock and nonstock items.
You can use an existing item setup as a model for a new item to speed data entry. Locate an item previously entered, copy the record, add the new item, and complete any of the information specific to the new item.
You cannot delete an item record if the item is referenced as an Item Branch/Plant record, Bill of Material item, or Item Cross-Reference.
6.3.3.1 Recording Quantities When the Meter Is Out of Service
If the meter is out of service, you can estimate the amount of product that passed through the meter and still perform throughput reconciliation. To do so, you:
-
Access the Out of Service Meter Quantity form.
-
Record the meter number and estimated quantity.
-
Return to the Throughput Reconciliation program.
The Throughput Reconciliation program performs the conversions, and then displays the default tank information and the calculated ambient volume, standard volume, and weight.
6.3.4 Understanding Default Units of Measure for Bulk Items
Each item in the Item Master table (F4101) can have several units of measure associated with it for different situations. For example, you can purchase and ship an item in cases, stock it in individual units, and sell it by the dozen. The system retrieves the item-level units of measure throughout the JD Edwards EnterpriseOne Inventory Management and JD Edwards EnterpriseOne Sales Order Management systems. You need to define the units of measure associated with each item.
You can define additional units of measure in UDC table 00/UM. To do so, add the special handling code in the detail area of the User Defined Codes form. The weight and volume units of measure must have a special handling code of W (weight) or V (volume). The weight-to-volume conversion process must be able to determine whether to treat a unit of measure as weight or volume.
6.3.5 Understanding Unit of Measure Conversion Setup by Bulk Item
In addition to the standard unit of measure conversions, you need to set up unit of measure conversions that are item specific. For example, a drum of additive might have a different conversion factor than a drum of oil. You set up conversions that are unique for an item at the item level or item branch/plant level. The system stores this information in the Item Units of Measure Conversion Factors table (F41002). If you do not set up unit of measure conversions by item, the system uses the standard unit of measure conversions.
If you record fill, repack, and decant stock movements for a bulk item, you must also set up unit of measure conversions for the package quantity. For example, you can set up 1 DR (drum) = 209 LT (liters).
The system processes transactions according to this hierarchy of conversion factors:
-
Use the unit of measure at the item or item/branch level from the Item Units of Measure Conversion Factors table.
-
If this table does not exist, use the standard units of measure from the Unit of Measure standard conversion table.
-
If this table does not exist, the system displays an error message.
You can set up an unlimited number of conversion factors. However, you must set up conversion factors that calculate each unit of measure back to the primary unit of measure.
For example:
-
1 BX = 2 UN
-
1 CR = 2 BX
-
1 PL = 2 CR
6.3.6 Understanding Item Temperature and Density
For each item, you must define the default values that the system uses for temperature, density, and measurement. In addition, you specify the density and temperature tables to use for each item. You can also create your own temperature and density tables, as necessary.
The system uses these temperature and density tables for most bulk products. Allowable ranges are shown for each table.
6.3.6.1 Temperature Range
This table shows temperature ranges in Fahrenheit (F) and Celsius (C):
| Conversion Tables | Range: Minimum – Maximum |
|---|---|
| 24B | -58 to 302 °F |
| 54B | –50 to 150 °C |
| 54C | –18 to 150 °C |
| 54D | –50 to 150 °C |
| LPG | –50 to 50 °C LPG |
6.3.6.2 Density Range
This table shows density ranges:
| Density Tables | Range: Minimum – Maximum |
|---|---|
| 23B | 0.6112 to 1.6464 Relative Density |
| 53B | 611.16 to 1163.86 kg/m3 |
| 53D | 801.25 to 1163.85 kg/m3 |
| LPG | 0.5000 to 0.6530 Relative Density |
6.3.6.3 Creating a New Conversion Table
You can add a conversion routine that you have written. You must write the C code for the conversion routine yourself. After you have created your own routine, you can use it to define item temperature and density.
|
Important: When you select a table on the Work with Conversion Table Interfaces form, a warning appears. The message warns you that the table is shipped with data that the system needs to perform bulk temperature and density conversions. Any changes you make to the table can cause the system to be inoperable. |
6.3.6.4 Item Temperature and Density Definition
For each item, the system uses default values that you define for temperature, density, and measurement.
When defining item temperature and density, consider these guidelines:
-
When you enter a transaction, the system verifies that the temperature or density that you enter is within the range from the table that you select for the item.
-
When you add an item, click the Bulk Information tab on the Additional System Information form.
When you use this method, you can add or change information only for that specific item.
-
If an item currently exists in the Item Master table F4101, you can access the item information using the Bulk Product Information selection on the Bulk Stock Control Setup menu.
-
You cannot delete an item on the Bulk Product Information form.
You can delete items only from the Item Master form.
-
You can use a different temperature table for reporting purposes, such as government reporting requirements.
Specify this table in the Reporting Temperature Table field.
-
You can access Conversion Tables from the Bulk Information tab on the Additional System Information form to set up or edit your own conversion tables.
6.3.7 Understanding Conversion Table Setup
You can add your own conversion tables to customize your operations. During item setup, you can specify the conversion tables to use on the Bulk Information tab that you set up on the Conversion Table Interface Revisions form.
6.3.8 Prerequisites
Before you complete the tasks in this section:
-
Add an item to the Item Master table (F4101).
-
Set up standard unit of measure conversions.
6.3.9 Forms Used to Set Up a Bulk Item
| Form Name | FormID | Navigation | Usage |
|---|---|---|---|
| Item Master Revisions | W4101A | Inventory Master/Transactions (G4111), Item Master
On the Work With Item Master Browse form, click Add. |
Set up basic bulk item information. |
| Item Master Revisions | W4101AD | Inventory Master/Transactions (G4111), Item Master
On the Work With Item Master Browse form, locate an item and select Item Revisions from the Row menu. |
Define default units of measure for bulk items. |
| Item Unit Of Measure Conversions | W41002D | Inventory Master/Transactions (G4111), Item Master
On the Work With Item Master Browse form, locate an item and select Item Revisions from the Row menu. On the Item Master Revisions form, select the Weights and Measures tab and then select Conversions from the Form menu. On the Work With Item Unit of Measure Conversions form, click Add. |
Set up unit of measure conversions by bulk item. |
| Additional System Information | W4101C | Inventory Master/Transactions (G4111), Item Master
On the Work With Item Master Browse form, locate an item and select Addl System Info from the Row menu. |
Define item temperature and density. |
| Conversion Table Interface Revisions | W415004A | Bulk Stock Control Setup (G415041), Bulk Conversion Table
On the Work with Conversion Table Interfaces form, locate and select a density table. On the Warning message form, click OK. |
Set up conversion tables. |
6.3.10 Setting Processing Options for Item Master (P4101)
Processing options enable you to specify the default processing for programs and reports.
6.3.10.1 Defaults
These processing options define the default information that the system uses, such as unit of measure.
- 1. Primary Unit of Measure
-
Identify the primary unit of measure that the system uses. If you leave this processing option blank, the system uses EA (each).
- 2. Weight Unit of Measure
-
Identify the unit of measure for weight that the system uses. If you leave this processing option blank, the system uses LB (pounds).
- 3. Volume Unit of Measure
-
Enter a UDC from 00/UM that indicates the unit of measure by metric conversion for ambient volume. For example, the unit of measure code for a gallon might be GL and for a liter it might be LT. If you leave this processing option blank, the system uses GA.
- 4. Template
-
Enter a template name that you can use when entering items on Item Master Revisions (P4101). This name is case sensitive. If you use any capital letters in the template name when you add it, you must enter those letters in capitals whenever you search for or attach the template to Item Master Revisions. If you leave this processing option blank, the system uses None.
6.3.10.2 Process
These processing options enable you to specify the effective from and thru dates that the system uses in the Item Notes table and whether the system displays certain forms when you add or change information on the Item Master Revisions form.
- 1. Notes From Date
-
Specify the effective from date that the system uses in the Print Messages table (F4016). If you leave this processing option blank, the system uses the system date.
- 2. Notes Thru Date
-
Specify the effective through date that the system uses in the Print Messages table (F4016). If you leave this processing option blank, the system uses the last day of the default century.
- 3. Category Codes
-
Specify whether the system displays the Category Codes form when you add or change information on the Item Master Revisions form. Values are:
Blank: Do not display
1: Display
- 4. Additional System Information
-
Specify whether the system displays the Additional System Information form when you add or change information on the Item Master Revisions form. Values are:
Blank: Do not display
1: Display
- 5. Storage/Shipping
-
Specify whether the system displays the Storage/Shipping form when you add or change information on the Item Master Revisions form. Values are:
Blank: Do not display
1: Display
- 6. Cost Revisions (Conditional)
-
Specify whether the system displays the Cost Revisions form when you add or change information on the Item Master Revisions form. Values are:
Blank: Do not display
1: Display
Note:
For the system to display the Cost Revisions form, you must also set the value for the Inventory Cost Level field to 1 on the Item Master Revisions form. - 7. Price Revisions (Conditional)
-
Specify whether the system displays the Price Revisions form when you add or change information on the Item Master Revisions form. Values are:
Blank: Do not display
1: Display
Note:
For the system to display the Price Revisions form, you must also set the value for the Sales Price Level field to 1 on the Item Master Revisions form. - 8. Unit Of Measure Conversions (Conditional)
-
Specify whether the system displays the Item Branch form when you add or change information on the Item Master Revisions form. Values are:
Blank: Do not display the Item Branch form.
1: Display the Item Branch form, but return to the Item Master form.
2: Display and remain on the Item Branch form.
- 9. Item Branch
-
Specify whether the system displays the Item Notes form when you select a media object on the Work With Item Master Browse form. Values are:
Blank: Display only the internal attachments.
1: Display the Item Notes form.
- 10. Attachments
-
Specify whether the system displays the Attachments form when you select a media object on the Work With Item Master Browse form.
- 11. Templates
-
Specify whether you want to use templates for segmented items. Values are:
Blank: Do not use templates.
1: Use templates.
6.3.10.3 Global Update
This processing option enables you to update changes made to the second or third item numbers to records in selected tables.
- 1. Transfer Changes
-
Specify which tables the system updates when you have made changes to item numbers in the item branch records. You use the UDC table 40/IC to compile the list of tables. Values are:
Blank: The system does not update any tables.
1: The system updates only those tables that contain item branch information with changes to the second and third item numbers.
2: The system updates only selected tables that contain item branch information with changes to the second and third item numbers.
6.3.10.4 Versions
These processing options enable you to specify the versions for various programs that you access from the Item Master program. Versions control how the system processes and displays information. Therefore, you might need to set the processing options to meet your specific needs.
- 1. Item Availability (P41202),2. Item Branch (P41026),3. Cost Revisions (P4105), and4. Segmented Item Availability (P41206)
-
Specify the version that the system uses for the Item Availability program (P41202) and the Item Branch program (P41026). If you leave this processing option blank, the system uses version ZJDE0001.
Note:
Before you define cost methods for bulk items, you must specify the version that the system uses for the Cost Revisions program (P4105).
6.3.10.5 Interop
These processing options enable you to specify whether the system performs outbound interoperability processing and whether the system creates a record of a transaction before changes are made to the transaction.
- 1. Transaction Type
-
Specify the type of document for which you want the system to search.
The transaction type is a UDC (00/TT) that identifies the type of transaction, such as an invoice or a sales order. You can either enter the transaction type or select it from the Select User Defined Code form. The system uses the transaction type as the default. If you leave this processing option blank, the system does not perform export processing.
- 2. Before/After Image Processing
-
Specify whether the system creates a record of a transaction after the transaction is changed, or whether the system creates records of a transaction before and after a transaction is changed. Values are:
Blank: Create a record of a transaction after changes.
1: Create two records, one record before changes and one record after changes.
6.3.11 Setting Up Basic Bulk Item Information
Access the Item Master Revisions form.
-
Complete these fields on the Item Master Revisions form:
-
Item Number
-
Description
-
Stocking Type
-
G/L Class
-
Line Type
-
Bulk/Packed Flag
-
-
Complete these optional fields:
-
Catalog Number
-
Search Text
-
Unit of Measure
-
Inventory Cost Level
-
Sales Price Level
-
Purchase Price Level
-
Item Number (Short)
-
-
Select these options:
-
Backorders Allowed
-
Check Availability
-
-
Click the Additional Info tab.
-
Select the appropriate option to rank the item as A, B, C, or D under each of these headings and click OK:
-
Sales
-
Margin
-
Investments
-
-
Select the Lot Processing tab.
-
Complete these fields on the Lot Processing tab:
-
Serial No. Required
-
Lot Status Code
-
Lot Process Type
-
Country of Origin Required checkbox
-
- Item Number (Short), Item Number, and Catalog Number
-
Enter an identifier for an item.
- Search Text
-
Specify how the system searches for an item. The entry should be specific and descriptive of the item. Type the words in the order a user is likely to enter them.
In single-byte environments, where computer storage space can hold only Latin-based language character sets, the system inserts the first 30 characters from the item's description if you do not enter search text.
In double-byte environments, where computer storage space can hold more complex language character sets (in languages such as Japanese, Chinese, and Korean), you must complete this field. It is a single-byte field that you complete with single-byte characters to phonetically represent the item description (which can be single-byte, double-byte, or both).
- Stocking Type
-
Enter a UDC (41/I) that indicates how you stock an item, for example, as finished goods or as raw materials. These stocking types are hard-coded and you should not change them:
0: Phantom item
B: Bulk floor stock
C: Configured item
E: Emergency/corrective maintenance
F: Feature
K: Kit parent item
N: Nonstock
The first character of Description 2 in the UDC table indicates if the item is purchased (P) or manufactured (M).
- G/L Class
-
Enter a UDC (41/9) that indicates which general ledger accounts receive the dollar amount of inventory transactions for this item.
- Unit of Measure
-
Enter a UDC (00/UM) that indicates the primary unit of measure for the item. The primary unit of measure must be the smallest unit of measure in which you handle the item.
This is the primary stock accounting unit (PSAU) of measure that the system uses to store all inventory. If you change the primary unit of measure, the conversion factors in the item-level conversion table are no longer valid.
The default value for this field is the unit of measure that you specify for the item on Item Master form.
- Line Type
-
Enter a code that controls how the system processes lines on a transaction. It controls the systems with which the transaction interacts, such as General Ledger, Job Cost, Accounts Payable, Accounts Receivable, and Inventory Management. It also specifies the conditions under which a line prints on reports, and it is included in calculations. Codes include:
S: Stock item
J: Job cost
N: Nonstock item
F: Freight
T: Text information
M: Miscellaneous charges and credits
W: Work order
- Bulk/Packed Flag
-
Enter a code that indicates if the item is a bulk liquid product. If it is a bulk product, you must perform temperature and density/gravity conversions. To record the movement of bulk products, you must use forms designed specifically for bulk products. If you try to record movement using standard inventory forms, the system prevents the movement. Values are:
P: Packaged
B: Bulk liquid
If you leave this field blank, the system uses P.
- Backorders Allowed
-
Specify whether to allow backorders for this item. You can allow backorders by item using the Item Master (P4101) or Item Branch/Plant (P41026) programs, by customer using the Customer Billing Instructions program (P03013), or by branch/plant using the Branch/Plant Constants program (P41001).
- Check Availability
-
Specify whether the system performs availability checking. You might want to select availability checking for certain items. For other items, if you assume that an adequate supply is available, leave availability checking disabled.
- Inventory Cost Level
-
Enter a code that indicates whether the system maintains one overall inventory cost for the item, a different cost for each branch/plant, or a different cost for each location and lot within a branch/plant. The system maintains inventory costs in the Inventory Cost table (F4105). Codes are:
1:: Item level
2: Item/Branch level
3: Item/Branch/Location level
- Sales Price Level
-
Enter a code that indicates whether the system maintains standard sales prices for an item, different sales prices for each branch/plant, or different sales prices for each location and lot within a branch/plant. The system maintains sales prices in the Base Price file (F4106). Valid codes are:
1: Item level
2: Item/Branch level
3: Item/Branch/Location level
- Purchase Price Level
-
Enter a code that indicates where to retrieve the purchase price for an item when you enter a purchase order. Codes are:
1: Use the supplier/item price from the Purchase Price table (F41061).
2: Use the supplier/item/branch price from the Purchase Price table (F41061).
3: Use the inventory cost from the Inventory Cost table (F4105). This cost is based on the inventory cost level and the purchasing cost method you specify for the item.
The first two codes are applicable only if you set up supplier costs in the JD Edwards EnterpriseOne Procurement system. If you do not set up supplier costs, the system uses the inventory cost as the default for the purchase order.
6.3.12 Defining Default Units of Measure for Bulk Items
Access the Item Master Revisions form.
- Unit of Measure
-
Enter a UDC (00/UM) that indicates the primary unit of measure for the item. The primary unit of measure must be the smallest unit of measure in which you handle the item.
This is the PSAU of measure that the system uses to store all inventory. If you change the primary unit of measure, the conversion factors in the item-level conversion table are no longer valid.
The default value for this field is the unit of measure that you specify for the item on the Item Master form.
- Weight
-
Enter a UDC (00/UM) that identifies the unit of measure that the system uses to indicate weight for this item. You can specify ounces, grams, kilograms, and so on as weight standards. The system uses this unit of measure for the item or overrides it for an individual item or container.
The default value for this field is the weight unit of measure that you specify in processing options for the Item Master program.
- Volume
-
Enter a UDC (00/UM) that indicates the unit of measure by metric conversion for ambient volume. For example, the unit of measure code for a gallon might be GL and for a liter it might be LT.
6.3.13 Setting Up Unit of Measure Conversions by Bulk Item
Access the Item Unit Of Measure Conversions form.
Figure 6-2 Item Unit Of Measure Conversions form
Description of "Figure 6-2 Item Unit Of Measure Conversions form"
- From UoM (from unit of measure)
-
Enter a UDC (00/UM) that identifies the unit of measure for an item. For example, it can be each, cases, boxes, and so on.
- Quantity
-
Enter the factor that the system uses to convert one unit of measure to another unit of measure.
- To UoM (to unit of measure)
-
Enter a UDC (00/UM) that indicates a secondary unit of measure.
6.3.14 Defining Item Temperature and Density
Access the Additional System Information form and click the Bulk Information tab.
Figure 6-3 Additional System Information form
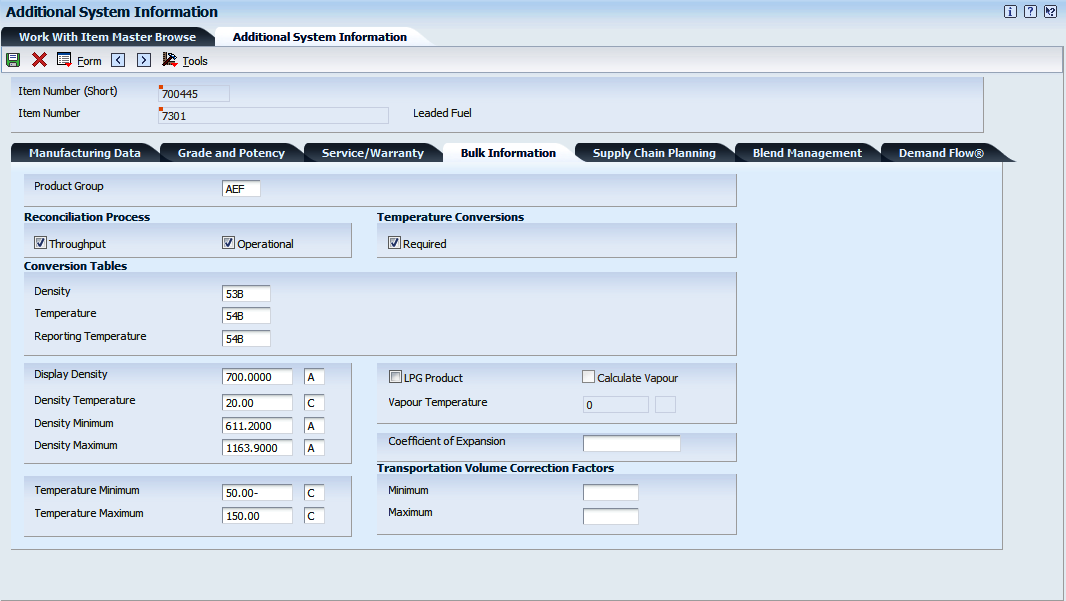
Description of "Figure 6-3 Additional System Information form"
- Product Group
-
Enter a value that indicates a line of products whose similarity enables them to be grouped together. The system uses this grouping to select products for other tasks or processes, such as reporting.
- Reconciliation Process
-
Select the Throughput checkbox to include the item in the throughput reconciliation process.
Select the Reconciliation checkbox to include the item in the operational reconciliation process.
- Temperature Conversions
-
Select the Required checkbox to indicate that the item requires a temperature conversion table.
- Density
-
Specify the density conversion table to use for calculations.
- Temperature
-
Specify the temperature conversion table to use for calculations.
- Reporting Temperature
-
Specify the temperature table to use for reporting purposes. Fill in this field only if you use a table that is different from the Temperature Conversion table. This table is usually used for government reporting.
- Display Density
-
Enter a value that indicates your company's standard for density.
- Density Temperature
-
Enter the temperature at which the density was measured. The system uses the density temperature type from the Bulk Product Constants form.
- Density Minimum
-
Enter a value that specifies the minimum density allowed for a product.
- Density Maximum
-
Enter a value that specifies the maximum density allowed for a product.
The density conversion tables and their corresponding ranges are:
Table Name Table Description Minimum Density Maximum Density Density Unit 5B API Grav-60F General Products -10 100 API 23B Rel Den-60F General Products 0.6112 1.16464 Rel Den 53B KG/M3 Den 15C-General Products 611.16 1163.86 kg/M3 53D KG/M3 Den 15C-General Lube Oil 801.25 1163.85 kg/M3
Note:
For most tables, there are multiple ranges that depend on temperature. The ranges listed are the lowest and highest numbers for all ranges within each specified table. - Temperature Minimum
-
Enter a value that specifies the minimum temperature allowed for the product.
- Temperature Maximum
-
Enter a value that specifies the maximum temperature allowed for the product.
The temperature conversion tables and their corresponding ranges are:
Table Name Table Description Minimum Temperature Maximum Temperature Temperature Unit 6B API Grav-60F General Products -58 302 F 24B Rel Den-60F General Products -58 302 F 54B KG/M3 Den 15C-General Products -50 150 C 54D KG/M3 Den 15C-General Lube Oil -50 150 C
Note:
For most tables, there are multiple ranges that depend on density. The ranges listed are the lowest and highest numbers for all ranges within each specified table. - LPG Product
-
Select this checkbox to identify the item as a liquid petroleum gas (LPG) product.
- Calculate Vapour
-
Select this checkbox to specify that the product requires a calculation of the vapor volume.
- Vapour Temperature
-
Enter a value that represents the standard vapour temperature at the item level. You record the observed temperature of the vapour in the LPG tank as part of the tank dip and use it to calculate the liquid equivalent volume of the vapour.
If you calculate LPG vapour, enter the standard LPG vapour. The system compares this value to the observed vapour from the Dip Volume Calculator and Multimeter Reading.
- Coefficient of Expansion
-
Enter the coefficient of expansion for the product.
You enter this value only for products whose coefficient of expansion cannot be calculated using a standard algorithm.
You use the following formula to calculate the coefficient of expansion:
Volume Correction Factor (VCF) = 1 + coefficient of expansion * temperature difference
Note:
You use the Coefficient of Expansion field to manually enter the coefficient of expansion only when you are not using a conversion table for calculation. - Transportation Volume Correction Factors
-
You use the transportation volume correction factors during bulk load and delivery confirmation.
- Minimum
-
Enter the minimum volume correction factor tolerance for the item.
- Maximum
-
Enter the maximum volume correction factor tolerance for the item.
6.3.15 Setting Up Conversion Tables
Access the Conversion Table Interface Revisions form.
Figure 6-4 Conversion Table Interface Revisions form
Description of "Figure 6-4 Conversion Table Interface Revisions form"
- Density Conversion Table Info
-
Use the following fields to enter values for density conversion.
- Table
-
Specify the density conversion table to use for calculations.
- Minimum
-
Enter a value that specifies the minimum density allowed for a product.
- Maximum
-
Enter a value that specifies the maximum density allowed for a product.
The density conversion tables and their corresponding ranges are:
Table Name Table Description Minimum Density Maximum Density Density Unit 5B API Grav-60F General Products -10 100 API 23B Rel Den-60F General Products 0.6112 1.16464 Rel Den 53B KG/M3 Den 15C-General Products 611.16 1163.86 kg/M3 53D KG/M3 Den 15C-General Lube Oil 801.25 1163.85 kg/M3
Note:
For most tables, there are multiple ranges that depend on temperature. The ranges listed are the lowest and highest numbers for all ranges within each specified table. - Density Conversion Routine
-
You use the Density Conversion Routine radio buttons to specify the method to use for conversions related to the conversion table you specify.
Select the Business Function radio button to use a JD Edwards EnterpriseOne business function for conversions.
Select the Executable radio button to use a third-party executable for conversions.
- Conversion Table Business Function
-
Enter the name of the business function to use for conversions.
- Temperature Conversion Table Info
-
Use the following fields to enter values for temperature conversion.
- Table
-
Specify the temperature conversion table to use for calculations.
- Minimum
-
Enter a value that specifies the minimum temperature allowed for the product.
- Maximum
-
Enter a value that specifies the maximum temperature allowed for the product.
The temperature conversion tables and their corresponding ranges are:
Table Name Table Description Minimum Temperature Maximum Temperature Temperature Unit 6B API Grav-60F General Products -58 302 F 24B Rel Den-60F General Products -58 302 F 54B KG/M3 Den 15C-General Products -50 150 C 54D KG/M3 Den 15C-General Lube Oil -50 150 C
Note:
For most tables, there are multiple ranges that depend on density. The ranges listed are the lowest and highest numbers for all ranges within each specified table. - Type
-
Enter a code to identify the type of density that the Density Table expects as input. If this density type is different from the expected density type in the Density Table, the system displays unpredictable results. Values are:
A: Absolute Density
G: API Specific Gravity
R: Relative Density
- Temperature Conversion Routine
-
You use the Temperature Conversion Routine radio buttons to specify the method to use for conversions related to the conversion table you specify.
Select the Business Function radio button to use a JD Edwards EnterpriseOne business function for conversions.
Select the Executable radio button to use a third-party executable for conversions.
- Conversion Table Business Function
-
Enter the name of the business function to use for conversions.
- Unit of Measure Info
-
Use these fields to enter information about units of measure.
- Volume
-
Enter a code (00/UM) that specifies the volumetric unit of measure for ambient volume. For example, you use GL for gallon or LT for liter.
The system uses this unit of measure for calculating standard volume in the Item Master.
- Weight
-
Enter a code (00/UM) that specifies the unit of measure the system uses to display weights for this item.
- Den/Temp Type
-
Enter the unit of measure to specify the density temperature type to use for calculations. Values are:
F: Fahrenheit
C: Centigrade
6.4 Setting Up Item Information by Depot
This section provides an overview of item information setup by depot, lists a prerequisite, and discusses how to:
-
Set up basic item information by depot.
-
Define a primary depot location.
-
Setting Processing Options for Cost Revisions (P4105).
-
Define cost methods for bulk items.
-
Set up additional item and depot information.
6.4.1 Understanding Item Information Setup by Depot
As part of bulk item setup, you must set up item information specific to a depot (branch/plant), such as stocking information, primary locations, cost methods, and pricing groups.
6.4.1.1 Basic Item Information Setup by Depot
The system stores the depot-specific information in the Item Branch File table (F4102).
The system retrieves item information in this order:
-
Item Branch File table.
-
If no information exists, it retrieves item information from Item Master table (F4101).
-
If no information exists, the system displays an error message.
When processing transactions, the system retrieves item information specific to a depot from the Item Branch File table. If none is found, the system retrieves item information from the Item Master table.
To delete an item from Item Branch/Plant Information, verify:
-
All associated balances for the item must be zero.
-
All on-hand balances, backordered quantities, and any commitments must be transferred or satisfied.
-
The Average Cost Work File table (F41051) must not contain any transactions for the item and branch.
If the requirements have been met, the system deletes the records from these tables:
6.4.1.2 Primary Depot Location Definition
You can define a primary depot location and assign a lot number when you add an item branch/plant record.
After you assign an item to a location on the Location Revisions form, you can change the primary depot location for the item from the Work With Item Locations form. The primary location designates a specific location in the depot where you will store the item.
You can assign a lot number to bulk products. However, the system will not select bulk products by lot, nor does the Bulk Load Confirm process enable you to load confirm bulk products by lot. Therefore, although you can set up bulk products by lot, you will not be able to use this information for sales transactions.
6.4.1.3 Cost Methods Definition for Bulk Items
You need to define all cost methods specific to an item. You can create an unlimited number of cost methods. The system stores cost methods in the Item Cost File table (F4105).
If you delete the Sales and Inventory cost method, a warning appears indicating that the inventory value will drop to zero. The system does not delete the cost record, but updates it to a zero cost.
If you change the Sales and Inventory cost method, the system creates general ledger and item ledger transactions to reflect the change.
You can set processing options to display these formats:
-
One cost method at a time, which also displays all locations and lots for the item.
-
Multiple cost methods per item.
6.4.1.4 Additional Item and Depot Information Setup
You need to set up additional information by depot that is specific to bulk items. The information includes additional volume conversion information, automated depot processes, and blending and filling categories.
When you access the Depot/Product Information tab on the Additional System Info form, the system updates the Reconciled Through Date based on the Operational Reconciliations program.
6.4.2 Prerequisite
Add or locate an item on the Item Master form. When you access Item Branch/Plant Information and specify the depot for which you want to complete item information, the item and depot that you specify provide the default values for the next form or window that you access.
6.4.3 Forms Used to Set Up Item Information by Depot
| Form Name | FormID | Navigation | Usage |
|---|---|---|---|
| Item/Branch Plant Info. | W41026A | Inventory Master/Transactions (G4111), Item Branch/Plant
On the Work With Item Branch form, click Add. |
Set up basic item information by depot. |
| Work With Item Master Browse | W4101JA | Inventory Master/Transactions (G4111), Item Master | Define a primary depot location. |
| Cost Revisions | W41051A | Inventory Master/Transactions (G4111), Item Master
On the Work With Item Master Browse form, locate an item and select Cost Revisions from the Row menu. On the Work With Item Cost form, click Add. |
Define cost methods for bulk items. |
| Additional System Info | W41026D | Inventory Master/Transactions (G4111), Item Master
On the Work With Item Master Browse form, locate an item and select Item Branch from the Row menu. On the Work With Item Branch form, select a row and then Addl System Info from the Row menu. |
Set up additional item and depot information. |
6.4.4 Setting Up Basic Item Information by Depot
Access the Item/Branch Plant Info. form.
- Stocking Type
-
Enter a UDC (41/I) that indicates how you stock an item, for example, as finished goods or as raw materials. These stocking types are hard-coded and you should not change them:
0: Phantom item
B: Bulk floor stock
C: Configured item
E: Emergency/corrective maintenance
F: Feature
K: Kit parent item
N: Nonstock
The first character of Description 2 in the UDC table indicates if the item is purchased (P) or manufactured (M).
- G/L Class
-
Enter a UDC (41/9) that controls which general ledger accounts receive the dollar amount of inventory transactions for this item.
- Line Type
-
Enter a code that controls how the system processes lines on a transaction. It controls the systems with which the transaction interfaces, such as General Ledger, Job Cost, Accounts Payable, Accounts Receivable, and Inventory Management. It also specifies the conditions under which a line prints on reports, and it is included in calculations. Codes include:
S: Stock item
J: Job cost
N: Nonstock item
F: Freight
T: Text information
M: Miscellaneous charges and credits
W: Work order
- Supplier Number
-
Enter a user-defined name or number that identifies an address book record. You can use this number to locate and enter information about the address book record. If you enter a value other than the address book number (AN8), such as the long address or tax ID, you must precede it with the special character that is defined in the Address Book constants. When the system locates the record, it returns the address book number to the field.
For example, if address book number 4100 (Total Solutions) has a long address TOTAL and an * distinguishes it from other entries (as defined in the Address Book constants), you could type *TOTAL into the field, and the system would return 4100.
- Print Message
-
Enter a UDC (40/PM) that represents a predefined message set up on Print Message Revisions. You can print the message on sales orders, purchase orders, and so forth.
- Sales Taxable
-
Enter a code that indicates whether the item is subject to sales tax when you sell it. The system calculates tax on the item only if the customer is also taxable.
- Purchasing Taxable
-
Enter a code that indicates whether the item is subject to sales tax when you purchase it. The system calculates tax on the item only if the supplier is also taxable.
6.4.5 Defining a Primary Depot Location
Access the Work With Item Master Browse form.
-
Locate an item and then select Item Branch from the Row menu on the Work With Item Master Browse form.
-
Select the branch/plant and then select Location Revisions from the Row menu on Work With Item Branch.
-
Select the location and then Change Primary from the Row menu on Work With Item Locations.
-
Click Close.
6.4.6 Setting Processing Options for Cost Revisions (P4105)
Specify the version of Cost Revisions on the Versions tab of the processing options for Item Master program (P4101). Access Interactive Versions to set the processing options for Cost Revisions.
6.4.6.1 Process
- 1. Process
-
Enter 1 to prevent the standard cost from being changed.
- 2. Interop (interoperability)
-
Enter the transaction type for the interoperability transaction. If left blank, outbound interoperability processing will not be performed.
- 3. Flex Acct (flex accounting)
-
Specify whether you want to activate flex accounting. Values are:
Blank: Do not activate
1: Activate
6.4.7 Defining Cost Methods for Bulk Items
Access the Cost Revisions form.
6.4.8 Setting Up Additional Item and Depot Information
Access the Additional System Info form and click the Depot/Product Information tab.
- Strategic Volume
-
Enter the government-mandated, strategic stock level assigned to the depot for a specific product. The system displays a warning message when the stock level falls below government-required minimums.
- Replenishment Type
-
Specify the replenishment type that indicates the method of supply, for example, blended product, purchased product, or filled product. The Replenishment Type field is also used in conjunction with the blend and fill categories. A blended product requires a blend category. A filled product requires a fill category. A purchased product prevents the use of either a blend or fill category. Values for replenishment type are:
B: Blended products
F: Filled products
P: Purchased product
- Blend Category
-
Enter a UDC (39/BC) that indicates the valid product groups (or categories) that can be put into a specific blending tank. It is used to specify compatible or incompatible groups for blended stock items and blending equipment (tanks).
- Fill Category
-
Enter a UDC (39/FC) that identifies the different filling categories. Fill categories are used to specify compatible/incompatible groups for filled stock items and filling equipment. This field also identifies the different types of fillings (for example DRUM, TIN) and matches a filling of a particular stock item against the equipment (filling line) used.
- Hydrometer Correction
-
Select to indicate that this product must include the appropriate stem correction for the thermal expansion of the glass hydrometer. Clear to indicate that this product does not include the appropriate stem correction for the thermal expansion of the glass hydrometer.
- Gantry/Load Rack Flag
-
Select to indicate that a gantry (loading rack) is used. Clear to indicate that a gantry (loading rack) is not used.
- Auto Warehouse
-
Select to indicate that this product at this depot will be used by an automated warehouse system. Clear to indicate that this product at this depot will not be used by an automated warehouse system.
- Air Correction
-
Select to indicate that an air correction must be applied in the volume-to-weight conversion. The weight in air of a liquid differs from its mass (weight in a vacuum) because of the effects of air buoyancy. Thus, the calculation changes slightly if an air correction is required. Clear to indicate that an air correction is not applied in the volume-to-weight conversion.
- Auto Batch Blend
-
Select to indicate that this product at this depot will be used by an automated batch blending system. Clear to indicate that this product at this depot will not be used by an automated batch blending system.