7 Setting Up Tanks and Flow Meters
This chapter contains the following topics:
7.1 Understanding Tank and Flow Meter Setup
A depot consists of tanks that hold various products. You must define the tanks, the allowed products, and the flow meter setup at the depot location. The system uses this information to calculate volumes and optimize tank usage.
7.2 Setting Up a Tank
This section provides an overview of tank setup and discusses how to:
-
Set up basic tank information.
-
Set up a blending tank.
-
Set up additional tank information.
-
Set up tank strapping information.
7.2.1 Understanding Tank Setup
To set up a tank, you specify the structural information about the tank, such as capacity, height, and tank specifications. The system uses this information to calculate volume and optimize tank usage.
7.2.1.1 Basic Tank Information Setup
You must define the basic structural information about a tank. The system retrieves this information when processing transactions to calculate volume. The system stores this information in the Tank Master File table (F41500). If the tanks are set up as fixed assets, you can record the asset number when you set up basic tank information. You can also record whether a tank is heated and requires an expansion correction factor to calculate volume, such as tanks containing asphalt or bitumen products. If you set up a heated tank, you must also record an expansion correction factor and a strapping temperature.
When you delete the record for a tank, the system automatically deletes the corresponding records in the Tank Strapping Table Maintenance (F41503) and the Default Tank Information (F41508) tables.
While you use the Tank Master Maintenance program, you can access the Fixed Assets Master program and locate or record fixed asset information, such as depreciation and accounting values, for the tank.
7.2.1.2 Blending Tank Setup
A blending tank is a tank that can hold more than one product. When you set up a blending tank, you define the blending categories that are allowed in that tank.
7.2.1.3 Additional Tank Information Setup
You must define additional information about a tank that the system uses to calculate volume and manage depot transactions. This information includes discharge and filling rates, tank status, and commingled stock.
If you set up a tank to accommodate commingled stock, all transactions, such as general stock movements, load confirm, and disposition require you to enter the owner of the product. You must define all tanks that contain the product as commingled because any of them could be the current tank at any time.
7.2.1.4 Tank Strapping Information Setup
You must set up the strapping (reading height) information for the storage, blending, and holding tanks in a depot. The system uses tank strapping to convert tank dip readings to gross volumes when you record tank dips.
You can enter information in both metric and U.S. measurements. The delimiter for U.S. measurements is the one that you defined in the U.S. Increments Delimiter field on Branch/Plant Constants - Bulk Product Constants form.
7.2.2 Forms Used to Set Up a Tank
| Form Name | FormID | Navigation | Usage |
|---|---|---|---|
| Tank Master Maintenance | W415001D | Bulk Stock Control Setup (G415041), Tank Master Maintenance
On Work With Tank Master, click Add. |
Set up basic tank information. |
| Blend Categories | W415001B | On the Processing tab of the Tank Master Maintenance form, enter a code for a blending tank in the Tank Usage field and select Blending Category from the Form menu. | Set up a blending tank. |
| Tank Master Maintenance | W415001D | Bulk Stock Control Setup (G415041), Tank Master Maintenance
On Work With Tank Master, click Add. |
Set up additional tank information after setting up basic tank information. |
| Tank Strapping Table Maintenance | W415003B | On Tank Master Maintenance, after setting up basic tank information, click Cancel to return to Work With Tank Master. Select the tank you set up and select Tank Strapping from the Row menu. | Set up tank strapping information. |
7.2.3 Setting Up Basic Tank Information
Access the Tank Master Maintenance form.
7.2.3.1 Processing Tab
Select the Processing tab.
Figure 7-1 Tank Master Maintenance form - Processing Tab
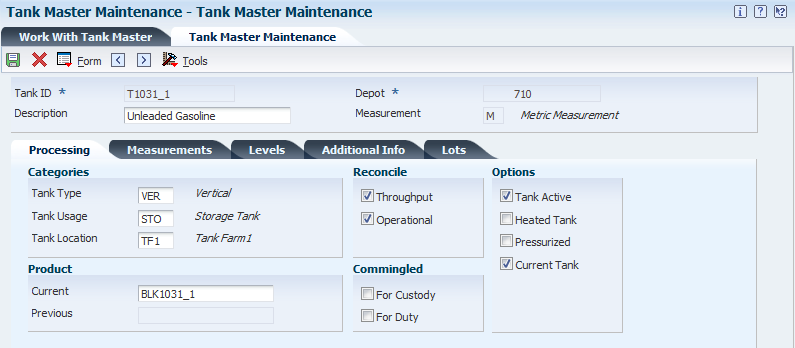
Description of "Figure 7-1 Tank Master Maintenance form - Processing Tab"
- Tank ID
-
Enter a value in the 8-character field that identifies the tank as defined on the Branch/Plant Constants form.
- Depot
-
Enter an alphanumeric code that identifies a separate entity within a business for which you want to track costs.
For example, a depot might be a warehouse location, job, project, work center, branch, or plant.
- Description
-
Enter a description for the tank.
- Measurement
-
Enter a value that indicates whether the system uses US based imperial units of measurement or metric standards for measurements.
Values are:
U: U.S Based
M: Metric Standards
If you leave this field blank, the system uses metric standards for measurements.
- Tank Type
-
Enter a code (41B/TY) that indicates the physical shape of the tank and whether the tank is on scale.
- Tank Usage
-
Enter a code (41B/TU) that identifies how the tank is used.
You identify a blending tank with a code that begins with the letter B. If the tank is a blending tank, the system displays the Blend Categories window when you press Enter during tank setup.
Note:
Blending tanks allow more than one product to be put in the tank. All other tanks can contain only one product, which is considered the current product. - Tank Location
-
Enter a code (41B/TL) that indicates the tank's location. For example, Tank Farm 1, Tank Farm 2, and so forth.
7.2.3.2 Measurements Tab
Select the Measurements tab.
Figure 7-2 Tank Master Maintenance form - Measurements Tab
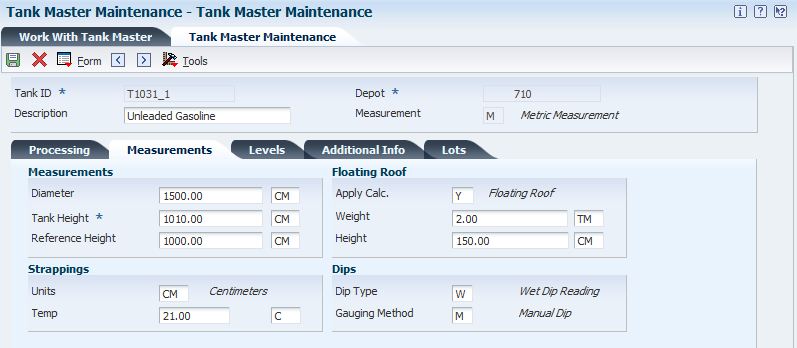
Description of "Figure 7-2 Tank Master Maintenance form - Measurements Tab"
- Tank Height
-
Enter the distance from the bottom to the top of a tank and the unit of measure. These fields are display-only fields.
- Units
-
Enter a user-defined code that identifies strapping table increments (for example, centimeters, millimeters, half inches, or quarter inches). If the depot uses U.S. increments, you must enter FF in this field.
- Dip Type
-
Enter a user-defined code from 39/DP that identifies the method of measurement that the system uses to calculate the volume from tank dips. Values are:
W: Wet Dip Reading
U: Ullage Dip Reading
R: Roto Gauge Percent Reading
S: Slip Tube Reading
E: Electronic Gauge Reading
If the Dip is E, you must select the user-defined code for Gauging Method as ambient volume, standard volume, or weight electronic.
- Gauging Method
-
Enter a user-defined code that identifies the measuring method that the system uses to determine the quantity of liquid in the tank. Values are:
A: Ambient Volume - Electronic
H: Hydrostatic Gauging
M: Manual Dip
S: Standard Volume - Electronic
W: Weight - Electronic
X: Mechanical Gauging
If the Dip Type is E, you must select Gauging methods A,S, or W.
- Apply Calc. (apply calculation)
-
Specify whether a floating roof calculation is required. This is a value in the detail column Floating Roof (FR) in Dip Volume Calculator.
Y or 1:: A floating roof calculation is applied.
Nor 0: No floating roof calculation is applied.
S or 2: Strapping already accounts for floating roof calculation. No floating roof calculation is required.
If you enter Y or 1, the system requires that you provide roof weight and floating height entries.
- Weight
-
Enter the unit of measure for the roof weight. If you use a unit of measure that is not equal to kilograms, you must set up a conversion between the unit of measure and kilograms in the Standard Unit of Measure Conversion program. The Roof Weight field is required if the Floating Roof field is set to Y or 1. This value is used to calculate the roof displacement correction.
7.2.3.3 Levels Tab
Select the Levels tab.
Figure 7-3 Tank Master Maintenance form - Levels Tab
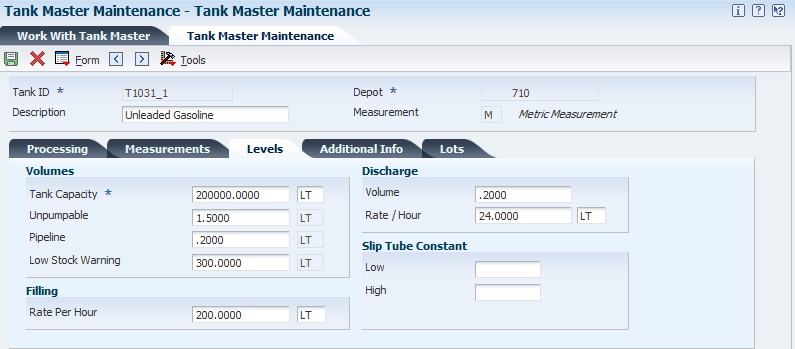
Description of "Figure 7-3 Tank Master Maintenance form - Levels Tab"
- Tank Capacity
-
Enter the total volumetric storage capacity of a tank. Tank capacity consists of two fields. The first is the total storage capacity of the tank. The second is the unit of measure associated with the capacity measurement. The capacity is checked while receiving products and recording general stock movements. If you enter a value that is greater than the tank's capacity, the system displays an error message and will not allow you to record the transaction.
The system uses the unit of measure as the basic unit of measure for the tank.
All other volume units of measure associated with the tank must match this unit of measure.
If the dip type is slip tube or normal dip, then the Tank Capacity field is informational only. If the dip type is roto percent (for LPG bullets/spheres only), then liquid volume equals roto percent multiplied by gross capacity. Vapour space equals gross capacity minus liquid volume.
7.2.3.4 Additional Information Tab
Select the Additional Information tab.
Figure 7-4 Tank Master Maintenance form - Additional Info Tab
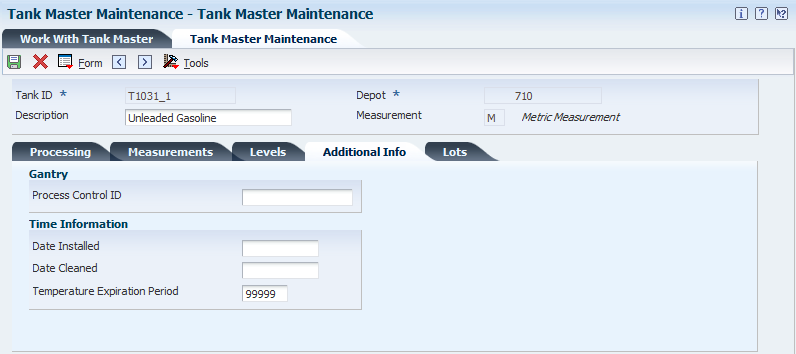
Description of "Figure 7-4 Tank Master Maintenance form - Additional Info Tab"
- Process Control ID
-
Enter a value that identifies the process control system. You can identify one or more process control systems associated by depot, tank, or mode of transport. The system uses this field for downloads of automated gantry information.
7.2.3.5 Lots Tab (Release 9.1 Update)
Access the Lots tab.
Figure 7-5 Tank Master Maintenance form - Lots Tab
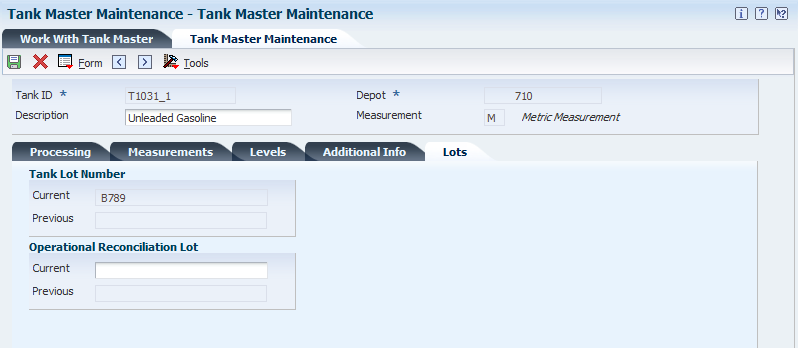
Description of "Figure 7-5 Tank Master Maintenance form - Lots Tab"
7.2.3.5.1 Tank Lot Number
- Current
-
Enter a number that identifies the current lot number.
Note:
A tank can contain only one lot number at a time. If you attempt to complete a transaction with a lot number other than the current lot number, the system displays an error message - ”Lot Number Conflict”.You can change the current lot number through one of the following transactions:
-
Blending
-
Repacking
-
Filling
-
Decanting
-
Rebanding
-
- Previous
-
The system displays the previous lot number.
7.2.4 Setting Up a Blending Tank
Access the Blend Categories form.
7.2.5 Setting Up Additional Tank Information
Access the Tank Master Maintenance form.
- Current Product
-
Enter a number that the system assigns to an item. It can be in short, long, or third item number format.
Identifies the current product that the tank contains. When you enter a product, the system checks the current product associated with a tank. If the new product differs from the current product, you cannot enter it into the tank unless the quantity of the current product is zero. Also, when you enter a product, the system checks the Allowed Products matrix to determine if the product group that this product is attached to is allowed to enter the tank, based upon the tank's previous contents.
If the tank is set up as a blending tank, it has no current product. You can enter any product.
- Commingled for Custody
-
Enter a value or select an option that indicates the type of commingled stock. If any tank for a product contains commingled stock, you must set up all tanks for that product to indicate that they contain commingled stock. You also use this field to divide product in the tank into two quantities. For example, enter a value if you want to separate duty-paid product from unpaid product in the same tank.
Select the appropriate option to indicate whether stocks are commingled for custody or for duty. If stocks are not commingled, clear both options. If stocks are commingled for both custody and duty, select both options.
Note:
If you want to indicate that a tank is a commingled tank on Commingled Stocks Inquiry, you must identify the tank as commingled. You do so on the Additional Tank Information form. - Commingled for Duty
-
Enter a value or select an option that indicates the type of commingled stock. If any tank for a product contains commingled stock, you must set up all tanks for that product to indicate that they contain commingled stock. You also use this field to divide product in the tank into two quantities. For example, enter a value if you want to separate duty-paid product from unpaid product in the same tank.
If the stocks are commingled, you must record all of the product movements at the owner level.
Select the appropriate option to indicate whether stocks are commingled for custody or for duty. If stocks are not commingled, clear both options. If stocks are commingled for both custody and duty, select both options.
Note:
If you want to indicate that a tank is a commingled tank on the Location Segment Inquiry form, you must first identify the tank as a commingled tank on the Additional Tank Information form. - Tank Status
-
Enter a value or select an option that indicates whether the tank is active or inactive. A tank must have a status of active to assign product to it. A tank that has a status of inactive is empty and not being used. Multiple tanks can be active for a product, but only one tank can be defined as the current, or default, tank.
Select this option to indicate that the tank is active. Clear this option to indicate that the tank is inactive.
- Unpumpable Volume
-
Enter the volume in the tank that is below the level of the discharge pipeline and, therefore, cannot be removed by the normal discharge pump. The system edits this volume during load confirmation, but it is not used when calculating tank dip volumes. The unpumpable volume quantity is used for informational purposes only.
- Pipeline Volume
-
Enter the volume of product held in the pipeline that is connected to the subject tank. The tank's content capacity includes the volume capacity of the pipeline. To reflect the total product volume in the tank and pipeline, pipeline volume is added to the observed (ambient) volume calculated on the Tank Dip form.
- Low Stock Warning
-
Enter the volume of product below which a low stock warning is issued. A low stock warning indicates that the volume is close to the safety stock level.
Enter the quantity and unit of measure that the system uses to provide a low stock warning. This field information is used during the Load Confirm process.
If the quantity being loaded will bring the tank to the low stock point, a soft error occurs. That is, the user can press Enter and continue with load confirm.
- Fill Rate Per Hour
-
Enter the maximum rate at which the tank can be filled.
- Discharge Volume
-
Enter the volume of the product in a tank's discharge pipeline. The system adds this value to obtain the total ambient volume.
- Discharge / Hour
-
Enter the rate per hour at which product can be discharged from the tank. This rate is used in the blending/filling process to calculate lead time.
- Date Cleaned
-
Enter the date when the tank was last cleaned. This field is for reference purposes only.
- Temp Exp Period (temperature expiration period)
-
Enter the number of hours the tank temperature remains valid. This number is used to calculate the next expiration date/time on the Default Tank Information screen. It is also checked at load confirm time to ensure that the default temperature reading is valid. Enter 99999 if no expiration exists (for example, stocks are stored at a third-party site).
7.2.6 Setting Up Tank Strapping Information
Access the Tank Strapping Table Maintenance form.
Figure 7-7 Tank Strapping Table Maintenance form
Description of "Figure 7-7 Tank Strapping Table Maintenance form"
- Reading Height
-
Enter a linear measurement that represents either the depth of oil or free space (ullage) available in a tank.
- Volume at Point
-
Enter a number that indicates the volume contained in the tank at this reading height. You can enter an amount or have the system calculate it. If you want the system to calculate the volume, you must enter information in the Volume per Increment field.
- Volume per Increment
-
Enter a number that is the gradient above a strapping point in terms of volume increase per strapping unit. If you enter a value in this field, the system calculates the volume at this point.
- Chart ID
-
Indicate the person responsible for the strapping. This field is for reference only
- Initial Volume
-
Specify the volume of liquid below the zero reference point. The initial volume is added to the total tank volume. When taking a dip reading, this volume is added to the Volume at Point to arrive at the ambient value.
- Chart Prep. By (chart prepared by)
-
Enter your user ID. user identification. This field is used in the Lease Master Validation file and indicates the user who initially set up the record.
7.3 Defining Tank Temperature and Density
This section provides an overview of tank temperature and density and discusses how to define tank temperature and density.
7.3.1 Understanding Tank Temperature and Density
The system uses the default temperature and density that are specific to a tank to calculate volume and to process the stock movements. If you do not enter the temperature and density information when performing a stock movement, the system retrieves the default temperature and density for the tank from the Default Tank Information table (F41508).
If you enter the date and time, the system uses this information in all records added in all detail lines.
If you enter the date and time on the form, you can display different information for each record.
To delete a record, select only the line for the tank to delete on the Work With Default Tank Information form.
7.3.2 Form Used to Define Tank Temperature and Density
| Form Name | FormID | Navigation | Usage |
|---|---|---|---|
| Default Tank Information Revision | W415108B | Bulk Stock Control Setup (G415041), Default Tank Information
On the Work With Default Tank Information form, click Add. |
Define tank temperature and density. |
7.3.3 Defining Tank Temperature and Density
Access the Default Tank Information Revision form.
Figure 7-8 Default Tank Information Revision form
Description of "Figure 7-8 Default Tank Information Revision form"
- Tank Temperature
-
Enter the temperature of the product in the tank. The temperature type specified on the Branch/Plant Constants - Bulk Product Constants form is the default value. The system checks this entry against the minimum and maximum temperature range.
- Density
-
Enter the company's standard for density. You can also use this field for pack size and weight information.
- Temperature Expiration Date
-
Enter the number of hours that the tank temperature remains valid. The system uses this number to calculate the next expiration date and time on Default Tank Information form. The system also checks the temperature expiration period at load confirm time to ensure that the default temperature reading is valid. If you do not require an expiration (for example, stocks are stored at a third-party site), enter 99999.
- Temperature Expiration Time
-
Enter the time beyond which this default temperature is invalid. This field is normally calculated based upon the Temperature Expiration Period on the Additional Tank Information form. The user may override the calculated values.
7.4 Defining Product Groups
This section provides an overview of product groups and discusses how to:
-
Set processing options for Allowed Product Matrices (P415005).
-
Define product groups.
7.4.1 Understanding Product Groups
You must define the product groups that a tank or filling line can hold. You must also specify the order in which products can be put into the tank without requiring the tank to be cleaned. The system displays a warning message if you need to flush the tank before adding another product.
The system uses the information about product groups and fill order whenever you perform any of these activities:
-
Transfer product into the tank as part of a general stock movement.
-
Receive product into the tank.
-
Change the current product in the tank on the Additional Tank Information form.
You can set up the product groups for individual tanks or by tank type, depending on your business needs.
7.4.2 Form Used to Define Product Groups
| Form Name | FormID | Navigation | Usage |
|---|---|---|---|
| Allowed Product Matrices | W415005D | Bulk Stock Control Setup (G415041), Allowed Product Matrices
On the Work With Product Matrices form, click Add. |
Define product groups. |
7.4.3 Setting Processing Options for Allowed Product Matrices (P415005)
Processing options enable you to specify the default processing for programs and reports.
- Process
-
Enter the type of matrix to be displayed. Values are:
T: Tanks (default)
F: Filling Line (future)
7.4.4 Defining Product Groups
Access the Allowed Products Matrices form.
Figure 7-9 Allowed Products Matrices form
Description of "Figure 7-9 Allowed Products Matrices form"
- Product Group
-
Enter a line of products whose similarity allows them to be grouped together (UDC 41B/PG). This grouping can be used to select products for other tasks or processes such as reporting.
- To
-
A line of products whose similarity enable them to be grouped together (UDC 41B/PG).
- I V (intersection value)
-
Enter a code that specifies what product groups are allowed and in what order (UDC 41B/IV). Values are:
Y: Can fill the tank/line/vehicle with the To product after the From product (default).
F: Can fill the tank/line/vehicle with that product group, but have to flush the tank/line/vehicle first.
N: Do not allow To product to be placed in the tank/line/vehicle after the From product.
7.5 Setting Up a Flow Meter
This section provides an overview of flow meter setup and discusses how to set up a flow meter.
7.5.1 Understanding Flow Meter Setup
You set up a flow meter to define such information as the current product, location, and calibration dates. The system uses this information during the throughput reconciliation process.
If you want to change the current product of an existing meter, you must enter a closing meter reading for the previous product.
You can attach notes about the meter from the Work With Meter Master Maintenance form.
7.5.2 Form Used to Set Up a Flow Meter
| Form Name | FormID | Navigation | Usage |
|---|---|---|---|
| Meter Master Maintenance Revision | W415006B | Bulk Stock Control Setup (G415041), Meter Master Maintenance
On Work With Meter Master Maintenance, click Add. |
Set up a flow meter. |
7.5.3 Setting Up a Flow Meter
Access the Meter Master Maintenance Revision form.
Figure 7-10 Meter Master Maintenance Revision form

Description of "Figure 7-10 Meter Master Maintenance Revision form"
- Meter Units
-
Enter the number of meter units used to calculate the quantity that passes through the meter. Meter units can differ from the units used to calculate volume or weight. For example, one meter unit can equal three volumetric units.
- Date Last Calibrated
-
Enter the last date that the meter flow was tested and calibrated. Whenever this date is changed, the system resets the entry in the Throughput Since Last Calibration field to zero.
- Throughput Since Last Calibration
-
Enter a valid number and the unit of measure in these fields. If you leave the first field blank, the system uses zero. You can enter values in these fields only during initial meter setup. After you have set up the meter, the total throughput is a rolling figure from the Meter Master table (F41506). As the system calculates volumes from closing readings, it adds them to the previous total to obtain a current figure for this record. If you change the date in the Date Last Calibrated field, the system clears this field.
- Maximum Reading
-
Enter the largest reading on the meter before it rolls back to one. If you leave this field blank, the system uses the value assigned in the data dictionary for this field.
- Temperature Compensated
-
Specify whether the throughput volume is already at the standard temperature and a temperature conversion is required. Values are:
Y or 1: Yes.
N or 0: No.
- Load Rack Interface
-
Specify whether the product is being loaded using a loading rack (gantry). Values are:
Y or 1: Loading rack interface in place.
N or 0: Loading rack interface not in place.