10 Working with Employee Benefit Statements
This chapter contains the following topics:
10.1 Understanding Employee Benefit Statements
Employers in the United States typically pay a significant portion of an employee's total compensation for benefit and tax payments. These payments made by the employer are nearly invisible to the employee. You can create a benefit statement that includes employees the funds spent on their behalf. The benefit statement can include specific information about an employee's compensation and benefits such as:
-
Base salary or regular earnings.
-
Specific additional earnings, such as bonuses.
-
Employee and employer contributions to specific insurance benefits.
-
Paid time off, such as holiday or vacation time.
-
Taxes such as FICA (Federal Insurance Contributions Act), unemployment, and workers' compensation.
When you create a benefit statement, you create benefit statement headings that correspond to the categories of information that you want to display on the benefit statement. For example, you might have benefit statement headings such as medical insurance, vacation pay, taxes, and so on. For each benefit statement heading, you select the pay type, deduction, benefit, accrual (PDBA) or tax types that will provide the amount spent on each type of compensation.
After you have gathered information for the benefit statement using benefit statement headings, you can merge a benefit statement form with a list of employees who should receive a benefit statement. You use the Mail Merge feature of Microsoft Word to combine the benefit statement form and list of employees to create a customized benefit statement for each employee.
You use the Benefit Statement program (P083300) to access the steps used to create benefit statements.
10.2 Setting Up a Benefit Statement
This section provides an overview of benefit statements setup, lists a prerequisite, and discusses how to set up benefit statements.
10.2.1 Understanding Benefit Statement Setup
When you set up a benefit statement, you assign a code and description that identifies the benefit statement. You might set up different benefit statements for different groups of employees, depending on the kind of compensation and benefits that each group receives.
You also need to specify the mail merge document that you will use to create the benefit statement. The mail merge document is a Microsoft Word document that contains the structure of the benefit statement.
10.2.2 Prerequisite
Before you complete the tasks in this section, you must set up a mail merge document for the benefit statement using the Benefit Statement mail merge Data Structure (D083305).
10.2.3 Form Used to Set Up a Benefit Statement
| Form Name | FormID | Navigation | Usage |
|---|---|---|---|
| Benefit Statement Revision | W083301B | Periodic Processing (G08BB2), Benefit Statement
On the Benefit Statement form, select Create a Benefit Statement. On the Work with Benefit Statement form, click Add. |
Set up a benefit statement. |
10.2.4 Setting Up a Benefit Statement
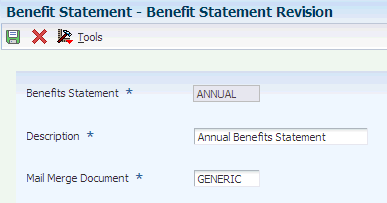
Access the Benefit Statement Revision form.
Figure 10-1 Benefit Statement Revision form
Description of "Figure 10-1 Benefit Statement Revision form"
- Benefits Statement
-
Enter the name of the benefit statement.
- Mail Merge Document
-
Enter the name that identifies a system object. JD Edwards EnterpriseOne architecture is object-based. Discrete software objects are the building blocks for all programs, and developers can reuse the objects in multiple programs. The Object Librarian tracks each object. Examples of system objects include:
Batch Programs (such as reports).
Interactive Programs.
Business Views.
Business Functions.
Business Functions Data Structures.
Event Rules.
Media Object Data Structures.
10.3 Setting Up Benefit Statement Headings
This section provides an overview of benefit statement headings and discusses how to:
-
Add a benefit statement heading.
-
Cross-reference PDBAs.
-
Cross-reference tax information.
10.3.1 Understanding Benefit Statement Headings
Benefit statement headings correspond to the categories of information that will appear on a benefit statement. You need to set up a benefit statement heading for each type of earning, benefit, or tax that you want to appear on the benefit statement. For example, you can set up a benefit statement for each type of insurance provided, for each significant type of pay (regular earnings, vacation pay, and so on), and for specific taxes.
When you create a benefit statement heading, you specify whether the heading corresponds to benefits or earnings. For example, company-paid insurance and taxes are all benefit-type headings, but regular pay types are earnings-type headings. The system uses the totals of the benefit-type headings and earnings-type headings to calculate the percentage of benefits that are company-paid.
You need to cross-reference each heading to either a PDBA or a tax type that supplies the amounts of employee and employer contributions for that heading, and indicate whether the amount is employer- or employee- paid. If the heading corresponds to a type of pay or a benefit plan, cross-reference a PDBA. If the heading corresponds to a tax, cross-reference a tax area and tax type. You must cross-reference either a PDBA or a tax area and type to each heading that you want to include on the benefit statement.
10.3.2 Forms Used to Set Up Benefit Statement Headings
| Form Name | FormID | Navigation | Usage |
|---|---|---|---|
| Benefit Statement Heading Revision | W083302B | Periodic Processing (G08BB2), Benefit Statement
On the Benefit Statement form, click Create and Define a Benefit Statement Heading. On the Work with Benefit Statement Heading form, click Add. |
Add a benefit statement heading. |
| PDBA Heading Cross Reference Detail | W083302C | On the Work with Benefit Statement Heading form, complete the Benefit Statement Heading field and click Find.
Select either the row with Benefits or Earnings in the Benefit Statement Heading field. From the Row menu, select PDBA Ref. |
Cross-reference PDBAs. |
| Tax Heading Cross Reference Detail | W083302D | On the Work with Benefit Statement Heading form, complete the Benefit Statement Heading field and click Find.
Select the row with Taxes in the Benefit Statement Heading field in the detail area and select Tax Ref. from the Row menu. |
Cross-reference tax information. |
10.3.3 Adding a Benefit Statement Heading
Access the Benefit Statement Heading Revision form.
Figure 10-2 Benefit Statement Heading Revision form

Description of "Figure 10-2 Benefit Statement Heading Revision form"
10.3.4 Cross-Referencing PDBAs
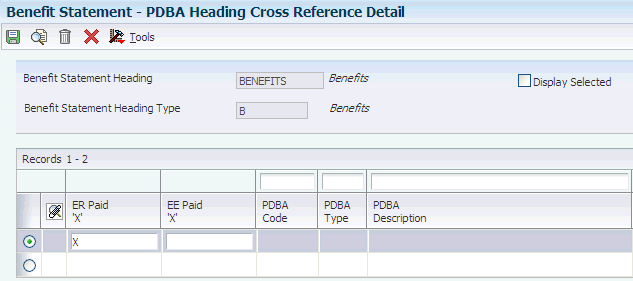
Access the PDBA Heading Cross Reference Detail form.
Figure 10-3 PDBA Heading Cross Reference Detail form
Description of "Figure 10-3 PDBA Heading Cross Reference Detail form"
To cross-reference PDBAs:
-
Complete the PDBA Code or PDBA Type field in the QBE row and click Find.
-
To indicate that you want to cross-reference a benefit, enter an X in the ER Paid 'X' field.
The system does not allow you to enter an X in the ER Paid 'X' field for a deduction code because deductions can only be employee-paid.
-
If this is a deduction that you want to cross-reference, enter an X in the EE Paid 'X' field.
The system does not allow you to enter an X in the EE Paid 'X' field for a PDBA code, such as a pay type code, that can only be employer-paid.
The employer-paid and employee-paid amounts from all the PDBAs that you cross-reference to a single heading will be totaled to produce total employer and employee contributions for that heading.
-
To review the cross-references, select the Display Selected option.
-
When you have cross-referenced all the PDBAs that you want, click OK.
10.3.5 Cross-Referencing Tax Information
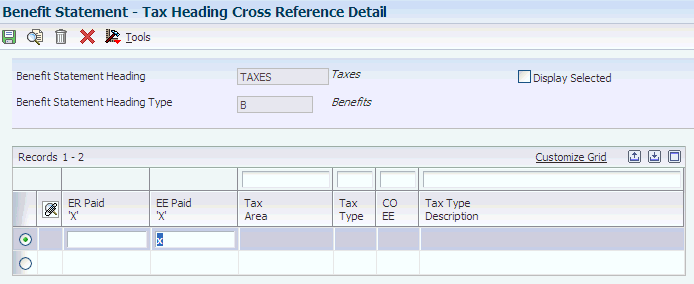
Access the Tax Heading Cross Reference Detail form.
Figure 10-4 Tax Heading Cross Reference Detail form
Description of "Figure 10-4 Tax Heading Cross Reference Detail form"
To cross-reference tax information:
-
Complete the Tax Area or Tax Type field in the QBE line and click Find.
-
Enter an X in either of these fields for each tax area that you want to cross-reference, and then click OK:
-
ER Paid 'X'
-
EE Paid 'X'
To produce the total of the employer and employee contributions for a heading, the system adds together the amounts from all of the tax areas that you cross-reference to a single heading.
-
-
To review the cross-references, select the Display Selected option.
-
Benefit Statement Heading
Enter the heading for the benefit statement.
-
Heading Description
Enter a description, remark, name, or address.
-
Heading Type
Enter a code that designates the heading type of the Benefit Statement. Values are:
Blank: Other (any type that is not Benefits or Earnings).
B: Benefits.
E: Earnings.
-
PDBA Code (pay type, deduction, benefit, accrual code)
Enter a code that defines the type of pay type, deduction, benefit, or accrual.
Pay types are numbered from 1 to 999. Deductions and benefits are numbered from 1000 to 9999.
-
PDBA Type (pay type, deduction, benefit, accrual type)
Enter a code that specifies the type of payroll entry. The hard-coded values are:
P: Time Cards (earnings)
D: Deductions withheld
B: Benefit (both cash and noncash)
A: Time accrual, such as sick and vacation time
When you enter * in this field, the system displays all four types of PDBAs.
-
ER Paid 'X' (Employer Paid 'X')
Enter a value that specifies whether the employer (not the employee) pays a pay type or a PDBA. Enter an X in this field if the employer pays the PDBA. If you enter an X in both the Paid by Employer and Paid by Employee fields, the system generates an error message. If you leave both the Paid by Employer and Paid by Employee fields blank, the system does not store the record.
-
EE Paid 'X' (Employee Paid 'X')
Enter a value that specifies whether the employee (not the employer) pays a PDBA. Enter an X to specify that the employee pays the PDBA. If you enter an X in both the Paid by Employer and Paid by Employee fields, the system generates an error message. If you leave both the Paid by Employer and Paid by Employee fields blank, the system does not store the record.
-
Display Selected
Select this option to specify the information that the program displays. When you select this option, the program displays only the items that you selected for Benefit Statement Heading.
-
Tax Area
Enter a code that identifies a geographical location and the tax authorities for an employee work site, including employee and employer statutory requirements. In the Vertex payroll tax calculation software, the tax area code is synonymous with GeoCode. To determine the valid codes for the location, refer to the documentation for the tax calculation software that you are using.
-
Tax Type
Enter a code from UDC 07/TX that specifies the type of payroll tax being processed. To set up state minimum wage amounts, you must enter MW in this field. To do so, you must first add MW to UDC 07/TX. However, you should not change the codes and definitions that are provided with the software.
-
10.4 Linking Headings to a Benefit Statement
This section provides an overview of linking headings to a benefit statement and discusses how to link headings to a benefit statement.
10.4.1 Understanding Linking Headings to a Benefit Statement
Link headings to a benefit statement to specify which benefit statements that you have created should appear on a particular benefit statement. Use sequence numbers to specify the order in which the headings appear on the benefit statement. You can link as many as ten headings of each heading type (benefit, earnings, or other).
10.4.2 Form Used to Link a Heading to a Benefit Statement
| Form Name | FormID | Navigation | Usage |
|---|---|---|---|
| Associate Benefit Statement Heading | W083303A | Periodic Processing (G08BB2), Benefit Statement
On the Benefit Statement form, select Associate Headings to Statement. |
Link headings to a benefit statement. |
10.4.3 Linking Headings to a Benefit Statement
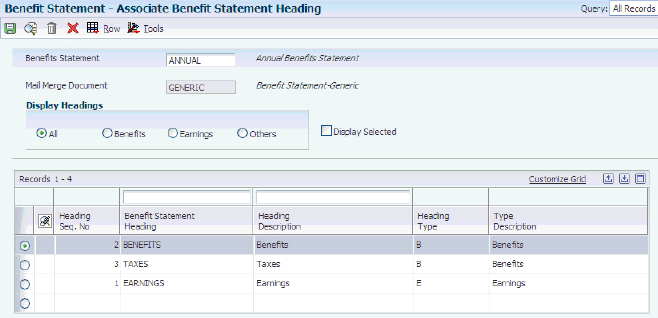
Access the Associate Benefit Statement Heading form.
Figure 10-5 Associate Benefit Statement Heading form
Description of "Figure 10-5 Associate Benefit Statement Heading form"
- Benefits Statement
-
Enter the name of the benefit statement.
- All
-
Select this option to display all headings.
- Benefits
-
Select this option to display benefits headings.
- Earnings
-
Select this option to display earnings headings.
- Others
-
Select this option to display other headings.
- Heading Seq. No (heading sequence number)
-
Enter a number that controls the sequence of Processing Options, DDS Selection values and DDS Key sequences.
The sequence number is relative, meaning that the sequence need not start 001, 002, and so on. A sequence of 003 and 005 will sort the report with the 003 field before the 005 field.
For Financial Reports, company MUST be sequence 001 in order to access the specific company automatic accounting instruction records. If company is not sequence 001, company 00000 AAIs are used.
10.5 Printing Benefit Statements
This section provides an overview of benefit statements printing, lists prerequisites, and discusses how to:
-
Print benefit statements.
-
Set processing options for the Benefit Statement File Creation Mail Merge program (R083305).
10.5.1 Understanding Benefit Statement Printing
When you print benefit statements, the system uses the data selection on a version of the Benefit Statement File Creation Mail Merge program (R083305) to generate the list of employees who will receive a benefit statement. The system merges this list with the mail merge document that you specified when you set up the benefit statement to create a customized benefit statement for each employee.
You must specify the name of the benefit statement in the processing options of the Benefit Statement File Creation Mail Merge program. You also specify the date range for the benefit statement in these processing options. The system uses the dates that you enter in the processing options, along with the PDBAs and tax areas that you have cross-referenced to headings, to produce total employer and employee contributions for each heading for each employee. The system retrieves the amounts of employer and employee contribution from the Employee Transaction History Summary table (F06146).
|
Note: Benefit statements are produced as Microsoft Word documents. You must have Microsoft Word in order to print benefit statements. |
10.5.2 Prerequisites
Before you complete the tasks in this section, you must:
-
Set up a version of the Benefit Statement File Creation Mail Merge program (R083305) with a data selection that selects the employees for whom you want to create benefit statements.
-
Enter the name of the benefit statement and specify the date range for the benefit statement in the processing options for the version of the Benefit Statement File Creation Mail Merge program. You can access the version list for the Benefit Statement File Creation Mail Merge program by choosing Versions from the Form menu on the Benefit Statement form.
10.5.3 Form Used to Print Benefit Statements
| Form Name | FormID | Navigation | Usage |
|---|---|---|---|
| Benefit Statement - Version | W083300C | Periodic Processing (G08BB2), Benefit Statement
On the Benefit Statement form, click Print the Statement. On the Version form, complete the Version field and click OK. |
Print a benefit statement.
As with other reports, you can print the benefit statements directly or display them online. If you choose to display the benefit statement online, the system takes you to a Microsoft Word document of the benefit statements. You can review or print the benefit statements. |
10.5.4 Printing Benefit Statements
Access the Benefit Statement - Version form.
- Version
-
Enter a user-defined set of specifications that control how programs and reports run. You use versions to group and save a set of user-defined processing option values and data selection and sequencing options. Interactive versions are associated with programs (usually as a menu selection). Batch versions are associated with batch jobs or reports. To run a batch process, you must select a version.
10.5.5 Setting Processing Options for the Benefit Statement File Creation Mail Merge Report (R083305)
Processing options enable you to specify the processing for programs and reports.
10.5.5.1 Define
These processing options specify information that appears on the benefit statement.
- 1. Benefits Statement Name
-
Specify a heading for the benefit statement.
- 2. Month - From
-
Specify the beginning month for the time period to which the statement applies.
- 3. Year - From
-
Specify the beginning year for the time period to which the statement applies.
- 4. Month - Through
-
Specify the ending month for the time period to which the statement applies.
- 5. Year - Through
-
Specify the ending year for the time period to which the statement applies.