4 Designing the Demand Flow Manufacturing Line
This chapter contains the following topics:
4.1 Understanding Mixed-Model Line Design
The purpose of JD Edwards EnterpriseOne Demand Flow Manufacturing is to design flow lines for producing families of similar products. The mixed model Demand Flow line can produce a range of volumes of any product within a mixed model family on any day, based on actual customer demand.
Line design uses demand data in combination with detailed information about the manufacturing process to calculate the logical production line design that is required to manufacture products in a flow. To complete a line design, you must calculate these values:
-
Operational cycle time or Takt: the calculated target of work content time to be performed by a person or machine in a Demand Flow line or cell.
-
Number of resources (machine or labor) that is required to support the line.
-
Number of operations that is required to support the line.
-
Number of pieces that is required for batch-driven machine operations.
-
In-process kanban sizes as visual signal that indicates when work must be performed in a Demand Flow line.
-
Total product cycle time: the calculated work content through the longest path of the processes that are required to build a product.
-
Actual time for completing all the processes that are required to build a product.
-
Actual time weighted based on demand at capacity for each product and process combination.
|
Note: Creating a line design is an iterative process that is used to refine the line design. You can repeat these calculations any time that you make an adjustment. |
To create a mixed-model line design, you set up a mixed-model family of products that you want to produce on the line. To accommodate the variations between these products, you define all the processes that are required to produce all the products and combine them into a product synchronization. The product synchronization enables you to concatenate the processes both in a graphical and tabular format. The graphical product synchronization is a diagram depicting the entire path, including feeder, rework, and option paths, that a product has to go through to be transformed from components into the final product. In the product synchronization, the system also calculates the amount of output, scrap, and throughput that are required to meet demand at capacity. After you have calculated the product synchronization, you create a volume design to determine what quantities of each product you want to produce based on demand at capacity and associate the volume design with the product synchronization. This association enables you to understand what quantities of each product have to be accommodated on the Demand Flow line in one day.
By creating a sequence of events for every process, you define the process steps or tasks that are required to complete each process. The resource times that you assign to each task are the lowest-level values that feed into the calculation of line design, total product cycle time, and operational definition. The system enables you to set up standard tasks and standard sequences of events that you can use to facilitate the sequence of events definition, but these are optional.
Based on the product synchronization and sequences of events that you created for all the processes in the product synchronization, you set up a process map that enables you to gauge the extent to which the products share processes. You can group products for production on the same Demand Flow line based on common processes. The system enables you to compare the total actual times for the different product and process combinations to further determine similarities that support a mixed-model line design.
When you set up a line design, you import the process map into the line design and calculate the actual time that is weighted for each process based on the actual times from the process map. The system also calculates the number of operations that is required for each process. You can adjust this value manually. The system also calculates Takt as part of line design. After the line design has been calculated satisfactorily, you can calculate the total product cycle time for all the products in the process map. You can also calculate the total product cycle time by product.
JD Edwards EnterpriseOne Demand Flow Manufacturing provides you with a tool to smooth the flow of tasks across a process to ensure a balanced work flow. Operational definition enables you to assign tasks to operations based on a calculated operational index and the number of operations that are calculated by line design. You can manually alter the operational definition.
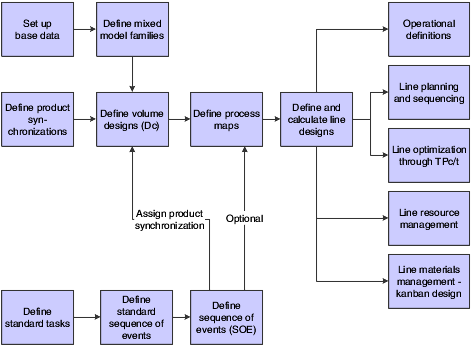
This flow diagram provides an overview of the task that is associated with creating a line design, showing where the output from line design is used:
4.1.1 User-Defined Codes for Line Design
Use these user-defined codes (UDCs) for line design:
| User-Defined Codes | Description |
|---|---|
| Active/Inactive (F30L/AC) | These codes indicate whether a scenario or a line design is active or inactive. |
| Balancing Technique ((F30L/BT) | These codes indicate which balancing technique is used when you calculate the operational definition. Currently, the calculation is hard-coded to use balancing by labor and machine. |
| Default Cell Name (F30L/DC) | This code specifies the default cell name for a process on the process map. |
| Default Resources (F30L/DR) | These codes specify the default resources that the system automatically associates with every process that you create. |
| Demand Sequence (F30L/DS) | These codes represent the values that you can use to define the design selection for the process map. The design selection determines the source of labor and machine times that the system uses when calculating line design. |
| Demand Type (F30L/DT) | These codes indicate the source for demand at capacity in volume design. |
| DFM Default Process Names (F30L/HP) | These codes represent the default processes that the system associates with each new scenario that you create. These processes are automatically added to the F30L701 table. You can change the process names. |
| External/Internal (F30L/IE) | These codes indicate whether the machine setup for setup or move tasks on the sequence of events or standard sequence of events is internal or external. |
| Operational Definition Calculation Basis (F30L/OC) | These codes indicate whether the operational definition is calculated based on the sequence of events or on a previously calculated operational definition. |
| Path Type Selection Filter (F30L/PS) | These codes represent the path types that you can select when working with product synchronization. You can set a processing option for the Path Revision program (PF30L702) to determine path-specific versions for this program. |
| Path Types (F30L/PT) | These codes represent the types of paths that you can use on the product synchronization. |
| Resource Type (F30L/RT) | These codes represent the available resource types. Currently, you can assign labor and machine resources. You can change the default resource names. |
| SSOE Comparison (F30L/SO) | The system uses these codes for the sequence of events to characterize differences between sequence-of-events (SOE) information and standard sequence-of-events (SSOE) information. For example, if you changed the standard sequence of events that the sequence of events is based on, the SSOE Comparison field displays one of these codes. |
| Sequencing Capability (F30L/SQ) | These codes represent the sequencing options that you can select for a line design. |
| TQC Criteria (F30L/TC) | When you define a task, these codes provide the values for defining total quality control criteria (TQC). |
| Transaction Status (F30L/TS) | These codes indicate the sources of time information that you can choose when calculating total product cycle time. |
| Line Design Type (F30L/TY) | These codes indicate what type of line design you create based on the process map that you select. |
| Work Type (F30L/WT) | These codes indicate the type of work for a task. |
4.1.2 Prerequisites
Provide the following information either by entering it through the base data setup programs or by importing it from other JD Edwards EnterpriseOne applications:
-
Scenario and user profile.
-
Items.
-
Bill of material.
-
Machine and labor resources.
4.1.3 Common Fields Used in This Chapter
- Process Name
-
Enter a name for a grouping of logical and functional manufacturing steps that are required to produce an end product.
- Product Synchronization
-
Define the concatenation of processes that are required to produce an end product.
- Sequence of Events
-
Define the tasks that make up a process sequentially. Enter task times and required resources.
- Volume Design
-
Define the allocation of demand at capacity to selected products from the mixed model family.
- Volume Selection
-
Determine the source for the demand at capacity value that is used for the volume design.
- Work Center and Line Design Work Center
-
Complete this field to define a work center if you are integrating JD Edwards EnterpriseOne Demand Flow Manufacturing with JD Edwards EnterpriseOne Manufacturing. If you have not selected the integration option for the scenario, this field does not appear.
- Work Center Branch
-
Displays the branch with which you have associated the work center.
4.2 Defining a Product Synchronization
This section provides an overview of product synchronization, lists a prerequisite, lists common fields, and discusses how to:
-
Define processes.
-
Set processing options for Path Revision (P30L702).
-
Add a product synchronization.
-
Create a graphical product synchronization.
-
Edit product synchronizations in the tabular view.
-
Revise process properties.
4.2.1 Understanding Product Synchronization
Product synchronization defines the phased relationship of all manufacturing processes that are required to build a product. Product synchronization supports line design by concatenating processes to reflect actual production paths. JD Edwards EnterpriseOne Demand Flow Manufacturing provides a tool that enables you to construct the product synchronization in a graphical interface, thus creating a visual impression of what the production line might look like.
You can create multiple product synchronizations based on an inventory of the processes that you use in the manufacturing environment. You define processes using the Process Master program (PF30L701). Processes can be reused throughout the product synchronization. You combine processes into physical and logical chains by linking them to a path. You build a product synchronization using the following paths:
-
Main line.
-
Rework paths.
-
Feeder paths.
-
Option paths.
The main line processes are the processes that most, if not all, products go through. These processes typically go straight to the end-of-line process. The main line may include feeder, rework, and option paths. When you set up a scenario, the system automatically defines an end-of-line process, as well as a scrap process, and stores these two default processes in the FF30L701 table. The end-of-line process is the required last process on the main line in any product synchronization. You cannot edit or delete this process.
You define rework paths to provide the ability to recover at least part of the product that would otherwise be scrapped. Rework paths are a series of processes that flow against the main flow of the line. Any process for which you defined yield as less than 100 percent has to have a rework path or a scrap process attached to it. When you attach a rework path to a process, you define the rework percentage and the number of rework loops. Rework paths can have many loops. Rework paths are subject to these rules:
-
A rework path must flow back to its originating path upstream.
It can return to its originating process just before the originating yield and fallout task.
-
You can attach other rework paths to a rework path.
-
You can attach a feeder path to a rework path.
-
You cannot attach an option path to a rework path.
-
Rework paths cannot rejoin the downstream processes without returning to the same or previous process.
-
Rework paths cannot go to the end-of-line process directly.
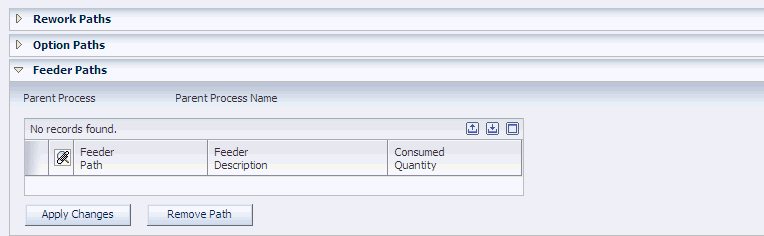
Feeder paths are branch processes that feed directly into a consuming operation. They build a portion of the product that feeds into the final product. Feeder path processes are consumed as a continuous grouping. They can contain additional rework and option paths. When you attach a feeder path to a process, you define the consumed quantity. Feeder paths are subject to the following rules:
-
You can attach feeder paths to other feeder path processes, rework path processes, option path processes, and main line processes.
-
Feeder paths parallel main line processes.
Option paths consist of processes that are used only by some of the products flowing down the line. They parallel the main line and can either continue to the end-of-line process or return to the main line. When you attach an option path to a process, you define the planned and designed percentage that is required to go through the option line. Option paths are subject to the following rules:
-
Option paths should return to the same paths where they originate.
-
Option paths cannot rejoin upstream processes.
-
You can attach a rework path to any process within the option path.
-
Option paths can return to the processes where they originate.
|
Note: You can delete a process only if it is not attached to a process synchronization or to any other path. |
4.2.1.1 Graphical Product Synchronization
The Graphical Product Synchronization program (PF30L703) enables you to design product synchronizations, as well as feeder, rework, and option paths, individually.
The Graphical Product Synchronization uses the Scalable Vector Graphics (SVG) Adobe Viewer for displaying the graphics that are associated with the product synchronization. The program automatically detects the SVG Viewer if it is already installed for the browser. If the SVG Viewer is not installed for the browser, the system displays a link that you can use to install the SVG Viewer from the Adobe website.
|
Note: SVG is a graphics file format and web development language based on XML that enables dynamic creation of high quality graphics with precise structural and visual control. It is based on standards that are defined by the World Wide Web Consortium (http://www.w3.org/TR/SVG/). |
See Adobe SVG Viewer Download Area, http://www.adobe.com/svg/viewer/install/main.html.
You access the graphical functionality of this tool by clicking any of the buttons at the top of the graphical interface. These buttons are available depending on where you are on the product synchronization and based on the rules that are defined for the different path types. When you start to create a product synchronization, the only option that is available to you is to insert a process. When revising an existing product synchronization, you must select the process that you want to attach a path to and then select an available option based on the rules. For example, if you select a rework path, the button for attaching an option path is disabled because you cannot attach an option path to a rework path. The graphical product synchronization enables you to perform the following actions:
-
Insert and remove a process.
-
Edit a process.
-
Attach a feeder path.
-
Attach a rework path.
-
Attach an option path.
-
Remove a path.
-
View path and process properties.
When you click any of the buttons for inserting processes or attaching paths, the system displays forms that list the processes or paths that are available for adding to the product synchronization. Because you have already defined default yield, rework, and scrap percentages for processes, the system prompts you to edit or accept these values when you add a process to the product synchronization. When you add a rework path, the system prompts you to enter the following values:
-
Rework percent.
-
Number of rework loops.
The system provides a method to control the display of the graphical product synchronization. As the structure becomes more complex, paths may overlay each other, making it more difficult to differentiate them from adjacent paths. To make a given path or process more visible, you can selectively dim the display of surrounding product synchronization paths and processes. You have the following options to control the display of the graphical product synchronization:
-
Dim Mode: Dim a selected path and its child paths.
-
Un-Dim Mode: Undim a selected dimmed path, as well as its child and parent paths.
-
Dim All: Dim all paths except the main paths.
-
Un-Dim All: Undim all dimmed paths.
If you navigate out of the graphical product synchronization to another form, using a form interconnect, for example, to add paths or to switch to the tabular view, the system preserves the dim state of all paths. When you return to the graphical product synchronization, all the paths that were dimmed before are still dimmed. If you leave the Manage Product Synchronizations form, the dim settings that you specified are lost.
You do have the option to save the dim settings that you specified before closing the application. When you save the dim settings for a product synchronization, the program saves the selected product synchronization with the dim settings for each component to the Graphical Product Synch Properties table (FF30L705).
When you return to the application and retrieve a graphical product synchronization that you previously saved with specific dim settings, the system retrieves these settings from the table and displays them as they were when you saved them in the previous session.
The program also offers a tabular view of product synchronization. You can use this view to create or revise a product synchronization as well. In the tabular view, the system indicates for each process that you have included in a path whether a feeder, option, or rework path is attached. When you attempt to attach a feeder, rework, or option path where the rules do not permit you to do so, the system issues an error message.
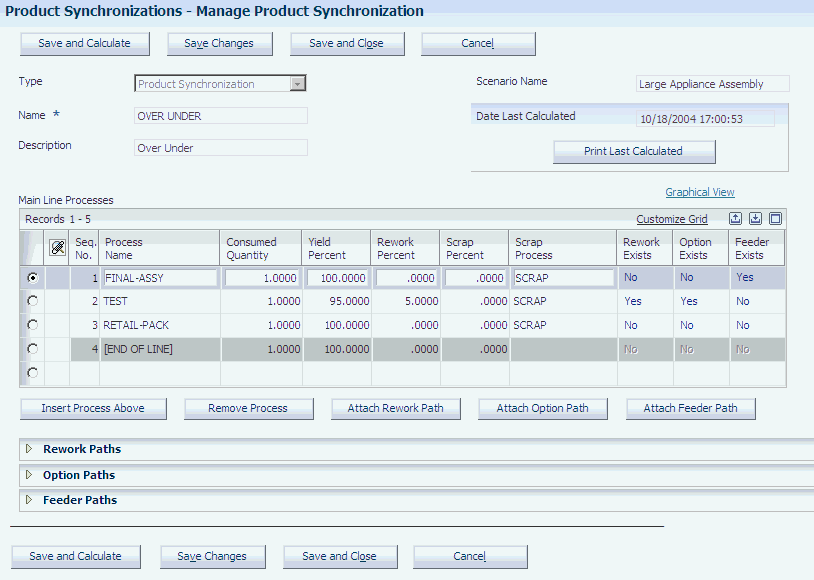
4.2.1.2 Calculating Throughput and Output
After you have added all the processes and paths that you need to the product synchronization, you can calculate the planned throughput percentage, planned output percentage, and planned scrap percentage for all the processes that are included in the product synchronization. You calculate these values when you click the Save and Calculate button on the Manage Product Synchronizations form. To view the product synchronization and the calculation results, print the Product Synchronization Results report (RF30L704).
The product synchronization calculation is based on a derivative method of determining the flow within a capacitated network. You enter a value called X at the start of the line. Each process processes a certain quantity of X and sends it to the next process on the path or line. The proportion of X that is carried forward to the next process is based on the percentage of yield that is defined for the process. It also depends on what rework, option, and scrap factors you have defined for the process. For example, a process with 100 percent yield and no option, rework, or scrap passes 1 (X) to the downstream processes. The amount of X that reaches the end of the line is used to calculate the final X factor. For example, if .875X (87.5 percent) of the product reaches the end of the line, then the X factor is calculated like this: 1 ÷ .875 = 1.14286. This factor is then applied to the starting process to determine the associated throughput, output, and scrap percentages for each process.
The following product synchronization diagram shows an example of a main line with one rework and one option path:
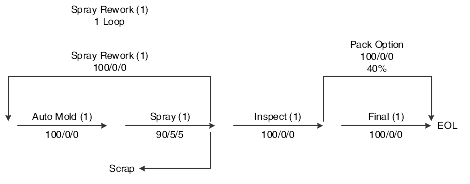
You calculate throughput, output, and scrap using the following steps:
-
Wet the line with X number of units.
The auto mold process has a yield of 100 percent. Thus, both throughput and output remain at X.
The spray process has a throughput of X. However, because it has 5 percent scrap and 5 percent rework, a quantity of 0.05X leaves the system as scrap. 0.05X is rework. That means that the net output of the spray process to inspection is 0.95, consisting of the 0.9X net usable output from spray plus 0.05X from the spray rework path.
The inspect process has 100 percent yield; therefore, its throughput and output is 0.9X.
Forty percent of the inspect process output goes to the pack option path. You calculate the amount of inspect process output that is going through the option path like this: 0.9X × 40% = 0.36X. The remaining 0.54X of the inspect process output goes through the final process.
The following table summarizes the calculations for each process:
Process Throughput Output Automold X X Spray X 0.95 Scrap 0.05 X 0.05X Spray Rework 0.05X 0.05X Inspect 0.9X 0.9X Final 0.54X 0.54X Pack Option 0.36X 0.36X -
Walk through the line again, taking into account all rework and using the following conditions:
-
Quantities that flow through a process a second time, because the number of rework loops is set to one, are not reworked or scrapped.
-
In addition to the rework quantity, new product is now flowing through the line.
The auto mold has new product input of X plus 0.05X coming in as rework. Throughput and output for this process thus equal 1.05X.
The spray process has a throughput of 1.05X. Because 0.05X (input from rework) is not reworked or scrapped, this quantity moves on to the inspect process. The new product input of X, however, does have to go through scrap and rework. Thus, you calculate the net output of the spray process like this: 0.9X (new output to inspect) + 0.05X (new product scrap) + 0.05X (old rework from auto mold) = X.
Throughput and output for the inspect process is 0.95X (new product output from spray + old rework output of spray).
The pack option path takes 40 percent of this output. Hence, its throughput and output are both 0.38X.
The final process takes the remaining 0.57X as its throughput. Because it has a 100 percent yield, its output is 0.95X as well.
-
-
Set the output at the end of the line to 1 and solve for X.
The end of the line has as its input 0.95X. Because the quantity at the end of the line is assumed to be Dc, 0.95X equals Dc. If you set Dc to 1 and solve for X, the result is X = 1.05263. You calculate the throughput and output for each process based on this value.
The following table displays the calculated values:
| Process | Path | Auto Mold | Spray | Spray Rework | Scrap Percent | Inspect | Pack | Final | End of Line |
|---|---|---|---|---|---|---|---|---|---|
| Main Path | Main | Main | Main | NA | NA | Main | NA | Main | Main |
| Feeder Path | NA | NA | NA | NA | NA | NA | NA | NA | NA |
| Rework Path | Spray Rework | NA | NA | Spray Rework | NA | NA | NA | NA | NA |
| Option Path | NA | NA | NA | NA | NA | NA | Pack | NA | NA |
| Input/ Output | NA | 1.05X/ 1.05X | 1.05X/1X | 0.05X/ 0.05X | 0.05X/0 | 0.95X/ 0.05X | 0.38X/ 0.38X | 0.57X/ 0.57X | 0.95X |
4.2.3 Common Fields Used in This Section
- Print Last Calculated
-
Click to print the Product Synchronization Results report (RF30L704).
- Save and Calculate
-
Click to calculate throughput, output, and scrap percent for each process and save the product synchronization. You have to calculate the product synchronization to make it available for line design.
Note:
If you make changes to a product synchronization, you have to recalculate it. Otherwise, the changes are not available to other applications. If you have associated process maps with a product synchronization, you have to save the changes to each process map. - Save Changes and Save and Close
-
Click either one of these buttons to save the changes that you made to the product synchronization; however, the system does not perform the calculations.
- Yield Percent, Rework Percent, and Scrap Percent
-
Set up the default values for these fields in the Process Master program (PF30L701). When you attach the process to a path, you can override these values for this specific path on the Edit Process Properties form or on the tabular view for the product synchronization.
4.2.4 Forms Used to Define a Product Synchronization
4.2.5 Defining Processes
Access the Search for Process form. Click Add.
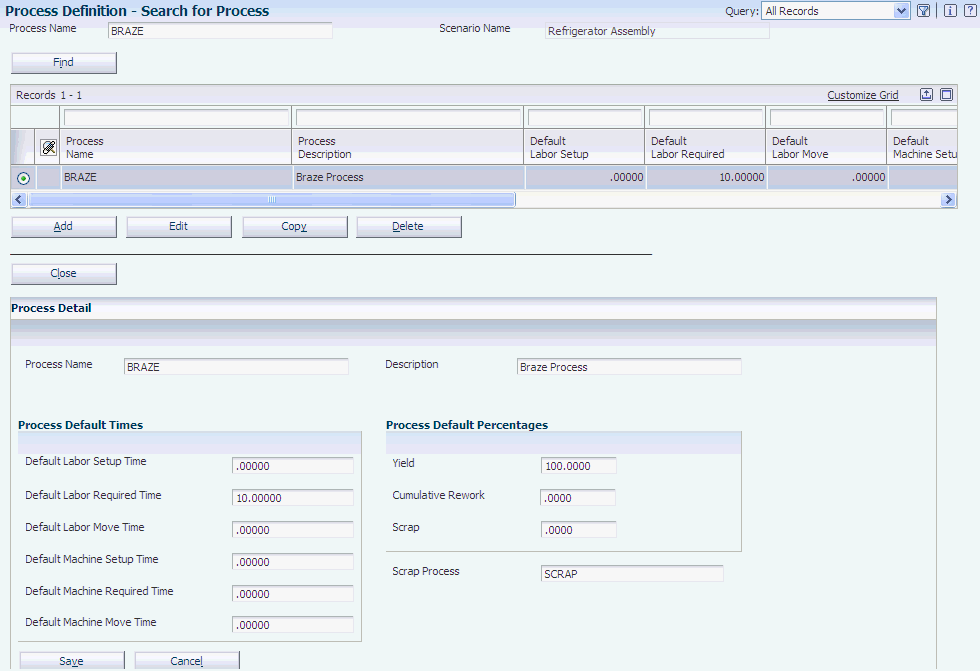
- Process Name
-
Enter the a name for the process that is unique within JD Edwards EnterpriseOne Demand Flow Manufacturing. When you define a process, the system automatically attaches a default labor and a default machine resource to the process.
- Work Center
-
Enter a work center for the process that you are defining. You can select only work centers of type 0 (standalone work center).
- Default Labor Setup Time, Default Labor Required Time, and Default Labor Move Time
-
Enter values for the labor operations that are used in a process.
The values that you enter in these fields are for reference only.
- Default Machine Setup Time, Default Machine Required Time, and Default Machine Move Time
-
(Optional) Enter values for the machine operations that are used in a process.
The values that you enter in these fields are for reference only.
- Scrap
-
Enter the name of the scrap process to be used as a default when you are creating or updating paths.
4.2.6 Setting Processing Options for Path Revision (PF30L702)
These processing options control default processing for the Path Revision program.
4.2.6.1 Defaults
These processing options control the default display of the Manage Product Synchronizations form.
- 1. Path Type (Required)
-
Specify path type this form is set up for when you access the form. Values are:
FD: Feeder path.
OP: Option path.
PS: Product synchronization.
RW: Rework path.
SA: Select all.
These values are stored in the Path Type Selection Filter UDC table (F30L/PS). If you leave this processing option blank, the system uses PS as the default value.
4.2.6.2 Versions
This processing option controls the version that the system calls when you run the following program from the Graphical Product Synchronization program:
- 1. Product Synchronization Results (RF30L704)
-
If you leave this processing option blank, the system uses the default version XJDE0001.
4.2.6.3 Process
This processing option controls whether you can remove a process from a full product synchronization.
- 1. Remove Process on Full Product Synchronization
-
Enter 1 to enable this functionality. If you enable this functionality, you can remove processes from the main path, feeder paths, option paths, and rework paths.
If you leave this processing option blank, you can remove processes only from the main path, but not from the attached paths.
Note:
If you remove a process from a path that appears more than once in the same product synchronization, or that appears in multiple product synchronizations, this change affects every instance of this path.After you remove the last process from a path, the path is deleted.
4.2.7 Adding a Product Synchronization
Access the Select Product Synchronization form. Click the Add button.
Enter a name and description for the product synchronization that you are creating. You access different versions of the same program to define option, feeder, and rework paths.
4.2.8 Creating a Graphical Product Synchronization
Access the Manage Product Synchronizations form.
Figure 4-4 Manage Product Synchronizations form

Description of "Figure 4-4 Manage Product Synchronizations form"
When you access the forms for creating feeder, option, and rework paths, the program offers the same fields and functions.
- View Path Properties
-
Click to view path name, description, and path type.
- View Process Properties
-
Click to view process name, description, and sequence number on the path. You can also review process attributes, such as consumed quantity, yield, rework, and scrap percent.
- Insert Process
-
Click to open the Select Process name form. Select the process that you want to insert into the product synchronization.
- Remove Process
-
Select a process and click this button to remove the process. If you have set the processing option to prevent process deletion, this button is disabled for processes on attached paths.
You can delete processes from the main path, even if you have set the processing option to prevent process deletion. However, you cannot delete main line processes if you have attached other paths to these processes.
- Edit Process
-
Click to access the Edit Process Properties form. You can change the consumed quantity and the scrap percent value.
- Attach Feeder
-
Select a process to which the system enables you to attach a feeder path, and click this button. Select the feeder path that you want to attach from the Attach Feeder Path form.
- Attach Rework
-
Select a process to which the system enables you to attach a rework path, and click this button. Select a rework path from the Attach Rework Path form, and enter the rework percentage and number of rework loops.
- Attach Option
-
Select a process to which the system enables you to attach an option path, and click this button. Select an option path from the Attach Option Path form, and enter the design and planned percent values.
- Remove Path
-
Click to remove a selected path from the product synchronization.
- Enable Dim Mode
-
Click to enable you to dim selected paths in the product synchronization. After clicking this button, select a path, and the system lowers the display intensity of the path, as well as its child paths. Disable this mode to return to the normal product-synchronization mode that enables you to select, insert, attach, or remove processes or paths.
- Un-Dim Mode
-
Click to enable you to return selected paths in the product synchronization to their original intensity. After clicking this button, select a path, and the system returns the selected path, its child, and its parent paths to their original intensity.
Important:
The system does not undim sibling paths. For example, if a parent path and its two child paths are dimmed and you select one child, the system undims this child path and the parent path, but not the other child path.Disable this mode to return to the normal product-synchronization mode that enables you to select, insert, attach, or remove processes or paths.
- Dim All Paths
-
Click to dim all paths except the main path. You can insert or remove processes and paths. If you attach a path to a dimmed path, the path that you attach is also dimmed.
- Un-Dim All Paths
-
Select to undim all paths that were previously dimmed.
- Save and Close
-
Click to save the product synchronization. Clicking this button also saves the dim path settings. To save the dim path settings, the program calls the
Set PSYNC View Tablesystem function to pass in the name of the Graphical Product Synch Properties table (FF30L705) and save the dim path settings to the Graphical Product Synch Properties table. - Tabular View
-
Click if you want to review and edit the product synchronization in a table. The system prompts you to save the graphical view before switching to the tabular view. When you switch back to the graphical view, you are prompted to save again.
Note:
Ensure that you add the end-of-line process before you switch to the tabular view. If you do not include an end-of-line process, the system does not save the product synchronization when you switch to the tabular view.
4.2.9 Editing Product Synchronizations in the Tabular View
Access the Manage Product Synchronization form.
Figure 4-5 Manage Product Synchronization form (1 of 2)
Description of "Figure 4-5 Manage Product Synchronization form (1 of 2)"
Figure 4-6 Manage Product Synchronization form (2 of 2)
Description of "Figure 4-6 Manage Product Synchronization form (2 of 2)"
- Insert Process Above
-
Select a process, and click this button to insert a process on the path before the selected process.
- Remove Process
-
Select a process, and click this button to remove the process.
When you click this button, the system does not remove the process from the database. When you click any of the save buttons, the system saves the changes to the database and refreshes the sequence numbers.
- Attach Rework Path
-
Select the process to which you want to attach a rework path, and click this button to select the path. Select the rework path that you want to attach on the Search and Select Rework form. The system expands the Rework Paths tab and enters the selected rework path in the grid.
Define the rework percentage and number of loops for the rework path, and select the consuming process. You can select only a consuming process that is an upstream process or the process where the rework path originates.
- Attach Option Path
-
Select the process to which you want to attach an option path, and click this button to select the path. Select the option path that you want to attach on the Search and Select Option form. The system expands the Option Path tab and enters the selected option path in the grid. Define the planned and designed percentage for the option path, and select the consuming process.
The planned percent value identifies the maximum percentage that is required to go through the option line. The design percent value is used by the product synchronization and represents the quantity that you would typically expect through the option path.
You can select only a consuming process that is downstream from the process where the option path originates.
- Attach Feeder Path
-
Select the process to which you want to attach a feeder path, and click this button to select the path. Select the feeder path that you want to attach on the Search and Select Feeder form. The system expands the Option Path tab and enters the selected feeder path in the grid. Define the consumed quantity that the feeder path feeds into the main line.
- Apply Changes
-
Click to display the changes on the form. The system does not save the changes until you click any of the Save buttons on the form.
- Rework Exists, Option Exists, and Feeder Exists
-
These fields indicate whether rework, option, or feeder paths are currently attached to a process.
4.2.10 Revising Process Properties
Access the Edit Process Properties form.

- Consumed Quantity
-
Enter the quantity that this process receives from the previous process or a feeder in the product synchronization. This value has to be greater than 1; otherwise, the system issues an error message.
- Update PSync (update product synchronization)
-
Click to apply the changes to the product synchronization.
4.3 Setting Up Mixed Model Families
This section provides an overview of mixed model families and discusses how to set up mixed model families.
4.3.1 Understanding Mixed Model Families
A mixed model family of products is a group of products with similar characteristics. Because of these similarities, these products can share production processes. After you have defined mixed model families using the Mixed Model Family Definition program (PF30L101), you attach them to product synchronizations that define the relationship of processes in a flow to produce the family of products. You can set up option paths on the product synchronizations to define the processes that are required to produce product variations, for example, different product colors.
In addition, you can define a mixed model family by similar total times by product, similar total times by process, and common materials.
4.3.2 Form Used to Set Up Mixed Model Families
4.3.3 Setting Up Mixed Model Families
Access the Edit a Mixed Model Family form.
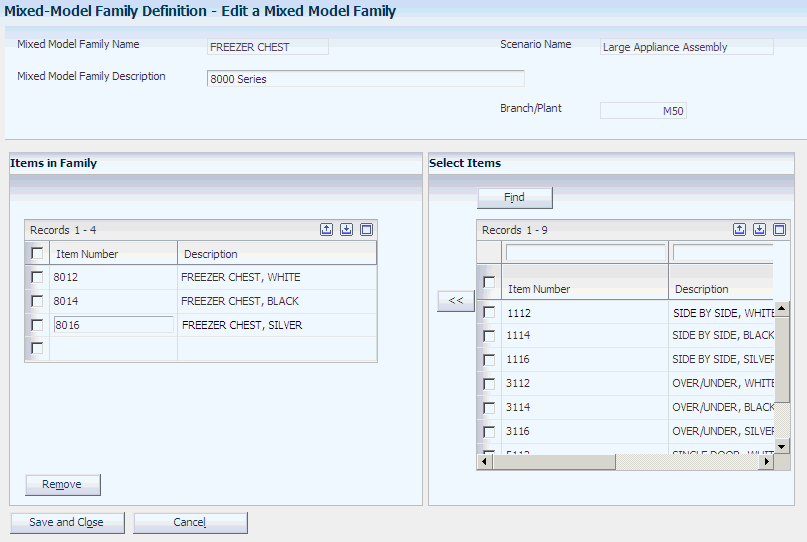
- Mixed Model Family Name
-
Enter a name for the mixed model family of products that you are defining based on common processes and materials. You can delete a mixed model family only if you have not yet associated it with a volume design.
- Branch/Plant
-
Enter the branch/plant for the mixed model family that you are defining. You can associate products with only the mixed model family that shares the same branch/plant.
- Associate Items
-
Click to retrieve items from the DFM Item Definition Master table (FF30L501) and include them in the mixed model family that you are setting up. The available items appear in the Select Items grid. The grid displays only items that belong to the same branch/plant as the mixed model family that you are setting up.
Use the arrow button to add items from the Select Items grid to the mixed model family. The items that are included in the mixed model family appear in the Items in the Family grid. The items that you add to the mixed model family are stored in the Mixed Model Family Items table (FF30L102).
4.4 Creating a Volume Design
This section provides an overview of volume design, lists prerequisites, and discusses how to:
-
Set processing options for Volume Design and Product Synchronization (PF30L201).
-
Assign demand at capacity to a mixed model family.
-
Define independent demand for products.
-
Set processing options for EMD Exploded BOM Processing (PF30L153).
-
Calculate dependent demand for subassemblies.
-
Assign a product synchronization to an item.
4.4.1 Understanding Volume Design
Demand at capacity (Dc) is the highest targeted volume of product, as defined by management, to be produced on a manufacturing line, typically in one day. You use Demand Flow techniques to create a line design that supports output to match demand at capacity.
The Volume Design and Product Synchronization program (PF30L201) enables you to:
-
Define demand for mixed model families and products within each family.
-
Define demand for subassemblies that are used to build products.
-
Assign a product synchronization to each product.
When you define a volume design, you associate it with one or more mixed model families and enter the volume for each mixed model family. The system stores this volume assignment in the FF30L202 table.
You can qualify the volume that you enter by assigning one of the following demand types:
-
Statistical/historical percent.
-
Target capacities.
-
User-defined.
|
Note: Currently, you can use only target capacities as a demand type. |
After assigning a volume on the mixed-model family level, you specify the demand for products within mixed model families. The system provides two methods for entering demand for individual products:
-
Assign individual product volume as a percentage of the mixed-model family volume.
To assign volumes to individual products in a mixed model family, you must select the products that you want to include. The percentages that you assign to the selected items have to add up to 100 percent.
-
Enter independent demand as an absolute value for each individual item.
If you enter independent demand quantities for individual products, the system automatically calculates the percentages for the selected products within the mixed model family out of 100 percent and recalculates the mixed-model family volume.
In addition to specifying the independent demand for the products in a mixed model family, you can also use the Volume Design and Product Synchronization program to calculate the demand for the manufactured items that are required to build the products in the mixed model family. Running the bill-of-material explosion calculates the dependent demand for the subassemblies. The system stores the subassemblies and their dependent demand in the FF30L203 table, in addition to the independent product demand.
|
Note: The system displays the manufactured items in the grid, but not the purchased components. |
You can add independent demand to the dependent demand for subassemblies if you want to use subassemblies as field replacement units (FRU). For these subassemblies, the system calculates total demand by adding independent and dependent demand. If a parent item and its subassembly are included in the same process map, then the component is treated as a phantom item. To maintain the relationship between parent and subassembly, they need to be included in different process maps.
|
Note: If no bill of material explosion has been performed or if it is outdated, the system sets the dependent demand to 0. |
After defining a volume design, you assign product synchronizations to the products in the mixed model family. Having defined independent and dependent demand for subassemblies, you can assign product synchronizations to them as well. Subassemblies can have product synchronizations that are different from their parent items.
The system enables you to delete a volume design provided that it is not used by any process map.
4.4.2 Prerequisites
Set up the following information:
-
Mixed model families.
-
Bills of material for the products in the mixed model families.
-
Product synchronizations.
4.4.3 Forms Used to Create a Volume Design
4.4.4 Setting Processing Options for Volume Design and Product Synchronization (PF30L201)
These processing options control default processing for the Volume Design and Product Synchronization program.
4.4.4.1 Versions
This processing option controls the version that the system calls when you run the following program from the Volume Design and Product Synchronization program:
- Enhanced Material Definition Explosion (PF30L153)
-
If you leave this processing option blank, the system uses version ZJDE000.
4.4.5 Assigning Demand at Capacity to a Mixed Model Family
Access the Add Volume Design form.
- Volume Design Name
-
Enter a name for the volume design that you are defining.
- Volume Selection
-
Enter the demand type on which you want to base the volume design. Values are:
S: Statistical/historical percent.
T: Target capacities.
U: User-defined.
The system stores these values in the Demand Type UDC table (F30L/DT).
Note:
Currently, only target capacity is available as a demand type. - Mixed Model Family
-
Select the mixed model family that you want to associate with this volume design. You can add multiple mixed-model families to the volume design.
If an item appears in more than one mixed model family that you selected for the current volume design, the system prompts you to identify the mixed model family under which you want to categorize the item.
- Volume for Family
-
Enter the volume for the family. You can distribute this volume among the products that are included in the family.
- Remove Family
-
Click to remove a family from a volume design.
- Edit Item Factors
-
Click to access the Product Volumes by Family form.
4.4.6 Defining Independent Demand for Products
Access the Product Volumes by Family form.
Figure 4-9 Product Volumes by Family form

Description of "Figure 4-9 Product Volumes by Family form"
- Volume % (volume percent)
-
Select the product and complete this field if you want to assign a volume percentage to any product in a product family. If the percentages that you enter for the products in a product family add up to less than 100 percent, the system issues an error message.
- Additional Item Factors
-
To assign individual product volumes without assigning percentages by product family, select the product for which you want to define independent demand and click this button to populate the grid in the Define Item Volume, Assign Product Synchronization, and Explode BOM region of the form. You can now edit the product volumes.
- Independent Demand
-
This field displays by default the independent demand calculated like this:
Volume % for the Parent Item × Volume for the Mixed Model Family of that Parent Item.
You can override this value. If you change this value, the system recalculates the values in the Volume %, as well as the Mixed Model Family Volume, column.
4.4.7 Setting Processing Options for EMD Exploded BOM Processing (PF30L153)
Use Interactive Versions (P983051) to access these processing options.
4.4.7.1 Edits
These processing options control how the system runs the bill-of-material explosion from the Volume Design and Product Synchronization program (P30L201) using the BF30L153 business function.
- As of Date
-
Specify the date that you want the system to use when selecting bills of material for effectivity checking. If you leave this processing option blank, the system does not check effectivity dates.
- Type Bill of Material
-
Specify the bill-of-material type that the system uses when searching for bills of material. Do not change the default value. Values are:
M: Standard manufacturing bill.
RWK: Rework bill.
SPR: Spare parts bill.
The system stores these values in the Bill Type UDC table (40/TB).
The system does not select bills of material based on revision level. The EMD Explosion function does not explode demand for fixed quantity components if the dependent demand for these components is greater than 0.
- Use Batch Bills
-
Specify whether the system uses batch bills. If you leave this processing option blank or set it to 1, the system uses the bill of material with the highest batch quantity to build product for the aggregate demand. For any remaining demand, you use the zero-batch bill.
If you set this processing option to 0, the system uses the zero batch bill quantity.
4.4.8 Calculating Dependent Demand for Subassemblies
Access the Product Volumes by Family form.
- Explode BOM and Save (explode bill of material and save)
-
Click to run the Enhanced Material Definition Explosion business function (BFF30L153). This process extends the independent demand for each parent item to its components by exploding the bill of material. If you have defined a shrink factor for the parent item, the component demand is inflated accordingly.
- Dependent Demand
-
Displays the dependent demand for subassemblies after you have run the BOM Explosion.
- Total Demand
-
Displays the sum of the dependent demand and the independent demand volume.
4.4.9 Assigning a Product Synchronization to an Item
Access the Product Volumes by Family form.
- Assign Product Synchronization
-
Click to assign a product synchronization to the selected item. The system displays the Search and Select Product Synchronization form, where you can select an existing product synchronization.
- Unassign Product Synchronization
-
Select an item record, and click this button to remove the product synchronization from the record.
4.5 Defining Sequence of Events
This section provides an overview of sequence of events, lists common fields, and discusses how to:
-
Define standard tasks.
-
Set processing options for Standard Sequence of Events (PF30L110).
-
Define a standard sequence of events.
-
Add tasks to a standard sequence of events.
-
Set processing options for Sequence of Events (PF30L115).
-
Define a sequence of events.
-
Define sequence-of-events details.
-
Attach consumed components to a sequence-of-events task.
4.5.1 Understanding Sequence of Events
The sequence of events (SOE) is one of the essential techniques of process definition in JD Edwards EnterpriseOne Demand Flow Manufacturing. It defines the work and quality criteria that are required to build a product in a specific production process. It lists the flow of tasks that are required to produce a product according to its product and process design specifications. The sequence of events drives the operational definition and is the basis for all work, line design, and mixed model planning, as well as the operation sheet design.
You define a sequence of events with all the tasks that it contains for every process that is included in the product synchronization for a specific product. The system provides you with the following tools to simplify and streamline the sequence-of-events definition:
The use of these tools is optional; however, they can be useful if the production processes contain standard tasks that are used in multiple processes and if you have products that share several work steps that could be defined in an SSOE.
Before you create an SOE or SSOE, you can define tasks that you have identified as standard tasks using the DFM Task Master program (PF30L005). Tasks may include the following information: task name and description, resource type, default times required for setup, move, and work performed by labor and machine resources. After you have defined the task, you assign resources to the task. You can also define Total Quality Control (TQC) criteria for every task. When you add a previously defined task to an SOE or SSOE, you can modify the times for the specific SOE or SSOE.
|
Note: You can define a task as value-added or non-value added. When you work with operational definition, you can use this task characteristic as a criterion for deciding whether to include the task in the operational definition. |
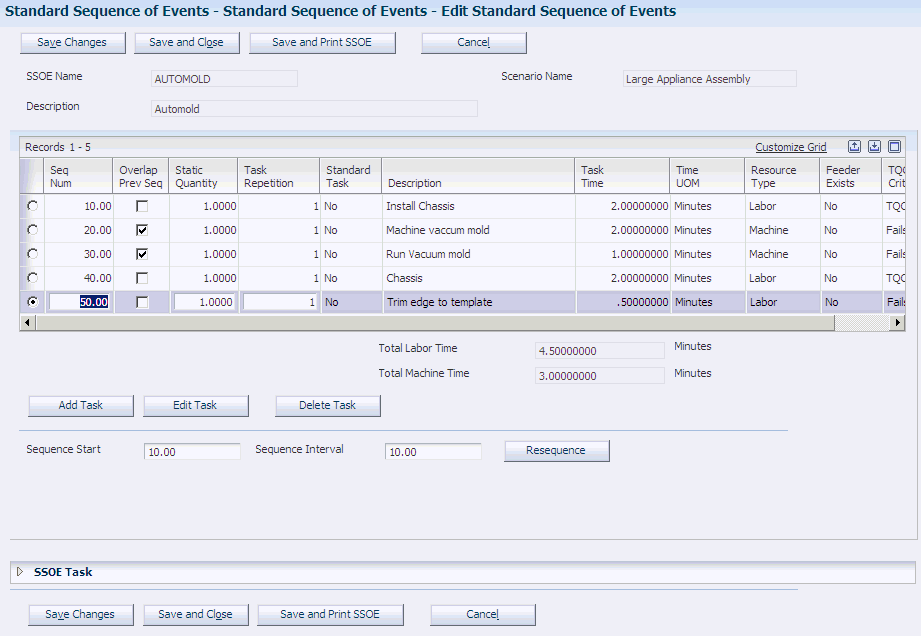
If you manufacture products that have shared production processes, you use the Standard Sequence of Events program (PF30L110) to define standard sequences of events for those processes. The advantage of a standard sequence of events is that you can reuse it for multiple products because you do not associate it with a specific product.
You create the actual sequence of events for a process and product using the Sequence of Events program (PF30L115). The system provides you with three methods for creating a sequence of events for a product:
-
Set up the sequence of events and manually attach the required tasks.
-
Copy a standard sequence of events into the new sequence of events.
-
Copy an existing sequence of events from an associated item.
You can create a sequence of events by manually attaching the required task information, or you can copy a standard sequence of events into a sequence of events. After you have copied the SSOE to the SOE, you can modify the information in the Sequence of Events program. To copy an existing sequence of events, you select an associated item that has a similar sequence of events. After you have associated this item with the sequence of events, the system retrieves that item's sequence of events and copies it into the new sequence of events.
|
Important: If you change any of the following values on a sequence of events with an associated item, the system changes the values on all sequences of events with the same associated item: sequence number, task repetition, overlap previous, internal/external, value add, work type, static quantity, and resource name. |
When you associate tasks with an SSOE or SOE, you can select predefined standard tasks from the FF30L005 table, or you can add nonstandard tasks in the Sequence of Events program or the Standard Sequence Events program. Nonstandard tasks do not have a task name. When you save tasks to the SOE or SSOE, they are stored in the F30L005 table with the standard task property set to N. After creating an SSOE or SOE, you can resequence tasks, for example, when you want to insert a new task in the existing sequence.
As you add tasks to an SSOE or SOE, the system automatically calculates total labor and machine time. The calculation takes into account any overlap that is defined between tasks. The system stores the calculated labor and machine time totals for each process in the FF30L117 table.
When you associate tasks with the sequence of events that you are defining, the Sequence of Events program enables you to associate the components that are consumed by a task with that task. You create the association by selecting the component item number from the product's bill of material. The system stores the association in the FF30L116 table. If you change the task sequence, the components move with the task. If you copy a sequence of events, the system copies only those components that exist on the bill of material of the sequence of events to which you copy the information. If a component does not exist, you have to add it manually afterwards.
When you have completed a sequence of events, you can print the results in the Sequence of Events report (RF30L115). If you create a standard sequence of events, you can generate the Standard Sequence of Events - Print report (RF30L110).
4.5.2 Common Fields Used in This Section
- Feeder Exists
-
Complete this option field for the standard sequence of events or sequence of events to indicate whether a feeder feeds into this path. If you indicate that a feeder exists, you can specify the path name of the feeder, the number of the item that is produced on the feeder path, and the branch/plant.
- Internal/External
-
Select a UDC (F30L/IE) to determine whether the machine setup for move or setup tasks is internal or external. Values are:
I: Internal.
X: External.
If you change this field in the sequence of events, the system applies these changes to any associated item's sequence of events.
- Overlap Previous
-
Indicate whether a task can overlap the previous task. Tasks can overlap. It is not necessary to complete one task before starting the next task. If you change this field in the sequence of events, the system applies this change to the associated item's sequence of events.
- Resequence
-
Click to resequence the standard sequence of events or sequence of events based on the parameters that you entered in the Sequence Start and Sequence Interval fields.
- Resource Name
-
Select the name of the resource for this task. This name must be unique within the scenario. If you change this field in the sequence of events, the system applies these changes to the associated item's sequence of events.
- Resource Type
-
Displays the type of resource that you have selected: machine or labor.
- Sequence Number
-
Indicates the order in which the tasks in the sequence of events are performed. The sequence number must be unique. The default value is 10.00. You can set up a default value in the Scenario Master program (PF30L010). If you change this field in the sequence of events, the system applies these changes to the associated item's sequence of events.
- Sequence Interval
-
Indicates the value for incrementing task sequence numbers when you resequence tasks.
- Sequence Start
-
Indicates the sequence number for the first task when you resequence tasks.
- Standard Task Name
-
Displays the name that identifies a standard task within JD Edwards EnterpriseOne Demand Flow Manufacturing. Only standard tasks have names. If you add a nonstandard task, this field remains blank.
The system does not enable you to rename a standard task to turn it into an new standard task. Because this field is locked, you have to delete the task and create a new task. You also cannot change a nonstandard task into a standard task.
- Static Quantity
-
Enter the number of items or batch quantity for the task. For example, if you have to move products on a pallet in groups of 12, you define a static quantity of 12. The default value is 1. If you change this field in the sequence of events, the system applies this change to the associated item's sequence of events.
- Task Repetition
-
Enter a value that indicates the number of times that a task is repeated. The default value is 1. If you change this field in the sequence of events, the system applies this change to the associated item's sequence of events.
- Task Time
-
Enter the amount of time that is required to perform the work of the task. If you change this field in the sequence of events, the system applies this change to the associated item's sequence of events.
- Time UOM (time unit of measure)
-
Select the unit of measure to use for displaying the task time. Values are:
S: Seconds.
M: Minutes.
H: Hours.
The system stores these values in the Work Content Time UDC table (F30L/WC). If you change this field in the sequence of events, the system applies this change to the associated item's sequence of events.
- Total Labor Time
-
As you add tasks to the SSOE or SOE, the system calculates the total time that is consumed by all tasks that are using labor resources. The system calculates the total time of each task like this: Total Task Time = (Task Time * Task Repetition) / Static Quantity. The system stores this value for the process in the FF30L117 table.
- Total Machine Time
-
As you add tasks to the SSOE or SOE, the system calculates the total time that is consumed by all tasks that are using machine resources. The system uses the same calculation for total task time as it does for labor resources. The system stores this value for the process in the FF30L117 table.
- TQC Criteria (total quality control criteria)
-
Enter a value that indicates the quality control criteria for the work that is being performed. Values are:
Failsafe: Only one way exists to perform the work; any other way is incorrect. This is the default value.
Verify: Multiple ways exist to perform the work, but only one way is correct. Document the correct method and verify it at the time the work is performed.
TQC: After performing work in the previous operation, validate it in a subsequent operation
If you change this field in the sequence of events, the system applies this change to the associated item's sequence of events.
- TQC Description (total quality control description)
-
Enter instructions on how to perform total quality control steps. If you change this field in the sequence of events, the system applies this change to the associated item's sequence of events.
- Value Added
-
Complete this field to indicate whether the task adds value to the end product. If you change this field in the sequence of events, the system applies this change to the associated item's sequence of events.
- Work Type
-
Select a value to specify the type of work that is being performed: Values are:
Required: Required labor or machine time represents the required steps that are performed by people or machines for the product to meet the specifications. Required labor and machine time may or may not be value added.
Setup: Setup time is work that precedes required machine or labor time. Setup time is always non-value added.
Move: Move time is the time that is spent in moving products or material through the process from the point where they are produced or introduced to the point where they are consumed. Move time may be either labor or machine time and is always non-value added.
If you change this field in the sequence of events, the system applies this change to the associated item's sequence of events.
4.5.3 Forms Used to Define Sequence of Events
4.5.5 Setting Processing Options for Standard Sequence of Events (PF30L110)
The processing options control default processing for the Standard Sequence of Events program.
4.5.5.1 Version
This processing option controls the version that the system calls when you run the following program from the Standard Sequence of Events program:
- 1. Standard Sequence of Events - Print (RF30L110)
-
If you leave this processing option blank, the system uses the default version, XJDE0001.
4.5.6 Defining a Standard Sequence of Events
Access the Add Standard Sequence of Events form.
- SSOE Name (standard sequence of events name)
-
Enter a unique name for the standard sequence of events within a scenario.
4.5.7 Adding Tasks to a Standard Sequence of Events
Access the Edit Standard Sequence of Events form.
Figure 4-11 Edit Standard Sequence of Events form
Description of "Figure 4-11 Edit Standard Sequence of Events form"
Complete the task fields for the standard sequence of events.
- Save and Print SSOE (save and print standard sequence of events)
-
Click to save the standard sequence of events and print a report using a version of the Standard Sequence of Events - Print program. You can also print the standard sequence of events from a link on the Search for Standard Sequence of Events form.
4.5.8 Setting Processing Options for Sequence of Events (PF30L115)
These processing options control default processing for the Sequence of Events program.
4.5.8.1 Version
This processing option controls the version that the system calls when you run the following program from the Sequence of Events program:
- 1. Sequence of Events - Print (RF30L115)
-
If you leave this processing option blank, the system uses the default version, XJDE0001.
4.5.9 Defining a Sequence of Events
Access the Add Sequence of Events Header form.
Figure 4-12 Add Sequence of Events Header form
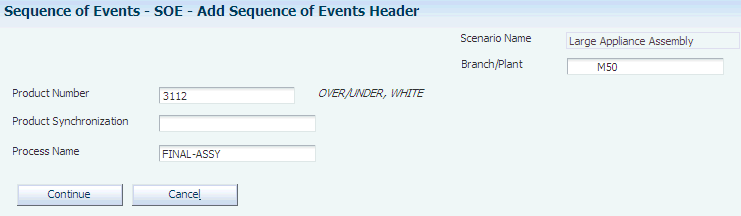
Description of "Figure 4-12 Add Sequence of Events Header form"
- Product Number
-
Enter the number of the product that is produced by the process for which you are defining a sequence of events.
- Product Synchronization
-
Enter the product synchronization that includes the process for which you are defining a sequence of events. The system does not store this value in the FF30L115 table.
- Process Name
-
Select the process from the chosen product synchronization for the sequence of events that you are defining.
4.5.10 Defining Sequence-of-Events Details
Access the Edit Sequence of Events form.

- Associated Item Number
-
Enter an associated item number if you want to copy the sequence of events information from another product. If you leave this field blank, the system uses the product number. When you tie a sequence of events to an associated item, the system writes a copy of the associated item's sequence of events to the FF30L115 table.
If you make changes to the associated item, the system deletes the sequence-of-events tasks from the table and attempts to copy the associated item's sequence of events. Before completing this action, the system issues a warning because the deletion is not reversible.
If you delete the associated item's sequence of events, any other sequences of events that are based on the associated item's sequence of events revert to their own product number.
- SSOE Name (standard sequence of events name)
-
(Optional) Enter the name of a standard sequence of events; the system ties the sequence of events to the standard sequence of events that is defined here. To retain the link, you can make only certain changes. You break the link if you:
-
Change the sequence number.
-
Add a new sequence-of-events task.
-
Change the standard sequence-of-events name.
You can delete a task without breaking the link between the sequence of events and the standard sequence of events. When you delete a task, it remains in the table, but is marked as deleted. You can view it, but not edit it. The deletion breaks the link between the two tasks. You cannot restore this link. If you change the sequence-of-events task, the sequence of events and standard sequence of events remain linked, but the link between the corresponding tasks is broken.
-
- Component Effective Date
-
Enter a date to indicate which components from the bill of material can be consumed in the sequence-of-events task. The default value is the current date.
Note:
Set this date and do not change it after attaching components to sequence-of-events tasks. Changing the date later may invalidate consumed component data. The system issues a warning when you change the date, but does not perform a validation. You can locate potential errors only on the Assign Components Consumed form for each task that consumes a component. - Component Consumed
-
Indicates whether the task consumes components from the bill of material. The default value is No.
- SSOE Comparison (standard sequence of events comparison)
-
If you have created the sequence of events based on a standard sequence of events, this field indicates whether you have modified the sequence-of-events task so that it differs from the original standard sequence-of-events task. Values are:
Blank: The sequence of events is not attached to a standard sequence of events.
SSOE (standard sequence of events): The sequence of events is attached to a standard sequence of events, but you have not modified the task.
SSOE Deleted (standard sequence of events deleted): You have deleted the task.
SSOE Changed (standard sequence of events changed): You have changed the line.
- Save and Print
-
Click to save the sequence of events and print a report using a version of the Sequence of Events - Print program.
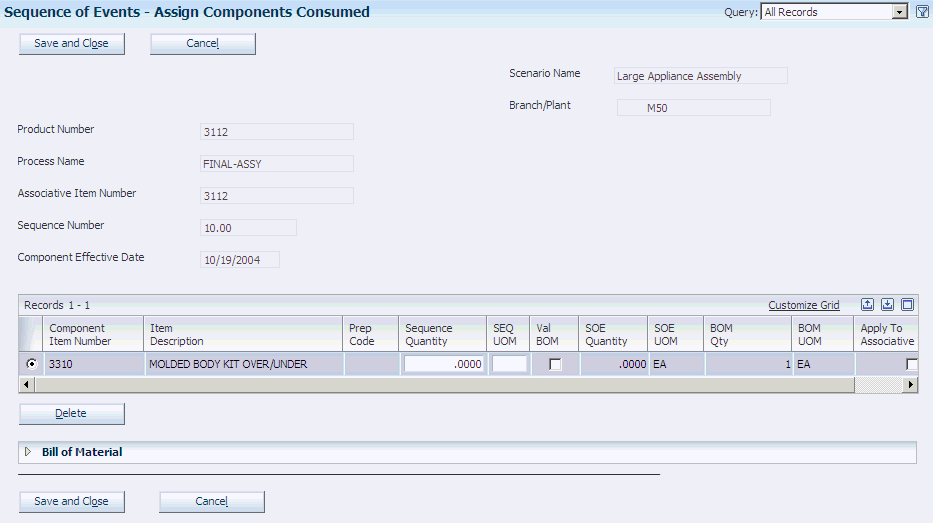
4.5.11 Attaching Consumed Components to a Sequence-of-Events Task
Access the Assign Components Consumed form.
Figure 4-14 Assign Components Consumed form (1 of 2)
Description of "Figure 4-14 Assign Components Consumed form (1 of 2)"
Figure 4-15 Assign Components Consumed form (2 of 2)
Description of "Figure 4-15 Assign Components Consumed form (2 of 2)"
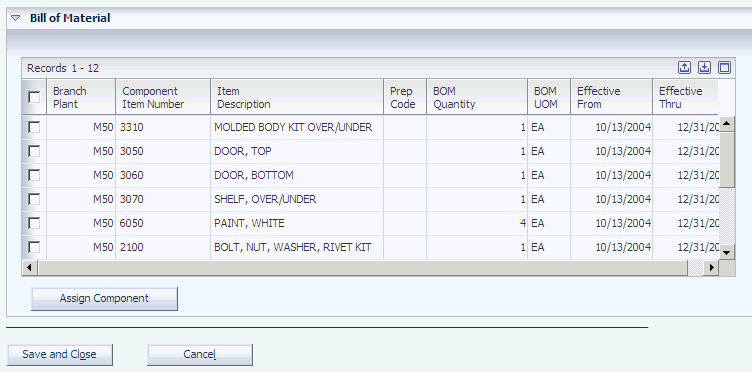
- Assign Component
-
Select a component from the bill of material and click to associate the component with the sequence of events task.
- Component Item Number
-
Identifies the component from the bill of material for the product. This component can occur only once for a sequence-of-events task. It can occur more than once if it has different prep codes. The system enables you to select components only from a bill of material that meets the following conditions:
-
The scenario matches the current user scenario.
-
The parent item matches the product of the sequence of events.
-
The branch/plant matches the sequence-of-events branch/plant.
-
The bill of material type is M.
-
The batch quantity equals 0.
-
The sequence number of the substitute item equals 0.
-
No co-product or by-product or immediate product exists.
-
The component effective date on the sequence of events is greater than or equal to the component's effective from date.
-
The component effective date on the sequence of events is greater than or equal to the component's effective through date.
-
- Sequence Quantity
-
Enter the quantity of the component that is consumed by the sequence-of-events task.
- SEQ UOM (sequence unit of measure)
-
Displays the unit of measure of the sequence quantity.
- Val Bom (validate bill of material)
-
Indicate whether the system validates that the sequence quantity exists in the bill of material.
- SOE Qty (sequence of events quantity)
-
Displays the total quantity of the component that is consumed across all sequences of events for the product number.
- SOE UOM (sequence of events unit of measure)
-
Displays the unit of measure for the sequence of events quantity. This is always the primary unit of measure to enable comparison with the bill-of-material quantity that always uses the primary unit of measure. Using the primary unit of measure simplifies the calculation if the component occurs in multiple sequence-of-events tasks.
- BOM Qty (bill of material quantity)
-
Displays the component quantity from the bill of material. If the component exists in multiple places on the bill of material, this value represents the sum of bill-of-material quantities on all records for this component.
- BOM UOM (bill of material unit of measure)
-
Indicates the primary unit of measure. Because the component can exist on the bill of material in different places with different units of measure, you need the primary unit of measure here for conversion.
- Apply to Associative Item
-
Specify whether the system should add or update the component record in all sequences of events that are linked to the same associated item as the current sequence of events.
The system does not check whether the component exists on the bills of material of the other product numbers that use the same associated item. You have to review the information on the Assign Components Consumed form to check whether the component exists on another product's bill of material.
4.6 Defining a Process Map
This section provides an overview of process maps, lists prerequisites, and discusses how to:
-
Set up a process map.
-
Add products to a process map.
-
Define cells on the process map.
-
Set up cells.
-
Enter actual work content.
-
View the commonality map.
-
View the time map.
-
Update the DFM Event Summary table (FF30L117).
4.6.1 Understanding Process Maps
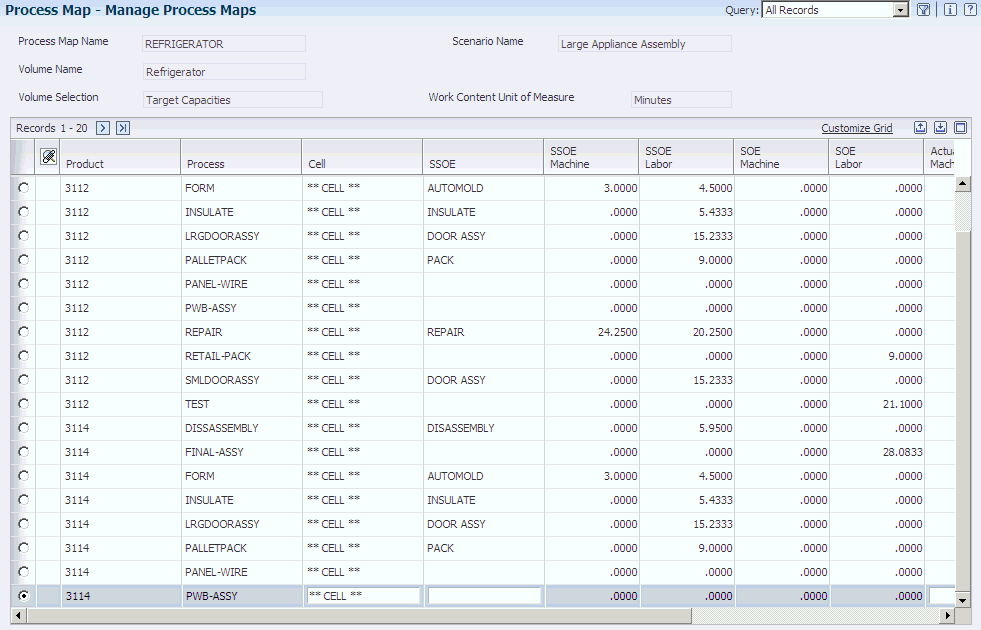
Process mapping is a Demand Flow technique that is used to determine the extent to which groups of products share common manufacturing processes. The objective of process mapping is to develop families of products that share common processes to determine which products can be produced on the same mixed-model Demand Flow line. The result of process mapping is a matrix of processes and products that shows where the two intersect—the process map. You use the Define Process Map program (PF30L901) to set up this matrix.
When you create a process map, you associate it with a volume design and its associated volume selection to retrieve the volumes for products in a mixed model family and copy them into the Demand at Capacity field. After you have set up a process map, you can add the products to the matrix. When you select a product from a list of items, you retrieve the processes based on the product synchronization that you associated with the product.
|
Important: If you make any changes to the product synchronization after you have already added the processes from the product synchronization to the process map, you must perform two steps to ensure that the process map reflects the product synchronization changes.The first step is to recalculate the product synchronization. The second step is to retrieve any process map that uses the changed product synchronization and click the Save Changes button on the Manage Process Maps form. When you access the form, you already see the changes, but they exist only in cache. If you do not save the changes, the system does not update the process map in the database. |
For each process, you can select a source of work content, that is, the amount of labor or machine resource time that is required to complete the process. The system uses this value to calculate the Actual Time Weighted (ATW) for both resource types. You determine which source the system uses by specifying a design selection. The system enables you to derive work content from three sources:
-
Standard sequence of events.
-
Sequence of events.
-
Manual entry.
To derive work content from a standard sequence of events, you can select the standard sequence of events that is defined for a process. After you have selected the standard sequence of events, the system populates the SSOE Labor and SSOE Machine fields for the process with times from the standard sequence of events.
If you do not specify a standard sequence of events as the source of work content, the system retrieves this information from the sequence of events if you have set up a sequence of events for the process. The sequence-of-events resource times automatically appear in the SOE Labor and SOE Machine fields for each process when you insert products. The process map retrieves these values from the F30L117 table.
|
Note: To eliminate any discrepancy between sequence-of-events or standard-sequence-of-events times and the labor and resource times that appear on the process map, you can run the Refresh Event Summary program (RF30L117) to update the resource and labor totals in the FF30L117 table. |
The system also enables you to enter labor and machine resource times in the Process Map Actual Work Content program (PF30L904). You can access this program from the process map and enter the resources that are required for the process as well as the setup, move, and actual times for each resource. When you save this information, the system displays the cumulative work content for the process in the Actual Labor field or the Actual Machine field. You can also enter cumulative labor and machine times directly in the process map.
If multiple products go through the same process but have different processing times, you can split the process into cells to accommodate these variations and facilitate a smooth flow of product down the mixed model line. The longest processing time represents the upper end of the range. The system divides the total range into seven segments and assigns each product to the segment of the range that represents its processing time, together with the percentage of product that is moved through the process. You can assign cells to the process in addition to the original default cell and define the processing time ranges for each cell. You have to set up cells in the Cell Master program (PF30L905) before you can assign them here.
To evaluate to what extent products share processes, you can view a commonality map for a particular process map. The commonality map shows all the processes that the products on the process map have in common.
The time map shows the labor and machine times for each process on the product synchronization for the products that are included in the process map. This view enables you to evaluate the differences in processing time between products in the same process.
You can delete a process map, but only if it is not used in any line design or kanban.
4.6.2 Prerequisites
Before creating a process map, you must:
-
Set up a product synchronization for the products that you include in the process map.
-
Create a volume design.
-
(Optional) Set up a standard sequence of events or sequence of events.
4.6.3 Forms Used to Define a Process Map
4.6.4 Setting Up a Process Map
Access the Search for Process Map form. Click the Add button.
- Process Map Name
-
Enter a name for the process map that you are setting up.
- Volume Name
-
Enter the name of the volume design with which you want to associate the process map. The Volume Selection field displays the demand at capacity definition that you have set up for the volume design. You can revise a process map by assigning a different volume design.
4.6.5 Adding Products to a Process Map
Access the Manage Process Maps form.
- Assign Products
-
Click to access the Work With Selected Items form, where you can select the products that you want to include in the process map. This form also displays the product synchronization that you have defined for the product.
- Remove Products
-
Click to remove products from a process map and exclude them from the selected volume design.
- SSOE (standard sequence of events)
-
Enter the name of the standard sequence of events that you want to use as source for labor and machine resource times. When you enter a standard sequence of events in this field, the system retrieves the cumulative resource times for the process and displays them in the SSOE Machine (sequence of events machine) and SSOE Labor (sequence of events labor) fields.
- SOE Machine (sequence of events machine) and SOE Labor (sequence of events labor)
-
Display the total machine and labor times for the process if you have defined a sequence of events for the process. The process map retrieves these values from the FF30L117 table.
Note:
If these values do not match the labor and resource totals in the FF30L110 and FF30L115 tables, run the Event Summary Update program (RF30L117). - Actual Machine and Actual Labor
-
Enter resource time estimates for the process manually.
- Design Selection
-
Select a value from the Demand Sequence UDC table (F30L/DS) to indicate which work content value the system uses in line design to calculate actual time weighted (ATW) for labor and machine operations by process. Values are:
ACT: Actual times.
SOE: Sequence of events.
STD: Standard sequence of events.
- Define Cells by Machine and Define Cells by Labor
-
Click to access the Define Cells Using Work Content form, where you can split the process into cells.
- Define Machine Resources and Define Labor Resources
-
Click to access the Actual Work - Edit Work Content form, which enables you to enter multiple resources and resource times for the process. The process map displays the total resource time by resource type.
- Save Changes
-
Click to save changes to the process map. If you have changed and recalculated the product synchronization, you must click this button to save these changes to the database, even though the changes are already visible in the grid.
- View Time Map and View Commonality Map
-
Click to access the View Time Map and the View Commonality Map form. To view the most up-to-date information, you must have saved the changes to the process map before you access these forms
4.6.6 Defining Cells on the Process Map
Access the Define Cells Using Work Content form.
Figure 4-17 Define Cells Using Work Content form
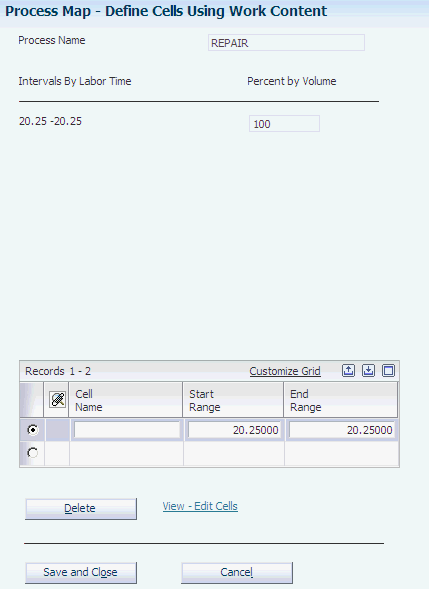
Description of "Figure 4-17 Define Cells Using Work Content form"
- Intervals by Machine Time or Interval by Labor Time
-
Displays the total range of processing time for the products flowing through the process, divided into seven segments.
- Percent by Volume
-
Displays the quantity percentage for each product flowing through the process.
- Start Range and End Range
-
Select a cell that you have defined in the Cell Master program, and define the range of processing time for this cell. This definition enables you to perform the process for the product with a processing time that falls within this range in this cell, parallel to the other cells that you assign to the process here.
- View - Edit Cells
-
Click to access the Edit Cell Master form to add new cells, if needed.
4.6.7 Setting Up Cells
Access the Edit Cell Master form.
- Cell Name
-
Enter a name for the cell that you use to split a process when products that use the same process have different processing times. Splitting a process into cells enables you to accommodate different processing times and facilitate a smooth flow of product down the mixed model line.
- Work Center
-
Associate a work center with the cell. If you integrate JD Edwards EnterpriseOne Demand Flow Manufacturing with JD Edwards EnterpriseOne Manufacturing systems, the system uses this value when you import processes from the process map into the F3003 table. You can select only a work center of type 0. The system also displays the associated work center branch.
If you did not select the integration constant for the scenario, the Work Center field and the Work Center Branch field are hidden.
4.6.8 Entering Actual Work Content
Access the Actual Work - Edit Work Content form.
Figure 4-18 Actual Work - Edit Work Content form
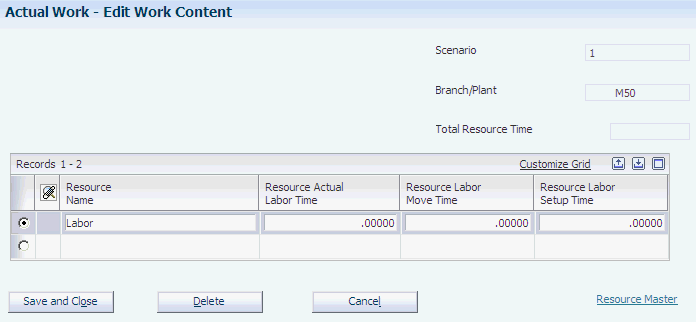
Description of "Figure 4-18 Actual Work - Edit Work Content form"
Enter the resources that are required to perform the process, as well as the actual, setup, and move times. The system adds the resource times that you enter here and displays the total on the process map.
To create additional resources, click the Resource Master link.
4.6.9 Viewing the Commonality Map
Access the View Commonality Map form.
Review which processes are shared by different products. Export the time map to a csv file if you want.
4.6.10 Viewing the Time Map
Access the View Time Map form.
Review the time similarities between processes when the same process is used to produce different products. Export the time map to a csv file, if you want.
4.6.11 Updating the DFM Event Summary Table (FF30L117)
Access a version of the Refresh Event Summary program from the Work With Batch Versions - Available Versions form.
Run this program to eliminate any discrepancy between sequence-of-events or standard-sequence-of events times and the labor and resource times that appear on the process map.
4.7 Calculating Line Design
This section provides an overview of line design calculations, lists prerequisites, and discusses how to:
-
Set up a line.
-
Set processing options for Mixed Model Line Design (PF30L910).
-
Add a line design.
-
Set processing options for Calculate Total Product Cycle Time by Line Design (RF30L921).
4.7.1 Understanding Line Design Calculations
Based on the product synchronization, volume design, and process map that you have defined and calculated, you can perform the line design calculations using the Mixed Model Line Design program (PF30L910). These calculations support building the actual Demand Flow manufacturing line on the shop floor. You can perform the calculations multiple times until you are satisfied with the results. You must designate as the active line design the line design that you want to use for further processing.
Before creating a line design, you must set up the line for which you want to create the line design. When you set up the line, you also define an associated JD Edwards EnterpriseOne work center. If you integrate JD Edwards EnterpriseOne Flow® Manufacturing with other JD Edwards EnterpriseOne Manufacturing systems, you must specify a work center name.
After you have set up a line, you define the line design. You can have multiple line designs for a line. When you define the line design, you associate it with a process map and retrieve the processes and their associated information from the process map. If the process map includes only one product, the line is automatically set up as a dedicated line. If the process map contains a product mix, the line is defined as a mixed model line.
After you have loaded the processes from the process map into the line design, you can change the following data:
-
Number of shifts per day.
-
Effective hours per shift.
After you have run the calculations, you can adjust the number of labor and machine operations for the process, based on the calculated values. You can override any of these fields and save the changes to the data base. The system retains these values until you recalculate the line design. At that point, the system issues a warning that the recalculation will delete the overrides.
When you run line design, the system calculates the following values:
-
Takt time.
-
Actual work content time weighted for machine and labor.
-
Number of required labor and machine operations per process or cell based on the data from the process map.
Takt time is the targeted amount of time that is required for machines and labor to meet the production capacity that the Demand Flow line is designed to achieve. The system calculates Takt time for each process using the effective hours per shift (HE), number of shifts (S), and demand at capacity (Dc) per process. The system retrieves the effective hours from the branch/plant. If you have not defined shifts and hours for the branch/plant, the system retrieves these values from the line-design control parameters of the default scenario. The system calculates demand at capacity by item and process like this: Total targeted volume for the product synchronization for the item × process consumption quantity (for each process in the product synchronization) + scrap add-ons + rework input + option input.
The system sums the demand at capacity for all products that share a particular process resulting in the throughput for this process. Based on these values, the system calculates Takt like this:
Takt = (HE × S) ÷ Σ (Dc)
Actual time weighted is based on the actual time that is required to complete a process, as stated on the process map. The design selection on the process map determines whether this calculation uses the actual machine or labor times from the standard sequence of events or the sequence of events, or resource times that are entered directly into the process map. The calculation is weighted by the volume of product flowing through the line. The system calculates actual time weighted for machines and labor like this:
ATW = Σ (Dc × AT) ÷ (ΣDc)
As part of line design processing, the system also calculates how many labor and machine operations are required to perform a process. This calculation assumes that actual time weighted and Takt have been calculated. The system calculates the number of labor or machine operations like this:
NumOper = ATW ÷ Takt
4.7.1.1 Calculation for Total Product Cycle Time
The system also enables you to calculate total product cycle time (TPc/t) for the products that you included in the line design. If any inputs to the calculation have changed, the system runs the Calculate Total Product Cycle Time by Line Design batch program (RF30L921) to perform this calculation automatically when you close the Add Line Design or Edit Line Design form. If you do not want to run this batch program every time that you close the form after a change, use the program version with the processing option set not to perform the TPc/t calculation. You have to set a processing option for the batch program to determine the source for resource time information.
|
Note: When calculating total product cycle time, the system updates the FF30L501 table if the primary line that is defined in the FF30L501 table matches the item in the line design. |
4.7.2 Prerequisites
Define the following data for the products that you include in the line design:
-
Product synchronization and volume design.
-
Process map.
4.7.3 Forms Used to Calculate Line Design
4.7.4 Setting Up a Line
|
Note: You can also access this form by clicking the View - Edit Lines button on the Search for Line Design form. |
- Line Name
-
Define a name for the line for which you are going to create a line design.
- Work Center
-
Enter the work center that you associate the line with. You can enter work center of type 2 (production line in a repetitive environment) or type 3 (production line in a lean environment). A one-to-one relationship has to exist between the line and the work center.
The Branch/Plant field displays the work center branch for the work center.
If you did not select the integration constant for the scenario, this field does not appear on the form.
4.7.5 Setting Processing Options for Mixed Model Line Design (PF30L910)
These processing options control default processing for the Mixed Model Line Design program.
4.7.5.1 Process
This processing option controls whether the Mixed Model Line Design program calculates total product cycle time.
- 1. Calculate Total Product Cycle Time
-
Specify whether the system calculates total product cycle time when you close the form if the calculation has changed. If you leave this processing option blank, the system does not calculate total product cycle time.
4.7.5.2 Versions
This processing option controls the version that the system calls when you run the following program from the Mixed Model Line Design program:
- 1. Calculate Total Product Cycle Time by Line Design (RF30L921) Version
-
If you leave this processing option blank, the system uses the default version, XJDE0001.
4.7.6 Adding a Line Design
Access the Add Line Design form.
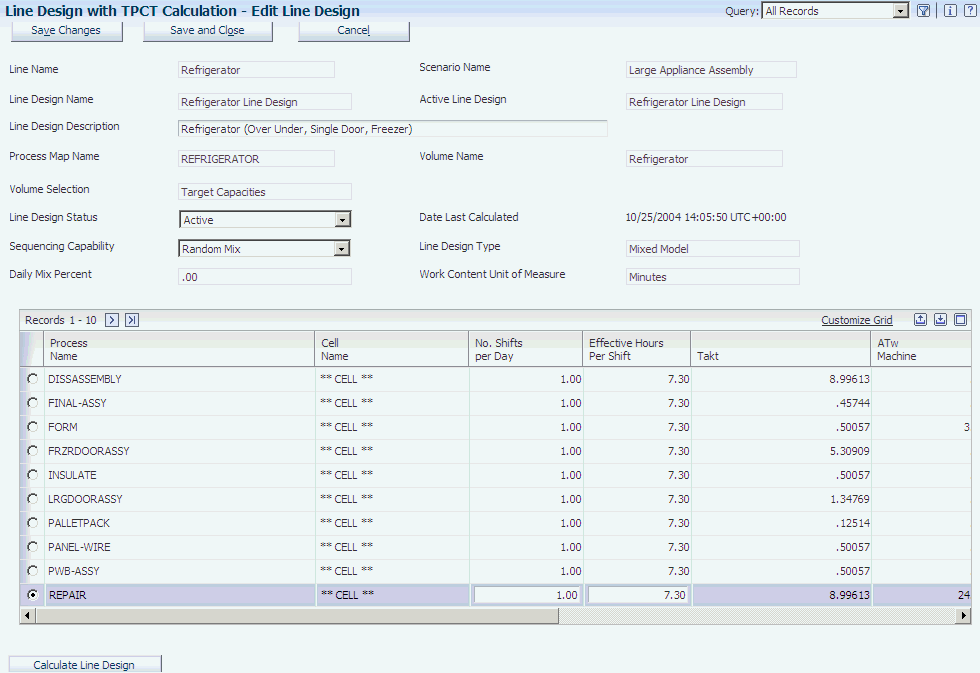
Complete the Line Name field, the Line Design Name field, and the Process Map Name field.
- Load Processes
-
Click to retrieve processes from the process map.
- Line Design Status
-
Identifies the status of a line design. The status can be active or inactive. Only one line design per line can be active.
- Sequencing Capability
-
Specify a method for sequencing the line. Values are:
Blank
Random Mix
Batch
User Defined
These values are stored in the Sequencing Capability UDC table (F30L/SQ).
- Daily Mix Percent
-
Specify this value as a factor in determining cycle of imbalance. This field is not available for random mix.
- Line Design Type
-
Indicates the type of line design that you create. This field is populated when you select a process map and load the processes into the line design. If the process map includes only one product, you create a line design for a dedicated line. Values are:
Mixed Model
Dedicated
These values are stored in the Line Design Type UDC table (F30L/TY).
- No. Shifts per Day (number of shifts per day)
-
Overrides the default number of shifts. The system deletes the changes when you recalculate the line design.
- Effective Hours per Shift
-
Overrides the default effective hours. The system deletes the changes when you recalculate the line design.
- Designed Machines and Designed Labor Operations
-
Overrides the suggested values, which are based on the calculated values. The system deletes the changes when you recalculate the line design.
- Calculate Line Design
-
Click to calculate the line design. Line design processing calculates the following values for every process on the line design:
-
Takt time.
-
Actual time weighted for machine and labor.
-
Number of operations for machine and labor.
-
4.7.7 Setting Processing Options for Calculate Total Product Cycle Time by Line Design (RF30L921)
These processing options control default settings for the Calculate Total Product Cycle Time by Line Design program.
4.7.7.1 Defaults
This processing option controls which time source for calculating total product cycle time the system uses when you run the program.
- 1. Total Product Cycle Time Selection
-
Specify the time selection to use when calculating total product cycle time. If you leave this processing option blank, the system uses Process Map Actual Times as the default. You can retrieve time selection values from the Transaction Status UDC table (F30L/TS). Values are:
10: Process map actual times.
20: Sequence of events.
30: Process map design selection.
4.8 Calculating Total Product Cycle Time
This section provides an overview of total product cycle time calculations and discusses how to calculate total product cycle time for a product.
4.8.1 Understanding Total Product Cycle Time Calculations
After you have created the line design, you can calculate total product cycle time (TPc/t) for an item, using the Calculate Total Product Cycle Time by Line Design program (PF30L920). TPc/t is the calculated work content time through the longest path of the product synchronization that is required to build a product. TPc/t is typically less than the total work content time that you need to build the entire product. You have three options to determine which type of work content that the system uses to calculate TPc/t:
-
Actual time entered on the process map.
-
Work content from the sequence of events.
-
Design selection on the process map.
The system calculates total product cycle time for one product at a time based on a line and line design, using the critical path algorithm. The calculation is based on the following rules:
-
The static quantity is not used in the calculation.
-
The calculation uses the longest of the overlapping times for overlapping sequences.
-
For tasks that are standard tasks, the TPc/t calculation multiplies the time to complete one sequence by the number of times the task is to be repeated.
-
The calculation begins at the end-of-line process and moves backwards through the product synchronization, searching for the longest accumulated work content time.
-
The work content time that is counted for each process is the time from the last sequence back to the point at which a feeder process is consumed.
After you calculate TPc/t, the Define Total Product Cycle Time form displays the processes that occur on the critical path along with their times and the paths on which they occur.
If the selected work content source identifies value-added and non-valued added work, the TPc/t calculation calculates and displays these values separately. It also calculates the percentage of value-added or required work.
The system does not perform the TPc/t calculation when the selected work content sources do not contain any time information. In this case, the system issues an error message.
|
Note: When calculating total product cycle time, the system updates the FF30L501 table if the primary line that is defined in the FF30L501 table matches the item in the line design. |
When you run the calculation, the system populates the Total Product Cycle Time and Primary Line fields in the DFM Item Master program (PF30L501). You can export the item record with the updated total product cycle time and primary line back to the JD Edwards EnterpriseOne inventory tables by running the DFM Export Item Branch program (RF30L501E).
See Understanding Data Export from JD Edwards EnterpriseOne Demand Flow Manufacturing.
4.8.2 Form Used to Calculate Total Product Cycle Time
4.8.3 Calculating Total Product Cycle Time for a Product
Access the Define Total Product Cycle Time form.
Figure 4-20 Define Total Product Cycle Time form
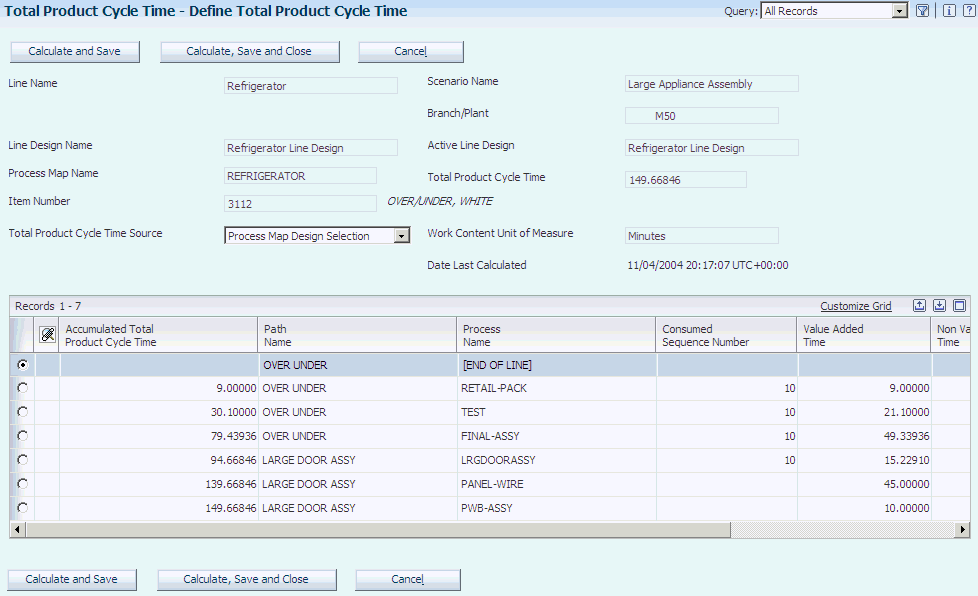
Description of "Figure 4-20 Define Total Product Cycle Time form"
- Calculate and Save and Calculate, Save and Close
-
Click to perform the total product cycle time calculation. The system displays the calculation results in the grid. If you use the Calculate, Save and Close button, the system automatically closes the form when the calculation is complete.
- Accumulated Total Product Cycle Time
-
Displays the total product cycle time as it accumulates from process to process.
- Consumed Sequence Number
-
Displays the sequence number of the task into which the process feeds if you calculate total product cycle time based on the sequence of events as work content selection. For example, if a main line process feeds into another main line process, the value in this field is 10 (first task).
- Value Added Time, Non Value Added Time, and Value Added Percent
-
Provides information about the amount of process time that is value-added or non-value added. If the process time does not include non-value added time, the value-added percentage is 100 percent.
4.9 Calculating and Maintaining Operational Definitions
This section provides an overview of operational definition, lists prerequisites, and discusses how to:
-
Set processing options for Define DFM Operational Definition (PF30L950).
-
Calculate operational definitions.
-
Revise and recalculate an operational definition.
4.9.1 Understanding Operational Definition
After you have calculated the number of labor and machine operations that are required for each process in the line design, the next step is to create an operational definition. The operational definition enables you to simulate various options for structuring each process within the line design. After you have arrived at a satisfactory solution, you can return to the sequence of events and line design for which you calculated the operational definition and adjust them, based on the calculation.
In the operational definition, you group the tasks from the sequence of events that the line design is based on into operations based on the number of operations that are calculated for the mixed-model line design. You calculate the operational definition using one product that represents the other products that go through the same process.
When you create an operational definition using the Define DFM Operation Definition program (PF30L950), you retrieve all existing line designs and select the one for which you want to create an operational definition. The system retrieves the processes from the selected line design, including the following values:
-
Process or cell.
-
Takt time.
-
Actual time weighted for machine and labor.
-
Calculated and designed number of machine and labor resources.
-
Work content selection.
|
Note: The design selection has to be the sequence of events; otherwise, you cannot calculate the operational definition. |
To calculate an operational definition for the line design, specify a representative item number for each process. When you enter the representative item, the system calculates the sequence-of-events total time, as well as the operational index. This value serves as a guideline for grouping tasks into operations. You can also enter a tolerance percent value that enables you to group tasks to an operation using a time frame that is greater than the calculated operational index by the defined percentage. The system uses the operational index and the tolerance percentage to determine how many tasks can fit into one operation.
The operational definition calculates operations like this: The system retrieves all the tasks from the sequence of events for the process. The calculation assigns tasks to operations in the order that they appear on the sequence of events, accumulating the task times until the operational index is reached. After you add a task time that causes the cumulative task time to exceed the operational index value, the system assigns this task to the next operation. If tasks are repeated, the system can assign repetitions to different operations, if necessary. The last operation receives all the remaining tasks regardless of whether the accumulated task time is greater than the operational index. You can group tasks that should be performed together to avoid moving them to another operation. The system groups them to the operation of the first task in the task group.
When you calculate an operational definition for the first time, the calculation is automatically based on the actual time values from the sequence of events. Actual time from the sequence of events equals task time multiplied by the task repetition value. For overlapping tasks, the system uses the time of the longest of the overlapping tasks. More than two tasks can overlap. After you have calculated the operational definition, the system displays the last calculation date. If you have already calculated an operational definition and want to calculate it again after making changes, the system automatically selects the operational definition as the calculation basis. When the system recalculates the operational definition, the operational index is recalculated to account for the changes that you made. The system does not recalculate the number of operations.
|
Note: If you change the calculation basis manually on the Manage Calculated Operational Definition form, the system displays a form with a warning. When you click OK on this form, the system does not automatically perform the calculation. You have to click the Calculate button to start the calculation. |
In addition to assigning tasks to operations, the system calculates in-process kanbans (IPK) as part of the operational definition. In-process kanbans represent in-process inventory and are used to signal demand, resolve imbalances, and indicate where and when to flex the operational definition. The system calculates in-process kanbans by operation. It becomes 1 by default if the actual time by operation is less than or equal to Takt time. The IPK calculation is based on the line design type and sequencing capability.
The in-process kanban for a dedicated line is calculated like this: IPK = I × C ÷ Takt, where I represents imbalance and C represents cycle of imbalance.
Imbalance is calculated by subtracting Takt time from operational actual time. The calculation of the cycle of imbalance depends on the line design type and sequencing capability. The following table illustrates how the calculations differ:
| Dedicated Line | Mixed Model Line |
|---|---|
| C = HE ÷ AT |
|
The operational definition displays the in-process kanban at the appropriate task. You can manually change the calculated value.
After you have calculated the operational definition, the system enables you to review the calculated results and manually balance operations in the Operational Definition Maintenance program (PF30L951). You can move tasks or delete them, for example, non-value added tasks. You can also add new tasks. When you have completed this step, you recalculate the operational definition with the operational definition as the calculation basis.
Based on the operational definition, you can create operation method sheets. Operation method sheets are detailed graphical work instructions that you can attach to each item and operation combination. To create operation method sheets, create media objects as attachments.
4.9.2 Prerequisites
Calculate the following values:
-
Sequence of events for the processes for which you want to create operational definitions.
-
Mixed-model line design with Takt time and number of required operations for each process.
4.9.3 Forms Used to Calculate and Maintain Operational Definitions
4.9.4 Setting Processing Options for Define DFM Operational Definition (PF30L950)
These processing options control default settings for the Define DFM Operational Definition program.
4.9.4.1 Version
This processing option controls the version that the system calls when you run the following program from the Define DFM Operational Definition program:
- Operational Definition - Print (RF30L950)
-
If you leave this processing option blank, the system uses the default version, XJDE0001.
4.9.5 Calculating Operational Definitions
Access the Define Operations form.
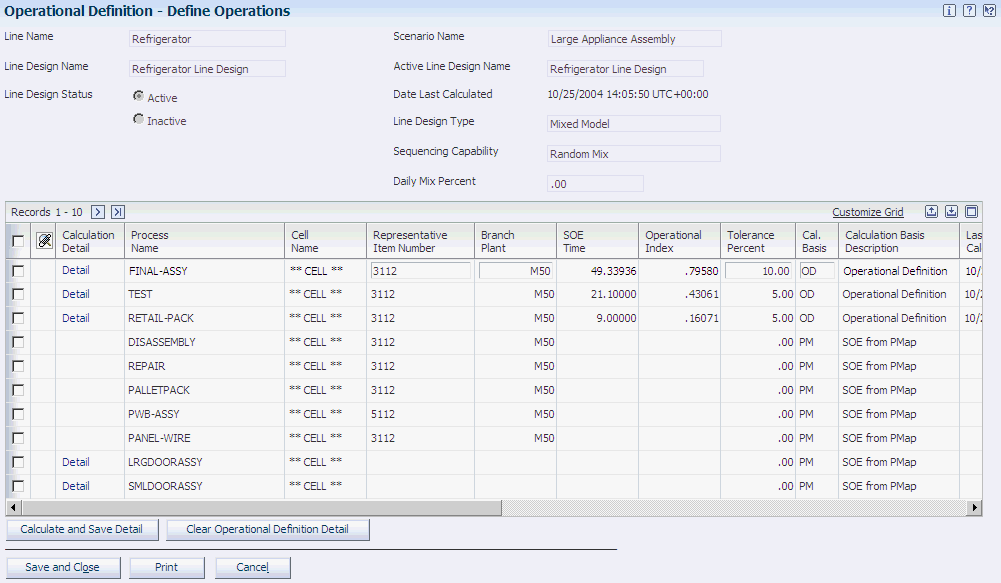
- Representative Item Number
-
Enter the product that represents the other products that share the process for which you are calculating the operational definition.
- Operational Index
-
Defines the time that is available in an operation within a process. It is calculated by dividing actual time (from the sequence of events) by the number of operations that are calculated in line design.
- Tolerance Percent
-
Enter the tolerance value that enables you to exceed the calculated operational index value by the stated percentage when grouping operations. This value is supplied by default from the line design control parameters that are set up for the scenario, but you can override it here to balance actual time to the operational index.
- Cal. Basis (calculation basis)
-
Specify which sequence of events to use as a basis for calculating the operational definition. Values are:
OD: Operational definition.
PM: SOE from PMap.
These values are stored in the Op Def Calculation Basis UDC table (F30L/OC).
- Calculate and Save Detail
-
Click to calculate the operational definition and store the tasks that are grouped into operations in the F30L951 table. This action updates the Date Last Calculated field.
- Calculation Detail
-
Click the link in this field to access the Manage Calculated Operational Detail form.
-
Click to generate the DFM Operational Definition report (RF30L950).
4.9.6 Revising and Recalculating an Operational Definition
Access the Manage Calculated Operational Definition form.
Figure 4-22 Manage Calculated Operational Definition form (1 of 2)
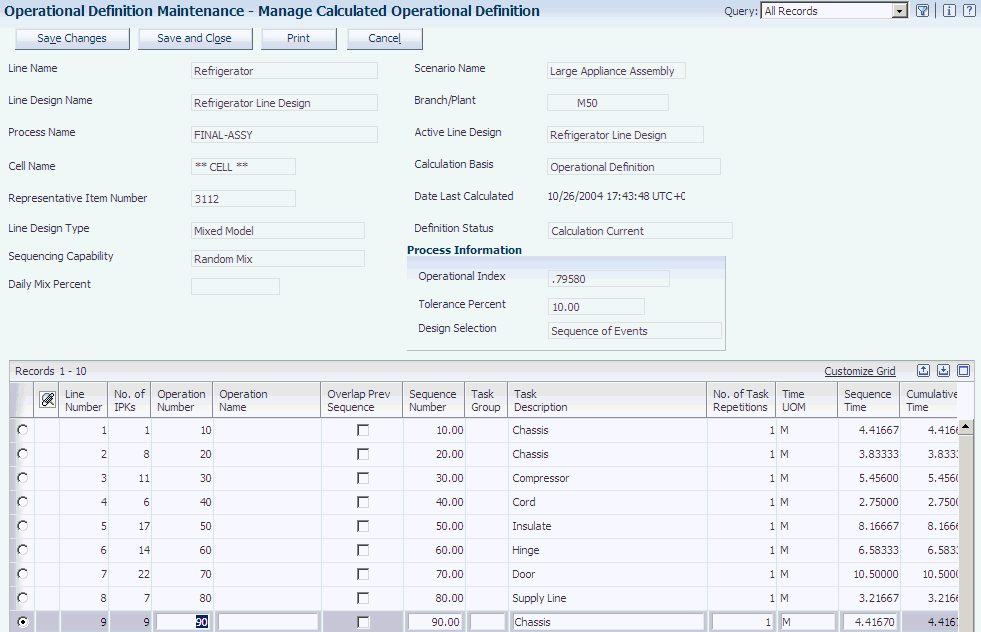
Description of "Figure 4-22 Manage Calculated Operational Definition form (1 of 2)"
Figure 4-23 Manage Calculated Operational Definition form (2 of 2)
Description of "Figure 4-23 Manage Calculated Operational Definition form (2 of 2)"
- No. of IPKs (number of in-process kanbans)
-
Displays the calculated number of in-process kanbans between operations.
- Operation Number
-
Displays the number of the operation that you have assigned a task either manually or by calculation.
- Operation Name
-
Assigns a name to each operation.
- Overlap Prev Sequence (overlap previous sequence)
-
Define tasks as overlapping in the sequence of events; you can do so here to help balance the workflow.
- Task Group
-
Define tasks within an operational definition as a group. If you group tasks in this way, the operational definition calculation treats the task group as a single entity when assigning operations.
- Sequence Time
-
Displays the duration of a task within an operation. The system typically retrieves this value from the task on the sequence of events or standard sequence of events. In cases in which you have defined a static quantity, the system calculates sequence time.
- Cumulative Time
-
Displays the sequence times cumulatively for a process. The total time should be less than Takt time to facilitate effective balancing of operations.
- Insert Task
-
Select a task and click to insert a task before the selected task.
- Remove Task
-
Select a task and click to remove the task from the operational definition.
- Move Task
-
Click to move a task from its present location to a new location defined by the line number that you specify.
- Calculation Basis
-
Displays the sequence of events as the calculation basis when calculating the operational definition for the first time. For any subsequent calculations, the operational definition serves as the calculation basis. If you change the calculation basis manually, the system displays a warning. You can override the warning and recalculate the operational definition.
-
Click to generate the DFM Operational Definition Detail report (RF30L951), which lists the results of the operational definition that you calculated.
- Save and Close
-
Overwrites any previously calculated operational definition for this product and process when you save the calculated operational definition.
4.10 Augmenting Line Design Data for Execution
This section provides an overview of line design augmentation, lists prerequisites, and discusses how to:
-
Set processing options for Augment Line Design (RF30L930).
-
Run the Augment Line Design program (RF30L930).
4.10.1 Understanding Line Design Augmentation
If you integrate JD Edwards EnterpriseOne Demand Flow Manufacturing with JD Edwards EnterpriseOne Manufacturing, you have to populate the F3003 table with routing information to support shop floor processing and manufacturing accounting transactions. Without augmentation of line design data, the processing system does not have enough data for these transactions.
JD Edwards EnterpriseOne Demand Flow Manufacturing provides the Augment Line Design program (RF30L930) to augment line design data based on the process and time information on the process map. You must have an active line design. When you run this batch program, the system:
-
Retrieves the processes that are required to manufacture a product from the process map.
If a process is repeated on the product synchronization, the Augment Line Design program includes it only once.
-
Retrieves TPc/t to ensure that the processes that lie on the critical path are marked as critical processes.
-
Sequences processes following the associated product synchronization.
When you run the Augment Line Design program, the system populates the FF30L930 table. To create FF30L930 records that can then be exported to the F3003 table, the system retrieves the following values from DFM tables to populate the appropriate fields:
-
Item and branch information from the FF30L902 table.
-
The work center branch from the FF30L701 table if the cell on the process map is the default cell.
-
The work center branch from the FF30L905 table if the cell is not a default cell.
-
The line/cell information from the FF30L912 table.
After you have run the Augment Line Design program, you run the DFM - Export Routings program (RF30L930E) to populate the F3003 table. The system creates a routing that matches the bill-of-material revision level.
4.10.2 Prerequisites
To run the Augment Line Design program, you must:
-
Define and calculate a product synchronization.
-
Create a process map.
-
Set up line master and cell master records.
-
Calculate a line design.
-
Calculate TPc/t.
4.10.3 Setting Processing Options for Augment Line Design (RF30L930)
These processing options control default processing for the Augment Line Design program.
4.10.3.1 Defaults
These processing options control default values for sequencing routing steps.
- 1. Starting Sequence Number
-
Specify the sequence number that you want to use as the starting sequence number for routing steps. If you leave this processing option blank, the system uses the default start value that is defined for the scenario.
- 2. Sequence Number Increment
-
Specify the value that the system uses to increment the series of operation sequence numbers on a routing. If you leave this processing option blank, the system uses the default value that is defined for the scenario.